


Topic: BW - Vic - 3VB
3rd VB
3rd Victorian Bushmen
Outline
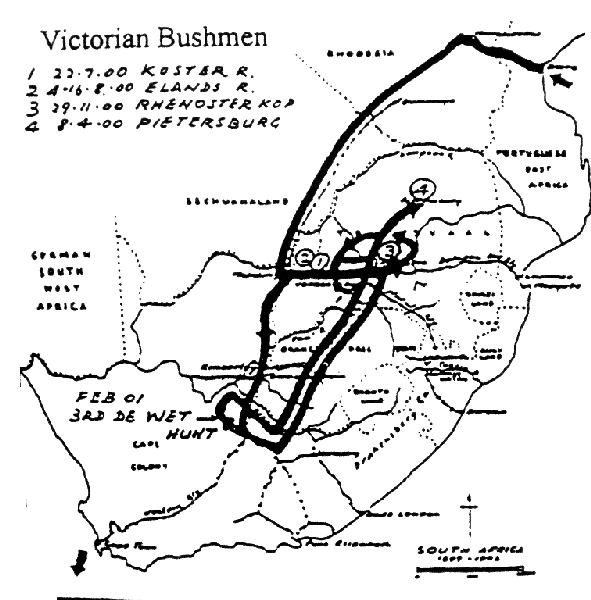
Map illustrating the activities of the 3rd Victorian Bushmen in South Africa, 1900 - 1901.
[From: Chamberlain, M., The Australians in the South African War 1899-1902, Canberra, 1999.]
In 1911, Lieutenant-Colonel P. L. Murray, produced a marvellous Boer War reference detailing all the contingents sent from Australia to South Africa, giving a brief history of the formation and finally, listing all the soldiers who saw service in South Africa with that unit. The book was called, Official Records of the Australian Military Contingents to the War in South Africa. It is now the standard reference and starting place for any person interested in pursuing information about Australian involvement in the Boer War.
Murray, P. L., Official Records of the Australian Military Contingents to the War in South Africa, pp. 240 - 244.
The Third (Bushmen's) Contingent.
Like the "Citizen's Bushmen's" Contingent in New South Wales, this corps was largely subscribed for by the public. It was resolved that, in lieu of drawing the men exclusively from the local forces, a class of Australian yeomen and bushmen should be obtained; hardy riders, straight shots, accustomed to find their way about in difficult country' and likely to make an expert figure in the vicissitude of such a campaign as was being conducted. There was an enormous number of candidates for enlistment. Those selected were, practically, untrained in military matters; no lees than 230 being farmers, or connected with that industry. They ware selected by a committee, and passed a strict test in riding and shooting; as also, of course, medical examination.
General Order 6 (Victoria), 1900, directed Commanding Officers of Militia and Volunteer Corps to submit names of officers under their command who volunteered for service with the Bushmen's Corps, and were recommended. Applicants were required to be skilled bushmen, good riders, medically fit, and, preferably, unmarried.
Rates of pay were as in previous Contingents.
The eminent surgeon, Sir Thomas Fitzgerald, accompanied the Contingent to South Africa, as an indulgence passenger, for the purpose of visiting the hospitals there.
Cameron's Scouts.
This was a party of 24 men raised by Mr. John McLeod Cameron for special service, and for whom he obtained horses, except when they provided themselves with mounts. They were attached to the Contingent, and similarly armed and equipped.
Establishment.
The following establishment was authorized:- Two captains, 8 lieutenants, 1 adjutant, 1 medical office, 1 veterinary officer, I chaplain, 2 company sergeant majors, 2 company quartermaster-sergeants, 8 sergeants, 12 corporals, 2 saddler sergeants, 2 saddlers, 2 farrier-sergeants, 4 shoeing-smiths, 4 buglers. 195 privates, 4 drivers; total, 14 officers, 12 sergeants, 10 artificers, 4 buglers, 211 rank and file; in all, 251. Horses - 26 officers', 233 N.C.O.'s and men's, 24 spare. Four wagons, with 8 horses and 2 spare, 31 pack horses; total, 41.
Cameron's Scouts - One lieutenant, 1 sergeant, 2 corporals, 21 privates; total, 25, with 33 horses.
Grand total - 15 officers, 13 sergeants, 10 artificers, 4 buglers, 234 rank and file; in all, 276, with 357 horses. In addition, 2 horses were taken for Mr. Staughton, and 1 for Mr. Hood, bringing the total to 360.
Clothing, Etc.
Uniform consisted of khaki “Garibaldi" jacket, and pants, with leggings, F.S. hat, and F.S. cap. Provided with boots and greatcoats.
Arms and equipment. - M.L.E. magazine rifles, and sword bayonet (provided in South Africa), bandolier and waist belt. They were fully horsed, but, in many instances, the men brought their own horses; in some cases, more than one per man.
Supplied with saddlery, and regimental transport. Each men also received a full kit, comprising underclothing, necessaries, &c.
This was the only Contingent to wear "Garibaldies"- a jacket with a fold or pleat over a waistband, falling somewhat after the fashion of a shirt. It was considered an appropriate costume for bushmen, and rather suggested the uniform worn by Victorian Volunteers in the each sixties.
Nursing Sisters
The following nursing sisters proceeded to South Africa with this Contingent, for service under the Imperial Government, in terms of the cablegram from the High Commissioner of the Cape, dated 3rd February, 1900.
Rawson, Marianne (in charge).
Tiddy, Diana.
Smith, Ethel Mary Bernhard.
Langlands, Eleanor Augusta Victoria.
Smith, Dorothy F.
Hines, Frances Emma.
Anderson, Julia B.
Walter, Ellen.
Thomson, Annie Eliza Helen.
Ivey, Isabel.
These ladies were all single. They did excellent work in the hospitals, developing the best qualities of professional nurses. Sister Hines died in South Africa. Sister Rawson was awarded the Royal Red Cross. Sister Ivey was mentioned in Commander-in-Chief s despatches, 26th June, 1902. In both cases, despatches, London Gazette, 29th July, 1902.
Departure and Return
The Contingent left on 10th March, 1900, comprising 15 officers, 261 other ranks, with 357 horses and 4 wagons Seventeen were killed or died; 5 officers were transferred; 3 officers, 12 others were struck off the strength in South Africa; 1 officer, 1 other commissioned in the Imperial Army; 9 officers, 228 others returned.
Promotions, Etc.
Dobbin, Captain W. W. - Promoted Major while serving with the Rhodesian Field Force, 18th May, 1900.
McKnight, Captain - Adjutant W. Promoted Major, 5th Contingent in South Africa.
Hill, Lieutenant C. - Promoted Captain, 1st May, 1900.
Trees, Lieutenant H. F. - Promoted Captain, 5th Contingent, in South Africa.
Services placed at disposal of Inspector-General, South African Constabulary, 11th July, 1901.Carstairs, Lieutenant H. G. - Promoted Captain, 5th Contingent, in South Africa.
Holdsworth, Lieutenant J. H. B. - Promoted Captain, 5th Contingent, South
Africa.Cameron, Lieut. J. McL. - Promoted Captain while serving with Rhodesian Field Force, 22nd June, 1800; Major in Cape Colony Colonial Force.
McCuIlock, 2nd Lieutenant W. - Commissioned Royal Irish Rifles, 29th August, 1900.
Fletcher, Veterinary-Lieutenant S. - Transferred to South Australian Imperial Bushmen.
De Haviland, Sergeant T. L. - Lieutenant, 20th May, 1900; Adjutant, 13th December, 1900; Captain, 5th Contingent, in South Africa; services placed at disposal of Inspector-General, South African Constabulary, 11th July, 1901.
Howe, Sergeant R. W. - Promoted Lieutenant, 18th July, 1900; Captain in Rhodesian Force, 8th May, 1901.
Service.
The Contingent left Melbourne on 10th March, 1900, in the transport Euryalus, and touched at Cape Town, from whence they proceeded to Beira, arriving on 3rd April, and disembarked. From Beira their route lay to Marandellas, in Rhodesia, where all the Colonial Bushmen were formed into regiments known as the Rhodesian Field Force; the Victorians and West Australians forming the 3rd, under Major Visits. Except Cameron's Scouts, which remained at Marandellas, they marched by squadrons through Rhodesia to Buluwayo; and from there to Mafeking, where they were again mobilized, equipped, and moved out in regiments, under General Baden-Powell, their destination being Rustenburg.
In that district on 22nd July, the Victorians, under Captain Hill, and other Contingents, encountered the enemy at Koster River, and lost 7 men killed, and many wounded. In Rustenburg district also, a party of Victorians, under Captain Ham, With Bushmen from New South Wales and Queensland, were attacked and besieged by General De Is Rev at Eland's River; the siege lasting thirteen days, and the casualty list being heavy. After enduring great hardships, and losing all their hones by the fire of the enemy, the garrison was relieved by Lord Kitchener on 17th August (vide 3rd Queensland Mounted Infantry).
Here the Contingent was divided, and those with Captain Ham were attached to Lord Methuen's Force until they reached Mafeking, to which place from Eland's River they marched on foot, no horses being available. The other portion of the Victorian Contingent, under Major Vial, moved from Rustenburg to Pretoria and thence to Warmbad and Nylstroom; which, under General Baden-Powell, was captured, and then retired to Pienaars River. The party under Captain Ham, after being partially equipped at Mafeking, left that place at the end of August, and travelled south through Kimberley to De Aar, and from then to Naauwpoort, Bloemfontein, and Pretoria, where after a few days' rest they moved north and, rejoined the Regiment at Pienaars River. From here the Regiment operated through the north-western portion of the Transvaal, and south as far as Rustenburg; and from there back once more to Pretoria. Several engagements took place in these operations, and what with killed, wounded, and sick men, the column, under General Plumer, who was now in command, was sadly weakened. At Pretoria the column was strengthened by the New Zealanders, portion of the 4th Queenslanders, and some South Australians, and General Paget with two companies of Munster Fusiliers (as infantry); also two batteries of Royal Artillery, pom pom battery, and several maxims. Operations were undertaken this time in an easterly direction from Pretoria. Several engagements at Silbrants' Kraal, Wagon Drift, and other places, culminated in the action at Rhenoster Kop on the 29th November, where the enemy, under Viljoen and Botha, made a firm stand. All the force was engaged from 4 o'clock in the morning until 7 in the evening, and the fighting line extended for a distance of four miles, and all of it under a hot fire. At times the attack was pushed to within 600 yards of the Boer position, but it was impossible to dislodge them from the naturally strong position which they held, and the darkness of evening ended the battle. The Victorians, under the command of Captain Ham, were towards the left flank, and the New Zealanders were on the right. The casualty list was a heavy one, but, compared with the Bushmen, the Victorians may be considered lucky.
From Rhenoster Kop the column moved north and west, and gave the commandoes under Viljoen and Botha a routing on several occasions, and once more camped at Pienaars River, north of Pretoria. From here they started to clear up the north-western portion of the Transvaal, moving by forced marches to Rustenburg, Commando Nek, Hekpoort, and Nooitgedacht, arriving at the latter place soon after De la Rey and Beyers had attacked General Clements and the Northumberland Fusiliers. Several smart engagements took place along the Magliesberg and Witwatererand Ranges, and continued south to Krugersdorp and east to the outskirts of Pretoria, where the Bushmen again camped for four days. From here they were ordered to Balmoral, east of Pretoria, and towards Middelburg. The Bushmen were ordered to De Aar to check De Wet and other Boer generals from invading Cape Colony. It was a big move from Middelburg to De Aar, but the Bushmen did it; and in the swift and oppressive march that General Plumer made after De Wet, when other columns were tired out or withdrawn, the 3rd Regiment were with him to the last, and lost heavily in their attacks on the enemy. The Victorians had the majority of the wounded, including Lieutenant Gartside; only 60 men answered the roll call when orders came for the 3rd Regiment to be withdrawn. These men had been on short rations: six biscuits for six days being their share, and 18 lbs. of oats for the horses. A few days recruiting in Bloemfontein, Weinberg, and Brandfort, and orders came to move once more to Pretoria, and from there to Pienaars River, where forces were once more concentrated with the object of attacking the enemy at Warmbad, Nylstrom, and Pietersburg. These places were captured one after the other after considerable resistance, and General Plumer 's Bushmen had the honour of capturing the last Boer capital.
Cameron's Scouts.
These proceeded from Marandellas to Buluwayo and were appointed bodyguard to Sir Frederick Carrington; Sergeant R. M. Hows was promoted to Lieutenant. They entrained from Buluwayo to Mafeking, where the main body of the Rhodesian Field Force was mobilized, and marched from there to Ottoshoop and Zeerust, where there was a reconnaissance in force of 2,000 men. These marched to Marion River, thence to Brakfontein, near Eland's River, where an engagement lasting eight hours took place against a commando of De L Rey. A rearguard action was fought back to Marico River, and two days after the order was given to return to Zeerust. A rearguard action was fought for three or four miles along the road to Zeerust. From thence they proceeded to Ottoshoop; and after remaining there two days, advanced again on Zeerust. After proceeding about four miles a commando, under General Lemmer, opened fire on them, and held them in check for about six hours. They remained on the firing line all night; and, on advancing in the morning, found that the Boots had retired, leaving several dead upon the field. The Scouts returned to Ottoshoop next day, remaining there nearly two weeks, during which time there were several small sniping engagements, in which a few officers and men were killed.
General Carrington was then ordered to return to Rhodesia, and the Cameron Scouts were practically disbanded. Their leader, however, saw that all who desired to return to Victoria were sent back. Both he and Lieutenant Howe remained (vide War services).
Return of Contingent.
The Victorian Bushmen embarked at Cape Town on transport Morayshire, an 9th May, 1901, and arrived at Melbourne on 6th June, having called at Albany and Adelaide en route. Captain Ham returned in charge. Disbanded shortly after return.
Further Reading:
3rd Victorian Bushmen, Roll of Honour
Battles where Australians fought, 1899-1920
Citation: 3rd Victorian Bushmen, Outline
