« September 2024 »
S M T W T F S
1 2 3 4 5 6 7
8 9 10 11 12 13 14
15 16 17 18 19 20 21
22 23 24 25 26 27 28
29 30
You are not logged in. Log in


Search the site:


powered by FreeFind
Volunteer with us.

Entries by Topic All topics
A Latest Site News
A - Using the Site
AAA Volunteers
AAB-Education Centre
AAC-Film Clips
AAC-Photo Albums
AIF & MEF & EEF
AIF - Lighthorse
AIF - ALH - A to Z
AIF - DMC
AIF - DMC - Or Bat
AIF - DMC - Anzac MD
AIF - DMC - Aus MD
AIF - DMC - British
AIF - DMC - BWI
AIF - DMC - French
AIF - DMC - Indian
AIF - DMC - Italian
AIF - DMC - Medical
AIF - DMC - Remounts
AIF - DMC - Scouts
AIF - DMC - Sigs
AIF - DMC - Sigs AirlnS
AIF - DMC - 1 Sig Sqn
AIF - DMC - 2 Sig Sqn
AIF - DMC - Eng
AIF - DMC - Eng 1FSE
AIF - DMC - Eng 2FSE
AIF - DMC - GSR
AIF - 1B - 1 LHB
AIF - 1B - 6 MVS
AIF - 1B - 1 LHMGS
AIF - 1B - 1 Sig Trp
AIF - 1B - 1 LHFA
AIF - 1B - 1 LHR
AIF - 1B - 2 LHR
AIF - 1B - 3 LHR
AIF - 2B - 2 LHB
AIF - 2B - 7 MVS
AIF - 2B - 2 LHFA
AIF - 2B - 2 LHMGS
AIF - 2B - 2 Sig Trp
AIF - 2B - 5 LHR
AIF - 2B - 6 LHR
AIF - 2B - 7 LHR
AIF - 3B - 3 LHB
AIF - 3B - 8 MVS
AIF - 3B - 3 LHB Sigs
AIF - 3B - 3 LHFA
AIF - 3B - 3 LHMGS
AIF - 3B - 3 Sig Trp
AIF - 3B - 8 LHR
AIF - 3B - 9 LHR
AIF - 3B - 10 LHR
AIF - 4B - 4 LHB
AIF - 4B - 4 Sig Trp
AIF - 4B - 9 MVS
AIF - 4B - 4 LHFA
AIF - 4B - 4 LHMGS
AIF - 4B - 4 LHR
AIF - 4B - 11 LHR
AIF - 4B - 12 LHR
AIF - 5B - 5 LHB
AIF - 5B - 10 MVS
AIF - 5B - 5 LHFA
AIF - 5B - 5 Sig Trp
AIF - 5B - ICC
AIF - 5B - 14 LHR
AIF - 5B - 15 LHR
AIF - 5B - 1er Regt
AIF - 5B - 2 NZMGS
AIF - AASC
AIF - Aboriginal LH
AIF - Badges
AIF - Cars
AIF - Chinese LH
AIF - Double Sqns
AIF - Engineers
AIF - Fr - 22 Corps
AIF - Fr - 13 LHR
AIF - Honour Roll
AIF - HQ - 3rd Echelon
AIF - Marching Songs
AIF - Misc Topics
AIF - NZMRB
AIF - NZMRB - AMR
AIF - NZMRB - CMR
AIF - NZMRB - EFT
AIF - NZMRB - NZMFA
AIF - NZMRB - NZMGS
AIF - NZMRB - OMR
AIF - NZMRB - Sig-Trp
AIF - NZMRB - WMR
AIF - Ships
AIF - Ships - Encountr
AIF - Ships - Una
AIF - WFF
AIF - Wireless Sqn
Battles
BatzA - Australia
BatzA - Broken Hill
BatzA - Liverpool
BatzA - Merivale
BatzB - Boer War
BatzB - Bakenlaagte
BatzB - Belmont
BatzB - Bothaville
BatzB - Buffels Hoek
BatzB - Coetzees Drift
BatzB - Diamond Hill
BatzB - Driefontein
BatzB - Elands
BatzB - Graspan
BatzB - Grobelaar
BatzB - Grootvallier
BatzB - Hartebestfontn
BatzB - Houtnek
BatzB - Karee Siding
BatzB - Kimberley
BatzB - Koster River
BatzB - Leeuw Kop
BatzB - Mafeking
BatzB - Magersfontein
BatzB - Modder River
BatzB - Onverwacht
BatzB - Paardeberg
BatzB - Palmietfontein
BatzB - Pink Hill
BatzB - Poplar Grove
BatzB - Rhenoster
BatzB - Sannahs Post
BatzB - Slingersfontn
BatzB - Stinkhoutbm
BatzB - Sunnyside
BatzB - Wilmansrust
BatzB - Wolvekuil
BatzB - Zand River
BatzG - Gallipoli
BatzG - Anzac
BatzG - Aug 1915
BatzG - Baby 700
BatzG - Evacuation
BatzG - Hill 60
BatzG - Hill 971
BatzG - Krithia
BatzG - Lone Pine
BatzG - Nek
BatzJ - Jordan Valley
BatzJ - 1st Amman
BatzJ - 2nd Amman
BatzJ - Abu Tellul
BatzJ - Es Salt
BatzJ - JV Maps
BatzJ - Ziza
BatzM - Mespot
BatzM - Baghdad
BatzM - Ctesiphon
BatzM - Daur
BatzM - Kurna
BatzM - Kut el Amara
BatzM - Ramadi
BatzN - Naval
BatzN - AE1
BatzN - Cocos Is
BatzN - Heligoland
BatzN - Marmara
BatzN - Zeebrugge
BatzN - Zeppelin L43
BatzNG - Bitapaka
BatzO - Other
BatzO - Baku
BatzO - Egypt 1919
BatzO - Emptsa
BatzO - Karawaran
BatzO - Peitang
BatzO - Wassa
BatzP - Palestine
BatzP - 1st Gaza
BatzP - 2nd Gaza
BatzP - 3rd Gaza
BatzP - Aleppo
BatzP - Amwas
BatzP - Ayun Kara
BatzP - Bald Hill
BatzP - Balin
BatzP - Beersheba
BatzP - Berkusieh
BatzP - Damascus
BatzP - El Auja
BatzP - El Buggar
BatzP - El Burj
BatzP - Haifa
BatzP - Huj
BatzP - JB Yakub
BatzP - Kaukab
BatzP - Khan Kusseir
BatzP - Khuweilfe  
BatzP - Kuneitra
BatzP - Megiddo
BatzP - Nablus
BatzP - Rafa
BatzP - Sasa
BatzP - Semakh
BatzP - Sheria
BatzP - Surafend
BatzP - Wadi Fara
BatzS - Sinai
BatzS - Bir el Abd
BatzS - El Arish
BatzS - El Mazar
BatzS - El Qatiya
BatzS - Jifjafa
BatzS - Magdhaba
BatzS - Maghara
BatzS - Romani
BatzS - Suez 1915
BatzSe - Senussi
BatzWF - Westn Front
BW - Boer War
BW - NSW
BW - NSW - 1ACH
BW - NSW - 1NSWMR
BW - NSW - 2NSWMR
BW - NSW - 3ACH
BW - NSW - 3NSWIB
BW - NSW - 3NSWMR
BW - NSW - 5ACH
BW - NSW - A Bty RAA
BW - NSW - AAMC
BW - NSW - Aust H
BW - NSW - Lancers
BW - NSW - NSW Inf
BW - NSW - NSWCBC
BW - NSW - NSWIB
BW - NSW - NSWMR_A
BW - NZ
BW - Qld
BW - Qld - 1ACH
BW - Qld - 1QMI
BW - Qld - 2QMI
BW - Qld - 3ACH
BW - Qld - 3QMI
BW - Qld - 4QIB
BW - Qld - 5QIB
BW - Qld - 6QIB
BW - Qld - 7ACH
BW - QLD - AAMC
BW - SA
BW - SA - 1SAMR
BW - SA - 2ACH
BW - SA - 2SAMR
BW - SA - 3SACB
BW - SA - 4ACH
BW - SA - 4SAIB
BW - SA - 5SAIB
BW - SA - 6SAIB
BW - SA - 8ACH
BW - SA - AAMC
BW - Tas
BW - Tas - 1ACH
BW - Tas - 1TIB
BW - Tas - 1TMI
BW - Tas - 2TB
BW - Tas - 2TIB
BW - Tas - 3ACH
BW - Tas - 8ACH
BW - Vic
BW - Vic - 1VMI
BW - Vic - 2ACH
BW - Vic - 2VMR
BW - Vic - 3VB
BW - Vic - 4ACH
BW - Vic - 4VIB
BW - Vic - 5VMR
BW - Vic - 6ACH
BW - Vic - AAMC
BW - Vic - Scot H
BW - WA
BW - WA - 1WAMI
BW - WA - 2ACH
BW - WA - 2WAMI
BW - WA - 3WAB
BW - WA - 4ACH
BW - WA - 4WAMI
BW - WA - 5WAMI
BW - WA - 6WAMI
BW - WA - 8ACH
BW Gen - Campaign
BW Gen - Soldiers
BW General
Cavalry - General
Diary - Schramm
Egypt - Heliopolis
Egypt - Mena
Gen - Ataturk Pk, CNB
Gen - Australia
Gen - Legends
Gen - Query Club
Gen - St - NSW
Gen - St - Qld
Gen - St - SA
Gen - St - Tas
Gen - St - Vic
Gen - St - WA
Gm - German Items
Gm - Bk - 605 MGC
GW - 11 Nov 1918
GW - Atrocities
GW - August 1914
GW - Biographies
GW - Propaganda
GW - Spies
GW - We forgot
Militia 1899-1920
Militia - Area Officers
Militia - Inf - Infantry
Militia - Inf - 1IB
Militia - Inf - 2IB
Militia - Inf - 3IB
Militia - Inf - NSW
Militia - Inf - Qld
Militia - Inf - SA
Militia - Inf - Tas
Militia - Inf - Vic
Militia - Inf - WA
Militia - K.E.Horse
Militia - LH
Militia - LH - Regts
Militia - LH - 1LHB
Militia - LH - 2LHB
Militia - LH - 3LHB
Militia - LH - 4LHB
Militia - LH - 5LHB
Militia - LH - 6LHB
Militia - LHN - NSW
Militia - LHN - 1/7/1
Militia - LHN - 2/9/6
Militia - LHN - 3/11/7
Militia - LHN - 4/6/16
Militia - LHN - 5/4/15
Militia - LHN - 6/5/12
Militia - LHN - 28
Militia - LHQ - Qld
Militia - LHQ - 13/2
Militia - LHQ - 14/3/11
Militia - LHQ - 15/1/5
Militia - LHQ - 27/14
Militia - LHS - SA
Militia - LHS - 16/22/3
Militia - LHS - 17/23/18
Militia - LHS - 24/9
Militia - LHT - Tas
Militia - LHT - 12/26
Militia - LHV - Vic
Militia - LHV - 7/15/20
Militia - LHV - 8/16/8
Militia - LHV - 9/19
Militia - LHV - 10/13
Militia - LHV - 11/20/4
Militia - LHV - 19/17
Militia - LHV - 29
Militia - LHW - WA
Militia - LHW-18/25/10
Militia - Military Orders
Militia - Misc
MilitiaRC - Rifle Clubs
MilitiaRC - NSW
MilitiaRC - NT
MilitiaRC - Qld
MilitiaRC - SA
MilitiaRC - Tas
MilitiaRC - Vic
MilitiaRC - WA
Militiaz - New Zealand
Tk - Turkish Items
Tk - Army
Tk - Bks - Books
Tk - Bks - 1/33IR
Tk - Bks - 27th IR
Tk - Bks - Air Force
Tk - Bks - Yildirim
Tk - POWs
Wp - Weapons
Wp - Hotchkiss Cav
Wp - Hotchkiss PMG
Blog Tools
Edit your Blog
Build a Blog
RSS Feed
View Profile
Open Community
Post to this Blog
Site Index
Education Centre
LH Militia
Boer War
Transport Ships
LH Battles
ALH - Units
ALH - General
Aboriginal Light H
Weapons
Ottoman Sources

"At a mile distant their thousand hooves were stuttering thunder, coming at a rate that frightened a man - they were an awe inspiring sight, galloping through the red haze - knee to knee and horse to horse - the dying sun glinting on bayonet points..." Trooper Ion Idriess

The Australian Light Horse Studies Centre aims to present an accurate history as chroniclers of early Australian military developments from 1899 to 1920.

The Australian Light Horse Studies Centre site holds over 12,000 entries and is growing daily.

Contact: Australian Light Horse Studies Centre

Let us hear your story: You can tell your story, make a comment or ask for help on our Australian Light Horse Studies Centre Forum called:

Desert Column Forum

WARNING: This site contains: names, information and images of deceased people; and, language which may be considered inappropriate today.

Monday, 1 November 2010
The Battle of Khuweilfe, Palestine, 1 - 8 November 1917, Contents
Topic: BatzP - Khuweilfe

The Battle of Khuweilfe

Palestine, 1 to 8 November 1917

Contents


Items

Outline

The Battle of Khuweilfe, Palestine, 1 - 8 November 1917, Outline
3rd Battalion ICC Account 


 Australian Official War History Account

Khuweilfe, HS Gullett, Sinai and Palestine, Account


Other Historical Works

Khuweilfe, Lindsay Baly, Horseman, Pass By, Account


Roll of Honour

The Battle of Khuweilfe, Palestine, 1 - 8 November 1917, Roll of Honour
Lest We Forget


Further Reading:

The Battle of Khuweilfe, Palestine, 1 - 8 November 1917

The Battle of Khuweilfe, Palestine, 1 - 8 November 1917, Roll of Honour

The Third Battle of Gaza, Palestine, 26 October 1917 - 2 January 1918

Battles where Australians fought, 1899-1920


Citation: The Battle of Khuweilfe, Palestine, 1 - 8 November 1917, Contents

Posted by Project Leader at 12:01 AM EADT
Updated: Tuesday, 9 November 2010 8:23 AM EAST
Sunday, 1 November 2009
The Battle of Khuweilfe, Palestine, 1 - 8 November 1917, Outline
Topic: BatzP - Khuweilfe

The Battle of Khuweilfe

Palestine, 1 - 8 November 1917

Outline


The view from the top of Tel el Khuweilfe demonstrating its military value.

[Photograph by Gal Shaine.]


Khuweilfe, a prominent hill eighteen kilometres north of Beersheba, became the scene of an unexpected fight on 1-8 November 1917 initially between Australian light horsemen and Turkish forces. The action was triggered when a small detachment of 70 men under Lieut.-Colonel S.F. Newcombe, pressed ahead of the Desert Mounted Corps in the wake of the fall of Beersheba (q.v.) to search for water towards Nejile, in hill country beside the road to Hebron. Detecting this movement and concluding that the British were aiming to thrust north to Jerusalem via Hebron, which housed the headquarters of the Turkish 7th Army, the enemy quickly committed six battalions in this area and began transferring some reserve units from Gaza.


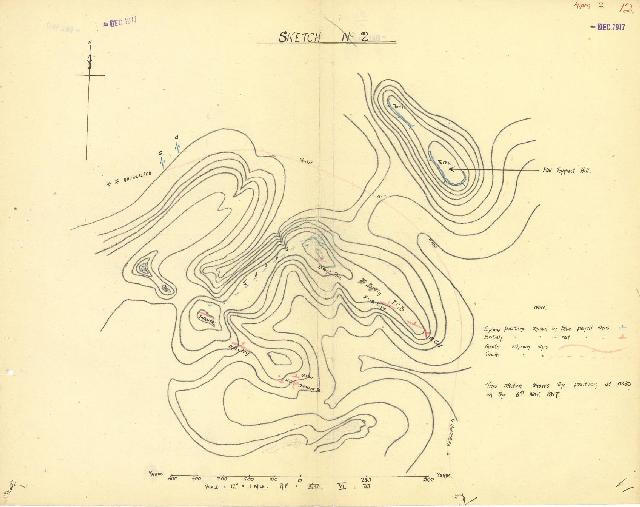
Hand drawn map detailing the situation at 8.30 am, 6 November 1917.

[Click on map for larger version.]


The latter deployments actually played into British hands, since they weakened Gaza's defences when a third (and ultimately successful) attempt to capture that place was launched on the night of 1 November. In the meantime the commander of Desert Mounted Corps, Lieut.-General Harry Chauvel, suddenly found his force presented with a serious obstacle at Tel el Khuweilfe at the very time that his superior (General Allenby) was counting on its availability for mobile operations to exploit any breaches in the enemy's defensive line between Hebron and Gaza.


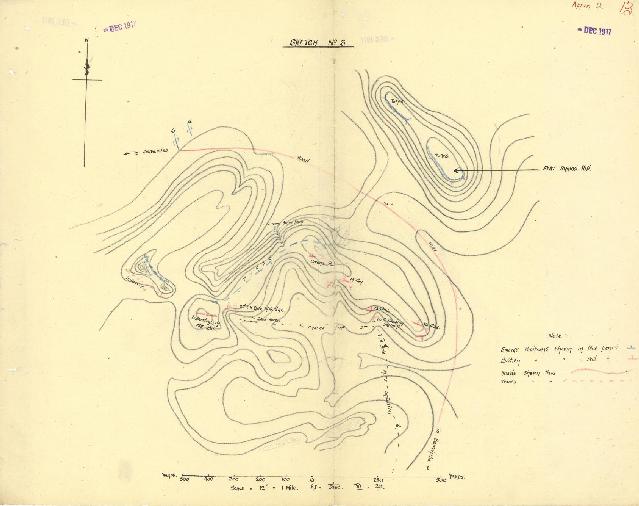
Hand drawn map detailing the situation during 6 November 1917.

[Click on map for larger version.]


For five days Chauvel used his light horsemen, British yeomanry and New Zealanders, along with infantry from the British 53rd Division and men of the Camel Brigade which were placed under his command, in attempts to push the Turks off the dominating ridge. The fighting in the waterless and rocky country was extremely difficult, and at times the attackers found themselves under immense pressure.


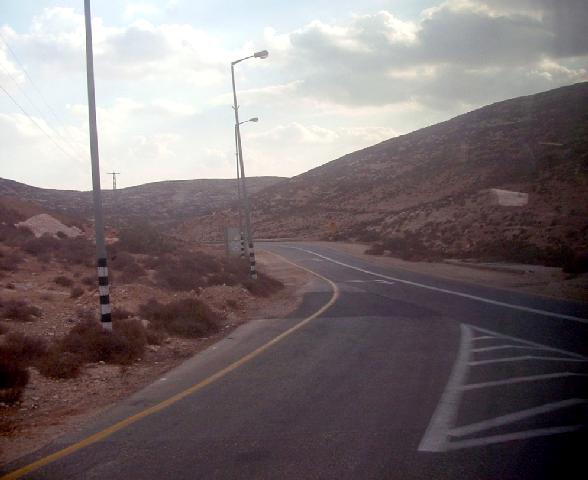
The entrance to the imposing hills on the Hebron Road.

[Photograph by Gal Shaine.]


Although the operation served a valuable purpose in drawing in a large part of the enemy's own reserves, it seriously blunted Chauvel's ability to undertake vigorous pursuit of an expected Turkish withdrawal.

In preparation for an infantry assault by the British 20th Corps at Qawuka, eighteen kilometres to the west, on 6 November Chauvel was ordered to hand over conduct of the fight at Khuweilfe to Major-General G. de S. Barrow's Yeomanry Division. The enemy-held hill was not finally taken until two days later, its capture being accomplished by troops of the 53rd Division. By then the Desert Mounted Corps was already moving to exploit the 20th Corps' success against the Turkish centre, but being without its Yeomanry Division and three other brigades (Camels, New Zealanders, and 3rd Light Horse) the advance towards Huj and Jemmamah was slow. Although the overall outcome of the operation (the fall of Gaza) was achieved on 7 November, this result had not come as spectacularly as had been hoped.


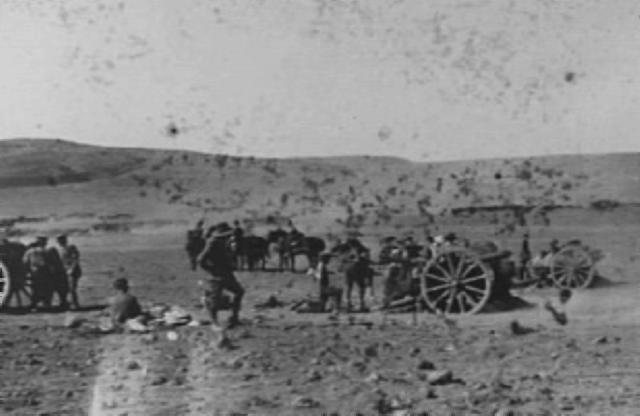
Inverness Battery Royal Horse Artillery Guns in action at Tel el Khuweilfe.


Extracted from the book produced by Chris Coulthard-Clark, Where Australians Fought - The Encyclopaedia of Australia's Battles, Allen and Unwin, Sydney, 1998, p. 136.


Additional References cited by Chris Coulthard-Clark:

H.S. Gullett, (1944), The Australian Imperial Force in Sinai and Palestine, Sydney: Angus & Robertson.

A.J. Hill, (1978), Chauvel of the Light Horse, Carlton, Vic.: Melbourne University Press.


Further Reading:

The Battle of Khuweilfe, Palestine, 1 - 8 November 1917

The Battle of Khuweilfe, Palestine, 1 - 8 November 1917, Roll of Honour

The Third Battle of Gaza, Palestine, 26 October 1917 - 2 January 1918

Battles where Australians fought, 1899-1920


Citation: The Battle of Khuweilfe, Palestine, 1 - 8 November 1917, Outline

Posted by Project Leader at 12:01 AM EAST
Updated: Tuesday, 9 November 2010 6:46 AM EAST
The Battle of Khuweilfe, Palestine, 1 - 8 November 1917, Baly Account
Topic: BatzP - Khuweilfe

The Battle of Khuweilfe

Palestine, 1 - 8 November 1917

Baly Account


The following is extracted from the book written by Lindsay Baly called Horseman, Pass By,  Chapter 13, Khuweilfe barrier and Kauwukah breakthrough.

Unknown to the British, the Turkish Army was in disarray owing to divided counsels, uncertainty in its aims and irresolution in its actions. Rations, clothing and munitions were not flowing and a chronic haemorrhaging of deserters wasted the front line. The German General von Falkenhayn, in Fall's estimation one of the greatest soldiers of the war, was at dangerous odds with Djemal Pasha, the tempestuous Turkish Commander-in-Chief who resented German interference. In his eyes, they were to provide technical assistance in aircraft, gunnery, transport and communications and no more, and he made an ostentatious point of ignoring German strategic advice. Djemal ran Palestine like a despotic potentate and sybarite of old, and a Turkish major general remarked to the German von Kressenstein, 'Now we shall go hungry because Djemal will have no interest in feeding us'.

In spite of all this the Turkish Army after Beersheba summoned a creditable defence. There was less throwing down of arms and begging for mercy and more of the dogged rifleman who, having dug a trench to his liking was not about to give it up.

The effect of this resistance on the British plan was that the envisaged 'rolling up' of the Turkish left flank from Beersheba towards Gaza by the mounted men did not take place. Instead, there was a series of chequerboard actions for the next week around Tel el Khuweilfe, a Turkish strongpoint with good water ten miles north of Beersheba. What influenced von Falkenhayn to fight here was the seizure of some high ground overlooking the Hebron road by Arab irregulars under a British officer. Falkenhayn was convinced they were Chauvel's advance guard and deployed six Turkish battalions against them. The Arabs fought well and their eventual surrender was dearly bought.

The British then had to tackle the enemy who still held Khuweilfe. This was rough, dry country and the summer lingered on with intense heat and a three-day khamsin. There was no water to be had beyond Beersheba and the infantrymen, Yeomanry and Light Horse had to march and fight on one water bottle in 36 hours, and the horses on nothing - they would not eat past the early stages of thirst - until they could be brought out of action and back to Beersheba, twelve to fifteen miles away.

Tel el Khuweilfe commanded the country to both west and east, and would therefore menace the British infantry and mounted troops when they struck at the Hareira and Nejile redoubts in the rolling-up process. On the other hand, its capture by the British would leave the Turkish left flank in the air.

The 8th Mounted Brigade of Sherwood Rangers and South Notts Hussars and the 8th Light Horse Regiment (which was under the mistaken impression it would be deployed for only one day and did not draw rations) advanced directly up the valley to three miles below the enemy stronghold.

Brigadier General JT Wigan considered a bold frontal attack offered the best chance of success and sent a squadron of the 8th Light Horse at it at the gallop. The squadron got to within 800 yards before it was forced into cover on its left by heavy fire. It was later joined by the rest of the 8th Regiment. After nightfall, Wigan endeavoured to link up the Yeomanry regiments with the Light Horse, but the Sherwoods could not go forward.

All night the 8th was under heavy machine-gun and rifle fire, but with good cover in the rocks, suffered little. At dawn, the enemy was discovered in strength much closer, within 200 to 300 yards of the Australians, who had now been 24 hours without food and had exhausted their water on the previous day

The commitment expanded. The 53rd Infantry Division and Cox's 1st Light Horse Brigade advanced on the feature and Cox's 1st Regiment seized a ridge on its right, but there they were pinned down and isolated all day, suffering heavy casualties. Many officers were killed and one squadron was left with a sergeant in command. The Turks deliberately fired on ambulance cans sent in to collect the 1st's wounded in a gross breach of their previously honoured convention. A Turkish prisoner said this was at the instigation of Germans, who claimed the ambulance carts would be carrying ammunition.

Soon after the 1st Regiment's advance, Brigadier General 'Fighting Charlie' Cox took over the forward area, including the ridge called Ras el Nagb, from the Yeomanry and the 8th Light Horse came under his command. The Yeomanry were withdrawn but Cox ordered the 8th to hold on at all costs. The 8th endured and fought back until their ammunition was exhausted.

At 11 am the enemy launched a rare counterattack, but Cox dispersed it with the 2nd and 3rd Regiments. In two hours, fresh British regiments began to arrive and the 5th Mounted took over at Ras el Nagb. Elements of the 53rd Division marched up from the south-west and at 4 PM the British took over the whole line.

These rotations, a trial in themselves, where necessary for men and horses to be watered at Beersheba. The long-suffering 8th Light Horse arrived at Beersheba at 10 PM and their desperate horses heaved and struggled for the water troughs and their first drink in 39 hours. Many men drank too much, suffering the consequences of severe diarrhoea.

During the action at Khuweilfe, Ryrie's 2nd Brigade was vainly trying to break through from the east. The country was just as strewn with rocks and ridges over which men and horses could only pick their way and the Turks, on higher ground, had the advantage. Over two days, Ryrie tried three times to turn the Turks' flank, but the terrain, lack of water, shortage of supplies and ammunition, and constant enemy shell fire in which time after time the led horses were searched out and fired on, indicating Bedouin cooperation with enemy artillery, all conspired to frustrate the brigade. The truth was, it was being worked to exhaustion. Recognising this, Chauvel intervened to say the main object should be to guard the flank rather than advance and that Ryrie should just hold the line. The last of some rain puddles from an October thunderstorm dried out and Ryrie had to march back to Beersheba after a most strenuous and frustrating operation.

In the centre, on 6 November, Chetwode was to assault the Kauwukah Trench System, a typically labyrinthine Turkish gallery protecting the Hareira and Sheria redoubts, with three divisions of infantry. This plan also provided for the 53rd Division to capture Khuweilfe simultaneously.

The New Zealand Brigade had relieved the 1st Light Horse Brigade at Khuweilfe just as 2000 Turks attacked the Yeomanry on Ras el Nagb. The Yeomanry held them off until nightfall, when they were relieved by the Canterbury Regiment. The New Zealanders' orders were to hold their ground while the 53rd Division attacked Khuweilfe from the south-west again. The 53rd had suffered much for no gain, except to serve and to augment the flow of Turks from Gaza to the Beersheba operation.

A quiet night of the 5th ended with two hours of Turkish bombardment and an advance against the Canterburys at dawn. The Wellingtons went to their support, the enemy was stopped and there was no further action that day But in the evening, the NZ Brigade had to return to Beersheba for water: they had been unable to complete watering before setting out, owing to congestion and insufficient flow at Abraham's Wells.

The Camel Brigade took over their line, less its 3rd Battalion (Australian), temporarily attached to the 53rd Division. Its task was to follow close in rear of the 53rd's advance and occupy Khuweilfe's commanding hill once it was captured.

The 158th Brigade of the 53rd Division set off before dawn on the 6th, unfortunately short of one battalion that had not arrived in time. The Hereford Battalion was ordered to close this gap in the line, but in attempting this movement they lost direction and turned a full circle to the left. The Camel Battalion, which had been following the Herefords, kept to the line of march and with daylight found themselves in utter isolation, with Tel el Khuweilfe looming ominously ahead. To Lieutenant Colonel N. de Lancey Forth's alarm, the Camels would obviously attract annihilating fire and he moved to cover behind a spur just as the Turks swept the open ground with machine-guns. At the same time, some 200 of the Herefords in the open were targeted: they lost all their officers and fell back in confusion on the left of the Camels, in the process abandoning to the enemy part of the ridge behind which the Australians sheltered. It was clear that unless the Herefords held that part of the ridge, the Camels would have to retreat from their part. Lieutenant E.W Dixon with about 30 men rushed to meet the retreating infantry and, waving his hat, stemmed the confusion and turned them under heavy fire back onto the ridge, where they then held steadfastly. Later in the day, they repulsed a Turkish attempt to envelop them, at the same time saving the Camels from encirclement and likely disaster.

But from every approach, the Camels were still taking shrapnel, machine-gun and rifle fire and Forth asked for assistance. His official report says: 'At about 10 o'clock, representations were made by the 3rd Battalion to the General Officer Commanding the 158th Brigade for the infantry to come up and drive the Turks off the ridge ... to the left rear, and over which the infantry held commanding ground. This, for reasons unknown, they were not ordered to do; but the 2nd Light Horse Brigade's machine-gun squadron were ordered to gallop up a little valley commanded by the Turks ... They charged in a very gallant manner and at once came under murderous machine-gun and shrapnel fire, but ... led by Captain Cain, reached their objective ... They rushed their guns up the hill within forty yards of the Turks, and, although the teams were shot down almost to a man, their very gallant action caused the Turks to pause and gave the 3rd Battalion breathing time to size up their position.'

The machine-gun squadron maintained their precarious hold and their fire, along with the Camel Battalion's, all through the day, repelling repeated Turkish counterattacks that threatened to sweep them, and the 53rd Division's leading elements beside them, off their ground.

Shortly before dawn on the 7th, the machine-gunners were withdrawn, but the fire fights resumed with daylight, Turkish close-range sniping especially taking a severe toll. The action was deadlocked, with the Camels and 53rd units unable to move, and the Turks held at bay At 3 PM, accurate artillery fire was brought to the support of the 53rd, enabling a general advance to be mounted towards evening. All troops had been marching and fighting for over 36 hours, but summoned their last reserves to attack determinedly. The Camels rushed the slopes of Khuweilfe with bayonets and hand grenades, and after brief resistance the Turks fled the grim mound. The 53rd went forward until darkness checked them. The night was tense but quiet, and in the morning it was found that the Turks, whose front had been comprehensively breached by Chetwode at Kauwukah, had abandoned all the Khuweilfe fortifications.

Khuweilfe was a piecemeal, reactive action. It seemed small scale, undeserving of proper plans and systematic reduction, yet the pinprick became a consuming canker that wore down and mauled three divisions for six days. Beersheba, from the time Brigadier General Grant got his orders to the fall of the town, took less than an hour.

The Khuweilfe operations dashed Allenby's hope of an early breakthrough and pursuit, yet in the sense that it did draw the enemy away from Gaza in strength, it contributed very much to victory. And despite the lack of an overall operational plan, no theorist has yet conjured any one that would have served well.

In the final action, the 53rd Division suffered the heaviest pro rata casualties. The 3rd Camel Battalion lost 22 men killed and 54 wounded, and Captain Cain's machine-gun squadron eight men killed and nineteen wounded.


Further Reading:

The Battle of Khuweilfe, Palestine, 1 - 8 November 1917

The Battle of Khuweilfe, Palestine, 1 - 8 November 1917, Roll of Honour

The Third Battle of Gaza, Palestine, 26 October 1917 - 2 January 1918

Battles where Australians fought, 1899-1920


Citation: The Battle of Khuweilfe, Palestine, 1 - 8 November 1917, Baly Account

Posted by Project Leader at 12:01 AM EAST
Updated: Monday, 8 November 2010 1:11 PM EAST
The Battle of Khuweilfe, Palestine, 1 - 8 November 1917, HS Gullett Account
Topic: BatzP - Khuweilfe

The Battle of Khuweilfe

Palestine, 1 to 8 November 1917

HS Gullett Account


The following is extracted from the book written by HS Gullett called Sinai and Palestine,  Chapter XXIV, Tel El Khuweilfe.


The successful blow at Beersheba had effects upon the enemy even beyond Allenby's anticipations. The Turkish intelligence had made light of the flank attack, even while it was developing, and had reported " six British infantry divisions deeply echeloned" before Gaza in the closing days of October. After Beersheba the failure to sense Allenby's scheme became still more marked. On the night of October 31st von Kressenstein jumped to the conclusion that Allenby intended to strike for Jerusalem up the Hebron road along the saddle of Judea; he immediately swung three divisions of infantry from the Gaza side to the east. In committing this disastrous error he was influenced by the 2nd Australian Light Horse Brigade's seizure of the road at Sakati, but still more by the activities of Colonel Newcombe's Arab detachment. Newcombe, marching from Asluj some time before Desert Mounted Corps, had made a wide detour by the east, established his headquarters at Yutta, and taken up a position on high ground overlooking the road between Dhaheriye and Hebron. His force was small, and carried only three days' rations, but was stiffened by a few British machine and Lewis gunners, and was well supplied with ammunition. His mission was merely to harass the Turks retiring from Beersheba; as the road was already cut further south, at Sakati, he remained for a time in idleness, except for the capture of some motor-transport. The Turks, ignorant of the character and strength of the party, apparently took it for a strong advance-guard of Chauvel's mounted troops, and marched a force of no less than six battalions against it, three from Hebron and three from Sheria. Newcombe's men, surrounded by overwhelming numbers, resisted bravely as long as their ammunition lasted, but were reduced by severe losses, and finally made prisoners two or three days after the fall of Beersheba.

While this minor struggle was taking place, Ryrie's brigade had worked its way up the road to Dhaheriye, probing the enemy position on high ground to the west of the road. At the same time two regiments of the 7th Mounted (Yeomanry) Brigade (with the 8th Australian Light Horse Regiment attached) and the Camel Brigade had moved on what proved a very hazardous enterprise against the strong Turkish reserve flank position at Tel el Khuweilfe. All this movement, which was, in truth, little more than reconnaissance, contributed to the enemy's deception. Throughout the day of November 1st, when the last touches were being given to the preparations of Bulfin's XXI Corps for its great stroke against the enemy's extreme right flank between Gaza and the sea, Turkish troops were being hurried away from behind Gaza to meet the imagined menace on the east.

Allenby had intended that Desert Mounted Corps and XX Corps should strike north-west two days after the capture of Beersheba. Chetwode was to assail Sheria and Hareira, while Chauvel, covering his right flank, was to win Nejile and the abundant water-supplies in that district. But the problem of supplies on the flank, and especially of water, proved even more difficult than was expected. Chauvel and Chetwode were on November 1st strongly of opinion that to embark upon the next phase of the struggle immediately, as planned, would be taking excessive risks. The blow could not yet be given its full force, and scarcity of water might bring the whole movement to a premature standstill. The Commander-in-Chief chafed at the proposed delay, but bowed to the opinion of his two experienced lieutenants, and the advance was postponed for four days. Perhaps the strongest ground for an immediate renewal of the battle was the necessity for compelling the Turks to remove their deep reserves from the Gaza sector, and so ease in some measure the tremendous task which lay before Bulfin's divisions in their frontal attack against the enemy trenches on the sand-dunes. Happily von Kressenstein's miscalculation as to the British objective on the flank was already achieving that much-desired development.

Bulfin attacked in the dark at 3 a.m. on November 2nd. Nothing could have demonstrated more strongly than this assault the change which less than six months had wrought in the strength and quality of the British army. Between the beach and the impenetrable cactus hedges which guarded the face of the town on the south, the enemy had laboriously established a system of trenches about 4,000 yards long, which any leader might have deemed impregnable. With one flank protected by the sea, and the other by the cactus and the high ground around Gaza, the line ran an erratic course over the dunes; its trenches were soundly upheld by sandbags, and the trunks of thousands of palm-trees and the beams of most of the houses in Gaza had contributed to their timbering. The defences were deep, line succeeding line. Barbed-wire, so sparingly used on the Beersheba flank, was applied here in profusion; the soft sand made a cushion for British shells, and only occasional direct hits gave concern to the defenders.

The British line lay a thousand yards away, and the No-Man's Land to be crossed in the assault was loose sand, on which marching with packs was heavy and very slow; the surface was in part undulating, but many wide patches were quite level, and on them the infantry must be fully exposed to the Turkish fire. This made a daylight attack impracticable. The contemplated assault imposed on Bulfin's troops a task which would have been quite beyond the same divisions a few months earlier. But, as this engagement was to demonstrate, the transformation in individual fighting men and in battalions and brigades, so miraculously wrought in the preceding six months, was only one phase of the difference between Allenby's army and Murray's. Allenby's command was complete in all arms. No infantry, however stalwart and brilliant, could have carried the line between Gaza and the sea without the support of a great artillery barrage; and this Allenby could provide.

The initial bombardment opened on October 29th, with the dual purpose of reducing the defences and of concealing the attack on Beersheba. It was continued at intervals, and with increasing intensity, by two 60-pounder batteries. five and a half 6-inch howitzer batteries, one 8-inch howitzer battery, and the divisional artillery of the 52nd, 54th, and 75th Divisions. Two days later the navy joined in the shelling, and day and night the Turks were punished with artillery as they had never been in this or any other war. Many of the guns were directed on the enemy's batteries, and, before the infantry attacked, compelled a number of these to pull back their guns. The first essay of Bulfin's infantry was made by the 7th Scottish Rifles against a formidable position known as " Umbrella Hill." Attacking at I I p.m. on November 1st, after an intensive bombardment, the Scots fought in a fashion which must have been very assuring to the Corps commander. As the first wave, about sixty-five strong, approached the enemy wire, they were entirely destroyed by the explosion of four large contact mines. But the second wave, undismayed, went straight through. In half-an-hour the Turks had been bombed and bayoneted into silence, and the hill won.

At 3 o'clock on the morning of the 2nd, No-Man's Land was crossed from end to end by the 161st and 162nd Brigades of the 54th Division, and the front-line trench was completely captured. Very bitter fighting attended the capture of the supports, in which six tanks successfully cooperated; but the British pushed on, until they had seized Sheikh Hassan, a little settlement which serves Gaza as a port on the open roadstead. Heavy counter-attacks were decisively repulsed, and the British, after a dash of 3,000 yards on a 5,000-yard front, consolidated their new position. The enemy had been severely mauled; 1,000 Turkish dead were buried on the ground, and 650 prisoners, 3 guns, 29 machine-guns, and 7 trench mortars were captured. Nor was the fight a bloodless one for the British, who had 30 officers and 330 other ranks killed, 94 officers and 180 other ranks wounded, and 10 officers and 360 other ranks missing. The flank was not yet decisively turned; but the enemy had been jolted from a line which he believed invincible, and, although less than two miles had been gained by the British, that two-mile stretch-lying where it did, as a flanking protection to Gaza-was of vital importance. Within three days Allenby had, by a surprise attack, shattered the enemy at Beersheba, which the Turks had not thought could be approached by a powerful force; he had, by a plain, deliberate frontal attack crushed him on the sand-dunes at the other extremity of the line; and the enemy, confused as to where the next heavy blow would fall, was already in a state of dangerous vacillation and disorganisation. On the morning of November 1st the 53rd Infantry Division, with the Camel Brigade on its right, advanced to Towal Abu Jerwal, to be in a position to cover the XX Corps when Chetwode moved against the Kauwukah and Rushdi trench systems, which protected Sheria and Hareira. The move placed the 53rd with the Camels in the foot-hills about eight miles north of Beersheba, and about the same distance west of the Hebron-Beersheba road. Already the water shortage on the right flank was becoming acute; two brigades of Anzac Mounted Division were ordered to push north, between the Camels and the Hebron road, in search of wells. At the same time the 2nd Light Horse Brigade on the east of the road moved from the Sakati area towards Dhaheriye. The New Zealanders and part of the 1st Light Horse Brigade had intermittent fighting against small bodies of Turkish cavalry, but pushed on steadily through the hills to a position between Bir el Makhrune and Towal Abu Jerwal. During the day 180 prisoners and four machineguns were taken by the Anzacs; but the main purpose of the advance, which was to discover water, was disappointed. A number of wells were located, but the water was at extreme depths and in very limited supply.

There was now abundant evidence of the movement of enemy troops to the east-large bodies were moving towards a strong natural position in the hills around Tel el Khuweilfe, where good water was known to exist. To forestall the enemy at Khuweilfe, and if possible to seize and develop the water there, the 7th Mounted Brigade, with the 8th Light Horse Regiment attached, was sent forward to occupy the area Tel el Khuweilfe-Bir Abu Khuff-Ain Kohleh.

By nightfall on November 1st Chauvel was compelled to confess to grave anxiety about water. Great numbers of the horses had received a short allowance at Asluj, and since reaching the Beersheba district on the morning of the 3rst many were still without a drink. He obtained Allenby's reluctant permission to send the Australian Mounted Division back to Karm on the following day, a move which not only served to illustrate again how narrow was the margin of victory at Beersheba, but was also an important factor in the argument for delaying the next phase of the operations. The country was even more destitute of foodstuffs than of water. The bare plains and harsh stony hills had already become dusty again after the thunderstorms, and offered not a blade of grass to supplement the small ration of a few pounds of pure grain which was now the sole issue to the already jaded horses. The month of October, just before the early rains, has ever been the season of reduced wells and short supplies, not only on the plains of southern Palestine, but over the maritime plain and throughout Judea. Not without justification had the Turks believed that Beersheba was made safe by its desert environment, and that, even if their line should be broken, the British would find vigorous pursuit impossible over the country immediately behind.

The advance of the 7th Mounted Brigade and the 8th Light Horse Regiment towards Khuweilfe proved the forerunner of some very stiff and bloody fighting in that district. Having lost Beersheba, the Turks, pivoting on their strongholds at Sheria and Hareira, withdrew their left and rested it on Khuweilfe, which gave them a stout flank merging into the stronghold of the Judean hills.

The British aim was to deny them Khuweilfe, or, if that proved impossible, to drive them from the position. On the night of the 31st the 8th Light Horse under Major A. McG. McLaurin had rejoined the 3rd Brigade, and bivouacked to the east of Tel el Saba. Early on the morning of November 2nd the regiment was ordered to join the 8th Mounted Brigade, under Brigadier-General J. T. Wigan,' on the Hebron road two miles north of Beersheba. Wigan at the time had only two of his own regiments, the Sherwood Rangers and the South Notts Hussars, and recognised, as he moved towards Khuweilfe, that he had a heavy task before him. Owing to some confusion in orders, McLaurin understood that he was to be away from the 3rd Brigade for only one day; the regiment was rushed forward without drawing rations, and, as the country was too rough for wheels, the regimental water-cart was also left behind. As Wigan led his little column past Abu Jerwal, he learned from the 2nd Light Horse Regiment that the enemy was building up a stout line between Ain Kohleh and the Hebron road.

Tel Khuweilfe is a dominating, bare, flat-topped hill flanked by rough ranges on either side, but open to the south up a wide valley. It commanded the country to the west; if held by the enemy, therefore, it would be a menace to the right flank of the British infantry and mounted troops as they struck for Hareira and Nejile, but its capture by the British would leave the enemy's left flank completely open. Wigan advanced directly up the valley until he came within about three miles of the Tel; then, meeting with opposition, he sent the Sherwoods forward along the hills on the right and the South Notts over the high ground on the left. The Sherwoods met with little resistance, and made good progress, but the South Notts regiment found the enemy strongly posted about Am Kohleh, and was definitely checked. By 2 o'clock Wigan was convinced that nothing but a bold thrust up the valley offered any prospect of success. Major Shannon, of the 8th Light Horse, therefore advanced at the gallop with his squadron directly against the Tel; but, finding the fire too hot on the exposed plain, he swung into the foot-hills to the left. There he travelled rapidly over the ranges until he reached a position about 800 yards from the Khuweilfe hill, where he was joined by the rest of the regiment. Considerable enemy strength was then displayed; as the yeomanry regiments on either side had been unable to conform with the Australian advance, McLaurin dismounted his squadrons, and worked up a defensive line. After nightfall Wigan endeavoured to link up the yeomanry with the light horse. The South Notts made contact on the left, but the Sherwoods could not get forward. McLaurin was then, with his right exposed, close to a strongly held, dominating enemy position; he therefore established a small post in the valley on his open flank, and waited anxiously for the dawn. The line held by the three regiments at this time extended from a point half-a-mile to the west of Ain Kohleh through Hill 1580 to Hill 1910 (El Jabry).

All night the 8th Light Horse Regiment was under heavy machine-gun and rifle fire, but, secure in their rocks, the men suffered very few casualties. At dawn it was discovered that the enemy had been substantially reinforced, and that he had in places advanced his firing line to within 200 or 300 yards of the Australians, who had now been twenty four hours without food, while their water-bottles had been exhausted early on the previous day. During the night the 53rd Infantry Division and the 1st Australian Light Horse Brigade were ordered forward to ensure, as it was hoped, the speedy reduction of the opposition. The 53rd Division was to advance on the line Ain Kohleh-Abu Khuff on the left, and Cox's brigade on the line Bir Khuweilfe-Ras el Nagb on the right. At 7 a.m. the Sherwood Rangers had seized Ras el Nagb, a considerable hill in rough country to the north-east of Tel Khuweilfe. Cox pushed forward the 1st Light Horse Regiment with four machine-guns, allotting as its objective a rough ridge immediately east of Tel Khuweilfe. Every move served to disclose the strength of the enemy. Granville's men, after dismounting from their horses, advanced rapidly on foot, and covered 800 yards of rough fire-swept ground. This thrust carried them considerably beyond the troops on their flanks; but the squadron leaders, believing they would be supported, pushed on until they reached a patch of sheltered ground on the eastern side of the ridge, within 300 or 400 yards of the Turkish left flank. There they spent the day, completely isolated, and with the ground behind them dominated by Turkish fire. Their cover was scanty, and every man who moved at once became a target for the vigilant enemy snipers. Under such conditions heavy casualties among officers are inevitable. Lieutenants W. J. M: Edwards, F. A. Guthrie,' and J. R. Wright: and thirteen other ranks were killed; and Major A. A. White, Captain M. E. Wright,' and Lieutenants W. H. Gray: W. F. M. Ross and 0. N. Hayes, and thirty-nine other ranks were wounded. Major White's squadron had all its officers killed or wounded, and was at the dose of the day commanded by a sergeant.

As a rule the Turks scrupulously observed Red Cross rules; but on this day all enemy arms fired very deliberately upon three ambulances and carts which had been sent up over the exposed ground for the wounded. The carts were clearly marked with the Red Cross, the visibility was good, and the Turks were shooting at close range. In one cart most of the wounded and drivers were hit, and four horses killed. A Turkish doctor, taken prisoner soon afterwards, was reminded of this gross offence; he said he had been at Khuweilfe, and explained that the ambulance had been fired on at the urging of a German officer, who argued that the carts were probably carrying ammunition up to the Australians. At that time the position of the light horsemen was critical, and the German insisted that they should be given no possible chance of escape. During the campaign there were other cases of what appeared to be deliberate firing on the Red Cross in action; and it was remarkable that in nearly every instance the offenders were not clean-fighting Turkish riflemen, but Austrian artillerymen or German machine-gunners. Soon after the advance of the 1st Regiment, Cox took over Ras el Nagb from the yeomanry, and the 8th Light Horse Regiment passed under his command. The yeomanry were withdrawn, but the Victorians were ordered to hang on to their precarious position at all costs. The day was hot, and they were now suffering much distress from want of water; but the order was obeyed with fine spirit, and their fire-fight was vigorously maintained until their ammunition was exhausted. At I 1 o'clock in the morning a counter-attack by two companies of enemy infantry developed against Ras el Nagb, but Cox at once sent one squadron of the 3rd Regiment to reinforce the men of the 2nd, and the Turks were easily dispersed. Further British regiments were now arriving, and before 1 o'clock the 5th Mounted Brigade had taken over Ras el Nagb from the Australians. With the 53rd Division marching up from the south-west, the light horsemen were ordered to stand upon their ground; this they did without trouble until 4 o'clock, when the infantrymen on the left and the 5th Mounted Brigade on their right took over their line. At nightfall the yeomanry line ran from the right of the 53rd Division through Ras el Nagb to El Jabry, where touch was made with patrols of the

2nd Light Horse Brigade. The day's fighting had revealed considerable and increasing enemy strength, and it was clear that only careful preparation and persistent and heavy fighting would clear the Turks from the position. Lack of water was still a formidable obstacle, and the absence of supplies nearer than Beersheba prevented Chauvel from concentrating strength on the position. Each brigade, after a day on the ground, had to be withdrawn eleven miles to water, and the fighting and marching and loss of sleep were rapidly reducing the strength of the troops.

To the men of the 8th, who had been for some hours without munitions and thirty hours without water, the relief was particularly welcome. McLaurin marched at once for Beersheba, which he reached at 10 o'clock at night. The horses, which had been thirty-nine hours without water, crowded madly about the troughs at the wells, almost beyond the control of their exhausted riders. During two days and a night, in which they had been constantly fighting or riding, the Victorians had existed on one bottle of water and practically no rations. Many men drank to excess at the wells, and the result was a severe outbreak of diarrhoea.

While the fighting was proceeding at Khuweilfe, Ryrie's brigade was vainly endeavouring to bear in from the east across the Hebron road on the extreme flank. The opposing enemy force was small; but the country was extremely rough, and the Turks, securely posted on the higher ground, had all the best of the struggle. Shortly after daylight on the 1st, the 5th Light Horse Regiment, advancing up the Hebron road towards Um el Makhrune and Deir Saideh, was stopped by mountain guns and machine-guns shooting from unassailable heights. On the morning of the 2nd the full brigade tested the same route, but was held up by the Turks near Deir Saideh. The enemy guns could be plainly seen, and the Ayrshire Battery effectively shelled them into silence; but advance along the road was still impossible. Ryrie then decided to leave the 6th Light Horse Regiment to contain the enemy there, while he led the 5th and 7th on a detour by the east to menace the enemy's flank and rear near Dhaheriye. The country covered by the two regiments was broken and steep, and marching was slow. Night came down before any attack could be made. Casualties were slight, as the range was extreme and cover good; but Captain A. C. Thompson," of the 6th, was killed near Deir Saideh.

On the 3rd the turning movement by Ryrie's brigade was again attempted. But the enemy had brought reinforcements down from Hebron, some of them in motor-lorries; he had only a few guns, but these, well placed, and directed by aeroplane observation, swept the valleys occupied by the Australians' led horses; lack of water was a constant embarrassment to Ryrie, whose horses were fortunate if they had one drink a day after travelling long distances; ammunition and supplies were short, and reached the brigade only after heavy journeys over the hills at night. In fact, Ryrie's brigade was being worked to exhaustion in the mere effort to hold its ground. At IO a.m. on the 3rd Chauvel advised Ryrie that the brigade's purpose would be achieved if the line then held could be maintained; the object was to dominate the road and guard the flank, rather than to advance. During the 4th and 5th the brigade continued to demonstrate; the light guns of the Ayrshire Battery fought on persistently, but were unable to check the enemy artillery. The natives of the district appeared friendly to the Australians; but the manner in which the enemy artillery discovered and re-discovered the horses of the brigade, as they were shifted from shelter, suggested strongly that the Arabs were serving the Turks. Meanwhile the rain-pools dried rapidly, and on the 6th the brigade, after a very arduous week, marched back to Beersheba.

Meanwhile the 1st Light Horse Brigade, after fighting at Khuweilfe, reached the wells at Beersheba at 3 a.m. on the 4th, when the horses had been thirty hours without water. The New Zealand Brigade had been under orders to relieve the 5th Mounted Brigade on the Ras el Nagb line early on the 4th; but, owing to water difficulties, Meldrum was unable to leave his bivouac north of Beersheba until 2 o'clock in the afternoon. Even then his horses had received very little water since leaving Beersheba on the previous day, and went into the line already thirsty. At about 4.30 a force of some 2,000 Turks with five guns attacked the yeomanry on Ras el Nagb; but the British, aided by the rough ground, maintained their position until about dark, when they were relieved by the Canterbury Mounted Rifles. The Aucklands and Wellingtons arrived an hour afterwards. The Camel Brigade, which had advanced on the right flank of the 53rd Division, was (with the exception of the 3rd Battalion) placed for the day under the orders of the Anzac Mounted Division. The 3rd Battalion remained under the command of the 53rd Division.

The mounted brigades (including the Camel Brigade) on the Ras el Nagb sector at Khuweilfe were now under orders to hold the line, while the 53rd Division made a decisive assault from the south-west. The British infantry brigades, after their arrival on the afternoon of the 3rd, had been securely held up by the enemy. Every advance had been shattered and heavy casualties suffered; and the Turks not only were still strong, but were steadily being reinforced. The check was disappointing to the British High Command, but it continued to serve one good purpose-the flow of troops from the Gaza district towards the eastern flank was each hour improving Allenby's prospects. Chetwode was completing preparations for his great blow against Sheria and Hareira and Bulfin was ready to strike on either side of Gaza.

After a quiet night, the New Zealanders were heavily shelled at about 8 a.m. on the 5th. Two hours' bombardment followed, and the Turks then advanced against the left of the Canterburys. Two squadrons of the Wellingtons were rushed up in support, and, after a persistent effort in which his losses were heavy, the enemy was stopped, and the opposing forces remained quiet for the rest of the day.

Chetwode's attack on the Kauwukah defences (which were held by the Seventh Turkish Army) was timed for dawn on the 6th. The blow was to be struck with the 10th, 60th, and 74th Divisions, while General Barrow, of the Yeomanry Mounted Division, was to cover the right flank with a force made up of the 53rd Division, the Camel Brigade, the Yeomanry Mounted Division) the New Zealand Brigade, and part of the 2nd Light Horse Brigade. Chauvel was to be in readiness, in the event of Chetwode's success, to advance with the remaining forces of Desert Mounted Corps towards the line Jemmameh-Huj. The original order to strike for Nejile was cancelled. On the evening of the 5th the Camel Brigade took over the Ras el Nagb line in order to allow the New Zealanders to return to Beersheba to water. The 2nd Light Horse Brigade withdrew from its position along the Hebron road on the same night; but it left a few patrols in observation, and one squadron of the 7th Regiment (commanded by Major Easterbrook) was sent as escort to eight machine-guns under Captain J. R. Cain, which proceeded to the support of the Camels. The 53rd Division was ordered to capture Tel Khuweilfe on the 6th, simultaneously with the advance of the three infantry divisions against the Kauwukah system.

From first to last the Khuweilfe operations went in favour of the defenders. At the outset the British had made a false estimate of its strength; and, although reinforcements had been brought up to aid the attack, the enemy had maintained the balance in his favour by constant additions. The assault was therefore of an accidental and piecemeal character, and lacked the preparation) the resolution, and the individual leadership essential for success. The advance of the 53rd Division on the morning of the 6th was to be made in the dark, a precarious undertaking over mountainous country. At 4.20, after a vigorous bombardment of the enemy positions on Tel Khuweilfe and the adjacent hills, the 158th Brigade was to advance, maintaining a front of 1,500 yards, and assail the Turks with the bayonet. The 1/1st Herefords was on the right, the 1/6th Royal Welsh Fusiliers on the centre, and the 2/6th Royal Welsh Fusiliers on the left. The 3rd Battalion (Australian) of the Camel Brigade, under Lieutenant-Colonel de Lancey Forth, was to follow in rear of the right of the 1/1st Herefords; when the Herefords had gained Tel Khuweilfe, the Australians were to occupy the hill and cover the flank of the brigade in the subsequent advance. Unfortunately one of the infantry battalions was late in reaching the point of assembly, and the others were compelled to start without it. This caused a gap in the line, and the Herefords on the right were ordered to extend their frontage to the left. Attempting this movement, the battalion lost direction, and performed a complete left wheel. De Lancey Forth kept to his line of march as ordered, and just before dawn found his battalion isolated, with Tel Khuweilfe immediately ahead; the barrage had ceased, and any demoralisation it may have caused among the Turks was past.

In the first light of the dawn de Lancey Forth recognised that, as soon as his men were discovered, they would come under a murderous fire at close range from the Tel; he therefore moved to the cover of a low spur which ran parallel with it. As his men cleared the open ground, it was swept with enemy machine-gun fire, but the Turks were just too late. Two companies made a line behind the spur, and at once came under heavy machine-gun fire, while the remaining two companies were placed in support behind another spur 300 yards away. The commanding Tel was only 300 yards from the British front line, and the Turks endeavoured to envelop the right of the Camels, but were checked. At the same time about 200 men of the 1/1st Herefords, who had been under very heavy punishment and had lost all their officers, fell back in confusion on the left of the Camel line, abandoning to the enemy an extension of the ridge held by the Australians, which dominated the Camel line. Lieutenant E. W. Dixon, recognising instantly that, unless the Herefords held their part of the ridge, the Camel battalion must at once retire, rushed with about thirty of his men to meet the retreating infantry. Waving his hat, he led them under heavy fire back on to the ridge, and the British, responding to the gallant example, held to it steadfastly. Later in the day the Turks made a determined effort to envelop the left rear of the position. In places they broke the Hereford resistance, and endeavoured to seize a dominating hill behind the Australian position-which at this time was almost encircled by the enemy's fire and threatened with complete isolation-but the British infantry rallied finely, the enveloping movement was checked, and disaster averted.

Nevertheless the enemy by this time was sweeping with shrapnel, machine-gun, and rifle fire every approach to de Lancey Forth's men. "At about 10 o'clock,'' to quote from the official narrative of the 3rd Camel Battalion, " representations were made by the 3rd Battalion to the General Officer Commanding the 158th Brigade for the infantry to come up and drive the Turks off the ridge which they held to the left rear, and over which the infantry held the commanding ground. This, for reasons unknown, they were not ordered to do; but the 2nd Light Horse Brigade Machine-Gun Squadron were ordered to gallop up a little valley commanded by the Turks and secure the left of the ridge they held. They charged in a very gallant manner, and at once came under a murderous machine-gun and shrapnel fire; but, very gallantly led by Captain Cain, they reached their objective, at which point the hill rose so abruptly as to give cover from the Turkish firing line above and slightly to their right. They rushed their guns up the hill within forty yards of the Turks, and, although the teams were shot down almost to a man, their very gallant action caused the Turks to pause and gave the 3rd Battalion breathing-time to size up their position."

The order which committed Cain and his men to their heroic enterprise was perhaps a mistake. The machine gunners paid dearly. Lieutenant A. s. Muir and seven men were killed, and Captain Cain, Lieutenant R. B. Dixon, and Lieutenant R. C,. Owen-Jones and sixteen men were wounded. But there is compensation in the thought of the splendid dash and daring with which the mounted machine gunners raced their teams forward to almost certain destruction under a hail of fire, and in the magnificent fashion in which they served their guns within forty yards of the Turkish line. In every engagement in the long campaign this spirit distinguished the light horse machine-gun squadrons. In fight after fight their support alone made the advance of the sparse lines of riflemen possible; wherever the adventurous light horseman went, they knew that galloping close at hand were the heavily burdened pack-horses of the gunners, ready to come into action a few moments after a halt was ordered.

All day Cain's men maintained their precarious position, and by their fire had a material effect in checking the Turkish counter-attacks, which constantly threatened to sweep the 3rd Camel Battalion and the British infantry off their ground. The Turks that day fought with exceptional resolution and savagery, and British and Australian wounded and stretcher-bearers were repeatedly fired upon. De Lancey Forth's men held on under severe punishment all day and through the night. Shortly before dawn the machine-gun party was withdrawn. All day on the jth the fire-fight between the rival forces was very heavy, and at the close range the sniping was especially deadly; but about 3 o'clock the 3rd Camel Battalion received effective artillery support, and the situation was immediately eased. Towards evening a general advance was ordered. All troops had been marching and fighting without a moment's respite for more than thirty-six hours, but still the attack was made with great spirit. Lieutenant E. W. Dixon led a force of the Camels against Tel Khuweilfe. The artillery effectively cooperated, the men rushed up the slopes with bayonets and hand-grenades, and after a brief struggle the Turks fled. At the same time the 53rd Division-which had, of course, borne the full brunt of the main attack-made substantial headway. Darkness checked the onslaught, and at daylight on the morning of the 8th it was found that the Turks, whose front had been badly broken towards Sheria, had evacuated the whole Khuweilfe position.

Casualties were heavy, especially in the infantry of the 53rd Division. Among the Australians of the 3rd Camel Battalion, Captain R. W. Creswell, and Lieutenant C. H. Lyon and twenty other ranks were killed, and two officers and fifty-two other ranks wounded.


Further Reading:

The Battle of Khuweilfe, Palestine, 1 - 8 November 1917

The Battle of Khuweilfe, Palestine, 1 - 8 November 1917, Roll of Honour

The Third Battle of Gaza, Palestine, 26 October 1917 - 2 January 1918

Battles where Australians fought, 1899-1920


Citation: The Battle of Khuweilfe, Palestine, 1 - 8 November 1917, HS Gullett Account

Posted by Project Leader at 12:01 AM EAST
Updated: Monday, 8 November 2010 1:06 PM EAST
Thursday, 1 November 2007
The Battle of Khuweilfe, Palestine, 1 - 8 November 1917, Roll of Honour
Topic: BatzP - Khuweilfe

The Battle of Khuweilfe

Palestine, 1 - 8 November 1917

Australian Forces

Roll of Honour


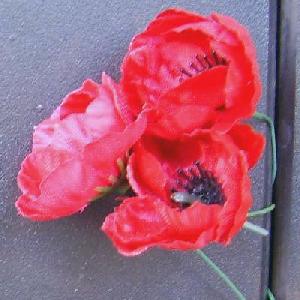
Poppies on the Roll of Honour, Australian War Memorial, Canberra


The Roll of Honour contains the names of all the men known to have given their lives during the Battle of Khuweilfe, Palestine, 1 - 8 November 1917.


Roll of Honour

Victor Wadsworth ASHWORTH, 4th Battalion, Imperial Camel Corps, 7 November 1917


Alfred Henry BARKER, 2nd Light Horse Machine Gun Squadron, 5 November 1917

Thomas Harold BLOMLEY, 3rd Battalion, Imperial Camel Corps, 6 November 1917

Charles BRYANT, 3rd Battalion, Imperial Camel Corps, 6 November 1917

Leslie Stuart BURNISTON, 3rd Battalion, Imperial Camel Corps, 6 November 1917

Frederick George BURNS, 1st Light Horse Regiment, 3 November 1917


William McLellan CAMPBELL, 1st Light Horse Regiment, 3 November 1917

Alfred CHAPMAN, 2nd Light Horse Machine Gun Squadron, 5 November 1917

David COLQUHOUN, 4th Battalion, Imperial Camel Corps, 8 November 1917

Randolph William CRESWELL, 3rd Battalion, Imperial Camel Corps, 6 November 1917

George CUMMINS, 3rd Battalion, Imperial Camel Corps, 7 November 1917


Albert Edward DAWSON, 1st Light Horse Regiment, 4 November 1917

Erskine William Douglas Hamilton DAWSON, 3rd Battalion, Imperial Camel Corps, 6 November 1917

Eric Fane DE SALIS, 2nd Light Horse Machine Gun Squadron, 5 November 1917

Francis James DENNIS, 3rd Battalion, Imperial Camel Corps, 6 November 1917

Henry Cecil DRADER, 1st Light Horse Regiment, 3 November 1917


William James Munro EDWARDS, 1st Light Horse Regiment, 3 November 1917


Athol Clyde FAINT, 1st Light Horse Regiment, 4 November 1917

Gordon John FARMER, 3rd Battalion, Imperial Camel Corps, 6 November 1917

Ernest James FIRTH, 1st Light Horse Regiment, 3 November 1917

Robert James FOSTER, 6th Light Horse Regiment, 6 November 1917


Frederick Alexander GUTHRIE, 1st Light Horse Regiment, 3 November 1917

Claude William GUYER, 1st Light Horse Regiment, 4 November 1917


Clifton Henry James HOAD, 6th Light Horse Regiment, 5 November 1917

Allan Stokeham HUTHWAITE, 1st Light Horse Regiment, 5 November 1917


William Howe IRVING, 3rd Battalion, Imperial Camel Corps, 6 November 1917


Ernest Leslie JACKSON, 8th Light Horse Regiment, 3 November 1917

Sydney Ellis Clare JOHNSON, 1st Light Horse Regiment, 3 November 1917

Osborne William JOHNSTON, 1st Light Horse Regiment, 3 November 1917


John KELSALL, 2nd Light Horse Regiment, 4 November 1917

George Stanley Arthur KING, 3rd Battalion, Imperial Camel Corps, 6 November 1917

Leslie Matthew KIRLEY, 1st Light Horse Regiment, 3 November 1917


Wilfred Dudley LOVEGROVE, 7th Light Horse Regiment, 6 November 1917

Charles Hill LYON, 3rd Battalion, Imperial Camel Corps, 7 November 1917


Robert MANUEL, 4th Battalion, Imperial Camel Corps, 2 November 1917

John James MARSH, 5th Light Horse Regiment, 6 November 1917

John Thomas MARTIN, 1st Light Horse Regiment, 3 November 1917

Franc MATZONAS, 3rd Battalion, Imperial Camel Corps, 6 November 1917

William MCCARTHY, 2nd Light Horse Machine Gun Squadron, 5 November 1917

John Richard MCDONALD, 3rd Battalion, Imperial Camel Corps, 7 November 1917

Arndell James Gwydir MCKID, 1st Light Horse Regiment, 3 November 1917

Harry Endrich MORLEY, 3rd Battalion, Imperial Camel Corps, 6 November 1917

Thomas William MOUNTAIN, 1st Light Horse Regiment, 3 November 1917

Albert Stanley MUIR, 1st Light Horse Machine Gun Squadron, 5 November 1917

Dennis MULLEN, 4th Battalion, Imperial Camel Corps, 2 November 1917


William Martinus NILSON, 4th Battalion, Imperial Camel Corps, 8 November 1917


Arthur Robert French OXFORD, 3rd Battalion, Imperial Camel Corps, 6 November 1917


Roy Noel PEISLEY, 3rd Battalion, Imperial Camel Corps, 6 November 1917

Daniel Mallen POLAND, 3rd Battalion, Imperial Camel Corps, 6 November 1917

Albert James PRENDERGAST, 6th Light Horse Regiment, 3 November 1917


James QUINN, 5th Light Horse Regiment, 5 November 1917


James Reginald REID, 3rd Battalion, Imperial Camel Corps, 6 November 1917

William REID, 7th Light Horse Regiment, 6 November 1917

Bert REYNOLDS, 3rd Battalion, Imperial Camel Corps, 6 November 1917

Frederick Charles ROBINSON, 1st Light Horse Regiment, 4 November 1917

Richard Louis Stanford ROGERS, 8th Light Horse Regiment, 2 November 1917


Archibald SMITH, 4th Battalion, Imperial Camel Corps, 6 November 1917

Walter Stephen SMITH, 1st Light Horse Regiment, 3 November 1917


Alfred Charles THOMPSON, 6th Light Horse Regiment, 2 November 1917

Francis George THOMPSON, 4th Battalion, Imperial Camel Corps, 7 November 1917


Geoffrey Hughes WARREN, 6th Light Horse Regiment, 3 November 1917

Alfred John WATT, 8th Light Horse Regiment, 3 November 1917

Harold Edwin WILLIAMS, 2nd Light Horse Machine Gun Squadron, 5 November 1917

Joseph WILLIAMS, 1st Light Horse Regiment, 3 November 1917

Andrew James WOOD, 3rd Battalion, Imperial Camel Corps, 6 November 1917

Alex Robertson WRIGHT, 3rd Battalion, Imperial Camel Corps, 6 November 1917

John Dorman WRIGHT, 3rd Battalion, Imperial Camel Corps, 6 November 1917

John Robert WRIGHT, 1st Light Horse Regiment, 3 November 1917


Lest We Forget


Further Reading:

The Battle of Khuweilfe, Palestine, 1 - 8 November 1917

The Battle of Khuweilfe, Palestine, 1 - 8 November 1917, Roll of Honour

The Third Battle of Gaza, Palestine, 26 October 1917 - 2 January 1918

Battles where Australians fought, 1899-1920


Citation: The Battle of Khuweilfe, Palestine, 1 - 8 November 1917, Roll of Honour

Posted by Project Leader at 12:01 AM EADT
Updated: Monday, 8 November 2010 12:56 PM EAST

Newer | Latest | Older

Full Site Index


powered by FreeFind
Let us hear your story: You can tell your story, make a comment or ask for help on our forum.

Desert Column Forum

A note on copyright

The Australian Light Horse Studies Centre is a not for profit and non profit group whose sole aim is to write the early history of the Australian Light Horse from 1900 - 1920. It is privately funded and the information is provided by the individuals within the group and while permission for the use of the material has been given for this site for these items by various donors, the residual and actual copyright for these items, should there be any, resides exclusively with the donors. The information on this site is freely available for private research use only and if used as such, should be appropriately acknowledged. To assist in this process, each item has a citation attached at the bottom for referencing purposes.

Please Note: No express or implied permission is given for commercial use of the information contained within this site.

A note to copyright holders

The Australian Light Horse Studies Centre has made every endeavour to contact copyright holders of material digitised for this blog and website and where appropriate, permission is still being sought for these items. Where replies were not received, or where the copyright owner has not been able to be traced, or where the permission is still being sought, the Australian Light Horse Studies Centre has decided, in good faith, to proceed with digitisation and publication. Australian Light Horse Studies Centre would be happy to hear from copyright owners at any time to discuss usage of this item.

Contact

Australian Light Horse Studies Centre

eXTReMe Tracker