"At a mile distant their thousand hooves were stuttering thunder, coming at a rate that frightened a man - they were an awe inspiring sight, galloping through the red haze - knee to knee and horse to horse - the dying sun glinting on bayonet points..." Trooper Ion Idriess
The Australian Light Horse Studies Centre aims to present an accurate history as chroniclers of early Australian military developments from 1899 to 1920.
The Australian Light Horse Studies Centre site holds over 12,000 entries and is growing daily.
Contact:Australian Light Horse Studies CentreLet us hear your story:
You can tell your story, make a comment or ask for help on our Australian Light Horse Studies Centre Forum called:
The Battle of Sunnyside, South Africa, 1 January 1900, Outline Topic: BatzB - Sunnyside
South African (Second Boer) War
The Battle of Sunnyside, South Africa, 1 January 1900
Outline
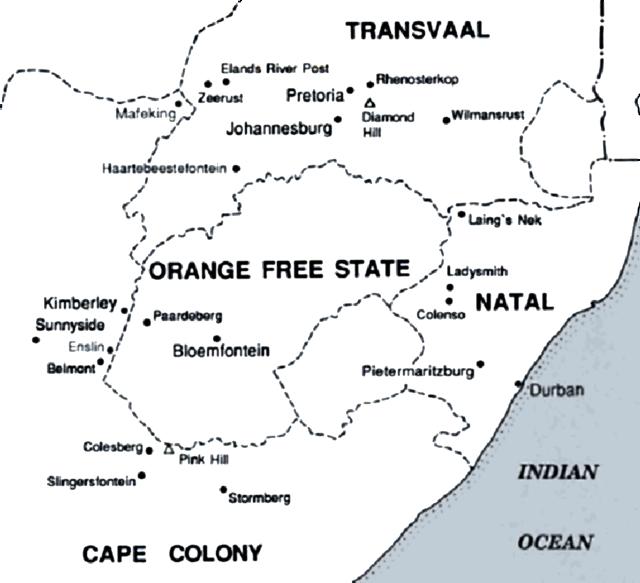
The location of Sunnyside in South Africa.
Sunnyside, an action fought on 1 January 1900 during the Second South African War, in which a ‘flying column' of less than 500 British, Canadian and Australian troops under Lieut.-Colonel T.D. Pilcher of the Northumberland Fusiliers attacked a laager (camp) of some 180 Boers near the township of Douglas on the western border of the Orange Free State. Elaborate security precautions masked Picher's departure from Belmont on 31 December 1899 and ensured that when he began his attack on the enemy camp the next day at 11.25 a.m. with a barrage from two guns, the Boers were taken completely by surprise.
While many of the enemy were seen to immediately take flight, the remainder adopted a defensive position on a kopje (small hill) in front of their laager and opened fire on a company of advancing Canadians and some 40 British mounted regulars. Meanwhile, two companies of the Queensland Mounted Infantry Regiment (who had joined Pilcher's garrison at Belmont less than two weeks earlier) were sent around the right flank. The Queenslanders came into action about an hour later, suffering their first casualties - also the first of any contingent sent from the Australian colonies to the war - when a five-man scouting patrol rode into Boer fire. The enveloping movement was continued and progressively pushed to within 50 metres of the Boer position. Although some more the enemy had managed to escape while this movement was being carried out, the rest were now trapped and, after another 45 minutes of firing, were forced to hoist the white flag of surrender shortly after 3 p.m.
Boer losses in this action were 14 dead and 38 prisoners taken (seven of whom were wounded), along with all their stores and wagons. Pilcher's force had only two men killed and two wounded-these all being from the Queensland Mounted Infantry. The commander of the company to which the dead men belonged, Captain Harry Chauvel, recorded after the action that: 'We had great difficulty in preventing the men from bayoneting the Boers as they fired a few shots after they put up the white flag'.
Although the action was only a minor success, wide publicity given to the steadiness of the Queenslanders under fire helped to modify the unfavourable opinion of colonials which was then current among British regulars. The engagement also enabled Douglas to be entered the next day and its British population freed from the Boers, who hastily fled. Although the inhabitants implored Pilcher to leave a detachment of troops to defend them, he refused this request as being beyond the scope of the expedition. When the column marched out on 3 January, it was accordingly accompanied by some 90 loyalist refugees.
Extracted from the book produced by Chris Coulthard-Clark, Where Australians Fought - The Encyclopaedia of Australia's Battles, Allen and Unwin, Sydney, 1998, pp. 63-64.
Additional References cited by Chris Coulthard-Clark:
L.S. Amery, (ed.) The Times History of the War in South Africa 1899-1902, Vol. 3 (1905), London: Sampson Low, Marston & Co.
F. Maurice (ed.) History of the War in South Africa 1899-1902, Vol. 1 (1906), London: Hurst & Blacken;
R.L. Wallace (1976) The Australians at the Boer War, Canberra: Australian War Memorial & Australian Government Publishing Service.
The Battle of Sunnyside, South Africa, 1 January 1900, Roll of Honour Topic: BatzB - Sunnyside
South African (Second Boer) War
The Battle of Sunnyside, South Africa, 1 January 1900
Roll of Honour
Australian Forces
Poppies on the Roll of Honour, Australian War Memorial, Canberra
The Roll of Honour contains the names of all the Australian men from the Scottish Horse known to have served and lost their lives during the Battle of Bakenlaagte, 30 October 1901.
Sunnyside, 1 January 1900, Chamberlain Account Topic: BatzB - Sunnyside
South African (Second Boer) War
The Battle of Sunnyside, South Africa, 1 January 1900
Chamberlain Account
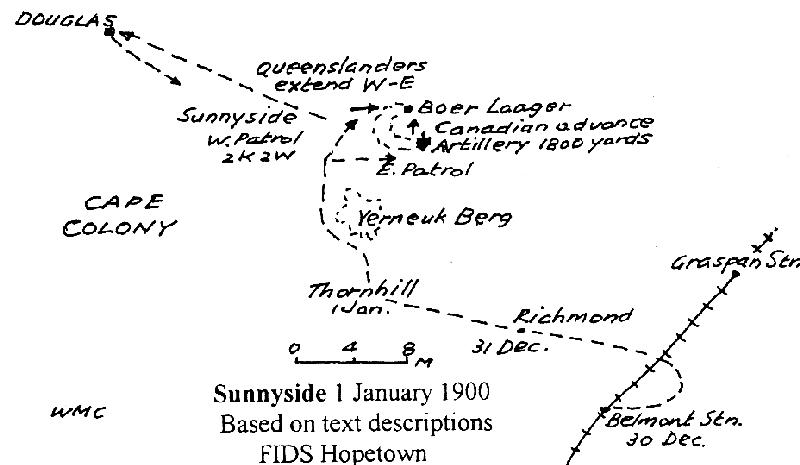
Map 54, Sunnyside, 1 January 1900.
The following account is extracted from Max Chamberlain's book called The Australians in the South African War 1899 - 1902, A Map History, published by Army history Unit in Canberra, 1999. This section is called Map 54.
SUNNYSIDE 1 JANUARY 1900
When it became known that Cape Rebels were operating in the area west of Belmont, Lt Col T Pilcher conducted a raid to remove them. To deceive the spies who reported every British move, the Flying Column of 200 QMI, 100 Canadian infantry in waggons, 40 Royal Munster Fusiliers MI, P Battery RHA and NSW AMC headed east on 29 December 1899 before crossing the railway to Richmond Farm on the 31st and marching west to Thornhill Farm. Pilcher detained all natives encountered under guard.
On 1 January 1900 the column left Thornhill before daybreak and moved north in the direction of Sunnyside Kopjes in several parallel groups which joined up at Verneukberg. A shower of rain prevented dust rising to disclose their presence. The column headed west of the chain of kopjes running north to Sunnyside from Thornhill. Two patrols of QMI headed to east and west of Sunnyside Hill to ascertain the position of the laager. The western patrol ran into Boer fire and had two men killed and two wounded. Troopers V S Jones and D C McLeod were the first Australians in this war to die in battle.
P Battery, RMFMI and the Canadians were sent to the eastern flank and took up a position suitable for the artillery to the north and east of the Boer camp. At 1,800 yards the battery fired. The QMI extended east to west and moved northward. The Canadians moved toward the laager between the guns and the main advance of the Queenslanders.
The Boer camp was at the north-east corner of a horseshoe shaped feature. One company of QMI was sent to the left and was hotly engaged, a detachment was on the higher slope of the ridge and another in support. The Canadians moved forward into the open under heavy fire from rebels being driven from west to east by the Queenslanders. The Queensland reserve was sent in from the southern spur of the horseshoe in time to assist in the capture of 40 prisoners. The enemy retreated towards Douglas and the action was over by 4pm.
Pilcher pursued to Dover Farm, 7 miles distant, leaving the Canadians in charge of the prisoners and the NSW AMC to tend the wounded. Pilcher entered Douglas, then on 3 January retired on Belmont with prisoners and a convoy after burning the enemy's ammunition. This first major operation by the Australians in this war showed the British ability to assist the loyal residents beleaguered by rebels.
Bibliography
Chamberlain, M., The Australians in the South African War 1899 - 1902, A Map History, Army history Unit, Canberra, 1999.
The Battle of Sunnyside, South Africa, 1 January 1900, Times Account, 3 January 1900 Topic: BatzB - Sunnyside
South African (Second Boer) War
The Battle of Sunnyside, South Africa, 1 January 1900
Times Account, 3 January 1900
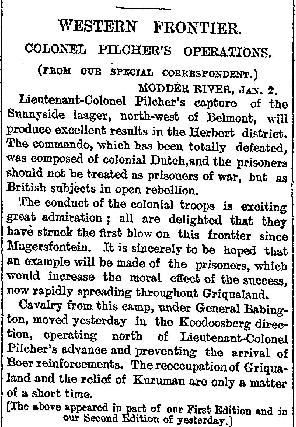
The Times, 3 January 1900, p. 3
The transcription:
WESTERN FRONTIER.
COLONEL PILCHER'S OPERATIONS.
MODDER RIVER, JAN. 2.
Lieutenant-Colonel Pilcher's capture of the Sunnyside laager, north-west of Belmont, will produce excellent results in the Herbert district. The commando, which has been totally defeated, was composed of colonial Dutch, and the prisoners should not be treated as prisoners of war, but as British subjects in open rebellion.
The conduct of the colonial troops is exciting great admiration; all are delighted that they have struck the first blow on this frontier since Magersfontein. It is sincerely to be hoped that an example will be made of the prisoners, which would increase the moral effect of the success, now rapidly spreading throughout Griqualand.
Cavalry from this camp, under General Babington, moved yesterday in the Koodoosberg direction, operating north of Lieutenant-Colonel Pilcher's advance and preventing the arrival of Boer reinforcements. The reoccupation of Griqualand and the relief of Kuruman are only a matter of a short time.
The following is the conclusion of Reuter's despatch from Dover Farm regarding the capture of the Boer laager at Sunnyside, the first portion of which appeared in The Tunes of yesterday:
DOVER FARM, Jan. 1.
While B Company of the Queenslanders kept moving along the left among kopjes strewn with big stones, carefully using every bit of cover, A Company advanced along the ridges. The Boers kept up a sustained fire all the time, but, as they could see none of their assailants, no harm was done.
By about 2 o'clock in the afternoon B Company had completely worked round the left kopje and A had reached the backbone of the ridge. The latter were steadily advancing, when the fire of the enemy suddenly ceased and a party of 35 Boers hoisted a white flag and immediately surrendered to A Company.
The position was now taken. A portion of the Torontos moved across in front of the guns and entered the Boer laager. The bulk of the enemy's force had fled. Fourteen tents, three wagons, and a great store of rifles and ammunition, as well as saddles, forage, and camp equipment, fell into our hands. We also found numerous incriminating papers. Many of the envelopes were stamped with the words “On her Majesty's Service," and had evidently been used by the newly appointed Landdrost of Douglas in the absence of an official Free State superscription.
The loss of the Boers besides prisoners was six killed and about 12 wounded.
The affair was altogether a success. The best dispositions were made, and the Boers were beaten at their own game. The Torontos stood a galling fire with admirable patience and spent never a shot unnecessarily. Captain Bell, in charge of their Maxim, and Captain Belham, directing the Queenslanders' machine gun, did good work. Major Bayly, of the Queensland contingent, also rendered good service, and every one was full of praise of Lieutenant Ryan's handling of the mounted infantry.
DOUGLAS, Jan. 2, 7 20 p.m.
The British flag is again flying over Douglas, and the arrival of Colonel Pilcher's column has restored confidence among the inhabitants. Yesterday's engagement resulted in the entire dispersal of the rebels, who for the past six weeks have been governing the country. Their leaps: was occupied mostly by British subjects, who, or the arrival of a Free State commando, which was probably invited, threw in their lot with the enemy, terrorizing the loyalists, who are now jubilant that the day of freedom has arrived.
Last night we encamped on Dover Farm, the proprietor of which fled. The Toronto company remained in the enemy's laager and joined the main body in the morning, bringing the whole of the Boer tents and wagon loot. Shortly afterwards the Cornwalls, under Major Ashby, marched into camp, having performed a splendid march across the veldt. At 10 o'clock the force started for Douglas, leaving the Cornwalls to garrison the farm. The Queenslanders furnished scouts and formed the advance guard. They were followed by the guns, which were escorted by mounted infantry. The Toronto company brought up the rear, riding in wagons.
At 12 o'clock natives reported that Douglas was unoccupied. Colonel Pilcher had sent a letter last night to Mr. Warner, the Landdrost, announcing his intention of marching on Douglas, and threatening all rebels bearing arms with just punishment. Those surrendering, he added, would be handed over to the civil authorities.
At 1 o'clock the force watered six miles from Douglas and, after s brief halt, continued its march. Various reports were received, chiefly from natives, that the enemy would attempt to make a stand. Consequently, Colonel Pilcher on approaching Douglas extended the Queenslanders, who gradually worked their way to the outskirts of the town, which is situated y in a hollow. Colonel Ricardo sent forward a small advance patrol, which was greeted with loud cheers on entering the place.
An extraordinary scene ensued. The inhabitants were in a frenzy of delight. They crowded round the soldiers, shaking hands with them, and their enthusiasm was increased when they learned that their deliverers were Australians and Canadians as well as Imperial troops.
All the troops were received with deafening cheers. The enthusiasm reached a climax when Colonel Pilcher appeared. Such a welcome has seldom been seen.
The inhabitants stated that the Landdrost left is at 10 o'clock last night with the whole of the mounted rebels. The unmounted men, who are described as having been in a state of extreme terror, are reported to have intrenched themselves in the vicinity.
Colonel Pilcher's column succeeded completely in its object, the rebels in this district having it been dispersed once and for all. The loyalists have now a feeling of security, while the hasty departure of all the Dutch, even the women and children, shows how great was the effect of the march.
The Union Jack was hoisted by a band of loyal natives and the State flag was pulled down immediately on the arrival of the column. A quantity of ammunition and a large number of letters showing the entire organization of the district were captured. As I write the ammunition is being burned.
A telegram has been received at the War Office from the General at Cape Town, dated January 2, which says:-
January 2.-Methuen's Cavalry Brigade in support of and in communication with Pilcher's a reconnaissance to Douglas watching Koodoos Drift.
The Australian Light Horse Studies Centre is a not for profit and non profit group whose sole aim is to write the early history of the Australian Light Horse from 1900
- 1920. It is privately funded and the information is provided by the individuals within the group and while permission for the use of the material has been given for this
site for these items by various donors, the residual and actual copyright for these items, should there be any, resides exclusively with the donors. The information on
this site is freely available for private research use only and if used as such, should be appropriately acknowledged. To assist in this process, each item has a citation
attached at the bottom for referencing purposes.
Please Note: No express or implied permission is given for commercial use of the information contained within this site.
A note to copyright holders
The Australian Light Horse Studies Centre has made every endeavour to contact copyright holders of material digitised for this blog and website and where
appropriate, permission is still being sought for these items. Where replies were not received, or where the copyright owner has not been able to be traced, or where
the permission is still being sought, the Australian Light Horse Studies Centre has decided, in good faith, to proceed with digitisation and publication. Australian Light
Horse Studies Centre would be happy to hear from copyright owners at any time to discuss usage of this item.