"At a mile distant their thousand hooves were stuttering thunder, coming at a rate that frightened a man - they were an awe inspiring sight, galloping through the red haze - knee to knee and horse to horse - the dying sun glinting on bayonet points..." Trooper Ion Idriess
The Australian Light Horse Studies Centre aims to present an accurate history as chroniclers of early Australian military developments from 1899 to 1920.
The Australian Light Horse Studies Centre site holds over 12,000 entries and is growing daily.
Contact:Australian Light Horse Studies CentreLet us hear your story:
You can tell your story, make a comment or ask for help on our Australian Light Horse Studies Centre Forum called:
The Nek, Turkey, August 7, 1915, Outline Topic: BatzG - Nek
The Nek
Turkey, 7 August 1915
Outline
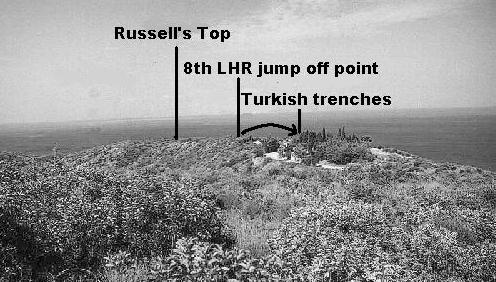
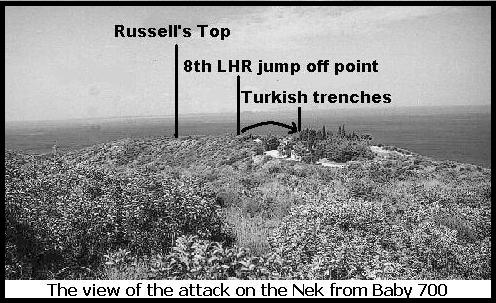
Scene from Baby 700 to Russell's Top illustrating the Nek from the Ottoman point of view.
The Nek, a narrow saddle running east-west between the ridgeline known as Russell's Top and Baby 700 - the strongest position at Anzac (q.v.) - which was the scene of a tragic assault on 7 August 1915 by Australian light horsemen fighting as infantry. Passage over this strip of ground was barred by opposing Turkish and Australian trenches, which faced each other at distances varying from 20 to 60 metres; the edges of both firing lines fell away at each side to the valley floor 150 metres below. Rebind the Turkish front-line, moreover, were right more trenches rising in tiers to the Summit of Baby 700, so that annihilating lire could be brought to bear upon any movement not just from rifles but no fewer than five groups of machine-guns.
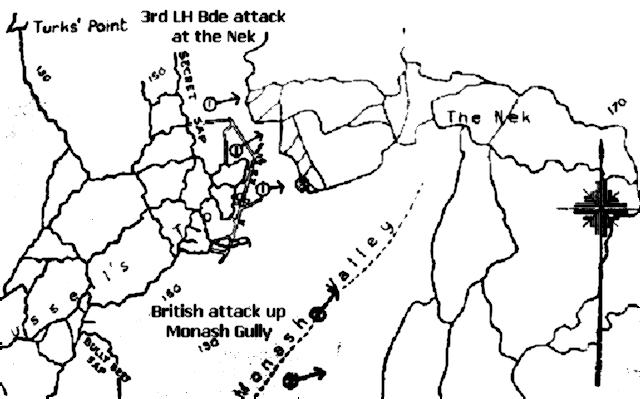
The direction of the charge at the Nek, 7 August 1915.
In ordering a feint to be launched here at dawn the day after Lone Pine (q.v.), aimed at ensuring that Turkish attention continued to he focused on the main Anzac position rather than on activities underway further north (see Hill 971), British commanders were not unmindful of the futility of attacking 'unaided'. The assault was therefore planned to proceed only after supporting movements had taken place, designed to silence some of the enemy machine-guns or draw off fire while the attack went in. In the event, these other operations either failed or were delayed, so that at the time designated for the attempt the 3rd Light Horse Brigade received no relief from any of them.
To make matters worse, an intense artillery barrage that was to begin half an hour before the troops attacked at 4.30 a.m. was mistimed due to the synchronisation of watches having been overlooked. The barrage ended seven minutes earlier than expected, and the Turks were given ample opportunity to recover and re-occupy their parapets. Accordingly, when the first assault line of 150 men rose to the attack-the ground being so narrow that there was no room for more-most fell dead or wounded before they had covered ten metres under the withering fire directed at them. Three more waves were sent forward at intervals and each met the same fate. Since no-one in the later assault lines can have doubted the outcome, there were poignant scenes as men farewelled each other while they waited for the order to attack.
By 5.15 a.m. some 300 men of the 8th and 10th Light Horse regiments lay in a huddled mass within an area no larger than a tennis court. In the words of the Official History:
At first here and there a man raised his arm to the sky, or tried to drink from his water bottle. But as the sun of that burning day climbed higher, such movement ceased. Over the whole summit the figures lay still in the quivering heat.
At most, the bold display by the light horsemen at the Nek may have impeded for a few hours - but did not prevent - the transfer of Turkish reinforcements towards Chunuk Bair, where the New Zealanders were also engaged in a desperate struggle.
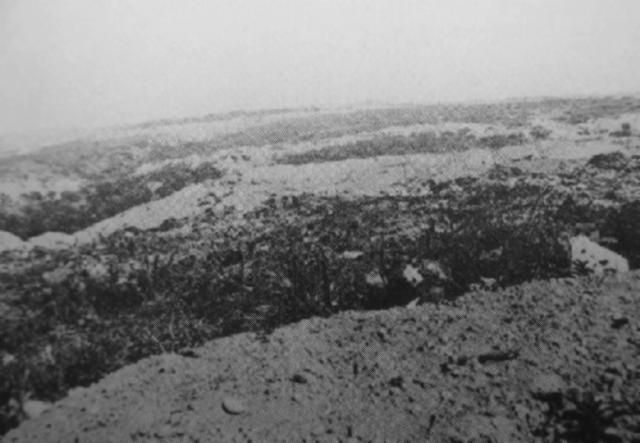
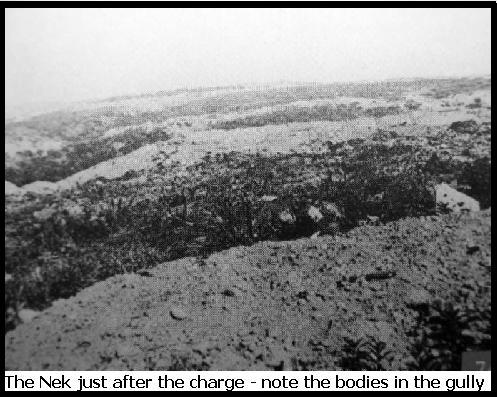
Picture taken from Russell Top trenches overlooking the Nek soon after the charge.
Extracted from the book produced by Chris Coulthard-Clark, Where Australians Fought - The Encyclopaedia of Australia's Battles, Allen and Unwin, Sydney, 1998, pp. 108-109.
Additional References cited by Chris Coulthard-Clark:
C.E.W. Bean, (1924), The Story of Anzac, Vol. 2 , Sydney: Angus & Robertson.
Peter Burness, (1996), The Nek, Kenthurst, NSW: Kangaroo Press
The Nek, Gallipoli, 7 August 1915, The Chronology Topic: BatzG - Nek
The Nek
Gallipoli, 7 August 1915
The Chronology
The Chronology
4.23 - the "joke" of a bombardment ends.
4.28 - Turks clearly seen manning the parapets of the trenches and machine gun ranged.
4.29 – The men in the first line already know they are in for a tough time.
4.30 – The whistle blows and 150 men of the 8th Light Horse Regiment, led by Colonel White, climb out of the trenches and charge across the Nek.
4.35 – 150 men lay dead or wounded within 30 metres of the trench. Three men made it to the Turkish trench only to die there. An observer spots a location flag in Turkish trenches and reports this to Antill. The whistle blows and a further 150 men climb out of their trench.
4.40 – 150 more men lay dead or wounded. Colonel Brazier, commander of the 10th Light Horse Regiment argues with Antill about sending the next line out. Antill orders Brazier to send out the third line.
4.45 - Trooper Harold Rush, 10th Light Horse Regiment, says to his friend as both men shake hands: “Goodbye Cobber. God bless you." He died a minute later.
The whistle blows and a 150 men from the 10th Light Horse Regiment climb out of their trench.
4.50 – 150 more men lay dead, wounded or pretending to be dead.
5.15 - The 4th line of the attack is called off but some troops misunderstand this direction and charge.
5.20 – 234 dead and wounded from the 8th LHR and 138 from the 10th LHR lay on the blood soaked ground of the Nek. Any movement of the wounded men brought Turkish machine gun fire to bear on the person. Some of the wounded were able to crawl back into the trenches. Others who had been lucky and not injured made their way as best as possible. For the rest, their lot was a miserable day in the sun without any hope of relief until the evening.
Three nations participated in the charge at the Nek on that early morning of 7 August 1915, and so those who died, deserve recognition. This list is as comprehensive as possible. It contains the names of the men who died as a consequence of that action at the Nek, either on the day or subsequently from wounds. The roll is based upon an extensive search of Australian, British and Turkish records. Much to my regret British and Turkish records do not contain the level of information available to Australian records and thus can only be included where possible to identify the individual.
We have an obligation to see the commonality of suffering experienced by all men that day, all the sons who lay in the soil. The following list aims to fulfil that aspiration by placing on equal footing all who died during that terrible slaughter at the Nek.
This is a historic document which acknowledges the common sacrifice of the Australians along with the British and the Ottoman Turks, all of whom gave their lives at the Nek.
They shall not grow old as we that are left grow old; Age shall not weary them, nor the years condemn. At the going down of the sun and in the morning We will remember them.
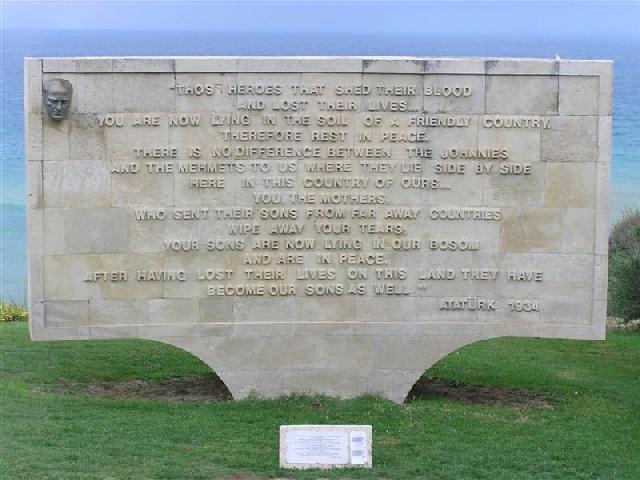
After all the rancour died down, in an effort to promote reconcilliation, in 1934 Atatürk wrote:
Those heroes that shed their blood and lost their lives... You are now lying in the soil of a friendly country. Therefore rest in peace. There is no difference between the Johnnies and the Mehmets to us where they lie side by side now here in this country of ours... you, the mothers, who sent their sons from faraway countries wipe away your tears; your sons are now lying in our bosom and are in peace. After having lost their lives on this land. They have become our sons as well.
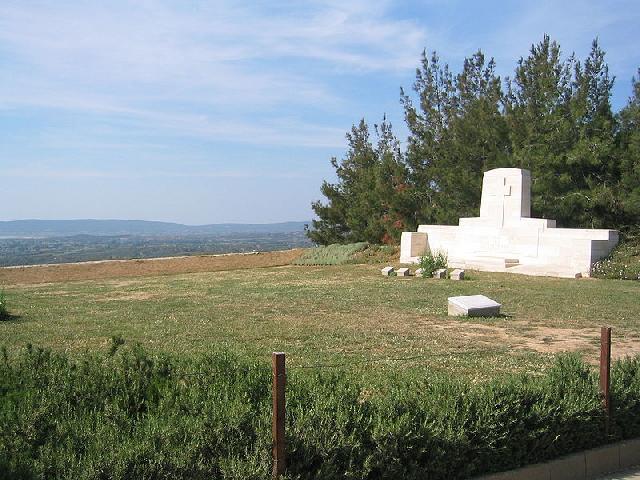
The words are immortalised upon a wall specially constructed to preserve this sentiment.
The Nek, Gallipoli, 7 August 1915, The First Charge at the Nek, 30 June 1915 Topic: BatzG - Nek
The Nek
Gallipoli, 7 August 1915
The First Charge at the Nek, 30 June 1915
The melancholy drum beat of mechanised death was a lesson being learned by the Turks at the urging of their German officers who stuck to the idea that dense masses of men charging win the day. One didn’t have to go back far in history to see that these ideas became redundant during the first mechanised war of the century, the Russo-Japanese War of 1904-5. On the two main sieges, the Russians lost 10,000 men to Japan’s 50,000 men at Port Arthur while at Mukden the combatants lost 20,000 and 70,000 killed or wounded respectively. If that was too far back in history, the lessons of the Marne where the dense masses were just mown down by machine guns was still to filter through to the Turks. It would take many more wholesale slaughters of Turkish soldiers for the Turkish commanders and their German advisers to learn that those leading the assault on a position were going to suffer casualties in the ratio of 5:1 against the defenders. The 3rd LH Bde was in an excellent position to deliver that lesson although strangely enough also ignore what they taught.
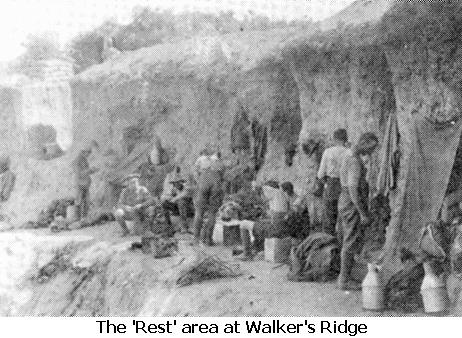
On Saturday, 19 June 1915 the rest camp was over for the 9th LHR. Grudgingly they trudged their way up from Reserve Gully to Walker’s Ridge. Over the rest of the afternoon, small groups filtered into the trenches and relieved AMR.
The Regiment that entered the trenches for a second time was a mere shadow of the healthy young men of a month before. They were now debilitated by high work demands, little sleep and poor diet. Flies and dysentery followed the men sending many to the field ambulance very sick. Increasing numbers were taken to Lemnos sick with every sort of illness stemming primarily from poor nutrition and exhaustion.
Those who arrived in the trenches slept little during the day while in the evenings worked on fatigue parties. Another fortnight of over exhaustion faced the troops. Combat fatigued men often become careless and lose their sense of danger. This is when cease to undertake practices that keep them safe but instead do silly things that prove fatal.
Pte Henry Blanch from Birchip, Victoria eschewed his basic training while cleaning his rifle on Sunday, 20 June 1915. He forgot to fully check the barrel by moving the bolt vigorously in and out and thus remove the bullet from up the spout. Consequently, he accidentally shot himself in the head. While this was seen by his mates as just bad luck, for the purposes of records, his death was recorded as “Killed in action”, a euphemism that covered any number of strange deaths. By doing so it allowed his mother to collect on his life insurance policy and a small pension of £52 per year till her death, a tiny reward for the loss of her son under terrible circumstances.
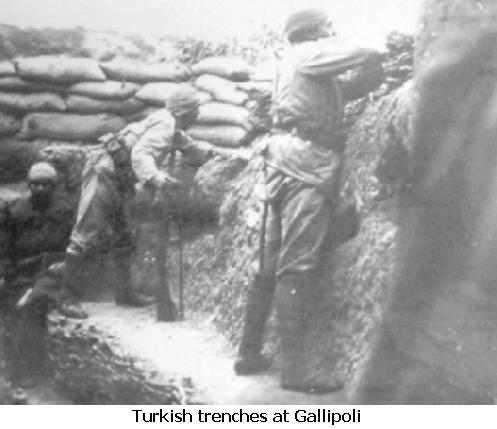
While Birdwood was planning a breakout from Anzac, the Turks were preparing for their offensive. Both sides feverishly made plans independent of each other. Occasionally these preparations collided. The Turks had the jump on the Australians in terms of the advanced nature of their preparations. Turkish trenches were extended and greatly fortified while the 9th LHR was relieved from the trenches.
The last couple weeks also saw the Turks bring more artillery into position. To keep the Australians off balance and in a state of stress and fatigue, the Turks shelled the positions held by the 3rd Light Horse Brigade continuously throughout the next week. The shelling did little damage but it did keep the anxiety levels up. On Monday, 21 June 1915, the Turks introduced a new and bigger, 10-inch high explosive shell. The first time they heard the tremendous whine of the shell coming over, few realised what it was until it detonated. It was massive. The men christened the shell “Jack Johnson” after the world famous, champion heavy weight boxer with a similar punch. Some had even seen Jack Johnson win the World Heavyweight Title in Sydney on 26 December 1908, when he Tommy Burns. While the shelling caused a great deal of discomfort to the men through the sheer terror of it dropping on them, the real physical damage caused was minimal. It definitely tossed up clods of earth and so destroyed many meals and cups of tea, the latter being the most desired beverage in an otherwise bland diet so it was well and truly upsetting to lose a cuppa.
The continuous shelling eventually had corrosive effect desired by the Turks. Nerves were fraying and the men were showing the effects of the continuous stress of being at the receiving end of these devastating explosives. Finally the men broke.
On Friday, 25 June 1915 the nerves of Pte John Woods appeared to collapse. At 25 years old, Woods he wounded himself accidentally. From the description of the wound, Woods’ rifle was leaning against a trench wall with a bullet in the spout, ready for action. His left forearm was over it, possible holding onto the trench wall. The rifle discharged injuring soft tissue and passing cleanly through the arm. The damage was extensive and his use of the arm limited for many years. The action earned him a quick trip to Australia and a discharge on a permanent half pension. The truth of the incident will never be known. The scandal of the self injury had to be avoided as it would impact adversely upon the army propaganda coming out of Gallipoli and recruiting efforts.
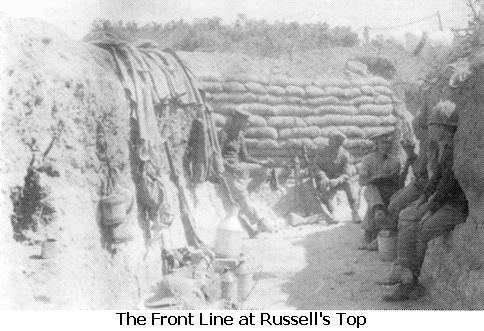
During this period of continuous bombardment by the Turks, the men of the 9th LHR were given orders by General Russell to excavate a Secret Sap. The purpose of the sap was to serve as a surprise redoubt from which to launch an attack on Chunuk Bair, the key to the Gallipoli Peninsular from Anzac. Consequently this task was one of the key objectives within the plan devised by Colonel Skeen for an Anzac breakout from the stalemate presented by the current trench warfare everyone experienced. Back in the heady day of 25 April, a weak Australian force had captured Chunuk Bair by 6.30am and called out for reinforcements. Opposing the Australians on that part of Anzac was Lieutenant Colonel Mustafa Kemal who recognised the significance of the situation. He rounded up all the troops he could and attacked the force on Chunuk Bair. Just before the attack Kemal gave this famous speech: “I do not expect you to attack, I order you to die. In the time which passes until we die other troops and commanders can come forward and take our places.” With the cries of “Allah”, they charged onto the Australians and by sheer numbers like and avalanche, overwhelmed the position. He won the battle of Gallipoli in that single action. Now Skeen expected the 3rd LH Bde to make good this loss during the anticipated breakout.
The Secret Sap was designed to get close to the Turkish lines so allowing attacking troops to cover only some 15 metres to the enemy trenches. In this way, they would quickly outflank the Turkish defences at the Nek, the only obstacle preventing the Australians reaching Chunuk Bair, or so they believed. The geography of the site allowed an excavation to occur as it was sheltered by a low rising hump that prevented the Turks any vision on that part of the front. The 9th LHR were ordered to use this hump in disguising the construction of the sap. While construction was occurring, the plan to hide any evidence of excavation was to place the soil in sandbags and haul it to the rear of other trenches and build up paradoses. The depth of the sap was to be no more than one metre, small enough to hide a couple troops of men before an attack.
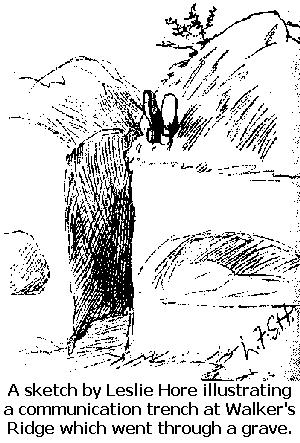
At night the construction began. Men were dragooned into working on this project. It was considered to be one of the worst at Russell’s Top. The reason for this was the fact that the sap passed through a Turkish graveyard filled with bodies from the fighting which occurred over the last month. The Turks only buried their dead deep enough to prevent any garments from flapping in the breeze. This meant that the corpses were only buried very shallow. Each fall of the pick usually brought with it the putrid ooze of a decaying corpse flowing through a hole in the ground creating a hideous puddle of human remains and stench. Trenching spades cut putrescent flesh and snapped bones in an effort to move soil. Each load went into the sandbags, which dripped as they were taken to the rear. Wherever possible, human remains were re-interred at the bottom of any fresh parados.
During the work of excavation, the only way the men were able to withstand the reeking effluvium exposed through their digging was to cover up with gas masks. It made the stench bearable but since it was hot, the men were uncomfortable wearing the masks. To them it was a choice of the lesser evils. Once the Secret Sap had been constructed, an activity that only took a few nights, the men sent there to occupy the position also needed to wear respirators. It was going to take some time for the fetid air to return to a bearable condition. In the meantime, for the men of the 9th LHR, it was like going to hell. Returning from the Secret Sap at the end of duty was a blessing revelled in by all of whom shared the miserable experience.
One sure sign of an upcoming offensive is intense artillery shelling of a position. The Turks were handing out shells on the positions held by the 3rd Light Horse Brigade as though there was no shortage of ammunition. At 6pm on Tuesday, 22 June 1915, the Turks let loose with a bombardment lasting nearly two hours. The bursting shells threw up clumps of dirt, shattered tree stumps, shredded sandbags and scattered kit bags into the air so the men could enjoy the gentle rain from the remaining shards. One shell hit a grave tossing out a couple pulverised occupants unleashing a ferocious stench. The official count was 95 high explosive shells lobbed on the 9th LHR’s trenches on Walker’s Ridge. At the end of the bombardment, the dead men were placed on stretchers, covered with blankets and placed outside the trench for burial. Graves were hard wrought out of the unforgiving soil and scrub but the job was completed by midnight. Three men from the 9th LHR, Pte William James Gribble, Pte Thomas Makin, and Pte Leslie Samuel Wilson, were buried that night. After a quick service for each man, the empty stretchers were taken down to the sea where the stretcher-bearers scrubbed the blood off the canvass in preparation for the next day’s carnage.
Wednesday and Thursday passed with some desultory shelling. On Friday afternoon at about 5.30pm a German aircraft puttered over the hills and when it reached the area around Anzac, began to loiter over the Australian trenches. During the campaign, the Australians christened any German aeroplane a “Taube” regardless of its origin, in honour of the first mass-produced aircraft the Germans employed over their lines at Gallipoli.
The mission of this Taube was to find the Australian trenches, then drop propaganda paper onto them so the Turkish artillery observers could range their guns accurately. This evening produced no joy for the pilot, as the wind was strong from the west, it blew the paper in a pretty trail over to the Turk’s trenches. The artillery had to await another occasion for ranging work.
For those lucky enough to get a piece of propaganda, it offered the soldiers in the front line a continuous banquet at the expense of the Turks provided they wandered over to the Turkish trenches. The language was extravagant and certainly enticing when it richly proclaimed: "Greedy England made you fight under a contract. You may confide in us for excellent treatment. Our country disposes of ample provisions. There is enough to feed you well and make you feel quite at your comfort. Don't further hesitate, come and surrender." The Turkish commanders could only scratch their heads in disbelief that such a generous offer was turned down with derision by the troops in the trenches. One look at the poor condition of the Turks gave cause for the front line troops to be a little suspicious and conclude that the authors of the leaflet might just not be telling the truth.
One truth the men did know was that the flight of the Taube was like the albatross to the sailor, the bearer of ill fortune. Saturday, 26 June 1915, proved to be one of ranging practice for the Turkish artillery as they fired shells at a lethargic pace. The next morning turned out to be the big one. On Sunday morning, 27 June 1915, at 5.15am the Turks opened up with 10 guns aimed at Russell's Top and Walker's Ridge. The symphony of guns included 6" howitzers and French 75's firing from Su Yatagha, a place found immediately to the east of Chunuk Bair, an area christened by Australians as the Sandpits. It was an intense barrage with fifteen shells landing on the 9th LHR’s positions every minute. When the bombardment finished at 7.15am, it was estimated that between 400 to 500 shells were concentrated on an area of about 100 square metres of trench.
The men survived the bombardment by lying on the trench floor. They were covered in dirt from cave-ins and some needed digging out. Miraculously, the 9th LHR suffered only three men wounded despite the intensity of the bombardment. It bore strong testimony to the excellent trenches constructed to protect the men. The only men who did not lay down during the bombardment were those brave few whose job was to keep looking over the trenches with the periscopes. It was an extremely dangerous job, but necessary, since bombardments like this usually became preludes to charges. The attack didn’t come that morning. It gave the men of the 8th LHR time to bury their dead and take the wounded to the Field Ambulance. They suffered far worse casualties than the 9th LHR that morning.
After the Turks, it was the Australian’s turn to fire. The observation posts of the 9th LHR noticed that just before sunrise the Turkish reliefs for the front line used a well-camouflaged communication’s trench. The weak point was discovered. There was a small tree near a low point of the trench that could only be seen at dawn. It screened the Turks as they moved forward. By aiming at the tree, some 200 metres away, there existed a strong possibility that the bullets would land in the trench. Just before dawn on Monday, 28 June 1915, twelve men from ‘C’ Squadron put this theory into practice. When the reliefs began to move through the trenches the men opened up with rapid fire often known as the “mad minute”. Then all fell silent.
In a divisional action, at 1pm on Monday, 28 June 1915, every available canon at Anzac was turned on the Turkish trenches and fired continuously for an hour. In addition to the canon fire, the men in the trenches opened fire with their rifles and tossed bombs into the Turkish trenches. This feint was aimed at assisting another British attack at Cape Helles. By giving the impression of an attack being fomented by the Australians, it was hope to draw off any reinforcements that might be on their way to Krithia to defend against the British assault. While it was all thunder and fire from the Australians, what became known as the Battle of Gully Ravine, was just another Hunter-Weston approved slaughter. The British lost some 3,800 casualties but with these lives purchased about a kilometre of coast although gains elsewhere were negligible.
Not to be passive about the shelling, the Turks responded in kind shelling Walkers Ridge with the howitzer and the 75’s from the Sandpit. Again the men tried to burrow as deeply as possible in the trenches. No where in the trenches of dugouts was deep enough. Many men had lucky escapes. But not all. The butcher’s bill for the 9th LHR that afternoon proved to be two killed, Pte Eric Gordon Clark, and Pte John Henry Hildebrand, and four wounded.
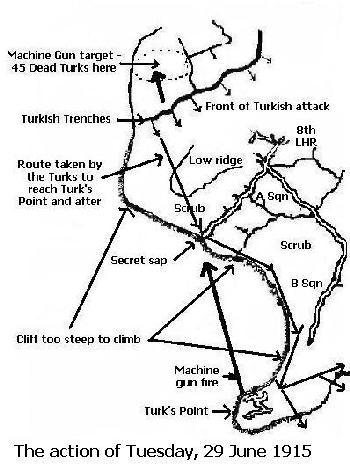
The next morning, Tuesday, 29 June 1915, the Turks went back to a desultory shelling of Walker's Ridge and Mule Gully with the shelling easing off in the afternoon.
This was an ideal time for the 9th LHR to return the favour and intimidate the Turks. The plan was to give the impression that they were about to launch an attack. It succeeded. The skittish Turks opened fire at 9pm with their rifles and canon. To add to the Turks’ confusion, the men in the trenches made a great deal of noise shouting and the like, while shooting off star shells and flares from the front trenches. The Turks kept up their firing for about an hour. Adding to the Turks’ discomfort, during the day it was windy and by 9.30pm it became so gusty that it lifted tremendous amounts of rubbish and dust from Anzac and deposited it on the Turkish trenches. The men in the front lines added to the volume of rubbish being blown over. As the wind blew and the Turks fired, the men in the trenches had a good laugh as they speculated over the discomfort the Turks might have been feeling at that time. At least, they reasoned, they had given the Turks a taste of their own medicine.
But the night was not over. By midnight a large black cloud blanketing the terrain with darkness blotted out any light from the moon. Such darkness made attack easier. The presence of Enver Pasha, the front man of the Young Turk Junta, was visiting the trenches on Chunuk Bair which overlooked the trenches of the 3rd LH Bde at Russell’s Top and Walker’s Ridge. Along with him came 1,200 hand picked Turks from the Sultan's Body Guards. They were tough soldiers who were keen to demonstrate to Enver Pasha that they too could defend the homeland and drive the infidel into the sea. While the Australians did not know any of this at midnight, a few minutes later they were about to feel the consequences of Enver Pasha’s visit which was a guaranteed an attack.
At 12.15am the Turkish artillery opened with a barrage on the trenches at Walker’s Ridge. Poor aim by the Turks meant that the shells overflew the trenches and landed harmlessly behind the men of the 9th LHR as they kept under cover. While the barrage was going on, the men didn’t know this and they just prayed that the shells would not hit them. Mercifully, the shelling lasted for about 20 minutes. The barrage moved on to other targets. As the firing eased off from Walker’s Ridge, it fell upon Quinn's Post and Courtney's Post.
Rifle and machine gun barrage erupted from Baby 700 began at 1am. The volume of fire increased rapidly as the Turks fired upon the trenches occupied by the 8th and 9th Light Horse Regiments. Over the noise of the firing, the men in the trenches at Walker’s Ridge could hear cries of “Allah! Allah!” coming from the Turkish trenches. There was no guessing as to what was about to occur. This was the call the Turks gave in preparation for an attack on the Australian trenches.
Lookouts, undertaking their perilous duty, gazed through their periscopes over the trench parapets and spied movement in front of the Turkish trenches. What the lookouts saw was a horde climbing out of the Turkish trenches. These were men from the Turkish 18th Regiment, which comprised three battalions, each containing a thousand men. Facing the men of the 3rd Light Horse Brigade was the battalion of the Sultan's Body Guards. Men from the battalion filled the communications trenches and front lines, then rose up, walking in open order, towards the trenches held by the ‘C’ Squadron of the 8th LHR. One troop from ‘A’ Squadron of the 9th LHR was immediately rushed into fire bays of the 8th LHR trenches to give additional support.
The officers blew their whistles and as many troops as possible moved onto the firing step and exposed themselves by leaning over the parapet. Others spilled over the back of the trench and so, in effect, created a double firing line. Behind the men on the firing line were helpers who would load empty magazines and pass full ones to those firing so there was no loss in volume of fire concentrated upon the attacking Turks.
Turks rapidly moved forward. Their high level of training and good leadership showed as the advance was quick and well coordinated. It took only minutes attacked some sectors with good leadership.
Quickly, one party of Turks overran Sap No 1 and proceeded to take over part of the trench occupied by ‘A’ Squadron. It took only minutes for Sergeant Harold Sullivan, an orchardist from Blackwood, to organise a counter attack. With the men of his troop he formed a bombing party. Since the trenches zigzagged, the method of clearing them was brutal and close quarters. A man would hurl a bomb around a corner and when it exploded, a couple men would race around the corner shooting with rapid fire.
Because of close quarters, this was designed to knock over anyone still standing. After the fire ceased, another two men behind would undertake a bayonet charge and secure that part of the trench. The bomb thrower would hurl a bomb around the next corner and the men who did the bayonet charge now began rapid fire. In this way, each team would leapfrog off each other and clear a trench of enemy. The danger was at the initial stage of tossing the bomb. If the bomb did not go off immediately, it gave the enemy sufficient time to move around the next corner. When the troops came round the corner for rapid fire, they could quite easily meet up with another enemy team waiting to shoot them down or charge on them with bayonets. The whole operation was fraught with danger for everyone. It was in this manner that the bombing party drove the Turks out of the sap.
Very shortly after 1.30am, a report came through to Reynell that the Secret Sap had been overrun by the Turks. All the men in the trench had successfully escaped except for Pte John Leslie Hopping, a miller from Broken Hill, was the only man in the Secret Sap who didn’t get away. They found his body later. In response, Reynell organised a counter attack from the two communication trenches, which led onto the Secret Sap. When Reynell blew his whistle, the men of ‘A’ Squadron poured through the communication trenches and into the Secret Sap. It was a quick and bloody exchange between bayonet and revolver which resulted ten Turks killed while the rest retreated towards their own trenches. At 1.45am the Secret Sap was secured from the Turks. Reynell ordered 45 men to hold it against any future Turkish attack. The nature of the Secret Sap made this a difficult order to follow. The support troops who moved up to the line found that the fire steps on the parapet were too crowded, so they were forced onto the parados, where they took up defensive positions. The unfortunate thing here was the parados had not been built up in the same manner as the other trenches and thus left the additional troops exposed to Turkish fire.
The Turkish attack ended at 1.50am and soon the firing died down. It was a relief to everyone. The adrenalin that had kept the men alert now flowed out and the men relaxed. There might be another attack but for the moment, it was time for a break and to smoke a pipe and chat about the experience.
Ten minutes later, much to everyone’s surprise, a platoon of about 40 Turks suddenly appeared near Turk's Point threatening the Machine Gun positions. Apparently they were from the company that attacked the Secret Sap. This platoon had been detached and passed through to outflank the Australian positions. Due to the heavy fighting, they had not been seen by anyone until they emerged from the scrub at Turk’s Point. At that moment, the men in the Turkish platoon did not know that the Secret Sap had been retaken nor that they were trapped.
The Turk’s location as they approached Turk’s Point made it impossible for the two machine guns to be of any use in the defence of the position. When the Turks finally attacked, they almost captured the machine guns. Sergeant Clifford William Ashburner, an ex-boxer originally from South Africa, was unarmed when he saw a Turk heading for a machine gun. Ashburner picked up a rifle and fired as the Turk was beginning to turn the machine gun. At point blank range the Turk was thrown off the machine gun. Ashburner grabbed the machine gun while kicking the dying Turk out of the way. He turned the machine gun on the attacking Turks and began to fire. The Turks quickly disappeared.
Since no one had any idea of the Turk’s strength, half of ‘C’ Squadron was sent out by Reynell to defend Turk’s Point. By 2.10am, Turk’s Point was fully manned and ready for any renewed Turkish onslaught. It never came. Curiously, at 2.10am, the Latrine Gully Cossack post sent a message to Reynell that they had captured a Turk. More alarming news came in from another Cossack post to the effect that there were a great number of enemy soldiers within their vicinity. Captain Wieck, the Regimental Adjutant was the only officer not engaged in the fighting. He pulled together Regimental headquarters staff – clerks, batmen and cooks - and set off with this odd collection to reinforce the Cossack posts. These positions were to guard against Turkish access to the Anzac artillery and more specifically a 6-inch howitzer. The Turks were not heard any more from the men at the newly reinforced Cossack posts.
Twenty minutes later, at 2.30am, without any warning, the Turks mounted another attack on the trenches. This time the men of the 9th LHR were ready and waiting. The clouds had cleared and the moon shone brightly to illuminate the Turks as silhouettes on the horizon. Kirwan flares, fabricated from pieces of hemp dipped in kerosene and thrown from the trench by hand assisted in illuminating the skyline presenting good targets for the machine gunners laying down enfilading fire. In addition to this the men in the Secret Sap fired directly on the unsuspecting Turks and the assault was ended before the Turks reached the 9th LHR trenches.
One Turkish officer observing the attack described these flares as: "What appeared to be balls of fire were thrown out by the "English" and these, it seemed lay burning in the rear of the attackers, preventing both them from returning and others from reinforcing them."
Firing died down by 3.30am but the Turks had not finished with their night’s work. In an attempt to replicate a good Australian trick, the Turks began jiggling straw dummies over the parapets of their trenches in an attempt to suggest that a new attack was emerging and so draw fire. It was a pointless exercise as the men from the 9th LHR recognised the ploy for what it was – after all, they had done this many times themselves. The only thing it draw was howls of derisive comments and wry laughter.
After the action, Reynell, together with an interpreter, crawled through the Secret Sap. It was a grisly task, as they had to crawl over many bodies of Turkish soldiers. There was no escaping the close and personal glimpse of the Turkish faces as they lay in all the hideous and contorted poses reflecting their agonising deaths. When they reached the end of the sap, the interpreter called out an invitation to any of the Turks who were injured or playing dead. The Turks were urged to surrender with the promise of good medical care if injured and protection if not. Since the Australians had a good reputation amongst the Turks of caring for their prisoners and were not known to perpetrate any deliberate cruelty, the Turks had little hesitation in responding to the call. Within minutes of the invitation, Turks slowly began to crawl into the Australian lines. Some injured were given assistance. Unsurprisingly they were relieved to be alive and out of the terrible war.
One Armenian who had his own amazing adventure, had a difficult time surrendering. During the height of the firing, he shouted out in impeccable English: “Please stop firing! I want to come in!” Initially the men suspected a trick and kept firing. A couple more calls and the men stopped shooting. The Turkish soldier crawled up to the parapet and was pulled over into the trench. His excellent English was as a consequence of his education at the American Mission in Constantinople. After explaining that he had enough of the war he went on and clarified why the attack took place. It seems as though Enver Pasha had come from Constantinople especially to see the attack that would push the Australians into the sea. He had an even more immediate story to tell. Taking Miell in tow, the Armenian went to the 9th LHR trench that overlooked a Turkish communication trench and stated that a couple days before ten men were killed at that place. Included in the casualties was their Colonel. This of course was the place where the men fired at the tree on the morning of Saturday, 26 June 1915. Now they had confirmation that their plan succeeded beyond all expectations.
During the daylight hours of 30 June 1915 there was no gunfire. The silence was overwhelming to the men. The Turkish snipers were absent so men could carry on activities which ordinarily they would have invited death. Taking advantage of this beak, the men slept. Regardless of their location, they just dropped on the ground and slept while a few guards kept watch over them, ever alert to call the alarm. However, despite the alert, there were no more attacks that day. Indeed, the Turkish offensive seemed to have petered out.
In the washup, the number of Turks killed over the frontage of the 1st and 3rd Light Horse Brigades was in the many hundreds. Due to this great number, the Turks sought an armistice in the same manner as occurred on 24 May 1915, to bury their dead. The Generals at Anzac turned the approach down flat. John Faulkner of the 8th LHR reported the event, when a letter of his appeared in the Wimmera paper of October 1915. In the letter Faulkner details the reasons for the denial when he says: "The Turks asked us for an Armistice to bury the dead, but their request was refused as the previous Armistice (on May 24th) had been violated. Instead of just burying their dead, the Turks had sneakily brought up stores and shifted guns etc. during the lull in the fighting. Apart from that one incident, as far as I can see, the Turks always fought fairly."
Antill was pessimistic when he undertook his analysis of the battle. He recognised the courage of the men under his command in the Brigade. He had no doubts about their ability. He lets his frustration come to the fore in the summary of the 3rd Light Horse Brigade’s action when he said: “Men behaved excellently in this there first serious fight and were very cool doing good work. Fire was received until the last. Machine Guns did nothing, positions being unfavourably placed and we got no assistance whatever all night from any of our own artillery. Regiments are depleted and hard worked.”
His comments about the machine guns understated the enfilading fire that occurred as a consequence of Ashburner’s team at Turk’s Point. They made a real impact on the Turkish attack. Antill recognised this by appointing Ashburner as the machine gun training officer. It was the other machine gun positions of the 9th and 8th LHR that needed relaying to be more effective than they were during the battle.
This scathing commentary of the artillery boded ill for the future. They had to fight off the attack without any artillery assistance. The 3rd LH Bde was entitled to a battery for its own employment and yet Godley released none to help. This occurred despite pleas from Antill. The lack of cooperation weighed heavily on the mind of Antill when he was asked to assist in producing a local plan for the expected breakout. The failure of artillery support was to be a key factor in all Gallipoli battles and so haunt Antill in his preparations.
In the meantime, it was the troops in the front line trenches who suffered the consequence of these decisions. No armistice meant more corruption, stench and flies to add to the already considerable load they carried. No artillery meant an added burden. Soon Death’s hand would place more bodies upon the ragged field that comprised the Nek.
The Australian Light Horse Studies Centre is a not for profit and non profit group whose sole aim is to write the early history of the Australian Light Horse from 1900
- 1920. It is privately funded and the information is provided by the individuals within the group and while permission for the use of the material has been given for this
site for these items by various donors, the residual and actual copyright for these items, should there be any, resides exclusively with the donors. The information on
this site is freely available for private research use only and if used as such, should be appropriately acknowledged. To assist in this process, each item has a citation
attached at the bottom for referencing purposes.
Please Note: No express or implied permission is given for commercial use of the information contained within this site.
A note to copyright holders
The Australian Light Horse Studies Centre has made every endeavour to contact copyright holders of material digitised for this blog and website and where
appropriate, permission is still being sought for these items. Where replies were not received, or where the copyright owner has not been able to be traced, or where
the permission is still being sought, the Australian Light Horse Studies Centre has decided, in good faith, to proceed with digitisation and publication. Australian Light
Horse Studies Centre would be happy to hear from copyright owners at any time to discuss usage of this item.