


Topic: BW - WA - 1WAMI
1st WAMI
1st West Australian Mounted Infantry
Outline
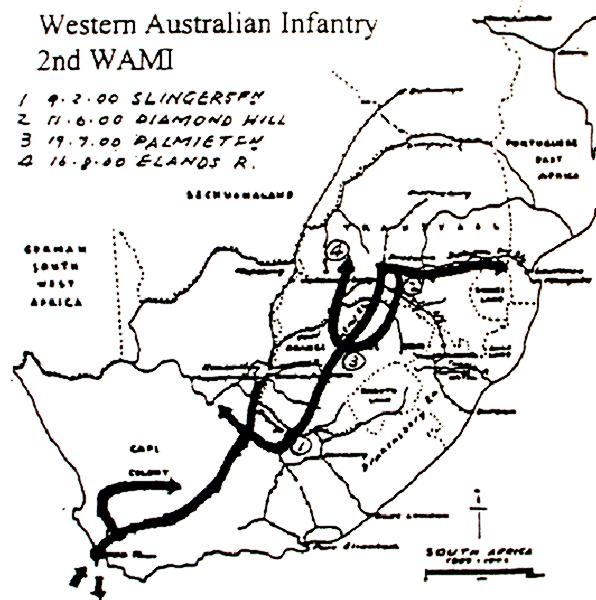
Map illustrating the activities of the 1st Western Australian Mounted Infantry in South Africa, 1902.
[From: Chamberlain, M., The Australians in the South African War 1899-1902, Canberra, 1999.]
In 1911, Lieutenant-Colonel P. L. Murray, produced a marvellous Boer War reference detailing all the contingents sent from Australia to South Africa, giving a brief history of the formation and finally, listing all the soldiers who saw service in South Africa with that unit. The book was called, Official Records of the Australian Military Contingents to the War in South Africa. It is now the standard reference and starting place for any person interested in pursuing information about Australian involvement in the Boer War.
Murray, P. L., Official Records of the Australian Military Contingents to the War in South Africa, pp. 396 - 398.
First Mounted Infantry Contingent.
In the Western Australian Government Gazette of 13th October, 1899, appeared a notification that His Excellency the Governor in Council had been pleased to sanction the formation of a Company of Infantry, with an establishment of 1 captain, 3 lieutenants, and 125 other ranks, for service with Her Majesty's Imperial Forces in South Africa. The period of engagement to be for one year, but this was subsequently extended (Western Australian Government Gazette, 19th October, 1900). Men between the ages of 20 and 30 were qualified for enlistment. There was a Machine Gun Section.
Pay.
For officers, upon the same scale as in other States; for Warrant Officers, N.C.O.'s, and men, as follows:- Company Sergeant-Major, 9s. per diem ; Sergeants 8s.. Corporals, 7s.; paid Lance-Corporals' 5s.; privates and buglers, 4s. 6d.; 2s.6d. per diem to be retained as deferred pay and handed over on completion of engagement, but forfeited in case of desertion or dismissal for misconduct, and for every day on which actual pay was forfeited.
It was stipulated also that pay and allowances were to be considered as in full; and that any payments made by the Imperial Government to members of the Contingent for service in South Africa, would be deducted there from.
Clothing and Equipment
Uniform consisted of khaki drill jacket (2), drill trousers (3), F.S. hat, and forage-cap (Glengarry). Greatcoat, ankle-boots, and blue Guernsey were also provided, together with the following kit - 1 tin blacking, 1 pair braces, I set brushes, 1 button-holder, comb, knife, fork, and spoon, holdall, clasp-knife and lanyard, canvas kit-bag, razor and case, 3 flannel shirts, 3 pairs woollen socks, 1 piece soap, sponge, 2 towels.
Arms and equipment. - M.L.E. rifle and bayonet, infantry valise equipment and entrenching tools.
Regimental transport was provided.
Departure and Return
The Contingent went away on 7th November, 1899, consisting of 5 officers, 125 others, with 17 horses, 2 maxim guns, I spring-cart, and 2 wagons. Two officers, 4 others, died or were killed; 4 were struck off in South Africa; 5 officers, 115 others, returned to Australia. Two promotions from ranks.
Promotions, Etc.
Captain H. G. Moor, promoted Major, 14th October, 1899.
Lieutenant F. M. W. Parker, promoted Captain, let January, 1901. Lieutenant H. F. Darling, promoted Captain, 5th Contingent, 11th December, 1900.
Lieutenant J. Campbell, Captain, 11th December, 1900; to 6th Contingent, 8th March, 1901.
Major G. F. McWilliams (Medical Staff), promoted Lieut: Colonel, 12th December, 1900.
Sergeant A. J. B. Brown, promoted Lieutenant, 22nd April, 1900. Captain, 5th Contingent, 25th June, 1901.
Sergeant G. G. W. Hensman, Lieutenant, 1st January, 1900.
Lance-Corporal A. E. Malay, became Lieutenant (6th Contingent), 8th March, 1901.
Lance-Corporal J. F. Messer, Lieutenant, 5th Contingent, 11th December,
1800.
Private N. Sherard, commissioned Lieutenant, 6th Contingent, 11th December,
1800.
Private F. W. Bell, commissioned Lieutenant, 6th Contingent, 8th March, 1901.
Private G. A. Mons, commissioned Lieutenant, 6th Contingent, 21st August
1901.
For promotions of N.C.O.'s and men, vide nominal roll.
Service.
The Contingent left Albany on the 7th November, 1899, in the transport Medic, together with Victorian, South Australian, and Tasmanian units, and arrived at Cape Town on 27th November. These companies were there formed into "The Australian Regiment," and were joined subsequently by a Company from New South Wales. On lot December, the Regiment entrained for De Aar to join the Kimberley Relief Force; and were employed on the lines of communication between De Aar and Modder River. On let February, 1900, the Western Australian Company was converted into Mounted Infantry at Naauwpoort, as were also the others.
For details of service between November, 1898, and April, 1800, when the Regiment was broken up, vide let Victorian Contingent, under “Australian Regiment." Reference may be directed to General Order, 10th February, 1804, quoted therein, with regard to the gallant defence of a kopje at Slingersfontein (afterwards known as “West Australian Hill") by Captain Moor, with Lieutenants Darling and Hensman, 2 sergeants, and 23 rank and file, against 300 or 400 of the enemy. Mention should be made of Private Krygger's gallantry. After Lieutenant Hensman had fallen mortally wounded, this soldier, under very heavy fire, endeavoured to build a sangar or wall round his officer, as a screen.
Subsequently the lot Western Australians participated in operations in the Transvaal, Orange Free State, and Cape Colony, including actions at Johannesburg, Pretoria, Diamond Hill, Wittebergen, Vet River, Zand River, Waterval Onder, and Colesberg, and many skirmishes. They were with General Clements' Column (as part of the Australian Regiment) ; with Major-General Hutton's Column on advance from Bloemfontein to occupation of Pretoria ; and with Colonel De Lisle's Column, from capture of Pretoria to departure from South Africa.
" At Diamond Rill, 12th June, 1900, the New South Wales Mounted Rifles were ordered to support the 6th Mounted Infantry battalion, and the lot Western Australian Mounted Infantry were held in reserve. About 2 p.m. the advance began, under cover of the pom-pom fire, which was directed on the Boar gun. As soon as De Lisle saw that the battalion had gained a footing on the hill, he brought the pom-poms under shelter of the wall of Rhenosterfontein Farm, at a range of 1,400 yards, and let go the New South Wales Mounted Rifles. Leaving their horses under cover of the dead ground, the Australians came on to the attack in column of troops, the men being opened out at intervals of 30 yards, with 50 yards distance between troops. Extended in this way, the 350 men of the corps created the appearance of a much larger force, and as they swarmed over the crest of the hill with fixed bayonets, the Boers, without waiting for the attack, retired to a second position, some 1,200 yards away. Darkness was just closing over Diamond Hill when the Boers beyond opened a furious fusillade all down the line ; the 2nd Coldstream (;}wards responded with equal energy. The sound as of a few do joie was beard over the whole field. But this was the end; far the English had captured the key of the Boer position." - Times History of the War.
On the 27th June, a post on the railway near Roodeval station was attacked, but the enemy were repulsed by a detachment of the Shropshire Light Infantry with the 1st Western Australian Mounted Infantry, with the aid of a 15-pr. gun on an armoured train.
Ridley's Mounted Infantry Brigade, including the let Western Australians, formed part of the force which Sir Archibald Hunter led into the north-east Orange River Colony, with a view of surrounding, if possible, the enemy under De Wet, and Prinsloo, in the Wittebergen, or Brandwater Basin, as the district was more generally called. On the night of the 15th July, De Wet, with about 1,600 men and some guns, escaped from Slabbert's Nek. General Broadwood, with the 2nd Cavalry Brigade and Ridley's Mounted Infantry, were sent in pursuit. The Boars succeeded in cutting the railway line. On 22nd July, General Knox, at Kroonstad, wired to the General in Command, Central Transvaal, the following from General Broadwood, sent by despatch-rider to Honingspruit, and telegraphed from there to Lord Kitchener:-"Have followed commando since 16th July. Had sharp fight at Palmietfontein on 19th July; prevented from pursuing by darkness. Eight dead Boers found. Our casualties-Billed, Major Moor, Western Australian Mounted Infantry, and four men ; wounded-Lieutenant Stanley, 10th Hussars, Lieutenant Tooth, Australian Contingent, and fourteen men." Major Moor's death was a heavy loss to the 1st Western Australians. His fine leadership had brought his corps into great prominence, considering their small number. There were, besides him, one killed, six wounded.
In the fighting at Stinkhoutboom, 24th July, there were several casualties. At the relief of Colonel Hore at Eland's River, 16th August, the first troops to ride in and receive the thanks of the garrison were De Lisle's Western Australians, here scouting in front of Lord Kitchener's force, which comprised six regiments of regular cavalry. De Lisle's corps reached Pretoria on 28th August, and were thereafter employed in the Central Transvaal. At Waterval Onder, 3rd September, Lieutenant Darling and four men were wounded. On the 15th October, the 1st Western Australians were inspected by Lord Roberts in Pretoria, and were complimented on their work.
On 13th December, 1900, the Contingent left Cape Town in the transport Orient, and arrived at Albany on the 29th. Disbanded on 29th March, 1901.
War Services and Honours.
Moor, Major H. G. (Captain, Royal Artillery). - Served in Rhodesian Campaign, 1897. Medal. Operations and actions in Transvaal and Orange Free State. Killed in action, 19th July, 1900.
Parker, Captain F. M. W. - Operations in Transvaal, Orange Free State and Cape Colony, between December, 1899, and December, 1900. Actions at Johannesburg, Pretoria, Diamond Hill, Vet River, Zand River, and Colesberg, Despatches, London Gazette, 19th April, 1901, D.S.O. Queen's Medal with four clasps.
Darling, Lieutenant H. F. - Operations and actions as stated, and in Natal. Slightly wounded, 3rd September, 1900. Subsequently promoted Captain and appointed to the command of the 5th Contingent, 11th December, 1900. Operations in Eastern Transvaal, including actions at Belfast and Rhenoster Kop. Despatches, London Gazette, 16th April, 1901, and 29th July, 1902. D.S.O. Queen's Medal with four clasps.
Campbell, Lieutenant J. - Operations and actions as stated. Commanded Maxim Gun Section. Promoted Captain, and appointed to command of 6th Contingent, 8th March, 1901. Operations in Eastern Transvaal, Mentioned in Commander-in-Chief's despatches, 8th July, 1901. Queen's Medal with four clasps.
Further Reading:
1st West Australian Mounted Infantry
1st West Australian Mounted Infantry, Roll of Honour
Battles where Australians fought, 1899-1920
Citation: 1st West Australian Mounted Infantry, Outline
