« April 2003 »
S M T W T F S
1 2 3 4 5
6 7 8 9 10 11 12
13 14 15 16 17 18 19
20 21 22 23 24 25 26
27 28 29 30
You are not logged in. Log in


Search the site:


powered by FreeFind
Volunteer with us.

Entries by Topic All topics  
A Latest Site News
A - Using the Site
AAA Volunteers
AAB-Education Centre
AAC-Film Clips
AAC-Photo Albums
AIF & MEF & EEF
AIF - Lighthorse
AIF - ALH - A to Z
AIF - DMC
AIF - DMC - Or Bat
AIF - DMC - Anzac MD
AIF - DMC - Aus MD
AIF - DMC - British
AIF - DMC - BWI
AIF - DMC - French
AIF - DMC - Indian
AIF - DMC - Italian
AIF - DMC - Medical
AIF - DMC - Remounts
AIF - DMC - Scouts
AIF - DMC - Sigs
AIF - DMC - Sigs AirlnS
AIF - DMC - 1 Sig Sqn
AIF - DMC - 2 Sig Sqn
AIF - DMC - Eng
AIF - DMC - Eng 1FSE
AIF - DMC - Eng 2FSE
AIF - DMC - GSR
AIF - 1B - 1 LHB
AIF - 1B - 6 MVS
AIF - 1B - 1 LHMGS
AIF - 1B - 1 Sig Trp
AIF - 1B - 1 LHFA
AIF - 1B - 1 LHR
AIF - 1B - 2 LHR
AIF - 1B - 3 LHR
AIF - 2B - 2 LHB
AIF - 2B - 7 MVS
AIF - 2B - 2 LHFA
AIF - 2B - 2 LHMGS
AIF - 2B - 2 Sig Trp
AIF - 2B - 5 LHR
AIF - 2B - 6 LHR
AIF - 2B - 7 LHR
AIF - 3B - 3 LHB
AIF - 3B - 8 MVS
AIF - 3B - 3 LHB Sigs
AIF - 3B - 3 LHFA
AIF - 3B - 3 LHMGS
AIF - 3B - 3 Sig Trp
AIF - 3B - 8 LHR
AIF - 3B - 9 LHR
AIF - 3B - 10 LHR
AIF - 4B - 4 LHB
AIF - 4B - 4 Sig Trp
AIF - 4B - 9 MVS
AIF - 4B - 4 LHFA
AIF - 4B - 4 LHMGS
AIF - 4B - 4 LHR
AIF - 4B - 11 LHR
AIF - 4B - 12 LHR
AIF - 5B - 5 LHB
AIF - 5B - 10 MVS
AIF - 5B - 5 LHFA
AIF - 5B - 5 Sig Trp
AIF - 5B - ICC
AIF - 5B - 14 LHR
AIF - 5B - 15 LHR
AIF - 5B - 1er Regt
AIF - 5B - 2 NZMGS
AIF - AASC
AIF - Aboriginal LH
AIF - Badges
AIF - Cars
AIF - Chinese LH
AIF - Double Sqns
AIF - Engineers
AIF - Fr - 22 Corps
AIF - Fr - 13 LHR
AIF - Honour Roll
AIF - HQ - 3rd Echelon
AIF - Marching Songs
AIF - Misc Topics
AIF - NZMRB
AIF - NZMRB - AMR
AIF - NZMRB - CMR
AIF - NZMRB - EFT
AIF - NZMRB - NZMFA
AIF - NZMRB - NZMGS
AIF - NZMRB - OMR
AIF - NZMRB - Sig-Trp
AIF - NZMRB - WMR
AIF - Ships
AIF - Ships - Encountr
AIF - Ships - Una
AIF - WFF
AIF - Wireless Sqn
Battles
BatzA - Australia
BatzA - Broken Hill
BatzA - Liverpool
BatzA - Merivale
BatzB - Boer War
BatzB - Bakenlaagte
BatzB - Belmont
BatzB - Bothaville
BatzB - Buffels Hoek
BatzB - Coetzees Drift
BatzB - Diamond Hill
BatzB - Driefontein
BatzB - Elands
BatzB - Graspan
BatzB - Grobelaar
BatzB - Grootvallier
BatzB - Hartebestfontn
BatzB - Houtnek
BatzB - Karee Siding
BatzB - Kimberley
BatzB - Koster River
BatzB - Leeuw Kop
BatzB - Mafeking
BatzB - Magersfontein
BatzB - Modder River
BatzB - Onverwacht
BatzB - Paardeberg
BatzB - Palmietfontein
BatzB - Pink Hill
BatzB - Poplar Grove
BatzB - Rhenoster
BatzB - Sannahs Post
BatzB - Slingersfontn
BatzB - Stinkhoutbm
BatzB - Sunnyside
BatzB - Wilmansrust
BatzB - Wolvekuil
BatzB - Zand River
BatzG - Gallipoli
BatzG - Anzac
BatzG - Aug 1915
BatzG - Baby 700
BatzG - Evacuation
BatzG - Hill 60
BatzG - Hill 971
BatzG - Krithia
BatzG - Lone Pine
BatzG - Nek
BatzJ - Jordan Valley
BatzJ - 1st Amman
BatzJ - 2nd Amman
BatzJ - Abu Tellul
BatzJ - Es Salt
BatzJ - JV Maps
BatzJ - Ziza
BatzM - Mespot
BatzM - Baghdad
BatzM - Ctesiphon
BatzM - Daur
BatzM - Kurna
BatzM - Kut el Amara
BatzM - Ramadi
BatzN - Naval
BatzN - AE1
BatzN - Cocos Is
BatzN - Heligoland
BatzN - Marmara
BatzN - Zeebrugge
BatzN - Zeppelin L43
BatzNG - Bitapaka
BatzO - Other
BatzO - Baku
BatzO - Egypt 1919
BatzO - Emptsa
BatzO - Karawaran
BatzO - Peitang
BatzO - Wassa
BatzP - Palestine
BatzP - 1st Gaza
BatzP - 2nd Gaza
BatzP - 3rd Gaza
BatzP - Aleppo
BatzP - Amwas
BatzP - Ayun Kara
BatzP - Bald Hill
BatzP - Balin
BatzP - Beersheba
BatzP - Berkusieh
BatzP - Damascus
BatzP - El Auja
BatzP - El Buggar
BatzP - El Burj
BatzP - Haifa
BatzP - Huj
BatzP - JB Yakub
BatzP - Kaukab
BatzP - Khan Kusseir
BatzP - Khuweilfe
BatzP - Kuneitra
BatzP - Megiddo
BatzP - Nablus
BatzP - Rafa
BatzP - Sasa
BatzP - Semakh
BatzP - Sheria
BatzP - Surafend
BatzP - Wadi Fara
BatzS - Sinai
BatzS - Bir el Abd
BatzS - El Arish
BatzS - El Mazar
BatzS - El Qatiya
BatzS - Jifjafa
BatzS - Magdhaba
BatzS - Maghara
BatzS - Romani
BatzS - Suez 1915
BatzSe - Senussi
BatzWF - Westn Front
BW - Boer War
BW - NSW
BW - NSW - 1ACH
BW - NSW - 1NSWMR
BW - NSW - 2NSWMR
BW - NSW - 3ACH
BW - NSW - 3NSWIB
BW - NSW - 3NSWMR
BW - NSW - 5ACH
BW - NSW - A Bty RAA
BW - NSW - AAMC
BW - NSW - Aust H
BW - NSW - Lancers
BW - NSW - NSW Inf
BW - NSW - NSWCBC
BW - NSW - NSWIB
BW - NSW - NSWMR_A
BW - NZ
BW - Qld
BW - Qld - 1ACH
BW - Qld - 1QMI
BW - Qld - 2QMI
BW - Qld - 3ACH
BW - Qld - 3QMI
BW - Qld - 4QIB
BW - Qld - 5QIB
BW - Qld - 6QIB
BW - Qld - 7ACH
BW - QLD - AAMC
BW - SA
BW - SA - 1SAMR
BW - SA - 2ACH
BW - SA - 2SAMR
BW - SA - 3SACB
BW - SA - 4ACH
BW - SA - 4SAIB
BW - SA - 5SAIB
BW - SA - 6SAIB
BW - SA - 8ACH
BW - SA - AAMC
BW - Tas
BW - Tas - 1ACH
BW - Tas - 1TIB
BW - Tas - 1TMI
BW - Tas - 2TB
BW - Tas - 2TIB
BW - Tas - 3ACH
BW - Tas - 8ACH
BW - Vic
BW - Vic - 1VMI
BW - Vic - 2ACH
BW - Vic - 2VMR
BW - Vic - 3VB
BW - Vic - 4ACH
BW - Vic - 4VIB
BW - Vic - 5VMR
BW - Vic - 6ACH
BW - Vic - AAMC
BW - Vic - Scot H
BW - WA
BW - WA - 1WAMI
BW - WA - 2ACH
BW - WA - 2WAMI
BW - WA - 3WAB
BW - WA - 4ACH
BW - WA - 4WAMI
BW - WA - 5WAMI
BW - WA - 6WAMI
BW - WA - 8ACH
BW Gen - Campaign
BW Gen - Soldiers
BW General
Cavalry - General
Diary - Schramm
Egypt - Heliopolis
Egypt - Mena
Gen - Ataturk Pk, CNB
Gen - Australia
Gen - Legends
Gen - Query Club
Gen - St - NSW
Gen - St - Qld
Gen - St - SA
Gen - St - Tas
Gen - St - Vic
Gen - St - WA
Gm - German Items
Gm - Bk - 605 MGC
GW - 11 Nov 1918
GW - Atrocities
GW - August 1914
GW - Biographies
GW - Propaganda
GW - Spies
GW - We forgot
Militia 1899-1920
Militia - Area Officers
Militia - Inf - Infantry
Militia - Inf - 1IB
Militia - Inf - 2IB
Militia - Inf - 3IB
Militia - Inf - NSW
Militia - Inf - Qld
Militia - Inf - SA
Militia - Inf - Tas
Militia - Inf - Vic
Militia - Inf - WA
Militia - K.E.Horse
Militia - LH
Militia - LH - Regts
Militia - LH - 1LHB
Militia - LH - 2LHB
Militia - LH - 3LHB
Militia - LH - 4LHB
Militia - LH - 5LHB
Militia - LH - 6LHB
Militia - LHN - NSW
Militia - LHN - 1/7/1
Militia - LHN - 2/9/6
Militia - LHN - 3/11/7
Militia - LHN - 4/6/16
Militia - LHN - 5/4/15
Militia - LHN - 6/5/12
Militia - LHN - 28
Militia - LHQ - Qld
Militia - LHQ - 13/2
Militia - LHQ - 14/3/11
Militia - LHQ - 15/1/5
Militia - LHQ - 27/14
Militia - LHS - SA
Militia - LHS - 16/22/3
Militia - LHS - 17/23/18
Militia - LHS - 24/9
Militia - LHT - Tas
Militia - LHT - 12/26
Militia - LHV - Vic
Militia - LHV - 7/15/20
Militia - LHV - 8/16/8
Militia - LHV - 9/19
Militia - LHV - 10/13
Militia - LHV - 11/20/4
Militia - LHV - 19/17
Militia - LHV - 29
Militia - LHW - WA
Militia - LHW-18/25/10
Militia - Military Orders
Militia - Misc
MilitiaRC - Rifle Clubs
MilitiaRC - NSW
MilitiaRC - NT
MilitiaRC - Qld
MilitiaRC - SA
MilitiaRC - Tas
MilitiaRC - Vic
MilitiaRC - WA
Militiaz - New Zealand
Tk - Turkish Items
Tk - Army
Tk - Bks - Books
Tk - Bks - 1/33IR
Tk - Bks - 27th IR
Tk - Bks - Air Force
Tk - Bks - Yildirim
Tk - POWs
Wp - Weapons
Wp - Hotchkiss Cav
Wp - Hotchkiss PMG
Blog Tools
Edit your Blog
Build a Blog
RSS Feed
View Profile
Open Community
Post to this Blog
Site Index
Education Centre
LH Militia
Boer War
Transport Ships
LH Battles
ALH - Units
ALH - General
Aboriginal Light H
Weapons
Ottoman Sources

"At a mile distant their thousand hooves were stuttering thunder, coming at a rate that frightened a man - they were an awe inspiring sight, galloping through the red haze - knee to knee and horse to horse - the dying sun glinting on bayonet points..." Trooper Ion Idriess

The Australian Light Horse Studies Centre aims to present an accurate history as chroniclers of early Australian military developments from 1899 to 1920.

The Australian Light Horse Studies Centre site holds over 12,000 entries and is growing daily.

Contact: Australian Light Horse Studies Centre

Let us hear your story: You can tell your story, make a comment or ask for help on our Australian Light Horse Studies Centre Forum called:

Desert Column Forum

WARNING: This site contains: names, information and images of deceased people; and, language which may be considered inappropriate today.

Sunday, 20 April 2003
2nd West Australian Mounted Infantry, Outline
Topic: BW - WA - 2WAMI

2nd WAMI

2nd West Australian Mounted Infantry

Outline


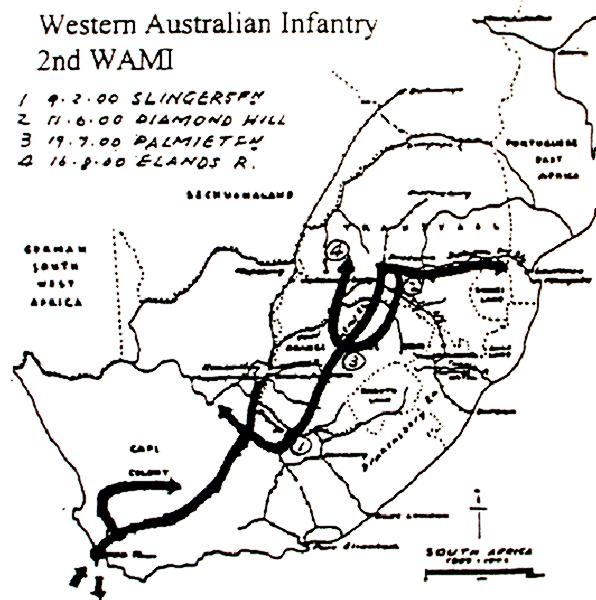
Map illustrating the activities of the 2nd Western Australian Mounted Infantry in South Africa, 1900 - 1901.

[From: Chamberlain, M., The Australians in the South African War 1899-1902, Canberra, 1999.]


In 1911, Lieutenant-Colonel P. L. Murray, produced a marvellous Boer War reference detailing all the contingents sent from Australia to South Africa, giving a brief history of the formation and finally, listing all the soldiers who saw service in South Africa with that unit. The book was called, Official Records of the Australian Military Contingents to the War in South Africa. It is now the standard reference and starting place for any person interested in pursuing information about Australian involvement in the Boer War.

Murray, P. L., Official Records of the Australian Military Contingents to the War in South Africa, pp. 403 - 404.


Second Mounted Infantry Contingent.

On 20th December, 1899, the formation of a second Company of Mounted Infantry for service in the war, was sanctioned by the Western Australian Government. Period of engagement, one year, but subsequently extended (Western Australian Government Gazette, 8th March, 1901). Establishment -One captain, 3 subalterns, and 50 other ranks. Clothing, kit, etc.., as before, but adapted to mounted men ; also rates of pay, except that there was an addition of staff sergeants, 10s. per diem, and warrant officers, 11s. 6d. per diem. It was further notified that pensions to widows of officers and warrant officers, and compassionate allowance to their children, pensions for wounded, etc., would be such as might be considered and allowed by the Imperial Government from Imperial funds ; and that officers, warrant officers, N.C.O.'s, and privates had no claim on the Western Australian Government in such respect.

An increase in the establishment to 125 of all ranks was sanctioned on 8th January, 1900. Men between the ages of 20 and 34 were qualified for enlistment.


Departure and Return.

The Company departed on 3rd February, 1900, comprising - 8 officers and 97 others, with 125 horses, 1 spring cart, and 1 wagon. Five officers, 21 others, were struck off in South Africa; 5 officers, 72 others, returned to Australia. (Four officers promoted from ranks.)


Promotions, Etc

Captain H. L. Pilkington to Major, 21st December, 1899; to Lieut.-Colonel, (local in South Africa), 15th August, 1900.

Lieutenant R. T. McMasters, to Captain, 10th March, 1900.

Lieutenant S. Harris, to Captain (local in South Africa), lot March, 1900.

Lieutenant S. A. Oliver, to Lieutenant, lot March, 1900; to Captain, 25th. February, 1901. Joined South African Constabulary, 12th April, 1901.

Lieutenant L. D. P. Potter, Sergeant, ___; Lieutenant, 1st March, 1900. Joined South African Constabulary.

Sergeant A. H. Barclay, to Lieutenant, 29th May, 1900.

Sergeant J. S. Duffy, to Lieutenant, 25th March, 1901.

Corporal P. C. Collins obtained a Lieutenancy in South African Constabulary, 7th March, 1901.
Corporal J. A. Bullock, promoted Lieutenant, Bush Veldt Carbineers, 7th March, 1901.

Private C. W. Williams, to Lieutenant, 11th December, 1900; served in 5th Contingent.

Private S. S. Reid, to Lieutenant, 8th March, 1901; served in 6th Contingent.

Quartermaster-Sergeant G. St. G. R. Beresford became Lieutenant, 8th Australian Commonwealth Horse, 5th May, 1902.

Private R. D. W. Esdaile became Lieutenant, 4th Australian Commonwealth Horse.

For promotions of N.C.O.'s and men, vide nominal roll.


Service.

This Contingent embarked in the transport Surrey on 3rd February, 1900, at Fremantle, and arrived at Cape Town on the 24th. They proceeded to the Prieska district in March, and were amongst the troops engaged in dealing with an organized disaffection. The rising having been put down, some of the Western Australian force continued to operate in that district during part of April.

The 2nd Western Australians were with General Pole-Carew's Column from the advance from Bloemfontein to the engagement at Belfast ; and with Colonel De Lisle's Column after engagement at Belfast during the remainder of their term. It is rather difficult in some respects to disassociate their service from that of the 1st.

The Company arrived at Bloemfontein in time to take part in the advance to Pretoria in May. At Bloemfontein they were attached to General Pole-Carew's 11th Division, in which they served from let May to the end of October, with the exception of a few weeks about the end of June and beginning of July, when they were detached to assist on the lines of communication in the Orange River Colony, The 2nd were in action at Brandfort, 3rd May ; Vet River, 4th; Zand River. 9th and 10th; Vaal, 26th; Johannesburg, 28th, 29th, 30th ; 6-Mile S raft, 4th June ; Silverton, 8th ; Diamond Bill, 11th and 12th June ; and Belt, 27th August.

The Westralians were heavily engaged at Diamond Hill. In his telegram of the 16th June, Lord Roberts said. said. --" Botha's army has retired, believed to MiddeIburg. His rearguard was surprised and thoroughly routed by Ian Hamilton's Mounted Infantry, chiefly Western Australians, and the 6th Battalion."

On the 16th July, a party of the 2nd Western Australians at Pienaar's Pont, on the left of General Pole-Carew's position east of Pretoria, successfully repelled a Boer attack.

The 2nd took part, under General Pole-Carew, in the advance from Pretoria to Komati Poort, starting about the 23rd July. They had fighting in the Belfast district on 27th August, and frequently thereafter. In his telegram of 13th September, Lord Roberts remarked that the Western Australian had been seeming in front of Pole-Carew's Division. They were said to have been the first to discover much railway material and other valuable stores near the Poort. They were present at a review on a large scale held there on 28th September. After their stay in that neighbourhood, they were employed about Machadodorp, where they suffered some casualties throughout October.

On the 7th November the Company left Cape Town in the transport Woolloomooloo, and arrived, on the 8th December, at Fremantle. Disbanded on 7th March, 1901.

Note:- Although the bulk of the Company left as stated, some remained and were employed in Cape Colony, assisting to drive out the invaders. At Klipplaat, on 5th February, 1901, Lieutenant Oliver had been sent in command of a small force of twelve of the 7th Dragoon Guards, twelve Western Australians, and three Cape police, to carry despatches from Colonel Haig to another leader. The little party was surprised by several hundred of the enemy. They kept up a steady fire, as occasion served, from 11 a.m. until sundown, but eventually were all overpowered. Four dragoons were killed, and Lieutenant Oliver and several others wounded.

The last of the Contingent appear to have steamed for Australia, under Lieutenant Duffy, on 31st March.


Further Reading:

2nd West Australian Mounted Infantry

Boer War, 1899 - 1902

Battles where Australians fought, 1899-1920


Citation: 2nd West Australian Mounted Infantry, Outline

Posted by Project Leader at 12:01 AM EADT
Updated: Sunday, 2 May 2010 4:51 PM EADT

View Latest Entries

Full Site Index


powered by FreeFind
Let us hear your story: You can tell your story, make a comment or ask for help on our forum.

Desert Column Forum

A note on copyright

The Australian Light Horse Studies Centre is a not for profit and non profit group whose sole aim is to write the early history of the Australian Light Horse from 1900 - 1920. It is privately funded and the information is provided by the individuals within the group and while permission for the use of the material has been given for this site for these items by various donors, the residual and actual copyright for these items, should there be any, resides exclusively with the donors. The information on this site is freely available for private research use only and if used as such, should be appropriately acknowledged. To assist in this process, each item has a citation attached at the bottom for referencing purposes.

Please Note: No express or implied permission is given for commercial use of the information contained within this site.

A note to copyright holders

The Australian Light Horse Studies Centre has made every endeavour to contact copyright holders of material digitised for this blog and website and where appropriate, permission is still being sought for these items. Where replies were not received, or where the copyright owner has not been able to be traced, or where the permission is still being sought, the Australian Light Horse Studies Centre has decided, in good faith, to proceed with digitisation and publication. Australian Light Horse Studies Centre would be happy to hear from copyright owners at any time to discuss usage of this item.

Contact

Australian Light Horse Studies Centre

eXTReMe Tracker