« September 2009 »
S M T W T F S
1 2 3 4 5
6 7 8 9 10 11 12
13 14 15 16 17 18 19
20 21 22 23 24 25 26
27 28 29 30
You are not logged in. Log in


Search the site:


powered by FreeFind
Volunteer with us.

Entries by Topic All topics  
A Latest Site News
A - Using the Site
AAA Volunteers
AAB-Education Centre
AAC-Film Clips
AAC-Photo Albums
AIF & MEF & EEF
AIF - Lighthorse
AIF - ALH - A to Z
AIF - DMC
AIF - DMC - Or Bat
AIF - DMC - Anzac MD
AIF - DMC - Aus MD
AIF - DMC - British
AIF - DMC - BWI
AIF - DMC - French
AIF - DMC - Indian
AIF - DMC - Italian
AIF - DMC - Medical
AIF - DMC - Remounts
AIF - DMC - Scouts
AIF - DMC - Sigs
AIF - DMC - Sigs AirlnS
AIF - DMC - 1 Sig Sqn
AIF - DMC - 2 Sig Sqn
AIF - DMC - Eng
AIF - DMC - Eng 1FSE
AIF - DMC - Eng 2FSE
AIF - DMC - GSR
AIF - 1B - 1 LHB
AIF - 1B - 6 MVS
AIF - 1B - 1 LHMGS
AIF - 1B - 1 Sig Trp
AIF - 1B - 1 LHFA
AIF - 1B - 1 LHR
AIF - 1B - 2 LHR
AIF - 1B - 3 LHR
AIF - 2B - 2 LHB
AIF - 2B - 7 MVS
AIF - 2B - 2 LHFA
AIF - 2B - 2 LHMGS
AIF - 2B - 2 Sig Trp
AIF - 2B - 5 LHR
AIF - 2B - 6 LHR
AIF - 2B - 7 LHR
AIF - 3B - 3 LHB
AIF - 3B - 8 MVS
AIF - 3B - 3 LHB Sigs
AIF - 3B - 3 LHFA
AIF - 3B - 3 LHMGS
AIF - 3B - 3 Sig Trp
AIF - 3B - 8 LHR
AIF - 3B - 9 LHR
AIF - 3B - 10 LHR
AIF - 4B - 4 LHB
AIF - 4B - 4 Sig Trp
AIF - 4B - 9 MVS
AIF - 4B - 4 LHFA
AIF - 4B - 4 LHMGS
AIF - 4B - 4 LHR
AIF - 4B - 11 LHR
AIF - 4B - 12 LHR
AIF - 5B - 5 LHB
AIF - 5B - 10 MVS
AIF - 5B - 5 LHFA
AIF - 5B - 5 Sig Trp
AIF - 5B - ICC
AIF - 5B - 14 LHR
AIF - 5B - 15 LHR
AIF - 5B - 1er Regt
AIF - 5B - 2 NZMGS
AIF - AASC
AIF - Aboriginal LH
AIF - Badges
AIF - Cars
AIF - Chinese LH
AIF - Double Sqns
AIF - Engineers
AIF - Fr - 22 Corps
AIF - Fr - 13 LHR
AIF - Honour Roll
AIF - HQ - 3rd Echelon
AIF - Marching Songs
AIF - Misc Topics
AIF - NZMRB
AIF - NZMRB - AMR
AIF - NZMRB - CMR
AIF - NZMRB - EFT
AIF - NZMRB - NZMFA
AIF - NZMRB - NZMGS
AIF - NZMRB - OMR
AIF - NZMRB - Sig-Trp
AIF - NZMRB - WMR
AIF - Ships
AIF - Ships - Encountr
AIF - Ships - Una
AIF - WFF
AIF - Wireless Sqn
Battles
BatzA - Australia
BatzA - Broken Hill
BatzA - Liverpool
BatzA - Merivale
BatzB - Boer War
BatzB - Bakenlaagte
BatzB - Belmont
BatzB - Bothaville
BatzB - Buffels Hoek
BatzB - Coetzees Drift
BatzB - Diamond Hill
BatzB - Driefontein
BatzB - Elands
BatzB - Graspan
BatzB - Grobelaar
BatzB - Grootvallier
BatzB - Hartebestfontn
BatzB - Houtnek
BatzB - Karee Siding
BatzB - Kimberley
BatzB - Koster River
BatzB - Leeuw Kop
BatzB - Mafeking
BatzB - Magersfontein
BatzB - Modder River
BatzB - Onverwacht
BatzB - Paardeberg
BatzB - Palmietfontein
BatzB - Pink Hill
BatzB - Poplar Grove
BatzB - Rhenoster
BatzB - Sannahs Post
BatzB - Slingersfontn
BatzB - Stinkhoutbm
BatzB - Sunnyside
BatzB - Wilmansrust
BatzB - Wolvekuil
BatzB - Zand River
BatzG - Gallipoli
BatzG - Anzac
BatzG - Aug 1915
BatzG - Baby 700
BatzG - Evacuation
BatzG - Hill 60
BatzG - Hill 971
BatzG - Krithia
BatzG - Lone Pine
BatzG - Nek
BatzJ - Jordan Valley
BatzJ - 1st Amman
BatzJ - 2nd Amman
BatzJ - Abu Tellul
BatzJ - Es Salt
BatzJ - JV Maps
BatzJ - Ziza
BatzM - Mespot
BatzM - Baghdad
BatzM - Ctesiphon
BatzM - Daur
BatzM - Kurna
BatzM - Kut el Amara
BatzM - Ramadi
BatzN - Naval
BatzN - AE1
BatzN - Cocos Is
BatzN - Heligoland
BatzN - Marmara
BatzN - Zeebrugge
BatzN - Zeppelin L43
BatzNG - Bitapaka
BatzO - Other
BatzO - Baku
BatzO - Egypt 1919
BatzO - Emptsa
BatzO - Karawaran
BatzO - Peitang
BatzO - Wassa
BatzP - Palestine
BatzP - 1st Gaza
BatzP - 2nd Gaza
BatzP - 3rd Gaza
BatzP - Aleppo
BatzP - Amwas
BatzP - Ayun Kara
BatzP - Bald Hill
BatzP - Balin
BatzP - Beersheba
BatzP - Berkusieh
BatzP - Damascus
BatzP - El Auja
BatzP - El Buggar
BatzP - El Burj
BatzP - Haifa
BatzP - Huj
BatzP - JB Yakub
BatzP - Kaukab
BatzP - Khan Kusseir
BatzP - Khuweilfe
BatzP - Kuneitra
BatzP - Megiddo
BatzP - Nablus
BatzP - Rafa
BatzP - Sasa
BatzP - Semakh
BatzP - Sheria
BatzP - Surafend
BatzP - Wadi Fara
BatzS - Sinai
BatzS - Bir el Abd
BatzS - El Arish
BatzS - El Mazar
BatzS - El Qatiya
BatzS - Jifjafa
BatzS - Magdhaba
BatzS - Maghara
BatzS - Romani
BatzS - Suez 1915
BatzSe - Senussi
BatzWF - Westn Front
BW - Boer War
BW - NSW
BW - NSW - 1ACH
BW - NSW - 1NSWMR
BW - NSW - 2NSWMR
BW - NSW - 3ACH
BW - NSW - 3NSWIB
BW - NSW - 3NSWMR
BW - NSW - 5ACH
BW - NSW - A Bty RAA
BW - NSW - AAMC
BW - NSW - Aust H
BW - NSW - Lancers
BW - NSW - NSW Inf
BW - NSW - NSWCBC
BW - NSW - NSWIB
BW - NSW - NSWMR_A
BW - NZ
BW - Qld
BW - Qld - 1ACH
BW - Qld - 1QMI
BW - Qld - 2QMI
BW - Qld - 3ACH
BW - Qld - 3QMI
BW - Qld - 4QIB
BW - Qld - 5QIB
BW - Qld - 6QIB
BW - Qld - 7ACH
BW - QLD - AAMC
BW - SA
BW - SA - 1SAMR
BW - SA - 2ACH
BW - SA - 2SAMR
BW - SA - 3SACB
BW - SA - 4ACH
BW - SA - 4SAIB
BW - SA - 5SAIB
BW - SA - 6SAIB
BW - SA - 8ACH
BW - SA - AAMC
BW - Tas
BW - Tas - 1ACH
BW - Tas - 1TIB
BW - Tas - 1TMI
BW - Tas - 2TB
BW - Tas - 2TIB
BW - Tas - 3ACH
BW - Tas - 8ACH
BW - Vic
BW - Vic - 1VMI
BW - Vic - 2ACH
BW - Vic - 2VMR
BW - Vic - 3VB
BW - Vic - 4ACH
BW - Vic - 4VIB
BW - Vic - 5VMR
BW - Vic - 6ACH
BW - Vic - AAMC
BW - Vic - Scot H
BW - WA
BW - WA - 1WAMI
BW - WA - 2ACH
BW - WA - 2WAMI
BW - WA - 3WAB
BW - WA - 4ACH
BW - WA - 4WAMI
BW - WA - 5WAMI
BW - WA - 6WAMI
BW - WA - 8ACH
BW Gen - Campaign
BW Gen - Soldiers
BW General
Cavalry - General
Diary - Schramm
Egypt - Heliopolis
Egypt - Mena
Gen - Ataturk Pk, CNB
Gen - Australia
Gen - Legends
Gen - Query Club
Gen - St - NSW
Gen - St - Qld
Gen - St - SA
Gen - St - Tas
Gen - St - Vic
Gen - St - WA
Gm - German Items
Gm - Bk - 605 MGC
GW - 11 Nov 1918
GW - Atrocities
GW - August 1914
GW - Biographies
GW - Propaganda
GW - Spies
GW - We forgot
Militia 1899-1920
Militia - Area Officers
Militia - Inf - Infantry
Militia - Inf - 1IB
Militia - Inf - 2IB
Militia - Inf - 3IB
Militia - Inf - NSW
Militia - Inf - Qld
Militia - Inf - SA
Militia - Inf - Tas
Militia - Inf - Vic
Militia - Inf - WA
Militia - K.E.Horse
Militia - LH
Militia - LH - Regts
Militia - LH - 1LHB
Militia - LH - 2LHB
Militia - LH - 3LHB
Militia - LH - 4LHB
Militia - LH - 5LHB
Militia - LH - 6LHB
Militia - LHN - NSW
Militia - LHN - 1/7/1
Militia - LHN - 2/9/6
Militia - LHN - 3/11/7
Militia - LHN - 4/6/16
Militia - LHN - 5/4/15
Militia - LHN - 6/5/12
Militia - LHN - 28
Militia - LHQ - Qld
Militia - LHQ - 13/2
Militia - LHQ - 14/3/11
Militia - LHQ - 15/1/5
Militia - LHQ - 27/14
Militia - LHS - SA
Militia - LHS - 16/22/3
Militia - LHS - 17/23/18
Militia - LHS - 24/9
Militia - LHT - Tas
Militia - LHT - 12/26
Militia - LHV - Vic
Militia - LHV - 7/15/20
Militia - LHV - 8/16/8
Militia - LHV - 9/19
Militia - LHV - 10/13
Militia - LHV - 11/20/4
Militia - LHV - 19/17
Militia - LHV - 29
Militia - LHW - WA
Militia - LHW-18/25/10
Militia - Military Orders
Militia - Misc
MilitiaRC - Rifle Clubs
MilitiaRC - NSW
MilitiaRC - NT
MilitiaRC - Qld
MilitiaRC - SA
MilitiaRC - Tas
MilitiaRC - Vic
MilitiaRC - WA
Militiaz - New Zealand
Tk - Turkish Items
Tk - Army
Tk - Bks - Books
Tk - Bks - 1/33IR
Tk - Bks - 27th IR
Tk - Bks - Air Force
Tk - Bks - Yildirim
Tk - POWs
Wp - Weapons
Wp - Hotchkiss Cav
Wp - Hotchkiss PMG
Blog Tools
Edit your Blog
Build a Blog
RSS Feed
View Profile
Open Community
Post to this Blog
Site Index
Education Centre
LH Militia
Boer War
Transport Ships
LH Battles
ALH - Units
ALH - General
Aboriginal Light H
Weapons
Ottoman Sources

"At a mile distant their thousand hooves were stuttering thunder, coming at a rate that frightened a man - they were an awe inspiring sight, galloping through the red haze - knee to knee and horse to horse - the dying sun glinting on bayonet points..." Trooper Ion Idriess

The Australian Light Horse Studies Centre aims to present an accurate history as chroniclers of early Australian military developments from 1899 to 1920.

The Australian Light Horse Studies Centre site holds over 12,000 entries and is growing daily.

Contact: Australian Light Horse Studies Centre

Let us hear your story: You can tell your story, make a comment or ask for help on our Australian Light Horse Studies Centre Forum called:

Desert Column Forum

WARNING: This site contains: names, information and images of deceased people; and, language which may be considered inappropriate today.

Wednesday, 9 September 2009
Wellington Mounted Rifles, NZMRB, Outline
Topic: AIF - NZMRB - WMR

WMR Regiment

Wellington Mounted Rifles Regiment

Outline


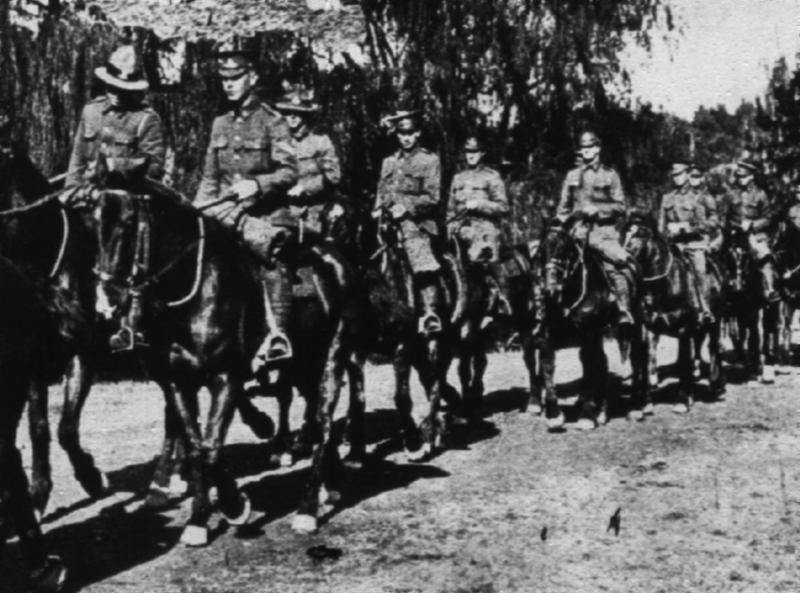
Wellington Mounted Rifles marching at Awapuni Camp, Palmerston North, September 1914.

[From: Auckland Weely News, 1 October 1914, p. 45.]


Formation


Wellington Mounted Rifles Squadron Recruitment Catchment Areas

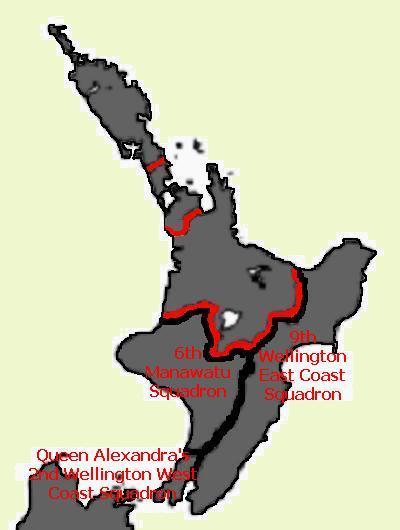
The Wellington Mounted Rifles utilised the Volunteer Territorial structure to recruit members into the three squadrons gazetted as establishment in August 1914.  Below is a listing of the three squadrons inclusive of the distinguishing squadron badge.


Queen Alexandra's 2nd Wellington West Coast Squadron

Badge for the Queen Alexandra's 2nd Wellington West Coast Regiment

The anticedents for the Queen Alexandra's 2nd Wellington West Coast Regiment stretched further back than 1914. The district surrounding Wellington provided a volunteer force for many decades. Men from these formations served during the Boer War while afterwards, during the reorganisation of 1 October 1900, two new Territorial battalions were formed. In 1906, the name battalion was replaced by Regiment. The Queen Alexandra's 2nd Wellington West Coast Regiment as a Territorial Volunteer formation came into being on 17 March 1911 when the New Zealand compulsory military training program commenced. The Queen Alexandra's 2nd Wellington West Coast Squadron was recruited from the same Territorial region which included the Wellington metropolitan area and the region immediately adjacent to the city.


6th Manawatu Squadron

Badge for the 6th Manawatu Regiment

The 6th Manawatu Regiment as a Territorial Volunteer formation came into being on 17 March 1911 when the New Zealand compulsory military training program commenced. After the outbreak of the Great War the 6th Manawatu Squadron was recruited from the same Territorial region region north and west of Wellington.


9th Wellington East Coast Squadron


Badge for the 9th Wellington East Coast Regiment

The 9th Wellington East Coast Regiment as a Territorial Volunteer formation came into being on 17 March 1911 when the New Zealand compulsory military training program commenced. After the outbreak of the Great War the 9th Wellington East Coast Squadron was recruited from the same Territorial region which included the region north and east of Wellington.


Machine Gun Section

The Machine Gun Section was drawn from recruits over the entirety of the Wellington Mounted Rifles catchment area.


Embarkation

The original Wellington Mounted Rifles embarked to Egypt on 16 October 1914.

  • HMNZT 10 Arawa - Headquarters Staff, 2nd Squadron (less one troop), and Machine-gun Section.
  • HMNZT 4 Tahiti - 6th Squadron (less one troop).
  • HMNZT 6 Orari - 9th Squadron (one troop each, 2nd and 6th Squadrons) and all the horses of the Regiment.

In Egypt additional training occurred at Maadi Camp.


Gallipoli

As mounted troops, the New Zealand Mounted Rifles were considered to be unsuitable for work in Gallipoli. The mounted troops volunteered to operate as infantry and thus were sent to Gallipoli with the Wellington Mounted Rifles landing on 12 May 1915. Only once was this regiment used for offensive activities which occurred during the two attacks on Hill 60 in August 1915. For the balance of the time the Wellington Mounted Rifles remained at Gallipoli, the unit played a defensive role.


Defence of Egypt

In March 1916, the Wellington Mounted Rifles was allotted as a Regiment in the newly formed Australian and New Zealand Mounted Division, or more commonly called the Anzac Mounted Division. As part of the Division the Wellington Mounted Rifles moved to join its parent brigade, the New Zealand Mounted Rifles Brigade, which was taking part in the defence of the Suez Canal. The work was hot and monotonous. they remained here until moved to the Romani region to bolster the defence of that area.


Sinai

The New Zealand Mounted Rifles Brigade played an important role in beating back the Turkish invasion of the Suez Canal zone at Romani. Now known as the Battle of Romani which lasted from 4-6 August which was quickly followed by the Battle of Katia and then Bir el Abd on 9 August. All the actions in which the Wellington Mounted Rifles finally led to the defeat of the Ottoman Canal Expeditionary force and its retreat to Bir el Mazar.


Over the next few months, the Wellington Mounted Rifles took part in the Allied advance over the Sinai leading to the fall of Bir el Mazar, then El Arish followed by Bir el Magdhaba and finally Rafa in January 1917. The Ottoman forces were expelled from the Sinai and were poised to be tackled in Palestine.


Palestine

On 27 March 1917, the Wellington Mounted Rifles took an adventurous role during the First Battle of Gaza. While involved in the encirclement of the city as a prelude to its capture, the Wellington Mounted Rifles received the order to withdraw and return to the starting line. Grudgingly they did so but realised the Turks had snatched victory out of the jaws of defeat.

The Wellington Mounted Rifles took part in the Second Battle of Gaza on 19 April 1917 and suffered the heaviest casualties since Gallipoli.

The Wellington Mounted Rifles took part in the Battle of Beersheba and then the follow up actions that lasted until early January 1918. This included such actions as the Battle of Ayun Kara and the advance to Jaffa.

After the fall of Jerusalem the Wellington Mounted Rifles moved to the Jordan Valley and took parts in operations in this region. This included the taking of Jericho, the attack on Amman during 27 March - 2 April 1918 and Es Salt Raid of 30 April – 4 May 1918. It's last major action prior to the breakout was to repel the German Asien Corps attack on Abu Telllul, 14 July 1918.


Amman

At the opening of the final Allied offensive on 19 September 1918, the Wellington Mounted Rifles took part in the invasion of the Moab hills for the third time. This time Amman was captured and finally, the Ottomans called for an Armistice on 30 October 1918.


Commanders
Lieutenant Colonel W. Meldrum, from 8 August 1914 to 23 April 1917.
Lieutenant Colonel J. H. Whyte, from 12 June 1917 to 31 December 1918.
Major A. F. Batchelor, from 1 January 1919 to 30 June 1919      


Attachments

Formed August 1914.

Attached to the New Zealand and Australian Division from December 1914 to April 1915. Attachment ceased on the Division's deployment to Gallipoli.

Attached to the New Zealand and Australian Division at Gallipoli from May 1915 to February 1916.

Attached to the Anzac Mounted Division March 1916 until March 1919.


Campaigns

Gallipoli:
  • Anzac
  • Defence at Anzac
  • Suvla
  • Sari Bair
  • Gallipoli 1915-1916

Egypt:

  • Defence of Egypt.

Sinai:

Palestine:

  • First Battle of Gaza;
  • Second Battle of Gaza;
  • Third Battle of Gaza;
  • Beersheba;
  • Ayun Kara;
  • Jerusalem;
  • Jericho;
  • First Amman;
  • Es Salt;
  • Megiddo; and,
  • Second Amman.


Casualties suffered by the Wellington Mounted Rifles

  • 328 killed
  • 496 wounded


Disbandment

The Wellington Mounted Rifles returned to New Zealand with the main body of the New Zealand Mounted Rifles. With much ceremony at Chevalier Island, the Wellington Mounted Rifles along with the New Zealand Mounted Rifles Brigade was disbanded on 30 June 1919. On the same day, Wellington Mounted Rifles returned to New Zealand on the SS Ulimaroa.


Acknowledgement: Thanks are extended to Steve Butler and Greg Bradley for the excellent site New Zealand Mounted Rifles Association and their consent to use information and images from that particular site. Steve Butler has kinldy provided the artwork for this entry.


Further Reading:

Wellington Mounted Rifles Regiment

New Zealand Mounted Rifles Brigade

Battles where Australians fought, 1899-1920


Citation: Wellington Mounted Rifles, NZMRB, Outline

Posted by Project Leader at 12:01 AM EADT
Updated: Friday, 11 September 2009 3:03 PM EADT

View Latest Entries

Full Site Index


powered by FreeFind
Let us hear your story: You can tell your story, make a comment or ask for help on our forum.

Desert Column Forum

A note on copyright

The Australian Light Horse Studies Centre is a not for profit and non profit group whose sole aim is to write the early history of the Australian Light Horse from 1900 - 1920. It is privately funded and the information is provided by the individuals within the group and while permission for the use of the material has been given for this site for these items by various donors, the residual and actual copyright for these items, should there be any, resides exclusively with the donors. The information on this site is freely available for private research use only and if used as such, should be appropriately acknowledged. To assist in this process, each item has a citation attached at the bottom for referencing purposes.

Please Note: No express or implied permission is given for commercial use of the information contained within this site.

A note to copyright holders

The Australian Light Horse Studies Centre has made every endeavour to contact copyright holders of material digitised for this blog and website and where appropriate, permission is still being sought for these items. Where replies were not received, or where the copyright owner has not been able to be traced, or where the permission is still being sought, the Australian Light Horse Studies Centre has decided, in good faith, to proceed with digitisation and publication. Australian Light Horse Studies Centre would be happy to hear from copyright owners at any time to discuss usage of this item.

Contact

Australian Light Horse Studies Centre

eXTReMe Tracker