"At a mile distant their thousand hooves were stuttering thunder, coming at a rate that frightened a man - they were an awe inspiring sight, galloping through the red haze - knee to knee and horse to horse - the dying sun glinting on bayonet points..." Trooper Ion Idriess
The Australian Light Horse Studies Centre aims to present an accurate history as chroniclers of early Australian military developments from 1899 to 1920.
The Australian Light Horse Studies Centre site holds over 12,000 entries and is growing daily.
Contact:Australian Light Horse Studies CentreLet us hear your story:
You can tell your story, make a comment or ask for help on our Australian Light Horse Studies Centre Forum called:
WARNING: This site contains: names, information and images of deceased people; and, language which may be considered inappropriate today.
Sunday, 6 September 2009
Australian Light Horse, Tactical Training of the AIF at Zeitoun, Rearguards Topic: AIF - Lighthorse
Australian Light Horse
Tactical Training of the AIF at Zeitoun
Rearguards
The following entries dealing with the emerging tactics taught to officers and NCO's at the Imperial School of Instruction, Zeitoun and are extracted from a very informative handbook called Lectures by Commandant, School of Instruction, Zeitoun, 1916. At one time or another, all officers and NCO's within the Light Horse were inculcated with the tenets expounded by the lectures.
REARGUARDS.
Rearguards are used to prevent the march of the mainbody, from being hindered by attack.
A rearguard is above everything a Fighting Force. It is divided into a Main Guard and Rear Party, corresponding to the divisions of an advanced Guard. They are linked up in the same way by connecting files.
If not engaged the duties of a Rearguard are easy, but when attacked by an enterprising enemy the commander has a very difficult and dangerous task to perform.
The chief duties of a Rearguard are:
1. To offer enough resistance to allow the main body to retire unmolested.
2. Not to allow the enemy to approach and to engage too closely. The commander must watch his flanks most carefully in order not to let the enemy envelope him and cut him off.
To achieve the above, the Commander must observe the following points:
(1) Choose positions with an extended field of fire, to force the enemy to deploy early and so occasion him delay, occupying positions with fiery wile extension.
(2) Open fire very early with the same object as No. 1.
(3) Quit positions before the enemy approaches too closely.
(4) The whole of the Rearguard never retires at the same time.
(5) One portion retires and occupies another position the other portion holding on to the original position, the first portion then retires through the second line and takes up a third position, and so on.
(6) It is better to sacrifice a portion of the rearguard than to allow the evenly to fall on the rear of the mainbody, and so possibly turn the retirement into a rout.
It is essential for a Rearguard to be strong in Artillery as by shelling the evenly at long ranges, the enemy will be forced to extend, which enables the retiring force to gain time, a most important factor.
el Qatiya, Sinai, 23 April 1916, Falls Account, The Advance into Sinai Topic: BatzS - El Qatiya
el Qatiya
Sinai, 23 April 1916
Falls Account, The Advance into Sinai
As part of the Official British War History of the Great War, Captain Cyril Falls and Lieutenant General George MacMunn were commissioned to produce a commentary on the Sinai, Palestine and Syrian operations that took place. In 1928, their finished work, Military Operations, Egypt and Palestine - From the outbreak of war with Germany to June 1917, was published in London. Their book included a section specifically related to the battle of Romani and is extracted below.
MacMunn, G. & Falls, C., Military operations: Egypt and Palestine, (London 1930), pp. 159 - 162:
The Advance into Sinai.
Until the middle of February the troops were fully engaged in reorganization, training, and work upon the Canal Defences, in the making of roads and laying of light railways and pipe-lines, without which these defences could not be occupied. Reconnaissances by the Royal Flying Corps and the seaplanes of the Royal Naval Air Service (a squadron of which now succeeded the French seaplane detachment at Port Said - The "East Indies and Egypt Seaplane Squadron" was formed in late January 1916, and consisted of British seaplanes which had been employed in the Gallipoli campaign and of the French seaplane detachment. There is no record of the precise date at which the French detachment was withdrawn from Egypt, but its last reported flight took place on the 16th April. Squadron Commander C. L'Estrange Malone was the first commander of the East Indies Squadron, Commander C. R. Sampson, R.N., taking over command in May 1916. The seaplane carriers at the disposal of the squadron were the Ben-my-Chree, Anne, Raven, and Empress, but the last named was sent to Mudros in May. The depot included a training base for observers, who were supplied by the Army, and an intelligence report centre. The squadron carried out remarkable work in reconnaissance, photography, and bombing along the Syrian coast throughout 1916 and 1917, and was also employed in the Red Sea and at Aden. An interesting account of its activities is to be found in "In the Side Shows" by Captain Wedgwood Benn (Holder and Stoughton).)" established the fact that there were no considerable Turkish forces in Sinai and no signs of a concentration in Southern Palestine for an attack on Egypt. During the latter half of the month the XV Corps pushed its mounted patrols out 20 miles, to Bir en Nuss and Hod Umm Ugba, finding this area clear of the enemy and practically deserted by the Bedouin. From Tor, at the southern end of Sinai, which was garrisoned by the 2nd Battalion Egyptian Army and had come under General Murray's control by arrangement with General Maxwell, a reconnaissance was carried out, and a small force of the enemy - chiefly Bedouin with a few Turkish officers - ejected from a camp established several miles inland. In No. 2 (the Central) Section a force about a squadron strong of the 8th and 9th Australian Light Horse and a detachment of Bikanir Camel Corps carried out between the 11th and 15th April a raid to Jifjafa, [See:Jifjafa] a distance of 52 miles, captured an Austrian engineer officer and 33 men, and destroyed a well-boring plant which had been at work for five months. At the same time the IX Corps in the Southern Section reconnoitred 30 miles to Bir el Giddi and the tracks leading east there from.
Meanwhile the standard-gauge line from Qantara towards Qatiya had been begun. On the 10th March the first shipload of rails and sleepers arrived at Qantara, and in four weeks 16 miles, including sidings, were laid. The line followed the caravan track for 5 miles and was then to make a sweep north to avoid the large and shifting sand dunes of Romani, curving back to the caravan route near the 0ghratina oasis, 5 miles east of Qatiya. A subsidiary 2 ft. 6 in. line was also begun from Port Said along the shore, April.
The railway having passed through the advanced line of the Canal Defences, it became necessary to establish permanent posts ahead of it in the Qatiya Oasis to protect it from attack by the enemy and to ensure the Egyptian labourers against interference from armed Bedouin. On the 6th April, Br.-General E. A. Wiggin, 5th Mounted Brigade (the mounted troops in the XV Corps Section), was appointed to the command of the Qatiya district, and made responsible to Lieut.-General Horne. Three days afterwards the latter was recalled to a command in France and succeeded by Major-General the Hon. H. Lawrence, hitherto commanding the 52nd Division. The XV Corps Headquarters was broken up and General Lawrence was given a reduced corps staff, known as Headquarters No. 3 Section.
On the 9th April a squadron of the Worcester Yeomanry found the Turks in some strength at Bir el Abd, 15 miles east of Qatiya. By the third week of the month the whole of the 5th Mounted Brigade was disposed to cover the railway:
Headquarters and Gloucester Hussars at Romani,
Worcester Yeomanry at Qatiya,
Warwick Yeomanry (less one squadron on the Canal) at Bir el Hamisah, 3 miles south of Qatiya.
The 2/2nd Lowland Field Company, R.E., 52nd Division, was attached to the brigade for the development of wells.
The brigade had no artillery, the ground being soft sand over which wheels could scarcely move and the water supply for horses still far from plentiful. On the 21st and 22nd two squadrons (less one troop) Worcester Yeomanry with a detachment (4 officers and 60 other ranks) of the Field Company were pushed out to the Oasis of Oghratina, and replaced in Qatiya by a squadron of Gloucester Hussars until the arrival of the 5th Australian Light Horse. This regiment had been ordered to reinforce General Wiggin, in view of signs of renewed activity on the part of the enemy, an outpost of the Warwick Yeomanry from Bir el Hamisah having been attacked by Turkish or Bedouin cavalry before dawn on the 19th and having had its horses stampeded. The Light Horse was due to arrive at Qatiya on the 24th.
Thirteen miles S.S.W. of Qatiya, on the track from Qantara, the small oasis of Dueidar was held by 120 rifles 5th Royal Scots Fusiliers, a few Yeomanry and men of the Bikanir Camel Corps, 156 rifles in all. Five miles behind this post, at Hill 70 in the advanced line of the Canal Defences, was the 4th Royal Scots Fusiliers, of the 52nd (Lowland) Division, which was holding this portion of the front. Railhead was on the 21st near El Arais and 4 miles west of Romani, so that the time had come when Qatiya could be held in greater strength and more easily supplied. At the very moment when this reinforcement was about to take place, the enemy struck a blow which for combined speed, skill, daring, and success is hardly to be matched in the records of the campaign.
Battle of Romani, Sinai, August 4 to 5, 1916, Outline Topic: BatzS - Romani
Battle of Romani
Sinai, August 4 to 5, 1916
Outline
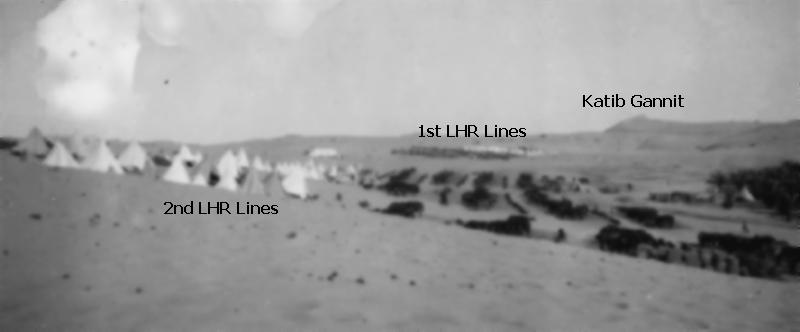
1st Light Horse Brigade camp at Romani
Romani, an action fought on 4-5 August 1916 in the Sinai Desert 35 kilometres east of the Suez Canal, took place amid towering sand-dunes astride the old caravan route to Palestine skirting the Mediterranean Sea. After Turkish raids had inflicted some damage to British outposts in this area during April, Romani was occupied by the 52nd (Lowland) Infantry Division and the Anzac Mounted Division, the latter at that time comprising two brigades of Australian light horse under Major-General Harry Chauvel. From here the mounted troops undertook a vigorous program of desert patrols, aimed at keeping the enemy away from this route to the canal and detecting any approach that was made.
On 18 July, aerial reconnaissance had discovered the presence of four large bodies of Turkish troops a few days' march beyond the line of British outposts. The next fortnight involved continual skirmishing in the midsummer heat, during which it was established from enemy prisoners that the puckish force comprised a reinforced division of 12,000-14,000 men under command of a German general, Kress von Kressenstein. During the night of 2-3 August the Turks advanced to Katia, eight kilometres south-east of Romani, and it was concluded that an attack on the main British position was imminent.
In the expectation that the enemy planned to envelop the southern end of the Romani defences, before sweeping onto the camps and railway behind than, Chauvel positioned his 1st Brigade - all that was available to him since his 2nd Brigade was out on reconnaissance-in small posts covering a frontage of five kilometres south of the 2nd Division's Lines. The Turks were in the process of forming up on their start-lines for an assault when they unexpectedly bumped into the Australians at about midnight on 3 August. After adjusting their plans, the Turks come on an hour later. In the fighting that quickly developed, the 700 rifles in Chauvel's screen of outposts were opposed by up to 8,000 Turks.
Under the weight of the unrelenting enemy pressure, the light horsemen fell back steadily. At 4.30 a.m., when it appeared that the Turks' outflanking movement must succeed, Chauvel brought in his 2nd Brigade into line on the right flank of the 1st. As the Turks continued to feel their way around the southern flank of the defence, Chauvel began moving troops from the left of his line to keep extending his right, with the 52nd Division taking over the parts of his front that had to be thus vacated. Despite these tactics, by 7 a.m. the enemy had gained a long sandhill dubbed Wellington Ridge flanking the camps. The Australians had been pushed back to a towering sand-dune called Mount Royston, their front now facing due south.
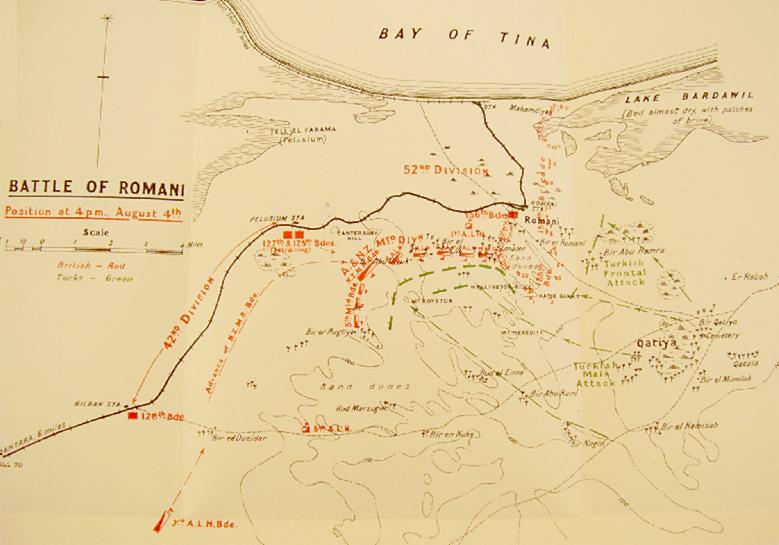
Romani and the disposition of the various armies, 4 August 1916
[Click on map for larger image]
At about 7 a.m. the New Zealand Mounted Rifles Brigade and a brigade of British yeomanry, having been sent forward from reserve positions closer to the canal, were ordered into action against the enemy's now exposed flank. These forces were not in position to commence a counter-attack on Mount Royston until nearly 2 p.m. The fight continued throughout the afternoon, but by the time a brigade from a British infantry division in reserve, the 42nd (Lancashire), also neared the scene at about 6 p.m. the Turks had begun surrendering in large numbers. Meanwhile Chauvel's brigades had managed to maintain their positions in the centre, but were too tired for any further counter-stroke to be attempted.
At 4 a.m. on 5 August the 1st and 2nd Light Horse Brigades, together with adjoining infantry, advanced with the bayonet. Except at one point, Turkish resistance on Wellington Ridge was quickly subdued. With the enemy flank now crushed, Chauvel was instructed at 6.30 a.m. to undertake a pursuit using all available mounted troops. This now involved the 3rd Brigade of his own division, which had arrived from the canal zone. The 3rd Light Horse Brigade had a major success south of Katia, when a Turkish strongpoint was rushed at about 1 p.m. and resulted in the capture of 425 enemy and seven machine-guns.
Elsewhere on this front the Turkish positions proved too strong and well protected by fire, so that Katia itself remained untaken. The British forces were compelled to retire, essentially through lack of water for the horses, but during the night the Turks took the opportunity to abandon the place anyway. Thus the threat to Romani had been decisively eliminated, although the failure of the British command to turn the Turkish defeat into a rout has largely obscured the significance of the victory. The brunt of the fighting had fallen upon the Anzac Mounted Division, which suffered over 900 of the 1,130 casualties (including 202 killed) on the British side. Turkish losses are unknown but were estimated at 9,000; 1,250 dead were buried by the victors and nearly 4,000 were taken prisoner.
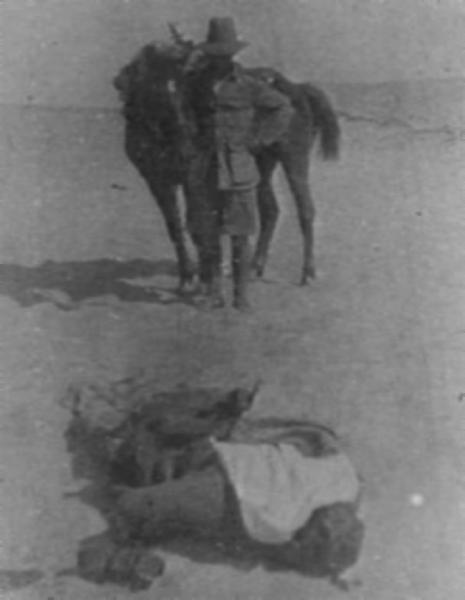
A poignant moment as a 3rd LHR man pays his respects to a fallen Turk.
Extracted from the book produced by Chris Coulthard-Clark, Where Australians Fought - The Encyclopaedia of Australia's Battles, Allen and Unwin, Sydney, 1998, pp. 118-118.
Additional References cited by Chris Coulthard-Clark:
H.S. Gullett, (1944), The Australian Imperial Force in Sinai and Palestine, Sydney: Angus & Robertson.
A.J. Hill, (1978), Chauvel of the Light Horse, Carlton, Vic.: Melbourne University Press.
el Qatiya, Sinai, 23 April 1916, Falls Account, The Affair of Qatiya Topic: BatzS - El Qatiya
el Qatiya
Sinai, 23 April 1916
Falls Account, The Affair of Qatiya
As part of the Official British War History of the Great War, Captain Cyril Falls and Lieutenant General George MacMunn were commissioned to produce a commentary on the Sinai, Palestine and Syrian operations that took place. In 1928, their finished work, Military Operations, Egypt and Palestine - From the outbreak of war with Germany to June 1917, was published in London. Their book included a section specifically related to the battle of Romani and is extracted below.
MacMunn, G. & Falls, C., Military operations: Egypt and Palestine, (London 1930), pp. 162 - 170:
The Affair of Qatiya.
Br.-General Wiggin had received a report that the enemy party which had raided his outpost on the 19th was at Bir el Mageibra, 8 miles south-east of Hamisah, and that it was about two hundred strong. With the approval of General Lawrence, he arranged to carry out a raid from Hamisah against the camp. This raid he decided to command in person. He arrived at Hamisah on the 22nd, bringing with him headquarters, one squadron and one troop of Worcester Yeomanry from Qatiya. The dispositions of his force that evening were therefore as follows :
Oghratina:-
Two squadrons (less one troop) Worcester Yeomanry,
Detachment 2/2nd Lowland Field Company R.E.
Qatiya :-
One squadron and machine-gun subsection, Gloucester Hussars,
40 dismounted details Worcester Yeomanry,
Details R.A.M.C.,
Details A.V.C., and
Camel transport.
Hamisah:-
Warwick Yeomanry (less one squadron),
One squadron and one troop Worcester Yeomanry.
Romani (in reserve):-
Gloucester Hussars (less one squadron and machine-gun subsection).
As luck would have it, the raid coincided with the Turkish advance. General Wiggin arrived at Mageibra at dawn on the 23rd and found a considerable but almost empty camp. He dispersed a handful of Turkish troops, captured six prisoners, and destroyed the camp. He was back at Hamisah by 9 a.m., having marched 16 miles, his horses tired and in need of water but not exhausted. On his arrival, as will be recorded later, he heard of the Turkish attack, to which we must now turn.
Oghratina, on the morning of the 23rd April, had been occupied only about thirty-six hours by one squadron and the detachment of Royal Engineers and twelve hours by the second squadron, so that not much entrenching had yet been carried out. The camp was, however, alert, and stood to arms at 4 a.m. in a dense sea-fog, which is not uncommon in the early morning at this season. Suddenly the sound of pumps at the wells 500 yards south-west of the camp and at the foot of the slope on which it stood was heard by the sentries of "D" Squadron, on the left of the line. It was thought that a patrol of "A" Squadron must be watering, but Captain E. S. Ward ran down the hill to investigate. He almost ran into the midst of a party of about sixty Turks in a hod south of the wells. He rushed back, collected what men he could find in the mist, opened fire on the Turks at point-blank range, inflicted heavy casualties on them, and forced them to retreat headlong. Captain Ward followed, but was at once met by very heavy rifle fire, showing him all too plainly that it was no small party which he had surprised. He therefore fell back to the line held by his squadron.
Soon afterwards "A" Squadron on the right was heavily attacked and by 5.15 a.m. the whole camp was assaulted from north, east and south-east in overwhelming strength. Almost from the first the troops were engaged from a range of fifty yards or less. Major F. S. Williams-Thomas, in command of the detachment, had orders to retire if attacked in force, but found himself unable to do so without leaving in the lurch the dismounted men. He felt it his duty to stand by the engineers, but for whom, he considered, he might have been able to disengage his two squadrons and fight a rear-guard action back to Qatiya. The remnants of "D" Squadron were driven back upon the second line of defence, held by the engineers, but that position was speedily forced also, and then the Turks had the whole camp at their mercy. By 7.45 a.m., he states, 11 Yeomanry officers and 135 other ranks were casualties. Half the rifles of those still unwounded were clogged with sand. Further resistance would have meant that the whole force would have been slaughtered to no useful end, and the remnant of the detachment surrendered.
At Qatiya "A" Squadron Gloucester Hussars, under Captain M. G. Lloyd Baker, stood to arms and saddled up at 3.30 a.m. A patrol came in to report having seen and heard nothing in the mist. Soon afterwards a small patrol of the enemy approached and fired into the camp, then retired swiftly. Heavy firing was heard from Oghratina and a message received at 6 a.m. that an attack had been repulsed. Half an hour later came a message that it had been renewed, and a mounted orderly from Romani reported that Dueidar, far away to the right rear, had also been attacked. At 7.45 another enemy patrol was driven off. All firing at Oghratina had ceased and there was for an hour complete quiet, while the fog gradually dispersed.
At 8.45 a.m. a patrol, sent out toward Oghratina, saw two lines of troops in open order, about three hundred in each line, advancing on Qatiya, and a mile and a half distant. Behind them were further troops in a formed body, and cavalry could be seen advancing south-west, doubtless to surround the post. At 9.45 a.m, a battery of mountain guns opened fire from near Er Rabah, north-east of Qatiya. The first twenty shells fell beyond the camp, but then a correction was made and shells began to burst in the horse-lines, killing or maiming most of the horses within a few minutes. An enemy aeroplane came over very low, spotting for the artillery. As the guns opened the enemy advanced, crawling forward in small parties, covered by rifle fire.
Meanwhile, on his arrival at Hamisah, General Wiggin had learnt that Oghratina was surrounded, and soon afterwards was informed of the advance on Qatiya. He ordered Lieut.-Colonel Coventry, commanding the Worcester Yeomanry, to water the Worcester squadron first and advance with it on Qatiya. Watering at a few small desert wells was slow work, and, before it was completed, shells were seen bursting at Qatiya. Colonel Coventry then moved off at once, at 9.50 a.m. As he approached Qatiya he saw that the camp was heavily engaged. He dismounted his squadron three-quarters of a mile west of the camp and led it up on foot to prolong the line of the Gloucester squadron to the left. This considerably relieved pressure on that flank, where the enemy fell back some distance. A heavy fire battle then continued for several hours. The enemy's artillery had ceased fire after destroying the horses, but the volume of his rifle and machine-gun fire was great, and under its cover his infantry gradually pressed in on front and flanks.
The first of General Wiggin's remaining squadrons Warwick Yeomanry having watered at Hamisah, moved off 23 April, at 10.30 a.m., he himself following with the second a quarter of an hour later. His intention was to attack the enemy in rear in the neighbourhood of the Hod um Ugba, north-east of Qatiya. Half-way between Hamisah and the camp he became engaged with the enemy's flanking troops. He fought his way slowly forward for about a mile. But now, at 1.45 p.m., the opposition became very strong, and his own men and horses were tired out. He saw soon afterwards a commotion among the camels in Qatiya camp and that some of the tents were burning. He decided that he could do no more to help and that his best course was to fall back on Hamisah, whence he had heard a burst of machine-gun fire, and pick up a detachment of 20 men guarding the camp, a quantity of stores and a number of camels. On his return he discovered that the firing had been no more than an exchange of shots between a body of Turks retiring from Dueidar and British aeroplanes pursuing them. It must be added that the firing and the safety of his detachment at Hamisah had had no serious weight in deciding General Wiggin to retire.
Lieut.-Colonel R. M. Yorke, in command at Romani, moved out with five troops and a machine-gun subsection, Gloucester Hussars, at 10.15 a.m. His intention was not to advance to the support of Qatiya, of the attack on which he had not heard, but to intercept a column of 500 Turks, which he was informed was retiring south-east from Dueidar in a disorganized condition. But shortly after leaving Romani he heard firing from Qatiya, and, on reaching some high ground, was able to see the Turkish artillery north of Er Rabah shelling the camp. He changed direction and advanced towards it, whereupon it ceased fire and a quarter of an hour later withdrew some distance.
At 10.45 a.m. Colonel Yorke's advanced guard came under fire north-west of Er Rabah. He pressed on, driving the enemy back to the high ground south of the Hod um Ugba. Here the enemy was reinforced and his rifle fire became so heavy that Colonel Yorke found himself unable to make any further progress. He began a gradual withdrawal, with long halts to let his wounded get clear to Romani, and was followed up by the Turks at 1 p.m., their battery reopening fire from a new position, but with little result.
It will be noted that his advance had been almost simultaneous with that of General Wiggin on the other flank of the enemy. Unfortunately, he was not aware of the presence of the other force to south of Qatiya, nor was it till after General Wiggin's troops had begun their retirement, about 3 p.m., that Colonel Yorke, who was then a mile east of Abu Hamra, caught sight of them. General Wiggin had seen Colonel Yorke's force on the horizon an hour earlier and had tried to communicate with it by heliograph. At 3.30 he saw that Qatiya was in the hands of the enemy and decided to retire at once to Romani. There he remained till midnight, when, on being informed that no infantry could be sent up to support him, he fell back on railhead.
From the time - about 1 p.m. - when the two relieving forces had failed in their object, the garrison of Qatiya was doomed. The enemy pressed in closer and closer. Soon after 1.30 p.m. Colonel Coventry asked Captain W. H. Wiggin, commanding the squadron of Worcester Yeomanry, if he thought he could get back to the horses and bring up the horse-holders, as every man was needed. Captain Wiggin crawled down the hill, but before he reached the horses, by what proved to be extraordinary good fortune for himself and other survivors, fainted from the effect of a wound received earlier and lay about an hour unconscious. Meanwhile the shelling was renewed and the enemy closed to within fifty yards. At 3 p.m. the Turks charged with the bayonet, and the remnant of the little garrison was forced to surrender. Captain Wiggin, now recovered, was leading forward the numbers-three when he saw the camp rushed by the enemy. But, seeing some men running back from the line, he had the presence of mind to gallop horses up to meet them, and rescued a number of them. In all, including the horse-holders, about eighty escaped. Captain Wiggin himself was the only officer at Oghratina or Qatiya not either killed or captured.
There remains to be recorded an episode incidental to the Turkish expedition against Oghratina and Qatiya: the attack on Dueidar. This post was in a small oasis, measuring 450 yards from east to west and 150 from north to south, and was defended by half a dozen small works clear of the date trees. Its garrison, as previously stated, consisted of 156 rifles.
At 4 a.m. it was found that communication with Qatiya was interrupted. A linesman was sent out and the commander of the garrison, Captain F. Roberts, 5th Royal Scots Fusiliers, visited his posts. He then sent out a Yeomanry patrol to the south-east and ordered the troops to stand to arms. The patrol returned without having seen anything in the dense mist. At 5.17 a.m. a large body of men suddenly appeared in front of the principal redoubt, to the south-east of the oasis. As the sentry who had seen them fired, the Turks dashed forward. The garrison of the redoubt was creditably alert, when it is considered that it had no reason to suppose there was an enemy nearer than Mageibra, 20 miles away. The fire of a Lewis gun under 2nd Lieutenant G. McDiarmid and of every one of the fifty rifles in the redoubt swept the Turkish ranks. The enemy recoiled, leaving about twenty dead and wounded on the ground.
Fire was now opened by a mountain gun out of the mist, but the shooting was hopelessly erratic, doubtless because no observer could see the British position. The rifle fire increased, and at 7 a.m. the enemy attempted to outflank the position to the south. This move was checked by the fire of a little work on that flank, containing only one N.C.O. and six men. Shortly afterwards the Turks shouting "Allah!" again charged the south-eastern redoubt. Again they were routed by the steady fire of the defence, some being brought down within twenty yards of the wire. Thenceforward they confined themselves to ineffective artillery, machine-gun and rifle fire.
At 6.25 a.m. Major H. Thompson, 4th Royal Scots Fusiliers, at Hill 70 on the railway, 5 miles in rear, received orders to reinforce Dueidar with two companies. He moved off forty minutes later with " C " and " D " Companies and 11 men of the Glasgow Yeomanry as scouts. On approaching the palm grove he sent up a small detachment to reinforce the south-eastern redoubt, where the action appeared hottest, and went forward himself to ascertain the situation and take over command. He found that the enemy had a firing line south of the Dueidar-Qatiya track, 200 yards distant from the principal redoubt. North of the track there were apparently no Turks; at least no attack had been made in that quarter.
Major Thompson then sent a party out to an isolated work, north-east of the grove and not hitherto held, to engage the enemy with enfilade fire. Shortly afterwards the mist cleared somewhat, and a British aeroplane dropped a message to the effect that the enemy's main body was in retreat and that the firing line in front of the position now amounted to no more than about one hundred and fifty rifles. At noon a squadron of the 5th Australian Light Horse arrived and moved off south-east in pursuit of the enemy's main body, leaving the rearguard to the garrison of Dueidar, which issued from the oasis and attacked it all along the line. The Turks broke and fled. They were pursued for a mile and a half and 17 unwounded prisoners taken, while several wounded men were brought in later. The remainder of the 5th Australian Light Horse arrived at 1.30 p.m., having marched from Qantara, and took up the pursuit, capturing a few more prisoners. The total captures were one officer and 31 other ranks, and 75 dead were left on the field. The British casualties numbered 55, and 52 camels were killed in the lines beside the oasis.
At 9 p.m. Br.-General Wiggin arrived at Dueidar with his two squadrons, [On the following day he was ordered to take the remnants of his brigade back to Qatiya.] and the outer line of defence now became from railhead to Dueidar. Both positions were reinforced, the 2nd Australian Light Horse Brigade moving up to railhead the following morning. But the attack was over and the enemy in retreat. On the 24th aeroplanes of the 5th Wing followed various columns, bombing them and firing on them with machine guns.
An interesting point regarding this series of actions was later brought to notice. An observer of the 14th Squadron R.F.C., discovered from tracks in the sand the lines of advance of the enemy. The main force, which attacked Oghratina and Qatiya, advanced along the caravan route from Bir el Abd. On the other hand, the track of the column which attacked Dueidar - consisting mainly if not wholly of camelry - ran from Mageibra through Bir Gharif ed Dukhan. There is therefore no doubt that this was the force reported at Mageibra to General Wiggin. While he was on the march to attack it, as he hoped by surprise, it was on the march to attempt the surprise of Dueidar.
It must be added that it was not the intention of Major-General Lawrence to make a serious resistance in the oases to a Turkish attack, and that in such circumstances General Wiggin's orders were to retire on Dueidar or railhead. The difficulty regarding these orders was the presence of dismounted troops with the outposts. The engineers at Oghratina could scarcely have marched 14 miles from Oghratina to railhead without being caught by the enemy's camelry, which could have brought them (and the Yeomanry if it attempted to succour them) to action until the Turkish infantry came up. Had there been no sappers at Oghratina it is possible that the Yeomanry might have slipped away in the fog. It is also probable that the presence of dismounted details at Qatiya made Captain Lloyd Baker hesitate to retire during the short period that such a course was open to him, before his horses were destroyed.
It should, however, be noted that Captain Lloyd Baker was in telephonic communication with Br.-General Wiggin after 9 a.m., that he informed the latter of the advance of 600 men in open order with a formed body behind them, and that he was not ordered to retire. He was told that both General Wiggin and Colonel Yorke were moving to his assistance.
The details of the capture of these two posts were not known till after the Armistice, when information became available from officers who had been prisoners of war. This information, which has been embodied in the foregoing narrative, tends to relieve the Yeomanry of the charge of having been completely surprised. It may be said that patrols from Oghratina were not apparently far enough out, and that a mounted outpost of this type should have had standing patrols far ahead in the direction of the enemy. But at Qatiya there was not any suggestion of surprise, and it is difficult to see in what respect Captain Lloyd Baker (who was killed) could have acted differently. In both cases the defence was gallant in the extreme.
The affair at Qatiya was a lamentable occurrence, resulting as it did in the total loss of three and a half squadrons of Yeomanry. Otherwise it had no effect, except to delay the progress of the railway for a few days. On the 24th Major-General Chauvel, commanding the A. & N. Z. Mounted Division, was put in command of the advanced positions, including the 52nd Division's post at Dueidar. Romani was reoccupied that day, but General Chauvel, taught by the unhappy experience of the 5th Mounted Brigade, established a considerable camp there and controlled the area by vigorous patrolling rather than by maintaining dangerously isolated detachments at the other oases.
The delay to the railway's progress was small. By the 29th April four trains a day were running regularly to railhead, and a special company had been formed to work the line - No. 276 Railway Company. The subsidiary narrow-gauge line from Port Said had reached Mahamdiyah on the coast. By the 19th May the main line was open for traffic up to Romani. During the week ended 26th May the following tonnage was carried:
1,125 tons supplies,
420 tons engineering material,
960 tons water (215,000 gallons),
150 tons railway material,
150 tons miscellaneous stores, and
60 tons troops (about 700 men).
It was decided to link up Romani and Mahamdiyah by a branch of standard gauge. This was completed by the 9th June. It was now possible to garrison Romani with infantry on a considerable scale, to construct a strong position, and to maintain there a certain amount of artillery for its defence.
The Australian Light Horse Studies Centre is a not for profit and non profit group whose sole aim is to write the early history of the Australian Light Horse from 1900
- 1920. It is privately funded and the information is provided by the individuals within the group and while permission for the use of the material has been given for this
site for these items by various donors, the residual and actual copyright for these items, should there be any, resides exclusively with the donors. The information on
this site is freely available for private research use only and if used as such, should be appropriately acknowledged. To assist in this process, each item has a citation
attached at the bottom for referencing purposes.
Please Note: No express or implied permission is given for commercial use of the information contained within this site.
A note to copyright holders
The Australian Light Horse Studies Centre has made every endeavour to contact copyright holders of material digitised for this blog and website and where
appropriate, permission is still being sought for these items. Where replies were not received, or where the copyright owner has not been able to be traced, or where
the permission is still being sought, the Australian Light Horse Studies Centre has decided, in good faith, to proceed with digitisation and publication. Australian Light
Horse Studies Centre would be happy to hear from copyright owners at any time to discuss usage of this item.