


Topic: AIF - 3B - 9 LHR
The Battle of Rafa
Sinai, 9 January 1917
9th Light Horse Regiment War Diary Account
9th Light Horse Regiment, War Diary Account
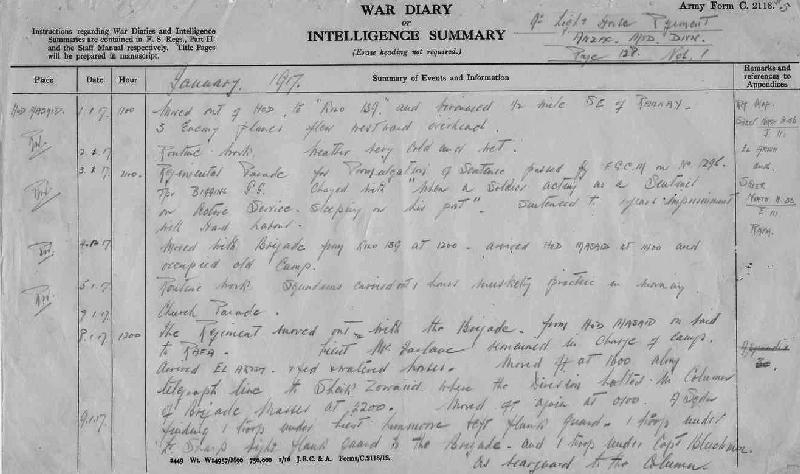
The following is a transcription of the 9th Light Horse Regiment, War Diary Account detailing their role at the Battle of Rafa, Sinai, 9 January 1917.
Hod Masaid 8 January 1917
1200 The Regiment moved out with the Brigade from Hod Masaid on track to Rafa. McFarlane, Lieutenant H, remained in charge of camp. Arrived at El Arish, fed and watered horses.
Moved off at 1600 along telegraph line to Sheikh Zowaiid where the Division halted in columns of Brigade masses at 2200.
Rafa 9 January 1917
Moved off again at 0100. A Squadron fielding one troop under Luxmoore, Lieutenant EM, left flank guard - one troop under Sharp, Lieutenant RC, right flank guard to the Brigade and one troop under Blackman, Captain as rearguard to the column.
At about 0600 the column arrived about two miles south east of the Divisional position at El Magruntein and here the left flank guard was fired on by a Turkish outpost. The outpost fired two green lights and was captured. The Brigade moved toward east of the "border" and remained in reserve until 1100 when orders were received to make a joint attack on redoubt C2, C3 and C4 at 1130. The 9th Light Horse Regiment was detailed to make good trenches known as C2 and C3 to keep touch with the 10th Light Horse Regiment on the right and Imperial Camel Corps on the left.
The Regiment [less A Squadron, and less Lewis Gun] then formed one column of C Squadron on left and three troops of B Squadron on right with one troop from each squadron in support and A Squadron, Lewis Gun on the extreme left. Trench was gained on the right with 20 Other Ranks and at 1400 the line moved forward mounted to maintain about 2,000 yards of the Turkish position. The Regiment here dismounted and maintained the advance on foot to within about 1,400 yards when the left guard joined up with the Imperial Camel Corps. From here onwards the enemy's rifle fire was becoming heavy the advance was continued short pushes by the troops from the left of Squadrons then advance being covered and supported by the fire of the remaining troops.
The Lewis Guns advanced with the leading troop and covered the advance of the remainder - doing excellent work and again proving their adaptability for this kind of warfare. From the results of El Magdhaba and Rafa engagement it is evident that the automatic rifles are invaluable and that the efficiency of the troops would be greatly increased if the establishment of these or similar automatic rifles was increased.
At about 1,000 yards the line was straightened up only a slight fold in the ground. The left of the Regiment in trench known as Z4 - the general direction of the line being 75 degrees - and a constant fire opened up on the enemy trenches known as C group. The intervening ground was a slight concave and bare and offered absolutely no cover making further advance impossible for the time.
At 1430 the situation remained unchanged on the Regiment's front but the 1st Light Horse Brigade on the right flank could be seen to be advancing and a number of Turks were observed to give themselves up. The Imperial Camel Corps on our left were also unable to make headway. During the intense bombardment of the enemy trenches by our guns [from 1430 to 1600] a continued fire was kept up by rifles and Lewis Guns on assault offering in the C Group. And the enemy's fire was greatly subdued.
About 1330 Brown, Lieutenant AR, took up a position on our left flank in a vacated enemy trench with two machine guns and opened up fire with excellent effect. At 1530, a message was received from Fulton, Lieutenant Colonel G, 3rd Light Horse Regiment asking if the 9th Light Horse Regiment would advance. The message with a footnote asking if they could wait, was sent to Commanding Officer 10th Light Horse Regiment but no answer was received.
At 1540 a message was received from 3rd Light Horse Brigade ordering an advance to take place at 1530. At 1540 Royston, Brigadier General JR, came up and gave verbal order for the 9th Light Horse Regiment's advance to be timed by 10th Light Horse Regiment's advance on our right. Up to this time our casualties had been comparatively slight considering the heaviness of the fire on both sides - and the absolute lack of cover. About this time McDonald, Lieutenant JH was wounded in the knee.
At 1545 the extreme right of the line [1st Light Horse Brigade] was observed to be falling back and the enemy's fire at once greatly increased. Numerous enemy stood up to fire and afforded good targets to our Lewis Guns and rifles. At 1610 a second message was received from Fulton, Lieutenant Colonel G, 3rd Light Horse Regiment asking for covering fire as he was being very hard pressed, and our fire was at once increased. A verbal message was received from Robertson, Major, 10th Light Horse Regiment via Siekmann, Major TA, [Officer Commanding B Squadron 9th Light Horse Regiment] that the two troops 10th Light Horse Regiment on the right of the line were retiring and would we if necessary cover the retirement of the 10th Light Horse Regiment - which was agreed to.
Soon after this a number of troops [New Zealand Mounted Rifle Brigade] were seen to come over the skyline to the west of large tree and the Turks appeared to be surrendering. The signal "Cease Fire" was given and the Imperial Camel Corps on our left and the 9th Light Horse Regiment at once advanced directly on the trenches C2 and C3 - the enemy all surrendering before the trenches were reached. Chanter, Captain JC, pushed forward and C Squadron with some Imperial Camel Corps found four [4] Mountain Guns and a number of the enemy. He placed a guard over same and reported the matter to Brigade. The led horses having been brought up to regiment was rallied and took up a line of outposts in accordance with orders received from the General Officer in Command Brigade.
During the engagement 15,000 rounds of SAA [small arms ammunition] were expended the supply being replenished from the horse bandoliers and pack ammunition.
At about 2100 the Regiment [less A Squadron and one troop C Squadron] left Rafa with the Brigade and returned to Sheikh Zowaiid arriving there at about 0200. Horses were watered [having been without water for 36 hours] and rations drawn.
During the bombardment the artillery fire was most effective.
Our total casualties for the engagement were wounded: one Officer, McDonald, Lieutenant JH; and, 14 Other Ranks.
Wounded in Action:Alfred CURRIE
Arthur Christopher DOWN
Desmond Landseer FITZGERALD
Ernest John GODWIN
William HAINS
Austin James HEITHERSAY
Ronald George HOGG
Frank MAYFIELD
James Purnell MUIR
James MURRAY
Hubert Hamilton NICKELS
Ernest Daniel PEARMAN
William Ernest QUIRK
John SEELEY
John Bradbury YOUNG
Horses: two killed and nine wounded.
Sheikh Zowaiid 10 January 1917
At 0720 on the 10th inst the Regiment [less A Squadron] moved off with the Brigade and returned to Hod Masaid via El Arish where horses were watered. The condition of both men and horses in spite of the arduous operations is good.
War Diaries
All War Diaries cited on this site should be read in conjunction with the Australian Light Horse Studies Centre, AIF War Diaries of the Great War, Site Transcription Policy which may be accessed at:
Australian Light Horse Studies Centre, AIF War Diaries of the Great War, Site Transcription Policy
Further Reading:
9th Australian Light Horse Regiment, Roll of Honour
The Battle of Rafa, Sinai, 9 January 1917
The Battle of Rafa, Sinai, 9 January 1917, Roll of Honour
The Palestine Campaign, 1917 - 1918
Battles where Australians fought, 1899-1920
Citation: The Battle of Rafa, Sinai, 9 January 1917, 9th Light Horse Regiment, War Diary Account
