« March 2003 »
S M T W T F S
1
2 3 4 5 6 7 8
9 10 11 12 13 14 15
16 17 18 19 20 21 22
23 24 25 26 27 28 29
30 31
You are not logged in. Log in


Search the site:


powered by FreeFind
Volunteer with us.

Entries by Topic All topics  
A Latest Site News
A - Using the Site
AAA Volunteers
AAB-Education Centre
AAC-Film Clips
AAC-Photo Albums
AIF & MEF & EEF
AIF - Lighthorse
AIF - ALH - A to Z
AIF - DMC
AIF - DMC - Or Bat
AIF - DMC - Anzac MD
AIF - DMC - Aus MD
AIF - DMC - British
AIF - DMC - BWI
AIF - DMC - French
AIF - DMC - Indian
AIF - DMC - Italian
AIF - DMC - Medical
AIF - DMC - Remounts
AIF - DMC - Scouts
AIF - DMC - Sigs
AIF - DMC - Sigs AirlnS
AIF - DMC - 1 Sig Sqn
AIF - DMC - 2 Sig Sqn
AIF - DMC - Eng
AIF - DMC - Eng 1FSE
AIF - DMC - Eng 2FSE
AIF - DMC - GSR
AIF - 1B - 1 LHB
AIF - 1B - 6 MVS
AIF - 1B - 1 LHMGS
AIF - 1B - 1 Sig Trp
AIF - 1B - 1 LHFA
AIF - 1B - 1 LHR
AIF - 1B - 2 LHR
AIF - 1B - 3 LHR
AIF - 2B - 2 LHB
AIF - 2B - 7 MVS
AIF - 2B - 2 LHFA
AIF - 2B - 2 LHMGS
AIF - 2B - 2 Sig Trp
AIF - 2B - 5 LHR
AIF - 2B - 6 LHR
AIF - 2B - 7 LHR
AIF - 3B - 3 LHB
AIF - 3B - 8 MVS
AIF - 3B - 3 LHB Sigs
AIF - 3B - 3 LHFA
AIF - 3B - 3 LHMGS
AIF - 3B - 3 Sig Trp
AIF - 3B - 8 LHR
AIF - 3B - 9 LHR
AIF - 3B - 10 LHR
AIF - 4B - 4 LHB
AIF - 4B - 4 Sig Trp
AIF - 4B - 9 MVS
AIF - 4B - 4 LHFA
AIF - 4B - 4 LHMGS
AIF - 4B - 4 LHR
AIF - 4B - 11 LHR
AIF - 4B - 12 LHR
AIF - 5B - 5 LHB
AIF - 5B - 10 MVS
AIF - 5B - 5 LHFA
AIF - 5B - 5 Sig Trp
AIF - 5B - ICC
AIF - 5B - 14 LHR
AIF - 5B - 15 LHR
AIF - 5B - 1er Regt
AIF - 5B - 2 NZMGS
AIF - AASC
AIF - Aboriginal LH
AIF - Badges
AIF - Cars
AIF - Chinese LH
AIF - Double Sqns
AIF - Engineers
AIF - Fr - 22 Corps
AIF - Fr - 13 LHR
AIF - Honour Roll
AIF - HQ - 3rd Echelon
AIF - Marching Songs
AIF - Misc Topics
AIF - NZMRB
AIF - NZMRB - AMR
AIF - NZMRB - CMR
AIF - NZMRB - EFT
AIF - NZMRB - NZMFA
AIF - NZMRB - NZMGS
AIF - NZMRB - OMR
AIF - NZMRB - Sig-Trp
AIF - NZMRB - WMR
AIF - Ships
AIF - Ships - Encountr
AIF - Ships - Una
AIF - WFF
AIF - Wireless Sqn
Battles
BatzA - Australia
BatzA - Broken Hill
BatzA - Liverpool
BatzA - Merivale
BatzB - Boer War
BatzB - Bakenlaagte
BatzB - Belmont
BatzB - Bothaville
BatzB - Buffels Hoek
BatzB - Coetzees Drift
BatzB - Diamond Hill
BatzB - Driefontein
BatzB - Elands
BatzB - Graspan
BatzB - Grobelaar
BatzB - Grootvallier
BatzB - Hartebestfontn
BatzB - Houtnek
BatzB - Karee Siding
BatzB - Kimberley
BatzB - Koster River
BatzB - Leeuw Kop
BatzB - Mafeking
BatzB - Magersfontein
BatzB - Modder River
BatzB - Onverwacht
BatzB - Paardeberg
BatzB - Palmietfontein
BatzB - Pink Hill
BatzB - Poplar Grove
BatzB - Rhenoster
BatzB - Sannahs Post
BatzB - Slingersfontn
BatzB - Stinkhoutbm
BatzB - Sunnyside
BatzB - Wilmansrust
BatzB - Wolvekuil
BatzB - Zand River
BatzG - Gallipoli
BatzG - Anzac
BatzG - Aug 1915
BatzG - Baby 700
BatzG - Evacuation
BatzG - Hill 60
BatzG - Hill 971
BatzG - Krithia
BatzG - Lone Pine
BatzG - Nek
BatzJ - Jordan Valley
BatzJ - 1st Amman
BatzJ - 2nd Amman
BatzJ - Abu Tellul
BatzJ - Es Salt
BatzJ - JV Maps
BatzJ - Ziza
BatzM - Mespot
BatzM - Baghdad
BatzM - Ctesiphon
BatzM - Daur
BatzM - Kurna
BatzM - Kut el Amara
BatzM - Ramadi
BatzN - Naval
BatzN - AE1
BatzN - Cocos Is
BatzN - Heligoland
BatzN - Marmara
BatzN - Zeebrugge
BatzN - Zeppelin L43
BatzNG - Bitapaka
BatzO - Other
BatzO - Baku
BatzO - Egypt 1919
BatzO - Emptsa
BatzO - Karawaran
BatzO - Peitang
BatzO - Wassa
BatzP - Palestine
BatzP - 1st Gaza
BatzP - 2nd Gaza
BatzP - 3rd Gaza
BatzP - Aleppo
BatzP - Amwas
BatzP - Ayun Kara
BatzP - Bald Hill
BatzP - Balin
BatzP - Beersheba
BatzP - Berkusieh
BatzP - Damascus
BatzP - El Auja
BatzP - El Buggar
BatzP - El Burj
BatzP - Haifa
BatzP - Huj
BatzP - JB Yakub
BatzP - Kaukab
BatzP - Khan Kusseir
BatzP - Khuweilfe
BatzP - Kuneitra
BatzP - Megiddo
BatzP - Nablus
BatzP - Rafa
BatzP - Sasa
BatzP - Semakh
BatzP - Sheria
BatzP - Surafend
BatzP - Wadi Fara
BatzS - Sinai
BatzS - Bir el Abd
BatzS - El Arish
BatzS - El Mazar
BatzS - El Qatiya
BatzS - Jifjafa
BatzS - Magdhaba
BatzS - Maghara
BatzS - Romani
BatzS - Suez 1915
BatzSe - Senussi
BatzWF - Westn Front
BW - Boer War
BW - NSW
BW - NSW - 1ACH
BW - NSW - 1NSWMR
BW - NSW - 2NSWMR
BW - NSW - 3ACH
BW - NSW - 3NSWIB
BW - NSW - 3NSWMR
BW - NSW - 5ACH
BW - NSW - A Bty RAA
BW - NSW - AAMC
BW - NSW - Aust H
BW - NSW - Lancers
BW - NSW - NSW Inf
BW - NSW - NSWCBC
BW - NSW - NSWIB
BW - NSW - NSWMR_A
BW - NZ
BW - Qld
BW - Qld - 1ACH
BW - Qld - 1QMI
BW - Qld - 2QMI
BW - Qld - 3ACH
BW - Qld - 3QMI
BW - Qld - 4QIB
BW - Qld - 5QIB
BW - Qld - 6QIB
BW - Qld - 7ACH
BW - QLD - AAMC
BW - SA
BW - SA - 1SAMR
BW - SA - 2ACH
BW - SA - 2SAMR
BW - SA - 3SACB
BW - SA - 4ACH
BW - SA - 4SAIB
BW - SA - 5SAIB
BW - SA - 6SAIB
BW - SA - 8ACH
BW - SA - AAMC
BW - Tas
BW - Tas - 1ACH
BW - Tas - 1TIB
BW - Tas - 1TMI
BW - Tas - 2TB
BW - Tas - 2TIB
BW - Tas - 3ACH
BW - Tas - 8ACH
BW - Vic
BW - Vic - 1VMI
BW - Vic - 2ACH
BW - Vic - 2VMR
BW - Vic - 3VB
BW - Vic - 4ACH
BW - Vic - 4VIB
BW - Vic - 5VMR
BW - Vic - 6ACH
BW - Vic - AAMC
BW - Vic - Scot H
BW - WA
BW - WA - 1WAMI
BW - WA - 2ACH
BW - WA - 2WAMI
BW - WA - 3WAB
BW - WA - 4ACH
BW - WA - 4WAMI
BW - WA - 5WAMI
BW - WA - 6WAMI
BW - WA - 8ACH
BW Gen - Campaign
BW Gen - Soldiers
BW General
Cavalry - General
Diary - Schramm
Egypt - Heliopolis
Egypt - Mena
Gen - Ataturk Pk, CNB
Gen - Australia
Gen - Legends
Gen - Query Club
Gen - St - NSW
Gen - St - Qld
Gen - St - SA
Gen - St - Tas
Gen - St - Vic
Gen - St - WA
Gm - German Items
Gm - Bk - 605 MGC
GW - 11 Nov 1918
GW - Atrocities
GW - August 1914
GW - Biographies
GW - Propaganda
GW - Spies
GW - We forgot
Militia 1899-1920
Militia - Area Officers
Militia - Inf - Infantry
Militia - Inf - 1IB
Militia - Inf - 2IB
Militia - Inf - 3IB
Militia - Inf - NSW
Militia - Inf - Qld
Militia - Inf - SA
Militia - Inf - Tas
Militia - Inf - Vic
Militia - Inf - WA
Militia - K.E.Horse
Militia - LH
Militia - LH - Regts
Militia - LH - 1LHB
Militia - LH - 2LHB
Militia - LH - 3LHB
Militia - LH - 4LHB
Militia - LH - 5LHB
Militia - LH - 6LHB
Militia - LHN - NSW
Militia - LHN - 1/7/1
Militia - LHN - 2/9/6
Militia - LHN - 3/11/7
Militia - LHN - 4/6/16
Militia - LHN - 5/4/15
Militia - LHN - 6/5/12
Militia - LHN - 28
Militia - LHQ - Qld
Militia - LHQ - 13/2
Militia - LHQ - 14/3/11
Militia - LHQ - 15/1/5
Militia - LHQ - 27/14
Militia - LHS - SA
Militia - LHS - 16/22/3
Militia - LHS - 17/23/18
Militia - LHS - 24/9
Militia - LHT - Tas
Militia - LHT - 12/26
Militia - LHV - Vic
Militia - LHV - 7/15/20
Militia - LHV - 8/16/8
Militia - LHV - 9/19
Militia - LHV - 10/13
Militia - LHV - 11/20/4
Militia - LHV - 19/17
Militia - LHV - 29
Militia - LHW - WA
Militia - LHW-18/25/10
Militia - Military Orders
Militia - Misc
MilitiaRC - Rifle Clubs
MilitiaRC - NSW
MilitiaRC - NT
MilitiaRC - Qld
MilitiaRC - SA
MilitiaRC - Tas
MilitiaRC - Vic
MilitiaRC - WA
Militiaz - New Zealand
Tk - Turkish Items
Tk - Army
Tk - Bks - Books
Tk - Bks - 1/33IR
Tk - Bks - 27th IR
Tk - Bks - Air Force
Tk - Bks - Yildirim
Tk - POWs
Wp - Weapons
Wp - Hotchkiss Cav
Wp - Hotchkiss PMG
Blog Tools
Edit your Blog
Build a Blog
RSS Feed
View Profile
Open Community
Post to this Blog
Site Index
Education Centre
LH Militia
Boer War
Transport Ships
LH Battles
ALH - Units
ALH - General
Aboriginal Light H
Weapons
Ottoman Sources

"At a mile distant their thousand hooves were stuttering thunder, coming at a rate that frightened a man - they were an awe inspiring sight, galloping through the red haze - knee to knee and horse to horse - the dying sun glinting on bayonet points..." Trooper Ion Idriess

The Australian Light Horse Studies Centre aims to present an accurate history as chroniclers of early Australian military developments from 1899 to 1920.

The Australian Light Horse Studies Centre site holds over 12,000 entries and is growing daily.

Contact: Australian Light Horse Studies Centre

Let us hear your story: You can tell your story, make a comment or ask for help on our Australian Light Horse Studies Centre Forum called:

Desert Column Forum

WARNING: This site contains: names, information and images of deceased people; and, language which may be considered inappropriate today.

Saturday, 15 March 2003
4th West Australian Mounted Infantry, Outline
Topic: BW - WA - 4WAMI

4th WAMI

4th West Australian Mounted Infantry

Outline


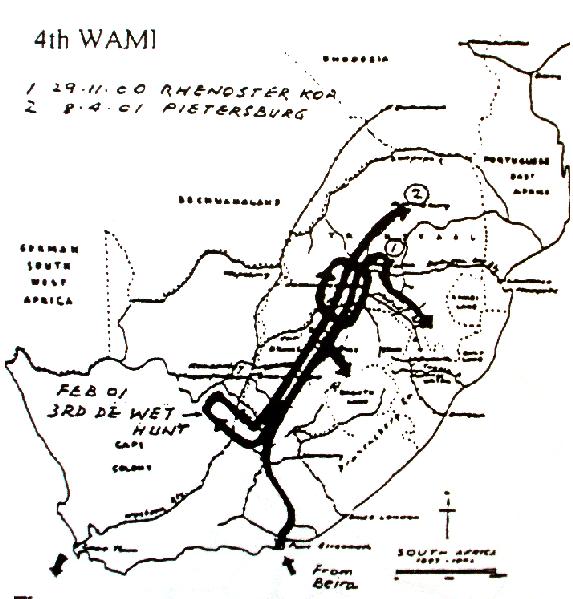
Map illustrating the activities of the 4th West Australian Mounted Infantry in South Africa, 1900-1901.

[From: Chamberlain, M., The Australians in the South African War 1899-1902, Canberra, 1999.]


In 1911, Lieutenant-Colonel P. L. Murray, produced a marvellous Boer War reference detailing all the contingents sent from Australia to South Africa, giving a brief history of the formation and finally, listing all the soldiers who saw service in South Africa with that unit. The book was called, Official Records of the Australian Military Contingents to the War in South Africa. It is now the standard reference and starting place for any person interested in pursuing information about Australian involvement in the Boer War.

Murray, P. L., Official Records of the Australian Military Contingents to the War in South Africa, pp. 413 - 414.


Fourth (Mounted Infantry) Contingent.

By the Western Australian Government Gazette of 16th March, 1900, it was notified that the formation of a fourth Company of Mounted Infantry had been authorized, with an establishment of 7 officers and 125 of other ranks. This was the first Western Australian Contingent of Imperial Bushmen. For pay, clothing, equipment, conditions of enrolment, and service, etc., vide Imperial Bushmen, New South Wales or Victoria.

By Army Order 150 (Imperial), July, 1900, it was intimated that N.C.O: s and men of Australian and other Colonial Contingents in receipt of ordinary Army rates of pay, would obtain a gratuity of £5 when discharged medically unfit, or on account of their services being no longer required, or on the termination of their engagements. In the event of death during service, the gratuity would be credited to the estate. This gratuity was, also, to be in addition to the gratuity (if any) given to the troops at the end of the war.


Departure and Return

The Contingent left on the 8th May, 1900, comprising-7 officers, 120 others, with 132 horses. Three were killed; 1 officer promoted from the ranks; 3 officers, 35 others were struck off in South Africa; 5 officers, 81 others returned to Australia.


Promotions, Etc.

Captain J. Rose was promoted Major, 15th March, 1900. Lieutenant C. A. C. Newland, promoted Captain, 15th March, 1900.

Lieutenant E. Vernon, promoted Captain (Sap.), 1st April, 1902, attached to 6th Contingent.

Lieutenant E. R. Williams, promoted Captain, 8th March, 1901, and appointed to 6th Contingent.

Quartermaster-Sergeant H. N. Venn, promoted Lieutenant, 2nd March, 1901.

Corporal L. L. Reid became a Lieutenant in 8th Australian Commonwealth Horse.

For promotions of N.C.O.'s and men, vide nominal roll.


Service.

The squadron left Fremantle by the transport Manhattan on the 8th May, 1900, and arrived at Beira on the 28th. After having touched at Durban, the Contingent was landed at Port Elizabeth on 19th June, and was at ones taken to the Kroonstadt district. They served with General Clements' Column; and they were present at Bethlehem, Rhenoster Kop, and Wittebergen.

On 23rd June they joined a force under Colonel Brookfield, which was to we some very severe fighting during the ensuing three weeks. They also formed part of the 4th Regiment of Imperial Bushmen, consisting of the 4th South Australians, the 4th Western Australians, and the 4th (or more properly 3rd) Tasmanians, under Lieut.-Colonel J Rowell.

On the 3rd July, General Paget had a stiff engagement with the enemy at Leeuw Kop. In the course of the fighting the guns had been taken to the road; and, during a pause in the action, the escort had been removed to the rear. The Boers, with great skill and secrecy, delivered a sudden and furious counter-attack, in which they gained temporary possession of the guns. Captain Budworth succeeded in rallying the Australians, who had retired, and promptly brought them back. For some time there was cause for anxiety; but the period of imminent danger did not last long; it was over from the moment when, under the firing of the Australians, the Boers left the disabled guns and retreated. Colonel Rowell, having broken a rib through his horse falling, was unable to be present, and Major Rose commanded the Bushmen.

At the taking of Bethlehem, 7th July, 300 Bushmen, mostly South and Western Australians, joined in the attack, and behaved excellently. They were in the pursuit of Do Wet from Bethlehem through Oliphant's Nek. On 4th November, the regiment, which had been split up, was together again, under Colonel Rowell. It was long in General Plumer's Force, and did very good work in the operations north of Pretoria and in the Eastern Transvaal.

Upon De Wet's intention to attempt an invasion of Cape Colony being manifested about the end of January, 1901, General Plumer's troops were entrained from Brugspruit in the Eastern Transvaal to Cape Colony; and it was in a great measure due to them that the Boer General was driven out. There were many casualties in the numerous rear-guard engagements with the commandoes. After pursuing the remnant northward, Plumer's men were again entrained at Brandfort for the district north of Pretoria, and took part in the expedition to Pietersburg.

On the Pietersburg trek, and after the occupation of that place, the 4th Imperial Bushmen contributed largely to the success of operations generally in advance of Plumer's Force ; they took many prisoners and wagons, and one gun. Some of the 4th Imperial Bushmen were in the escort for a convoy which was sharply attacked by some 400 of the enemy, on the Bethal-Standerton-road, 25th May, 1901. “The escort under Colonel Galway fought with great gallantry, and completely confuted the enemy's repeated efforts to press into close quarters." (Lord Kitchener's despatch, 8th July).

On the 5th July, 1901, the Contingent departed from Cape Town in the transport Britannic, and arrived at Albany on the 20th. Disbanded on the 14th August.

War Services and Honours.

Rose, Major J.- Operations in the Transvaal and Orange River Colony between June, 1900, and July, 1901, including actions at Bethlehem, Rhenoster Kop, and Wittebergen. Queen's Modal with three clasps.

Newland, Captain C. A. C.- Operations and actions as stated. Queen's Modal with three clasps.

Barnes, Lieutenant C. A.- Operations as stated. Actions at Eland's River, Bethlehem, and Wittebergen. Queen's Medal with three clasps.

Vernon, Lieutenant E.- Operations as elated. Actions at Bethlehem, Rhenoster Kop, and Wittebergen. Police duty, under Military Governor, Pretoria. Queen's Modal with three clasps; King's medal with two clasps.

Lieutenants F. G. Hume, B. R. Williams, and H. N. Venn, and Captain (Medical Staff) W. Gibson, participated in the operations and actions generally, and obtained the Queen's Medal with clasps. Lieutenant Williams was promoted Captain, 8th March, 1901, and served with 6th Contingent, vide operations of that Contingent.


Further Reading:

4th West Australian Mounted Infantry

4th West Australian Mounted Infantry, Roll of Honour 

Boer War, 1899 - 1902

Battles where Australians fought, 1899-1920


Citation: 4th West Australian Mounted Infantry, Outline

Posted by Project Leader at 12:01 AM EAST
Updated: Sunday, 2 May 2010 5:00 PM EADT

View Latest Entries

Full Site Index


powered by FreeFind
Let us hear your story: You can tell your story, make a comment or ask for help on our forum.

Desert Column Forum

A note on copyright

The Australian Light Horse Studies Centre is a not for profit and non profit group whose sole aim is to write the early history of the Australian Light Horse from 1900 - 1920. It is privately funded and the information is provided by the individuals within the group and while permission for the use of the material has been given for this site for these items by various donors, the residual and actual copyright for these items, should there be any, resides exclusively with the donors. The information on this site is freely available for private research use only and if used as such, should be appropriately acknowledged. To assist in this process, each item has a citation attached at the bottom for referencing purposes.

Please Note: No express or implied permission is given for commercial use of the information contained within this site.

A note to copyright holders

The Australian Light Horse Studies Centre has made every endeavour to contact copyright holders of material digitised for this blog and website and where appropriate, permission is still being sought for these items. Where replies were not received, or where the copyright owner has not been able to be traced, or where the permission is still being sought, the Australian Light Horse Studies Centre has decided, in good faith, to proceed with digitisation and publication. Australian Light Horse Studies Centre would be happy to hear from copyright owners at any time to discuss usage of this item.

Contact

Australian Light Horse Studies Centre

eXTReMe Tracker