« November 2008 »
S M T W T F S
1
2 3 4 5 6 7 8
9 10 11 12 13 14 15
16 17 18 19 20 21 22
23 24 25 26 27 28 29
30
You are not logged in. Log in


Search the site:


powered by FreeFind
Volunteer with us.

Entries by Topic All topics  
A Latest Site News
A - Using the Site
AAA Volunteers
AAB-Education Centre
AAC-Film Clips
AAC-Photo Albums
AIF & MEF & EEF
AIF - Lighthorse
AIF - ALH - A to Z
AIF - DMC
AIF - DMC - Or Bat
AIF - DMC - Anzac MD
AIF - DMC - Aus MD
AIF - DMC - British
AIF - DMC - BWI
AIF - DMC - French
AIF - DMC - Indian
AIF - DMC - Italian
AIF - DMC - Medical
AIF - DMC - Remounts
AIF - DMC - Scouts
AIF - DMC - Sigs
AIF - DMC - Sigs AirlnS
AIF - DMC - 1 Sig Sqn
AIF - DMC - 2 Sig Sqn
AIF - DMC - Eng
AIF - DMC - Eng 1FSE
AIF - DMC - Eng 2FSE
AIF - DMC - GSR
AIF - 1B - 1 LHB
AIF - 1B - 6 MVS
AIF - 1B - 1 LHMGS
AIF - 1B - 1 Sig Trp
AIF - 1B - 1 LHFA
AIF - 1B - 1 LHR
AIF - 1B - 2 LHR
AIF - 1B - 3 LHR
AIF - 2B - 2 LHB
AIF - 2B - 7 MVS
AIF - 2B - 2 LHFA
AIF - 2B - 2 LHMGS
AIF - 2B - 2 Sig Trp
AIF - 2B - 5 LHR
AIF - 2B - 6 LHR
AIF - 2B - 7 LHR
AIF - 3B - 3 LHB
AIF - 3B - 8 MVS
AIF - 3B - 3 LHB Sigs
AIF - 3B - 3 LHFA
AIF - 3B - 3 LHMGS
AIF - 3B - 3 Sig Trp
AIF - 3B - 8 LHR
AIF - 3B - 9 LHR
AIF - 3B - 10 LHR
AIF - 4B - 4 LHB
AIF - 4B - 4 Sig Trp
AIF - 4B - 9 MVS
AIF - 4B - 4 LHFA
AIF - 4B - 4 LHMGS
AIF - 4B - 4 LHR
AIF - 4B - 11 LHR
AIF - 4B - 12 LHR
AIF - 5B - 5 LHB
AIF - 5B - 10 MVS
AIF - 5B - 5 LHFA
AIF - 5B - 5 Sig Trp
AIF - 5B - ICC
AIF - 5B - 14 LHR
AIF - 5B - 15 LHR
AIF - 5B - 1er Regt
AIF - 5B - 2 NZMGS
AIF - AASC
AIF - Aboriginal LH
AIF - Badges
AIF - Cars
AIF - Chinese LH
AIF - Double Sqns
AIF - Engineers
AIF - Fr - 22 Corps
AIF - Fr - 13 LHR
AIF - Honour Roll
AIF - HQ - 3rd Echelon
AIF - Marching Songs
AIF - Misc Topics
AIF - NZMRB
AIF - NZMRB - AMR
AIF - NZMRB - CMR
AIF - NZMRB - EFT
AIF - NZMRB - NZMFA
AIF - NZMRB - NZMGS
AIF - NZMRB - OMR
AIF - NZMRB - Sig-Trp
AIF - NZMRB - WMR
AIF - Ships
AIF - Ships - Encountr
AIF - Ships - Una
AIF - WFF
AIF - Wireless Sqn
Battles
BatzA - Australia
BatzA - Broken Hill
BatzA - Liverpool
BatzA - Merivale
BatzB - Boer War
BatzB - Bakenlaagte
BatzB - Belmont
BatzB - Bothaville
BatzB - Buffels Hoek
BatzB - Coetzees Drift
BatzB - Diamond Hill
BatzB - Driefontein
BatzB - Elands
BatzB - Graspan
BatzB - Grobelaar
BatzB - Grootvallier
BatzB - Hartebestfontn
BatzB - Houtnek
BatzB - Karee Siding
BatzB - Kimberley
BatzB - Koster River
BatzB - Leeuw Kop
BatzB - Mafeking
BatzB - Magersfontein
BatzB - Modder River
BatzB - Onverwacht
BatzB - Paardeberg
BatzB - Palmietfontein
BatzB - Pink Hill
BatzB - Poplar Grove
BatzB - Rhenoster
BatzB - Sannahs Post
BatzB - Slingersfontn
BatzB - Stinkhoutbm
BatzB - Sunnyside
BatzB - Wilmansrust
BatzB - Wolvekuil
BatzB - Zand River
BatzG - Gallipoli
BatzG - Anzac
BatzG - Aug 1915
BatzG - Baby 700
BatzG - Evacuation
BatzG - Hill 60
BatzG - Hill 971
BatzG - Krithia
BatzG - Lone Pine
BatzG - Nek
BatzJ - Jordan Valley
BatzJ - 1st Amman
BatzJ - 2nd Amman
BatzJ - Abu Tellul
BatzJ - Es Salt
BatzJ - JV Maps
BatzJ - Ziza
BatzM - Mespot
BatzM - Baghdad
BatzM - Ctesiphon
BatzM - Daur
BatzM - Kurna
BatzM - Kut el Amara
BatzM - Ramadi
BatzN - Naval
BatzN - AE1
BatzN - Cocos Is
BatzN - Heligoland
BatzN - Marmara
BatzN - Zeebrugge
BatzN - Zeppelin L43
BatzNG - Bitapaka
BatzO - Other
BatzO - Baku
BatzO - Egypt 1919
BatzO - Emptsa
BatzO - Karawaran
BatzO - Peitang
BatzO - Wassa
BatzP - Palestine
BatzP - 1st Gaza
BatzP - 2nd Gaza
BatzP - 3rd Gaza
BatzP - Aleppo
BatzP - Amwas
BatzP - Ayun Kara
BatzP - Bald Hill
BatzP - Balin
BatzP - Beersheba
BatzP - Berkusieh
BatzP - Damascus
BatzP - El Auja
BatzP - El Buggar
BatzP - El Burj
BatzP - Haifa
BatzP - Huj
BatzP - JB Yakub
BatzP - Kaukab
BatzP - Khan Kusseir
BatzP - Khuweilfe
BatzP - Kuneitra
BatzP - Megiddo
BatzP - Nablus
BatzP - Rafa
BatzP - Sasa
BatzP - Semakh
BatzP - Sheria
BatzP - Surafend
BatzP - Wadi Fara
BatzS - Sinai
BatzS - Bir el Abd
BatzS - El Arish
BatzS - El Mazar
BatzS - El Qatiya
BatzS - Jifjafa
BatzS - Magdhaba
BatzS - Maghara
BatzS - Romani
BatzS - Suez 1915
BatzSe - Senussi
BatzWF - Westn Front
BW - Boer War
BW - NSW
BW - NSW - 1ACH
BW - NSW - 1NSWMR
BW - NSW - 2NSWMR
BW - NSW - 3ACH
BW - NSW - 3NSWIB
BW - NSW - 3NSWMR
BW - NSW - 5ACH
BW - NSW - A Bty RAA
BW - NSW - AAMC
BW - NSW - Aust H
BW - NSW - Lancers
BW - NSW - NSW Inf
BW - NSW - NSWCBC
BW - NSW - NSWIB
BW - NSW - NSWMR_A
BW - NZ
BW - Qld
BW - Qld - 1ACH
BW - Qld - 1QMI
BW - Qld - 2QMI
BW - Qld - 3ACH
BW - Qld - 3QMI
BW - Qld - 4QIB
BW - Qld - 5QIB
BW - Qld - 6QIB
BW - Qld - 7ACH
BW - QLD - AAMC
BW - SA
BW - SA - 1SAMR
BW - SA - 2ACH
BW - SA - 2SAMR
BW - SA - 3SACB
BW - SA - 4ACH
BW - SA - 4SAIB
BW - SA - 5SAIB
BW - SA - 6SAIB
BW - SA - 8ACH
BW - SA - AAMC
BW - Tas
BW - Tas - 1ACH
BW - Tas - 1TIB
BW - Tas - 1TMI
BW - Tas - 2TB
BW - Tas - 2TIB
BW - Tas - 3ACH
BW - Tas - 8ACH
BW - Vic
BW - Vic - 1VMI
BW - Vic - 2ACH
BW - Vic - 2VMR
BW - Vic - 3VB
BW - Vic - 4ACH
BW - Vic - 4VIB
BW - Vic - 5VMR
BW - Vic - 6ACH
BW - Vic - AAMC
BW - Vic - Scot H
BW - WA
BW - WA - 1WAMI
BW - WA - 2ACH
BW - WA - 2WAMI
BW - WA - 3WAB
BW - WA - 4ACH
BW - WA - 4WAMI
BW - WA - 5WAMI
BW - WA - 6WAMI
BW - WA - 8ACH
BW Gen - Campaign
BW Gen - Soldiers
BW General
Cavalry - General
Diary - Schramm
Egypt - Heliopolis
Egypt - Mena
Gen - Ataturk Pk, CNB
Gen - Australia
Gen - Legends
Gen - Query Club
Gen - St - NSW
Gen - St - Qld
Gen - St - SA
Gen - St - Tas
Gen - St - Vic
Gen - St - WA
Gm - German Items
Gm - Bk - 605 MGC
GW - 11 Nov 1918
GW - Atrocities
GW - August 1914
GW - Biographies
GW - Propaganda
GW - Spies
GW - We forgot
Militia 1899-1920
Militia - Area Officers
Militia - Inf - Infantry
Militia - Inf - 1IB
Militia - Inf - 2IB
Militia - Inf - 3IB
Militia - Inf - NSW
Militia - Inf - Qld
Militia - Inf - SA
Militia - Inf - Tas
Militia - Inf - Vic
Militia - Inf - WA
Militia - K.E.Horse
Militia - LH
Militia - LH - Regts
Militia - LH - 1LHB
Militia - LH - 2LHB
Militia - LH - 3LHB
Militia - LH - 4LHB
Militia - LH - 5LHB
Militia - LH - 6LHB
Militia - LHN - NSW
Militia - LHN - 1/7/1
Militia - LHN - 2/9/6
Militia - LHN - 3/11/7
Militia - LHN - 4/6/16
Militia - LHN - 5/4/15
Militia - LHN - 6/5/12
Militia - LHN - 28
Militia - LHQ - Qld
Militia - LHQ - 13/2
Militia - LHQ - 14/3/11
Militia - LHQ - 15/1/5
Militia - LHQ - 27/14
Militia - LHS - SA
Militia - LHS - 16/22/3
Militia - LHS - 17/23/18
Militia - LHS - 24/9
Militia - LHT - Tas
Militia - LHT - 12/26
Militia - LHV - Vic
Militia - LHV - 7/15/20
Militia - LHV - 8/16/8
Militia - LHV - 9/19
Militia - LHV - 10/13
Militia - LHV - 11/20/4
Militia - LHV - 19/17
Militia - LHV - 29
Militia - LHW - WA
Militia - LHW-18/25/10
Militia - Military Orders
Militia - Misc
MilitiaRC - Rifle Clubs
MilitiaRC - NSW
MilitiaRC - NT
MilitiaRC - Qld
MilitiaRC - SA
MilitiaRC - Tas
MilitiaRC - Vic
MilitiaRC - WA
Militiaz - New Zealand
Tk - Turkish Items
Tk - Army
Tk - Bks - Books
Tk - Bks - 1/33IR
Tk - Bks - 27th IR
Tk - Bks - Air Force
Tk - Bks - Yildirim
Tk - POWs
Wp - Weapons
Wp - Hotchkiss Cav
Wp - Hotchkiss PMG
Blog Tools
Edit your Blog
Build a Blog
RSS Feed
View Profile
Open Community
Post to this Blog
Site Index
Education Centre
LH Militia
Boer War
Transport Ships
LH Battles
ALH - Units
ALH - General
Aboriginal Light H
Weapons
Ottoman Sources

"At a mile distant their thousand hooves were stuttering thunder, coming at a rate that frightened a man - they were an awe inspiring sight, galloping through the red haze - knee to knee and horse to horse - the dying sun glinting on bayonet points..." Trooper Ion Idriess

The Australian Light Horse Studies Centre aims to present an accurate history as chroniclers of early Australian military developments from 1899 to 1920.

The Australian Light Horse Studies Centre site holds over 12,000 entries and is growing daily.

Contact: Australian Light Horse Studies Centre

Let us hear your story: You can tell your story, make a comment or ask for help on our Australian Light Horse Studies Centre Forum called:

Desert Column Forum

WARNING: This site contains: names, information and images of deceased people; and, language which may be considered inappropriate today.

Saturday, 8 November 2008
2431 Pte Jack Kearns, 11th LHR, Lesson 11 Resource
Topic: AIF - Aboriginal LH


Education Centre

The Australian Light Horse Studies Centre in conjunction with the various Education authorities in Australia, has embarked upon producing a program of instruction targeted initially towards the Later Adolescence band of scholars, characteristically those who are studying in Year 9 and 10 within Australia. Each lesson will be a self contained module. Some will be more difficult than others and graded accordingly.


Lesson 11 Aboriginal Light Horsemen

Resource - Light Horseman Service Record - Essential Pages

2431 Pte Jack Kearns,  11th Light Horse Regiment, 20th Reinforcement

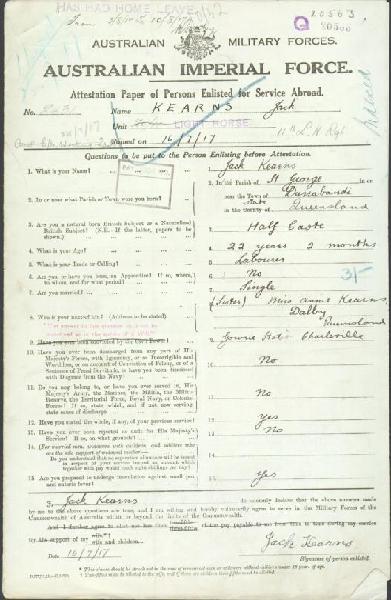
2431 Pte Jack Kearns, Attestation Paper, p. 1.

[Click on document for larger version.]

The front cover of the Attestation Paper of Persons Enlisted for Service Abroad provides the reader with the following information:

  • Service Number,
  • Surname,
  • Given Names,
  • Age,
  • Employment,
  • Married or Single,
  • Next of Kin Relationship,
  • Next of Kin Name and Address,
  • Enlistment Date.

This information is vital as it identifies the specific soldier and in case of death or injury, allows the relatives to be informed. The next of kin was important for another reason. Each soldier was compelled to give an allotment of their daily wage to the person nominated as the next of kin. This was an essential financial consideration.

Once this information was gathered, the second page dealt with an oath to the King. The next page to give information was page 3.

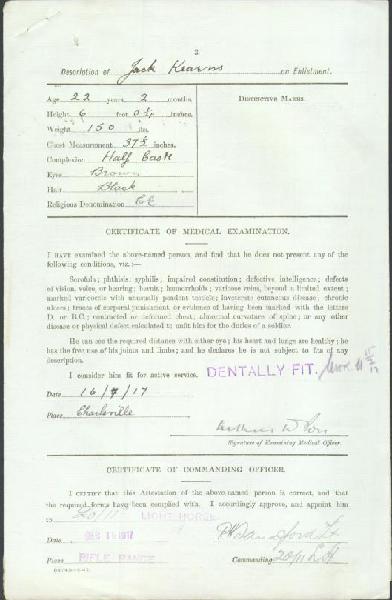
2431 Pte Jack Kearns, Attestation Paper, p. 3

[Click on document for larger version.]

The third page of the Attestation Paper of Persons Enlisted for Service Abroad provides the reader with the following information:

  • Height,
  • Weight,
  • Chest Measurement
  • Complexion,
  • Eyes,
  • Hair, 
  • Religion.

The health of the potential soldier was important as the life was particularly strenuous. The ability to carry heavy weights for great distances was most important.

The next form that is most common in the Service File is the B103, the  Casualty Form - Active Service. Every movement of the soldier is recorded. The reasons for this are fourfold.

1. The location of the soldier at any one time was essential to establish where his rations were to be drawn.

2.  The form established the entitlements to drawing pay at a particular level. A soldier in the field was allowed to draw pay but when in hospital was not allowed to draw their pay as it was considered that everything to assist the soldier's recovery was provided.

3.  By tracking the movements of the soldier, it allowed early detection of desertion if that were to occur.

4. At the end of the war, the chronology of this form was used as the basis for post war entitlements such as medals, pensions, repatriation assistance, access to hospitals and any other service available for an ex-serviceman for the rest of his life.

The B103 may be as simple as one sheet or multiple sheets. It depended upon the individual serviceman.

To assist in understanding this particular form in relation to the men from the 11th LHR, Lesson 11 Resource, a list of terms and names are available at the Index to Common B103 Terms. The link is below.


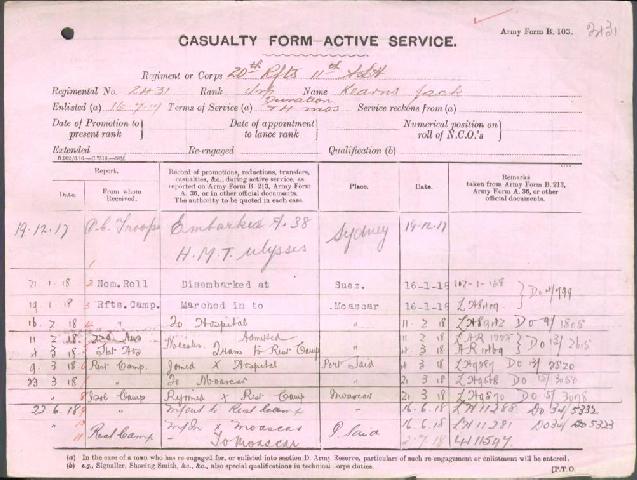
2431 Pte Jack Kearns, B103, p. 1.

[Click on document for larger version.]

The front of the B103, the  Casualty Form - Active Service provides the reader with the following information:

  • Regiment
  • Rank on Enlistment,
  • Terms of Enlistment,
  • Embarkation Date,
  • Embarkation Port,
  • Embarkation Ship,
  • Date Taken on Strength.

As can be seen, the form is a chronology of the man's service in the AIF. All B103 forms in every service file is similar. 

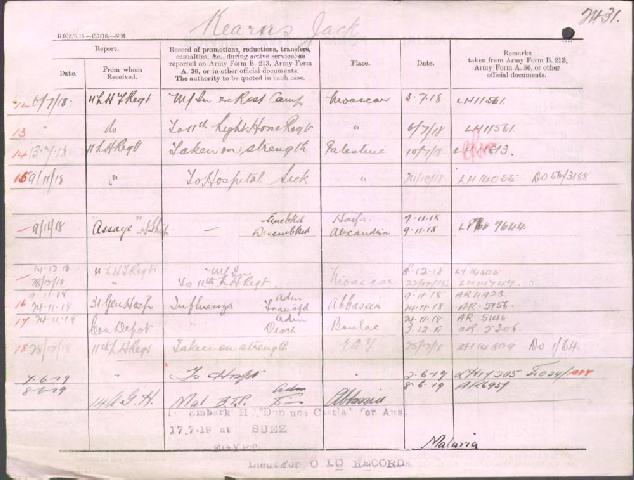
In this case the man has two pages to the form. To finish his story, the page will be turned over. 


2431 Pte Jack Kearns, B103, p. 2.

[Click on document for larger version.]

The back of the B103, the  Casualty Form - Active Service provides the reader with the following information:

  • Chronology,
  • Fate,
  • Date.

Once the B103, the  Casualty Form - Active Service was completed due to the expiration of service, any transactions during subsequent to service were recorded on a flimsey called Transferred to Australian Imperial Force D and it was here that all post service information was maintained.


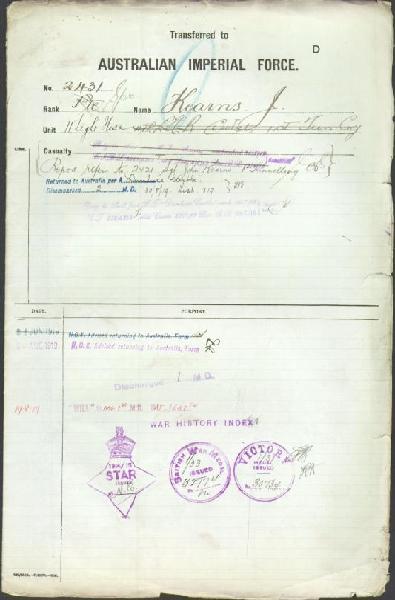
2431 Pte Jack Kearns, AIF D, p. 1.

[Click on document for larger version.]


Page 1 of the Transferred to Australian Imperial Force D provides the reader with the following information:

  • The last rank held in the AIF,
  • The date of Discharge,
  • The place where Discharged,
  • The eligible medals awarded to the serviceman.

Information on this form depends upon the individual. This particular form can at times run into many pages.


2431 Pte Jack Kearns, a brief military biography from The AIF Project:

Jack KEARNS

Regimental number2431
ReligionChurch of England
OccupationLabourer
AddressGowrie Station, Charleville, Queensland
Marital statusSingle
Age at embarkation22
Next of kinSister, Miss Annie Kearns, Dalby, Queensland
Enlistment date16 July 1917
Rank on enlistmentPrivate
Unit name11th Light Horse Regiment, 20th Reinforcement
AWM Embarkation Roll number10/16/3
Embarkation detailsUnit embarked from Sydney, New South Wales, on board HMAT A38 Ulysses on 19 December 1917
Rank from Nominal RollPrivate
Unit from Nominal Roll11th Light Horse Regiment
FateReturned to Australia 17 July 1919


Additional Research:

To understand the terms employed in the B103, the  Casualty Form - Active Service, an index is available here:

Index to Common B103 Terms

For those interested in further study on this man, the following internet resources are available:

ADFA Summary - This is a cameo summary of his service record.

http://www.aif.adfa.edu.au:8080/showPerson?pid=160245

National Archives - This is the complete service file of 2431 Pte Jack Kearns

http://naa12.naa.gov.au/scripts/imagine.asp?B=4375186&I=1&SE=1

Australian War Memorial

The Australian War Memorial carries two biographical data bases - the Embarkation Roll and the Nominal Roll which was closed in August 1919.

Embarkation details:

http://www.awm.gov.au/nominalrolls/ww1/embarkation/person.asp?p=42549


Nominal Roll:

http://www.awm.gov.au/cms_images/awm133/28/28-056.pdf


Further Reading:

Other Aboriginal Servicemen

Pte Tom Cooper

2919 Pte Alfred John Henry Lovett

2430 Pte John Johnston, 11th LHR

Listing of Aboriginal Servicemen Biographies on this site

Other related items 

Reveille Articles on Aboriginals in the AIF

11th Light Horse War Diary Index for 1918 - 1919, Lesson 11 Resource

11th LHR, AIF account about the 2nd Es Salt Raid - March to May 1918, Chapter XVI

11th LHR, AIF account about the Jordan Valley – May to August 1918, Chapter XVII


Citation: 2431 Pte Jack Kearns, 11th LHR, Lesson 11 Resource

Posted by Project Leader at 10:28 AM EAST
Updated: Thursday, 20 November 2008 9:13 PM EAST
2429 Pte John Geary, 11th LHR, Lesson 11 Resource
Topic: AIF - Aboriginal LH


Education Centre

The Australian Light Horse Studies Centre in conjunction with the various Education authorities in Australia, has embarked upon producing a program of instruction targeted initially towards the Later Adolescence band of scholars, characteristically those who are studying in Year 9 and 10 within Australia. Each lesson will be a self contained module. Some will be more difficult than others and graded accordingly.


Lesson 11 Aboriginal Light Horsemen

Resource - Light Horseman Service Record - Essential Pages

2429 Pte John Geary,  11th Light Horse Regiment, 20th Reinforcement

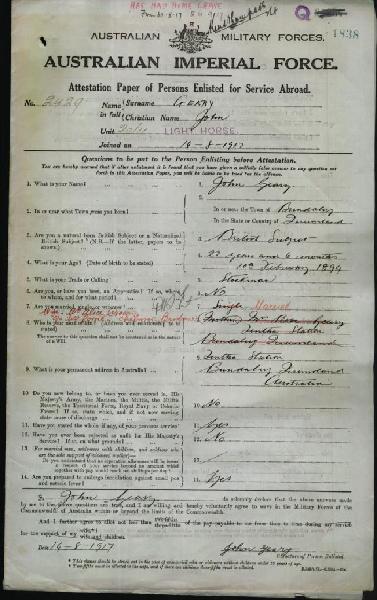
2429 Pte John Geary, Attestation Paper, p. 1.

[Click on document for larger version.]

The front cover of the Attestation Paper of Persons Enlisted for Service Abroad provides the reader with the following information:

  • Service Number,
  • Surname,
  • Given Names,
  • Age,
  • Employment,
  • Married or Single,
  • Next of Kin Relationship,
  • Next of Kin Name and Address,
  • Enlistment Date.

This information is vital as it identifies the specific soldier and in case of death or injury, allows the relatives to be informed. The next of kin was important for another reason. Each soldier was compelled to give an allotment of their daily wage to the person nominated as the next of kin. This was an essential financial consideration.

Once this information was gathered, the second page dealt with an oath to the King. The next page to give information was page 3.

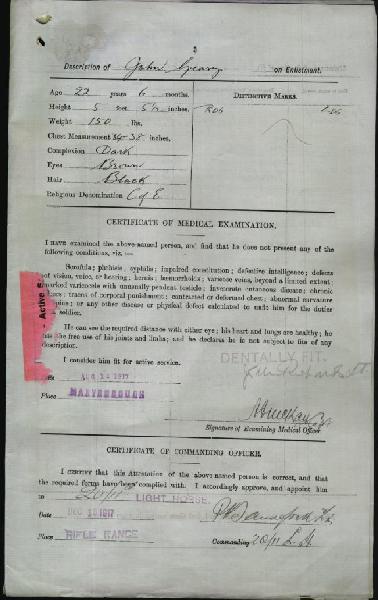
2429 Pte John Geary, Attestation Paper, p. 3

[Click on document for larger version.]

The third page of the Attestation Paper of Persons Enlisted for Service Abroad provides the reader with the following information:

  • Height,
  • Weight,
  • Chest Measurement
  • Complexion,
  • Eyes,
  • Hair, 
  • Religion.

The health of the potential soldier was important as the life was particularly strenuous. The ability to carry heavy weights for great distances was most important.

The next form that is most common in the Service File is the B103, the  Casualty Form - Active Service. Every movement of the soldier is recorded. The reasons for this are fourfold.

1. The location of the soldier at any one time was essential to establish where his rations were to be drawn.

2.  The form established the entitlements to drawing pay at a particular level. A soldier in the field was allowed to draw pay but when in hospital was not allowed to draw their pay as it was considered that everything to assist the soldier's recovery was provided.

3.  By tracking the movements of the soldier, it allowed early detection of desertion if that were to occur.

4. At the end of the war, the chronology of this form was used as the basis for post war entitlements such as medals, pensions, repatriation assistance, access to hospitals and any other service available for an ex-serviceman for the rest of his life.

The B103 may be as simple as one sheet or multiple sheets. It depended upon the individual serviceman.

To assist in understanding this particular form in relation to the men from the 11th LHR, Lesson 11 Resource, a list of terms and names are available at the Index to Common B103 Terms. The link is below.


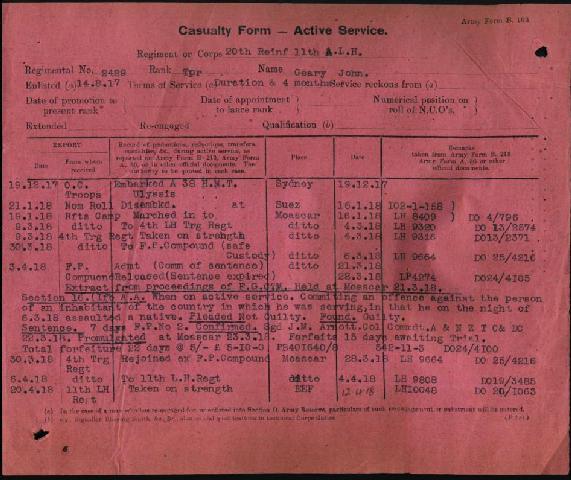
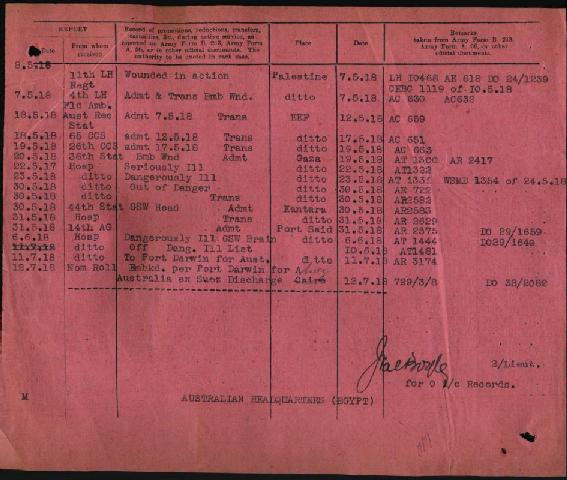
2429 Pte John Geary, B103, p. 1.

[Click on document for larger version.]

The front of the B103, the  Casualty Form - Active Service provides the reader with the following information:

  • Regiment
  • Rank on Enlistment,
  • Terms of Enlistment,
  • Embarkation Date,
  • Embarkation Port,
  • Embarkation Ship,
  • Date Taken on Strength.

As can be seen, the form is a chronology of the man's service in the AIF. All B103 forms in every service file is similar. 

In this case the man has two pages to the form. To finish his story, the page will be turned over. 


2429 Pte John Geary, B103, p. 2.

[Click on document for larger version.]

The back of the B103, the  Casualty Form - Active Service provides the reader with the following information:

  • Chronology,
  • Fate,
  • Date.

Once the B103, the  Casualty Form - Active Service was completed due to the expiration of service, any transactions during subsequent to service were recorded on a flimsey called Transferred to Australian Imperial Force D and it was here that all post service information was maintained.


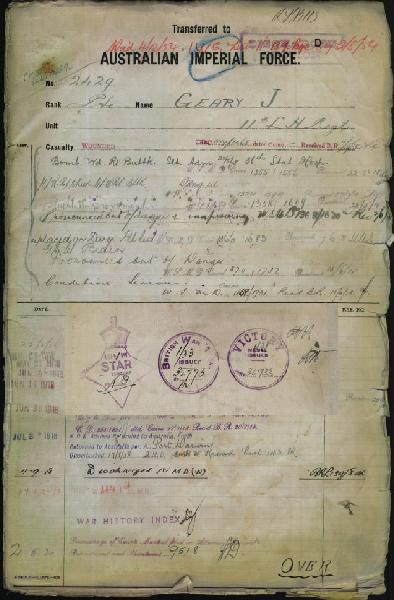
2429 Pte John Geary, AIF D, p. 1.

[Click on document for larger version.]


Page 1 of the Transferred to Australian Imperial Force D provides the reader with the following information:

  • The last rank held in the AIF,
  • The date of Discharge,
  • The place where Discharged,
  • The eligible medals awarded to the serviceman.

Information on this form depends upon the individual. This particular form can at times run into many pages.


2429 Pte John Geary, a brief military biography from The AIF Project:

John GEARY

Regimental number2429
ReligionChurch of England
OccupationStockman
AddressBundaberg, Queensland
Marital statusMarried
Age at embarkation22
Next of kinWife, Mrs Alice Geary, c/o Mrs Corrie, Chelmer, Brisbane, Queensland
Enlistment date14 August 1917
Rank on enlistmentPrivate
Unit name11th Light Horse Regiment, 20th Reinforcement
AWM Embarkation Roll number10/16/3
Embarkation detailsUnit embarked from Sydney, New South Wales, on board HMAT A38 Ulysses on 19 December 1917
Rank from Nominal RollPrivate
Unit from Nominal Roll11th Light Horse Regiment
FateReturned to Australia 12 July 1919
Other details

War service: Egypt, Palestine

Medals: British War Medal, Victory Medal
Date of death4 December 1953
Age at death58
Place of burialBeaudesert Cemetery, Queensland


Additional Research:

To understand the terms employed in the B103, the  Casualty Form - Active Service, an index is available here:

Index to Common B103 Terms

For those interested in further study on this man, the following internet resources are available:

ADFA Summary - This is a cameo summary of his service record.

http://www.aif.adfa.edu.au:8080/showPerson?pid=108758

National Archives - This is the complete service file of 2429 Pte John Geary

http://naa12.naa.gov.au/scripts/imagine.asp?B=4104159&I=1&SE=1

Australian War Memorial

The Australian War Memorial carries two biographical data bases - the Embarkation Roll and the Nominal Roll which was closed in August 1919.

Embarkation details:

http://www.awm.gov.au/nominalrolls/ww1/embarkation/person.asp?p=42547


Nominal Roll:

http://www.awm.gov.au/cms_images/awm133/19/19-070.pdf


Further Reading:

Other Aboriginal Servicemen

Pte Tom Cooper

2919 Pte Alfred John Henry Lovett

2430 Pte John Johnston, 11th LHR

Listing of Aboriginal Servicemen Biographies on this site

Other related items 

Reveille Articles on Aboriginals in the AIF

11th Light Horse War Diary Index for 1918 - 1919, Lesson 11 Resource

11th LHR, AIF account about the 2nd Es Salt Raid - March to May 1918, Chapter XVI

11th LHR, AIF account about the Jordan Valley – May to August 1918, Chapter XVII


Citation: 2429 Pte John Geary, 11th LHR, Lesson 11 Resource

Posted by Project Leader at 9:54 AM EAST
Updated: Thursday, 20 November 2008 9:12 PM EAST
2428 Pte Frank Fisher, 11th LHR, Lesson 11 Resource
Topic: AIF - Aboriginal LH


Education Centre

The Australian Light Horse Studies Centre in conjunction with the various Education authorities in Australia, has embarked upon producing a program of instruction targeted initially towards the Later Adolescence band of scholars, characteristically those who are studying in Year 9 and 10 within Australia. Each lesson will be a self contained module. Some will be more difficult than others and graded accordingly.


Lesson 11 Aboriginal Light Horsemen

Resource - Light Horseman Service Record - Essential Pages

2428 Pte Frank Fisher,  11th Light Horse Regiment, 20th Reinforcement

2428 Pte Frank Fisher, Attestation Paper, p. 1.

[Click on document for larger version.]

The front cover of the Attestation Paper of Persons Enlisted for Service Abroad provides the reader with the following information:

  • Service Number,
  • Surname,
  • Given Names,
  • Age,
  • Employment,
  • Married or Single,
  • Next of Kin Relationship,
  • Next of Kin Name and Address,
  • Enlistment Date.

This information is vital as it identifies the specific soldier and in case of death or injury, allows the relatives to be informed. The next of kin was important for another reason. Each soldier was compelled to give an allotment of their daily wage to the person nominated as the next of kin. This was an essential financial consideration.

Once this information was gathered, the second page dealt with an oath to the King. The next page to give information was page 3.

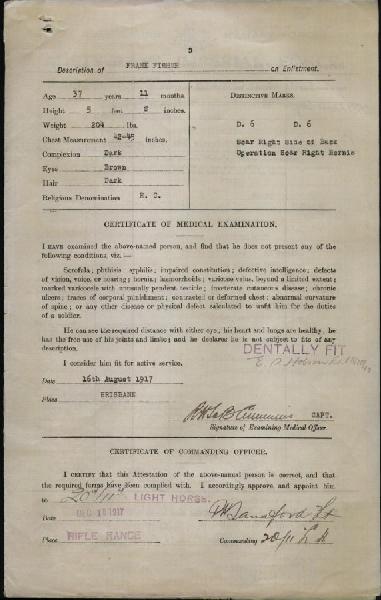
2428 Pte Frank Fisher, Attestation Paper, p. 3

[Click on document for larger version.]

The third page of the Attestation Paper of Persons Enlisted for Service Abroad provides the reader with the following information:

  • Height,
  • Weight,
  • Chest Measurement
  • Complexion,
  • Eyes,
  • Hair, 
  • Religion.

The health of the potential soldier was important as the life was particularly strenuous. The ability to carry heavy weights for great distances was most important.

The next form that is most common in the Service File is the B103, the  Casualty Form - Active Service. Every movement of the soldier is recorded. The reasons for this are fourfold.

1. The location of the soldier at any one time was essential to establish where his rations were to be drawn.

2.  The form established the entitlements to drawing pay at a particular level. A soldier in the field was allowed to draw pay but when in hospital was not allowed to draw their pay as it was considered that everything to assist the soldier's recovery was provided.

3.  By tracking the movements of the soldier, it allowed early detection of desertion if that were to occur.

4. At the end of the war, the chronology of this form was used as the basis for post war entitlements such as medals, pensions, repatriation assistance, access to hospitals and any other service available for an ex-serviceman for the rest of his life.

The B103 may be as simple as one sheet or multiple sheets. It depended upon the individual serviceman.

To assist in understanding this particular form in relation to the men from the 11th LHR, Lesson 11 Resource, a list of terms and names are available at the Index to Common B103 Terms. The link is below.


2428 Pte Frank Fisher, B103, p. 1.

[Click on document for larger version.]

The front of the B103, the  Casualty Form - Active Service provides the reader with the following information:

  • Regiment
  • Rank on Enlistment,
  • Terms of Enlistment,
  • Embarkation Date,
  • Embarkation Port,
  • Embarkation Ship,
  • Date Taken on Strength.

As can be seen, the form is a chronology of the man's service in the AIF. All B103 forms in every service file is similar. 

In this case the man has two pages to the form. To finish his story, the page will be turned over. 


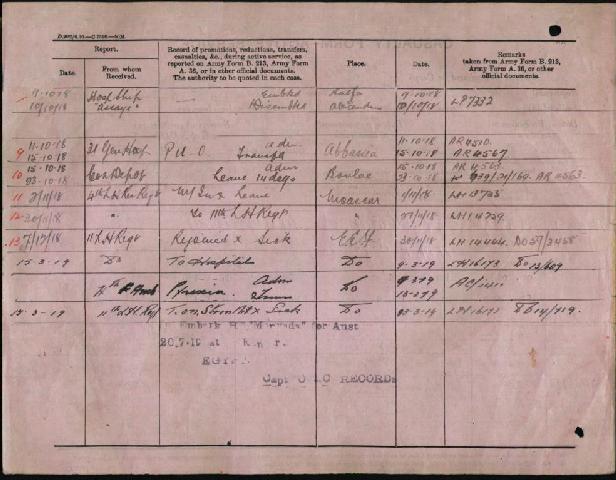
2428 Pte Frank Fisher, B103, p. 2.

[Click on document for larger version.]

The back of the B103, the  Casualty Form - Active Service provides the reader with the following information:

  • Chronology,
  • Fate,
  • Date.

Once the B103, the  Casualty Form - Active Service was completed due to the expiration of service, any transactions during subsequent to service were recorded on a flimsey called Transferred to Australian Imperial Force D and it was here that all post service information was maintained.


2428 Pte Frank Fisher, AIF D, p. 1.

[Click on document for larger version.]


Page 1 of the Transferred to Australian Imperial Force D provides the reader with the following information:

  • The last rank held in the AIF,
  • The date of Discharge,
  • The place where Discharged,
  • The eligible medals awarded to the serviceman.

Information on this form depends upon the individual. This particular form can at times run into many pages.


2428 Pte Frank Fisher, a brief military biography from The AIF Project:

Frank FISHER

Regimental number2428
Date of birth27 August 1880
ReligionRoman Catholic
OccupationLabourer
AddressBarrambah Settlement via Murgon, Queensland
Marital statusMarried
Age at embarkation38
Next of kinWife, Mrs Esme Fisher, Barrambah Settlement via Murgon, Queensland
Enlistment date16 August 1917
Rank on enlistmentPrivate
Unit name11th Light Horse Regiment, 20th Reinforcement
AWM Embarkation Roll number10/16/3
Embarkation detailsUnit embarked from Sydney, New South Wales, on board HMAT A38 Ulysses on 19 December 1917
Rank from Nominal RollPrivate
Unit from Nominal Roll11th Light Horse Regiment
FateReturned to Australia 22 July 1919
Discharge date22 September 1919
Other details

War service: Middle East

Embarked from Sydney, 19 December 1917; disembarked Suez, 16 January 1918.

Taken on strength, 11th Light Horse Regiment, 11 April 1918. Evacuated from Haifa, Palestine, to Alexandria, Egypt, 9 October 1918 (pyrexia); rejoined unit, 30 November 1918.

Commenced return to Australia on board HT 'Morvada', 22 July 1919; disembarked Sydney, 28 August 1919; discharged, 22 September 1919.

Medals: British War Medal, Victory Medal


Additional Research:

To understand the terms employed in the B103, the  Casualty Form - Active Service, an index is available here:

Index to Common B103 Terms

For those interested in further study on this man, the following internet resources are available:

ADFA Summary - This is a cameo summary of his service record.

http://www.aif.adfa.edu.au:8080/showPerson?pid=97927

National Archives - This is the complete service file of 2428 Pte Frank Fisher

http://naa12.naa.gov.au/scripts/imagine.asp?B=3900597&I=1&SE=1

Australian War Memorial

The Australian War Memorial carries two biographical data bases - the Embarkation Roll and the Nominal Roll which was closed in August 1919.

Embarkation details:

http://www.awm.gov.au/nominalrolls/ww1/embarkation/person.asp?p=42546

Nominal Roll:

http://www.awm.gov.au/cms_images/awm133/17/17-047.pdf


Further Reading:

Other Aboriginal Servicemen

Pte Tom Cooper

2919 Pte Alfred John Henry Lovett

2430 Pte John Johnston, 11th LHR

Listing of Aboriginal Servicemen Biographies on this site

Other related items 

Reveille Articles on Aboriginals in the AIF

11th Light Horse War Diary Index for 1918 - 1919, Lesson 11 Resource

11th LHR, AIF account about the 2nd Es Salt Raid - March to May 1918, Chapter XVI

11th LHR, AIF account about the Jordan Valley – May to August 1918, Chapter XVII


Citation: 2428 Pte Frank Fisher, 11th LHR, Lesson 11 Resource

Posted by Project Leader at 9:29 AM EAST
Updated: Thursday, 20 November 2008 9:11 PM EAST
9th LHR AIF War Diary, 8 November
Topic: AIF - 3B - 9 LHR

9th LHR, AIF

9th Light Horse Regiment

War Diary, 8 November

Pro Gloria et Honore - For Glory and Honour

Regimental March -  Marching Through Georgia


The following entries are extracted and transcribed from the 9th Light Horse Regiment War Diary, the originals of which are held by the Australian War Memorial. There are 366 entries on this site. Each day has entries as they occurred from 1914 to 1919. In addition to the 9th Light Horse Regiment War Diary, when appropriate, entries from the 3rd Light Horse Brigade War Diary and other regiments with the Brigade will also appear. Entries from the unit history, Darley, TH, With the Ninth Light Horse in the Great War, Adelaide, Hassell Press, 1924 will also appear from time to time. The aim is to give the broadest context to the story and allow the reader to follow the day to day activities of the regiment. If a relative happened to have served in the regiment during the Great War, then this provides a general framework in which the individual story may be told.


The Diary


1914

Sunday, November 8, 1914

9th Light Horse Regiment Location -  Morphettville Race Course Camp and Broadmeadows Camp, Victoria. 

9th Light Horse Regiment War Diary - Formation of Regiment occurring at Morphettville Race Course Camp, Adelaide, while "C" Squadron is formed at Broadmeadows Camp, Victoria. 

See: Broadmeadows 1909


1915

Monday, November 8, 1915

9th Light Horse Regiment Location - Rhododendron Spur

9th Light Horse Regiment War Diary -  General Godley inspected the position today.


1916

Wednesday, November 8, 1916

9th Light Horse Regiment Location - Bir Etmaler

9th Light Horse Regiment War Diary - No entry.


1917

Thursday, November 8, 1917

9th Light Horse Regiment Location - Tel el Sheria.

9th Light Horse Regiment War Diary - 0400 Moved forward at 0400. A Squadron supplied the advanced guard and B Squadron with Regimental Headquarters supplied main guard for 3rd Light Horse Brigade C Squadron who were on outpost were ordered to concentrate and follow on behind Regiment.

Orders received from Brigade Headquarters were to move and occupy the line 10th Light Horse Regiment to occupy the line Wadi Jemmameh - Wadi Burber and 9th Light Horse Regiment on left to occupy line Wadi Burber to Khirbit el Kofkhah. 5th Mounted Brigade on left of 3rd Brigade. At 0450 A Squadron captured outpost of two cavalry and three infantry. At 0500 the Regiment had crossed Wadi el Zaideh closely followed by remainder of the Brigade. Dawn was just breaking when the right flank of advanced guard came under heavy rifle and machine gun fire. Owing to the bad light ten minutes elapsed before enemy were located in a strong position in vicinity of Tel Abu Dilakh. A and B Squadrons were brought quickly into action, A on the right 600 to 800 yards from enemy position B on the left 800 to 1000 yards from enemy. The remainder of the Brigade were under severe shrapnel fire and withdrew one mile south west to cover. A and B Squadrons with two subsections of Machine Guns [4 guns] attached brought heavy rifle, Hotchkiss and machine gun fire to bear right along enemy position. A number of the enemy were thus cut off who later on surrendered to a troop of the 8th Light Horse Regiment A and B Squadrons taking 12 prisoners here.

At 0730 the enemy was observed withdrawing his light guns when A Squadron moved forward 200 yards and by adopting an aggressive attitude the enemy were forced to retire.

At 0900 with A Squadron in advance B and C Squadrons in support the Regiment moved forward on a bearing of 305 degrees towards Huj.

At 1000 gained close touch with 5th Mounted Brigade on left and halted advance guard to allow 10th Light Horse Regiment to come up on right.

At 1030 the enemy were observed retiring from Huj in large numbers but the ridges between A Squadron and Huj were held by rear guards.

The 5th Mounted Brigade on left now commenced to push vigorously towards the west of Huj. The Notts Battery was in action harassing the enemy's retirement. 5th Mounted Brigade on left of Regiment was observed to most gallantly charge mounted a strong enemy position containing many big guns and machine guns in Sq O73 A8a.

A and B Squadrons did magnificently pushing the enemy back from position to position. Right flank patrol of A Squadron in charge of Bennet, 705 Lance Corporal KC, gained Neby Huj at which place after shooting one of the escort and capturing the remainder 5.9 inch mountain Krupp guns were captured by same patrol. By 1200 the whole of Huj was in our hands with much war material including over 100,000 rounds of big gun ammunition. Before retiring from Huj the enemy succeeded in blowing up one ammunition dump mostly SAA [small arms ammunition] but the vigorous action of Parsons, Major HM, with A squadron and two subsections of 3rd Machine Gun Squadron attached prevented the enemy from destroying others.

At about 1300 a request was received from Williams, Colonel; and, Cheap, Colonel, to reinforce to allow 5th Mounted Brigade to reorganise as enemy was contemplating a counter attack. B and C Squadrons were used for this purpose whilst A Squadron and Machine Gun sub section pushed on to Sq O72S23.

B Squadron was shortly after pushed on to Sq O72 S13 & 14. In Sq S26A Mueller, Lieutenant GLH, with his patrol, shot down the teams of one four inch gun and forced the escort to retire leaving a second four inch gun 400 yards to the right.

A team of eight bullocks was also abandoned. As these were already yoked a party from B Squadron hitched them to the first gun but all the efforts to shift it failed due no doubt to the Turkish bullocks failing to appreciate the Australian bullocky's language which was lavished upon them.

These two guns and also the two captured at Neby Huj were left in position where captured and 3rd Light Horse Brigade Headquarters notified of the locality.

At 1330 one Squadron under Timperley, Major LC, 10th Light Horse Regiment joined up on right. At about 1400 Hargrave, Lieutenant LMS, with troop pushed forward with great boldness on to high ground west of junction in wadis in Sq O72S9c and shot down team and part of the escort of a 15 cm gun and by keeping up a heavy rifle and Hotchkiss fire prevented a strong enemy force from removing the gun until Smith, Lieutenant PT, with troop 9th Light Horse Regiment and McGregor, Lieutenant FJ, with troop 10th Light Horse Regiment charged mounted the remainder of the escort capturing the gun and ten prisoners. About the same time Lilly, Lieutenant, 3rd Machine Gun Squadron pushed his subsection which was attached to A Squadron well forward to wadi in Sq O72S17a and shot down team and escort of a long 10 cm gun which had to be abandoned by the enemy.

1500 The flat country in vicinity of Bureir and Simsim now presented a wonderful sight with thousands of disorganised enemy retiring north and north eastwards but our limit of advance was reached as the horses were tiring having had ten hours hard fighting and no water for 33 hours. Two troops of C Squadron were withdrawn from 5th Mounted Brigade position and brought to support A Squadron. The other troops had been taken by the 5th Mounted Brigade as a burial party and rejoined Regiment at 1700.

From 1500 until dark, the Regiment continued to harass the enemy with rifle, Hotchkiss and machine gun fire suffering heavy casualties.

1800 A and B Squadrons with C Squadron in support took up night outpost line Sq O72S18 - 17 - 14 - 13 A on right B on left and joining up with infantry on left and 10th Light Horse Regiment on right. Our casualties were 7 Other Ranks wounded, 6 horses killed 12 wounded. Prisoners captured by Regiment about 130 including the official photographer to the Turkish Army and a medical officer and his wife who had sheltered during heavy shelling in wadi Sq O72S9a. After the very successful days fighting the spirits of the men were excellent but the horses were very tired and badly in need of off-saddling. Country advanced over during the day was open undulating and hilly in places broken here and there by wadis easy to cross. It was splendid country for mounted operations affording good cover. Ration convoy arrived at 2400.

The wounded during the Battle of Huj from the 9th Light Horse Regiment:

2nd Lt Harold James Cattle, wounded but remained on duty.

1535 Pte Garnet Delanty

1029 Private George Wilfred Dibben

1405 L/Cpl Clement Harold Humphris

558 T/SSM William George Miller

3271 Private Albert Edwin Smith

770 Private Angus  Thomas

916 T/SSM Roland Arthur Virgo


3rd Light Horse Brigade War Diary -

At 0400 10th Light Horse Regiment on the right and 9th Light Horse Regiment on the left moved from night outpost line to occupy position ordered by Divisional Headquarters.

At 0450 a small enemy outpost was captured by the 9th Light Horse Regiment and by one post just as dawn was breaking the 9th Light Horse Regiment came under very heavy enemy rifle and machine gun fire. The enemy at the same time opened up a battery of four field guns and the remainder of the Brigade, which had moved forward immediately in rear of the two advanced regiments were subjected to very heavy shelling. Notts Battery moved back to the right flank very rapidly, and brought their guns into action immediately with good effect. 8th Light Horse Regiment and remainder of the 3rd Machine Gun Squadron and Brigade Headquarters group extended and moved back to a slightly covered position sustaining very few casualties. The 10th and 9th Light Horse Regiments had dismounted for action on the opening up of enemy fire at 0510 and with the support of the Notts Battery were pushing the Turks back, although the 9th Light Horse Regiment met with strong opposition and were suffering many casualties.

The 9th Light Horse Regiment under Scott, Lieutenant Colonel WH, DSO, and the 10th Light Horse Regiment under Todd, Lieutenant Colonel TJ, DSO, made a determined advance against the strong enemy position and shortly afterwards the enemy were observed to be withdrawing from his redoubt. This redoubt was now occupied by us. The Notts Battery came up and gave enfilading fire against the enemy in front of the Anzac Mounted Division. During the last mentioned, fighting instructions had been received from Division to move on Huj. These were now acted on, the right of the 3rd Light Horse Brigade moving by Khirbit el Kofkhah. At 0900 with the 9th Light Horse Regiment in advance and Brigade moved on a bearing of 305 degrees towards Huj. At 1000 touch was gained with the 5th Mounted Brigade on our left. At 1030 the enemy were observed retiring from Huj in large numbers, but the ridges between our advanced guard and that place were held by strong rear guards. The 5th Mounted Brigade on our left now began to push vigorously towards the west of Huj. Our advanced guard conformed and with the aid of Notts Battery pushed in the opposing rear guard. The 5th Mounted Brigade were now observed to make a most gallant, charge at a strong enemy position containing four guns and many machine guns. The charge was successful, although with heavy casualties to the Yeomanry. The right flank path of the 9th Light Horse Regiment in charge of Bennett, 705 Lance Corporal KC, passed through Neby Huj at which place, after shooting one of the gun teams and capturing the remainder, two 5.9 inch modern Krupp guns were captured by that patrol.
By 1200 the whole of Huj was in our hands with much war material, together with large dumps of field and big gun ammunition. Before retiring the enemy blew up one ammunition dump, mostly SAA [small arms ammunition] but the vigorous action of A Squadron of the 9th Light Horse Regiment under Parsons, Major HM, with 4 machine guns attached, prevented them from destroying others.

The whole of the enemy forces were now in full retreat. Our infantry were on our left, pursuing the Gaza garrison. The Anzac Mounted Division was on our right. The enemy on our front were making towards Simsim and Bureir, in somewhat disorganised bodies. All available squadrons of the Brigade were ordered forward, with instructions to harass the enemy and to make what captures they could. The Notts Battery was not however, able to move past Huj, as their horses were completely exhausted, their last drink had been at Karm early the previous morning.

The three Regiments and the 3rd Machine Gun Squadron accordingly pushed forward and attacked the rear guards, inflicting heavy casualties, at short range, and seizing many prisoners and guns.

From my subsequent experience of the use of the sword, I consider it would have been invaluable here. If we had had swords, I am sure we could have ridden on and captured thousands, as it was, we stood off and shot hundreds only. At dusk the pursuit stopped. The horses were very exhausted they had been without water since we had left Karm 33 hours previously. It was necessary to look after them, otherwise, they would knock up, and the Brigade becomes immobile.

During the day 15 guns were captured by the Brigade, the following are same of the incidents of their capture: -

In square S26A Mueller, Lieutenant GLH, 9th Light Horse Regiment with patrol, shot down the team of a four inch gun, and forced the escort to retire, leaving a second four inch gun to the right. A team of eight bullocks was also abandoned. As these were yoked they were hitched on to the first gun but all efforts to shift it failed. The Turkish bullocks refused to assist. The gun was left and collected later on.

About the same time as the last episode, Lilly, Lieutenant, of the machine gun squadron, pushed his sub - section, which was attached to the 9th Light Horse Regiment, well forward to the Wadi in square 072 - S - 17A and shot down the team and escort of a long 10 cm gun, which was accordingly abandoned by the enemy.

Turks with guns were seen retreating north west from Wadi Jemmameh. Borbidge, Lieutenant RH, of the 8th Light Horse Regiment galloped his troop into action, dismounting at close quarters and opening fire at the enemy with rifles and his Hotchkiss gun. The horses harnessed to one gun were shot and in the confusion the second gun fell into the Wadi. Both guns, [77 mm], together with the limbers full of ammunition and 16 prisoners were captured.

Our position was being shelled by large guns which could be seen on the Bureir track and in the Wadi [Wadi um Lakis] where the track crosses. Fire was brought to bear on and around where the guns were firing from, at about 1500 to 1700 yards range. About 1500 in the afternoon the enemy brought up bullock teams from the Wadi with the intention of moving his gun. McGregor, Lieutenant FJ, 10th Light Horse Regiment went back to try and get touch with the 3rd Machine Gun Squadron and finding Lilly, Lieutenant, with his section with the 9th Light Horse Regiment asked him to bring a Vickers gun forward to play on the enemy's teams, which he did with great effect, thus preventing guns from being moved. McGregor, Lieutenant FJ, then went out with his troop to try and capture the guns, but encountered such heavy machine gun and shrapnel fire on the flat that he thought it advisable to put his troop under cover whilst he went forward with a section to reconnoitre the gun position. This he did and found the gun crews and escort had broken and were retreating up the Wadi towards Simsim. He then sent back for his troop and with the remaining three men galloped up the Wadi and captured a German Officer and crew of the 6 inch Howitzer, two hundred yards from the gun. Under very heavy fire he marked the gun "10th Light Horse Regiment'' and killed the animals, which had not already been killed by fire from our positions. They left eight wounded Turks near the gun and brought the others in, ten in after dark. They held the position of the day all night, and at dawn McGregor, Lieutenant FJ, went out with a section of men and an Australian Army Medical Corps detail, who dressed the wounded Turks whilst they, rounded up three Turks who were making towards Bureir. McGregor, Lieutenant FJ, then took stock of all the gear and transport, and a description of the guns, six in all, which the different Units of the Brigade had prevented enemy getting away. For his action in this matter McGregor, Lieutenant FJ, was awarded the MC; and, Newton, 3427 Trooper IW, was awarded the M.M.

Thompson, Lieutenant AWM, 10th Light Horse Regiment received orders from Timperley, Major LC, Officer in Command, C Squadron, 10th Light Horse Regiment to move forward with A Troop, C, Squadron on the right flank together with Kingdon, Lieutenant HR, on his left with ''B" Troop. At this time great masses of the enemy were retreating across the flat towards Bureir, in disorder. Thompson, Lieutenant AWM, moved his troop forward at the trot over very broken ground, skirting round a hill to the right. Kingdon, Lieutenant HR, moving to the left, coming abreast of the Wadi el Hesi in square S - 17.d., he was unable to get a crossing over the Wadi, so moved off to the right, and rode down the flat parallel with the wadi, those men who did not have revolvers drawing their bayonets. They charged down to what appeared to be a pretty substantial enemy transport column, about 600 yards away, the drivers and escort of which started to make off, some cutting horses out of the wagon and getting away on them. By the time shrapnel and machine gun fire were brought to bear on Thompson, Lieutenant AWM, and his party, they then recrossed the wadi, and secured good cover for their horses. Five prisoners were sent back to Brigade Headquarters with two of our wounded men. During this time about half a squadron of Turkish cavalry had come out and were making an attempt to get at the ammunition column. All available rifles and the Hotchkiss rifles got action against this party, who broke and retired. The Hotchkiss rifles did particularly good work under Middleditch, Sergeant RW; and, Barrett, Trooper. One troop of the 8th Light Horse Regiment came into action here and took up a position on the right flank. Thompson, Lieutenant AWM, then decided to attempt to bring the ammunition column in. Gwynne, Sergeant S; Hyde, 1248 Lance Corporal WH; and, Jarrick, Trooper, [Author's note: This name does not appear in the Nominal Roll nor does any variation exist that can be traced.] assisting Middleditch, Sergeant RW, with the Hotchkiss Rifle and the remainder of the troop maintained a covering fire for their protection. There were 21 limbered wagons loaded with big ammunition. Some of the horses had already been shot, and some of them removed. Thompson, Lieutenant AWM, found it impossible to move the wagons without assistance, so to prevent the enemy removing them he shot over 60 horses. The wagons contained all large calibre ammunition. For his action in this matter Thompson, Lieutenant AWM, was awarded the M.C.

Hargrave, Lieutenant LMS, 9th Light Horse Regiment was in charge of B troop A Squadron 9th Light Horse Regiment. He pushed forward and occupied high ground west of junction of wadis in square O72 S9c, and shot down part of a gun team and escort of a 15 cm gun. By keeping up a heavy rifle and Hotchkiss gun fire he prevented a strong enemy party reaching the guns. He later, with part of his troop together with Smith, Lieutenant PT, and his troop - C troop, A squadron, 9th Light Horse Regiment - charged mounted and took the gun. This would not have been possible had not Hargrave, Lieutenant LMS, seized the excellent tactical position he did, and broken up the enemy by fire. For his action in this matter, Hargrave, Lieutenant LMS, was awarded the MC.

The Brigade suffered exceptionally light casualties in both men and horses throughout the day considering the nature of the fighting and the large numbers of guns, prisoners and booty won. The country was excellent for mounted operations - open, undulating, broken in parts, but not to such an extent as to block passage of mounted troops. It afforded excellent cover for mounted approach.

At about 1730, 28 of our aeroplanes flew overhead in bombing formation. The noise of the explosion of bombs dropped on the retreating enemy could be distinctly heard. The Brigade occupied the ridge two miles north east of Huj as a night outpost line. During the night of 8/9th November the horses of the Brigade were sent to Wadi Jemmameh to water; this place had been made good by the Anzac Mounted Division the previous day. The supply would allow for a very slow watering and the horses were not returned to Huj until 1600 on 9th November, some of them have been thus more than 45 hours without water.


1918

Friday, November 8, 1918

9th Light Horse Regiment Location - Tel el Kale

9th Light Horse Regiment War Diary - 0630 Marched to Jisr Ayash where an hour's halt was made to feed and water horses.

1130 The march was resumed to Nahr Aarka arriving there at 1545 and bivouacked for night.


1919

Saturday, November 8, 1919

9th Light Horse Regiment Location - Adelaide

9th Light Horse Regiment War Diary - Regiment disbanded.


Previous: 9th LHR AIF War Diary, 7 November

Next: 9th LHR AIF War Diary, 9 November


Sources:

See: 9th Australian Light Horse Regiment, Contents
Australian Light Horse Studies Centre, AIF War Diaries of the Great War, Site Transcription Policy


Further Reading:

9th Light Horse Regiment AIF

Bert Schramm Diary

9th Australian Light Horse Regiment, Roll of Honour 

Battles where Australians fought, 1899-1920

 
Citation: 9th LHR AIF War Diary, 8 November

Posted by Project Leader at 1:01 AM EAST
Updated: Friday, 17 September 2010 12:51 PM EADT
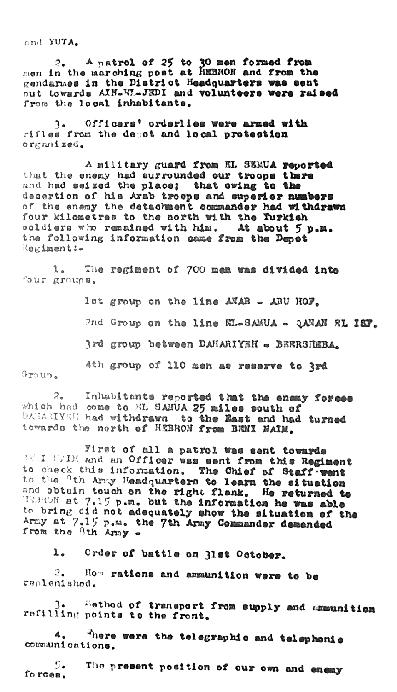
Colonel Husnu, Yildirim, Page 124
Topic: Tk - Bks - Yildirim

Another entry from the book written by Lieutenant Colonel Hüseyin Hüsnü Emir, called Yildirim. Every day, one page of the book will be posted. This is Page 124.


Colonel Hüsnü, Yildirim, Page 124.

[Click on page for a larger print version.]


This chapter deals with Hüsnü observations of the Turkish response to Beersheba on other parts of the battlefield.


Further Reading:

List of all Yildirim pages

Full listing of all material about Beersheba on the blog


Citation: Colonel Hüsnü, Yildirim, Page 124

Posted by Project Leader at 1:01 AM EAST
Updated: Sunday, 9 November 2008 3:29 PM EAST

Newer | Latest | Older

Full Site Index


powered by FreeFind
Let us hear your story: You can tell your story, make a comment or ask for help on our forum.

Desert Column Forum

A note on copyright

The Australian Light Horse Studies Centre is a not for profit and non profit group whose sole aim is to write the early history of the Australian Light Horse from 1900 - 1920. It is privately funded and the information is provided by the individuals within the group and while permission for the use of the material has been given for this site for these items by various donors, the residual and actual copyright for these items, should there be any, resides exclusively with the donors. The information on this site is freely available for private research use only and if used as such, should be appropriately acknowledged. To assist in this process, each item has a citation attached at the bottom for referencing purposes.

Please Note: No express or implied permission is given for commercial use of the information contained within this site.

A note to copyright holders

The Australian Light Horse Studies Centre has made every endeavour to contact copyright holders of material digitised for this blog and website and where appropriate, permission is still being sought for these items. Where replies were not received, or where the copyright owner has not been able to be traced, or where the permission is still being sought, the Australian Light Horse Studies Centre has decided, in good faith, to proceed with digitisation and publication. Australian Light Horse Studies Centre would be happy to hear from copyright owners at any time to discuss usage of this item.

Contact

Australian Light Horse Studies Centre

eXTReMe Tracker