


Topic: BatzG - Nek
Gallipoli, 7 August 1915
The Nek and Hill 60
The Nek and Hill 60
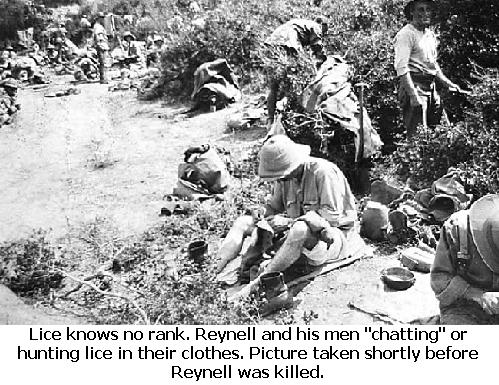
Just before the attack, Reynell tossed a few reflections around. He said: “I suppose there will be a lot of promotion, but as far as I can see my chances are nil. If the Brigade command becomes vacant they don't seem disposed to put Colonel Meill, the senior Regimental Commander, in - and unless he goes up or out, my cake's dough. Without wishing anyone bad luck there is a lot in the old toast – ‘Here's to bloody wars and sickly seasons and quick promotion’. Well some of us will be making room for others before long I guess and it's all in the game. I see big stacks of new stretchers being made just near by our bivouac.”
Stretchers were the harbingers of casualties. The number of stretchers arriving at a unit indicated what the staff officers thought would be the casualty rate for a particular attack. The arithmetic was simple. Every stretcher would carry two or three wounded men. The casualty ratio was about one man killed in action for every three wounded. A quick count of the number of stretcher told the men in advance the number of their friends were expected to die that next morning. It was not an encouraging thought. While they felt very uncomfortable about the physical manifestations of their job, the men lived with the notion.At 3.30am, Saturday, 7 August 1915, the canons were being prepared for their work. Soon their percussions would sound the drumbeat of the battle, the pendulum of the metronome that ticked inescapably towards destiny. In the trenches, men were already standing to, alert and with rifles in hand. Cups of tea were being distributed as best as possible. It was the calm before the impending storm of hostilities that created a sense of hopelessness amongst the troops going into battle.
The timetable of a massacre.
4.00 – The bombardment began.
Reynell’s diary: … the artillery bombardment was a joke and such as it was not made in cooperation with the attack. There was just a desultory bombardment and then an attack.
At Turk’s Point, Ashburner’s two machine guns launch a barrage lasting for half an hour and expending 10,000 rounds.
4.23 - the "joke" of a bombardment ends.
4.28 - Turks clearly seen manning the parapets of the trenches and machine gun ranged.
4.29 – The men in the first line already know they are in for a tough time.
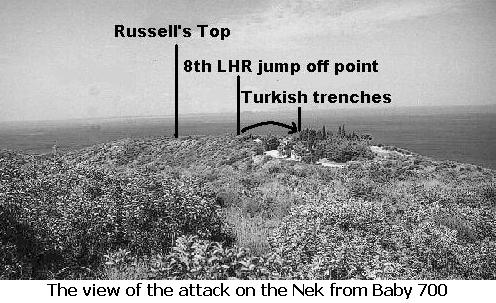
4.30 – The whistle blows and 150 men of the 8th Light Horse Regiment, led by Colonel White, climb out of the trenches and charge across the Nek.
Ashburner is forbidden to use his machine guns to provide covering fire for the charge in case he hits the emerging Australians.
Cyril Lawrence of the 2nd Field Company Engineers made the following note in his diary about the events of that morning. “Well simply that the boys in that section had 'hopped out' as ours had done the night before. Two seconds and the bullets began to come across, not in ones or twos either, but in showers, screaming and whining by, spitting up the dust everywhere, a man standing beside me was hit fair on a locket round his neck. The bullet must have been well spent as it did nothing except give him a bit of a shock...The only difference with this rifle fire was that it did not cease after a few minutes but continued a long while before it died down, and before that our artillery and boats opened up again... the duration of the rifle fire showed plainly that the men were not in their trenches..."
4.35 – 150 men lay dead or wounded within 30 metres of the trench. Three men made it to the Turkish trench only to die there. An observer spots a location flag in Turkish trenches and reports this to Antill.
The whistle blows and a further 150 men climb out of their trench.
4.40 – 150 more men lay dead or wounded.
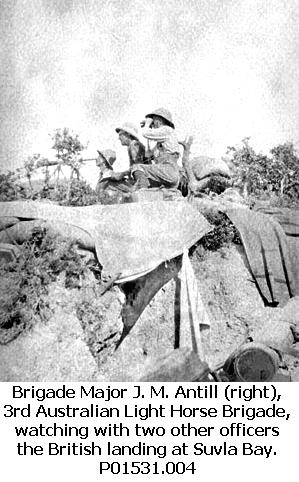
Colonel Brazier, commander of the 10th Light Horse Regiment argues with Antill about sending the next line out. Antill orders Brazier to send out the third line.
4.45 - Trooper Harold Rush, 10th Light Horse Regiment, says to his friend as both men shake hands: “Goodbye Cobber. God bless you." He died a minute later.
The whistle blows and a 150 men from the 10th Light Horse Regiment climb out of their trench.
4.50 – 150 more men lay dead, wounded or pretending to be dead.
5.15 - The 4th line of the attack is called off but some troops misunderstand this direction and charge.
5.20 – 234 dead and wounded from the 8th LHR and 138 from the 10th LHR lay on the blood soaked ground of the Nek. Any movement of the wounded men brought Turkish machine gun fire to bear on the person. Some of the wounded were able to crawl back into the trenches. Others who had been lucky and not injured made their way as best as possible. For the rest, their lot was a miserable day in the sun without any hope of relief until the evening.
For the 9th LHR they suffered the loss of Lt Col Albert Miell, Sqn Sgt Maj William Edward Harvey, L/Cpl George Southwell Seager, and Pte Frederick Joseph Smith. Pte Frank Napier Drew died of wounds he received a few days later.
All up, the 3rd Light Horse Brigade lost 264 men killed as a consequence of that dreadful half an hour, some twenty per cent of the Brigade. It was a traumatic loss that would take a considerable amount of work to rebuild.
Antill summarised the event when he stated: “The positions assaulted by the 3rd Light Horse Brigade were absolutely impossible to take by frontal attack and the front comprised a Nek less than 100 yards across with cliffs on either side, the whole full of machine guns. There was no hesitation or falter amongst our officers and men, especially the 8th Light Horse Regiment who were practically wiped out.”
The British fared somewhat better. The leader of the Royal Welch Fusiliers company, Captain Walter Lloyd was killed along with ten of his comrades as they charged up Monash Gully. A number of others were wounded. In addition, the Cheshires lost seven men, making a total of 18 British soldiers killed at the Nek.
Books, movies and art have all tried to explain the charge at the Nek but no one has understood why the events unfolded as they did.
Many questions remain about this event. Why did the artillery attack end at 4.23am? Why did Colonel White lead his troops in the first wave? Were there any flags raised in the Turkish trenches? If Antill, as he states, was so opposed to the plan in the first place, why did he persist in ordering the next waves to charge?
By 4am, Birdwood and Godley already knew that the attack on Chunuk Bair had failed upon whose success the attack on the Nek was predicated. Yet they failed to call off an attack which was now rendered pointless. Without the New Zealanders exerting pressure from the north onto Chunk Bair, there was no pressure on the Turkish defences, which were now free to concentrate solely on where they expected the attack. The aimless artillery barrage let them know the exact spot as forecast by Antill. Through lack of leadership and pure negligence, Birdwood and Godley allowed the slaughter to proceed at the Nek and Pope’s. At least in regards to Pope’s, Chauvel had the leadership capacity to buck against stupidity when he refused to send any further men to their deaths after the failure of the first wave of his projected attack. This piece of sound leadership minimised many unnecessary casualties. It had no impact on Chauvel’s subsequent career so it was the correct decision.
So why was the 3rd LH Bde so different? The issue specifically related to the quality of leadership. Brigadier General Hughes, the putative commander, put himself out of the way so as to be unreachable during the attack. This effectively split the command of the 3rd LH Bde leaving two parts of the leadership unsure of what to do next. Hughes was not able to get in contact with Antill and vice versa. It left Antill effectively in command of the Brigade. In contrast, the 1st LH Bde was firmly under the control of Chauvel and he was on hand to make the assessments at the time and place necessary. He never delegated important decisions to junior officers.
In essence, Hughes abrogated his responsibility of command and gave it to Antill who carried none of the authority to the General staff, as did Hughes. The consequence was that Antill decision making ability was paralysed by many conflicting demands. He did what all incompetents do in this situation. He refused to make a decision except to affirm his orders. Antill felt trapped by circumstances and responsibilities that were far in excess of his capacity to deal with in any effective manner.
It is also important to examine the role of the Regimental commanders to ascertain if they too failed in their duty to the men. Sadly this negligence is evident.
The first officer, Lt Col White of the 8th LHR behaved in a most bizarre and irresponsible manner in leading the first wave of the assault. That there is undoubted bravery implicit in his action is without question. However, the issue is whether he should have led the first wave or delegated the responsibility. By being killed almost immediately the first wave left the trenches, there was no one in command that had his authority. White could have called off the next wave without loss of his career or risking arrest. But even if this were so, he would have been negligent to send out the next wave as it would result in more of the same – death and wounding without any result. If White was brave enough to lead his men into combat, he would also have had the character to call off the attack. However, he chose his fate but left his men to suffer in greater numbers than need be the case.
From the 10th LHR, we see that Lt Col Brazier tried to have the attack called off and specifically saw Antill for this purpose. This was when Antill went down in history by ordering Brazier to continue the assault. Brazier had his choices at this point in time. He chose to let
Antill wear the opprobrium by dodging the hard decision. White can be excused from this because when leading the first wave, he didn’t know it was going to be a massacre. Brazier does not have the luxury of this excuse. Brazier knew full well what the situation was facing his men but refused to do the right thing by his men and ordered the third wave to leave the trenches.
When the third wave was slaughtered as expected, Antill finally came to his senses and countermanded the order for the fourth wave to be launched. Brazier failed to make this clear and by sheer accident, half the fourth wave launched itself. It is unknown as to the reason. However, lack of clear direction from Brazier in a timely manner lies at the bottom of this last minutes of killing.
After the massacre, Brazier became embittered towards Antill and publicly called him a butcher. Eventually Brazier was sent home from Gallipoli with a wound. This was a noble way to ease Brazier out of command and get him out of the way. So Brazier had nothing to lose. His relationship with the senior officers was already strained and they looked for any excuse to get rid of him. He was in the position to do the right thing by his men and chose not to do so. Blaming Antill for this is disingenuous and overlooks Brazier’s own character and leadership flaws.
Since Lt Col Miell was sniped, the 9th LHR command fell into the hands of Major Reynell. If anything, Reynell believed that the attack would succeed even after the slaughter of four waves. Reynell thought he could see where everyone had gone wrong and developed his own plan of attack. He begged Antill for the chance to prove the veracity of the plan. Not even Antill was foolish enough to issue such an insane order. It was only long after the event that Reynell was able to understand why he was not given any permission to waste any further lives on a fruitless exercise. As for Reynell, he had his own opportunity to slaughter his men in another folly some twenty days later.
In the final analysis, the slaughter was basically due to Australian incompetence in command, planning and leadership. There was no one villain just poor leaders and a bad plan. For the men they had a naïve belief in their officers and the cause. It was a potent mix for a great victory or a dreadful disaster.
Antill’s reputation was destroyed. Throughout his life and even after his life, he was vilified as the pompous jackass who sent good men to their deaths. Bean led the attack in Volume 2 of the Official History. The film “1915” popularised this view. Carlyon’s book “Gallipoli” reinforces this sentiment. This accusation let others who are as culpable off the uncomfortable hook for the roles they played in making a hash of a poor plan.
The men paid the butcher’s bill for this lesson.
After the failure of the Nek attack, the 9th LHR was the only coherent unit available to prevent a Turkish counter attack should they deign to do so. In addition, the Cheshires were brought up in support of the 9th LHR.
Around 8am, at Anzac Cove, the three destroyers trained their guns on the Turkish positions near Baby 700 and the Nek, then commenced another bombardment. While not furious and more described as desultory and designed to discourage any Turkish counter attack, it lasted about half an hour. At 1pm, those unwounded men of the 8th LHR were ordered to the front and reserve trenches.
The Turks were not interested in counter attacking but they did want to inflict casualties. Soon after the 8th LHR men moved back into the trenches, the artillery at the back of Baby 700 began their own barrage firing their 75’s on the reserve trenches on Russell’s Top. Both the men of the 3rd LH Bde and the 8th Cheshire Regiment sustained heavy casualties.
When the bombardment ended, the men settled down to the tension of front line duty with the two elements of sheer terror and extended boredom. It was a harrowing time for the men as they listened to the moans of their comrades laying a few metres in front of them but unable to reach them. Any movement was met with a hail of bullets from the Turkish machine guns.
Allen Cameron recorded his thoughts about this time in his diary when he said: “We had some severe fighting and it turns out that we have gained little in territory or position, yet sacrificed thousands of lives. The Turkish Machine Guns just poured out lead and our fellows went down like corn before a scythe, …. Four hundred and ninety casualties in less than a quarter of an hour. Yes, it was heroic, it was marvellous, the way those men rose, yet it was murder. We are still holding Russell's Top, and the strain is telling terribly on all ranks. Whenever one looks in the direction of the Turkish trenches one sees the bodies of our own chaps in almost the same places as were the bodies of the Turks after the 30th June. Nothing can be done to get them buried or brought in except those which are very close to our own trench. The smell is dreadful. Nothing can compare with decomposed human flesh for horror. The intervening space is continually lit by flares and bombs and several bodies have been burnt thus. It seems cruel, but from a health point it is better, whoever does the burning.”
Reynell was promoted to command of the 9th LHR with the rank of Lieutenant Colonel making his former idle thoughts a reality. At the same time RQMS Darley, Sgt Guy Theodore Butler and Sgt John Malcolm McDonald were given field commissions as Second Lieutenants. The survivors of the 9th LHR did quite well out of the day.
The trench routine went on almost interminably. Outside the attacks of the August Offensive still raged to the north. Fighting could be clearly heard at Suvla and Rhododendron Ridge. The job of the 9th LHR was to sit in the trenches on Walker’s Ridge and absorb all the hate from the Turks. This meant sitting through whatever bombardments the Turks launched which they did on a regular basis.
Take for instance the morning of Monday, 9 August 1915 when the Turks decided to give Walker’s Ridge a thorough shelling with their artillery. Three men, 2/Lt Darley, RQMS Elias Judell, and Cpl Arthur Carrington Smedley were huddled together in their trench, a wonderfully deep trench ironically called the “Broadway” as though the word would conjure the beautiful passion of the New York theatre district rather than the squalid violence confronting them. Smedley had come to draw stores from the Quartermaster’s dugout. A large, high explosive shell burst near the group hurling Smedley some 30 metres into a communication trench called Tod Lane. Darley was flung 10 metres along the Broadway while Judell was killed instantly. Darley was the only man to recover.
The story of Smedley is one of the more curious tales of the war. Smedley was taken to the Casualty Clearing Station where Captain Follitt, the Regimental Medical Officer, did what he could to patch up his wounds. Follitt removed both Smedley’s shattered legs and patched the arm socket where it had been blown out. Smedley was then put aboard a hospital ship for evacuation to Malta. When the ship arrived at Malta, there was no Smedley nor was there anything in the hospital ship paperwork to indicate his fate. They thought he might have been shipped to England by mistake but a search throughout English hospitals proved fruitless. The Third Echelon at Cairo was requested to see if he had arrived in a hospital at Heliopolis. Again, no joy. Smedley had literally and metaphorically disappeared from the face of the earth. He was never seen of or heard from again.
Mrs Alice Smedley of Brougham Place in North Adelaide was advised on 30 August that her son was wounded but recovering in hospital. Since there was no other information, she was informed that it was obviously not a serious wound. Later on, having received letters of condolences from Smedley’s friends about the death of her son, Mrs Smedley knew this to be untrue and in early October, informed the Army through an interview with the Minister of Defence. Much to its embarrassment, the Army conducted a search of his whereabouts. Now more bureaucratic games came into play. Since Smedley was absent due to being wounded for a period greater than 14 days, he was reverted from Temporary Corporal to his substantive rank of Lance Corporal. This, of course, immediately impacted on the income Smedley’s mother, received from his pay.
A Court of Enquiry found that Smedley might have died on the hospital ship and was buried at sea. No one could explain the disappearance of the paperwork. It fell upon Captain McNicol in Melbourne to explain the impossible. He writes hopefully but without tact: “Though we have no evidence by an eye witness of his death, several men told us he was already in dying condition when he was carried to the beach, and he was so badly wounded – both an arm and a leg being blown off – that no one could wish him to have lived.” No parent would ever endorse that sentiment.
Worse was still to come. The Army wanted to award all Smedley’s medals to his father, a person who left the household when Smedley was 11 and never saw him again. Once more Mrs Smedley had to fight for this anachronism that gave the father precedence if there was no will or instruction to any other effect. Mrs Smedley won her battle two years later. She must have wondered about her son’s sacrifice and whether his loss was really worth it. Her words pleading with the military authorities for some dignity seem to reflect this sentiment.
Back in the trenches, routine debilitated the men. Morale plummeted. Reynell sums this up when he says: “Our losses to date are killed and wounded 150. Sick in hospital 200. We also have about 50 sick here "off duty". The effective strength of the Regiment is about 300 all ranks and nearly everyone is weak and run down and really not fit for duty. We have men go off into dead faints occasionally and the Doctor says most of the trouble is just absolute "done - upness". He calls them "Grey Faces". They are plucky and stick to it but have reached breaking point.”
After their 14 days in the trenches, the Leinsters, a New Army unit relieved the 9th LHR who remained as support for them. The men from the 9th LHR felt sorry for the Leinsters, as they appeared to be poorly trained, and even worse, poorly led. From their elevated position they could see all the attacks occurring at Suvla. As with all their rotations, rest camp was a euphemism for hard work, increased casualties and little sleep.
It was a red-letter day on Thursday, 26 August 1915. The men were marched down to the beach at Anzac with high hopes of taking a holiday at Imbros, or Lemnos. While soaking up the sun and enjoying their afternoon tea thinking about the prospect of getting off Gallipoli for a couple weeks, the men were excited and happy.
Their lolling around was just too good to be true. An hour later, orders were given to move up into the newly captured trenches in the Damijelik Hills, some six kilometres north of Walker’s Ridge. At 10pm that night, the 9th LHR bivouacked at Kaiajak Dere within touch of Hill 60, a hotly contested piece of real estate. Here they remained until 7pm, Friday 27 August 1915, when new orders arrived.
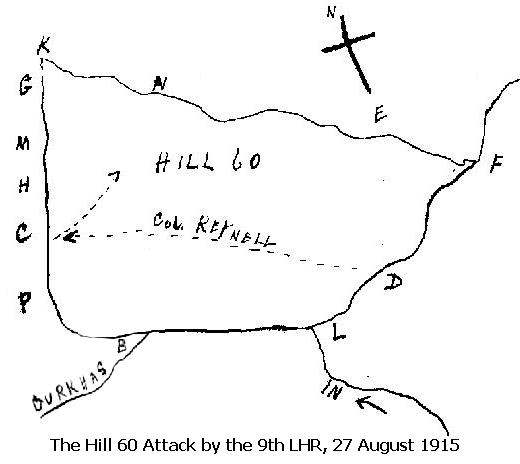
General Russell had over stretched his forces and could not defend the captured positions against the freshly reinforced Turks. The 5th Connaught Rangers had held the trenches, between Points C and D as per the Hill 60 Attack map, that day. Nightfall had come and the Turks mounted their counter attack, bombing and shooting their way through their previously lost trenches. The Connaughts were inexperienced at trench fighting and abandoned their positions at 8.30pm leaving the Turks in control of the trenches.
Orders came from Birdwood for Russell’s men to take Hill 60 at all costs. Russell called upon the only troops available, the 9th Light Horse Regiment, to act as shock troops and retake the trenches. Three parties were established for this purpose: Lieutenant Phillis and 50 men went into the frontline fire trench to assist New Zealand Mounted Rifle Brigade; Maj Harry Meshach Parsons, a farmer from Victor Harbor, took charge of another 100 men as an attack team; and, 25 men commanded by Captain Callary were afterwards sent to support Parsons. The last two groups were split between Parsons with 52 men to assault and bomb a Turkish fire trench and Reynell taking 75 men to cross over to the Turkish trenches and bomb their way to the New Zealanders trench.
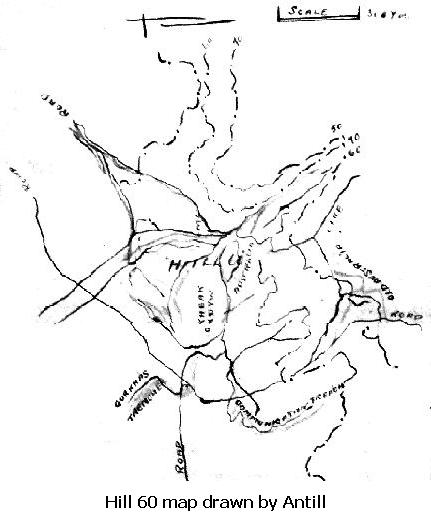
At 11.30pm Parsons led his party bombing his way up the Turkish trench. The moved up about 100 metres but retired 20 metres and put up a barricade. The area assaulted by Parson is marked on the hand drawn map of Antill. The letters PCHMGK designates the successive progress of Parsons. “M” marks the place where Parsons’ men erected their barricade.
Next went Reynell at 12.15am. It didn’t take long for Reynell and his party to get confused. Faulty maps supplied by Coxes Headquarters ensured that Reynell would be confused by the lay of the land. When he thought he had reached the Turkish trenches, in actuality, he had stumbled upon Parson’s party as they rested from their exertions.
Reynell and his men left the trench and moved off into the direction to where he thought his raiding party should be heading to the Turkish trenches. As they crossed the open for the second time in an hour, they tempted fate one too many times. The Turkish observers couldn’t believe their luck when spotted the party a second time in the evening. This time the Turks were ready. Reynell and his men came under intense rifle and machine gun fire. The Turks also tossed bombs at them. The result was a charnel house. Men fell everywhere. The screaming of the wounded and those dying filled the air along with bullets and bombs. Major Scott chillingly summed up the result when he said: “…the party literally faded away.”
The majority of the men actually made it to their objective known as Point N on the Hill 60 attack map. After clearing out the Turks from this segment of the trenches, the men were not safe. The Turkish defences were set up carefully so in the event of a section being taken over, machine guns could sweep the tenches with impunity. After the Turks had scrambled out of the trench, the machine gun opened fire. The result was havoc. It swept the trench inflicting many more casualties on the men. The survivors quickly jumped out of the trench and crawled back to safety during the night. First a party of five arrived at the Australian trenches, then another twenty wounded. One group attached to Reynell became hopelessly lost. Fifteen men from the party returned to the safety of Scott’s men unharmed. In an act of sheer bravery, Lt John Malcolm McDonald, a clerk from Semaphore, who had been with Reynell and returned safely, left the trenches four times to rescue wounded men.
While Reynell’s group was being shot up, things were not going well for Parsons. Using the cover of the fight against the Reynell party, the Turks mounted a counter attack and forced Parson’s men to retreat to Point C where they were able to establish a strong sand bag blockade and hold off the Turkish assault. When day broke, Parsons and his team went on the attack again and reclaimed all the trenches that were lost during the night. Then all went quiet except for the occasional sniping from both sides.
At 1am, Sunday, 29 August 1915, McDonald and a party of men bombed their way along an important trench. The result was to get the trenches held by the 9th LHR trenches joined to the 10th Light Horse Regiment. It was a coordinated action with the men from the 10th LHR working the other end of the trench.
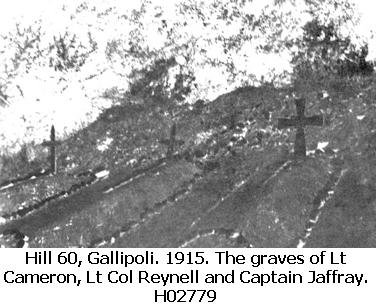
Later in the morning the bodies of Reynell and Capt Alfred John Jaffray were recovered and brought to a clearing. At 9am the men from the 9th LHR gathered for a funeral service. It was a difficult service for the men idolised Reynell and took his loss hard. Jaffray was also popular with his men so as the padre gave his eulogy, the men made no pretence of hiding their tears.
The Turks on Hill 971, however, were not in the same frame of mind. The funeral was spotted as the men stood together listening to the padre and made a tempting artillery target. The first salvo sent everyone scattering. It was followed by a further half an hour’s shelling to let the Australian’s understand that they were not sympathetic to the loss.
The rest of the men remained in the trenches until relieved that night at 9pm when everyone moved to Sazli Beit Dere for a rest. A party of 25 was left behind. Here they met the men from C Squadron, 11th Light Horse Regiment who were attached to the 9th LHR as reinforcements. The 11th LHR was broken up with squadrons being sent to other light horse units. ‘C’ Squadron of the 11th LHR was a South Australian unit and thus natural to add them to a South Australian regiment. The CO of the 11th LHR, Lieutenant Colonel Grant, took command over the new 9th Light Horse Regiment.
"Lest we forget"
Further Reading:
The Nek, Gallipoli, 7 August 1915
The Nek, Gallipoli, 7 August 1915, Roll of Honour
Battles where Australians fought, 1899-1919
Citation: The Nek and Hill 60 - The massacre of the Australians
