« August 2009 »
S M T W T F S
1
2 3 4 5 6 7 8
9 10 11 12 13 14 15
16 17 18 19 20 21 22
23 24 25 26 27 28 29
30 31
You are not logged in. Log in


Search the site:


powered by FreeFind
Volunteer with us.

Entries by Topic All topics  
A Latest Site News
A - Using the Site
AAA Volunteers
AAB-Education Centre
AAC-Film Clips
AAC-Photo Albums
AIF & MEF & EEF
AIF - Lighthorse
AIF - ALH - A to Z
AIF - DMC
AIF - DMC - Or Bat
AIF - DMC - Anzac MD
AIF - DMC - Aus MD
AIF - DMC - British
AIF - DMC - BWI
AIF - DMC - French
AIF - DMC - Indian
AIF - DMC - Italian
AIF - DMC - Medical
AIF - DMC - Remounts
AIF - DMC - Scouts
AIF - DMC - Sigs
AIF - DMC - Sigs AirlnS
AIF - DMC - 1 Sig Sqn
AIF - DMC - 2 Sig Sqn
AIF - DMC - Eng
AIF - DMC - Eng 1FSE
AIF - DMC - Eng 2FSE
AIF - DMC - GSR
AIF - 1B - 1 LHB
AIF - 1B - 6 MVS
AIF - 1B - 1 LHMGS
AIF - 1B - 1 Sig Trp
AIF - 1B - 1 LHFA
AIF - 1B - 1 LHR
AIF - 1B - 2 LHR
AIF - 1B - 3 LHR
AIF - 2B - 2 LHB
AIF - 2B - 7 MVS
AIF - 2B - 2 LHFA
AIF - 2B - 2 LHMGS
AIF - 2B - 2 Sig Trp
AIF - 2B - 5 LHR
AIF - 2B - 6 LHR
AIF - 2B - 7 LHR
AIF - 3B - 3 LHB
AIF - 3B - 8 MVS
AIF - 3B - 3 LHB Sigs
AIF - 3B - 3 LHFA
AIF - 3B - 3 LHMGS
AIF - 3B - 3 Sig Trp
AIF - 3B - 8 LHR
AIF - 3B - 9 LHR
AIF - 3B - 10 LHR
AIF - 4B - 4 LHB
AIF - 4B - 4 Sig Trp
AIF - 4B - 9 MVS
AIF - 4B - 4 LHFA
AIF - 4B - 4 LHMGS
AIF - 4B - 4 LHR
AIF - 4B - 11 LHR
AIF - 4B - 12 LHR
AIF - 5B - 5 LHB
AIF - 5B - 10 MVS
AIF - 5B - 5 LHFA
AIF - 5B - 5 Sig Trp
AIF - 5B - ICC
AIF - 5B - 14 LHR
AIF - 5B - 15 LHR
AIF - 5B - 1er Regt
AIF - 5B - 2 NZMGS
AIF - AASC
AIF - Aboriginal LH
AIF - Badges
AIF - Cars
AIF - Chinese LH
AIF - Double Sqns
AIF - Engineers
AIF - Fr - 22 Corps
AIF - Fr - 13 LHR
AIF - Honour Roll
AIF - HQ - 3rd Echelon
AIF - Marching Songs
AIF - Misc Topics
AIF - NZMRB
AIF - NZMRB - AMR
AIF - NZMRB - CMR
AIF - NZMRB - EFT
AIF - NZMRB - NZMFA
AIF - NZMRB - NZMGS
AIF - NZMRB - OMR
AIF - NZMRB - Sig-Trp
AIF - NZMRB - WMR
AIF - Ships
AIF - Ships - Encountr
AIF - Ships - Una
AIF - WFF
AIF - Wireless Sqn
Battles
BatzA - Australia
BatzA - Broken Hill
BatzA - Liverpool
BatzA - Merivale
BatzB - Boer War
BatzB - Bakenlaagte
BatzB - Belmont
BatzB - Bothaville
BatzB - Buffels Hoek
BatzB - Coetzees Drift
BatzB - Diamond Hill
BatzB - Driefontein
BatzB - Elands
BatzB - Graspan
BatzB - Grobelaar
BatzB - Grootvallier
BatzB - Hartebestfontn
BatzB - Houtnek
BatzB - Karee Siding
BatzB - Kimberley
BatzB - Koster River
BatzB - Leeuw Kop
BatzB - Mafeking
BatzB - Magersfontein
BatzB - Modder River
BatzB - Onverwacht
BatzB - Paardeberg
BatzB - Palmietfontein
BatzB - Pink Hill
BatzB - Poplar Grove
BatzB - Rhenoster
BatzB - Sannahs Post
BatzB - Slingersfontn
BatzB - Stinkhoutbm
BatzB - Sunnyside
BatzB - Wilmansrust
BatzB - Wolvekuil
BatzB - Zand River
BatzG - Gallipoli
BatzG - Anzac
BatzG - Aug 1915
BatzG - Baby 700
BatzG - Evacuation
BatzG - Hill 60
BatzG - Hill 971
BatzG - Krithia
BatzG - Lone Pine
BatzG - Nek
BatzJ - Jordan Valley
BatzJ - 1st Amman
BatzJ - 2nd Amman
BatzJ - Abu Tellul
BatzJ - Es Salt
BatzJ - JV Maps
BatzJ - Ziza
BatzM - Mespot
BatzM - Baghdad
BatzM - Ctesiphon
BatzM - Daur
BatzM - Kurna
BatzM - Kut el Amara
BatzM - Ramadi
BatzN - Naval
BatzN - AE1
BatzN - Cocos Is
BatzN - Heligoland
BatzN - Marmara
BatzN - Zeebrugge
BatzN - Zeppelin L43
BatzNG - Bitapaka
BatzO - Other
BatzO - Baku
BatzO - Egypt 1919
BatzO - Emptsa
BatzO - Karawaran
BatzO - Peitang
BatzO - Wassa
BatzP - Palestine
BatzP - 1st Gaza
BatzP - 2nd Gaza
BatzP - 3rd Gaza
BatzP - Aleppo
BatzP - Amwas
BatzP - Ayun Kara
BatzP - Bald Hill
BatzP - Balin
BatzP - Beersheba
BatzP - Berkusieh
BatzP - Damascus
BatzP - El Auja
BatzP - El Buggar
BatzP - El Burj
BatzP - Haifa
BatzP - Huj
BatzP - JB Yakub
BatzP - Kaukab
BatzP - Khan Kusseir
BatzP - Khuweilfe
BatzP - Kuneitra
BatzP - Megiddo
BatzP - Nablus
BatzP - Rafa
BatzP - Sasa
BatzP - Semakh
BatzP - Sheria
BatzP - Surafend
BatzP - Wadi Fara
BatzS - Sinai
BatzS - Bir el Abd
BatzS - El Arish
BatzS - El Mazar
BatzS - El Qatiya
BatzS - Jifjafa
BatzS - Magdhaba
BatzS - Maghara
BatzS - Romani
BatzS - Suez 1915
BatzSe - Senussi
BatzWF - Westn Front
BW - Boer War
BW - NSW
BW - NSW - 1ACH
BW - NSW - 1NSWMR
BW - NSW - 2NSWMR
BW - NSW - 3ACH
BW - NSW - 3NSWIB
BW - NSW - 3NSWMR
BW - NSW - 5ACH
BW - NSW - A Bty RAA
BW - NSW - AAMC
BW - NSW - Aust H
BW - NSW - Lancers
BW - NSW - NSW Inf
BW - NSW - NSWCBC
BW - NSW - NSWIB
BW - NSW - NSWMR_A
BW - NZ
BW - Qld
BW - Qld - 1ACH
BW - Qld - 1QMI
BW - Qld - 2QMI
BW - Qld - 3ACH
BW - Qld - 3QMI
BW - Qld - 4QIB
BW - Qld - 5QIB
BW - Qld - 6QIB
BW - Qld - 7ACH
BW - QLD - AAMC
BW - SA
BW - SA - 1SAMR
BW - SA - 2ACH
BW - SA - 2SAMR
BW - SA - 3SACB
BW - SA - 4ACH
BW - SA - 4SAIB
BW - SA - 5SAIB
BW - SA - 6SAIB
BW - SA - 8ACH
BW - SA - AAMC
BW - Tas
BW - Tas - 1ACH
BW - Tas - 1TIB
BW - Tas - 1TMI
BW - Tas - 2TB
BW - Tas - 2TIB
BW - Tas - 3ACH
BW - Tas - 8ACH
BW - Vic
BW - Vic - 1VMI
BW - Vic - 2ACH
BW - Vic - 2VMR
BW - Vic - 3VB
BW - Vic - 4ACH
BW - Vic - 4VIB
BW - Vic - 5VMR
BW - Vic - 6ACH
BW - Vic - AAMC
BW - Vic - Scot H
BW - WA
BW - WA - 1WAMI
BW - WA - 2ACH
BW - WA - 2WAMI
BW - WA - 3WAB
BW - WA - 4ACH
BW - WA - 4WAMI
BW - WA - 5WAMI
BW - WA - 6WAMI
BW - WA - 8ACH
BW Gen - Campaign
BW Gen - Soldiers
BW General
Cavalry - General
Diary - Schramm
Egypt - Heliopolis
Egypt - Mena
Gen - Ataturk Pk, CNB
Gen - Australia
Gen - Legends
Gen - Query Club
Gen - St - NSW
Gen - St - Qld
Gen - St - SA
Gen - St - Tas
Gen - St - Vic
Gen - St - WA
Gm - German Items
Gm - Bk - 605 MGC
GW - 11 Nov 1918
GW - Atrocities
GW - August 1914
GW - Biographies
GW - Propaganda
GW - Spies
GW - We forgot
Militia 1899-1920
Militia - Area Officers
Militia - Inf - Infantry
Militia - Inf - 1IB
Militia - Inf - 2IB
Militia - Inf - 3IB
Militia - Inf - NSW
Militia - Inf - Qld
Militia - Inf - SA
Militia - Inf - Tas
Militia - Inf - Vic
Militia - Inf - WA
Militia - K.E.Horse
Militia - LH
Militia - LH - Regts
Militia - LH - 1LHB
Militia - LH - 2LHB
Militia - LH - 3LHB
Militia - LH - 4LHB
Militia - LH - 5LHB
Militia - LH - 6LHB
Militia - LHN - NSW
Militia - LHN - 1/7/1
Militia - LHN - 2/9/6
Militia - LHN - 3/11/7
Militia - LHN - 4/6/16
Militia - LHN - 5/4/15
Militia - LHN - 6/5/12
Militia - LHN - 28
Militia - LHQ - Qld
Militia - LHQ - 13/2
Militia - LHQ - 14/3/11
Militia - LHQ - 15/1/5
Militia - LHQ - 27/14
Militia - LHS - SA
Militia - LHS - 16/22/3
Militia - LHS - 17/23/18
Militia - LHS - 24/9
Militia - LHT - Tas
Militia - LHT - 12/26
Militia - LHV - Vic
Militia - LHV - 7/15/20
Militia - LHV - 8/16/8
Militia - LHV - 9/19
Militia - LHV - 10/13
Militia - LHV - 11/20/4
Militia - LHV - 19/17
Militia - LHV - 29
Militia - LHW - WA
Militia - LHW-18/25/10
Militia - Military Orders
Militia - Misc
MilitiaRC - Rifle Clubs
MilitiaRC - NSW
MilitiaRC - NT
MilitiaRC - Qld
MilitiaRC - SA
MilitiaRC - Tas
MilitiaRC - Vic
MilitiaRC - WA
Militiaz - New Zealand
Tk - Turkish Items
Tk - Army
Tk - Bks - Books
Tk - Bks - 1/33IR
Tk - Bks - 27th IR
Tk - Bks - Air Force
Tk - Bks - Yildirim
Tk - POWs
Wp - Weapons
Wp - Hotchkiss Cav
Wp - Hotchkiss PMG
Blog Tools
Edit your Blog
Build a Blog
RSS Feed
View Profile
Open Community
Post to this Blog
Site Index
Education Centre
LH Militia
Boer War
Transport Ships
LH Battles
ALH - Units
ALH - General
Aboriginal Light H
Weapons
Ottoman Sources

"At a mile distant their thousand hooves were stuttering thunder, coming at a rate that frightened a man - they were an awe inspiring sight, galloping through the red haze - knee to knee and horse to horse - the dying sun glinting on bayonet points..." Trooper Ion Idriess

The Australian Light Horse Studies Centre aims to present an accurate history as chroniclers of early Australian military developments from 1899 to 1920.

The Australian Light Horse Studies Centre site holds over 12,000 entries and is growing daily.

Contact: Australian Light Horse Studies Centre

Let us hear your story: You can tell your story, make a comment or ask for help on our Australian Light Horse Studies Centre Forum called:

Desert Column Forum

WARNING: This site contains: names, information and images of deceased people; and, language which may be considered inappropriate today.

Sunday, 9 August 2009
Australian Light Horse, Roles within the Regiment, Relieving and Posting
Topic: AIF - Lighthorse

Australian Light Horse

Roles within the Regiment

Relieving and Posting


The following entries dealing with the roles and duties within the hierarchy of a light horse regiment are extracted from a very informative handbook called The Bushman’s Military Guide, 1898. While written in 1898, the information contained in the entries held true for the next twenty years with only minor modifications with the principles remaining as current then as now.


Relieving and Posting


(1.) On the approach of the relief, a sentry will place himself with shouldered arms in front of his sentry-box. The corporal of the relief will proceed as follows:


"Shoulder-Arms."

At about 10 paces from the sentry.


"Relief, Halt."

At about 6 paces from the sentry.


"Sentries, Port - Arms."

The old sentry, and the man who is to relieve him, will port arms, the latter moving out from the relief and placing himself at 1 pace from the former, facing him; the old sentry will then give over his orders, the corporal referring to the board of orders to see if they are correctly given.


"Pass."

The old sentry will take 1 pace to his left, and then move to his place in the relief, turning to the rear, and the new sentry will take 1 pace to his front.


"Shoulder-Arms."

"Front."

The sentries will then be ordered to shoulder arms and front.


"Relief Quick - March."

"Support - Arms."

The relief will be marched on, and, when it has proceeded about 10 pares, will be ordered to support arms.

(2.) The proper front of a sentry's post, and the extent of his walk, should be pointed out to him when he is posted.

When a sentry is to be posted on a new post, the procedure will be as above described, except that on the command, "Sentry, Port - Arms", the sentry will port arms, move to the post assigned to him, and be ordered to front. The corporal will read the orders to him, and then direct him to shoulder.

(3.) Sentries walking to and fro on their posts must do so in a brisk and soldier-like manner; they must on no account quit their arms, lounge, or converse with anyone; nor must they stand in their sentry boxes in good, or even in moderate weather. Sentries are to walk about with supported arms, but they are permitted to order arms and stand at ease from time to time.


Previous: Marching Reliefs 

Next: Sentries Paying Compliments 


Further Reading:

Australian Light Horse

Militia 1899 - 1920


Citation: Australian Light Horse, Roles within the Regiment, Relieving and Posting

Posted by Project Leader at 12:01 AM EADT
Updated: Wednesday, 2 September 2009 11:21 AM EADT
Bir el Abd, Sinai, 9 August 1916, Auckland Mounted Rifles Regiment, Unit History Account
Topic: AIF - NZMRB - AMR

Bir el Abd

Sinai, 9 August 1916

AMR Unit History Account


13/112 Sergeant Charles Gordon Nicol, a member of the Auckland Mounted Rifles, a unit which was part of the New Zealand Mounted Rifles Brigade, wrote an account of this unit called The Story of Two Campains”  Official war history of the Auckland Mounted Rifles Regiment, 1914 - 1919 in the Battlefields  of Gallipoli, Sinai and Palestine during WWI, in which included a section specifically related to the battle of Beersheba and is extracted below. A copy of this book is available on the New Zealand Mounted Rifles Association website.

Nicol, CG, The story of two campaigns : official war history of the Auckland Mounted Rifles Regiment, 1914-1919, (Auckland 1921).

There was little rest for the brigade on the night of August 8. Bir El Abd was to be attacked at 6 the following morning, and the lines were awake and busy at 2 a.m., when horses were fed. The brigade moved out at 4.30, and at 5.15 the advance screen supplied by the A.M.R. was in touch with the enemy. (Flow simple it is to say that a screen was in touch with the enemy! How easy to say it, but what of the bullets that whip the morning air and the anxious peering eyes that must miss nothing, and the furrowed brow of the lieutenant who must be certain that the messages he sends back by flag are perfectly true. Yes! it is much easier to say that the screen gained touch). Leaving the horses under the cover of sand dunes the troopers, in open formation, moved forward to the attack, from a point about one and a-half miles west of and overlooking Bir El Abd. Splendid covering fire was provided by the Somerset Battery. The front line of the A.M.R. comprised the 3rd squadron on the left, and two troops of the 11th squadron and one section of machine-guns on the right.

On the Regiment’s left were the C.M.R., with Australians beyond them, and on the right was expected to come the 3rd Light Horse Brigade. The 3rd brigade again failed to get up, and again the Regiment had its right flank “in the air.’ On the left of the hummocky country to be traversed was a ridge running forward from Bir El Abd, and on it were the Turks who, if unmolested, would have made it particularly hot for the attackers, but the moment the advance was started Lieutenant Hinman’s machine-guns sent a deadly sheet of metal along the crest and cleared it. The absence of the brigade on the right soon began to have serious consequences. At 6.45 it was reported that enemy reinforcements were coming over the long ridge south-east of Bir El Abd, and the Regiment had to extent its front to a considerable extent.

Major McCarroll went across to command this section, taking with him two troops of the 4th squadron. Advancing by troops the regiments made steady progress. At 9 a.m. the right flank was reinforced by one squadron of the 5th Light Horse. About 11.20 the C.M.R. and the left flank of the A.M.R.. had to retire a distance owing to enfilade fire and, with the continued pressure against the unprotected right, the situation began to look ugly. Half-an-hour later the Turks counterattacked with two battalions, each numbering 500 or 600 men. Aided by the Somerset Battery, the Regiment was able to hold its ground until the arrival of small reinforcements and a W.M.R. machine-gun section. The enemy then opened up a heavy artillery fire, which continued until 3.30, when he launched a second counter-attack, before which the C.M.R. had to retire.

During the afternoon the Turks sent in three fresh battalions against the left, and although the fighting did not develop into a hand-to-hand affair, it was warm enough for anyone. By 3.15 the A.M.R. reported that it was holding the enemy well, but at 4.15 a retirement was ordered. This presented a problem of difficulty, especially in view of the signs of another counter-attack. It had been observed, however, that the machine-guns used by the enemy were of German make. It was thus known that their field of fire was limited. Accordingly, it was decided to move back slowly to a point where the horses could be brought up, and then rush off the two flanks at a wide angle, which would prevent the machine-guns getting round on them. This was done, leaving only a small body in the centre. When the time came for this section to move, the enemy machine-guns were apparently fixed on the flank routes taken by the others. Instead of going by the flanks the men mounted their horses and galloped straight over the ridge immediately in rear. So successful was the movement that only one casualty occurred among the last section as it got away. Mention should be made of the splendid work of the machine-guns under Lieutenants Hinman and McCarroll in covering the respective withdrawals of the right and left sections. Some delay occurred in starting the final withdrawal on account of the shortage of sand carts for the wounded, but all the wounded were successfully evacuated before it began. The Regiment’s casualties for the day numbered 11 killed and 19 wounded. The A.M.R. lost two particularly fine officers in Captain O. Johnson, who was killed, and Lieutenant A. M. Martin, who died of wounds. Lieutenant Martin had done splendid work in finding and developing water.

This was the last fighting the Regiment engaged in at this period. The Turk, menaced on the southern flank by the Camel Corps, and on the rear by the mounted troops, who had so thoroughly proved themselves, hurried his departure, and within a couple of days patrols had penetrated beyond Salmana without meeting the enemy. For some days the Regiment was bivouacked at Bir El Abd doing patrol duty and helping to bury the dead and the bodies of animals. Plenty of evidence was found of the havoc the guns had caused among the enemy transport camels. Romani was a most decisive victory. Nearly 4,000 prisoners were captured and the Turkish casualties were estimated at no less than 7,000.

Thus, over half the force that had come across the desert was accounted for. The Regiment had its full share of fighting.

During the week the men had little sleep, little water, and only “hard tack” and bully beef for food. The heat had added to their trials, which did not end with the battle, however, for patrol duty beyond Salmana was the usual routine. “It’s a hell of a life,” wrote one man during these days. “We need a spell, and so do the mokes. At Bir we found lots of beer bottles.

Empty, of course. If ever I get out of this don’t talk desert to me. The only shelter from the sun is what we can rig up with our blanket. All manner of insects attack us at night, and at dawn they are relieved by an army corps of vicious flies.

Anyhow we got an onion issue today, and they say the railway is coming on fast. I suppose we are dinkum crusaders, but we don’t look it or feel it. In the next war I’m going to be a rum buyer in Jamaica.” A few days after the last of the fighting, Brigadier-General Chaytor had to go to hospital owing to his Gallipoli wound giving him trouble, and in his absence Lieutenant-Colonel Mackesy took command of the brigade and Major McCarroll of the Regiment.

A week later the brigade moved to Hod Amara, beyond Abd, where it took over the out post line, and made a reconnaissance over the rough ground north of Salmana and the island of El Gaiss, which is separated by a very shallow strip of water which dries up in summer. No traces of recent occupation by the enemy were found. It was a long, rough ride, but most interesting. En route a number of dry salt “lakes” were crossed, the horses’ hoofs not making a mark on the hard crystal bottom. There was good fresh water in the vicinity of El Gaiss, sometimes in proximity to very salt wells.

Patches of water melons and fig trees were found, and the fruit tasted like food of the gods after the fare of the recent hard days, but many suffered terrible pains afterwards. Lieutenants Finlayson and Coates acted as guides to the brigade on this expedition.

A couple of days later an enemy airman dropped three bombs on the Amara Camp, but did no harm. It was at this time that the 3rd squadron commander, Major Schofield, who had been seriously wounded on Gallipoli, broke down in health, and went away for good. He was succeeded by Major Bennett.

The brigade remained at Amara until September 11, the only diversions being provided by enemy ‘planes, which usually appeared overhead at breakfast time, but usually passed on. A shift was then made back to the old camping ground at Bit Etmaler, where a well-earned rest a was enjoyed. Reinforcements were received, and the old hands were sent away on leave to a splendid camp, established for the convenience of leave men, at Sidi Bishr, on the coast at Alexandria. A pleasant month was so spent.

Meantime, the railway was pushed on with remarkable speed, and all that troubled the workers and their protectors was air raids, which, however, rarely did any damage.

On October 22 the New Zealand Mounted Brigade was shifted up to Bir El Abd with camel transport, which was suggestive of further adventures.


Further Reading:

Auckland Mounted Rifles Regiment

Auckland Mounted Rifles Regiment, Roll of Honour

New Zealand Mounted Rifles Brigade

Battle of Romani, Sinai, August 4 to 5, 1916 

Bir el Abd, Sinai, 9 August 1916

Battles where Australians fought, 1899-1920


Citation: Bir el Abd, Sinai, 9 August 1916, Auckland Mounted Rifles Regiment, Unit History Account

Posted by Project Leader at 12:01 AM EADT
Updated: Saturday, 19 September 2009 5:14 PM EADT
Bir el Abd, Sinai, 9 August 1916, 1st LHR, AIF, Unit History Account
Topic: AIF - 1B - 1 LHR

Bir el Abd

Sinai, 9 August 1916

1st LHR, AIF, Unit History Account


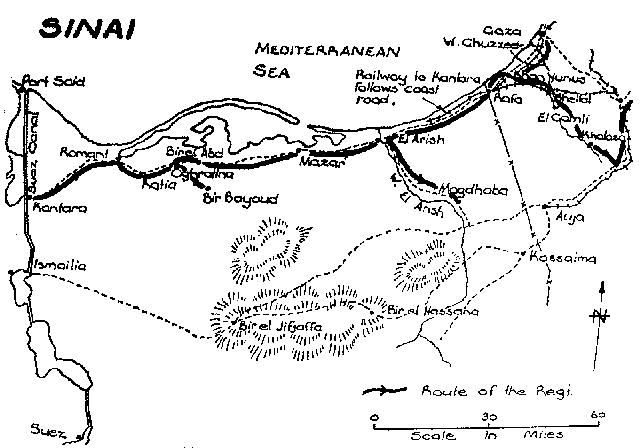
Map of the 1st LHR participation in the Sinai Campaign, 1916-17

[From: Vernon, The Royal New South Wales Lancers 1885-1985, p. 105.]

[Click on map for larger version.]


PV Vernon's 1985 centenary celebration of the Royal New South Wales Lancers included a section on the work performed by the 1st Light Horse Regiment during the Great War. The pages specifically related to the battle of Romani are extracted below.


Vernon, PV, editor, The Royal New South Wales Lancers 1885-1985, (Sydney 1986), pp. 112 - 113:


At 2.15 p.m. on August 8 the regiment, now 236 strong, with "A" Squadron of the 3rd Light Horse Regiment, left Romani for Katia as advanced guard to the 1st and 2nd Brigades which were both under Brigadier-General J. R. Royston, C.M.G., D.S.O., the object being to cut off the Turks at Bir el Abd. The force moved along the caravan route to Hod el Khibba, thence in a night march, swinging off at a bearing of 22 degrees as far as the recently swollen marsh, thence on a bearing of 80 degrees to Hod Hamada and from there on a bearing of 129 degrees in order to reach a point north-east of Bir el Abd. On reaching the edge of the sand dunes north-east of Bir el Abd, the unit came under heavy fire, and was forced to deploy on a line running eastward into the dunes from the edge of a marsh, el Huag, lying north-east of Hod el Hisha. At 11 a.m. an attempt was made to straighten out the line - the Wellington Mounted Rifles, attached to the 2nd Light Horse Brigade, moved forward and occupied a hill south-west of Hod el Asal. The 1st Light Horse Regiment moved forward supporting this attack, one troop reaching the hill. As the enemy appeared to be making some advance across the flat to the east, two troops of the regiment were moved up to Hod el Hisha, and were heavily fired on, at which time the Wellingtons were being heavily shelled on the hill occupied by them south-west of Hod el Asal. The enemy made a general advance, and orders were received at 3.30 p.m. to withdraw to the north-west towards Hod Hamada, thence via Hod el Khibba to Oghratina, where the regiment bivouacked for the night. Lieutenant R. A. L. McDonald and two men had been killed, and Major D. W. A. Smith and 13 men wounded.

At Romani, on August 4 1916, the British had routed the Turks and destroyed half their force. It was a decisive battle in the campaign. After the actions at Katia on August 5, and at Bir el Abd on August 9 to 12, the main enemy force was withdrawn across the 50 miles of practically waterless country to el Arish, but with a strong outpost left at Mazar, 24 miles east of Abd. The Romani operations had stressed the need for the railway line and pipeline which were gradually being constructed in the wake of the army, and the G.O.C. now made a determined effort to get these completed. (By December 21, the British were in el Arish.)


Further Reading:

1st Australian Light Horse Regiment, AIF

1st Australian Light Horse Regiment, Roll of Honour

Battle of Romani, Sinai, August 4 to 5, 1916 

Bir el Abd, Sinai, 9 August 1916

Battles where Australians fought, 1899-1920


Citation: Bir el Abd, Sinai, 9 August 1916, 1st LHR, AIF, Unit History Account

Posted by Project Leader at 12:01 AM EADT
Updated: Thursday, 17 September 2009 12:36 PM EADT
Bir el Abd, Sinai, 9 August 1916, Friedrich Freiherr Kress von Kressenstein Account
Topic: Gm - German Items

Bir el Abd

Sinai, 9 August 1916

Friedrich Freiherr Kress von Kressenstein  Account


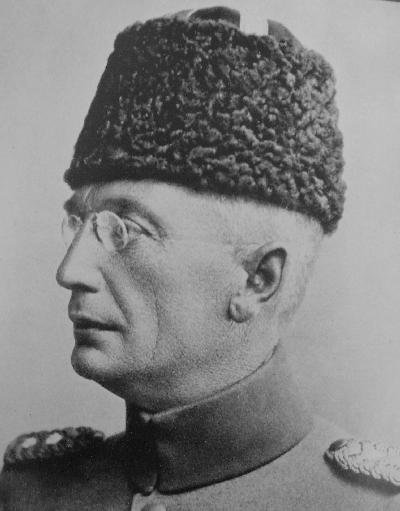
General Friedrich Freiherr Kress von Kressenstein
 
[From:  Kress, Mit den Tèurken zum Suezkanal, 1938, Plate facing p. 48.]


The German General charged with the defence of Beersheba was General Friedrich Freiherr Kress von Kressenstein, commonly called Kress. He wrote his book Mit den Tèurken zum Suezkanal [With the Turks to the Suez Canal] in 1938.

Kressenstein, Friedrich Freiherr Kress von, Mit den Tèurken zum Suezkanal, 1938.


The next day [8 August] our centre and right wing were engaged in a short but very violent artillery duel, wherein again the Austro-Hungarian Batteries excelled with their accurate firing performance. On the left wing, the situation for Major Dohlmann was at times very critical. The rapid moving Smith’s Column bypassed Dohlmann so that by the afternoon, he was facing a front from the east. I sent him the order to return to Hod um Vayhelhilm when darkness fell. To assist Dohlmann in his task, I sent him the battalion commanded by Major Marr. The rest of the 1st Expeditionary Force took over the night in the line of Bir el Abd – Hod um Vayhelhilm. On the morning of 9 August five brigades of the enemy on horseback attacked us at Bir el Abd. At 1 p.m. the skirmish proved costly and ended with the withdrawal of the British. The success of the day was in most part thanks Refit Bey, who with his Infantry made a few gutsy and successful counter-attacks. In addition there was excellent shooting from our artillery.

On the evening of the battle, our 15 cm battery had only about 75 rounds, the 10 cm battery over 95, the Austro-Hungarian batteries about 11 or 22 and the Turkish mountain batteries had a total of over 200 rounds. The Army Command promised ammunition from the Flack trains to resupply the Austrians and the other batteries, but they arrived without any ammunition. Of this seems to have been Djemal appeared to be out of touch with the reality on the front, otherwise he would probably not sent me a telegram expressing his dissatisfaction with that I had withdrawn to Bir el Abd.

Fortunately, both the British and our forces had reached the end of their endurance. They probably realized that I had my troops still firmly in hand and that they would not be able to cut us off from our line of retreat, or take our heavy artillery. One of the British generals said the failure of the British offensive happened because the Turks could march as fast as his men would ride. In fact, the superiority of the British mounted troops and their mobility was offset by the long time they needed to water their many animals.

On our extreme left wing, over the next few days occurred few minor skirmishes with the enterprising and well-run Smith’s Column


Further Reading:

German Items

Battle of Romani, Sinai, August 4 to 5, 1916 

Bir el Abd, Sinai, 9 August 1916

Battles where Australians fought, 1899-1920


Citation: Bir el Abd, Sinai, 9 August 1916, Friedrich Freiherr Kress von Kressenstein  Account

Posted by Project Leader at 12:01 AM EADT
Updated: Wednesday, 23 September 2009 11:27 PM EADT
Bir el Abd, Sinai, 9 August 1916, Canterbury Mounted Rifles Regiment, Unit History Account
Topic: AIF - NZMRB - CMR

Bir el Abd

Sinai, 9 August 1916

CMR Unit History Account


Colonel Charles Guy Powles along with Officers of the Canterbury Mounted Rifles produced in 1928 a collective work called The history of the Canterbury Mounted Rifles 1914-1919, in which included a section specifically related to the battle of Bir el Abd and is extracted below A copy of this book is available on the New Zealand Mounted Rifles Association website..

Powles, CG ed, The history of the Canterbury Mounted Rifles 1914-1919, 1928.:


The heat since leaving Hill 70 on the morning of the 4th had been steadily increasing, and officers and men suffered severely, several having to be evacuated to hospital. The 7th was a replica of the 6th, the enemy being driven back to Negiliat, whence he made great play with his guns. "We were on the move again by 3.30 a.m. on the 8th, but the enemy had again withdrawn, and was now holding a strong position at Bir el Abd. The Regiment remained all day at Debabis and finally bivouaced there for the night. This spell was very welcome to all.

Next morning, August 9th, all available mounted troops were on the move before daylight. The Turks were reported to be holding Bir el Abd in strength.

The attack was to be made from the west and. south-west, and the 1st and 2nd Australian Light Horse Brigades combined were to attack the north flank of the enemy. The 3rd Australian Light Horse Brigade was ordered to pass south of the enemy, and then come into action from the direction of Salmana, thereby cutting his line of retreat, and menacing his rear. At 5.30 a.m. our advanced regiment, Auckland Mounted Rifles, was fired on, and the 8th Squadron went up in support of its left. Almost at once they were heavily engaged, and the two remaining squadrons of the Regiment came into action on the left of the 8th Squadron. The Regiment's right flank now rested on the old caravan route, the left feeling round towards the 2nd Light Horse Brigade.

The 8th Squadron pushed steadily on driving the enemy off a low sandy ridge facing east. The 1st and 10th Squadrons advanced at the same time, finally securing the high ground west of Bir el Abd, the Canterbury Regiment being on the left of the "Old Road" and the Aucklanders on the right of it, and later the 5th Light Horse Regiment, still temporarily attached to the Brigade, came up on the right of. the Auckland Regiment. The main Turkish defences could now be seen. They consisted of a series of entrenched redoubts with rifle pits in front. Later it was found that all these redoubts were connected by telephone with their artillery — three batteries of 77 mm. and one 4.2 battery and several 5.9 inch howitzers.

Against these the Anzac Mounted Division had only four batteries of 18 pounders.

The Turks had about 6,000 men in the line against our total of about 3,000 dismounted rifles. They were mostly reinforcements from El Arish who had not been engaged at Romani, while our men were suffering from extreme physical exhaustion.

The task before the British force was therefore formidable and the only chance of success was, as at Katia, that the 3rd Light Horse Brigade should succeed in beating down the enemy's extended left flank and in shaking the Bir el Abd defences by threatening the Turks communications.

Up till now their artillery had been annoying, but did not cause much damage, but once the high ridge facing the Oasis was crossed our men were in full view of their gunners. The 8th Squadron were in the most exposed position and suffered severely. Lieutenant Menzies, signalling officer, was killed, and Major Hammond and Lieutenant Blakeney dangerously wounded.

Early in the fight the Turks began to disclose their strength. Soon after 6 o 'clock they advanced with the bayonet in their first counter attack, but were stopped by the Canterburys and Aucklanders, aided by the splendid shooting of the Somerset Battery, which, as usual, fought with the N.Z.M.R. Brigade.

The line was again advanced until the Canterbury and Auckland Regiments were well down the forward slopes leading to the wells, but by 10.30 a.m. the enemy guns showed increased activity, severely handling the combined 1st and 2nd Light Horse Brigades on the left.

The Warwickshire Yeomanry now came up to reinforce the N.Z.M.R. Brigade, and the increased activity apparent among the Turks indicated that they were making every effort to get away their supplies and transport.

Shortly before noon came the second counter-attack, and the full force was received by the Regiment, but every man held firmly to his ground, and by accurate and deliberate fire, aided most effectively by the fine shooting of the machine guns, the successive waves of enemy infantry were shattered.

By 2 p.m. the enemy's counter-attack was in full progress along the whole of the line, and both the Light Horse Brigades on the left and the 3rd Light Horse Brigade on the right began to give round, the regiments retiring for about a mile under heavy punishment with every available man in the line. As the Turks recognised the possibility of overwhelming the British force, their gun fire gathered intensity until it reached a degree of severity unknown either at Romani or on Gallipoli.

The New Zealand Brigade was now in a very difficult position in being well down the forward slopes with both flanks exposed, and had it not been for the accurate shooting of each individual man, backed up by the machine guns and the Somerset Battery, the entire Brigade would have been overwhelmed.

65 At 5.30 p.m. General Chauvel ordered a general withdrawal. It was recognised that this would be a difficult task, but. provided the horses could be reached, the heavy ground would save the regiments from a hand to hand encounter with superior forces of the enemy's fresh troops. As soon as the movement was perceived the Turks assaulted strongly, and such was the position of the N.Z.M.R. Brigade that General Chaytor decided that the better course was to hang on until dark.

Just at dusk after a very heavy attack which fell chiefly upon the Aucklanders, the latter withdrew with the 5th Light Horse Regiment and the Yeomanry, leaving the Canterbury Regiment as rear guard.

A great fight had been put up by the machine guns, and under their cover the Regiment slowly withdrew. Lieutenant Gordon Harper, the gallant commander of the section of guns attached to the Regiment, was mortally wounded and brought out with great difficulty by his famous brother Captain Robin Harper, O.C. Machine Gun Squadron, who had all guns available playing on the advancing Turks, breaking up their attack when within 100 yards of the New Zealand position.

As has been already told, Captain Hammond of the 8th Squadron had been wounded earlier in the day. Though suffering from illness on the morning of the battle and recommended for evacuation to hospital, he insisted on remaining with and leading his squadron, and fought his men with great brilliancy and determination throughout the long day.

Colonel Findlay, on hearing that Captain Hammond had been severely wounded and could not be moved, worked his way up to the firing line, and, though managing to escape the heavy machine gun and rifle fire, was wounded in the hand by a piece of the shell which mortally wounded Lieutenant Gordon Harper. The care and evacuation of the wounded was an exceedingly difficult task, and much praise was due to the M.O., Captain R.

Orbell, and his stretcher bearers, for the excellent work they performed throughout these trying days. Visual signalling was out of the question at Bir el Abd, but the signallers carried out all that was required of them as runners; and for the maintenance of communications throughout the day R.S.M.

Denton deserves great praise, and as a runner Trooper Graham Scales did yeoman service.

The Brigade withdrew to Debabis, carrying back the wounded, who were sent to Railhead at Romani by camel cacolets, and suffered extremely from the jolting.


Further Reading:

Canterbury Mounted Rifles Regiment

Canterbury Mounted Rifles Regiment, Roll of Honour

New Zealand Mounted Rifles Brigade

Battle of Romani, Sinai, August 4 to 5, 1916 

Bir el Abd, Sinai, 9 August 1916

Battles where Australians fought, 1899-1920


Citation: Bir el Abd, Sinai, 9 August 1916, Canterbury Mounted Rifles Regiment, Unit History Account

Posted by Project Leader at 12:01 AM EADT
Updated: Saturday, 19 September 2009 5:13 PM EADT

Newer | Latest | Older

Full Site Index


powered by FreeFind
Let us hear your story: You can tell your story, make a comment or ask for help on our forum.

Desert Column Forum

A note on copyright

The Australian Light Horse Studies Centre is a not for profit and non profit group whose sole aim is to write the early history of the Australian Light Horse from 1900 - 1920. It is privately funded and the information is provided by the individuals within the group and while permission for the use of the material has been given for this site for these items by various donors, the residual and actual copyright for these items, should there be any, resides exclusively with the donors. The information on this site is freely available for private research use only and if used as such, should be appropriately acknowledged. To assist in this process, each item has a citation attached at the bottom for referencing purposes.

Please Note: No express or implied permission is given for commercial use of the information contained within this site.

A note to copyright holders

The Australian Light Horse Studies Centre has made every endeavour to contact copyright holders of material digitised for this blog and website and where appropriate, permission is still being sought for these items. Where replies were not received, or where the copyright owner has not been able to be traced, or where the permission is still being sought, the Australian Light Horse Studies Centre has decided, in good faith, to proceed with digitisation and publication. Australian Light Horse Studies Centre would be happy to hear from copyright owners at any time to discuss usage of this item.

Contact

Australian Light Horse Studies Centre

eXTReMe Tracker