"At a mile distant their thousand hooves were stuttering thunder, coming at a rate that frightened a man - they were an awe inspiring sight, galloping through the red haze - knee to knee and horse to horse - the dying sun glinting on bayonet points..." Trooper Ion Idriess
The Australian Light Horse Studies Centre aims to present an accurate history as chroniclers of early Australian military developments from 1899 to 1920.
The Australian Light Horse Studies Centre site holds over 12,000 entries and is growing daily.
Contact:Australian Light Horse Studies CentreLet us hear your story:
You can tell your story, make a comment or ask for help on our Australian Light Horse Studies Centre Forum called:
WARNING: This site contains: names, information and images of deceased people; and, language which may be considered inappropriate today.
Friday, 31 July 2009
The Nek, Gallipoli, 7 August 1915, Hughes Request for His Son's Transfer Topic: BatzG - Nek
The Nek
Gallipoli, 7 August 1915
Hughes Request for His Son's Transfer
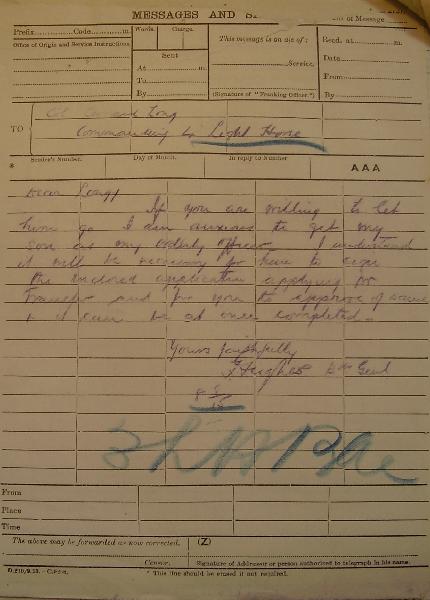
Signal ordered by Colonel Hughes, 8 August 1915
The transcribed message follows:
Dear Long
If you are willing to let him go I am anxious to get my son as my orderly officer. I understand it will be necessary for him to sign the enclosed application applying for transfer and for you to approve of same. It can be at once completed.
Yours faithfully F Hughes, Brigadier General.
Possibly one of the most craven and disgraceful actions of Colonel Hughes was to use his influence to get his son, Lt Arthur Godfrey Hughes, transferred from the 4th LHR to the 3rd LHB HQ so that he could be safe as Orderly Officer. Hughes had just sent over 300 other sons to their futile deaths at the Nek and consigned a similar number to hospital as being maimed and injured with hideous wounds and now a day after the slaughter, he wants to preserve the life of his own son.
While the father may have been motivated by a parental desire to protect his child from harm, and so understandable, in the context of the slaughter at the Nek, it was an abuse of influence that indicates the lack of care the man had for the men under his command. It is unconscionable behaviour and worthy of utmost scorn.
In contrast, the son was an honourable man, possibly embarrassed by this turn of events. Once Colonel Hughes was invalided to Australia, the son was seconded to the 10th LHR where he served with distinction. His record indicates that he was an excellent officer with exceptional skills and leadership ability.
Fearlessly, he led his men during the abortive Second Battle of Gaza where he was wounded at Atawineh Ridge on 19 April 1917. In recognition of his abilities, he went to Scout School at El Arish in March 1918. this was a distinction few ever achieved. During the Second Es Salt Raid 30 April - 3 May 1918, Hughes played an important role assisting Lt Rickaby in scouting duties. Finally, during the Great Ride, 19 September to 3 October 1918, along with Lt Foulkes-Taylor, led the 3rd Light Horse Brigade Scouts.
It is a credit to the man that Lt Arthur Godfrey Hughes was a different man to his father. He served his Regiment with great honour.
The Waler, Moving the Light Horse Topic: AIF - Lighthorse
The Waler
Moving the Light Horse
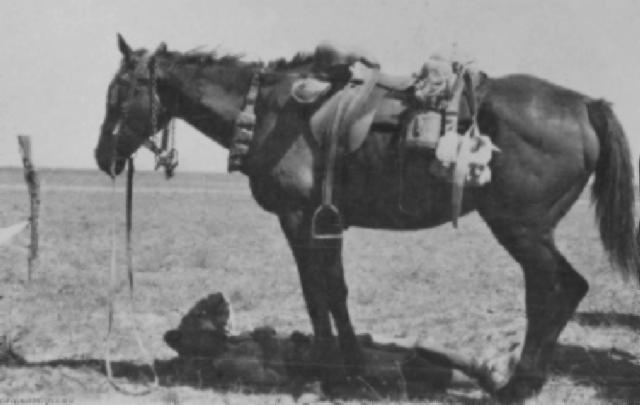
The Light Horseman and his Waler
WALERS
The following article is extracted from Dennis, P. et. al., The Oxford Companion to Australian Military History, 2nd Edition, OUP, Melbourne, 2008, p. 562.
WALERS was a term coined in India in the 1840s to describe horses from New South Wales, and was later applied more generally to Australian horses abroad. Though it has now been established as a breed proper, historically this was not the case and the term was used to describe almost all Australian - sourced horses despite the fact military horses varied greatly in size and characteristics depending on their intended use (artillery horses were a light draught type, for example, whilst cavalry mounts were lighter).
Australian horses were sold to the Indian Army from 1834 until just before the Second World War. The first Walers to be used in war by Australian troops were the 224 horses which went from Australia to the Sudan. The British and Australians used 37,245 Walers in the Boer War, but they, like almost all large horses brought to South Africa for the war, did not perform particularly well. This was due to a number of factors including undiscerning purchasing standards in Australia, an overstretched remount service which meant the horses were poorly acclimatised or prepared for military service once they arrived in Africa, virulent African horse diseases, poor unit standards of horse-mastership, an overworked veterinary service, an inadequate logistic service which precluded the supply of enough fodder, and finally a fundamental operational demand to keep the horses continually on the move without adequate rest. By the end of the war the Australian horses thought most suitable in South Africa were small mounts, known locally as nuggets, which were not dissimilar to the small horses the Boers used.
The Walers used by various armies in the First World War were more effective. Australian horses were not directly shipped to Europe due to the distances involved and it is the mastership, an overworked veterinary service, an inadequate logistic service which precluded the supply of enough fodder, and finally a fundamental operational demand to keep the horses continually on the move without adequate rest. By the end of the war the Australian horses thought most suitable in South Africa were small mounts, known locally as nuggets, which were not dissimilar to the small horses the Boers used.
The Walers used by various armies in the First World War were more effective. Australian horses were not directly shipped to Europe due to the distances involved and it is the performance of Walers in the Sinai and Palestine campaigns (see Palestine campaign), which has gained most attention.
Despite a popular notion that Walers outperformed all other horses in the Middle East this was not necessarily the case. Walers did perform very well, but so did the horses of nearly every cavalry, supply and artillery unit in Palestine Australian, New Zealand, British and Indian. Many Australian mounts benefited from their long period of acclimatisation while their riders were at Gallipoli, but perhaps more important for the campaign as a whole was the establishment of good standards of unit horse-mastership, thorough veterinary services, an operational tempo that permitted rest for the mounted units, and a well-organised logistical system that generally kept the horses well-fed and watered.
The work of purchasers in Australia and of the Australian Remount Unit in Egypt was also of notable benefit. At the end of the war most Australian Walers were sold on to the Indian Army. Older and otherwise unsuitable horses were destroyed (often by soldiers working under veterinary or remount unit supervision) but, despite the persistence of the myth, it seems very few, if any, were taken to a quiet spot near a camp and shot by their riders to save them being sold to local Arabs.
Australia sent 31,348 horses for overseas service with the AIF during the war and another 81,967 were sent to India. Shipments to Egypt ceased by mid 1916 mainly due to severe shipping shortages, though there were also complaints from Egypt about the quality of the horses being sent by this stage.
Of the horses used in these three wars only one, General W. T. Bridges' Sandy, was returned to Australia in 1918 far too late for Bridges' funeral in 1915, despite common belief.
With expanding industrialisation and urbanisation during the interwar period Walers became an ever-scarcer commodity and by the late 1920s it was proving difficult for the military to find enough mounts, especially for the militia light horse (whose riders provided their own horses). It was this factor, as much as a desire to modernise, which was behind the spasmodic efforts to mechanise the Army before the Second World War.
Surafend, the massacre, Palestine, 10 December 1918, Ted O'Brien Account Topic: BatzP - Surafend
Surafend, the massacre
Palestine, 10 December 1918
Ted O'Brien Account
The following is a transcript exerpt from an interview with 3511 Trooper Edward Harold O'Brien who served with "C" Squadron, 3rd Light Horse Regiment, AIF.
AWM Oral History Recording
Accession number: - S00681
Title: - (3511) O'Brien, Edward Harold (Private), C Squadron, 3rd Light Horse Regiment, AIF
Interviewee: - Edward Harold O'Brien
Interviewer: Douglas Wyatt
Date recorded: - 1988
Recording location: - Devonport, Tasmania
In this dialogue, there are two people speaking, Douglas Wyatt [DW] the interviewer and Edward Harold O'Brien [EHOB] which in the text is presented with indented initalcs.
[DW] Yes. There's some rogues about. Do you ever meet up with Chauvel?
[EHOB] No.
[DW] Allenby.
[EHOB] Allenby, yes, he come along. No, I never saw Chauvel. Unless I have forgotten about it. But I never forget Allenby. My word, he had a beautiful horse.
[DW] Did he?
[EHOB] ooh, yes. He just stood up in his stirrups and we went xxx. We were there at attention, close attention too. The poor xxx xxx xxx happened to be?
[DW] Was this all of the Third Light Horse, or more than that?
[EHOB] No. It was only the Third Light Horse, I think. I think they were the only ones who were in this mess up.
[DW] Were they.
[EHOB] Oh yes. And some New Zealanders. Well, I think perhaps the New Zealanders were the main ones, because a New Zealand sergeant it was.
[DW] That's right.
[EHOB] And these bedouins. They were wicked. The bedouins, you see, you didn't know whether they were for you or not. And they'd finish up ...
[DW] They were the local natives, were they?
[EHOB] Yeah, and they had to be treated as enemies, to finish up, you know. Anyone, you know ... You'd shoot them on site.
[DW] Were there any Tasmanians involved in that little incident?
[EHOB] Oh yes. Our squadron was there. I was down there. I don't know what I did with it, I was cranky and that. But they had a good issue of rum and they did their blocks. But I don't know.
[DW] Was the whole squadron involved? The officers as well or not?
[EHOB] Oh no. I think it would be only the sergeants, from the sergeants down. I can't think of any officers at all. But I can't think how it was organised or anything like that, it just happened. And everyone did their block. This sergeant was a very popular man, you know. It was really these New Zealanders came round our lines and tell them about it - they decided they'd go in and clean it up. And they did, I think.
[DW] And you went yourself?
[EHOB] Yeah, I was there, but I don't know if I did anything like that.
[DW] What about George Bramich, was he there?
[EHOB] [Harrigan, Harrigan], yeah, yeah. [Harrigan] and Don would be there too. We were all pretty well ... It must have been entered because it was our crowd that did it.
[DW] Was there much of a repercussion except from the tick off from Allenby or did you get fronted or anything?
[EHOB] No. Not our own personal crowd. They sort of wiped it off. It was one of those things. I think it got back to Australia and then I think Allenby sort of part apologised or something like that. But it was a wrong thing - it was bad, that's all. But there were these things that went on all the time.
[DW] What did you actually do? Did you go in and wreck the village?
[EHOB] Oh, absolutely. Yes. It didn't matter. There was cows and ducks and geese: there were kids. But men: they all went for the men with the bayonet and they got it.
[DW] The women then they moved out, I suppose.
[EHOB] There were some left. And they trekked out: they left their village and away they went. It was a bad thing, it was a real bad thing.
[DW] Were you camped close to this village at the time?
[EHOB] Yes.
[DW] In tents, or what?
[EHOB] I reckon so. I suppose so. It was about the only thing we used to have.
[DW] What was the name of the village?
[EHOB] Oh, God only knows. I don't know that it was ever named - there were villages everywhere.
[DW] Right.
[EHOB] You know, of course there were a lot of them. When we were at camp, xxx xxx xxx, and they'd drop down at night time and just sleep on the earth. They would get up in the morning and there would be flies in their ears and noses and eyes and everything like that and xxx xxx xxx xxx.
[DW] Was this the natives?
[EHOB] Yeah, yeah. There were two extremes, you see. There were the high and mighty and the very wealthy and then the rest of them. But they're still uncouth like that and they plough with a cow and a crooked stick sort of business and all this sort of rubbish.
Australian Light Horse, Roles within the Regiment, Duties of Regimental Orderly Squadron Sergeant Major Topic: AIF - Lighthorse
Australian Light Horse
Roles within the Regiment
Duties of Regimental Orderly Squadron Sergeant Major
The following entries dealing with the roles and duties within the hierarchy of a light horse regiment are extracted from a very informative handbook called The Bushman’s Military Guide, 1898. While written in 1898, the information contained in the entries held true for the next twenty years with only minor modifications with the principles remaining as current then as now.
Duties of Regimental Orderly Squadron Sergeant Major
(Permanent Staff-Sergeant)
(1.) He will assist the Captain of the day in instructing the regimental orderly serjeant, orderly corporal, in all their duties, as well as supervising all non-commissioned officers on or off duty, and will attend all parades.
(2.) He comes on duty at reveille and is on until the following morning at reveille, and will report himself to the Captain of the day and orderly officer at that time.
(3.) He will see that guards and sentries are alert, that sentries on horse-lines are posted.
(4.) He is responsible that the Sergeants' Mess is cleared every night at 11 o'clock.
(5.) He will never quit Camp except by special permission of the orderly officer or Adjutant.
(6.) He will collect the absentee reports at watch-setting and hand them to the orderly officer.
(7.) He will take special care that all non-commissioned officers and men use every effort to keep the Camp clean, free from paper, manure, or rubbish.
The Volunteer Movement in Western Australia, Geraldton Rifle Volunteers Topic: Militia - LHW - WA
Western Australian Militia
Geraldton Rifle Volunteers
The following is an extract from the book written in 1962 by George F. Wieck called The Volunteer Movement in Western Australia 1861-1903, pp. 42 – 43:
Geraldton Rifle Volunteers
Approval to form a Volunteer Infantry corps in the Champion Bay district appeared in the Government Gazette of 10 October 1876. The new corps was designated the "Geraldton Rifle Volunteers", with Headquarters at Geraldton. Capt. J.N. Hillman was appointed to Command.
The corps was administratively independent and in all matters dealt direct with the Military Commandant. Names on the roll totalled 60 in 1876, 48 in 1883, 67 in 1892, and 51 in 1895.
Apart from its deeds of prowess on the rifle range (which were outstanding) there is little on record concerning the activities of this corps: it was located so far from the others that particularly in the earlier years it could not participate with them in the higher forms of training. A small camp of training was held in the vicinity of Geraldton in 1884 - this was the first held by the corps. As in the case of Guildford very obsolete rifles were issued and these were not replaced until years later.
A detachment, with Lieutenant S. Mitchell in Command, was raised at Northampton in 1885. In 10 the corps was included with those of Guildford, Bunbury, and York to form the 3rd Battalion Western Australian Infantry Brigade.
Further details appear in Western Australian Infantry Brigade and 3rd Battalion Western Australian Infantry Brigade.
The Australian Light Horse Studies Centre is a not for profit and non profit group whose sole aim is to write the early history of the Australian Light Horse from 1900
- 1920. It is privately funded and the information is provided by the individuals within the group and while permission for the use of the material has been given for this
site for these items by various donors, the residual and actual copyright for these items, should there be any, resides exclusively with the donors. The information on
this site is freely available for private research use only and if used as such, should be appropriately acknowledged. To assist in this process, each item has a citation
attached at the bottom for referencing purposes.
Please Note: No express or implied permission is given for commercial use of the information contained within this site.
A note to copyright holders
The Australian Light Horse Studies Centre has made every endeavour to contact copyright holders of material digitised for this blog and website and where
appropriate, permission is still being sought for these items. Where replies were not received, or where the copyright owner has not been able to be traced, or where
the permission is still being sought, the Australian Light Horse Studies Centre has decided, in good faith, to proceed with digitisation and publication. Australian Light
Horse Studies Centre would be happy to hear from copyright owners at any time to discuss usage of this item.