« March 2010 »
S M T W T F S
1 2 3 4 5 6
7 8 9 10 11 12 13
14 15 16 17 18 19 20
21 22 23 24 25 26 27
28 29 30 31
You are not logged in. Log in


Search the site:


powered by FreeFind
Volunteer with us.

Entries by Topic All topics  
A Latest Site News
A - Using the Site
AAA Volunteers
AAB-Education Centre
AAC-Film Clips
AAC-Photo Albums
AIF & MEF & EEF
AIF - Lighthorse
AIF - ALH - A to Z
AIF - DMC
AIF - DMC - Or Bat
AIF - DMC - Anzac MD
AIF - DMC - Aus MD
AIF - DMC - British
AIF - DMC - BWI
AIF - DMC - French
AIF - DMC - Indian
AIF - DMC - Italian
AIF - DMC - Medical
AIF - DMC - Remounts
AIF - DMC - Scouts
AIF - DMC - Sigs
AIF - DMC - Sigs AirlnS
AIF - DMC - 1 Sig Sqn
AIF - DMC - 2 Sig Sqn
AIF - DMC - Eng
AIF - DMC - Eng 1FSE
AIF - DMC - Eng 2FSE
AIF - DMC - GSR
AIF - 1B - 1 LHB
AIF - 1B - 6 MVS
AIF - 1B - 1 LHMGS
AIF - 1B - 1 Sig Trp
AIF - 1B - 1 LHFA
AIF - 1B - 1 LHR
AIF - 1B - 2 LHR
AIF - 1B - 3 LHR
AIF - 2B - 2 LHB
AIF - 2B - 7 MVS
AIF - 2B - 2 LHFA
AIF - 2B - 2 LHMGS
AIF - 2B - 2 Sig Trp
AIF - 2B - 5 LHR
AIF - 2B - 6 LHR
AIF - 2B - 7 LHR
AIF - 3B - 3 LHB
AIF - 3B - 8 MVS
AIF - 3B - 3 LHB Sigs
AIF - 3B - 3 LHFA
AIF - 3B - 3 LHMGS
AIF - 3B - 3 Sig Trp
AIF - 3B - 8 LHR
AIF - 3B - 9 LHR
AIF - 3B - 10 LHR
AIF - 4B - 4 LHB
AIF - 4B - 4 Sig Trp
AIF - 4B - 9 MVS
AIF - 4B - 4 LHFA
AIF - 4B - 4 LHMGS
AIF - 4B - 4 LHR
AIF - 4B - 11 LHR
AIF - 4B - 12 LHR
AIF - 5B - 5 LHB
AIF - 5B - 10 MVS
AIF - 5B - 5 LHFA
AIF - 5B - 5 Sig Trp
AIF - 5B - ICC
AIF - 5B - 14 LHR
AIF - 5B - 15 LHR
AIF - 5B - 1er Regt
AIF - 5B - 2 NZMGS
AIF - AASC
AIF - Aboriginal LH
AIF - Badges
AIF - Cars
AIF - Chinese LH
AIF - Double Sqns
AIF - Engineers
AIF - Fr - 22 Corps
AIF - Fr - 13 LHR
AIF - Honour Roll
AIF - HQ - 3rd Echelon
AIF - Marching Songs
AIF - Misc Topics
AIF - NZMRB
AIF - NZMRB - AMR
AIF - NZMRB - CMR
AIF - NZMRB - EFT
AIF - NZMRB - NZMFA
AIF - NZMRB - NZMGS
AIF - NZMRB - OMR
AIF - NZMRB - Sig-Trp
AIF - NZMRB - WMR
AIF - Ships
AIF - Ships - Encountr
AIF - Ships - Una
AIF - WFF
AIF - Wireless Sqn
Battles
BatzA - Australia
BatzA - Broken Hill
BatzA - Liverpool
BatzA - Merivale
BatzB - Boer War
BatzB - Bakenlaagte
BatzB - Belmont
BatzB - Bothaville
BatzB - Buffels Hoek
BatzB - Coetzees Drift
BatzB - Diamond Hill
BatzB - Driefontein
BatzB - Elands
BatzB - Graspan
BatzB - Grobelaar
BatzB - Grootvallier
BatzB - Hartebestfontn
BatzB - Houtnek
BatzB - Karee Siding
BatzB - Kimberley
BatzB - Koster River
BatzB - Leeuw Kop
BatzB - Mafeking
BatzB - Magersfontein
BatzB - Modder River
BatzB - Onverwacht
BatzB - Paardeberg
BatzB - Palmietfontein
BatzB - Pink Hill
BatzB - Poplar Grove
BatzB - Rhenoster
BatzB - Sannahs Post
BatzB - Slingersfontn
BatzB - Stinkhoutbm
BatzB - Sunnyside
BatzB - Wilmansrust
BatzB - Wolvekuil
BatzB - Zand River
BatzG - Gallipoli
BatzG - Anzac
BatzG - Aug 1915
BatzG - Baby 700
BatzG - Evacuation
BatzG - Hill 60
BatzG - Hill 971
BatzG - Krithia
BatzG - Lone Pine
BatzG - Nek
BatzJ - Jordan Valley
BatzJ - 1st Amman
BatzJ - 2nd Amman
BatzJ - Abu Tellul
BatzJ - Es Salt
BatzJ - JV Maps
BatzJ - Ziza
BatzM - Mespot
BatzM - Baghdad
BatzM - Ctesiphon
BatzM - Daur
BatzM - Kurna
BatzM - Kut el Amara
BatzM - Ramadi
BatzN - Naval
BatzN - AE1
BatzN - Cocos Is
BatzN - Heligoland
BatzN - Marmara
BatzN - Zeebrugge
BatzN - Zeppelin L43
BatzNG - Bitapaka
BatzO - Other
BatzO - Baku
BatzO - Egypt 1919
BatzO - Emptsa
BatzO - Karawaran
BatzO - Peitang
BatzO - Wassa
BatzP - Palestine
BatzP - 1st Gaza
BatzP - 2nd Gaza
BatzP - 3rd Gaza
BatzP - Aleppo
BatzP - Amwas
BatzP - Ayun Kara
BatzP - Bald Hill
BatzP - Balin
BatzP - Beersheba
BatzP - Berkusieh
BatzP - Damascus
BatzP - El Auja
BatzP - El Buggar
BatzP - El Burj
BatzP - Haifa
BatzP - Huj
BatzP - JB Yakub
BatzP - Kaukab
BatzP - Khan Kusseir
BatzP - Khuweilfe
BatzP - Kuneitra
BatzP - Megiddo
BatzP - Nablus
BatzP - Rafa
BatzP - Sasa
BatzP - Semakh
BatzP - Sheria
BatzP - Surafend
BatzP - Wadi Fara
BatzS - Sinai
BatzS - Bir el Abd
BatzS - El Arish
BatzS - El Mazar
BatzS - El Qatiya
BatzS - Jifjafa
BatzS - Magdhaba
BatzS - Maghara
BatzS - Romani
BatzS - Suez 1915
BatzSe - Senussi
BatzWF - Westn Front
BW - Boer War
BW - NSW
BW - NSW - 1ACH
BW - NSW - 1NSWMR
BW - NSW - 2NSWMR
BW - NSW - 3ACH
BW - NSW - 3NSWIB
BW - NSW - 3NSWMR
BW - NSW - 5ACH
BW - NSW - A Bty RAA
BW - NSW - AAMC
BW - NSW - Aust H
BW - NSW - Lancers
BW - NSW - NSW Inf
BW - NSW - NSWCBC
BW - NSW - NSWIB
BW - NSW - NSWMR_A
BW - NZ
BW - Qld
BW - Qld - 1ACH
BW - Qld - 1QMI
BW - Qld - 2QMI
BW - Qld - 3ACH
BW - Qld - 3QMI
BW - Qld - 4QIB
BW - Qld - 5QIB
BW - Qld - 6QIB
BW - Qld - 7ACH
BW - QLD - AAMC
BW - SA
BW - SA - 1SAMR
BW - SA - 2ACH
BW - SA - 2SAMR
BW - SA - 3SACB
BW - SA - 4ACH
BW - SA - 4SAIB
BW - SA - 5SAIB
BW - SA - 6SAIB
BW - SA - 8ACH
BW - SA - AAMC
BW - Tas
BW - Tas - 1ACH
BW - Tas - 1TIB
BW - Tas - 1TMI
BW - Tas - 2TB
BW - Tas - 2TIB
BW - Tas - 3ACH
BW - Tas - 8ACH
BW - Vic
BW - Vic - 1VMI
BW - Vic - 2ACH
BW - Vic - 2VMR
BW - Vic - 3VB
BW - Vic - 4ACH
BW - Vic - 4VIB
BW - Vic - 5VMR
BW - Vic - 6ACH
BW - Vic - AAMC
BW - Vic - Scot H
BW - WA
BW - WA - 1WAMI
BW - WA - 2ACH
BW - WA - 2WAMI
BW - WA - 3WAB
BW - WA - 4ACH
BW - WA - 4WAMI
BW - WA - 5WAMI
BW - WA - 6WAMI
BW - WA - 8ACH
BW Gen - Campaign
BW Gen - Soldiers
BW General
Cavalry - General
Diary - Schramm
Egypt - Heliopolis
Egypt - Mena
Gen - Ataturk Pk, CNB
Gen - Australia
Gen - Legends
Gen - Query Club
Gen - St - NSW
Gen - St - Qld
Gen - St - SA
Gen - St - Tas
Gen - St - Vic
Gen - St - WA
Gm - German Items
Gm - Bk - 605 MGC
GW - 11 Nov 1918
GW - Atrocities
GW - August 1914
GW - Biographies
GW - Propaganda
GW - Spies
GW - We forgot
Militia 1899-1920
Militia - Area Officers
Militia - Inf - Infantry
Militia - Inf - 1IB
Militia - Inf - 2IB
Militia - Inf - 3IB
Militia - Inf - NSW
Militia - Inf - Qld
Militia - Inf - SA
Militia - Inf - Tas
Militia - Inf - Vic
Militia - Inf - WA
Militia - K.E.Horse
Militia - LH
Militia - LH - Regts
Militia - LH - 1LHB
Militia - LH - 2LHB
Militia - LH - 3LHB
Militia - LH - 4LHB
Militia - LH - 5LHB
Militia - LH - 6LHB
Militia - LHN - NSW
Militia - LHN - 1/7/1
Militia - LHN - 2/9/6
Militia - LHN - 3/11/7
Militia - LHN - 4/6/16
Militia - LHN - 5/4/15
Militia - LHN - 6/5/12
Militia - LHN - 28
Militia - LHQ - Qld
Militia - LHQ - 13/2
Militia - LHQ - 14/3/11
Militia - LHQ - 15/1/5
Militia - LHQ - 27/14
Militia - LHS - SA
Militia - LHS - 16/22/3
Militia - LHS - 17/23/18
Militia - LHS - 24/9
Militia - LHT - Tas
Militia - LHT - 12/26
Militia - LHV - Vic
Militia - LHV - 7/15/20
Militia - LHV - 8/16/8
Militia - LHV - 9/19
Militia - LHV - 10/13
Militia - LHV - 11/20/4
Militia - LHV - 19/17
Militia - LHV - 29
Militia - LHW - WA
Militia - LHW-18/25/10
Militia - Military Orders
Militia - Misc
MilitiaRC - Rifle Clubs
MilitiaRC - NSW
MilitiaRC - NT
MilitiaRC - Qld
MilitiaRC - SA
MilitiaRC - Tas
MilitiaRC - Vic
MilitiaRC - WA
Militiaz - New Zealand
Tk - Turkish Items
Tk - Army
Tk - Bks - Books
Tk - Bks - 1/33IR
Tk - Bks - 27th IR
Tk - Bks - Air Force
Tk - Bks - Yildirim
Tk - POWs
Wp - Weapons
Wp - Hotchkiss Cav
Wp - Hotchkiss PMG
Blog Tools
Edit your Blog
Build a Blog
RSS Feed
View Profile
Open Community
Post to this Blog
Site Index
Education Centre
LH Militia
Boer War
Transport Ships
LH Battles
ALH - Units
ALH - General
Aboriginal Light H
Weapons
Ottoman Sources

"At a mile distant their thousand hooves were stuttering thunder, coming at a rate that frightened a man - they were an awe inspiring sight, galloping through the red haze - knee to knee and horse to horse - the dying sun glinting on bayonet points..." Trooper Ion Idriess

The Australian Light Horse Studies Centre aims to present an accurate history as chroniclers of early Australian military developments from 1899 to 1920.

The Australian Light Horse Studies Centre site holds over 12,000 entries and is growing daily.

Contact: Australian Light Horse Studies Centre

Let us hear your story: You can tell your story, make a comment or ask for help on our Australian Light Horse Studies Centre Forum called:

Desert Column Forum

WARNING: This site contains: names, information and images of deceased people; and, language which may be considered inappropriate today.

Tuesday, 30 March 2010
The Battle of Anzac Cove, Gallipoli, 25 April 1915, New Zealand and Australian Division War Diary
Topic: BatzG - Anzac

The Battle of Anzac Cove

Gallipoli, 25 April 1915

New Zealand and Australian Division War Diary 


War Diary account of the New Zealand and Australian Division.


The following is a transcription of the War Diary of the New Zealand and Australian Division, of their role in the landings at Anzac on 25 April 1915.
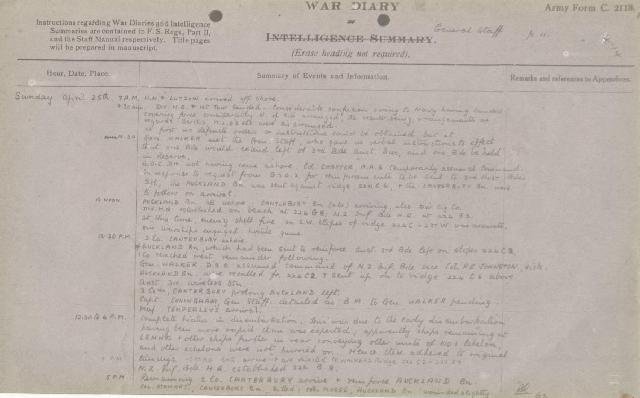
 

25 April 1915

7 am - HMT Lutzow arrived off shore.

9.30 am - Divisional Headquarters and 1st tow landed. Considerable confusion owing to Navy having landed covering force considerably north of site arranged, the result being arrangements as regards berths MLO's etc were disarranged.

10.30 am - General Walker met the General Staff, who gave us verbal instructions to effect that one Brigade would extend left of 3rd Brigade Australian Division, and one Brigade be held in reserve.

General Officer Commanding Division not having come ashore. Colonel Chaytor, AAG, temporarily assumed command. In response to request from General Service Officer II for reinforcements to be sent to 3rd Australian Brigade left, the Auckland Battalion was sent against ridge 224 C6 and the Canterbury Battalion were to follow on arrival.

12 noon - Auckland Battalion all ashore, Canterbury Battalion, two companies, arriving, also Divisional Signal Company and Divisional Headquarters established on beach at 224 G8, New Zealand Infantry Brigade Headquarters at 224 B3. At this time, enemy shell fire on south west slopes of ridge 224 C - 237 W was accurate. Our warships engaged hostile guns.

12.30 pm - Two Companies Canterbury Battalion ashore.

The Auckland Battalion, which had been sent to reinforce the Australian 3rd Brigade left on slopes 224 C2. One company reached crest, remainder following.

General Walker, DSO, assumed command of New Zealand Infantry Brigade vice Colonel FE Johnston, sick.

Auckland Battalion were recalled from 224 C and sent up on the ridge 224 C6 above Australian Divisional Wireless Station.

Two Companies Canterbury Battalion prolong Auckland Battalion left.

Captain Coningham, General Staff, detailed as Brigade major to General Walker pending Major Temperley's arrival.

12.30 - 4 pm - Complete hiatus in disembarkation . This was due to the early disembarkation having been more rapid than was expected; apparently ships remaining at Lemnos and other ships further in rear conveying other units of No. 1 Echelon, and other echelons were hurried on. Hence these adhered to original timings.

4 pm - Otago Battalion arrive and are directed to Walker's Ridge 224 C3 - 237 X7.

5 pm - Remaining two companies Canterbury Battalion arrive and reinforce Auckland Battalion. Colonel Stewart, Canterbury Battalion, killed, Colonel Plugge, Auckland Battalion, wounded slightly.

5.30 pm - Otago Battalion called back from left flank and reach ridge above Wireless Battalion 224 B7, B6 (Plugge's Plateau).

6 pm - Brigade Major and SC for New Zealand Infantry Brigade arrive.

8.30 pm - One Company, Wellington Battalion under Colonel Malone arrives.

Meanwhile fighting had been continuous. A good deal of the ground which had been gained by Colonel MacLagan's 3rd Australian Brigade had been lost and our troops considerably outnumbered, had difficulty holding on. We were much handicapped by having no artillery (CRC Mountain Batteries) to support us. Moreover the enemy held the higher ground and commanded our positions.

10.00 pm - Three Companies 16th Battalion and two Platoons 15th Battalion under Colonel having arrived reinforce 3rd Australian Brigade.

11 pm - General Officer Commanding ANZAC, arrived from HMS Queen and held a conference at which General Officers Commanding 1st Australian Division, New Zealand and Australian Division and General Walker were present. It was decided to reinforce the 3rd Australian Brigade (covering force under Colonel MacLagan) with all available troops and connect up its left with the New Zealand Infantry Brigade right.

So far only one field gun (1st Australian Division) had been landed; we had obtained no gun support from Navy. Whilst enemy had made free use of artillery our casualties up to midnight were said to have been 1,500. The hospital ship left for Alexandria with 500 cases. Arrangement to clear casualties on left flank appeared defective, probably due to enemy's snipers. All available stretchers were sent and ½ a bearer subdivision as well.

Midnight - 15th Battalion (4th Australian Brigade) having arrived are sent to reinforce 3rd Australian Brigade right. Sniping continued most of the night, on the whole our progress was not so good as anticipated, the causes perhaps being:

1. Owing disembarkation having taken place north of site arranged, confusion resulted.

2. The early stages of the operation and success of the covering force having been quicker and more complete than anticipated - the rest of the disembarkation should have been accelerated.

3. General Officer Commanding 1st Australian Division considering country unsuitable forbade landing of Australian Field Guns.

4. Naval arrangements for landing troops towards close of day and during night appeared defective. Launches, lighters scarce and work slow.


26 April 1915

1 am - During night and early morning 13th Battalion and remainder 15th and 16th Battalions and two more filed guns (1st Australian Division) landed and were sent up to reinforce the firing line. Lieutenant Davis, New Zealand Field Artillery went forward as observing officer to Indian Mountain Artillery.

5 am - Remainder of Wellington Battalion arrived.

6 am - 13th Battalion (4th Australian Brigade) all ashore.

1½ Companies Wellington Battalion - which had arrived during the night - are sent to reinforce right centre of firing line. At this time 13th Battalion and 2½ Companies Wellington Battalion in reserve. Two guns of the New Zealand Howitzer Battery are landed and come into action. 224 G6.

Enemy's guns opened fire early and shops replied strongly.

6.30 am - Mountain Guns, New Zealand Howitzers and HMS Queen Elizabeth open fire on enemy's field guns and silence them. Our infantry said to be advancing. Up to 9am the battle was in continual progress - firing being very heavy.

9 am - Orders were sent to Brigadiers in firing line to reorganise their units which had got badly mixed up as a result of yesterday's fight. General Walker, Colonel MacLagan and MacLaurin were instructed to divide up the line and organise sections.

9.15 am - Big shell burst in hill just above Division Headquarters said to be from Goeben in Dardanelles. Situation is now as follows:- Auckland, Canterbury and Otago in  Firing line. Two companies Wellington Battalion supporting MacLagan. 13th Battalion and part 16th Battalion in reserve. 14th Battalion and Headquarters 4th Australian Infantry Brigade not yet ashore.

10 am - Enemy's attack from direction of 224 D5 renewed and repelled. Section of Howitzers sent to 237 W5 to drive off snipers in direction of 237 Q3, who are interfering with collection of casualties on shore.

11.15 am - 4th Battalion and Headquarters 4th Australian Infantry Brigade land under heavy shrapnel fire. All the 4th Australian Infantry Brigade have now landed.

The reserve now consists of the 14th Battalion and two Companies Wellington Battalion, the rest of both Brigades being in firing line. At midday remaining Battalions Howitzer Battery disembarked and came into action.

12.30 pm - General Walker intimated that in order to reorganise units, he would relieve 3½ Companies Auckland Battalion by 2 Companies Otago Battalion on MacLagan's Ridge (224 I2, M9 and M5.

At this stage it was noticed Turks used following ruses:

1. Called out that MacLagan's 3rd Brigade was to retire and take a spell on beach.

2. British Division advancing and close, troops were not to fire.

3. Said they were French and danced about shouting.


With untrained and tired troops this might have some result. It effected little.

2pm - Beach shelled with shrapnel from direction of 224 F and 237 Z. Our Naval gun fire said to have been very effective in reply. Losses of New Zealand Infantry Brigade on April 25th said to have been heavy, as we had no guns (except naval) to help operations there.

Line held by ANZAC roughly as follows: 237 W5 - W9, X7 to X6, 224 C2 (Walker's Ridge), 224 C3 - C9, thence south west from 224 I3 - I7 to M3. Also Plateau 224 B7 to B5 and C4 and 5 (Plugge's Plateau).

3.15 pm - Colonel Pope, 16th Battalion, 4th Australian Infantry Brigade reported that one company 13th Battalion sent to clear Turks from his rear in 224 J1 were unable to do this and were retiring. Ships shelling ridge 224 D5 to F2.

3.30 pm - Officer Commanding 16th Battalion asks 13th Battalion for reinforcements. None available.

3.45 pm - Naval bombardment of Maltepe and Kojadere continued intermittently till 7 pm.

On this day efforts were made to restore order amongst units, but little was effected. During the night firing continued but nothing of importance occurred.

One company, New Zealand and Australian Division Train arrived.


War Diaries

All War Diaries cited on this site should be read in conjunction with the Australian Light Horse Studies Centre, AIF War Diaries of the Great War, Site Transcription Policy which may be accessed at:

Australian Light Horse Studies Centre, AIF War Diaries of the Great War, Site Transcription Policy 


Further Reading:

The Battle of Anzac Cove, Gallipoli, 25 April 1915

The Battle of Anzac Cove, Gallipoli, 25 April 1915, AIF, Roll of Honour 

Battles where Australians fought, 1899-1920


Citation: The Battle of Anzac Cove, Gallipoli, 25 April 1915, New Zealand and Australian Division War Diary

Posted by Project Leader at 12:01 AM EADT
Updated: Friday, 16 April 2010 9:56 AM EADT

View Latest Entries

Full Site Index


powered by FreeFind
Let us hear your story: You can tell your story, make a comment or ask for help on our forum.

Desert Column Forum

A note on copyright

The Australian Light Horse Studies Centre is a not for profit and non profit group whose sole aim is to write the early history of the Australian Light Horse from 1900 - 1920. It is privately funded and the information is provided by the individuals within the group and while permission for the use of the material has been given for this site for these items by various donors, the residual and actual copyright for these items, should there be any, resides exclusively with the donors. The information on this site is freely available for private research use only and if used as such, should be appropriately acknowledged. To assist in this process, each item has a citation attached at the bottom for referencing purposes.

Please Note: No express or implied permission is given for commercial use of the information contained within this site.

A note to copyright holders

The Australian Light Horse Studies Centre has made every endeavour to contact copyright holders of material digitised for this blog and website and where appropriate, permission is still being sought for these items. Where replies were not received, or where the copyright owner has not been able to be traced, or where the permission is still being sought, the Australian Light Horse Studies Centre has decided, in good faith, to proceed with digitisation and publication. Australian Light Horse Studies Centre would be happy to hear from copyright owners at any time to discuss usage of this item.

Contact

Australian Light Horse Studies Centre

eXTReMe Tracker