


Topic: BatzG - Anzac
The Battle of Anzac Cove
Gallipoli, 25 April 1915
14th Infantry Battalion, AIF, Unit History Account
Quinn's Post
[Note: The key to which explains the numbers on the map is at the end of the chapter.]
After the conclusion of the Great War, Newton Wanliss was commissioned to record the events of the battalion with the assistance of the Commonwealth book grant. Wanliss wrote the history of this Battalion called The History of the Fourteenth Battalion, AIF: being the story of the vicissitudes of an Australian unit during the Great War. The book was published Melbourne during 1929. The following is an extract from this book detailing the landing at Anzac in a manner that is seen from the members of the Battalion and so contains all the humour, fears, joy and sadness that is the full gamit of human emotions. As such this story fills in the gaps between the dry reports and the official histories.
Wanliss, N, The History of the Fourteenth Battalion, AIF: being the story of the vicissitudes of an Australian unit during the Great War, Melbourne, 1929, pp. 18 - 28.
Chapter IV
The Baptism Of Blood
Naval Bombardment Witnessed
Immediately after the transport left Mudros for the Peninsula a church parade was held on board (the last before the troops went into action), a most impressive - service being conducted by Chaplain Gillison. As the vessel approached the entrance to the Straits those on board were presented with a panoramic view of a modern, up-to-date naval bombardment. About mid-day the roar of the guns became more distinct and later, as the transport approached the entrance to the 'Dardanelles, the terrific naval bombardment of the coast and the heroic tragedy of the landing of the 29th Division were witnessed from the deck. The whole Peninsula was like an inferno. Columns of earth and dust, apparently hundreds of feet in height, were caused by the shelling, while vast clouds of smoke threw a shade over the lurid scene, which reminded many who saw it of a great bush fire, whilst the unearthly din provided a true devil's orchestra.
The scene put all in great heart, but many thought that nothing living could exist under this awful pounding, and that their task would be simply that of burying dead Turks. Whilst this unparalleled drama was being enacted, and all the officers were crowding spellbound on the bridge, imperturbable "Aussies" filled the decks of the transport, intent on card playing, and utterly indifferent to, and apparently oblivious of, the extraordinary events taking place in the vicinity. [The Brigadier, Col. Monash, particularly noted this, and called the attention of other officers to it.]
Hospital Ships Appear
As the transport approached Gaba Tepe two hospital ships, crowded with wounded, passed on their way to Egypt.
Wounded Accommodated "Seang Choon."
About 5 p.m. the vessel anchored beside many other transports, and lighters full of wounded, towed by naval pinnaces, began to appear, seeking for some vessel to which to transfer their pathetic human freight; the official arrangements for the disposal of casualties were inadequate. The heroism of these wounded men, many of whom were beyond hope of recovery, was marvellous. Orders were now received that the 14th Battalion was not to land until next day, but that the decks were to be cleared to make room for the - wounded. The few hospital ships available on the were soon overcrowded, and, in spite of the lack of accommodation on the "Seang Choon," the wounded continued to arrive on board until, by daylight, several hundred had been accommodated.
14th Men Work All Night Assisting the Wounded
The 14th boys worked hard and unceasingly getting the wounded on board. Few had any sleep that night, whilst Capt. Loughran (the - R.M.O.), Chaplain Gillison and the stretcher bearers worked to the limit of endurance dressing wounds and endeavouring to alleviate suffering; amputations and operations were carried on all night. The ship resembled a shambles and the decks were saturated with blood. The less severely wounded were plied with questions concerning the fight, and the 14th men heard the story of the landing, of the heavy losses before the 1st Division got ashore, of the brilliant charge under rifle and machine gun fire and of the seizing of the heights above the beach.
2nd Reinforcements First Ashore
A beach party, consisting of 2nd reinforcements to the 14th that had come from Egypt in another vessel, was ashore early on the 25th; these men were actually the first members of the battalion to land on the Peninsula.
Platoons Nos. 2 and 3 Land
Meanwhile, late in the afternoon of the 25th, Col. Courtney instructed Capt. Wright to take two platoons of A Company ashore. Capt. Wright chose No. 2 Platoon (Lieut. Crabbe ) and No. 3 Platoon (Lieut. A. R. Cox) and the two platoons, comprising about 100 men, were transhipped into a heavy lighter, and, after a long wait, were towed ashore in the dusk by a launch in charge of a midshipman. Each man carried three days' rations, a bundle of firewood and one hundred extra rounds of ammunition. The scene ashore was almost indescribable; dead and wounded men (some of the wreckage of the day's fighting) were lying all over the beach, and masses of equipment were piled up everywhere. Sailors from the landing parties were trying to straighten things up.
Capt. Wright reported to Major-General Godley, the divisional commander, who deputed an officer to take his detachment along the beach, to the north, and he was instructed to dig in, and not to retire under any circumstances as there was not anything between his men and Divisional Headquarters. The two platoons remained in that position, with only a couple of slight casualties, until after 8 a.m. on April 27, when they rejoined the remainder of the battalion on the march to Shrapnel Gully. Meanwhile the lack of Australian artillery ashore (for some inscrutable reason the artillery had not been allowed to land) had created a rather serious position, and for a brief period during the night there was danger of a re-embarkation of the remnants of the 1st Division. Fortunately, however, that crisis passed.
Remainder of Battalion Lands. Sgt. Murphy Killed
The remainder of the battalion, together with Brigade Headquarters, on the morning of April 26 landed under shrapnel fire which, fortunately, mostly fell too high or too wide, though Sgt. W. P. Murphy, of D Company, was shot through the heart. He was a resident of the Warracknabeal district, an immigrant from Great Britain and an old Imperial soldier. He achieved the melancholy distinction of being the first member of the 14th Battalion to be killed in action. The battalion (less Platoons 2 and 3) remained all day on the beach as a reserve, near the northern point of Anzac Cove at Ari Burnu, and close to where the wireless station was afterwards erected. There was shrapnel fire in the vicinity during the day, but it was too high and did little damage. The time was utilised by the men in collecting the arms, equipment and packs, which were strewn all over the beach, and in the water where they had been thrown off on the previous day by the men of the 1st Division on landing as they advanced on their whirlwind assault. The battalion bivouacked under the cliffs during the night.
Position at Anzac
It is necessary now to give a brief description of the position at Anzac in order that future operations may be understood. The position captured by the Australians on April 25 and permanently held consisted of a mass of scrubby ridges rising almost sheer from the sea, and containing about 300 acres, roughly triangular in shape, with the sea as a base. The apex of the triangle, and the key of the whole Anzac position, consisted of a series of so-called posts, eg. Pope's Hill, Quinn's Post, Courtney's Post and Steele's Post. These knolls facing the Turkish positions were, in some cases, commanded by high ground in the rear of the enemy's lines, but they were important for they were situated at the head of a gully flanked by high cliffs (known as Shrapnel Gully) which bisected the whole Anzac position. The posts (exec Courtney's and Steele's) were disconnected and separated branches of the gully out of which they rose precipitous The 4th Brigade became the guardian of these posts, and h, them for weeks against continuous attacks. Some of the blood of Australia was shed in their defence.
Battalion Marches up Shrapnel Gully
The 1st Division, which had been fighting continuously for two days, was now in a state of complete exhaustion, and urgently in need of reinforcements. On the morning of April 27 Capt. Baldock, O.C. of B Company, was evacuated sick. About 8.15 a.m. on that date the battalion received orders to march up Shrapnel Gully (Nos. 2 and 3 Platoons having been instructed to rejoin the main body), and, taking such cover as was available, the advance was made under an intermittent shrapnel fire. Wounded men met on their way to the dressing station did not hesitate to state how badly reinforcements were needed at the front. Many dead bodies were passed, and also little clusters of wounded men under the shelter of cliffs and being attended to by doctors. Men with only a few hours to live would ask for cigarettes as our boys passed them. After the advance had been made some distance up the gully orders were given to throw off packs. This was done but few men ever saw their packs or personal belongings again. During this advance Major Adams, the battalion's second in command, was wounded in the leg and had to be taken to the beach. As the battalion approached the head of the gully it was broken up into detachments and sent in to reinforce the various strong posts there on which the Turks were then pressing. The whole of A Company, with portions of other companies, under Major Rankine, reinforced the garrison at Quinn's. Later in the day Major Steel, with the whole of C and portion of D Company, took charge of Steele's Post, [Although named after Major H. Steel, 14th Battalion, this post was officially designated "Steele's Post."] whilst Lieut. Boyle with No. 8 Platoon joined Col. Pope in the defence of Pope's Hill.
QUINN'S POST.
It will be advisable in the first place to deal with the defence of Quinn's Post. It was shortly before mid-day that Lieut. Hanby, with No. 1 Platoon, followed shortly by the residue allotted to the post, advanced to that famous position the defence of which, during the ensuing months, forms one of the most thrilling stories of the Peninsula.
Description of Quinn's Post
As approached from the gully in the rear, it rose abruptly and precipitously to a height of about 150 feet, but the surrounding country was rugged and hilly and the summit was commanded by some higher ground in the vicinity. The summit was crescent shaped with one arm pointing to the gully between Quinn's and Pope's, known as Bloody Angle, whilst the surface of the hill was not level but saucer shaped, with the result that the right flank of the position was dangerously open to the fire of snipers located in the high and difficult ground in the front of Pope's. The steep and slippery slopes facing the gully made difficult climbing for men who had already undergone a gruelling march in the heat, and all arrived exhausted at the summit. Many dead and wounded men were passed during the ascent.
Critical Position at Front
At the summit conditions were found to be critical. A handful of men from different A.I.F. battalions, under a lance corporal, exhausted and fought to a standstill, were slowly retiring before the Turks who were pressing them strongly. A few rounds of rapid fire from the new comers drove the pursuing Turks to cover and the party on the hill joined up with the 14th in the defence of the post. An attempt was immediately made to consolidate the position. Few pickaxes and shovels were available, most of them having been left with the packs in the gully, but, with the aid of entrenching tools, rough head cover was improvised and some kind of protection obtained. During these operations at Quinn's Battalion Headquarters was at the foot of Courtney's Post; Major Rankine's dugout was at the back of Quinn's, whilst Capt. Wright was in charge of the actual firing line and was also responsible for the distribution of stores, water and ammunition. Bodies of troops could be seen moving about in the scrub opposite, but they were supposed to be detachments of our men. The chaotic fighting of the two previous days had left everything in confusion and it was difficult to obtain reliable information. Many false messages, too, some inspired by the enemy, came through to Quinn's, one being an order to retire, of which, however, no notice was taken. This lack of knowledge of facts added greatly to the strain imposed on those responsible for the safety of the post.
Death of Capt. Hoggart
The men had not been long in position, and desultory firing was occurring, when Capt. Hoggart, now O.C. of B Company, in an endeavour to clarify the situation and ascertain the movements of the Turks, rose on his knees, field glasses in hand, and was immediately killed-shot through the head. [Information supplied by Major (then 2nd-Lieut.) A. R. Cox who was beside Hoggart at the time of his death. The story universally circulated that he died endeavouring to locate the machine gun is incorrect. He was killed just before the machine gun opened fire.] He was the first officer of the 14th Battalion killed in the war. He united personal bravery with consideration for the comfort and wellbeing of his men. Prior to the war he had been a master in the Melbourne Grammar School. [Capt. W. R. Hoggart, O.C. of B Company, born Buangor, Victoria, August 22, 1876. Killed in action April 27, 1915.]
Turkish Machine Gun Opens. Slaughter in A Company.
Immediately after Hoggart's death a Turkish machine gun, from the right rear (between Courtney's and Quinn's) at close quarters, opened a terrible burst of enfilade fire which blew out a large number of A Company on the right centre of Quinn's, and strewed the hill with dead and writhing men. The senior subaltern, Lieut. Hanby, [Lieut. J. G. T. Hanby, clerk, of Brighton, Victoria.] was dangerously wounded in the arm and chest, Capt. Wright's rifle [It is not usual for officers to carry rifles in action, but prior to landing on the Peninsula the junior officers were equipped precisely the same as the men (including rifles). This did not occur later in the Peninsula or in France.] was shot to pieces and he was knocked down with the concussion, whilst a large number of other ranks were killed or mortally wounded. Among them were many excellent N.C.O.'s, including Cpls. Butterworth, [Corporal James Butterworth, A Company (1 Platoon), farm hand, England. Killed in action April 27, 1915.] Bowen, [Corporal James Bowen. A Company (1 Platoon), tuckpointer, Kensington, Victoria. Died of wounds April 29, 1915.] Thompson, [Lance-Corporal J. W. Thompson, A Company, wood merchant, Carlton, Victoria. Killed in action April 27, 1915.]Young, [Lance-Corporal R. E. Young, A Company, labourer, Fitzroy, Victoria. Died of Wounds April 29, 1915.] Macoboy, [Corporal M. F. Macoboy, A Company (4 Platoon), motor mechanic, Bendigo, Victoria. Killed in action April 27, 1915.] Chisholm, [Corporal C. Chisholm, A Company, merchant, England. Killed in action April 27, 1915.] Burton [Corporal R. H. Burton, D Company, saddler, Richmond, Victoria.
Killed in action April 27, 1915.] and Doyle. [Lance-Corporal W. J. Doyle, D Company, jeweller, Richmond, Victoria. Killed in action April 27. 1915] Several privates shared the same fate, including W. Cohen (Major Rankine's batman), D. Wren, C. Gist, C. G. Greenham and R. B. Earll. Private S. McDermott was mortally wounded and his brother, Sgt. C. McDermott, [Sergeant C. McDermott, B Company, packer, Albert Park, Victoria. Killed in action April 27, 1915. (Real Christian name Frank, but enlisted under the name of Christopher). His father was an old Imperial soldier.] was shot dead beside him. The wounded - a large number - included Sgt. Reynolds (of No. 3 Platoon) whose jaw was shattered, and Cpl. Garner. There were some marvellous escapes; Sgt. Raymond Jones (No. 1 Platoon) had his haversack shot to pieces on his back but escaped unhurt, whilst Private C. H. Coleman received no fewer than six superficial bullet wounds. This unexpected and murderous attack at short range shook the survivors and some of the men on the extreme right started to creep back from the head cover they had formed. Matters were made much worse by a rumour, which found credence among many, that they were being fired on in error by their own machine guns. [This incident formed the theme of innumerable arguments among the survivors of the battalion. Many are still convinced that the slaughter was mistakenly caused by our own guns.] The critical situation, however, was faced by the officers and the cooler heads among other ranks, and the men were steadied. One who helped materially in the crisis by example and forceful language was a stretcher bearer of the 13th Battalion. Some of the men, thinking that they had been victims of a tragic mistake, put their caps on their rifles and called out that they were Australians; the majority, however, finally convinced that the enemy was responsible for the carnage, settled down in grim earnest to pour in a hail of fire on the masked batteries on their front.
Battalion's Mascot "Gunner."
That was the first experience that the battalion had of the effect of machine gun fire-that scythe of the modern battlefield-which was to take a heavy toll of its ranks before the termination of the war. Among the combatants on the hill at this time was the battalion mascot, a fox terrier named "Gunner, [The Illustrated London News" (a famous London periodical) of June 5, 1915, has a full page illustration of the defence of Quinn's. showing the 14th men holding up their caps and "Gunner" in the foreground barking amid the bullets.] which had become attached to the battalion at Broadmeadows, had been smuggled aboard the "Ulysses" at Port Melbourne and ultimately found its way into the firing line. "Gunner" barked furiously when the bullets scattered dust, and his antics under fire doubtless provided a comic element which distracted attention from the seriousness of the position. But as the men were risking their lives to keep their mascot out of danger "Gunner" had to be sent back to Egypt.
The wounding of Lieut. Hanby led to a fine display of that spirit of comradeship which is one of the Australian's finest mental assets. When he had been lying under fire for some time Privates AT Cook, [Private ATC Cook, A Company, steward, Fitzroy, Victoria.] EJ McMaster, [Corporal EJ McMaster, A Company, railway porter, Ovens Vale, Victoria.] AJ Rennie [Private AJ Rennie, A Company, railway porter. Longwood, Victoria.] and another [Name of this man is unknown.] all belonging to his company, rushed out and carried him on an overcoat down the hill, two of them being wounded whilst engaged in this gallant rescue. After his treatment by the R.M.O. it was considered that the wounded officer's only hope of recovery lay in getting him off immediately to a hospital ship. Cpl. Hudson [Corporal JB Hudson. C Company, student. Garden Vale, Victoria.] and Private Cook volunteered to carry him down to the beach, though the route was infested by snipers; their self-imposed and dangerous task was carried out successfully, though Cook's hat was shot off his head en route. Hanby survived his injuries.
As the afternoon wore on, things became a little quieter; the cover was improved and some semblance of a line of trenches made. There was considerable difficulty in disposing of the wounded, and no attempt could be made to collect the dead. During the night the Turks made two determined attacks on Quinn's amid terrific noise; their bugles were blown and they shouted and called on "Allah." Both attacks were repulsed. Many ruses were practised by the Turks, or their German coadjutors, during the first few days on the Peninsula, such as calling out "officer wanted here," "stretcher bearer wanted," "ammunition wanted," in very good English, to confuse our men. Immediately after calling out the enemy would pour in a heavy fire. No notice subsequently was taken of these ruses, but at first they added to the confusion on Quinn's of raw troops fighting in an unknown country, raked at all angles by machine guns and snipers, shivering through cold and wet nights, with little shelter, and without overcoats or blankets, but sparsely supplied with food and water and with little cover for wounded and dying. Men less staunch might easily have succumbed to the dangers and difficulties surrounding them; that they did not was due to their own inherent manhood and the confidence now begotten of discipline and training.
Turkish Snipers Open Fire.
Wednesday morning (April 28) was ushered in by Turkish snipers, who had secured favourable positions during the night and were intent on making them selves disagreeable. Many, including Signaller Holmes, Q.M.S. Alston, his assistant Robinson, young Bugler Trevan and some New Zealand engineers (who had come to Quinn's to see whether they could assist in the defence of the post by improvising barbed wire entanglements) fell victims to these snipers who were firing, as it became known later, from a depression to the left of Quinn's, and who had the right flank of the position under fire. Those on the left, including Company Headquarters, were immune, but during the whole of the day most of the stores, ammunition and water supply were under fire. After Q.M.S. Alston fell Sgt. D. R. Macdermid took over his duties, getting the stores, water and ammunition in order. Efforts were made to locate these snipers, and shortly after mid-day Cpl. Reg. Jones, at considerable personal risk, located them and endeavoured subsequently, assisted by Private Verswywelt ("Belgian Joe") to put them out of action, but was unable to do so effectually owing to the activities of snipers just ahead of Pope's Hill.
An attempt was made during this evening to collect the dead, and L.-Cpl. Bronson was placed in charge of a burial party. Whilst the large grave was being dug an attack threatened the post from the Bloody Angle and the grave had to be prepared as a firing trench. Fortunately, our artillery obtained the range up Shrapnel Gully and the attack did not materialise. Chaplain Gillison subsequently came up and read the burial service, and 39 men (including some New Zealand engineers) were buried in a common grave. Decent burial was also given to two Turks. There was rain during the night of April 28 and, as neither overcoats nor waterproof sheets were available, the men had to shiver through the night. It had been impossible during the day to make a connected trench line owing to snipers, but in the evening Lieut. Crabbe organised a determined attempt and the work was successfully accomplished before daylight. A sap run out to the left of the position gave a fire command over the depression utilised by the snipers on the previous day, and they were driven out, some being killed and others wounded. It was now fairly safe to move about Quinn's.
Relief
During the first few days pandemonium reigned both day and night. The firing was continuous and all night the Turks blew their bugles and shouted, and our own men, too, were making plenty of noise calling out for water, ammunition or stretcher bearers. This shouting was stopped and messages had to be sent in an orderly and proper manner. All ranks were now showing signs of exhaustion. About noon on April 30 the C.O. and adjutant came up to state that relief would be effected during the afternoon. Towards evening Capt. Corser, of the 15th Battalion, took over the position from the shattered survivors of the garrison, which had lost about thirty per cent. of its numbers in defending the position. The survivors retired and spent the night at Courtney's Post.
Capt. Wright Wounded.
Just after the relief Capt. Wright, [Capt. Ferdinand Henry Wright, A Company, insurance manager, Malvern, Victoria, Born South Yarra, Victoria, on September 29, 1888.] who remained behind to hand over the position, received concussion of the brain from an exploding shell and was incapacitated from further service with the battalion.
The battalion had opened its war record by holding for seventy-six hours, under most adverse conditions, with only a portion of its personnel, one of the keys of Anzac, and, though its casualties had been heavy, it acquitted itself well. Its excellent work was recognised by the authorities and Major Rankine, who was O.C. of the post, received the D.S.O.; this was one of the very first decorations granted on the Peninsula. Much of the credit of the successful defence must be given to those young officers, Capt. Wright and Lieuts. A. R. Cox and Crabbe, who showed throughout energy and a complete disregard of their own safety. Other subalterns also did good work. Among the other ranks reference must be made to Sgt. Dadson, who was prominent in many ways, and whose South African war experience was of considerable value. Bugler Lyons, Sgt. Mahoney and some others showed coolness and intrepidity. It was noteworthy that some of the best men in the trenches were those who had given most trouble during the period of training. The rough initial experience proved invaluable and the survivors, drawn together by the bond of common suffering and danger, acquired confidence, experience and war cunning. Already, at this early stage, it was becoming evident that the war was to be a subalterns' war, and that success would depend largely upon the courage, skill and initiative of the junior officers.
The senior battalion officers prepared the plans or gave instructions, but during the actual fighting their duties lay largely in the rear, receiving and transmitting reports to the brigade. The varying phases arising out of the actual fighting had to be dealt with promptly by the junior officers and N.C.O.'s on the spot. Indeed, one of the outstanding features of the war, among all combatant nationalities, was the fearful carnage among subalterns.
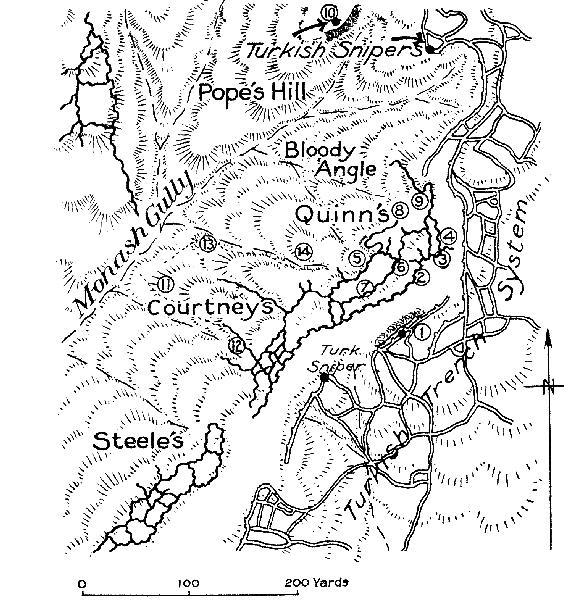
QUINN'S POST [See above map]
1. Turkish Machine Gun.
2. Captain Hoggart.
3. Cohen, Lt. Crabbe, and Anderson.
4. Thompdon, Butterworth, and Bowen.
5. Rations were issued here.
6. Where Captain Wright and Signaller Holmes stood when the latter was wounded.
7. New Zealand Engineers sapping here were wounded.
8. Company Headquarters-Major Rankine.
9. Turkish Snipers wrought havoc from here on our right.
10. Turkish Sniper, whose fire commanded Moorish Gully, but who could not, sight Quinn's Post, except at one or two isolated points.
11. Loughran - M.O.'s Dressing Station, exposed to fire from (10).
12. McDermaid's place for issue of rations.
13. Point on track clown from Quinn's, exposed to fire from sniper at (10).
14. Large grave where 39 were buried on Wednesday, April 28th, 1915.
Further Reading:
The Battle of Anzac Cove, Gallipoli, 25 April 1915
The Battle of Anzac Cove, Gallipoli, 25 April 1915, 14th Infantry Battalion, Roll of Honour
The Battle of Anzac Cove, Gallipoli, 25 April 1915, 4th Infantry Brigade, Roll of Honour
The Battle of Anzac Cove, Gallipoli, 25 April 1915, AIF, Roll of Honour
Battles where Australians fought, 1899-1920
Citation: The Battle of Anzac Cove, Gallipoli, 25 April 1915, 14th Infantry Battalion, AIF, Unit History Account
