"At a mile distant their thousand hooves were stuttering thunder, coming at a rate that frightened a man - they were an awe inspiring sight, galloping through the red haze - knee to knee and horse to horse - the dying sun glinting on bayonet points..." Trooper Ion Idriess
The Australian Light Horse Studies Centre aims to present an accurate history as chroniclers of early Australian military developments from 1899 to 1920.
The Australian Light Horse Studies Centre site holds over 12,000 entries and is growing daily.
Contact:Australian Light Horse Studies CentreLet us hear your story:
You can tell your story, make a comment or ask for help on our Australian Light Horse Studies Centre Forum called:
WARNING: This site contains: names, information and images of deceased people; and, language which may be considered inappropriate today.
Friday, 11 December 2009
The Battle of Anzac Cove, Gallipoli, 25 April 1915, 2nd Infantry Brigade Signals - No. 51 Topic: BatzG - Anzac
The Battle of Anzac Cove
Gallipoli, 25 April 1915
2nd Infantry Brigade Signals - No. 51
2nd Infantry Brigade, AIF, Signals - No. 51
The following is a transcription of the Signal No. 51 of the 2nd Infantry Brigade, AIF, which forms part of a series which illustrates the chaos and problems experienced in executing their role in the landings at Anzac on 25 April 1915.
Aust Div
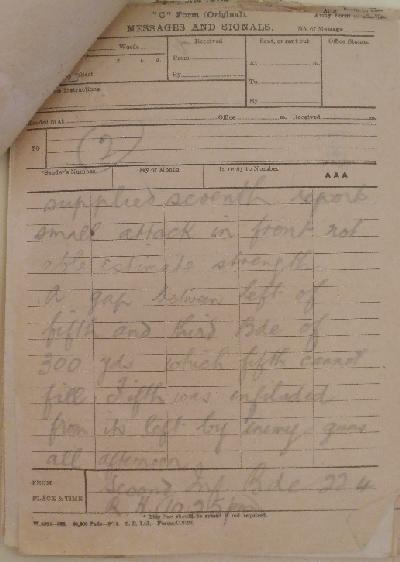
KB67 25/4/15 AAA
Begins:
Sixth Reports attack threatening on left of fourth on its right. I think reserve half Battalion of eighth has been taken into firing line fifth sixth seventh wan ammunition Eighth supplied seventh reports small attack in front not able to estimate strength. A gap between left of fifth and third Bde of 300 yds which fifth cannot fill. Fifth was enfiladed from its left by enemy guns all afternoon
The Battle of Anzac Cove, Gallipoli, 25 April 1915, 2nd Infantry Brigade Signals - No. 52 Topic: BatzG - Anzac
The Battle of Anzac Cove
Gallipoli, 25 April 1915
2nd Infantry Brigade Signals - No. 52
2nd Infantry Brigade, AIF, Signals - No. 52
The following is a transcription of the Signal No. 52 of the 2nd Infantry Brigade, AIF, which forms part of a series which illustrates the chaos and problems experienced in executing their role in the landings at Anzac on 25 April 1915.
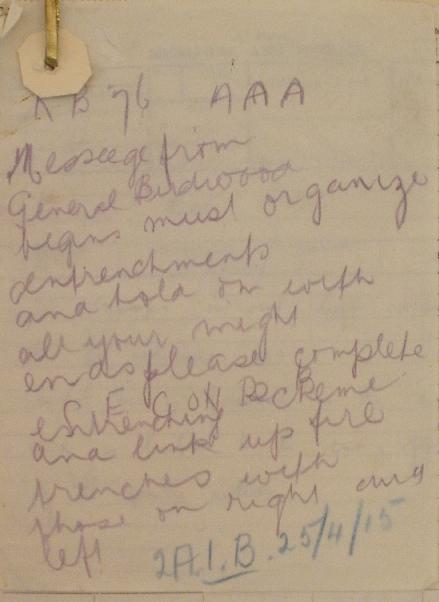
KB 76 AAA
Message from General Birdwood.
Begins:
Must organise entrenchments and hold on with all your might. Please complete entrenching scheme and link up fire trenches with those on right and left.
The Battle of Anzac Cove, Gallipoli, 25 April 1915, 16th Infantry Battalion, AIF, Unit History Account Topic: BatzG - Anzac
The Battle of Anzac Cove
Gallipoli, 25 April 1915
16th Infantry Battalion, AIF, Unit History Account
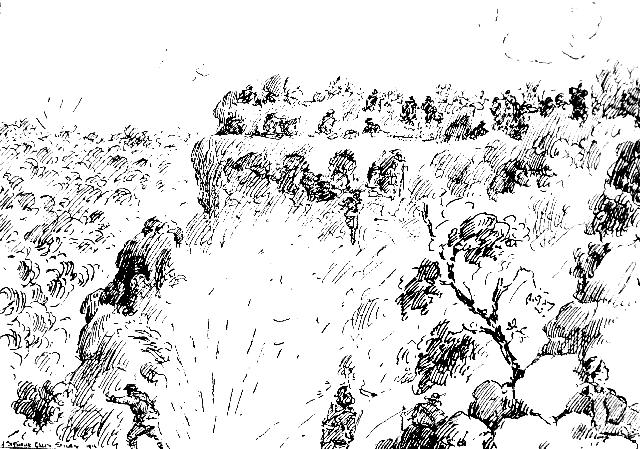
Pope's Hill
As seen on April 26, 1915, by the artist, Signaller Ellis Silas, of the 16th Battalion. Note Russell's Top on the left occupied by concealed Turks.
After a decade from the conclusion of the Great War, Cyril Longmore, a former member of the 44th Battalion Machine Gun Section was commissioned by the History Committee of the 16th Battalion Association to record the events of the 16th Battalion with the assistance of the Commonwealth book grant. Longmore wrote the history of this Battalion called The old Sixteenth: being a record of the 16th Battalion, A.I.F., during the Great War, 1914-1918. The book was published Perth during 1929. The following is an extract from this book detailing the landing at Anzac in a manner that is seen from the members of the Battalion and so contains all the humour, fears, joy and sadness that is the full gamit of human emotions. As such this story fills in the gaps between the dry reports and the official histories.
Longmore, C, The old Sixteenth: being a record of the 16th Battalion, A.I.F., during the Great War, 1914-1918, Perth, 1949, pp. 39 - 45.
Chapter 8
The Landing
About noon on April 25, the "Haida Pascha" weighed anchor and put to sea. During the morning distant firing was heard, which announced that the Australians were in action at last.
Approaching the shore of Gallipoli about 4 o'clock in the afternoon, all that could be seen from the "Haida Pascha" was a thick haze of blue smoke and flashes of guns ahead. Battleships and destroyers were numerous and very busy bombarding the shore where the 3rd Australian Brigade had landed at daybreak. The scene from the deck of the "Haida Pascha" was a memorable one. From right to left the ships of the navy were spread like the ribs of a fan, each battleship and cruiser having an allotted section of the coast to attend to with its enormous guns. The work of disembarking the rest of the 1st Australian Division was actively in progress and destroyers were fussing about between transports and the shore, towing long lines of boats, laden to the gunwales with Australian soldiers.
The covering force, the 3rd Brigade, had succeeded in effecting a landing at daybreak on the 25th and during the day the rest of the 1st Division had disembarked and been absorbed into heavy fighting in the tangle of hills and gullies that skirted the coast of Anzac.
By far the most critical position in the front on the evening of the 25th was the gap then known to exist at the head of what was later called Monash Valley. Row narrow or how wide this gap might be was unknown. A-11 that was clear was that touch had not been gained between the 3rd Brigade's left at the spur, known afterwards as Pope's Hill, and the New Zealanders on Walker's Ridge. Between them came Russell's Top - unknown and unexplored - and looking into the back of Pope's Hill. Who held Russell's Top, none was certain. The Turks were threatening to appear on it and the commander of the 3rd Brigade at dusk asked urgently for reinforcements of the 4th Brigade, which was then due to land.
The first party of the 16th to land were its first reinforcements, 98 men under Lieuts. Brashaw and Taylor. They landed at 5.45 a.m. and were detailed as a beach fatigue party, occupied in unloading ammunition and stores from the boats, and later carrying ammunition to the front line of the 1st Division. They were returned to the battalion on May 2.
At about 1.30 p.m. the 16th came ashore from the "Haida Pascha." The destroyer "Ribble" and the open boats from which the landing was made were heavily shelled, but with only half a dozen casualties. Colonel Pope, Capt, McDonald, Lieut. Wilton, R.S.M. Emmett, with headquarters.
"A" Coy., under Major Mansbridge, "B" Coy., under Capt. Margolin, and the MG section were in the first landing party. The C.O. was taken to General Godley and was ordered to move to the top of Monash Valley with a mixed column of all the troops available - two companies and M.G.S., 16th, one company 15th and half company of New Zealanders - about 400 rifles all told. A staff officer, Major Villiers Stuart, was sent with Colonel Pope as guide. The light was failing and the pace was slow. As they filed into Shrapnel Gully, the mules of the 26th Indian Mountain Battery, which was landing at the time, moved across the track and cut the column in two. Major Villiers Stuart went to find its tail and eventually put it into the line between Courtney's and 'Steele's Posts. Colonel Pope, with "A" Noel "B" Companies and M.G.S. of the 16th and half company New Zealanders, went forward in the direction of the head of the gully.
In the dark, the column filed up the muddy channel of Monash Valley and reached the fork at the valley's end. Between the two branches rose the dark mass of Pope's hill, The Colonel reconnoitred the vicinity. The roar of rifle fire came from the heir around, hot this bill and Russell's Top, on its left, were found to be empty except for a few men on Popes from various units of the 1st Division, under Captain Jacobs. Then the column occupied the sharp edge of the spar, which ever afterwards bore Pope's name.
As to the position at the valley's head, the C.O. was entirely in the dark. All that he knew was that the 3rd Brigade had been driven back with heavy losses. Captain McDonald found on the left of Pope's Hill, in charge of a small party there, a sergeant of the 11th. The sergeant said that his men formed the extreme left flank; that no officers near them were left alive and that their losses in the retirement had been very heavy. He added that Indian troops had been fighting on their left ever since the retirement began and were still on their left rear. McDonald, not suspecting any mistake in this information, reported it to the C.O., who sent Lieut. Elston, of "A" Company, and Private Lushington to the left to obtain communication - the latter understanding, Hindustanee. They moved for 150 yards through the low scrub and shouted back that they had obtained touch with Indian soldiers-and that a senior officer was required to discuss matters with their officer. Captain McDonald was, therefore, sent forward and he called back through the night that they wished to deal with the C.O. Accordingly, Colonel Pope went forward and about 150 yards along the northern ridge of the gully found McDonald, Elston and Lushington in parley with six soldiers who had rifles and bayonets fixed. A suspicious movement among them made the Colonel think that these men were Turks and not Indians. He warned the others, whereon the strangers pressed around the party. The C.O. burst through and jumped over the edge of the ridge into the gully and so escaped, although several shots were fired at him. Captain McDonald, Lieut. Elston and Private Lushington were less fortunate and became prisoners of war.
On getting back to his own party, and it being evident that the information received as to Indian troops on the left was false, the C.O. decided to occupy the position on the summit of the spur (Pope's Hill) covering about 300 yards of front, and to entrench at once. This was done acid the defences were improved and organised from time to time as opportunity allowed. All night long the fighting for this portion of the line was very fierce, for as soon as the Turks located the new line, they poured in an incessant rifle and machine gun fire. It was found that the position was not only open to fire from the front, but was subsequently much harassed by the fire of snipers who had penetrated Russell's Top, and were actually in rear of the 16th trenches. This sniping fire caused many casualties.
On the morning of the 26th, the trenches were down to a depth of 3 or 4 feet. It was found that 450 men word necessary for the proper defence of the position. The problem at this time was to link up the left of the 16th line on Pope's Hill with the right of the Australians and New Zealanders, on Walker's Ridge. The warships had shelled Russell's Top at dawn and broken up the organised bodies of Turks who occupied it, but there were still many snipers left, who kept up an extremely accurate and destructive fire. Later in the evening more Turks came across the head of Monash Valley, past The Nek and on to Russell's Top. From there they commenced to make the position on Pope's Hill untenable, picking off the men at the back of the hill like flies. At 8 o'clock Colonel Pope reported the position to headquarters. The men in the trenches on Pope's Hill were better protected than the supports at the back of the hill, who were entirely without cover from the fire coming from Russell's Top. Both the 16th machine guns were placed in position with the supports and all day long these guns sniped the snipers and the Turks creeping about on Russell's Top. The gun crews did magnificent work. Both guns were hit often with Turkish bullets. Percy Black, shot through the hand and later through the ear, refused to leave his gun during any of the heavy fighting of this and the following week. The barrel casings, shot through in many places, had to be plugged with pieces of ammunition boxes in order to hold the water necessary to keep the barrels cool. Murray was wounded during the morning but remained on duty Indeed, it was necessary that he should do so, for by this time many of the original gun crews had been killed or wounded. The work of the guns, while it kept down organised movement of Turks along Russell's Top, could not prevent various small parties of two or three from becoming established.
This was the situation all through the day of April 26. As opportunity offered, the men belonging to other units in the 16th's trenches were weeded out and instructed to report to their battalions, while during the day various parties of 16th men reported who, when they had landed the night before, had been thrown into the line at other points. Towards nightfall both machine guns were disabled by hostile fire and the gun crews commenced a diligent salvage hunt for others, without success. However, two naval machine guns were sent up at daybreak the next morning and, when mounted, they lifted at least one load off the mind of that sorely tried officer, Colonel Pope.
In the meantime, on the morning of the 26th, the 13th Battalion was brought up and in the face of a desultory fire, the men climbed Russell's Top and effected a junction with the composite force of Australians and New Zealanders who were holding Walker's Ridge. Unfortunately, they could not advance sufficiently far along the Top to relieve the 16th of the fire from its rear. During the afternoon the 13th was heavily attacked and forced to withdraw into Monash Gully, and this left the whole length of Russell's Top still open to the Turks. On the morning of the 27th it was found that the Turks had dug themselves in there and a company of the 2nd. Battalion was sent forward to take the trench. A desperate struggle then began for the much prized possession of Russell's Top. The 2nd Battalion took it. It was driven out, but rallied and took the trench again. This time it was held and with a reinforcement of New Zealanders it was strongly manned.
At about 2.30 in the afternoon, the Turks delivered an attack in six lines across the whole face of Battleship Dill, advancing on Walker's Ridge, Russell's Top, and Pope's Hill. The navy's guns opened on them and the first shell fell on Pope's Hill; the second beyond and the third, a huge shrapnel shell, which passed overhead with a heavy rumble, burst fairly over the Turks. As the dust of the explosion cleared, they could be seen running around, dazed, like ants on a disturbed nest. They then took cover in the scrub and commenced to snipe. The organised attack had completely failed.
But the snipers on Russell's Top were still doing considerable damage to the 16th. The 13th was not far enough along the ridge to relieve Pope's Hill from this harassing fire, which made communication very difficult. The slightest indiscretion of movement was met by a very well-aimed bullet.
Later in the afternoon a determined local assault was made upon Pope's Hill. A line of about 300 Turks emerged from a gully and charged across the Chessboard. An officer led them with his sword flashing and others, revolver in hand, were encouraging their men. This party was practically annihilated by an intense rifle and machine gun fire which the 16th brought to hear.
The night of the 27th was full of tension following a series of attacks. Signs of Turkish activity could be heard in bugle calls, shouts of officers rallying their men and the men calling on Allah in between times opening up a furious fusillade on the Australian trenches. Some of the 16th, worried by the continual bugle calls, climbed over the parapet and reconnoitred in front of the trenches. When daylight came, however, on the 28th, it was evident that no Turkish attack was imminent. It was probable that they were just as exhausted as were the Australians. So far as the 16th was concerned, the one thing that worried the troops was the fact that the snipers on Russell's Top were still active and invisible.
The 28th was a day of digging with intervals of rest and some fighting. The whole situation was still obscure, although as the men got their holes dug and connected them up, matters in this connection improved. The runners and stretcher bearers, whose jobs necessitated movement, suffered heavily during the day, but there was never a lack of volunteers to fill the places of casualties. As the messages were pieced together at the various headquarters in rear and the whereabouts and number; of the front line troops were made known, so, gradually, was order and system brought into the business of supplying them with ammunition and food. The rear slope of Pope's Bill was so steep that access to the firing line on top was a task of no small difficulty even to an unencumbered man, to those with water, ammunition and rations, it was almost impossible to surmount.. A stout rope was therefore secured from the navy and, fastened securely to a bush on the top of the hill, it formed a useful help in sealing the slope.
The situation did not change to any marked degree during the 29th. The rifle and machine gun fire during the period was intense, but both sides had got below ground and the casualties were not so severe as previously. Pope's Bill trench was continuous and afforded a safer position than the slope in rear, which was still covered by the fire of snipers.
On the evening of Friday, April 30, after having been in action on Pope's hill for five days, the 16th was relieved by the 15th Battalion. As the various sectors of trench were relieved, the weary occupants moved down the slope in rear and congregated at a spot in one of the gullies, called Rest Camp. Here they rested until Sunday, May 2. The rest was by no means a peaceful one, and the spot could only be called a rest camp in comparison with the greater activity of the front line. During its two days "residence," the 16th lost 50 men through snipers, so that much of the time that should have been devoted to rest was occupied in digging a "possy" which would be proof against the efforts of the wily Turk.
The Australian Light Horse Studies Centre is a not for profit and non profit group whose sole aim is to write the early history of the Australian Light Horse from 1900
- 1920. It is privately funded and the information is provided by the individuals within the group and while permission for the use of the material has been given for this
site for these items by various donors, the residual and actual copyright for these items, should there be any, resides exclusively with the donors. The information on
this site is freely available for private research use only and if used as such, should be appropriately acknowledged. To assist in this process, each item has a citation
attached at the bottom for referencing purposes.
Please Note: No express or implied permission is given for commercial use of the information contained within this site.
A note to copyright holders
The Australian Light Horse Studies Centre has made every endeavour to contact copyright holders of material digitised for this blog and website and where
appropriate, permission is still being sought for these items. Where replies were not received, or where the copyright owner has not been able to be traced, or where
the permission is still being sought, the Australian Light Horse Studies Centre has decided, in good faith, to proceed with digitisation and publication. Australian Light
Horse Studies Centre would be happy to hear from copyright owners at any time to discuss usage of this item.