


Topic: BatzS - Jifjafa
The Jifjafa Raid
Sinai, 10 - 14 April 1916
Outline
The collapse of the Gallipoli operations by the allied forces freed up large numbers of Turkish soldiers for other theatres of war. The Turks were now planning to re-engage the British at the Suez Canal. This was a smart political move. To the west of the Nile lay the restive tribes ready for open rebellion, led by the Senussi. While they may have been suppressed only a few months ago, this was only momentary, as the Senussi rebellion was far from a spent force. Turkish assistance exposed the ongoing weaknesses in the western flank of the British presence in Egypt.
Within Egypt itself, there was tremendous resentment towards the British, especially their declaration of the Protectorate in 1914. Beneath the calm exterior of the British Protectorate there were seething undercurrents of anti-British sentiment. The Turks knew this and were keen to exploit the dissension through their contacts with Egypt. However, to encourage rebellion, the Egyptians had to be shown by example that the British could be defeated. Quickly, the Turks put together a force from grab bag of units which added up to some 20,000 men in the projected Egyptian invasion force with 12,000 enemy troops at Jerusalem and 13,000 at Beersheba, with evidence that the Beersheba formation was pressing towards Katia.. By April a formation called the 'Desert Force' under the command of Colonel Friedrich Freiherr Kress von Kressenstein, commonly known as Kress, began to deploy near the Canal Zone. All over the Sinai Peninsular, parties of the Turkish vanguard were finding water sources and preparing wells, the most essential element for a successful campaign in the Sinai.
Aerial reconnaissance by the British exposed the works by the Turks in anticipation of a Suez campaign. New earthworks in the photographs showed that the Turks had already constructed an extensive outpost line west of the Maghara Hills down to the south-east of Nekhl. The locus of these positions was sited at Bir el Jifjafa, a fortified and natural defensive position supplied by an abundance of water, which flowed freely from the latest German pumps at the newly developed wells. All the new wells at Jifjafa were drilled with the latest German boring equipment at the site. Located on a caravan route some 85 kilometres east of Serapeum Bir el Jifjafa was fortified by three posts in an oblique line from north to south. Manning the Jifjafa perimeter was a garrison of 50 soldiers. Nearby at Bir Barthel Hegaiib, a well some five kilometres north of Jifjafa, at Rodh Salem north of Bir Barthel Hegaiib and at Bir el Hama to the south were a number of engineers, technicians and labourers whose primary task was to open up as many water sources as possible. The idea at this place was to provide an ideal point of concentration for a large force in preparation to strike quickly at the Canal. The news panicked the EEF command since they saw only too clearly the implications of these new works.
Bir el Jifjafa was too far away for the infantry to tackle so it was clearly a cavalry job. The Yeomanry Brigades were already committed to holding the Romani and Katia. The quality of the Australian Light Horse was unknown but they were the only troops available. The Generals needed to test out the ability of the Australians and so establish if they were up to the difficult task of cross-country raids. It basically meant travelling over waterless and featureless plains with the use of a compass and good bushcraft.
In late March the 8th LHR was selected to provide and lead a long range expedition into the Sinai with the objective of discovering problems and techniques required for such an action. The reason for the 8th LHR’s selection lay with one man, the leader of the Brigade Scouts, Captain Albert Ernest Wearne. He was considered to be the best Scout Officer in the Light Horse and so was a natural choice.
The aim of the expedition was to mount a reconnaissance overland to Wadi um Muksheib where earlier on in the year, the Turks were reported employing work parties to improve the water cisterns in the wadi’s catchment area. In addition they were ordered to inspect the water supply at Moiya Harab and El Hassif. Finally they were to report on their impressions of the land regarding distances and time required for travel, water supplies and other preparations necessary to move a large body of men across arid plains.
Two novelties were to be employed. The first was air support. An aircraft was allocated to fly in advance of the column. The pilot was given specific instructions to report on the countryside ahead of the column with a careful eye out for Turkish troops. This reduced the need for the column to send out advanced guards which then allowed the column greater speed and flexibility. The other novelty was the use of wireless. A radio transmitter was to be carried for the specific purposes of maintaining constant communication with the Anzac Mounted Division at the Canal.
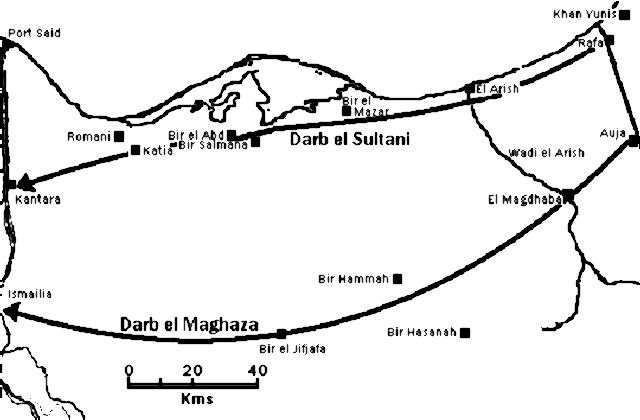
By use of both technologies, it was hoped that mounted men could move so quickly because their need for supplies would be kept to a minimum. Such long-range reconnaissances then would have the ability to strike the Turks hard and disappear before the Turks were able to respond in any effective manner. Since they would have speed on their side, they could make their getaway in relative safety, always knowing the location of any pursuing enemy. If this could be achieved, a long-range raid could sever communication link over the Darb el Maghaza, the new route the Turks were developing, which ran through Bir el Jifjafa. Cutting off this route would restrict any further Turkish advances to the more established Darb el Sultani that followed the coast by way of Katia. The impact on British strategy would be huge, allowing the British to concentrate their defence of Egypt on a confined front.
At 2pm, Tuesday, 21 March 1916, Wearne led off his column from Serapeum. All up, the column consisted of 109 men mainly from the 8th LHR. Trailing on behind was another group of Egyptian camel drivers following on foot. Their job was to carry enough water for the horses.
After a long march, they arrived at Wadi um Muksheib. The cisterns were well stocked with water. They surveyed all the Turkish works and found them to have been abandoned some time ago without any evidence of fresh works. Once all the wells had been fully examined and mapped, the column turned around for the march back to Serapeum. At the end of their journey of 37 hours, the column travelled over 128km through difficult desert conditions. News of the successful mission was passed onto the Anzac Mounted Division along with the valuable lessons learned during the journey.
The EEF Command gained confidence in the professional ability of the Australians, especially the 3rd LH Bde after the Wearne Reconnaissance, and wanted to implement their tactical scheme to remove the ability of the Turks to attack Egypt through the centre of the Sinai Peninsular. The Commanders requested that the 3rd Light Horse Brigade conduct the new mission: to send out a column to Jifjafa to destroy the pumps and wells.
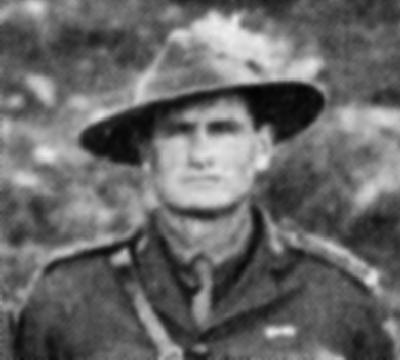
Antill had no difficulty in appointing Scott, now 2IC of the 9th LHR to lead the expedition. Since the beginning of the Brigade, Antill was very familiar with Scott’s work, especially as ‘C’ Squadron leader at Gallipoli and the temporary Regimental commander during the training period at Heliopolis. Scott was an austere man who said little but possessed a keen intelligence and an ability to lead men through strength of character. His capacity to prepare for an action was legendary. Scott left nothing to chance.
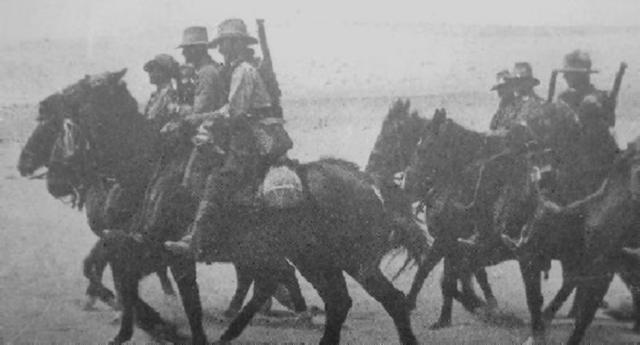
Scott put together a force mainly comprised of ‘C’ Squadron from the 9th LHR although other units were represented, mainly from the 8th LHR with 12 men, including Wearne himself as the chief scout. The key criterion for acceptance on the raid, after excellent horsemanship, was weight. Lighter men were preferred. The reason for this was to minimise the weight upon the horses and allow them to travel far and fast without any heavy load stress. In addition to the light horsemen were the supports, the key being a Bikanir Camel Corps troop under the command of Lieutenant Bhir Singh. This formation was raised in India, which moulded the men into a tough and highly skilled desert-fighting group. This unit on detachment comprised 25 men with 12 camels for rations and forage. In addition there was a need for 95 Egyptian camel drivers who were delegated to move supplies packed on some 195 camels. To ensure they moved at the pace of the fighting men, a group of light horsemen were delegated to supervise the Egyptians and so ensure their speed was in line with the movement of the column.
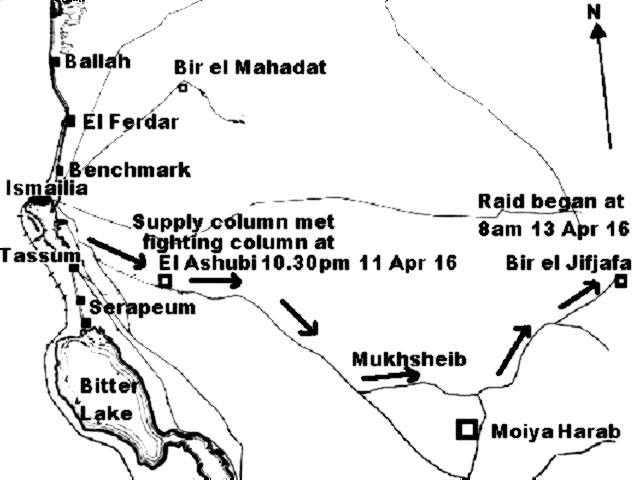
The column was divided into two sections. The first being the supply column under the protection of the Bikanirs and the second being the fighting column. Because the camels moved at a slower rate than the horses they were to leave earlier than the fighting column. The supply column moved off from the Road head on Monday, 10 April 1916 for the wells at the western end of Wadi um Muksheib near the El Ashubi mountain range, a journey towards the east of about 65km. The cisterns around this area had been surveyed by Wearne and found to have sufficient water for the number of camels and horses that would gather at that place. Here the supply column was ordered to await the arrival of the fighting column due on the following day.
![]()
At 2pm, Tuesday, 11 April 1916, the fighting column set off from the Road Head. To preserve the energy of the animals, the march rate was a normal walk for the horse with a break of 10 minutes every half hour. This translated into a speed of about 10 kilometres per hour.
As they marched on the surface began to move from sand to a solid surface, which allowed the horses to increase their speed. While this was good for the light Horsemen, for those in the wagons of the Field Ambulance unit, they found it difficult to maintain contact with the column. The result was that the men had to keep their horses on a steady trot to catch up with the light horsemen. This tired the horses quickly. Scott was informed about this problem and the column slowed down to keep pace with the Field Ambulance unit.
During this time, the column moved south-east keeping the sandhills on their left. At 5.30pm, the fighting column reached the north western section of Wadi um Muksheib where it began. Here the men rested for two hours. At 7.30pm, they men set off for El Ashubi, their rendezvous point with the Bikanir Camel Corps. It was dark so the progress was slower. A few hours later they could see the camp lights of the supply column. At 10.30pm, the exhausted fighting column finally met up with the supply column. After taking care of the horses, the wearied men fell under their bivvy sheets and slept soundly.
Reveille blew early and all the men of the column were on the march by 7.30am following the course of Wadi um Muksheib as it meandered its way in a south-easterly direction. By 11.20am, the fighting column reached Moiya Harab, the furthermost point reached by Wearne’s expedition a fortnight before. The supply column arrived two hours later.
While waiting at the well, the aerial reconnaissance reports arrived from the signallers. Basically, the British observation aircraft assigned to the column flew over the area surrounding the camp. Once they completed their survey the observations were recorded in a notepad. One can only guess at the difficulty of doing this in an open aeroplane with a clipboard, paper and pencil. The paper was placed in a metal tube and dropped to the ground near a cross marker laid out by the signallers who then recovered the message.
This day’s message indicated that there was a group of Bedouin in the area. Scott sent out patrols to find the Bedouins but as the squads returned they had disappeared without trace. In their place, three miserable desert dwellers were captured and brought back to Major Scott for interrogation. There was little benefit or information to be obtained from the men and so they were then released.
In addition to finding Bedouin, the patrols found nine wells in different stages of construction and content. Some were empty while others contained large amounts of water. These were handy back-up storage areas, which ensured the horses would be adequately cared for if adverse conditions occurred. This gave Scott even more options in case of trouble.
At this point the column was again divided between one group required for reaching Jifjafa and the other to provide support on retiring from Jifjafa. One officer and twenty men were left behind to supervise the supply column left behind at Moiya Harab.
After all the arrangements and orders had been given by Scott, the fighting column moved off at 7pm, Tuesday 12 April 1916, for a flying march to Bir el Jifjafa. They marched all night until 4.30am, Wednesday, 13 April 1916, stopping every 40 minutes to allow the camel transport to catch up. When they reached the point for the final bivouac, the men slept for the rest of what remained of the night.
At 5.30am the men moved off leaving the Bikanir Camel Corps, Wireless Section and the Transport column at the bivouac supervised by Captain Ragless. They marched to a pre arranged meeting place known as Hill 1082 where the column halted at 7.30am and waited. Scott was observing the Turkish positions at Jifjafa. Intelligence was already known that the men evacuated Jifjafa at night and arrived in the morning to undertake their duties. Scott was waiting for the Turks to arrive at their work stations. The attack was planned for 9am.
Half an hour later a British observer aeroplane flew over and dropped a package. The signallers grabbed the package and brought it to Scott. The message read: "All was clear". To acknowledge the receipt of the message in a time without radio in the aircraft required a physical display by the troops on the ground. If the message were unclear or illegible, a group of about ten men would form themselves into a large cross formation, which would be visible from the sky by the loitering aeroplane. In this case, the message was clear and understood, so Scott ordered his men to form a circle so the pilot could see that the message was received and clearly understood. When they did this, the aeroplane dipped its wings in acknowledgment and flew over the Turkish positions.
The psychological impact of a British aeroplane on the Turks was now used to Scott’s advantage. When an aeroplane flew over the Turkish positions it was observed that the Turks always scattered to avoid heavy casualties, standard responses to a potential air raid. After carefully examining the Turkish positions through his binoculars, Scott made the decision to attack Jifjafa immediately while the Turks were in a state of confusion.
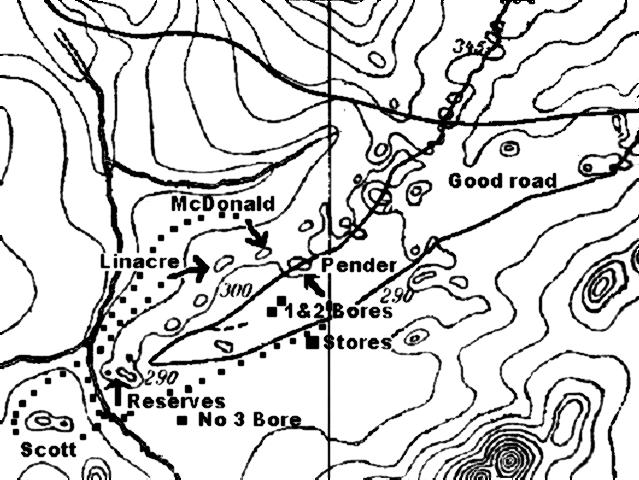
The column was divided into four troops with each allocated a specific task. Lt McDonald was ordered to take his troop to within 2 kilometres north west of the Turkish camp. Lt William Stanhope Pender, a farmer from Minyip in Victoria, moved his troop to a position north east of the Turks while Lt Frederick John Linacre, a police officer from Melbourne, was to make a frontal assault on the position when all the troops were in position.
McDonald’s troops found the going tough so were late in getting to their designated position. Scott needed to alter the plan. Linacre was sent to a ridge slightly north of the Turks while the men remaining with Scott were to undertake a frontal assault.
The Turks saw them coming and began to make for a safer place. Pender saw the Turks running and by a quick movement, outflanked them cutting off their retreat. Out of desperation, the Turks ran to some nearby trenches, jumped in and opened fire on the attacking Australians.
The firefight that ensued was brisk and deadly. No one was quite sure of the exact location of the trenches or where the Turks were hiding or firing at the Australians. Cpl Paul Teesdale Smith, an articled law clerk from Arthur's Seat, a house at Mount Lofty just outside Adelaide, led his section from ‘B’ Squadron forward in an attempt to flush our the Turks. Helping him out was Pte William Andrews, a bushman from Kadina, Pte Hector George Gillis, a former farmer who was living with his brother at Birkenhead, while the fourth man of the section acting as horse holder away from the battle. His section was part of McDonald’s Troop which was pushed forward in advance of the balance of McDonalds men. As the section moved forward, Smith found his men being vigorously fired on by the Turks from all sides. After returning fire, Smith saw a Turk fall and assumed he was wounded. The men began to move towards the Turk to capture and seek shelter. The position Smith’s section was now in turned out to be pivotal for bottling up the Turks. While he held this part of the Turkish trenches, there was no ability for the Turks to escape the trap. Scott saw this and walked over to Smith and ordered him to hold the position until the troops of McDonald and Linacre could fully deploy. Shortly L/Cpl Alfred Vernon Hancock, a farmer from Moonta and later to become an Air Force pilot, moved forward to join his mates. The four men held the position resolutely while inflicting the majority of casualties amongst the Turks.
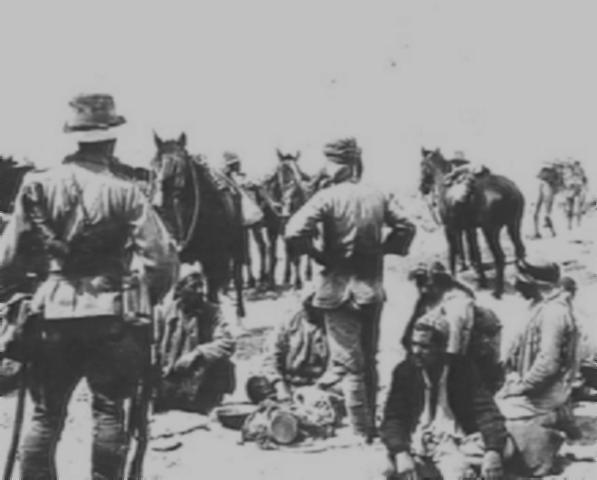
For a quarter hour or so, while the shooting was intense, some six Turks were killed while suffering five wounded. The Australians also suffered casualties. While attacking the trenches with his section from the 8th LHR, Corporal Stephen Frederick Monaghan was shot and killed outright. The firefight ended when surviving Turks realised they were outnumbered and unable to fight their way out of the situation. This proved to be more than enough resistance by the Turks and the remaining 30 Turks surrendered. Amongst their company was an Austrian engineer.
In the distance two mounted men were observed coming towards Jifjafa but once the firefight began, they turned and rode away towards the north-east. As there were no mounted men at the post it was assumed that these men were about to visit Jifjafa post when they rode off.
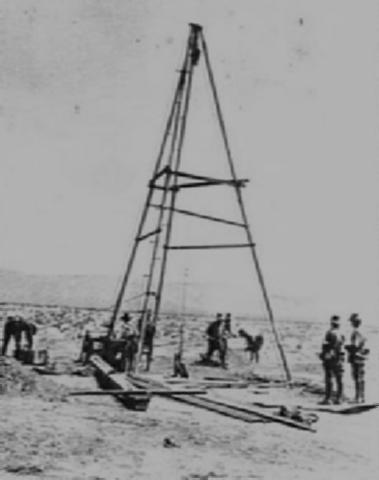
Once the post was in Australian hands, Scott ordered his men to set about the work of destroying the wells and drilling equipment. Scott expresses a great deal of sadness at destroying the artesian boring plant. They were well-crafted German machines and destroying them seemed a total waste.
According to the statement made by the captured Austrian officer, the post was occupied by a total of 41 men. After completing the count, it appeared that the whole of the enemy force had been accounted for among the dead and prisoners. The two mounted men were seen to gallop away were from another unit altogether. Evidently these men were just on the point of visiting the post when the attack started. However, other Turkish units in the region were now alerted to the presence of a substantial force of Australians. No one knew the dispositions of these forces or their numbers so they knew they had probably a day’s grace before any substantial unit could arrive to threaten the column.
After the Australians completed the destruction of the Turkish structures at Bir el Jifjafa, the column was ready to move back to the support camp. Beginning at 11am the column was forced march to their camp in some of the most difficult conditions as a kamseen began blowing at the time. As the dust whipped up, visibility was down to a bare 20 metres. They wearily trudged to their destination and finally arrived after 12 hours hard riding. The horses were watered and an attempt was made to radio back to Brigade headquarters. The heavy winds and sandstorm of the kamseen caused this endeavour to fail.
While the fighting column was moving off to Jifjafa the previous night of 12 April 1916, the supplies camp had their own adventure. A section patrol of cavalry from the Middlesex Yeomanry wandered into the camp and asked Lt Alexander Harold Horatio Nelson, an orchardist from Modbury, if they could get shelter. Nelson agreed and the men settled down for the night. It was not a good night’s sleep. A couple hours after the arrival of the Yeomanry, there was some sniping. The shooting was desultory and generally off target convincing the men that the snipers were the Bedouin who were seen the previous day. They had now double backed to the camp, taken up positions around the camp and began sniping. Nelson and his men returned fire. This lasted all night. The following day was quiet until the kamseen began to blow. While it was an evil thing to walk through, it did provide cover for Scott and his party to return to Nelson’s camp without injury.
At some time during the night, the kamseen died down. The next morning, Friday, 14 April 1916, radio communication was made between Scott’s formation and the 3rd LH Bde Headquarters. With great excitement, Scott gave a full report of the action detailing the destruction of equipment and capture of prisoners. At the Road Head, Antill could hardly contain himself. His good fortune had taken a turn for the better. The evacuation of Gallipoli had given him some sort of status as a man who can lead the retreat, but this proved that he was able make sound decisions regarding appointments and battle strategy. After receiving Scott’s report, Antill made sure the information was widely circulated around the camp and all the way up to the most senior echelons of the EEF. When the news broke, there was wild jubilation at the Road Head camp with many men in all units celebrating this victory.
When breakfast was finished the men set off on their return march and halted at 1pm for lunch. Various troops established themselves as comfortably as possible given the circumstances. One troop even set up its lines in a wadi bed, something the Bedouin would never contemplate. While lunch was being prepared, radio contact was established and various messages of congratulation were received
Scott called the men in for the reading of messages. They came from a swathe of military commanders all the way up to the GOC of the EEF. One from Chauvel to Antill encapsulated the sentiment: “Hearty congratulations to self, Scott, all concerned. Brilliant success.” With each message, the men cheered.
Halfway through a message from General Godley, the Canal defence Section 2 Leader, Scott saw a man from the outlying piquet riding towards the camp at breakneck speed. Everyone turned towards him. In seconds they saw the reason for the haste. A wall of water with the appearance and thickness of white paint was coming down the wadi and heading straight for the troop in the wadi. They were quickly alerted to the danger. It took seconds for the men in the wadi to respond and ride onto the safety offered by the banks.
The effect of the flood was to divide the column. When to column moved off to head for home, both groups kept in visual contact with each other. As the men were to discover a year later that all during their time in the Sinai, this was the only time ever that any Light Horse unit saw flowing water in a creek bed. Such water was never seen again by the men.
By early morning of Saturday, 14 April 1916, the column reached the Road Head. The men of the 9th LHR had completed a remarkable feat of travelling 260km through hostile territory in a bit over three and a half days, engaging the enemy and suffering only one casualty while returning with 34 captives. The 9th LHR had proven the worth of the Australian light horse as desert fighters. They had also fulfilled everything that the EEF required of them, that is, to close off the Darb el Maghaza as a credible attacking path to Egypt. The EEF only had to defend the north route without diffusing scarce defence resources.
Murray gave Scott a DSO and sang his praises. All the commanders in Egypt fell over themselves to offer congratulations to Scott and the men from the 9th LHR for producing a tactical and propaganda victory. It was also this action that urged Murray to do anything everything to keep the Light Horse in Egypt despite the urging of Kitchener to send more men to the Western Front.
For the 9th LHR, the celebrations of Scott’s exploits reverberated throughout their camp. The men felt very chuffed and ready to face anything the Turks could hand out. The cheering didn’t last for long. The next week, Kress made his presence felt to the British.
Further Reading:
Reconnaissance to Muksheib by Captain Wearne
The Jifjafa Raid, Sinai, April 10 to 14
Battles where Australians fought, 1899-1920
Citation: The Jifjafa Raid, Sinai, April 10 to 14, 1916, Outline
