"At a mile distant their thousand hooves were stuttering thunder, coming at a rate that frightened a man - they were an awe inspiring sight, galloping through the red haze - knee to knee and horse to horse - the dying sun glinting on bayonet points..." Trooper Ion Idriess
The Australian Light Horse Studies Centre aims to present an accurate history as chroniclers of early Australian military developments from 1899 to 1920.
The Australian Light Horse Studies Centre site holds over 12,000 entries and is growing daily.
Contact:Australian Light Horse Studies CentreLet us hear your story:
You can tell your story, make a comment or ask for help on our Australian Light Horse Studies Centre Forum called:
WARNING: This site contains: names, information and images of deceased people; and, language which may be considered inappropriate today.
Thursday, 1 April 2010
The Battle of Anzac Cove, Gallipoli, 25 April 1915, 2nd Infantry Brigade Landing Map Topic: BatzG - Anzac
The Battle of Anzac Cove
Gallipoli, 25 April 1915
2nd Infantry Brigade Landing Map
2nd Infantry Brigade Landing Map
[Click on map for larger version.]
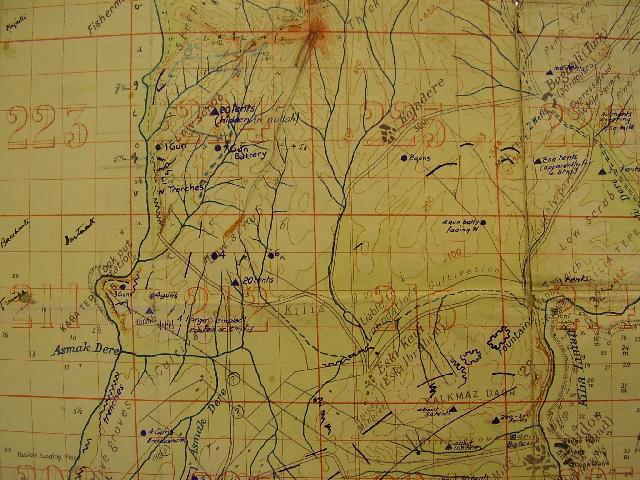
The following map was prepared for CEW Bean by utilising the original map issued to the officers prior to landing. All references in the War Diaries of regarding the landings on 25 April 1915 refer specifically to this edition of the Gallipoli map.
The map section included here details the Turkish defences faced by the troops as they disembarked and went ashore on that morning. Displayed are the defences from Maidos to Anzac Cove, which gives a fair idea of the difficulties faced by the invading Australian force.
This particular map displays the routes taken by both the 5th Battalion and 7th Battalion on landing. It also places the Headquarters of the 2nd Infantry Brigade located in Square 224. Grid references have been inserted by hand for Bean to allow him to follow the movements of this Brigade as it unfolded on the day.
While the above map appears small, the larger version is on a separate sheet which may be accessed by clicking the mouse on the map.
Australian Light Horse - Full Index, Contents Topic: AIF - ALH - A to Z
ALH, AIF
Australian Light Horse - Full Index
Contents
The following is an alphabetical roll of some 34,000 members of the Australian Light Horse, AIF including ancillary units, who are known to have embarked overseas during the Great War.
Search for the category that suits a search requirement. The link will take you to a page listing each man on this reference list with the following information:
First Names;
Family Name;
If applicable, any false name employed; and,
Embarkation unit.
Notes
Note 1: All soldiers’ names are linked to the specific unit and date when embarkation occurred. By utilising the link, upon the Embarkation Roll is a brief military biography of the individual. Also on the page are details and picture of the ship in which embarkation occurred for that specific soldier.
Note 2: There are duplications of some names in the following list. The reason for this is that the soldier embarked on more than one occasion. This was the simplest way of resolving the problem of multiple entries for a single individual.
Note 3: In comparing this roll with the official Embarkation Rolls published by the Department of Defence during the Great War, it will be noticed that some names are absent. The reason for this lies in the fact that when the official Embarkation Rolls were compiled, last minute absentees for one reason or another were recorded as embarking whereas in actuality, no embarkation occurred. In addition, there are other names that have been included that do not appear in the official Embarkation Rolls and yet they embarked with that particular group.
The Battle of Sannah's Post, South Africa, 31 March 1900, Outline Topic: BatzB - Sannahs Post
The Battle of Sannah's Post
South Africa, 31 March 1900
Outline
Sannah's Post, an action fought on 31 March 1900 during the Second South African War, after the British army commanded by Field Marshal Lord Roberts occupied the Orange Free State capital, Bloemfontein, on 13 March. Two days after the town's capture 300 mounted infantry were sent to Sannah's Post, situated on the Modder River 34 kilometres to the east, to secure the pumping station which supplied Bloomfontein's water supply. As it was known that a strong Boar commando under General JH Olivier was in this area, on the 18th another force - a 1,500-strong column of cavalry and mounted infantry under Lieut.-General John Drench - was sent to take up a defensive position at Thaba 'Nchu, a further 34 kilometres east. On the 26th French had departed to resume command of his cavalry division, leaving the garrison at Thaba 'Nchu under command of Colonel R.G. Broadwood.
When Broadwood found himself seriously menaced by Olivier's force of 5,000 men, he decided on 30 March to withdraw in towards Bloemfontein taking with him any of the town's pro-British residents who wished to be evacuated. Unknown to him, his movement coincided with a bold plan by another Boer leader, General Christiaan de Wet, who had moved south from Brandfort with a column of 1,600 men and seven guns, with the intention of seizing control of the Sannah's Post waterworks and placing himself astride the escape route which Broadwood would use once Olivier launched his planned attack. By 4 a.m. on the 31st he had his men in position: 400 under his own command west of the waterworks, the rest east of the Modder. De Wet's plan called for the larger force to mount the initial attack on the Sannah's Post garrison, in the expectation that the defenders (reduced now to only 200) would abandon the place and head to the capital-and straight into the ambush laid for them.
Intelligence reports delivered during the night told De Wet that a convoy had been despatched down the road from Thaba 'Nchu the previous afternoon, but he did not know that Broadwood's whole force was on the move. When he learned of this fact shortly before dawn, he decided to continue, laying in wait even though Broadwood's much larger force (about 1,800) - which he could actually see bivouacking nearby on the west bank of the Modder - could potentially overwhelm his own meagre numbers. While various minor skirmishes before sunrise at 6 a.m. should have given warning that Boers were in the vicinity, the nature and scale of the threat which was actually present was not evidenced to Broadwood until shells from the north-east started falling around the waterworks bivouac site at 6.20 a.m. Assuming that Olivier's commando had caught up with them, the British column and its convoy rapidly took to the saddle and moved out along the road to the west.
When it was reported to Broadwood that 300 Boers had been sighted along hills to the north, he deduced that an enemy force was trying to interpose itself along his escape route from that direction. He accordingly ordered one of his two batteries of Royal Horse Artillery with a mounted escort to occupy rising ground on this flank, retaining the bulk of his mounted infantry to provide a rearguard at the Modder. The battery proceeded towards the head of the supply convoy, which had become bottlenecked in a gully fifteen feet below the level of the plain-not realising that this was due to the action of De Wet's men, who were silently disarming and making prisoners of the teamsters as they entered the trap. The lead battery of guns was already in the enemy's hands when the true position was discovered by the following ('Q') Battery. This immediately turned about, with its escort, and galloped back to where a railway station was under construction-under heavy fire from the Boers after De Wet decided the time was right to reveal his hand.
With the ambush sprung, Broadwood proceeded to try and fight his way out of the predicament. Despite severe losses suffered during its flight out of the Boer trap, Q Battery brought four of its guns into action beside the unfinished railway buildings. Among the officers and men working these weapons was Lieut. J.C. Walch, a member of the Tasmanian Defence Forces on special service duty; he was severely wounded. Aided by the fire of the guns, Broadwood sent cavalry elements around by the south with orders to move into the gully and take the Boers from the right flank and rear. When these moves failed to case the pressure which the Boers continued to apply, at 10 a.m. Broadwood felt obliged to order a general retreat towards the south-west. In preparation for this movement, volunteers braved a storm of rifle-fire to pull back four of the guns and limbers from their exposed positions and thus prevent them being left for the enemy.
While two-thirds of Broadwood's force made good their escape, the various Boer forces now moved in to press the mounted infantry covering the rear-while also collecting up the spoils left behind. The leading elements of the British 9th Infantry Division began reaching the battlefield in the hour before midday, after marching from Bloemfontein, but these were too late to prevent the Boers making an orderly withdrawal by 1 p.m., taking with them 421 prisoners, seven guns and 83 wagons of stores. Broadwood had also suffered 159 officers and men either killed or wounded.
The considerable disaster which befell the British in this action might have been avoided, or at least attenuated, by the skilful intervention of a brigade of mounted infantry which had also arrived three kilometres in De Wet's rear at about 8 a.m. but then wasted the opportunity which its appearance presented. This brigade, ordered by Lord Roberts from Springfield when he first heard of Broadwood's planned retirement, was commanded by Colonel C.G. Martyr and comprised two British battalions and the Queensland contingent (commanded by Lieut.-Colonel St G.C. Henry) - a total of 600 men. A force of this size might have materially altered the course of events, but Martyr chose to split it up and disperse it.
While one battalion was sent to join in the belated cavalry movement Broadwood had initiated against De Wet's right flank and rear, the other British unit and the QMI had been sent north-east to aid an isolated outpost at Waterval Drift, an important crossing on the Modder north of the waterworks. I Here Henry's Queenslanders came into action after crossing the river for a distance, until recalled to take part in a short-lived defence of the ford. When the QMI was forced to join in the abandonment of Waterval to the enemy, they left behind two killed, two wounded and five men who became prisoners. The position at Sannah's Post was not restored to British control until 23 April.
Extracted from the book produced by Chris Coulthard-Clark, Where Australians Fought - The Encyclopaedia of Australia's Battles, Allen and Unwin, Sydney, 1998, pp. 72-74.
Additional References cited by Chris Coulthard-Clark:
L.S. Amery, (ed.) The Times History of the War in South Africa 1899-1902, Vol. 4 (1906), London: Sampson Low, Marston & Co.
R.L. Wallace (1976) The Australians at the Boer War, Canberra: Australian War Memorial & Australian Government Publishing Service.
The Battle of Anzac Cove, Gallipoli, 25 April 1915, Australian and New Zealand Army Corps (ANZAC) War Diary Topic: BatzG - Anzac
The Battle of Anzac Cove
Gallipoli, 25 April 1915
Australian and New Zealand Army Corps (ANZAC) War Diary
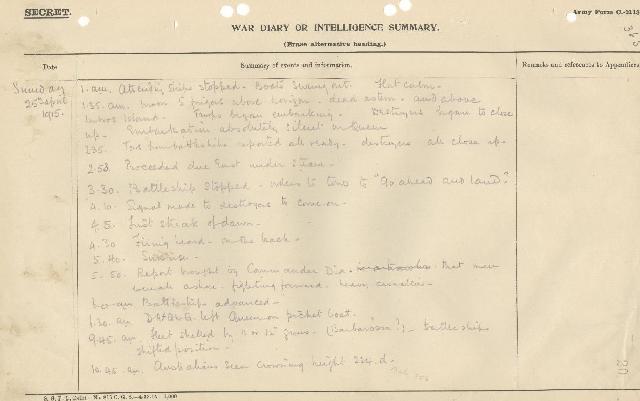
War Diary account of the Australian and New Zealand Army Corps (ANZAC).
The following is a transcription of the War Diary of the Australian and New Zealand Army Corps (ANZAC), of their role in the landings at Anzac on 25 April 1915.
1.35 am - Moon five fingers above horizon. Dead astern and above Imbros Island. Troops began embarking. Destroyers began to close up. Embarkation absolutely silent on Queen.
2.35 am - Tows from battleships reported all ready. Destroyers all close up.
2.53 am - proceeded due east under steam.
3.30 am - Battleship stopped. Orders to tows to "Go ahead and land."
4.10 am - Signal made to destroyers to come on.
4.5 am - First streak of dawn.
4.30 am - Firing heard on the beach.
5.40 am - Sunrise.
5.50 am - Report brought by Commander Dix that men were all ashore, fighting forward, heavy casualties.
6.0 am - Battleship advanced.
6.30 am - Deputy Assistant Quartermaster General left Queen on picket boat.
9.45 am - Fleet shelled by 11 or 12 guns - (Barbarossa?). Battleships shifted position.
10.45 am - Australians seen crowning height 224 D (Baby 700).
It will have been seen from the various orders issued for the operations that the idea was to land the covering force of about 4,000 men in two lots. The first lot off the battleships - 1,500 men - in tows. The second lot by destroyers which would stand in quite close and land the troops in pulling boats. The battleship tows did not get off quite together, but closed up soon. They closed too much and intervals were much less than that given in orders. The direction was given from the right. The Naval Officers responsible for direction noticed when 1½ miles from shore, that the time being taken would take the force further another than was intended. He tried to induce the tows to change course - but could not succeed in this. To avoid landing alone into two tows at a selected beach, he decided to join up with the remainder. The tows then joined up and went to the beach to this point - striking the shore at Fisherman's Hut. The enemy (since estimated at 900 on the beach) opened fire on the boats, when still off the shore, but the boats drove on, pulling themselves in after the steamboats cast off. The troops lept gallantly ashore, and rushed the enemy in font of them. With great dash they pushed straight on up the very steep hills they found in front of them, and gained the crest. The accounts are too confused, as yet, to show exactly what happened on shore.
The points to notice are:
1. The objective, given in orders, was missed entirely, but by the dark and resource of the covering force, a ridge was seized, which was a much later objective in the plan.
2. The advance from seaward was evidently seen and the enemy were fully prepared for it. Reports say that enemy detected the attack as early as 2 am and, from subsequent observation seaward from the ridge, this is more than probable.
3. Such an attack is possible if the men can take punishment, are fit, and determined to win the fight.
The casualties on the beach alone are estimated at 300 or 400 amounting to 10% of the covering force.
There followed there and interval. The destroyer service was somewhat disorganised for a while, and there was delay in getting the 2nd Brigade ashore. They followed, however, as fast as towage could be obtained. The action of the Galeka in standing right in under shell fire was noticeable. The mountain battery ships also stood in close and much facilitated disembarkation thereby. The 2nd Brigade moved off to the southward and gradually the landing place was shifted southward. The anchorage and landing places were shelled continuously from Kaba Tepe despite the fire of HMS Bacchante which stood right in to afford covering fire and protection as much as possible.
Demands for ammunition were constant. The supply was kept up but there was great difficulty in getting the ammunition ships to remain in the anchorage.
Major General Bridges went ashore about 9 am and conducted the fight. Major General Godley landed about 1 pm.
The force landed by the evening 6 pm consisted of -
3rd Australian Brigade (Covering Force)
2nd Australian Brigade
1st Australian Brigade
New Zealand Infantry Brigade
½ Section Field Battery, Australian Field Artillery
2 Mountain Batteries
Casualty Clearing Station
3 Field Hospitals and bearer subdivisions
42 mules.
The General Officer Commanding went ashore at 3 pm conferred with commanders and inspected the beach arrangements. He apportioned parts to commanders and received their reports. The troops ashore were not secure but the situation was not such as to cause great alarm at that time. General Officer Commanding gave out dispositions he required made. He then returned to Queen and made a report to General headquarters. Later both Divisions Divisional General represented that General Officer Commanding presence was necessary on shore. He landed again at 8 pm. A long conference was held at which the necessity and possibility of re-embarkation were discussed. The General Officer Commanding decided that we must hold on and he issued orders for the hastening of the disembarkation of more troops, including the New Zealand Infantry Brigade, a howitzer battery and more 18 pounder guns.
During the afternoon the troops were subjected to a heavy shrapnel fire, before they could dig in. It was this which caused the disorganisation and depression of which signs were apparent.
The casualties during the day were estimated at 2,000. 1,500 wounded were evacuated before 2 am, to ships.
26 April 1915
The night on the whole passed quietly. The enemy were evidently exhausted as a force but snipers and machine guns kept up a continuous fire on our advanced lines. The flat tops of hills were also reached with shrapnel, as was the beach at times. The 2ns and 3rd Brigades had to use the bayonet on occasion to repel counter attacks.
Early in the morning the general line held was straightened out. The men, taught by the experience of shrapnel fire in the previous afternoon had dug themselves well in and feeling secure in the morning were in better heart. Units were rallied and some order restored. This was most noticeable in the New Zealand Infantry Brigade which had been taken over by Brigadier General HB Walker DSO and reorganised. During the night ample water and ammunition was got up to the troops on mules and by hand. In the forenoon the troops on the northern and north eastern portions of the front pressed the enemy back to the summit of the ridge. 224 D. This was helped considerably by gunfire from the ships. Queen Elizabeth mad good practice and knocked out two guns. Ships guns ceased fire at 10.20 am. It is not quite certain by whose order the fire was stopped. The rumour is that the order originated with the enemy. Fire slackened later in the day. Our troops were sticking it well but were very exhausted. It appeared essential to effect some relief in the front line. This relief was made possible by the arrival on shore of the 4th Australian Brigade. Entrenching was continued throughout the day.
Observation of ships fire, which had been poor on 25th was much improved as the special cable connection were got through to flank observation officers. Judging from reports of prisoners the High Explosive shells did great execution and had great moral effect.
There were two instances of unnecessary retirements by units. These led, in both cases, to considerable losses.
Some more 18 pounders landed. These were got into position on right flank. The Howitzers landed during the night were got into position on left flank.
Casualties 500 to 600. No details available.
War Diaries
All War Diaries cited on this site should be read in conjunction with the Australian Light Horse Studies Centre, AIF War Diaries of the Great War, Site Transcription Policy which may be accessed at:
The Battle of Anzac Cove, Gallipoli, 25 April 1915, New Zealand and Australian Division War Diary Topic: BatzG - Anzac
The Battle of Anzac Cove
Gallipoli, 25 April 1915
New Zealand and Australian Division War Diary
War Diary account of the New Zealand and Australian Division.
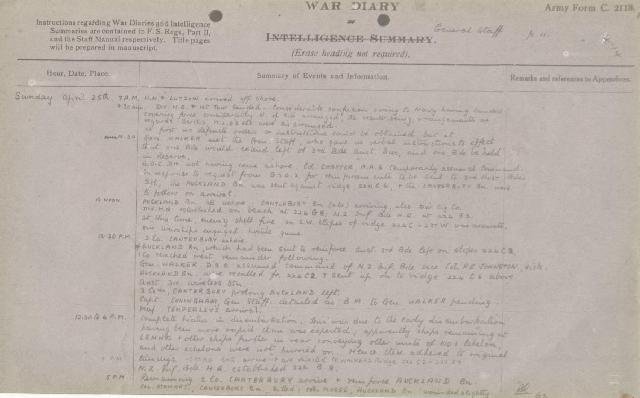
The following is a transcription of the War Diary of the New Zealand and Australian Division, of their role in the landings at Anzac on 25 April 1915.
25 April 1915
7 am - HMT Lutzow arrived off shore.
9.30 am - Divisional Headquarters and 1st tow landed. Considerable confusion owing to Navy having landed covering force considerably north of site arranged, the result being arrangements as regards berths MLO's etc were disarranged.
10.30 am - General Walker met the General Staff, who gave us verbal instructions to effect that one Brigade would extend left of 3rd Brigade Australian Division, and one Brigade be held in reserve.
General Officer Commanding Division not having come ashore. Colonel Chaytor, AAG, temporarily assumed command. In response to request from General Service Officer II for reinforcements to be sent to 3rd Australian Brigade left, the Auckland Battalion was sent against ridge 224 C6 and the Canterbury Battalion were to follow on arrival.
12 noon - Auckland Battalion all ashore, Canterbury Battalion, two companies, arriving, also Divisional Signal Company and Divisional Headquarters established on beach at 224 G8, New Zealand Infantry Brigade Headquarters at 224 B3. At this time, enemy shell fire on south west slopes of ridge 224 C - 237 W was accurate. Our warships engaged hostile guns.
12.30 pm - Two Companies Canterbury Battalion ashore.
The Auckland Battalion, which had been sent to reinforce the Australian 3rd Brigade left on slopes 224 C2. One company reached crest, remainder following.
General Walker, DSO, assumed command of New Zealand Infantry Brigade vice Colonel FE Johnston, sick.
Auckland Battalion were recalled from 224 C and sent up on the ridge 224 C6 above Australian Divisional Wireless Station.
Two Companies Canterbury Battalion prolong Auckland Battalion left.
Captain Coningham, General Staff, detailed as Brigade major to General Walker pending Major Temperley's arrival.
12.30 - 4 pm - Complete hiatus in disembarkation . This was due to the early disembarkation having been more rapid than was expected; apparently ships remaining at Lemnos and other ships further in rear conveying other units of No. 1 Echelon, and other echelons were hurried on. Hence these adhered to original timings.
4 pm - Otago Battalion arrive and are directed to Walker's Ridge 224 C3 - 237 X7.
5.30 pm - Otago Battalion called back from left flank and reach ridge above Wireless Battalion 224 B7, B6 (Plugge's Plateau).
6 pm - Brigade Major and SC for New Zealand Infantry Brigade arrive.
8.30 pm - One Company, Wellington Battalion under Colonel Malone arrives.
Meanwhile fighting had been continuous. A good deal of the ground which had been gained by Colonel MacLagan's 3rd Australian Brigade had been lost and our troops considerably outnumbered, had difficulty holding on. We were much handicapped by having no artillery (CRC Mountain Batteries) to support us. Moreover the enemy held the higher ground and commanded our positions.
10.00 pm - Three Companies 16th Battalion and two Platoons 15th Battalion under Colonel having arrived reinforce 3rd Australian Brigade.
11 pm - General Officer Commanding ANZAC, arrived from HMS Queen and held a conference at which General Officers Commanding 1st Australian Division, New Zealand and Australian Division and General Walker were present. It was decided to reinforce the 3rd Australian Brigade (covering force under Colonel MacLagan) with all available troops and connect up its left with the New Zealand Infantry Brigade right.
So far only one field gun (1st Australian Division) had been landed; we had obtained no gun support from Navy. Whilst enemy had made free use of artillery our casualties up to midnight were said to have been 1,500. The hospital ship left for Alexandria with 500 cases. Arrangement to clear casualties on left flank appeared defective, probably due to enemy's snipers. All available stretchers were sent and ½ a bearer subdivision as well.
Midnight - 15th Battalion (4th Australian Brigade) having arrived are sent to reinforce 3rd Australian Brigade right. Sniping continued most of the night, on the whole our progress was not so good as anticipated, the causes perhaps being:
1. Owing disembarkation having taken place north of site arranged, confusion resulted.
2. The early stages of the operation and success of the covering force having been quicker and more complete than anticipated - the rest of the disembarkation should have been accelerated.
3. General Officer Commanding 1st Australian Division considering country unsuitable forbade landing of Australian Field Guns.
4. Naval arrangements for landing troops towards close of day and during night appeared defective. Launches, lighters scarce and work slow.
26 April 1915
1 am - During night and early morning 13th Battalion and remainder 15th and 16th Battalions and two more filed guns (1st Australian Division) landed and were sent up to reinforce the firing line. Lieutenant Davis, New Zealand Field Artillery went forward as observing officer to Indian Mountain Artillery.
5 am - Remainder of Wellington Battalion arrived.
6 am - 13th Battalion (4th Australian Brigade) all ashore.
1½ Companies Wellington Battalion - which had arrived during the night - are sent to reinforce right centre of firing line. At this time 13th Battalion and 2½ Companies Wellington Battalion in reserve. Two guns of the New Zealand Howitzer Battery are landed and come into action. 224 G6.
Enemy's guns opened fire early and shops replied strongly.
6.30 am - Mountain Guns, New Zealand Howitzers and HMS Queen Elizabeth open fire on enemy's field guns and silence them. Our infantry said to be advancing. Up to 9am the battle was in continual progress - firing being very heavy.
9 am - Orders were sent to Brigadiers in firing line to reorganise their units which had got badly mixed up as a result of yesterday's fight. General Walker, Colonel MacLagan and MacLaurin were instructed to divide up the line and organise sections.
9.15 am - Big shell burst in hill just above Division Headquarters said to be from Goeben in Dardanelles. Situation is now as follows:- Auckland, Canterbury and Otago in Firing line. Two companies Wellington Battalion supporting MacLagan. 13th Battalion and part 16th Battalion in reserve. 14th Battalion and Headquarters 4th Australian Infantry Brigade not yet ashore.
10 am - Enemy's attack from direction of 224 D5 renewed and repelled. Section of Howitzers sent to 237 W5 to drive off snipers in direction of 237 Q3, who are interfering with collection of casualties on shore.
11.15 am - 4th Battalion and Headquarters 4th Australian Infantry Brigade land under heavy shrapnel fire. All the 4th Australian Infantry Brigade have now landed.
The reserve now consists of the 14th Battalion and two Companies Wellington Battalion, the rest of both Brigades being in firing line. At midday remaining Battalions Howitzer Battery disembarked and came into action.
12.30 pm - General Walker intimated that in order to reorganise units, he would relieve 3½ Companies Auckland Battalion by 2 Companies Otago Battalion on MacLagan's Ridge (224 I2, M9 and M5.
At this stage it was noticed Turks used following ruses:
1. Called out that MacLagan's 3rd Brigade was to retire and take a spell on beach.
2. British Division advancing and close, troops were not to fire.
3. Said they were French and danced about shouting.
With untrained and tired troops this might have some result. It effected little.
2pm - Beach shelled with shrapnel from direction of 224 F and 237 Z. Our Naval gun fire said to have been very effective in reply. Losses of New Zealand Infantry Brigade on April 25th said to have been heavy, as we had no guns (except naval) to help operations there.
Line held by ANZAC roughly as follows: 237 W5 - W9, X7 to X6, 224 C2 (Walker's Ridge), 224 C3 - C9, thence south west from 224 I3 - I7 to M3. Also Plateau 224 B7 to B5 and C4 and 5 (Plugge's Plateau).
3.15 pm - Colonel Pope, 16th Battalion, 4th Australian Infantry Brigade reported that one company 13th Battalion sent to clear Turks from his rear in 224 J1 were unable to do this and were retiring. Ships shelling ridge 224 D5 to F2.
3.45 pm - Naval bombardment of Maltepe and Kojadere continued intermittently till 7 pm.
On this day efforts were made to restore order amongst units, but little was effected. During the night firing continued but nothing of importance occurred.
One company, New Zealand and Australian Division Train arrived.
War Diaries
All War Diaries cited on this site should be read in conjunction with the Australian Light Horse Studies Centre, AIF War Diaries of the Great War, Site Transcription Policy which may be accessed at:
The Australian Light Horse Studies Centre is a not for profit and non profit group whose sole aim is to write the early history of the Australian Light Horse from 1900
- 1920. It is privately funded and the information is provided by the individuals within the group and while permission for the use of the material has been given for this
site for these items by various donors, the residual and actual copyright for these items, should there be any, resides exclusively with the donors. The information on
this site is freely available for private research use only and if used as such, should be appropriately acknowledged. To assist in this process, each item has a citation
attached at the bottom for referencing purposes.
Please Note: No express or implied permission is given for commercial use of the information contained within this site.
A note to copyright holders
The Australian Light Horse Studies Centre has made every endeavour to contact copyright holders of material digitised for this blog and website and where
appropriate, permission is still being sought for these items. Where replies were not received, or where the copyright owner has not been able to be traced, or where
the permission is still being sought, the Australian Light Horse Studies Centre has decided, in good faith, to proceed with digitisation and publication. Australian Light
Horse Studies Centre would be happy to hear from copyright owners at any time to discuss usage of this item.