


Topic: BatzG - Anzac
The Battle of Anzac Cove
Gallipoli, 25 April 1915
Turkish Official War History Account
[Click on plate for larger version.]
In 2004, the The Turkish General Staff Directorate of Military History and Strategic Studiesand Directorate of Inspection Publications in Ankara published a ground breaking text on the Gallipoli campaign. This was the first time the story could be told for an English speaking audience from a Turkish point of view. The book was called A BRIEF HISTORY OF THE ÇANAKKALE CAMPAIGN IN THE FIRST WORLD WAR, JUNE 1914 - JANUARY 1916). The account is structured to appeal to a Turkish audience as it is a conflated and modest translation of the Three Volume Turkish language version. While it has many failings, it was an important contribution to the understanding of the campaign as seen by the Turkish forces at the time and in perspective.
The Turkish General Staff Directorate of Military History and Strategic Studiesand Directorate of Inspection Publications, A Brief History Of The Çanakkale Campaign In The First World War (June 1914 - January 1916), Ankara, The Turkish General Staff Printing House, 2004, pp. 67 - 77.
Ariburnu Landings
E. Ariburnu Landings: the Battles and the Operations That Lasted Until the end of May 1915
1. Preparations and the Operation Plans of the Sides in the Anafartalar Region
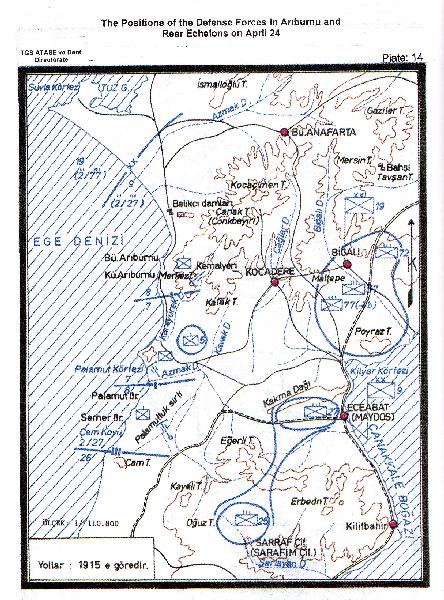
a. The Reconnaissance and Security Formations of the 9th Division on the Shoreline (Plate: 14)
As a result of Liman von Sanders's evaluating the actual landing sites as secondary to the Anatolian side, the defense of the 35 km shoreline extending from Azmak Creek, in the north of Ariburnu, to Seddulbahir was left to the power of the 9th Division.
According to the plan devised a battalion affiliated to the 29th Regiment was positioned in the northern sector of the division's area of responsibility. Some units of the 29th Regiment were scattered along the 12 km shoreline between Azmak and Camtepe. The main force was kept intact in the western sector of Eceabat.
The commander of the battalion considering the importance of the Kabatepe shoreline, as it provided an appropriate landing ground, had rightly positioned his reserve forces to 1.5 km to the east of Kabatepe.
A battalion and a company affiliated to the 26th Regiment were reconnoitring the shoreline between Kumtepe and Zigindere, the reinforced 3rd Battalion was positioned in the Seddulbahir forts between Tekeburnu and Morto Port; the 2nd Battalion, on the other hand, was positioned in Kanlidere. (Plate: 14)
The 25th Regiment that was reinforced with the inclusion of an artillery company was being kept intact, in the environs of the Sarafim Farm, to be used against the expected landings on the Kabatepe and Seddulbahir regions.
As for the 19th Division, Staff Lt. Col. Mustafa Kemal (ATATURK) who was in charge of the division was positioned as reserves in the environs of Bigali and Maltepe. (Plate: 14)
The division was given rather hard and peculiar task of defending the area against landings to be launched from Saros, Anatolian shores, and from the southern sector of the peninsula.
[Click on plate for larger version.]
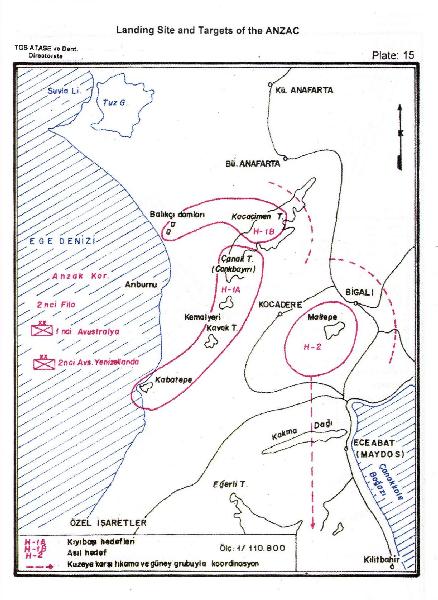
b. The Landing Plan of the ANZAC
(Plate: 15)
In General Hamilton's plan the ANZAC troops, consisted of two corps of Australians and New Zealanders, and the 2nd Contingency Fleet were given the task of landing in the Ariburnu region.
[Click on plate for larger version.]
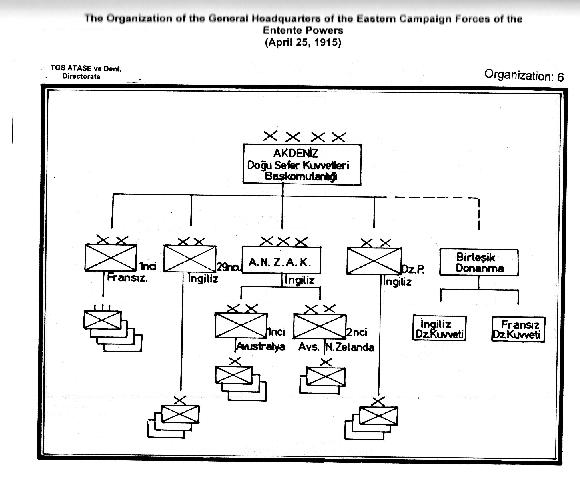
(Organization: 6).
For an effective surprise landing the first landing was to be performed during the night. The whole corps would advance forward rapidly, paralyze the defense lines, then seize the hills dominating the strait, and marching over to Eceabat line would protect the northern flank of the forces landing on Seddulbahir region.
The plan was also suggested the breaking of the connection of the Turkish Forces with the shoreline; and the issuing of further orders from the General Headquarters for an attack on the Kilitbahir Plateau.
The main characteristic of the plan. was that it was a reflection of the despising and optimistic attitude of the English, as it did not give importance to the factors like range, time, topology, and the strength and the willpower of the defense units. Nevertheless, the realities of the battlefield would eventually clarify the reasons of disappointments.
2. Ariburnu Landings of April 25, 1915, and the First Phase of the Battles on the Shore
a. The Beginning of the Landings landing site on April 25, 1915, by 01:30.
The first wave of attack directed towards Kabatepe was launched at 03:00 by a force of 1500 soldiers.
However, an hour later they have realized that they were drifted north and landed on the shores of Ariburnu instead of Kabatepe shores.
[Click on plate for larger version.]
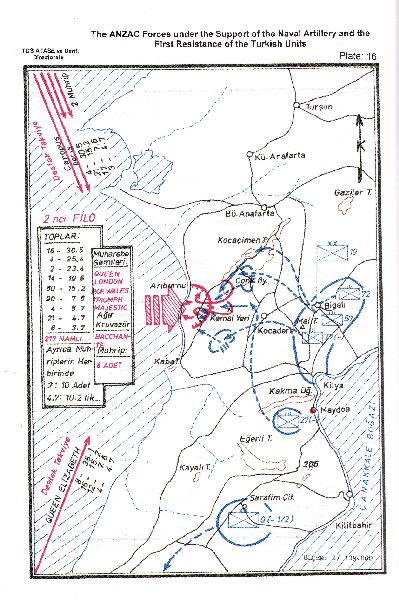
b. The First Phase of the Shore Battles and the Intervention of
Staff Lt. Col. Mustafa Kemal, the Commander of the 19th Division, the Landings and the Combats Before Noon (Plate: 16)
The English who landed on the shores of Ariburnu, instead of Kabatepe to their dismay, met with the heavy fire of a small Turkish unit composed of two squads.
The ANZAC troops with the shock of not surprising the Turks could hardly took refuge in the slopes of Ariburnu in utter disorder.
This small Turkish unit continued its resistance despite their being surrounded on both sides, and kept their positions in the Haintepe against the landing ANZAC troops. Only the squad leader and a few soldiers were saved.
Meanwhile, the 3rd platoon of the 8th Company, positioned in the upper ridge, suppressed the English landings with heavy flank fire, following the sunrise the batteries positioned on the ridges of Kabatepe and Palamut started to fire.
The clashes between a handful of Mehmedjiks and two battalions of ANZAC troops were intensifying in Ariburnu by 05:00. While the English battleships were bombarding the area between line Palamutluk ridges - Topgu ridges- Conkbayirf and the shore, the landings intensified and the 3rd Australian Brigade took its positions on the Ariburnu shoreline as of the early hours of the day.
Although the strong ANZAC troops that threw over the resisting weak security forces captured Kanlisirt, the intensive resistance of the Turkish company and the battery positioned on Kabatepe forced them to stop. However, as the time passed by, the weak Turkish units fighting immolatingly, despite their heavy losses, had to withdraw in front of the superior ANZAC forces. There remained no infantry units in Ariburnu or on the ridges in the rear echelons. The English who managed to land almost a division on the site was left unconfined to march over the direction of Conckbayiri.
In the meantime, an ANZAC battalion marching over the Balikci ports was stopped by a decisive resistance of a platoon affiliated to the 8th Company.
The same platoon that managed to stop the landing of an Australian company, and resisted the following attacks finally gave many casualties as the clashes around him were continuing drastically. The superior ANZAC troops managed to seize the Cesarettepe and started reaching over the dominant terrain. The platoon decided to cross over the southern ridges of Conkbayiri and continue resistance. The decision taken excels praise, when the topology, the general condition of the platoon and the complexity of the clashes are considered carefully.
The 27th Regiment that returned from a night exercise, 24/25 April, tired was woken up with the sound of the first gunshot. The commander Lt. Col. Sefik (Col. Aker) alarms his regiment at once.
The commander was of the opinion that the ANZAC troops were to be stopped before the security lines on the shore are broken.
The Commander of the 9th Division, finding the argument consistent issued the following order at 05:00.
"The English are landing their troops on the shores of Ariburnu and Kabatepe. The 27th Regiment taking the mountain artillery positioned on Camburnu under its command should move towards Kabatepe."
Although it may be asserted that the Commander of the 9th Division was hesitant and late in issuing the orders, when the general position and the scope of its area of responsibility are considered carefully it becomes evident that he needed time for the clarification of the situation.
The 27th Regiment set out upon receiving the orders immediately. Information received by phone stated that the ANZAC troops landed two battalions on the shores of Ariburnu, there were severe clashes in the region, the landings were continuing ceaselessly, and that the ANZAC troops seized Kanlisirt, Kirmizisirt, and the other ridges in the northern sector of the region. When the regiment arrived in the environs of Kemalyeri, they have heard the gunshots from Conkbayiri; and observed that the mobile Turkish units positioned on the Duztepe - Conkbayiri axis were trying to delay ANZAC actions.
The Commander of the 27th Regiment, who did not want the spreading and marching of the ANZAC troops over a wider area decided to launch an attack on the Kemalyeri - Merkeztepe line. After a short preparation he launched the attack by 06:00.
Meanwhile, the 9th Division informed that the 57th Regiment of the 19th Division was moved to Kocacimen, and ordered the 27th Regiment to establish contact with the 19th Division.
The attacks of the 27th Regiment had intensified and the ANZAC troops in the Karayurek Creek had been destroyed thoroughly. The moving of the units of the 19th Division towards Conkbayiri was a gratifying incident. Thus the English landings were curbed from the north as well.
There was an interesting moment during the attack of the 27th Regiment. "The Mehmedjiks who were making their way in a dense heath changed their dirty clothes with clean ones, and thus prepared themselves spiritually for the highest rank possible: martyrdom." This in fact was the affirmation of how Mehmedjik was respectful to religious faith, and their deeming the necessity of being clean as they were dying immolatingly for their country.
The Commander of the 27th Regiment sending his report on the position of the ANZAC troops and his plan of attack asked Mustafa Kemal, the Commander of the 19th Division, who had launched an attack on Conkbayiri, to coordinate the maneuvers.
The development of the maneuvers changed the fate of the peninsula as Staff Lt. Col. Mustafa Kemal took the initiatives in his hands at a moment when the critical situation extended as far as Conkbayiri from his own encampments.
Mustafa Kemal upon receiving reports from the 77th Regiment, in Maltepe, and from the 9th Division pertaining to the landings and intensive bombardment of the region alarmed his division. Ordered the cavalry company to reconnoitre the Kocacimen sector, which was the key point of the region, and to resist the enemy till the end if need be.
Actually Kocacimen and Conkbayiri nearby were the most dominant hills in the region. If they were to be lost, the defense of the strait would have been put to risk.
Upon not receiving of orders from the army, Staff Lt. Col. Mustafa Kemal taking all the initiative in his hands, leaving his two regiments and his Chief of Staff in Bigali, ordered the 57th Regiment under his command to get ready for an operation.
Thus he was not only positioning his troops in the key points of the region before the English, but also was giving the commander of the army the opportunity to use the reserve troops wherever he deemed necessary. The Commander of the 19th Division informing the 3rd Corps about the situation directs the 57th Regiment towards Kocacimen at 08:00. The Regiment is given a rest for 10 minutes (Plate: 16).
As soon the Commander arrives Conkbayiri he observes the approaching ANZAC troops and comes face to face with the withdrawing Turkish units. It was a highly critical situation. He orders the withdrawing troops (those who survived the attacks in the Balikci ports) decisively:
"Why are you withdrawing? One does not yield in front of the enemy; one does fight with the enemy. If you are out of ammunition you have your bayonets. Fix bayonets, take your positions!"
Staff Lt. Col. Mustafa Kemal's taking the command just on time showed its effect immediately, as the ANZAC troops were stunned by the positioning troops, and the ANZAC troops took shelter. Thus, very precious time was gained, and the first echelons of the 57th Regiment arrived the scene marching, and held one of the key points of the region, Conkbayiri hill, before the English arrived.
This event is immediately followed by a short order to the 57th Regiment to attack on the hill with elevation 261. Mustafa Kemal in his order says,
"I am ordering you to die! There will be new forces and new commanders to reach and assume your positions while you are dying."
Upon hearing this decisive order the Regiment attacks on the ANZAC troops despite intensive and hellish fire from the fleet. Soon Mehmedjiks destroyed the ANZAC units and achieve their target.
General Hamilton describes the Turkish attack saying,
"The pregnant mountains are continuing to give birth to Turks. They were pressurizing our positions in the highest and most central sectors like a series of unending waves."
Upon receiving information from the 9th Division that the 27th Regiment was engaged in a battle with the English on the west of Kemalyeri, Mustafa Kemal ordered 27th Regiment "to continue its attacks on the right flank of the English" as he was already engaged in battle with the 57th Regiment on the left flank of the English, and wanted the Commander of the 27th Regiment to get in touch with him.
Thus, the dense atmosphere prevailing Ariburnu was temporarily recovered as the English landings were engulfed tightly from the both flanks. The commander of the 19th Division who was not satisfied with the acquired status, ordered 72nd and 77th Regiments, he had left behind in Bigali region, to complete their preparations for marching over Ariburnu in no time.
The ANZAC troops had to withdraw from the hill with elevation 261. Thus, under the prevailing developments in the Conkbayiri region the danger was delayed and a very critical moment was overcome.
An English writer writes the following for the Ariburnu attacks of the day:
"The worst encounter of the operations for the Entente Powers was the presence of this intelligent small ranking officer (Staff Lt. Col. Mustafa Kemal) at the right moment at the very right spot (Conkbayiri). Because, otherwise the ANZAC troops could have captured Conkbayiri that day, and the future of the battle might have been determined at that moment."
The Commander of the 19th Division finds the opportunity to complain and convey his previous suggestions he made to the army for pushing the ANZAC troops in Ariburnu back into the sea by all the forces of the division before their landing, that were somehow turned down, to the command echelons of the 3rd Corps on his meeting with the Commander of the 3rd Corps Esat Pasha who landed in Maltepe via Kilye Port.
His suggestions were found to be reasonable and timely by Esat Pasha. He appoints Staff Lt. Col. Mustafa Kemal as the Commander of the Anafartalar Front. Moreover, Esat Pasha orders the pushing of the ANZAC troops back into the sea by taking the 27th Infantry Regiment under the command of the division.
Upon receiving of orders the Commander of the 19th Division issues his orders saying, "the Division, including the 27th Regiment will attack on the withdrawing English." To this end he orders the joining of the 77th Regiment in the attack on the left flank of the 27th Regiment, and he himself would march over Conkbayiri with the 72nd Regiment to support and reinforce the 57th Regiment. (Plate: 16)
Thus preparations for an attack had begun with four regiments. However, as the 72nd Regiment arrived Conkbayiri by 16:30 the attack was delayed for the next day.
Under the light of the circumstances discussed above, it would not be just to criticize the 19th Division's not attacking in the morning of April 25 with its three regiments. Yet, Staff Lt. Col. Mustafa Kemal had managed to enclose the English landings into a small region in Ariburnu with his initiative without waiting for orders to come.

[Click on plate for larger version.]
The Battles in the Afternoon
(Plate: 17)
The 1st Australian Division that had completed its landings was fighting with its two brigades, and the third brigade was being kept as reserve.
The landings of the 2nd Australia and New Zealand Division were accelerated.
The attacks of the 27th and the 77th Turkish Regiments were developing steadily despite the intensive bombardment of the English Fleet. The attack of the 57th Regiment on the left flank from Conkbayiri was occasionally coming to a stop in the face of the effective oblique fire of the fleet.
Meanwhile, the 57th Regiment that was reinforced with the coming of a battalion affiliated to the 72nd Regiment takes the Duztepe Ridges on Conkbayiri back from the enemy after a decisive man-to-man combat. As the night arrives the clashes come to an end.
The 27th Regiment that was advancing from the left flank was marching over Kirmizisirt and Kanlisirt. The clashes occurred here were also severe; in front of the bayonet attack launched by the regiment with the echoing of the prayer "Allah, Allah" the ANZAC troops were dissolved and withdrew. Thus the hills known as Kanlisirt were taken back.
On the other hand, the attacks of the 77th Regiment, that was responsible from extending the left flank of the attack launched by the 27th Regiment, could not have been expanded as desired. Although the Regiment captured the Albayrak Ridge it could not go any further and lost contact with the 27th Regiment.
To sum up, as a result of the successful attacks of the 27th and the 57th Regiments against one-and-a-half division of the ANZAC forces, the eastern sector of the hill with an elevation of 180, eastern sector of the Kanlisirt, Kanlisirt, and the Albayrak ridge were taken back from the enemy; thus, all the plans of the English were rendered useless.
They were way far back from their imaginary targets: western ridges of Kabatepe - Kocadere, Conkbayiri - Kocacimen line.
A strong and big ANZAC was confined in a narrow strip on the shore tightly.
The forward echelons of the 1st Australian Division also suffered from heavy losses. They were so demoralized that the dispersed groups and the wounded coming from the fronts all flocked on the beach.
General Birdwood who was amazed at the intimidated faces of the exhausted troops could not help writing General Hamilton that "all the troops will have to retreat." The situation was extremely serious.
The pushing of a force equivalent to a corps under the supporting umbrella of a fleet by the 19th Division back to the sea was a genuine fiasco for the English landing on Ariburnu Front and for the general lay out of the plans they had devised.
General Hamilton, who called for a meeting aboard the headquarters ship at 23:00, off the coast of Ariburnu, discussed withdrawal at length and upon learning that the 2nd Fleet was not ready for withdrawal they abandoned the plans.
Extremely strange lines were taking place in the order issued by General Hamilton after the meeting:
"You have survived the most difficult part of the mission. Your duty, from now on, until our security is established, is to dig trenches, dig trenches, and dig trenches."
As a matter of fact the order issued by the Commander-in-Chief had no importance as a tactical decision; but the idea the order relied on was reflecting the dilemma into which a command and control officer had fallen.
He was in fact leaving the developments in to their natural course.
It was the 19th Division, under the command of Staff Lt. Col. Mustafa Kemal, which pushed General Hamilton into such a dilemma. Only the 27th and the 57th Regiments, composed only of five battalions, of this division did not gave the English forces a chance to penetrate in the inner regions. The 19th Division successfully managed to push them back to their landing grounds and experience extremely fearful moments.

[Click on plate for larger version.]
The Night Attack of the 19th Division, April 25/26
(Plate: 18)
The Commander of the 19th Division decided to launch another attack on the English, who were stuck in the environs of Ariburnu, and push them back into the sea before they recovered from the effects of the daytime attacks.
The attack came to a halt after the taking of the Kilictepe, the eastern sector of the hill with an elevation of 180 m, eastern half of Kirmizisirt, Kanlisirt, Albayrak ridges where the units lost many lives. However, the fatigued 27th and the 57th Regiments were eager to continue the battle as their morale was amplified by the success of the day.
The attack had begun in accordance with the plan devised earlier. The 57th Regiment recaptured the hill with an elevation of 180 m and they started to march over the Cesarettepe, and Sercetepe; however, the irregular formation of the terrain weakened the control of the troops that were scattered in the dense heath and the operation came to a halt. Upon the counterattack of the ANZAC troops, the Regiment had to withdraw back to the hill with an elevation of 180 m.
Although, definite developments have been achieved in the 27th Regiment's attacks and the whole of Kirmizitepe was seized, the Kanlisirt was abandoned as an outcome of an event occurred in the southern flank. This event stemmed from the deserting Arabian soldiers, who formed the most of the troops of the 77th Regiment. They had hidden themselves in the dense heath and upon the intensive bombardment of the English battleships they fled the battleground.
In fact, many Turkish soldiers and few young Arab soldiers had fought against the English bravely side by side.
The darkness of the night, the unending bombardment of the fleet, irregular formation of the terrain had increased the dispersion of the troops. The control was lost; everything was out of control. The random firing of the ANZAC troops and the deserter Arabs had adversely affected the units fighting in the southern sector of the 27th Regiment; and the beginning of the desertions have rendered this night attack useless.
For short, the attacks that evolved successfully during the daytime, April 25, could not have been repeated as a result of the crisis stemmed from the dissolving of the 77th Regiment in the evening of April 25/26; the 19th Division was thus put at risk.
3. The Battles That Took Place on the Shores of Ariburnu Until the End of April 1915
a. Local Maneuvers of April 26
After the withdrawal of the 77th Regiment, which was dissolved during the night attack in the evening of April 25/26, rendered the positioning of the units of the 27th Regiment who had captured forward echelons of the Kanlisirt tactically difficult, and even more it was impossible for them to stay there.
Yet, the battalion's withdrawal from this ridge on its own, and its withdrawal to the inner regions rather than the eastern sector was not appropriate at all.
The dissolving of the 77th Regiment had severely damaged the 19th Division's plans. Staff Lt. Col. Mustafa Kemal, upon hearing the dissolvings in the southern flank early in the morning, ordered the positioning of the 72nd Regiment to the weakened flank immediately, recovering of the 77th Regiment, and ordered the taking of all the measures to stop the deserters. The Chief-of-Staff of the division was sent to the 3rd Corps to ask for reinforcements. Upon realizing the late arrival of the two regiments of the Corps, the units were ordered to maintain their positions with extreme patience and vigor.
The English who started bombarding the Turkish positions heavily with their strong fleet in the morning of April 26, concentrated their fires especially on the 57th Regiment; and although they launched an attack on the western flank of the regiment, they were driven back with strong retaliation.
Likewise the Turkish units have also managed to maintain their positions against the English's attacks on the left flanks as well as on the positions in the center patiently and vigorously.
Staff Lt. Col. Mustafa Kemal says,
"It was an important day gained by our officers' and commanders' courage and vigor. I can say that my worst day was April 26. Because the force I had against five English brigades was composed of the 57th Regiment that suffered heavy losses during the unforgettable decisive attack on April 25, 27th and 72nd Regiments that were composed of two battalions each, and of the 77th Regiment that was incapacitated. In fact, this was the force that formed the backbone of the Ariburnu Front victory, broke down the courage of the English, and ruined their plans of occupation on April 25."
On the other hand, the only thing the English feared was that they did not know how to cope up with the expected Turkish attacks to be realized on April 26 with the inclusion of new forces. The ANZAC troops spent the night of April 25/26 under such a condition, and the only thing they could do was to minimize the effects of the Turkish attacks by small clashes.
Consequently, they could not have advanced through the gap created by the dissolving 77th Regiment, and seized Kanlisirt after observing it in extreme hesitation for along time.
The general situation of the 19th Division in the evening of April 26 was as follows:
The 57th Regiment positioned on the Duztepe-Inebayir line was blockading the sector leading to Conkbayiri; the 27th Regiment positioned on the line extending from Edirne Ridge to the eastern ridges of Karayurek Creek in the middle thus blockading region extending between Maltepe and Eceabat; the 72nd Regiment positioned in the southern flank was keeping the English flanks under pressure.
A unit, equivalent of a battalion, form the 27th Regiment was reconnoitering the Kabatepe shores; two companies affiliated to 77th Regiment were covering the Azmakdere - Ece Part sector; two companies of the 72nd Regiment were kept as reserve force; and the Division Headquarters was positioned in Kemalyeri. There were no serious clashes between the forces, with the exceptions of heavy bombardment of the fleet and minor clashes occurred in various places, on April 26.
Further Reading:
Lt-Col. Sefik Aker Account of the 27th Infantry Regiment at Anzac
The Battle of Anzac Cove, Gallipoli, 25 April 1915
The Battle of Anzac Cove, Gallipoli, 25 April 1915, AIF, Roll of Honour
Battles where Australians fought, 1899-1920
Citation: The Battle of Anzac Cove, Gallipoli, 25 April 1915, Turkish Official War History Account
