


Topic: BatzP - Rafa
The Battle of Rafa
Sinai, 9 January 1917
Official British War History Account
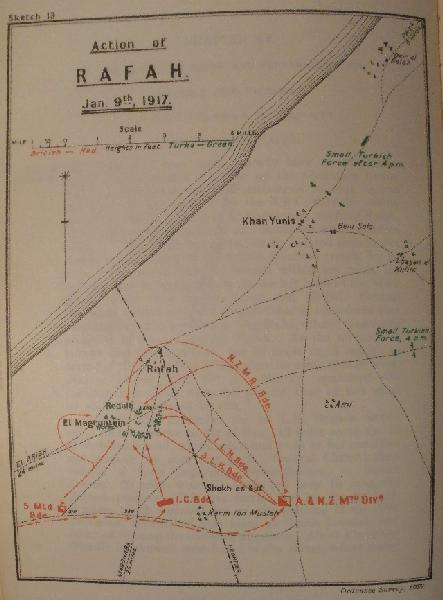
Map of Rafa accompanying the Official British War History Account
[Click on map for larger version.]
The following is an extract from Falls, C.; and, MacMunn, G., Military operations: Egypt and Palestine, (London 1928), pp. 262 - 271, about the role of the Allied forces at the Battle of Rafa, Sinai, 9 January 1917.
CHAPTER XV.
THE ACTION OF RAFAH AND PREPARATIONS FOR ADVANCE INTO PALESTINE.
THE ACTION OF RAFAH.
THE Turks had been dealt a heavy blow at Magdhaba, but it was impossible to follow up the advantage immediately. The Force was still condemned to wait on rail and pipe. It was reported by the R.F.C. that the enemy was entrenching a position at El Magruntein, south of Rafah, which was occupied by about two battalions with mountain artillery. The Turks had again left an isolated detachment within striking reach of the British mounted troops, for no other encampment could be located within ten miles, the next position being apparently on the left bank of the Wadi Ghuzze about Weli Sheikh Nuran and Shellal. General Chetwode, commanding the Desert Column, considered that a cutting-out raid, like that at Magdhaba, offered reasonable prospects of success against Rafah. As the advance of railway and pipe-line could not be made rapid enough to permit of the occupation of this place for some time to come, General Dobell and Sir A. Murray concurred-the Commander-in-Chief with the proviso that at this stage no undue risks should be run.
On the 28th December the 1st L.H. Brigade carried out a reconnaissance to Bir el Burj, 12 miles along the El Arish-Rafah road, which was found to be in fair condition and suitable for cars and guns. General Chauvel then ordered a more important reconnaissance, to Sheikh Zowaiid, 20 miles from El Arish and only 10 from the Turkish position. This was carried out by the 1st L.H. Brigade, which marched out on the morning of the 30th December, bivouacked that night at Sheikh Zowaiid, and returned to camp the following afternoon. About a hundred friendly inhabitants were found in the village, where water
262
was plentiful. Some cultivation, it has been stated, had been seen about El Arish, but the brigade brought back glad tidings of still better country, with rolling stretches of pasture and young crops, brightly starred with poppies and other wild-flowers. A small advanced guard, pushing forward to rising ground beyond Sheikh Zowaiid, had seen great activity at El Magruntein.
For a few days it was necessary to send back to railhead the N.Z.M.R. and 3rd L.H. Brigades to save transport. They returned to El Arish on the 5th January. The difficulty regarding supplies at El Arish was not yet over, though nearing its end. On the 4th January the first construction train reached the town, but it was to be some time before railhead, with the large station and sidings necessary, could be established there. The landing of supplies from the sea, on an exposed beach and in squally winter weather, was both slow and dangerous. The arrangements made by Vice -Admiral Sir R. Wemyss had, however, resulted in the first consignment of stores being put ashore in boats and lighters on the 23rd December and in the landing of 1,500 tons in the ensuing fortnight.
While the infantry was entrenching El Arish plans were being made for the raid against the enemy's position at Rafah. The troops which had captured Magdhaba, that is the A. & N.Z. Mounted Division (less 2nd L.H. Brigade) and Camel Brigade, were to be employed in this operation, and in addition the 5th Mounted Brigade and No. 7 Light Car Patrol. General Chetwode decided to command the raid in person. On the 7th January his orders were issued, with instructions for the concentration of the force at Sheikh Zowaiid.
At 4 p.m. on the 8th January the force moved out from El Arish, the 5th Mounted Brigade leading. After the Yeomanry had enveloped Sheikh Zowaiid, the column advanced and bivouacked about 10 p.m., the main body closing up to the cross roads west of the village.
At 1 a.m. on the 9th January the advance was resumed, 9 Jan. all wheeled vehicles except the guns remaining at Sheikh Zowaiid. The A. & N.Z. Mounted Division, followed by the Camel Brigade, moved along the track to Karm Ibn Musleh, the 1st L.H. Brigade as advanced guard. The 5th
264
Mounted Brigade, leaving two troops of the Worcester Yeomanry for the protection of Sheikh Zowaiid, moved off by the same route at 2.3 a.m., except for a squadron of the Worcester Yeomanry, which followed the historic El Arish-Rafah road. Half a mile outside Sheikh Zowaiid a Bedouin camel patrol was overrun by the advanced guard and fortunately captured to a man. The R.F.C. had during the previous afternoon prevented observation of the column's advance by Turkish aircraft, so that the enemy was still in ignorance of the impending attack.
At 3.30 a.m. the column reached Point 250, the road junction 4 1/2 miles south of Rafah, halted for an hour, then continued the advance eastward. The left flank guard of the 3rd L.H. Brigade captured two Turks, though not before they had put up a flare. The signal was not repeated elsewhere and probably was not seen.
At 5.15 a.m., the N.Z.M.R. Brigade, led by Major C. L. Barlow, an intelligence officer who knew the country well, and a native guide, was detached from the column to round up the native encampments about Karm Ibn Musleh and Shokh es Sufi. The population consisted of old men, women and children, with no arms but a few swords and revolvers. They gave a warning, however, before the New Zealanders could reach them - the long-drawn Arab " lulu-lu!" which travels a great distance - and as dawn appeared smoke signals went up from one Bedouin camp after another. At 6.15 a.m. the Auckland Regiment crossed the frontier, a dramatic and significant moment in the course of the campaign. The action that followed was to be fought in two continents, Asia and Africa.
Br.-General Chaytor reported to General Chauvel that there was a good position of assembly for the division in the neighbourhood of Karm Ibn Musleh. General Chauvel then moved up to this spot, dropping the Camel Brigade on the way. By 6.45 a.m. the 1st and 3rd L.H. Brigades and the artillery were just south of Karm Ibn Musleh, thus cutting off the retreat of the enemy to the south-east; the NZ.M.R. Brigade was rather over a mile to the north, and the Camel Brigade three-quarters of a mile to the west.
265
The 5th Mounted Brigade and General Chetwode's headquarters remained at Point 210, 41/2 miles west of Karm Ibn Musleh. A patrol of the Wellington Regiment was sent out to cut the telegraph line running east from Rafah in the direction of Shellal.
General Chauvel and his C.R.A. now reconnoitred the Turkish position. From Karm Ibn Musleh, where the ground was slightly higher, it was clearly visible and proved to be extremely strong. The approaches were devoid of cover and the immediate neighbourhood of the entrenchments almost a glacis. In the centre was a formidable keep, known as " the Reduit," on a smooth grassy knoll. South of this, in a rough semi-circle, was a series of three systems of works, known as "A," "B," and "C," the " B " works forming a first line of defence against advance from the south. The works were well dug and excellently sited, with a perfect field of fire up to 2,000 yards in almost every direction. But they were not wired, and this fact gave the attackers a chance of success. Desert Column headquarters sent a message to General Chauvel that a deliberate artillery preparation was necessary in view of the position's strength. General Chetwode announced that when targets had been selected he would cross the fire of the divisional artillery (consisting of the Leicester, Inverness and Somerset Batteries R.H.A.) with that of " B" Battery H.A.C., attached to the 5th Mounted Brigade, to obtain a greater concentration of fire.
At 8.30 General Chauvel, having received from the air reports that the roads east and south-east of Rafah were clear but for a few patrols, issued his orders. The N.Z.M.R. and 1st L.H. Brigades were to attack the " C," or eastern, group of works, and the Camel Brigade the " B " group. Artillery preparation was to begin at 9.30 a.m., and continue for half an hour, at the end of which time the attack was to commence. The 3rd L.H. Brigade was to remain in divisional reserve. General Chetwode was holding the 5th Mounted Brigade in column reserve.
By 9.45 a.m. the attacking troops had approached mounted to within 2,000 yards of the entrenchments. As they advanced, a camel train with an infantry escort was
266
observed leaving Rafah on the Khan Yunis road. The Canterbury Regiment headed straight for Rafah itself and quickly captured the village, with 45 prisoners - Germans, Turks and armed Bedouin - and a number of camels, horses and mules. The regiment, with the Auckland on its left and the Wellington in support (the latter after despatching two troops to the northward to observe Khan Yunis), then advanced dismounted due south against the ridge at Point 265. Brigade headquarters advanced to the boundary pillar a mile south of Rafah, whence there was an excellent view of the greater part of the Turkish position. The 1st L.H. Brigade advanced dismounted from the east against the " C " group of works, but was able to make little progress against shrapnel and heavy machine-gun fire.
On the south, the attack of the Camel Brigade had been launched, the 1st Battalion being directed on B4, the 3rd Battalion being in support and the 2nd in reserve. At 10.30 a.m. the 5th Mounted Brigade, ordered by General Chetwode to demonstrate against the works further west, moved off from Point 210, Warwick Yeomanry on right and Gloucester on left. The remaining squadron of the Worcester (two troops having been left, as recorded, at Sheikh Zowaiid, one detached to watch the left flank, while one squadron was acting as escort to " B " Battery H.A.C.) followed in reserve. On arrival upon the plateau, 2,500 yards from the enemy's position, the Warwick Yeomanry was ordered to engage Works B 1 and B2, and the Gloucester sent to the left along the edge of the sand-dunes (which here ran 2 miles inland) to attack the right of Al, the most westerly of the works. The troops dismounted and went into action at a range of 2,000 yards, at once coming under the fire of machine guns and two guns firing shrapnel.
All exits to the north being now stopped by the New Zealanders, orders were issued for the reserves to be thrown in and the attack pressed home. The 3rd L.H. Brigade (less 8th A.L.H., left with divisional headquarters) was to attack C3 and C4 on the left of the 1st L.H. Brigade and in touch with it. Br.-General Cot, commanding the 1st L.H. Brigade, was to reinforce his line and push home an attack against C4 and C5, keeping touch with the N.Z.M.R. Brigade on his right. The Camel Brigade was to close with its original objective, the " B " trenches.
267
At 11 a.m. the position of the troops, from right to left, follows: - Canterbury and Auckland Rifles, two squadrons 1st A.L.H., one squadron 2nd A.L.H., 3rd A.L.H., 10th A.L.H., 1st Battalion Imperial Camel Corps, Warwick and Gloucester Yeomanry. The Inverness Battery was covering the NZMR Brigade, the Leicester and Somerset batteries thee two Australian brigades, the Hong Kong Battery the Camel Brigade; while the H.A.C. battery shelled the "C" works from a point three-quarters of a mile north east from Point 210.
By 12.15 p.m. the N.Z.M.R. Brigade (the Wellington now having moved up between the other two regiments) was within 600 yards of the enemy's position, and shortly afterwards its right found touch with the left of the 5th Mounted Brigade, the cordon of troops round the enemy's fortifications being thus complete. The 2nd Battalion of the Camel Brigade was thrown in to thicken the line of the 1st and prolong its right. The batteries pushed forward boldly over the open ground, "B" Battery H.A.C. advancing 1,500 yards from its former position to within about the same distance from the enemy and switching its fire from the "C" works to support the attack of the 5th mounted Brigade. The 7th Light Car Patrol had been put at Br.-General Wiggin's disposal and he had ordered it to support the left of his line, which was in trouble from Turkish machine-gun fire. The cars were boldly and smartly handled. They bumped across country till they reached the Rafah road, rushed along it under fire past the flank of the Turkish position to a sunken portion which gave them just sufficient cover, and there came into action at a range of 1,600 yards, bringing oblique fire to bear on Al and A2.
Step by step, during the next two hours, the troops from all sides pressed in upon the position. But the very slight undulations of the ground gave hardly any cover, and every yard seemed to be beaten by machine-gun fire. The advance became slower and slower. At 2.30 p.m. General Chauvel called for a fresh effort against the Reduit (by the N.Z.M.R. Brigade) and the "C" works at 3.30 p.m.; the artillery keeping up an intense fire on them till that hour.' In the interval he received somewhat serious news from the New
268
Zealanders. A patrol had caught in the open near Rafah a Turkish officer and some Germans, who had stated on interrogation that the 160th Regiment had left Shellal to relieve the garrison of Rafah as soon as the action had begun. Confirmation of the report quickly followed, for the New Zealand patrols saw troops in artillery formation, about two battalions, advancing over the ridges west of Shellal. At 4.15pm the flank guard in the direction of Khan Yunis also reported that a force of about 500 was advancing on Rafah. Messages received by General Chauvel from his own formations all indicated that little or no progress was being made. The situation of the column was now exceedingly difficult.
At 4.p.m. General Chauvel had a conversation on telephone with General Chetwode who decided that, owing to the advance of the Turkish reinforcements and the poor prospect of capturing the position quickly enough, it might be necessary to break off the action and that preparatory arrangements should be made to do so. Orders to this effect were actually written by the staff of the A. & N.Z. Mounted Division, but before they were issued the turning point of the action had come and the General himself caught sight of the New Zealanders topping the green hill at Point 265.
At the moment when he was speaking to the G.O.C. Desert Column, the N.Z.M.R. Brigade was being launched to the final assault on the Reduit. The troops swept up the slope with the bayonet, and after a few minutes' fighting the central position was in their hands.
An attack against C5 was at once organized, but before the advancing New Zealanders reached it the Turks in the work stood up and raised their hands. The 1st L.H. Brigade, which had previously been forced by the enemy's fire to give some ground, followed up the success of the New Zealanders on its right by again advancing and capturing
269
the remainder of the enemy's position on its front, while the east 3rd L.H. Brigade was equally successful. To the south the Camel Brigade, which had thrown its 3rd Battalion into the attack, launched an assault on the "B" group of works. The troops had in most cases worked their way to within assaulting distance by crawling, and were unaware of the exact position of the enemy's front line. Fortunately, when they were within 200 yards of this the Turks fixed bayonets and let them be seen above the parapet, thus marking their position for the attackers. The last 40 yards were covered in a swift rush, the men cheering loudly. As they approached the trench, white flags appeared. A short fight followed with those who would not surrender, and B2, the central work of the system, was captured by 4.50 p.m. It was one of the most strongly held, and the Camel Brigade captured 5 officers and 214 other ranks. Shortly afterwards B1 was captured by the Warwick Yeomanry, the total number of prisoners captured in the "B" works being 320. Br.-General Wiggin had meanwhile switched the bulk of his force from the "B" works to the "A," and the latter were evacuated by the enemy. Some of the Turks from these works were captured by the Australians, but a number probably escaped in the dusk.
The action was over and it was urgently necessary to withdraw as swiftly as possible. Detachments from the Wellington Regiment were already engaged at long range with parties of the enemy advancing from Shellal and Khan Yunis. Arrangements were made to collect the wounded without delay and teams hastily despatched to bring in a captured mountain battery. For the former purpose the 3rd L.H. Field Ambulance, covered by a regiment of the 3rd L.H. Brigade, was left behind. The remainder of the column marched back to Sheikh Zowaiid, where it bivouacked for the rest of the night.
It was learnt from aeroplane reports that the enemy had made no attempt to reoccupy Rafah, so on the morning of the 10th January a squadron of the 3rd L.H. Brigade and the 7th Light Car Patrol returned to the battlefield with all available limbered wagons and loaded these up with captured material.' The 8th A.L.H., which remained all night at
370
Rafah, had a brush with Turkish cavalry and camelry east of Shokh es Sufi at 7 a.m., drove them off, and captured 14 prisoners.
The captures in this brilliant action were 35 officers (including the Turkish commander and one German) and 1,438 other ranks (including 10 Germans) unwounded, and 162 wounded; a total of 1,635. It was estimated that 200 of the enemy were killed. The bulk of the prisoners belonged to the 31st Regiment (3rd Division), two battalions of which were annihilated. Four mountain guns, 4 machine guns, 578 riles, 4 considerable quantity of ammunition and other material, 83 camels, 54 mules and horses were also taken. The British losses were 487. The total was more than thrice that incurred at Magdhaba, but this had been a more difficult operation, conducted against a stronger position and troops of better quality, and the casualties cannot be considered high. The enemy had defended his trenches with stubbornness and bravery. Even when they were under the heaviest tire, men could be seen exposing themselves to take deliberate aim. But the marksmanship of the Turks, as at Magdhaba, was poor. General Chetwode stated in his report to Sir C. Dobell that, excellent as was the work of all the troops engaged, the part played by the New Zealand Brigade was outstanding. That the action terminated favourably was largely due to its dashing assault upon the Reduit, for from that moment Turkish resistance began to crack.
The enemy had not learned aright the lesson of the disaster which had befallen his detachment at Magdhaba. It can only be supposed that he considered his position at Rafah to be better and more easily reinforced in case of need. That this view was not altogether ill-founded is shown by the fact that, owing to the arrival of enemy reinforcements and the lack of water - available only within the
271
enemy's position or many miles to the rear - the British at one moment proposed to retire before the fight was won. The margin between success and failure had been slight. The decision to leave wheels behind at Sheikh Zowaiid afterwards appeared to have been unnecessary and certainly increased the column's difficulties. By 1.30 p.m. no less than four of the New Zealand machine guns were out of action for lack of ammunition. Major A. H. Wilkie, quartermaster of the Wellington Regiment, brought up a supply from Sheikh Zowaiid and, hearing that his regiment was calling for ammunition, seized a cable wagon, tipped out the contents, filled it with boxes of S.A.A., and brought it up at a gallop, just in time for the machine guns to come into action to cover the final assault.
Further Reading:
The Battle of Rafa, Sinai, 9 January 1917
The Battle of Rafa, Sinai, 9 January 1917, Roll of Honour
The Palestine Campaign, 1917 - 1918
Battles where Australians fought, 1899-1920
Citation: The Battle of Rafa, Sinai, 9 January 1917, Official British War History Account
Posted by Project Leader
at 12:01 AM EAST
Updated: Saturday, 15 January 2011 7:18 AM EAST
