« March 2008 »
S M T W T F S
1
2 3 4 5 6 7 8
9 10 11 12 13 14 15
16 17 18 19 20 21 22
23 24 25 26 27 28 29
30 31
You are not logged in. Log in


Search the site:


powered by FreeFind
Volunteer with us.

Entries by Topic All topics  
A Latest Site News
A - Using the Site
AAA Volunteers
AAB-Education Centre
AAC-Film Clips
AAC-Photo Albums
AIF & MEF & EEF
AIF - Lighthorse
AIF - ALH - A to Z
AIF - DMC
AIF - DMC - Or Bat
AIF - DMC - Anzac MD
AIF - DMC - Aus MD
AIF - DMC - British
AIF - DMC - BWI
AIF - DMC - French
AIF - DMC - Indian
AIF - DMC - Italian
AIF - DMC - Medical
AIF - DMC - Remounts
AIF - DMC - Scouts
AIF - DMC - Sigs
AIF - DMC - Sigs AirlnS
AIF - DMC - 1 Sig Sqn
AIF - DMC - 2 Sig Sqn
AIF - DMC - Eng
AIF - DMC - Eng 1FSE
AIF - DMC - Eng 2FSE
AIF - DMC - GSR
AIF - 1B - 1 LHB
AIF - 1B - 6 MVS
AIF - 1B - 1 LHMGS
AIF - 1B - 1 Sig Trp
AIF - 1B - 1 LHFA
AIF - 1B - 1 LHR
AIF - 1B - 2 LHR
AIF - 1B - 3 LHR
AIF - 2B - 2 LHB
AIF - 2B - 7 MVS
AIF - 2B - 2 LHFA
AIF - 2B - 2 LHMGS
AIF - 2B - 2 Sig Trp
AIF - 2B - 5 LHR
AIF - 2B - 6 LHR
AIF - 2B - 7 LHR
AIF - 3B - 3 LHB
AIF - 3B - 8 MVS
AIF - 3B - 3 LHB Sigs
AIF - 3B - 3 LHFA
AIF - 3B - 3 LHMGS
AIF - 3B - 3 Sig Trp
AIF - 3B - 8 LHR
AIF - 3B - 9 LHR
AIF - 3B - 10 LHR
AIF - 4B - 4 LHB
AIF - 4B - 4 Sig Trp
AIF - 4B - 9 MVS
AIF - 4B - 4 LHFA
AIF - 4B - 4 LHMGS
AIF - 4B - 4 LHR
AIF - 4B - 11 LHR
AIF - 4B - 12 LHR
AIF - 5B - 5 LHB
AIF - 5B - 10 MVS
AIF - 5B - 5 LHFA
AIF - 5B - 5 Sig Trp
AIF - 5B - ICC
AIF - 5B - 14 LHR
AIF - 5B - 15 LHR
AIF - 5B - 1er Regt
AIF - 5B - 2 NZMGS
AIF - AASC
AIF - Aboriginal LH
AIF - Badges
AIF - Cars
AIF - Chinese LH
AIF - Double Sqns
AIF - Engineers
AIF - Fr - 22 Corps
AIF - Fr - 13 LHR
AIF - Honour Roll
AIF - HQ - 3rd Echelon
AIF - Marching Songs
AIF - Misc Topics
AIF - NZMRB
AIF - NZMRB - AMR
AIF - NZMRB - CMR
AIF - NZMRB - EFT
AIF - NZMRB - NZMFA
AIF - NZMRB - NZMGS
AIF - NZMRB - OMR
AIF - NZMRB - Sig-Trp
AIF - NZMRB - WMR
AIF - Ships
AIF - Ships - Encountr
AIF - Ships - Una
AIF - WFF
AIF - Wireless Sqn
Battles
BatzA - Australia
BatzA - Broken Hill
BatzA - Liverpool
BatzA - Merivale
BatzB - Boer War
BatzB - Bakenlaagte
BatzB - Belmont
BatzB - Bothaville
BatzB - Buffels Hoek
BatzB - Coetzees Drift
BatzB - Diamond Hill
BatzB - Driefontein
BatzB - Elands
BatzB - Graspan
BatzB - Grobelaar
BatzB - Grootvallier
BatzB - Hartebestfontn
BatzB - Houtnek
BatzB - Karee Siding
BatzB - Kimberley
BatzB - Koster River
BatzB - Leeuw Kop
BatzB - Mafeking
BatzB - Magersfontein
BatzB - Modder River
BatzB - Onverwacht
BatzB - Paardeberg
BatzB - Palmietfontein
BatzB - Pink Hill
BatzB - Poplar Grove
BatzB - Rhenoster
BatzB - Sannahs Post
BatzB - Slingersfontn
BatzB - Stinkhoutbm
BatzB - Sunnyside
BatzB - Wilmansrust
BatzB - Wolvekuil
BatzB - Zand River
BatzG - Gallipoli
BatzG - Anzac
BatzG - Aug 1915
BatzG - Baby 700
BatzG - Evacuation
BatzG - Hill 60
BatzG - Hill 971
BatzG - Krithia
BatzG - Lone Pine
BatzG - Nek
BatzJ - Jordan Valley
BatzJ - 1st Amman
BatzJ - 2nd Amman
BatzJ - Abu Tellul
BatzJ - Es Salt
BatzJ - JV Maps
BatzJ - Ziza
BatzM - Mespot
BatzM - Baghdad
BatzM - Ctesiphon
BatzM - Daur
BatzM - Kurna
BatzM - Kut el Amara
BatzM - Ramadi
BatzN - Naval
BatzN - AE1
BatzN - Cocos Is
BatzN - Heligoland
BatzN - Marmara
BatzN - Zeebrugge
BatzN - Zeppelin L43
BatzNG - Bitapaka
BatzO - Other
BatzO - Baku
BatzO - Egypt 1919
BatzO - Emptsa
BatzO - Karawaran
BatzO - Peitang
BatzO - Wassa
BatzP - Palestine
BatzP - 1st Gaza
BatzP - 2nd Gaza
BatzP - 3rd Gaza
BatzP - Aleppo
BatzP - Amwas
BatzP - Ayun Kara
BatzP - Bald Hill
BatzP - Balin
BatzP - Beersheba
BatzP - Berkusieh
BatzP - Damascus
BatzP - El Auja
BatzP - El Buggar
BatzP - El Burj
BatzP - Haifa
BatzP - Huj
BatzP - JB Yakub
BatzP - Kaukab
BatzP - Khan Kusseir
BatzP - Khuweilfe
BatzP - Kuneitra
BatzP - Megiddo
BatzP - Nablus
BatzP - Rafa
BatzP - Sasa
BatzP - Semakh
BatzP - Sheria
BatzP - Surafend
BatzP - Wadi Fara
BatzS - Sinai
BatzS - Bir el Abd
BatzS - El Arish
BatzS - El Mazar
BatzS - El Qatiya
BatzS - Jifjafa
BatzS - Magdhaba
BatzS - Maghara
BatzS - Romani
BatzS - Suez 1915
BatzSe - Senussi
BatzWF - Westn Front
BW - Boer War
BW - NSW
BW - NSW - 1ACH
BW - NSW - 1NSWMR
BW - NSW - 2NSWMR
BW - NSW - 3ACH
BW - NSW - 3NSWIB
BW - NSW - 3NSWMR
BW - NSW - 5ACH
BW - NSW - A Bty RAA
BW - NSW - AAMC
BW - NSW - Aust H
BW - NSW - Lancers
BW - NSW - NSW Inf
BW - NSW - NSWCBC
BW - NSW - NSWIB
BW - NSW - NSWMR_A
BW - NZ
BW - Qld
BW - Qld - 1ACH
BW - Qld - 1QMI
BW - Qld - 2QMI
BW - Qld - 3ACH
BW - Qld - 3QMI
BW - Qld - 4QIB
BW - Qld - 5QIB
BW - Qld - 6QIB
BW - Qld - 7ACH
BW - QLD - AAMC
BW - SA
BW - SA - 1SAMR
BW - SA - 2ACH
BW - SA - 2SAMR
BW - SA - 3SACB
BW - SA - 4ACH
BW - SA - 4SAIB
BW - SA - 5SAIB
BW - SA - 6SAIB
BW - SA - 8ACH
BW - SA - AAMC
BW - Tas
BW - Tas - 1ACH
BW - Tas - 1TIB
BW - Tas - 1TMI
BW - Tas - 2TB
BW - Tas - 2TIB
BW - Tas - 3ACH
BW - Tas - 8ACH
BW - Vic
BW - Vic - 1VMI
BW - Vic - 2ACH
BW - Vic - 2VMR
BW - Vic - 3VB
BW - Vic - 4ACH
BW - Vic - 4VIB
BW - Vic - 5VMR
BW - Vic - 6ACH
BW - Vic - AAMC
BW - Vic - Scot H
BW - WA
BW - WA - 1WAMI
BW - WA - 2ACH
BW - WA - 2WAMI
BW - WA - 3WAB
BW - WA - 4ACH
BW - WA - 4WAMI
BW - WA - 5WAMI
BW - WA - 6WAMI
BW - WA - 8ACH
BW Gen - Campaign
BW Gen - Soldiers
BW General
Cavalry - General
Diary - Schramm
Egypt - Heliopolis
Egypt - Mena
Gen - Ataturk Pk, CNB
Gen - Australia
Gen - Legends
Gen - Query Club
Gen - St - NSW
Gen - St - Qld
Gen - St - SA
Gen - St - Tas
Gen - St - Vic
Gen - St - WA
Gm - German Items
Gm - Bk - 605 MGC
GW - 11 Nov 1918
GW - Atrocities
GW - August 1914
GW - Biographies
GW - Propaganda
GW - Spies
GW - We forgot
Militia 1899-1920
Militia - Area Officers
Militia - Inf - Infantry
Militia - Inf - 1IB
Militia - Inf - 2IB
Militia - Inf - 3IB
Militia - Inf - NSW
Militia - Inf - Qld
Militia - Inf - SA
Militia - Inf - Tas
Militia - Inf - Vic
Militia - Inf - WA
Militia - K.E.Horse
Militia - LH
Militia - LH - Regts
Militia - LH - 1LHB
Militia - LH - 2LHB
Militia - LH - 3LHB
Militia - LH - 4LHB
Militia - LH - 5LHB
Militia - LH - 6LHB
Militia - LHN - NSW
Militia - LHN - 1/7/1
Militia - LHN - 2/9/6
Militia - LHN - 3/11/7
Militia - LHN - 4/6/16
Militia - LHN - 5/4/15
Militia - LHN - 6/5/12
Militia - LHN - 28
Militia - LHQ - Qld
Militia - LHQ - 13/2
Militia - LHQ - 14/3/11
Militia - LHQ - 15/1/5
Militia - LHQ - 27/14
Militia - LHS - SA
Militia - LHS - 16/22/3
Militia - LHS - 17/23/18
Militia - LHS - 24/9
Militia - LHT - Tas
Militia - LHT - 12/26
Militia - LHV - Vic
Militia - LHV - 7/15/20
Militia - LHV - 8/16/8
Militia - LHV - 9/19
Militia - LHV - 10/13
Militia - LHV - 11/20/4
Militia - LHV - 19/17
Militia - LHV - 29
Militia - LHW - WA
Militia - LHW-18/25/10
Militia - Military Orders
Militia - Misc
MilitiaRC - Rifle Clubs
MilitiaRC - NSW
MilitiaRC - NT
MilitiaRC - Qld
MilitiaRC - SA
MilitiaRC - Tas
MilitiaRC - Vic
MilitiaRC - WA
Militiaz - New Zealand
Tk - Turkish Items
Tk - Army
Tk - Bks - Books
Tk - Bks - 1/33IR
Tk - Bks - 27th IR
Tk - Bks - Air Force
Tk - Bks - Yildirim
Tk - POWs
Wp - Weapons
Wp - Hotchkiss Cav
Wp - Hotchkiss PMG
Blog Tools
Edit your Blog
Build a Blog
RSS Feed
View Profile
Open Community
Post to this Blog
Site Index
Education Centre
LH Militia
Boer War
Transport Ships
LH Battles
ALH - Units
ALH - General
Aboriginal Light H
Weapons
Ottoman Sources

"At a mile distant their thousand hooves were stuttering thunder, coming at a rate that frightened a man - they were an awe inspiring sight, galloping through the red haze - knee to knee and horse to horse - the dying sun glinting on bayonet points..." Trooper Ion Idriess

The Australian Light Horse Studies Centre aims to present an accurate history as chroniclers of early Australian military developments from 1899 to 1920.

The Australian Light Horse Studies Centre site holds over 12,000 entries and is growing daily.

Contact: Australian Light Horse Studies Centre

Let us hear your story: You can tell your story, make a comment or ask for help on our Australian Light Horse Studies Centre Forum called:

Desert Column Forum

WARNING: This site contains: names, information and images of deceased people; and, language which may be considered inappropriate today.

Thursday, 27 March 2008
9th LHR AIF War Diary, 27 March
Topic: AIF - 3B - 9 LHR

9th LHR, AIF

9th Light Horse Regiment

War Diary, 27 March

Pro Gloria et Honore - For Glory and Honour

Regimental March -  Marching Through Georgia


The following entries are extracted and transcribed from the 9th Light Horse Regiment War Diary, the originals of which are held by the Australian War Memorial. There are 366 entries on this site. Each day has entries as they occurred from 1914 to 1919. In addition to the 9th Light Horse Regiment War Diary, when appropriate, entries from the 3rd Light Horse Brigade War Diary and other regiments with the Brigade will also appear. Entries from the unit history, Darley, TH, With the Ninth Light Horse in the Great War, Adelaide, Hassell Press, 1924 will also appear from time to time. The aim is to give the broadest context to the story and allow the reader to follow the day to day activities of the regiment. If a relative happened to have served in the regiment during the Great War, then this provides a general framework in which the individual story may be told.


The Diary


1914

Friday, March 27, 1914

See 4th Military District, South Australia for militia activities.


1915

Saturday, March 27, 1915

9th Light Horse Regiment Location - Mena Camp, Egypt.

9th Light Horse Regiment War Diary -  No entry.

Carew Reynell Diary - No entry.


1916

Monday, March 27, 1916

9th Light Horse Regiment Location - Serapeum, Egypt.

9th Light Horse Regiment War Diary - No entry.


1917

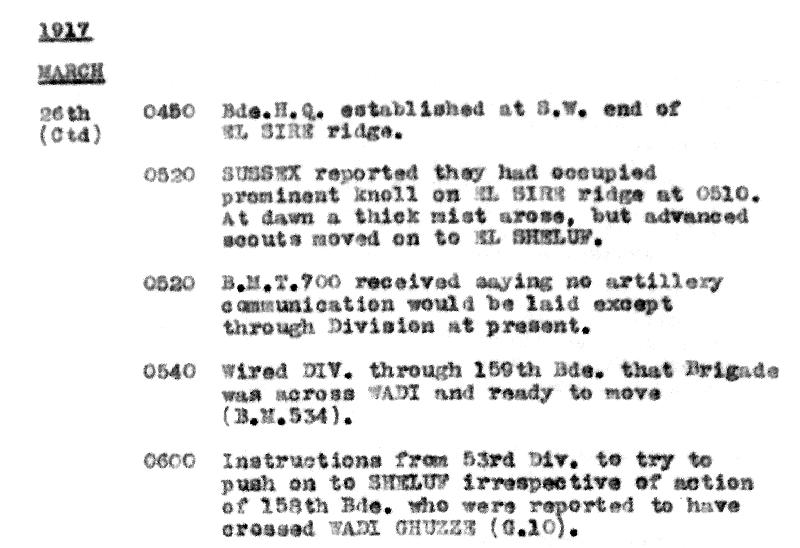
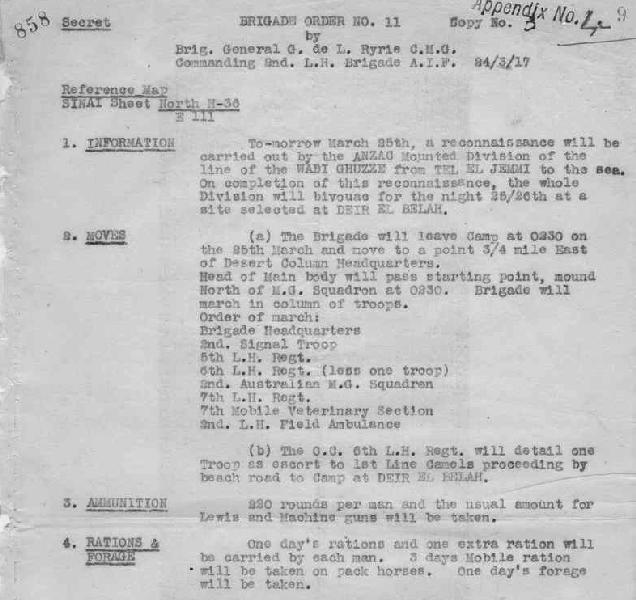
Tuesday, March 27, 1917

First Battle of Gaza

9th Light Horse Regiment Location - NE of Gaza.
9th Light Horse Regiment War Diary - At 0200 word was received from Brigade Headquarters to withdraw after the 8th Light Horse Regiment.
At 0230 the 8th Light Horse Regiment had completed withdrawing and about 0300 the Regiment withdrew and acted as rearguard to the column which moved off at 0330 without hindrance from the enemy. Moved east of Gaza to Wadi Ghuzze.
At dawn the Turks who had moved their flank around during the night attacked the rear guard and flank but were held off by Yeomanry on the flank and C Squadron working in association with the Armoured Car Detachment. The rear of the column was also shelled from a high ridge over to the east. But with the exception of two horses wounded no casualties were sustained. During the rearguard action C Squadron had two Other Ranks wounded.
The Wadi Ghuzze was crossed at 1700 and horses were watered at the large water hole north of Deir el Belah where the Brigade bivouacked.
At 1600 the Division moved to the vicinity of point 320 near the east of Goz el Taire and bivouacked for the night.
 
Darley, TH, With the Ninth Light Horse in the Great War, Adelaide, Hassell Press, 1924, pp 78 - 80.
First Battle of Gaza
Two Divisions of British Infantry had been brought forward to assist in the big task, viz., the 52nd and 53rd British Divisions, together with their Artillery. Some heavy batteries had also been brought forward and made a welcome addition to our force which now numbered close on 70,000 of all arms.
As far as could be gathered from the available information it was intended to capture Gaza by a frontal attack to be delivered by the Infantry, whilst the mounted troops and Imperial Camel Corps swung round to the left and attacked in the rear, thus cutting the enemy communications.
At dawn on the 26th March 1917, the whole country was enveloped in a thick fog, the first experienced, which made it impossible to see for any distance, and the recognition of landmarks became impossible. In spite of this, the mounted troops moved off at the allotted time, crossing the Wadi Ghuzze at Sheikh Nebhan and moving through Sheikh Abbas to the vicinity of Khirbit Sihan.
A position was taken up at this point to prevent enemy reinforcements moving up from Hareira, which lies about ten miles south east of Gaza, on the Beersheba road. The fog, which might have been turned to our advantage, as the attacking Infantry could, under its cover, have advanced right up to the outskirts of Gaza and Ali Muntar, proved the reverse, as when it lifted the Infantry were found to be far in rear of their positions. An enemy aeroplane could be heard buzzing overhead waiting for the fog to lift. When this happened it flew over the surrounding country, the pilot firing smoke signals over each body of troops, thus giving the range to their gunners.
About 9 a.m. the sun was shining brilliantly, and some distance ahead the Anzac Mounted Division could be seen moving in a north-easterly direction, disappearing a little later behind the Mansura ridge. The Anzacs were to hold the line from Huj to the sea, and the Imperial Camel Corps from our left to the Wadi Ghuzze. Clouds of light dust could be seen in the direction of Beersheba, and it was evident that enemy cavalry were moving to the assistance of their comrades at Gaza.
The Brigade halted on the Mansura Ridge, near Tel el Ahmar at 10 a.m. and awaited orders. News was received that the Anzacs had succeeded in completely isolating Gaza, and that they had captured the commander of the 53rd Turkish Division, together with his staff officers and escort, as he was entering the town to direct operations.
The booming of heavy guns was heard and high explosive shells began to fall on a ridge half a mile south of the Brigade. These were evidently fired from Abu Hareira, and although the fire was kept up for some hours it is doubtful whether they caused a single casualty. As there were a number of wells in the vicinity the opportunity was taken to water the horses after which they were given a small feed, and the men snatched a hasty meal.
At about 3.30 p.m. the Brigade received orders to move rapidly to a position near Australia Hill. As the Brigade up to this time had taken no part in the fight everyone was delighted at the prospect of doing his share. Moving at a fast trot the Brigade reached Anzac Ridge, now the Headquarters of the Anzac Mounted Division, and here orders were given to the Brigadier that the 3rd Light Horse Brigade was to intercept and hold off the large enemy reinforcements, consisting of about 4,000 infantry and 2,000 cavalry, which had been reported as advancing from the direction of Huj.
The 10th Light Horse Regiment were detached to act as a reserve, and the remainder of the Brigade galloped out and occupied a chain of small hills about two miles east of Gaza, completely blocking the path of the enemy reinforcements which were advancing in various columns at a distance of about two miles. The Regiment took the right of the Brigade line, and gained touch with the Berkshire Yeomanry who was on our right.
This new force of the enemy which had to be dealt with had evidently been marching for some hours as their rate of march was below normal and they appeared tired. As soon as they came within 2,000 yards the Brigade opened fire, and the Notts Battery, which had pushed well forward, opened a heavy shrapnel fire, which appeared to be well on the target.
At 5 p.m. the Yeomanry on our right were heavily engaged and our line was pushed well forward and strengthened by some armoured cars and a portion of the 8th Light Horse Regiment. As this new move threatened the enemy's flank they were obliged to fall back slightly. As darkness approached our line was shortened and an outpost line taken up.
During these movements the Infantry had delivered their assault against the formidable Ali Muntar, and in spite of heavy casualties had succeeded in taking a number of the outer works, but could not drive the stubborn Turks from the main position. The British Infantry made a splendid show as they advanced by waves in the face of a withering rifle and machine gun fire, their movements being as orderly as if on a peace parade.
Much to the surprise and disgust of all ranks, orders were received to the effect that the whole force would retire during the night to the Wadi Ghuzze. It was the first time our force had received such orders, and everyone wondered at the cause, some doubting the genuineness, but as they were verified shortly afterwards it was realized by all that there must be some good and sufficient reason for them.
The 3rd Light Horse Brigade was to cover the retirement, and remained in position until 2 a.m., at which time the 8th Light Horse Regiment were ordered to withdraw. At 3 a.m. the Regiment withdrew, acting as rearguard to the whole force, and moving round to the east and south of the defences made for the Wadi Ghuzze.
The Turks during the night had sent large reinforcements from Tel el Sheria, and when in the vicinity of Khirbit Sihan our flank guards got into touch with them. C Squadron, in conjunction with the armoured cars, formed the rear and flank guards, and from this point to the Wadi fought a continuous rearguard action, doing splendid work in checking the enemy's advance, and allowing the whole column to pass in safety over the Wadi.
The enemy now opened a continuous shell fire from the south, and the Regiment altered its formation to columns of sections, moving in echelon, and by continually altering the pace and direction succeeded in completing the retirement with only two casualties, two horses being wounded. The Wadi was crossed at 7 a.m. and the Regiment proceeded to Deir el Belah, a distance of four miles, where the horses were watered, the Regiment then moving to Goz el Taire, where it bivouacked.
It was now learned that the Infantry had been severely mauled during the attack, their casualties against Ali Muntar alone being, roughly, 3,000. The fact that Gaza had not fallen was not due to any lack of vigour or fighting efficiency on the part of any of the troops, but was considered to be due to the heavy fog which delayed the assault for so many hours.
 

1918

Wednesday, March 27, 1918

9th Light Horse Regiment Location - Deir el Belah

9th Light Horse Regiment War Diary - Elementary signalling classes, Hotchkiss Rifle practice and salvaging carried out.


1919

Thursday, March 27, 1919
9th Light Horse Regiment Location - Zagazig
9th Light Horse Regiment War Diary - Usual routine.


Previous: 9th LHR AIF War Diary, 26 March

Next: 9th LHR AIF War Diary, 28 March


Sources:

See: 9th Australian Light Horse Regiment, Contents
Australian Light Horse Studies Centre, AIF War Diaries of the Great War, Site Transcription Policy


Further Reading:

9th Light Horse Regiment AIF

Bert Schramm Diary

9th Australian Light Horse Regiment, Roll of Honour 

Battles where Australians fought, 1899-1920


Citation: 9th LHR AIF War Diary, 27 March

Posted by Project Leader at 12:01 AM EADT
Updated: Monday, 19 July 2010 12:02 PM EADT
Gallipoli Campaign - 1915-16, 2nd Field Company, Australian Engineers, AIF, Roll of Honour
Topic: BatzG - Anzac

Gallipoli Campaign - 1915-16

2nd Field Company, Australian Engineers

AIF

Roll of Honour


Poppies on the Roll of Honour, Australian War Memorial, Canberra


The Roll of Honour contains the names of all the men from the 2nd Field Company, Australian Engineers who gave their lives during the Gallipoli Campaign - 1915 - 1916.


Roll of Honour


503 Sapper Robert Felix BASS, Killed in action, 31 August 1915.

182 Sapper Harold Evelyn BAXTER, Killed in action, 3 June 1915.


Lieutenant William Henry DAWKINS, Killed in action, 20 May 1915.


155 Sergeant Herbert Fred HILLIER, Killed in action, 12 June 1915.


77 Sapper Frederick KENNEDY, Died of wounds, 25 May 1915.


120 Lance Corporal Percy James LOBB, Died of wounds, 19 August 1915.


244 Sapper Lewis MATTHEWS, Killed in action, 18 May 1915.

404 Sapper Donald McKAY, Killed in action, 7 August 1915.


Second Lieutenant John Morton PLAYNE, Killed in action, 7 August 1915.


178 Sapper Albert Edward RENSHAW, Died of wounds, 26 April 1915.

204 Sapper Edward Albert George ROGASCH, Killed in action, 5 July 1915.


102 Sapper Charles SPENCE, Killed in action, 6 August 1915.

402 Sapper Bernard Samuel Robinson STARKEY, Killed in action, 7 August 1915.


129 Sapper William WEEKES, Died of wounds, 30 June 1915.

207 Sapper James WEST, Died of wounds, 28 May 1915.


Lest We Forget


Sources Used:

National Archives Service File.

Embarkation Rolls, AWM8.

Nominal Roll, AWM133, Nominal Roll of Australian Imperial Force who left Australia for service abroad, 1914-1918 War.

AWM Roll of Honour

Commonwealth War Graves Commission


Finding more about a service person.

See: Navigating the National Archives Service File 


Further Reading:

Gallipoli Campaign - 1915-16

Gallipoli Campaign - 1915-16, Unit Casualties, AIF, Roll of Honour

Light Horse Battles

Battles where Australians fought, 1899-1920


Citation: Gallipoli Campaign - 1915-16, 2nd Field Company, Australian Engineers, AIF, Roll of Honour

Posted by Project Leader at 12:01 AM EADT
Updated: Wednesday, 27 July 2011 11:41 AM EADT
Gallipoli Campaign - 1915-16, 17th Infantry Battalion, AIF, Roll of Honour
Topic: BatzG - Gallipoli

Gallipoli Campaign - 1915-16

17th Infantry Battalion

AIF

Roll of Honour


Poppies on the Roll of Honour, Australian War Memorial, Canberra


The Roll of Honour contains the names of all the men from the 17th Infantry Battalion known to have given their lives during the Gallipoli Campaign - 1915 - 1916.


Roll of Honour


412 Private James Ellaby ABBOTT, Killed in action, 27 August 1915.

801 Private Sidney Torrington ALLEN, Killed in action, 7 December 1915.

428 Private John ANDREW, Died of wounds, 9 November 1915.


499 Private Frederick Stanley BARLING, Killed in action, 13 October 1915.

1817 Private Julius Sydney BLOOM, Killed in action, 5 November 1915.

161 Private John Montague BOWMAKER, Died of wounds, 22 September 1915.

166 Private Alfred Benjamin BROWNE, Killed in action, 27 August 1915.


1525 Private George Charles CHAPLIN, Killed in action, 27 August 1915.

1527 Private Morrice CHAPMAN, Killed in action, 27 August 1915.

855 Private Frank CHARLES, Killed in action, 3 November 1915.

183 Private James CHRISTOPHER, Killed in action, 27 August 1915.

1175 Private Frederick George CUDDEFORD, Died of wounds, 16 September 1915.


1617 Private Wilfred Bartell DIDCOTE, Killed in action, 27 August 1915.

195 Lance Corporal Francis William DILLON, Killed in action, 28 August 1915.

1055 Private James DONOVAN, Died of wounds, 26 August 1915.


369 Private John Raymond EGAN, Died of wounds, 4 September 1915.

1190 Private Frederick EWING, Died of wounds, 11 November 1915.


882 Private Edward FOGARTY, Killed in action, 3 November 1915.

214 Private Charles Upton FULLER, Died of wounds, 30 August 1915.

1354 Private Alfred John FURLESS, Killed in action, 1 September 1915.


554 Private John GALLOWAY, Died of Disease, 4 October 1915.

220 Private Charles GAVIN, Killed in action, 27 August 1915.


Second Lieutenant France GOMBERT, Killed in action, 28 August 1915.

260 Private John GRIMES, Killed in action, 27 August 1915.


371 Private Tom HALL, Killed in action, 27 August 1915.

1690 Private Albert Edward HENDERSON, Died of wounds, 29 November 1915.

1706 Private Harold Ellis HERMAN, Died of wounds, 20 November 1915.

230 Private James HOUGH, Killed in action, 27 August 1915.

767 Private James HUDSON, Killed in action, 28 August 1915.

910 Private Thomas Owen HUMPHREYS, Died of wounds, 25 September 1915.


1374 Private William Royal JAMES, Killed in action, 1 October 1915.

1711 Private George Blatchford Fay JOHNSON, Killed in action, 1 November 1915.


249 Private Joseph KAVANAGH, Killed in action, 27 August 1915.

251 Private Ernest KIDD, Killed in action, 27 August 1915.

373 Private Charles Wesley KING, Killed in action, 27 August 1915.


254 Private James LAING, Died of wounds, 30 August 1915.

263 Private James LOGAN, Killed in action, 27 August 1915.

1366 Sergeant Bertrand Evelyn LUFFMAN, Died of wounds, 27 August 1915.

1801 Private Thomas Henry LYONS, Died of wounds, 3 October 1915.


946 Private John Augustine MacDONALD, Killed in action, 29 August 1915.

616 Private Alexander Cameron MACKAY, Died of Disease, 17 November 1915.

1246 Private Michael MAHER, Died of wounds, 30 November 1915.

269 Private Thomas Edward MARTIN, Died of wounds, 21 August 1915.

288 Private Stephen McCARTHY, Killed in action, 27 August 1915.

1056 Private John McENALLY, Killed in Action, 24 August 1915.

613 Private Donald Alexander McLEAY, Killed in action, 1 November 1915.

294 Private William McNAIR, Killed in action, 27 August 1915.

1615 Private Edward McTAGUE, Killed in action, 4 September 1915.

624 Private William Herbert MILLER, Killed in action, 6 September 1915.

628 Lance Corporal Frederick William MORREN, Died of wounds, 27 August 1915.

282 Private Thomas MUNTON, Killed in action, 27 August 1915.


300 Private Thomas Patrick O'BYRNE, Killed in action, 27 August 1915.


303 Private Stanley PAGE, Killed in action, 30 November 1915.

307 Private Walter William PROCTOR, Killed in action, 27 August 1915.


376 Sergeant John Thomas ROBERTSON, Died of wounds, 30 August 1915.


328 Private Stanley Grenfell SCHWEITZER, Killed in action, 27 August 1915.

1007 Private Stafford SIMONS, Killed in action, 5 November 1915.

433 Private Thomas STACE, Killed in action, 27 August 1915.

330 Private John STEWART, Killed in action, 27 August 1915.


1310 Private George TOMLINSON, Killed in action, 25 August 1915.

342 Private Cecil TOWNSEND, Killed in action, 27 August 1915.


353 Private Clifford Edwin Arthur WELLS, Killed in action, 11 December 1915.

1528A Private Forest Alexander (Duncan) WHITECROSS, Killed in action, 24 September 1915.

348 Private Thomas WILLIAMS, Died of wounds, 4 December 1915.

730 Private Bertie Clyde WILLICK, Killed in action, 28 August 1915.

1030 Private Thomas WOOD, Killed in action, 21 September 1915.

363 Private Bertram William YEOMANS, Killed in action, 27 August 1915.


Lest We Forget


Sources Used:

National Archives Service File.

Embarkation Rolls, AWM8.

Nominal Roll, AWM133, Nominal Roll of Australian Imperial Force who left Australia for service abroad, 1914-1918 War.

AWM Roll of Honour

Commonwealth War Graves Commission


Finding more about a service person.

See: Navigating the National Archives Service File 


Further Reading:

Gallipoli Campaign - 1915-16

Gallipoli Campaign - 1915-16, Unit Casualties, AIF, Roll of Honour

Light Horse Battles

Battles where Australians fought, 1899-1920


Citation: Gallipoli Campaign - 1915-16, 17th Infantry Battalion, AIF, Roll of Honour

Posted by Project Leader at 12:01 AM EADT
Updated: Friday, 22 July 2011 3:26 PM EADT
Wednesday, 26 March 2008
The First Battle of Gaza, Palestine, 26 to 27 March 1917, Headquarters 160th Infantry Brigade, 53rd Division War Diary Account
Topic: AIF - DMC - British

The First Battle of Gaza

Palestine, 26 to 27 March 1917

Headquarters 160th Infantry Brigade, 53rd Division War Diary Account


Headquarters 160th Infantry Brigade, 53rd Division War Diary Account.


The following is a transcription of the Account from the War Diary of the Headquarters 160th Infantry Brigade, 53rd Division detailing its role at the First Battle of Gaza, Palestine, 26 to 27 March 1917.


Extracts from War Diary of
Headquarters 160th Infantry Brigade, 53rd division
Brigade General Commander, Brigadier General WJC Butler


25 March 1917

Brigade remained in the orchard at Khan Yunis until 1630.

1100 The Brigade General Commander 160th Infantry Brigade went to El Briej and saw General Dallas and n conference was held, the plan of attack of 26th being explained. The crossings of Wadi Ghuzze reconnoitred with Officers Commanding 1/4th Royal Sussex Regiment and 2/4th Royal West Kent Regiment.

1630 The Brigade marched to Deir el Belah and went into bivouac at BIR, about 1 mile north north east of Hill 130.


26 March 1917

The Brigade less 2/4th Royal West Kent Regiment left Deir el Belah and marched to Wadi Ghuzze near El Breij crossing about 0345. 2/4th Royal West Kent Regiment received direct orders from Desert Column and moved across Wadi Ghuzze about 600 yards south west of caves and took up a line from Caves to about the first "T" of Tel el Ajjul to protect 15th Heavy Battery Royal Garrison Artillery firing from Sabkhet 600 yards west of caves. They took no further part in the Brigade operations.

0400 1/4th Royal Sussex Regiment advanced on to El Sire and made good the bridge-head before daybreak, the Brigade crossing on to El Sire ridge.

0450 Brigade Headquarters established at south west end of El Sire Ridge.

0520 1/4th Royal Sussex Regiment reported they had occupied prominent knoll on El Sire Ridge at 0510. At dawn a thick mist arose, but advanced scouts moved on to El Sheluf.

0520 BMT 700 received saying no artillery communication would be laid except through Division at present.

0540 Wired Division through 159th Infantry Brigade that Brigade was across Wadi and ready to move. (BM 534)

0600 Instructions from 53rd Division to try to push on to Sheluf irrespective of action of 158th Infantry Brigade who were reported to have crossed Wadi Ghuzze. (G 10)

0630 1/4th Royal Sussex Regiment reported "all clear" 1,000 yards east of El Sire.

0645 158th Infantry Brigade reported by Division to be at Burjabye and ordered to feel their way to Mansura (G 13) 1/4th Royal Sussex Regiment and 2/10th Middlesex Regiment informed.

0755 1/4th Royal Sussex Regiment reported occupation of what they make out to be El Sheluf Ridge. Division and 158th Infantry Brigade informed.

0805 Divisional Headquarters moved to El Burjabye.

0815 Mist which had been very thick, cleared.

0846 1/4th Royal Sussex Regiment report they have direct observation on Ali Muntar. Reported to Division. (BM 554)

0921 158th Infantry Brigade report they are advancing and only meeting slight opposition. Orders received verbally by orderly.

0950 Brigade General Commander to meet General Officer Commanding 53rd Division at Mansura to arrange plan of attack. Brigade General Commander moved at once.

0956 G. 19 received instructing Brigade to push troops forward and reconnoitre as far as possible to direction of Ali El Muntar.

1100 and 1120 Brigade ordered to push on (G.22 and 23) as far as possible and await artillery support if necessary.

1130 Orders were given to 160th Infantry Brigade to attack position known as the "Labyrinth" 1/4th Royal Sussex Regiment attacked the objective marked by the mosque ALI Muntar on right and the niche between two hillocks apparently north of the mosque on the left. Officer Commanding 2/10th Middlesex Regiment was ordered to attack on left of 1/4th Royal Sussex Regiment between points indicated to Officer Commanding. The Queen's Own 2/4th Royal West Kent Regiment were to reserve.

1222 Informed Division that Ali Muntar to and including "Labyrinth" position appeared to be strongly held and asked for artillery support, 1/4th Royal Sussex Regiment scouts then 1,200 yards from enemy and being fired on.

1318 Orders to push on with attack received and 1/4th Royal Sussex Regiment reported that attack had been launched.

1330 2/10th Middlesex Regiment had cleared left of "Labyrinth" and seized prominent position on grass ridge. 158th Infantry Brigade were attacking from South. The advance of 1/4th Royal Sussex Regiment was checked by barrage fire on the slope beyond the well defined gully or donga on right. There were posts for an entanglement not far below the crest of the further slope in front of 1/4th Royal Sussex Regiment and 4 strands of wire already up in front of 2/10th Middlesex Regiment. Lieutenant Colonel Ashworth, Officer Commanding 1/4th Royal Sussex Regiment was killed about this time.

1349 53rd Division wired that Gaza had been cut off from north.

1414 2/10th Middlesex Regiment captured "Labyrinth" – Division informed. Owing to heavy casualties to 1/4th Royal Sussex Regiment a gap was caused on right of 2/10th Middlesex Regiment.

1430 Brigade Major wounded and Captain Herbert, Queen's Own 2/4th Royal West Kent Regiment assumed temporary duties.

1530 2/10th Middlesex Regiment asked for reinforcements and Small Arms Ammunition. 2½ Companies Queen's Own 2/4th Royal West Kent Regiment sent forward in answer to this request and Small Arms Ammunition was sent up with them.

1540 Information received 161st Infantry Brigade ordered to attack Green Hill south west of Ali Muntar between 160th and 158th Infantry Brigades.

1555 Information reached 271st Brigade Royal Field Artillery ordered into action south east of Ali Muntar to support right of attack (159th Infantry Brigade).

1650 Word received 159th Infantry Brigade had taken Ali Muntar.

1700 1 Company of Queen's Own 2/4th Royal West Kent Regiment arrived on right flank of 2/10th Middlesex Regiment and at the same time 161st Infantry Brigade was seen advancing. Remainder of Queen's Own 2/4th Royal West Kent Regiment advanced to reinforce 2/10th Middlesex Regiment and arrived shortly afterwards.

1800 Battalion of Essex (161st Infantry Brigade) arrived on right flank and contact was gained with them. The advance at this point was hung up by very hot fire from concealed positions in cultivation.

1900 Left flank of front line was thrown back and Officer Commanding 2/10th Middlesex Regiment reported that unless reinforced, position would be untenable. At this tine communication was most difficult, but orders were given to consolidate position pending further orders.

2000 Owing to impossible nature of country for camel transport, water and Small Arms Ammunition, had to be carried up by hand for a mile and a half. Orders were accordingly issued to 1½ Companies Queen's Own 2/4th Royal West Kent Regiment in reserve, and this was done.

2300 Orders were received for front line to be withdrawn to line Green Hill - El Sheluf, keeping touch with 161st Infantry Brigade. At this time troops were disposed on a considerable front and communication exceedingly difficult. Staff Officers and patrols were sent out to deliver necessary instructions and after much difficulty all were withdrawn.


27 March 1917

0430 The withdrawal of firing line was completed at this time and the Brigade took up a new line as ordered. Disposition of Troops - Front line - 2/10th Middlesex Regiment; Reserve - Queen's Own 2/4th Royal West Kent Regiment and 1/4th Royal Sussex Regiment.

0600 Orders received to send out strong patrols to reconnoitre positions won previous day with a view to reoccupying same. 2/10th Middlesex Regiment pushed forward patrols.

0802 Wire received from Division saying our troops in possession of Green Hill and Ali Muntar.

0815 Colonel Money reported an increase in enemy numbers north and north west of Gaza.

0815 Queen's Own 2/4th Royal West Kent Regiment ordered to get in touch with 161st Infantry Brigade who had captured Green Hill and Ali Muntar and to consolidate on their left when in touch. The Queen's Own 2/4th Royal West Kent Regiment advanced across deep nullah north of El Sheluf and were clear of it by 0930 picking up outpost companies en route. When across the nullah, our troops were seen on skyline in direction of Ali Muntar and east of it.

0948 Colonel Money reported enemy consolidating trench and redoubt between Sea and Ali Muntar (WK 36).

1000 These troops commenced to withdraw. The Queen's Own 2/4th Royal West Kent Regiment ordered forward, 1 Company advanced towards "Labyrinth" with a Second Company in support. The withdrawal of our troops on right stopped for about a quarter of an hour, but commenced again shortly afterwards. Troops retiring comprised portions of 158th and 161st Infantry Brigades with which the two leading Companies The Queen's Own 2/4th Royal West Kent Regiment were mixed up. The latter remained until all troops had withdrawn.

About 1100 The Queen's Own 2/4th Royal West Kent Regiment reported Turks retiring through GAZA, north north west.

1105 53rd Division Order G. 52 received ordering 53rd Division to withdraw to line on El Sire - Ali Muntar Ridge. 160th Infantry Brigade to hold ridge in rear of 161st Infantry Brigade and protect left flank (Copy of G.52 attached). The Queen's Own 2/4th Royal West Kent Regiment were ordered to fall back slowly on El Sheluf Ridge, 2/10th Middlesex Regiment being placed in position with their right in touch with 161st Infantry Brigade. The shelling during this period was intense and accurate. It came obliquely from direction of town of Gaza. Also heat was terrible and men suffered considerable hardship from want of water.

1118 53rd Division Headquarters moved to Burjabye.

1130 Word received a Mounted Brigade was being sent up on our left.

1400 Orders received from 53rd Division (GB 555) that line El Sire - Ali Muntar must be consolidated and held stoutly. Brigade General Commander 160th Infantry Brigade went to Headquarters 161st Infantry Brigade and saw Brigadier General Doddington. Disposition of troops explained and future action discussed.

1459 Orders received GT 557 to advance to support of 161st Infantry Brigade who were asking for support as their left flank.

Assistant Director Medical Services at El Burjanye. Bearer subdivision ordered to fellow Brigade and collect all casualties.

1500 Brigade advanced to conform with line of 161st Infantry Brigade up on their left flank. A defensive line was formed with the left thrown back - 1/4th Royal Sussex Regiment on right. Queen's Own 2/4th Royal West Kent Regiment left, 2/10th Middlesex Regiment in reserve and this line was held until orders were received to withdrawn.

1700 Orders received from 53rd Division (G 56) that 160th Infantry Brigade would retire across the Wadi Ghuzze at 2200 and take up an outpost line on high ground between Rafa-Gaza Roads at Sheikh Raschid and Belah-Gaza.

2155 Message received from 53rd Division that 161st Infantry Brigade were being attacked and ordering 160th Infantry Brigade to support stoutly. By this time 160th Infantry Brigade had formed up ready to move off, all firing having ceased.

2200 The Brigade assembled at Sheluf at 2200 and moved off crossing the Wadi Ghuzze at "A" crossing at 2400 (approx.) and reaching Sheikh Raschid at 0130 on 28th.


28 March 1917

Outpost Line was taken up and steps taken to put it in a state of defence.

Disposition of Troops:

2/10th Middlesex Regiment on left in touch with 159th Infantry Brigade with 1 Section Machine Gun Company.

2/4th Royal West Kent Regiment in centre with 1 Section Machine Gun Company.

1/4th Royal Sussex Regiment on right with 1 Section Machine Gun Company.

Queen's Own 2/4th Royal West Kent Regiment in reserve at Sheikh Raschid with Brigade Headquarters.

No. 160th Machine gun Company (less 3 Sections) in reserve at Sheikh Raschid with Brigade Headquarters.


War Diaries

All War Diaries cited on this site should be read in conjunction with the Australian Light Horse Studies Centre, AIF War Diaries of the Great War, Site Transcription Policy which may be accessed at:

Australian Light Horse Studies Centre, AIF War Diaries of the Great War, Site Transcription Policy 


Further Reading:

The British Army

British Forces, EEF, Roll of Honour

The First Battle of Gaza, Palestine, 26 to 27 March 1917

The First Battle of Gaza, Palestine, 26 to 27 March 1917, Allied Forces, Roll of Honour

The Palestine Campaign, 1917 - 1918

Battles where Australians fought, 1899-1920


Citation: The First Battle of Gaza, Palestine, 26 to 27 March 1917, Headquarters 160th Infantry Brigade, 53rd Division War Diary Account


Posted by Project Leader at 12:01 AM EADT
Updated: Saturday, 19 February 2011 8:27 AM EAST
The First Battle of Gaza, Palestine, 26 to 27 March 1917, 2nd Light Horse Brigade, Brigade Order No. 11
Topic: AIF - 2B - 2 LHB

The First Battle of Gaza

Palestine, 26 to 27 March 1917

2nd Light Horse Brigade, Brigade Order No. 11


2nd Light Horse Brigade War Diary Brigade Order No. 11.


The following is a transcription of the Brigade Order No. 11 from the War Diary of the 2nd Light Horse Brigade detailing their role at the First Battle of Gaza, Palestine, 26 to 27 March 1917.


Secret

Brigade Order No. 11

by

Brigadier General G. de L. Ryrie, CMG
Commanding 2nd Light Horse Brigade AIF

24 March 1917

Reference Map: Sinai Sheet North H36 EIII

1. Information: Tomorrow March 25th, a reconnaissance will be carried out by the Anzac Mounted Division of the line of the Wadi Ghuzze from Tel el Jemmi to the sea. On completion of this reconnaissance, the whole Division will bivouac for the night 25/26th at a site selected at Deir el Belah.

2. Moves

(a) The Brigade will leave Camp at 0230 on the 26th march and move to a point ¾ mile east of the Desert Column Headquarters.

Head of Main body will pass starting point, mound North of Machine Gun Squadron at 0230. Brigade will march in column of troops.

Order of march:

Brigade Headquarters

2nd Signal Troops

5th Light Horse Regiment

6th Light Horse Regiment (less one troop)

2nd Australian Machine Gun Squadron

7th Light Horse Regiment

7th Mobile Veterinary Section

2nd Light Horse Field Ambulance

(b) The Officer Commanding 6th Light Horse Regiment will detail one Troop as escort to 1st Line Camels proceeding by beach road to Camp at Deir el Belah.


3. Ammunition: 220 rounds per man and the usual amount for Lewis and Machine guns will be taken.

Rations & Forage: One day's rations and one extra ration will be carried by each man. 3 days Mobile ration will be taken on pack horses. One day's forage will be taken.

5. Limbers: All limbers will march with their units.

6. 1st Line Camels: All 1st Line Camels will be formed up on the beach north of Camp at 0300.

7. Entrenching Tools: All entrenching tools will be taken by units on pack horses.

8. Marching out states: Marching out states will be rendered to Brigade Headquarters by 0200.

JH Whyte Major
Brigade Major 2nd Light Horse Brigade


War Diaries

All War Diaries cited on this site should be read in conjunction with the Australian Light Horse Studies Centre, AIF War Diaries of the Great War, Site Transcription Policy which may be accessed at:

Australian Light Horse Studies Centre, AIF War Diaries of the Great War, Site Transcription Policy 


Further Reading:

2nd Light Horse Brigade, AIF

2nd Australian Light Horse Brigade, AIF, Roll of Honour 

The First Battle of Gaza, Palestine, 26 to 27 March 1917

The First Battle of Gaza, Palestine, 26 to 27 March 1917, Allied Forces, Roll of Honour 

The Palestine Campaign, 1917 - 1918

Battles where Australians fought, 1899-1920


Citation: The First Battle of Gaza, Palestine, 26 to 27 March 1917, 2nd Light Horse Brigade, Brigade Order No. 11


Posted by Project Leader at 12:01 AM EADT
Updated: Saturday, 19 February 2011 8:58 AM EAST

Newer | Latest | Older

Full Site Index


powered by FreeFind
Let us hear your story: You can tell your story, make a comment or ask for help on our forum.

Desert Column Forum

A note on copyright

The Australian Light Horse Studies Centre is a not for profit and non profit group whose sole aim is to write the early history of the Australian Light Horse from 1900 - 1920. It is privately funded and the information is provided by the individuals within the group and while permission for the use of the material has been given for this site for these items by various donors, the residual and actual copyright for these items, should there be any, resides exclusively with the donors. The information on this site is freely available for private research use only and if used as such, should be appropriately acknowledged. To assist in this process, each item has a citation attached at the bottom for referencing purposes.

Please Note: No express or implied permission is given for commercial use of the information contained within this site.

A note to copyright holders

The Australian Light Horse Studies Centre has made every endeavour to contact copyright holders of material digitised for this blog and website and where appropriate, permission is still being sought for these items. Where replies were not received, or where the copyright owner has not been able to be traced, or where the permission is still being sought, the Australian Light Horse Studies Centre has decided, in good faith, to proceed with digitisation and publication. Australian Light Horse Studies Centre would be happy to hear from copyright owners at any time to discuss usage of this item.

Contact

Australian Light Horse Studies Centre

eXTReMe Tracker