« October 2008 »
S M T W T F S
1 2 3 4
5 6 7 8 9 10 11
12 13 14 15 16 17 18
19 20 21 22 23 24 25
26 27 28 29 30 31
You are not logged in. Log in


Search the site:


powered by FreeFind
Volunteer with us.

Entries by Topic All topics  
A Latest Site News
A - Using the Site
AAA Volunteers
AAB-Education Centre
AAC-Film Clips
AAC-Photo Albums
AIF & MEF & EEF
AIF - Lighthorse
AIF - ALH - A to Z
AIF - DMC
AIF - DMC - Or Bat
AIF - DMC - Anzac MD
AIF - DMC - Aus MD
AIF - DMC - British
AIF - DMC - BWI
AIF - DMC - French
AIF - DMC - Indian
AIF - DMC - Italian
AIF - DMC - Medical
AIF - DMC - Remounts
AIF - DMC - Scouts
AIF - DMC - Sigs
AIF - DMC - Sigs AirlnS
AIF - DMC - 1 Sig Sqn
AIF - DMC - 2 Sig Sqn
AIF - DMC - Eng
AIF - DMC - Eng 1FSE
AIF - DMC - Eng 2FSE
AIF - DMC - GSR
AIF - 1B - 1 LHB
AIF - 1B - 6 MVS
AIF - 1B - 1 LHMGS
AIF - 1B - 1 Sig Trp
AIF - 1B - 1 LHFA
AIF - 1B - 1 LHR
AIF - 1B - 2 LHR
AIF - 1B - 3 LHR
AIF - 2B - 2 LHB
AIF - 2B - 7 MVS
AIF - 2B - 2 LHFA
AIF - 2B - 2 LHMGS
AIF - 2B - 2 Sig Trp
AIF - 2B - 5 LHR
AIF - 2B - 6 LHR
AIF - 2B - 7 LHR
AIF - 3B - 3 LHB
AIF - 3B - 8 MVS
AIF - 3B - 3 LHB Sigs
AIF - 3B - 3 LHFA
AIF - 3B - 3 LHMGS
AIF - 3B - 3 Sig Trp
AIF - 3B - 8 LHR
AIF - 3B - 9 LHR
AIF - 3B - 10 LHR
AIF - 4B - 4 LHB
AIF - 4B - 4 Sig Trp
AIF - 4B - 9 MVS
AIF - 4B - 4 LHFA
AIF - 4B - 4 LHMGS
AIF - 4B - 4 LHR
AIF - 4B - 11 LHR
AIF - 4B - 12 LHR
AIF - 5B - 5 LHB
AIF - 5B - 10 MVS
AIF - 5B - 5 LHFA
AIF - 5B - 5 Sig Trp
AIF - 5B - ICC
AIF - 5B - 14 LHR
AIF - 5B - 15 LHR
AIF - 5B - 1er Regt
AIF - 5B - 2 NZMGS
AIF - AASC
AIF - Aboriginal LH
AIF - Badges
AIF - Cars
AIF - Chinese LH
AIF - Double Sqns
AIF - Engineers
AIF - Fr - 22 Corps
AIF - Fr - 13 LHR
AIF - Honour Roll
AIF - HQ - 3rd Echelon
AIF - Marching Songs
AIF - Misc Topics
AIF - NZMRB
AIF - NZMRB - AMR
AIF - NZMRB - CMR
AIF - NZMRB - EFT
AIF - NZMRB - NZMFA
AIF - NZMRB - NZMGS
AIF - NZMRB - OMR
AIF - NZMRB - Sig-Trp
AIF - NZMRB - WMR
AIF - Ships
AIF - Ships - Encountr
AIF - Ships - Una
AIF - WFF
AIF - Wireless Sqn
Battles
BatzA - Australia
BatzA - Broken Hill
BatzA - Liverpool
BatzA - Merivale
BatzB - Boer War
BatzB - Bakenlaagte
BatzB - Belmont
BatzB - Bothaville
BatzB - Buffels Hoek
BatzB - Coetzees Drift
BatzB - Diamond Hill
BatzB - Driefontein
BatzB - Elands
BatzB - Graspan
BatzB - Grobelaar
BatzB - Grootvallier
BatzB - Hartebestfontn
BatzB - Houtnek
BatzB - Karee Siding
BatzB - Kimberley
BatzB - Koster River
BatzB - Leeuw Kop
BatzB - Mafeking
BatzB - Magersfontein
BatzB - Modder River
BatzB - Onverwacht
BatzB - Paardeberg
BatzB - Palmietfontein
BatzB - Pink Hill
BatzB - Poplar Grove
BatzB - Rhenoster
BatzB - Sannahs Post
BatzB - Slingersfontn
BatzB - Stinkhoutbm
BatzB - Sunnyside
BatzB - Wilmansrust
BatzB - Wolvekuil
BatzB - Zand River
BatzG - Gallipoli
BatzG - Anzac
BatzG - Aug 1915
BatzG - Baby 700
BatzG - Evacuation
BatzG - Hill 60
BatzG - Hill 971
BatzG - Krithia
BatzG - Lone Pine
BatzG - Nek
BatzJ - Jordan Valley
BatzJ - 1st Amman
BatzJ - 2nd Amman
BatzJ - Abu Tellul
BatzJ - Es Salt
BatzJ - JV Maps
BatzJ - Ziza
BatzM - Mespot
BatzM - Baghdad
BatzM - Ctesiphon
BatzM - Daur
BatzM - Kurna
BatzM - Kut el Amara
BatzM - Ramadi
BatzN - Naval
BatzN - AE1
BatzN - Cocos Is
BatzN - Heligoland
BatzN - Marmara
BatzN - Zeebrugge
BatzN - Zeppelin L43
BatzNG - Bitapaka
BatzO - Other
BatzO - Baku
BatzO - Egypt 1919
BatzO - Emptsa
BatzO - Karawaran
BatzO - Peitang
BatzO - Wassa
BatzP - Palestine
BatzP - 1st Gaza
BatzP - 2nd Gaza
BatzP - 3rd Gaza
BatzP - Aleppo
BatzP - Amwas
BatzP - Ayun Kara
BatzP - Bald Hill
BatzP - Balin
BatzP - Beersheba
BatzP - Berkusieh
BatzP - Damascus
BatzP - El Auja
BatzP - El Buggar
BatzP - El Burj
BatzP - Haifa
BatzP - Huj
BatzP - JB Yakub
BatzP - Kaukab
BatzP - Khan Kusseir
BatzP - Khuweilfe
BatzP - Kuneitra
BatzP - Megiddo
BatzP - Nablus
BatzP - Rafa
BatzP - Sasa
BatzP - Semakh
BatzP - Sheria
BatzP - Surafend
BatzP - Wadi Fara
BatzS - Sinai
BatzS - Bir el Abd
BatzS - El Arish
BatzS - El Mazar
BatzS - El Qatiya
BatzS - Jifjafa
BatzS - Magdhaba
BatzS - Maghara
BatzS - Romani
BatzS - Suez 1915
BatzSe - Senussi
BatzWF - Westn Front
BW - Boer War
BW - NSW
BW - NSW - 1ACH
BW - NSW - 1NSWMR
BW - NSW - 2NSWMR
BW - NSW - 3ACH
BW - NSW - 3NSWIB
BW - NSW - 3NSWMR
BW - NSW - 5ACH
BW - NSW - A Bty RAA
BW - NSW - AAMC
BW - NSW - Aust H
BW - NSW - Lancers
BW - NSW - NSW Inf
BW - NSW - NSWCBC
BW - NSW - NSWIB
BW - NSW - NSWMR_A
BW - NZ
BW - Qld
BW - Qld - 1ACH
BW - Qld - 1QMI
BW - Qld - 2QMI
BW - Qld - 3ACH
BW - Qld - 3QMI
BW - Qld - 4QIB
BW - Qld - 5QIB
BW - Qld - 6QIB
BW - Qld - 7ACH
BW - QLD - AAMC
BW - SA
BW - SA - 1SAMR
BW - SA - 2ACH
BW - SA - 2SAMR
BW - SA - 3SACB
BW - SA - 4ACH
BW - SA - 4SAIB
BW - SA - 5SAIB
BW - SA - 6SAIB
BW - SA - 8ACH
BW - SA - AAMC
BW - Tas
BW - Tas - 1ACH
BW - Tas - 1TIB
BW - Tas - 1TMI
BW - Tas - 2TB
BW - Tas - 2TIB
BW - Tas - 3ACH
BW - Tas - 8ACH
BW - Vic
BW - Vic - 1VMI
BW - Vic - 2ACH
BW - Vic - 2VMR
BW - Vic - 3VB
BW - Vic - 4ACH
BW - Vic - 4VIB
BW - Vic - 5VMR
BW - Vic - 6ACH
BW - Vic - AAMC
BW - Vic - Scot H
BW - WA
BW - WA - 1WAMI
BW - WA - 2ACH
BW - WA - 2WAMI
BW - WA - 3WAB
BW - WA - 4ACH
BW - WA - 4WAMI
BW - WA - 5WAMI
BW - WA - 6WAMI
BW - WA - 8ACH
BW Gen - Campaign
BW Gen - Soldiers
BW General
Cavalry - General
Diary - Schramm
Egypt - Heliopolis
Egypt - Mena
Gen - Ataturk Pk, CNB
Gen - Australia
Gen - Legends
Gen - Query Club
Gen - St - NSW
Gen - St - Qld
Gen - St - SA
Gen - St - Tas
Gen - St - Vic
Gen - St - WA
Gm - German Items
Gm - Bk - 605 MGC
GW - 11 Nov 1918
GW - Atrocities
GW - August 1914
GW - Biographies
GW - Propaganda
GW - Spies
GW - We forgot
Militia 1899-1920
Militia - Area Officers
Militia - Inf - Infantry
Militia - Inf - 1IB
Militia - Inf - 2IB
Militia - Inf - 3IB
Militia - Inf - NSW
Militia - Inf - Qld
Militia - Inf - SA
Militia - Inf - Tas
Militia - Inf - Vic
Militia - Inf - WA
Militia - K.E.Horse
Militia - LH
Militia - LH - Regts
Militia - LH - 1LHB
Militia - LH - 2LHB
Militia - LH - 3LHB
Militia - LH - 4LHB
Militia - LH - 5LHB
Militia - LH - 6LHB
Militia - LHN - NSW
Militia - LHN - 1/7/1
Militia - LHN - 2/9/6
Militia - LHN - 3/11/7
Militia - LHN - 4/6/16
Militia - LHN - 5/4/15
Militia - LHN - 6/5/12
Militia - LHN - 28
Militia - LHQ - Qld
Militia - LHQ - 13/2
Militia - LHQ - 14/3/11
Militia - LHQ - 15/1/5
Militia - LHQ - 27/14
Militia - LHS - SA
Militia - LHS - 16/22/3
Militia - LHS - 17/23/18
Militia - LHS - 24/9
Militia - LHT - Tas
Militia - LHT - 12/26
Militia - LHV - Vic
Militia - LHV - 7/15/20
Militia - LHV - 8/16/8
Militia - LHV - 9/19
Militia - LHV - 10/13
Militia - LHV - 11/20/4
Militia - LHV - 19/17
Militia - LHV - 29
Militia - LHW - WA
Militia - LHW-18/25/10
Militia - Military Orders
Militia - Misc
MilitiaRC - Rifle Clubs
MilitiaRC - NSW
MilitiaRC - NT
MilitiaRC - Qld
MilitiaRC - SA
MilitiaRC - Tas
MilitiaRC - Vic
MilitiaRC - WA
Militiaz - New Zealand
Tk - Turkish Items
Tk - Army
Tk - Bks - Books
Tk - Bks - 1/33IR
Tk - Bks - 27th IR
Tk - Bks - Air Force
Tk - Bks - Yildirim
Tk - POWs
Wp - Weapons
Wp - Hotchkiss Cav
Wp - Hotchkiss PMG
Blog Tools
Edit your Blog
Build a Blog
RSS Feed
View Profile
Open Community
Post to this Blog
Site Index
Education Centre
LH Militia
Boer War
Transport Ships
LH Battles
ALH - Units
ALH - General
Aboriginal Light H
Weapons
Ottoman Sources

"At a mile distant their thousand hooves were stuttering thunder, coming at a rate that frightened a man - they were an awe inspiring sight, galloping through the red haze - knee to knee and horse to horse - the dying sun glinting on bayonet points..." Trooper Ion Idriess

The Australian Light Horse Studies Centre aims to present an accurate history as chroniclers of early Australian military developments from 1899 to 1920.

The Australian Light Horse Studies Centre site holds over 12,000 entries and is growing daily.

Contact: Australian Light Horse Studies Centre

Let us hear your story: You can tell your story, make a comment or ask for help on our Australian Light Horse Studies Centre Forum called:

Desert Column Forum

WARNING: This site contains: names, information and images of deceased people; and, language which may be considered inappropriate today.

Monday, 13 October 2008
The Battle of Beersheba, Palestine, 31 October 1917, "Put Grant straight at it."
Topic: BatzP - Beersheba

The Battle of Beersheba

Palestine, 31 October 1917

"Put Grant straight at it."


Did Chauvel say to Grant: "Put Grant straight at it." ?

After the Great War, when all the stories were being sorted out and catalogued, one of the more enduring scenes of the Sinai and Palestine campaigns is the order given by General Chauvel to Brigadier General Grant to commence the famous charge at Beersheba.  

In Gullett, HS,  The Australian Imperial Force in Sinai and Palestine, 1914–1918 (10th edition, 1941) Official Histories – First World War, Volume VII, the story is told at p. 393:

"There was a brief but tense discussion, in which Fitzgerald and Grant pleaded for the honour of the galloping attack which was clearly in Chauvel's mind. FitzGerald's yeomanry had their swords and were close behind Chauvel's headquarters; Grant's Australians had only their rifles and bayonets, but they were nearer Beersheba. After a moment's thought, Chauvel gave the lead to the light horsemen. "Put Grant straight at it," was his terse command to Hodgson; and Grant, swinging on to his horse, galloped away to prepare and assemble his regiments."


See: Gullett account about the fall of Beersheba


A couple years later, when the British Official War History of the Sinai and Palestine campaign was written, the story is somewhat changed. It is no longer in the body of the text. In a footnote, a difference of opinion is aired leaving it up to the reader to ascertain if these words were indeed said as reported in Gullett.

Falls, C.; MacMunn, G.; and, Becke, AF, Military operations: Egypt and Palestine, (London 1930), Footnote p. 58:

"Australian Official History," p. 393. The records are lacking in Information here. At 3.30 p.m. General Chauvel sent or message to the Australian Mounted Division ordering it to attack Beersheba with one brigade, but without mention of mounted action. It is General Chauvel 's recollection that he gave no orders to Br.-General Grant, but spoke only to Major-General Hodgson. B.-General Grant, however, states that Major-General Hodgson took him to the corps commander, who directed him to "take the town before dark," without giving him instructions as to how the attack was to be carried out, and that he himself was therefore solely responsible for the mounted charge.
See: British Official War History account about the fall of Beersheba


This particular situation arose as a consequence of Falls receiving two contradictory letters, one from Chauvel and the other from Grant.


The Chauvel Letter:


General Chauvel's letter to Dr Bean

[Click on page for a larger print version.]


The transcription:

Dear Bean,

Your letter of the 31st July re Grant's comments on the Beersheba Chapter of the Official History of the Palestine Campaign. I did not personally give any orders to Grant. He got his orders from Hodgson. Mounted action was certainly contemplated when I discussed the matter with Hodgson before giving him his orders. As a matter of fact there was little time for anything else. I remember distinctly Fitzgerald, who was present at the discussion, presenting the claims of this Brigade because they were armed with the sword whilst Grant's was not. I told Hodgson to put in Grant as his Brigade ought to have been assembled much quicker that Fitzgerald's. Both were in Corps Reserve but were much scattered on account of hostile aircraft attack.

With kind regards,
Yours sincerely
Harry Chauvel


Chauvel is quite unequivocal about his memory when he states in this letter: "I did not personally give any orders to Grant."

In contrast, Grant tells a different story, the one which appeared in Gullett's book. 


The Grant Letter:


General Grant's letter to Dr Bean


The transcription: 

I had been watching the progress of the attack for some hours from a point near the Corps Headquarters when General Hodgson came to me at 4 p.m. and said:

"It is your turn to go in Grant. Come and see the Corps Commander."


We then went to the latter. General Chauvel said:

"Go right in and take the town before dark", and indicated the direction of the attack.


The BGGS (General Howard Vyse) then told me to move on the left of the A & NZ Mounted Division which was near the road from Beersheba to Khasim Zanna.

No instructions were given me how the attack was to be made.

From the movement of the enemy troops, I formed the opinion that the was then fighting a delaying action and would reture under cover of darkness after destroying the wells. I therefore ordered a mounted charge to smash through the defence and prevent this. I was solely responsible for the mounted charge, and it was due to my own initiative.


Grant is also unequivocal about his memory when he states in this letter that Chauvel said to him directly and personally: "Go right in and take the town before dark."

This is the only evidence we have of these two conflicting stories. While no one who was there is still alive to contest the account, and this particular note is here only to put the facts on the table rather than make a case, for the moment, as Falls has done, it is up to the readers to make their own minds up on this matter.


Further Reading:

The Battle of Beersheba, Palestine, 31 October 1917

Australian and New Zealand Roll of Honour

Battles where Australians fought, 1899-1920


Citation: The Battle of Beersheba, Palestine, 31 October 1917, "Put Grant straight at it."

Posted by Project Leader at 4:30 PM EADT
Updated: Sunday, 4 October 2009 11:09 AM EADT
The Battle of Beersheba, Palestine, 31 October 1917, Falls Account, Pt 2
Topic: BatzP - Beersheba

 The Battle of Beersheba

Palestine, 31 October 1917

Falls Account, Pt 2


The Capture of Beersheba, 31 October 1917

[Click on map for larger version]

[From: Military operations: Egypt and Palestine, Sketch 3 facing p. 50.]


As part of the Official British War History of the Great War, Cyril Falls; George MacMunn; and, Archibald Frank Becke, were commissioned to produce a commentary on the Sinai, Palestine and Syrian operations that took place. In 1930 their finished work, Military operations: Egypt and Palestine,  was published. Their book included a section specifically related to the battle of Beersheba and is extracted below.

Falls, C.; MacMunn, G.; and, Becke, AF, Military operations: Egypt and Palestine, (London 1930), pp. 52 - 62:


THE APPROACH MARCH OF THE DESERT MOUNTED CORPS.

[52] The two tasks of the Desert Mounted Corps were, to "attack Beersheba from the east so as to envelop the enemy's left rear," and to "seize as much water supply as possible in order to form a base for future operations northwards." The first objective of the leading division (the A. & N.Z. Mounted Division from Asluj) was a line through Bir el Hamam and Bir Salim Abu Irqaiyiq, on the road running eastward to Tell el Mila and the Dead Sea at Qasr Zuweira. Next it was to swing up its right and advance to the Hebron road between Bir es Sqati and Tell es Sabe, a fortified hillock at the confluence of the Wadi el Khalil and Wadi es Sabe. Finally it was to hold a line north-east of Beersheba, with its left on the town mosque. The division, leaving Asluj at 6 p.m. on the 30th October, was to march by way of Thaffha, 11 miles south-east of Beersheba, and Iswaiwin, except for the 2nd L.H. Brigade, which was to take a wider sweep through Bir `Arara. The Australian Mounted Division was to follow by the former route, to be concentrated at Iswaiwin at 9.30 a.m., and to be prepared to advance either directly westward on Beersheba or northward to assist the A. & N.Z. Mounted Division. The 7th Mounted Brigade was to move eastwards from Esani through Goz Itwail es Semin, 7 miles E.S.E. of Beersheba, and establish a line of posts astride the Asluj road. Its mission was to observe the enemy's defences at Ras Ghannam, to follow the Turks if they retired, and to be ready to co-operate either with the remainder of the Desert Mounted Corps or with the XX Corps on its left.

The marches before the mounted troops were therefore long. That of the A. & N.Z. Mounted Division from Asluj to Bir el Hamam was 24 miles, that of the Australian Mounted Division from Khelasa through Asluj to Iswaiwin [53] 30 miles that of the 7th Mounted Brigade about 17 miles. Moreover, each man carried two days' rations for himself one day's forage, and a two days' emergency ration of grain in a sand-bag. Seeing that Australians, New Zealanders and the Midland Yeomen of the 5th and 7th Mounted Brigades were big men, there must have been about twenty stone on every horse's back. But the horses of the whole corps were, if a little fine drawn, hard and fit, already inured to long marches and long periods without water, while horsemastership learned in the hard school of Sinai had reached a level so high that sore backs were seldom seen.

[Note: The marching-out state of the N.Z.M.R. Brigade has been preserved 95 officers, 1,763 other ranks, 1,727 riding horses, 144 packs, 243 draughts, 27 mules, 35 camels, 36 Hotchkiss guns, 12 (Vickers) machine guns. This was probably the strongest brigade.]

The head of the A. & N.Z. Mounted Division reached the cross roads east of Thaffha at 12.20 a.m. and halted while reconnaissances were carried out. Then the column split and pursued its march, the 2nd L.H. Brigade moving by the Bir `Arara track, the remainder of the division turning left-handed and marching on Iswaiwin, with the Wellington Regiment as advanced guard. It had been reported that there was a Turkish post at Goz esh Shegeib on this road; a little further north there was an encounter with a small body of the enemy, but the march was not checked. By 8.30 a.m. the troops were in position, the 2nd L.H. Brigade on the right north of Bir el Hamam, in touch with the N.Z.M.R. Brigade at Bir Salim Abu Irqaiyiq, the 1st L.H. Brigade in rear of the New Zealanders. One regiment of the Australian Mounted Division, the 8th A.L.H. (3rd L.H. Brigade), had marched in rear of the A. & N.Z. Mounted Division and turned off north of Iswaiwin on the track running into Beersheba. It had orders to reconnoitre the enemy's works about Ras Ghannam, and cover the concentration of its own division at Iswaiwin.

The head of the Australian Mounted Division reached Asluj at 8.30 p.m. on the 30th and remained there three and a half hours to water its transport, the 8th A.L.H., as previously stated, moving off with the A. & N.Z. Mounted Division. The division reached its area of concentration without incident, and advanced a short distance from Iswaiwin towards Ras Ghannam, the 5th Mounted Brigade remaining [54] at Iswaiwin in corps reserve. The 7th Mounted Brigade reached Goz Itwail es Semin at 5 am without on the 31st. The South Notts Hussars then took up without opposition a line from a mile and a half south of Ras Ghannam to Goz es Na'am. Patrols pushed forward towards Ras Ghannam found the trenches strongly held. Between 8 and 9 a.m, the Brigade got touch with th 4th L.H. Brigade on its right and the the XX Corps Cavalry on its left.

Thus the great march had been successfully accomplished, and the troops were in position for the next move. The enemy may have been aware of the concentrations at Asluj and Khelasa, but he was completely surprised by the appearance of two cavalry divisions to the east, not having contemplated that the British mounted troops would move, at any rate in such numbers, so far from water. The bombardment of the XX Corps had already alarmed him as to his western defences. Now there was observed a bustle about Beersheba as the few troops available took up positions to the east. But Ismet Bey was already in a hopeless situation unless the reinforcements which he demanded arrived speedily. They were refused, and he was bidden not to evacuate Beersheba. Perhaps Kress recalled the British withdrawal from Gaza seven months before, when the garrison had been in even worse straits than it was here. But in war fortune seldom bestows such favours twice.

Mention must be made of one small independent force also on the move in the early morning of the 31st, which was to have an effect altogether disproportionate to its size. It was commanded by Lieut.-Colonel S. F. Newcombe, RE, and consisted of 70 British camelry and a few Arab scouts, with ten machine guns, a number of Lewis guns, a supply of explosives, and three days' rations. Colonel Newcombe was, it will be recalled, the first head of the British Mission to the King of the Hejaz. Being in Cairo in September, he proposed to Sir Edmund Allenby that he should take a small party through the desert east of Beersheba - country which he had surveyed before the war and in which he knew some of the inhabitants [Note: The survey had been carried out as far north as the Wadi es Sabe, but Captain Newcombe (as he then was) had acquired a good knowledge of the country north and north-east of Beersheba.] to raise the Bedouin against the Turks [55] at the moment of the British attack, carry out raids, and block the Hebron road after Beersheba had been captured. Sir Edmund Allenby gave permission fort his bold enterprise to be attempted. Colonel Newcombe's detachment left Asluj on the 30th, and after an extremely rapid march through the hills reached Es Semua, 20 miles north-east of Beersheba. On the evening of the 31st he moved down to the Hebron road, captured a few prisoners, and cut the telegraph to Jerusalem. He heard that night from the Bedouin of the capture of Beersheba, and determined to hold the Hebron road, so as to cut off the enemy's retreat to the north, hoping for a speedy advance by the British cavalry. His further adventures will be recorded when we come to the British operations in the hills north of Beersheba.


THE ATTACK OF THE DESERT MOUNTED CORPS.

At 9.10 a.m. the N.Z.M.R. Brigade (Br.-General W. Meldrum began its advance on Tell es Sabe, Canterbury Regiment on the right, Auckland on the left, each with four machine guns. The mound of Tell es Sabe was the best defensive position on the eastern side of Beersheba. Though low, it commanded all the ground to the east and also that south of the Wadi es Sabe. It was flat-topped with steep flanks, strewn with boulders, and upwards of 20 acres in extent. Several machine guns on its top raked all the plain. [Note: The tell was held by one battalion (300 strong or a little more) and one machine-gun company.] On the right of the New Zealanders the 2nd L.H. Brigade (Br.-General G. de L. Ryrie was ordered to advance on Bir es Sqati, establish itself astride the Hebron road, and thus protect them from counter-attack from the north.  The advance began swiftly, in full view of Major-General Chaytor, who had established his headquarters near Khashim Zanna. From this point of vantage he could see, within an hour of the opening of the attack, the 2nd L. H. Brigade 2 miles north of Bir el Hamam, with patrols beyond the Wadi Hora, an the New Zealanders across the Wadi es Sabe.

The 7th the leading regiment of the 2nd L.H Brigade, advancing from Bir el Hamam at a gallop, speedily gained the Hebron road at Bir es Sqati, the pace of its [56] advance rendering the shrapnel fire from the hills above Beersheba innocuous. Just beyond the road, however, it was held up in a small wadi by the enemy on the heights and was unable to make further progress. The Turkish commander had withdrawn his 3rd Cavalry Division (only 1 100 strong) into the hills to prevent the envelopment of Beersheba, and it fulfilled its task. Despite the criticisms directed against him by Kress, it is difficult to see how he could better have employed this force, and it is probable that had he kept the division in the Beersheba defences the place would have fallen earlier and the garrison been annihilated.

Welcome news was received from Br.-General Ryrie that there was water in the little wadi which enters the Wadi es Sabe at Bir el Hamam, and in the Wadi Hora. These pools were the result of a recent rain-storm and had already been reported from the air.

The task of the New Zealanders was a stiff one, and the advance of the brigade, from the moment when the Auckland Regiment was within 800 yards of Tell es Sabe, was slow. The Somerset Battery was in action at a range of 3,000 yards, but could do little to keep down the fire of the machine guns upon the mound. At 10 a.m. Major-General Chaytor ordered the 1st L.H. Brigade (Br.-General C. F. Cox) to despatch a regiment to cover the left flank of the N.Z.M.R Brigade. The 3rd A.L.H. moved up to Kh. el Watan on the Wadi es Sabe and obtained touch with the New Zealanders. Br.-General Meldrum arranged that the regiment should advance south of the wadi and swing in upon the mound from the south while his own brigade pressed the attack from the east. A little later the 2nd A.L.H. was ordered up on the left of the 3rd to stiffen the attack, which was making slow progress. At 11 a.m. the Inverness Battery came into action against Tell es Sabe, and, covered by its fire, the Somerset Battery boldly moved up to within 1,300 yards and opened fire with increased effect. Enemy aircraft were now circling above the battlefield and dropping bombs, which caused a good many casualties to horses.

At 1.30 p.m. General Chauvel ordered the Australian Mounted Division to place the 3rd L.H. Brigade (Br.-General " Battery H.A.C., with orders to move upon the right of the N.Z.M.R. Brigade. But its support was not required. The diversion of the 1st L.H. Brigade across the wadi had already begun to make its weight felt. Moreover the Canterbury Regiment had crossed the Wadi el Khalil, and, though galled by fire from the hills, was threatening Tell es Sabe from the north. Soon after 2 p.m. the Auckland Regiment began its assault, advancing by a series of short rushes from cover to cover. At 2.40 a small outlying hummock east of the tell was captured with 60 prisoners and two machine guns, which were turned against the main position. At 3 o'clock the Aucklands made their final dash and within a few minutes Tell es Sabe was in their hands. Another 70 prisoners and two more machine guns were captured. At once the Turkish artillery began to shell the mound, while several aeroplanes swooped down upon it and dropped bombs. Major-General Chaytor then ordered the 1st L.H. Brigade to advance on the final objective, from Point 1020, north-east of Beersheba, to the mosque.

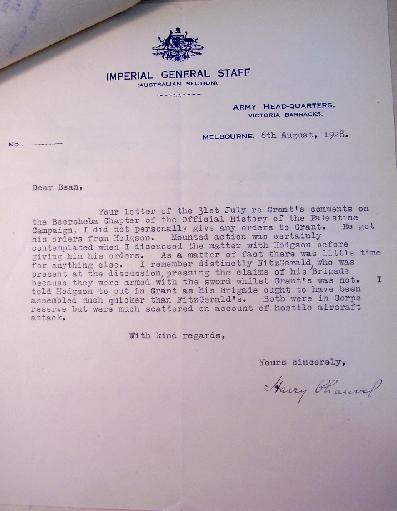
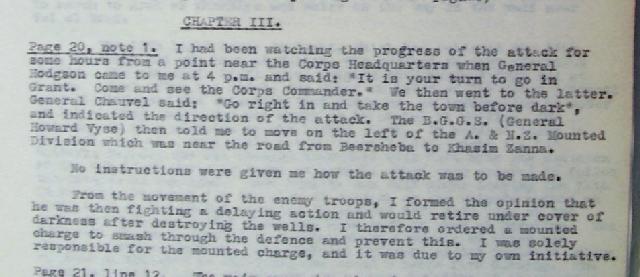
The attack had so far been successful, but the natural strength of Tell es Sabe and the stubborn resistance of its small garrison had seriously delayed the Desert Mounted Corps, and even now the New Zealand Brigade was unable to advance beyond this point. West of Beersheba the XX Corps had all its objectives, and could without doubt have captured Beersheba itself before the mounted troops. The objective, had, however, been allotted to the Desert Mounted Corps, and Sir Edmund Allenby, who had come up to General Chetwode's headquarters at El Baqqar, ordered General Chauvel to capture it before nightfall. General Chauvel, who had already realized that he was behind his programme, ordered Major-General Hodgson to direct the 4th L.H. Brigade (Br.-General W. Grant) to attempt to enter the town from the east. General Chauvel had hesitated for a moment whether to employ the 5th Mounted Brigade, which was in [58] reserve and was armed with the sword unlike the Australians, but as the 4th L.H. Brigade was closer in he decided that it should attack. "Put Grant straight at it!" was his order to Major-General Hodgson. [Note: "Australian Official History," p. 393. The records are lacking in Information here. At 3.30 p.m. General Chauvel sent or message to the Australian Mounted Division ordering it to attack Beersheba with one brigade, but without mention of mounted action. It is General Chauvel 's recollection that he gave no orders to Br.-General Grant, but spoke only to Major-General Hodgson. B.-General Grant, however, states that Major-General Hodgson took him to the corps commander, who directed him to "take the town before dark," without giving him instructions as to how the attack was to be carried out, and that he himself was therefore solely responsible for the mounted charge. {For copies of the letters, see: "Put Grant straight at it."}]

The 4th L.H. Brigade had the 11th A.L.H, holding a long line of posts astride the Iswaiwin-Beersheba track, in touch with the 7th Mounted Brigade. The 4th and 12th Regiments were east of Iswaiwin. Horses had been fed and rested, though not watered, after their long march the previous night. Squadrons were dispersed to escape the bombs of the German aeroplanes, so that it was after 4.30 p.m. when Br.-General Grant had them ready, and the sun went down just after the attack was launched. The 4th A.L.H. deployed north of the Iswaiwin-Beersheba track, the 12th south of it. The 11th A.L.H. was ordered to concentrate and follow the other two regiments as a reserve. Similar orders were sent by General Chauvel to the 7th Mounted Brigade on the left ; and the 5th Mounted Brigade, hitherto in corps reserve, was ordered to advance on Beersheba in rear of the attacking troops.

The 4th and 12th A.L.H. then advanced at a trot, but soon quickened pace to a gallop, each on a frontage of one squadron. The men, having no swords, carried bayonets in their hands. The 4th A.L.H. had all three squadrons in the charge, but one squadron of the 12th had been directed to co-operate with the machine-gun squadron (less one subsection following each regiment) which was to move along a wadi on the left of the track and protect the left of the advance against attack from the neighbourhood of Ras Ghannam, where the enemy could be seen in some strength in his trenches.

As the charging squadrons swept down the gentle slope towards Beersheba, enveloped in a cloud of dust, the 12th A.L.H. came under machine-gun fire from these trenches. [59] The Notts Battery, which had unlimbered at the point of deployment, found the range with its second shot and quickly drove the enemy from the position. The Principal Turkish trenches on the front of the charge faced south, and there was only one shallow trench facing east, across which the 4th A.L.H. swept without checking. At the next group of trenches there was a short fight. Two squadrons of the 12th A.L.H. swept straight on into Beersheba, but the remainder of the attacking force dismounted after passing through the trenches and attacked with the bayonet. The Turks fought grimly, and a considerable number were killed. Meanwhile the leading squadrons had reached the town, capturing prisoners and guns en route. When the 11th A.L.H. reached Beersheba, Br.-General Grant ordered it to push through the town and hold it against attack from the north, west, and south-west. On its way through the regiment captured about 400 prisoners who were retreating from the southwest. The 4th A.L.H. took up a line from the Wadi es Sabe to the mosque, the 11th A.L.H. from the mosque to the Khelasa road, while the 12th A.L.H. remained in reserve near the railway viaduct.

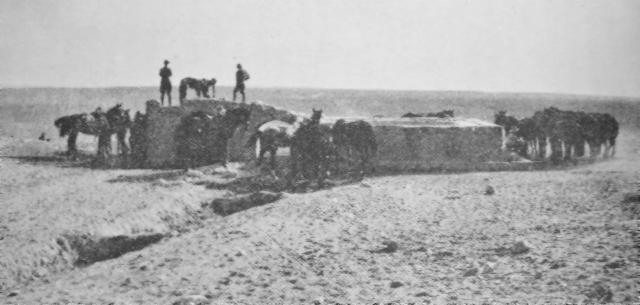
Finding the enemy evacuating his trenches at Ras Ghannam, the 7th Mounted Brigade had also advanced, and reached Beersheba by 6.30 p.m. On the right the A. & N.Z. Mounted Division with the 3rd L.H. Brigade attached had also reached its final objective, and by 6 p.m. was holding a line of outposts through Bir el Hamam, Bir es Sqati, Point 1020, and to within a hundred yards of the mosque. Though the haste with which the Turks in Beersheba retreated up the Gaza road and to the north prevented them from carrying out a tithe of the destruction they had planned, yet the water supply in the town would not itself have sufficed for the needs of all the horses. The pools discovered by the 2nd L.H. Brigade, and others in the Wadi es Sabe, were therefore exceedingly valuable. But this supply was not to last for long,

The total captures by the Desert Mounted Corps in the day's fighting were 70 officers and 1,458 other ranks. Of these over a thousand were captured by the 4th L.H. Brigade, either in the course of the charge, or from the troops who retired from the southern front and were intercepted by the 11th A.L.H. Nine field guns were also [60] captured. The brigade's own casualties were very small, owing to the enemy having been driven out of that part of the Wadi es Sabe immediately west of Tell es Sabe before the charge: 2 officers and 29 other ranks killed, 4 officers and 28 other ranks wounded, and one missing. The high proportion of killed to wounded in this small total was Br.-General Grant reported, due to the close fighting round the Turkish trenches. The total casualties of the corps were extraordinarily light, being under two hundred.

[Note: Killed.    Wounded.
1 Officers .    6    15
Other Ranks .    47    129

[It must be understood that the Light Horse and Mounted Rifles when acting dismounted did not attempt to push home an attack against strong opposition. The "Australian Official History" (p. 235) thus defines their tactics:

["The extreme caution displayed at most stages of these dismounted " attacks, and the relatively light casualties usually suffered, may be somewhat puzzling to those who have served only with infantry. But the explanation is simple . A light horse line is a slender striking force, and leaders dare not commit it to a decisive charge unless the odds of battle are strongly in its favour. A premature assault against a strongly placed enemy might in a few minutes have ended in the complete destruction of the attacking regiments."]

That Beersheba fell before the day was out was almost certainly the result of the brilliant charge by the 4th L.H. Brigade, even though, as we now know, Ismet Bey had already issued orders for withdrawal to the north and the formation of a rear guard upon the line of the Wadi es Sabe. Even supposing that this rear guard could have been dispersed during the night, which is not probable, the charge was none the less important. Beersheba without its wells would not have been a valuable possession, and it was the 4th L.H. Brigade which was entirely responsible for their preservation. Nor would the losses of the Turks have been nearly so heavy had they been allowed to carry out an orderly retirement. As it was, more than half the dismounted troops in the town were captured or killed, while out of 28 guns 9 fell into the hands of the Desert Mounted Corps and 6 into those of the XX Corps. Only the 3rd Cavalry Division withdrew without loss. The corps commander himself narrowly escaped capture.

Yet another result was the effect on Turkish morale, an effect greatly increased by the charges of the Yeomanry [61] pushed home with the sword in their case - which will be 1917 recorded in the accounts of the next fortnight's fighting. Till now the Turks had looked upon the British mounted troops as chiefly valuable for reconnaissance, or raids in superior numbers on isolated posts, as at Rafah, and had considered that the Turkish infantry had little to fear from them. Nor perhaps had it much to fear even note, unless the men lost their nerve, but that is precisely what was to happen at Maghar, at Abu Shushe, and on several other occasions. The commanders of the British mounted troops first learnt from this incident their own strength, and that in this theatre there was likely to be brilliant opportunity for the cavalry arm even in frontal attack, whereas mounted infantry tactics were never likely to achieve decisive success. A page had been turned in the annals of the campaign.

NOTE.

Of no action in the course of the campaign have we a fuller account from the Turkish side than of the capture of Beersheba. Several chapters of Turkish "Yilderim" are devoted to the battle and its lessons, and the subsequent reports of Kress and of Ismet Bey, commanding the III Corps, are included. The 27th Division consisted of two regiments, the 67th and 81st, which defended Beersheba from the west, the former south of the Wadi es Sabe, the latter north of it. From the Khelasa road to Ras Ghannam was the 48th Regiment, 16th Division. In reserve was the 3rd Cavalry Division (6th and 8th Regiments), and the 2nd Regiment of the 24th Division. This division had moved south from Tell en Nejile, and another regiment, the 143rd, was in the hills about 6 miles N.N.W. of Beersheba, but it was under the orders of the XX Corps and took no part in the action.

When Ismet Bey perceived that he had to face an attack by the mounted troops from the east he placed one battalion of the 48th Regiment and a machine gun company at Tell es Sabe, first one and then apparently a second battalion of the 2nd Regiment south-east of the town, and moved the 3rd Cavalry Division into the high ground to the north-east, to guard the Hebron road and prevent Beersheba from being surrounded from the north. At noon he had reports from Essad Bey, commanding the 3rd Cavalry Division, and also from the air that there were "two to three cavalry divisions to east and south," and so informed the commander of the Eighth Army. According to the Turkish version Kress replied: "No, they are only two cavalry brigades." A little later, in response to a more detailed report and a demand for instructions, Kress is stated to have telegraphed: "Beersheba will be held. The battle will be continued."

Ismet Bey, learning of the loss of the 67th Regiment's position and the virtual annihilation of two of its battalions, next despatched the third battalion of the 2nd Regiment to the south-west. He had now used up all his reserves, except for two companies of the 81st Regiment, north of Wadi es Sabe which he withdrew to Beersheba. All that stood between the British 60th and 74th Divisions and the town was the reserve battalion of the 67th Regiment and one battalion of the 2nd.

At 3 p.m., despite "the courageous and obstinate defence to the last [62] man" of Tell es Sabe, the hill was captured. At 4 p.m. the corps commander ordered a general retirement to "north of the town," and directed the engineer company attached to the 27th Division to destroy the water supply. The 48th Regiment was to retire first and take up a rear-guard on the Wadi es Sabe. Then came the charge of the 4th L.H. position Brigade, which entered the town when headquarters was on the point of leaving. Ismet Bey escaped on foot, gathered a score of men about him, beat off the attacks of some Australian troopers, and reached the headquarters of the 143rd Regiment. Thence he sent a message to Essad Bey to keep touch with the enemy, hold the high ground, and guard the Hebron road as well as the track to Tell esh Sheria through Kb. el Omry. The remnants of the infantry were reorganized as well as possible near Bir Abu Irqaiyiq Station, and reached Tell esh Sheria on the following morning. It is added that the destruction of the wells was not carried out, partly owing to damage done to "preparations" by the British artillery, but mainly owing to the Australian charge.

Kress ("Sinai," i, p. 43), complains that Ismet Bey had employed his reserves too soon and particularly criticizes the withdrawal of the mobile reserve, the 3rd Cavalry Division, to the hills. The only reflection on the action of the corps commander in the Turkish account is that he remained at the telephone in Beersheba, which was overlooked from all sides, and therefore could see nothing of the battle. He should, Colonel Hussein Husni suggests, have been at an observation post on the high ground to the north. For the rest the Turks put the blame on Kress and quote the following passage from his report:

"It was not possible to send reinforcements to Beersheba on the first day of the battle, to take up a more extensive position. Secondly, I had no idea that Beersheba would fall so rapidly, and did not see the necessity for these reinforcements. In addition, it was considered that the enemy's main attack would be against Gaza, and that the attack on Beersheba was a feint. Besides, a possible disembarkation on the coast had to be watched. Finally, lack of water precluded all idea of locating the Yilderim reserves north of and near Beersheba."

Regarding this last point, the Turkish report remarks that there was at Tell esh Sheria a well with a motor pump and a large reservoir, and that the wells at Kh. Abu Khuff and Bir Khuweilfe, 10 and 11 miles N.N.E. of Beersheba, contained more than enough water for an infantry division. The truth of this statement is proved by the fact that all the troops engaged in the hill fighting during the next week watered from these wells. But that is a minor question. The gist of the Turkish criticism lies in the following passage:

"The battle of Beersheba should have been fought on different lines. The group should have retained its mobility in preference to holding the front. It was unnecessary to accept a decisive combat against heavy odds at Beersheba. The army commander should have given the III Corps commander a 'directive,' some time before, and ... everything should have been so organized that the group could not be surrounded at once, and so that it could retire, in case of necessity, before superior forces to the Dhahriye-Abu Khuff line without loss."

Certain criticisms of Falkenhayn seem to show that he also believed the Eighth Army commander to have been at fault, and it was apparently for this cause that Kress, undoubtedly one of the greatest masters of desert warfare the war produced, was relieved of his command when the front had been stabilized, after the British capture of Jerusalem. Hussein Husni's summing up of Kress's action in the battle is contained in the sentence:

"He relied on Meinertzhagen's pocket book."


Further Reading:

Falls - the British Infantry

"Put Grant straight at it."

The Battle of Beersheba, Palestine, 31 October 1917

Australian and New Zealand Roll of Honour

Battles where Australians fought, 1899-1920


Citation: The Battle of Beersheba, Palestine, 31 October 1917, Falls Account, Pt 2

Posted by Project Leader at 10:59 AM EADT
Updated: Thursday, 8 October 2009 4:54 PM EADT
The Battle of Beersheba, Palestine, 31 October 1917, Falls Account, Pt 1
Topic: BatzP - Beersheba

The Battle of Beersheba

Palestine, 31 October 1917

Falls Account, Pt 1


The Capture of Beersheba, 31 October 1917

[Click on map for larger version]

[From: Military operations: Egypt and Palestine, Sketch 3 facing p. 50.]

As part of the Official British War History of the Great War, Cyril Falls; George MacMunn; and, Archibald Frank Becke, were commissioned to produce a commentary on the Sinai, Palestine and Syrian operations that took place. In 1930 their finished work, Military operations: Egypt and Palestine,  was published. Their book included a section specifically related to the battle of Beersheba and is extracted below.

Falls, C.; MacMunn, G.; and, Becke, AF, Military operations: Egypt and Palestine, (London 1930), pp. 48 - 52:


THE ATTACK OF THE XX CORPS.

[48] It was a cold, still night, precursor of a hot and breathless day. Over the troops' left shoulders the bombardment of Gaza, more than twenty miles away, was rumbling, and the horizon flickered with gun-flashes till breaking day concealed them. From the Turkish trenches in front there came not a sound. Then, at 5.55 a.m., the XX Corps' own artillery set about its work. The ground, after the scorching heat of summer, was dry as powder and bare of vegetation; there was no breath of wind; so that after an hour's bombardment the Turkish defences were screened in a dense cloud of dust. At 7 the bombardment was stopped for threequarters of an hour to permit the murk to clear a little and the observers to locate their targets. Visibility did not much improve during the pause, but from what could be seen of the wire it was by no means all cut. Br.-General Da Costa decided that further delay would prove more costly in the long run than an immediate assault, and got Major-General Shea's permission to carry it out after a final intense bombardment of ten minutes, beginning at 8.20. At this hour the 2/22nd London advanced against Point 1069 itself and the 2/24th against the works just north of it. The wirecutting parties cut the necessary gaps while the barrage was still upon the Turkish trenches 30 yards ahead, and within a few minutes the works were captured with 90 prisoners, the brigade having so far suffered about one hundred casualties.

While this attack was in progress the leading brigades of the 74th Division advanced in conformity with the 181st Brigade, coming as they topped the successive low cliffs [49] under accurate shrapnel fire, which inflicted heavy loss upon the 231st Brigade on the right. Direction was hard to keep upon ground which, though extraordinarily rough and broken, had few easily distinguishable features. The 231st Brigade (Br.-General C. E.Heathcote) edged off slightly to its right, forcing the 230th (Br.-General A. J. M'Neill) on the left to fill the gap with two supporting companies of its right battalion, the 10/Buffs. As the troops neared the enemy's entrenchments machine-gun fire slowed down the advance, but by 10.40 the 231st Brigade was within 500 yards of the front line, and the 230th, the left of which was slightly refused, about 400 yards further off. Batteries now moved forward to positions from which the wire covering the main defences could be cut.

The sun was well up when the new bombardment began; the stones which bestrewed the ground were already burning to the touch, and the hillsides radiated heat. At 11.40 Major-General Shea told Major-General Girdwood that the wire on his division's front appeared to be cut and asked how soon he would be prepared to attack. Major-General Girdwood replied that he could not see whether or not the wire on his front was cut, but that the 74th Division would go forward when the 60th was ready. General Chetwode then ordered the assault on the main line to be launched at 12.15 p.m., at which hour the bombardment was to increase in intensity.

The four brigades, 179th, 181st, 231st, and 230th, advanced swiftly, to a great extent screened by the dust and smoke of the bombardment. In every case but that of the 181st Brigade their attack was carried out by two battalions in first line. The 181st Brigade had three battalions in line, the 2/22nd London remaining in the captured position at Point 1069. Dispositions varied slightly, but those of the 2/14th London, which are recorded in detail, may be taken as typical. It had two of its four companies in first line, each on a front of two platoons, the companies in two "waves," each of two lines - 50 yards between lines and 100 yards between waves. Where the troops were attacking salients in the enemy's position there were two further waves in similar formation 300 yards in rear, formed from the remaining companies. The troops advancing against re-entrants were not thus supported and were echeloned slightly in rear.

[50] During the period of waiting several parties of Turks had been seen withdrawing, and when the assault reached the trenches resistance on the 60th Division's front was never very determined. The loss of Point 1069 had without oubt demoralized the enemy here. The 2/15th London, right battalion of the 179th Brigade, suffered somewhat severely from the fire of a machine gun, but when that was captured all resistance was over The 2/13th London of this brigade then passed through the other two battalions and its leading company attacked two field-guns beyond the final objective with Lewis-gun fire, drove off the detachments, and captured the guns. All the 60th Division's objectives were in its hands before 1 p.m.

The 74th Division had a less easy task. Major-General Girdwood had ordered the artillery to lengthen range very slightly and thus turned the dust, which had prevented observation of fire, to advantage; for it formed a screen behind which the infantry was enabled to cut the wire. The two Welch Fusilier battalions of the 231st Brigade met with stout resistance. In one post which fought to the last Corporal John Collins of the 25th bayoneted fifteen Turks. [Note: This N.C.O, when displayed remarkable gallantry and leadership during the period battalion was lying under heavy fire, and had repeatedly carried wounded men back to cover. After the incident recorded he advanced with a Lewis Gun section beyond the section and covered the consolidation of the captured postion. He was awarded the Victoria Cross.]  These two battalions suffered nearly two-thirds of the casualties of the whole corps and took three-quarters of its prisoners. All objectives were captured within a few minutes of those of the 60th Division.

It was now uncertain whether or not the works north of the Wadi es Sabe were held. To the 230th Brigade there appeared to be little or no movement in them, but there was some long-range fire from that flank, and patrols of Smith's Group were also shot at when they approached the wire. Major-General Girdwood obtained permission from General Chetwode to attack these trenches from the south with the 230th Brigade while the 5th and 6th R.W.F. of Smith's Group attacked them from the west. The operation was first ordered to take place at 6 pm. and then postponed till 7 p.m., but even then Smith's Group reported that the two [51] battalions under its orders could not get into position by that hour. Br.-General M'Neill was therefore instructed by Major-General Girdwood to carry out the attack alone, so as to avoid altering the artillery programme already arranged. The 16/Sussex advanced at the appointed time and occupied all the enemy's trenches up to the Beersheba-Tell el Fara road with little difficulty. The works had, in fact, been evacuated, and the only resistance was from a handful of snipers. An abandoned battery was captured by the Sussex.

Beersheba itself had by this time fallen to the Desert Mounted Corps, so that the XX Corps had no further task. The 60th and 74th Divisions bivouacked on the battlefield behind a line of outposts. The 53rd Division, to which the battalions in Smith's Group had been returned, remained to cover the flank in the positions which it had occupied during the action, still with the 30th Brigade under its orders. The remainder of the 10th Division, which had moved up to Goz el Basal during the afternoon, bivouacked there.

In the course of the day 419 prisoners, 6 guns, numerous machine guns, and a quantity of material of all sorts had been captured by the XX Corps. The Turkish defences were excellently sited and deeply dug. With good wire they would have been formidable, but, lacking a strong obstacle in front, the garrison was too weak and too little resolute to make a serious resistance, except at isolated points. Nor was the weak Turkish artillery able to give it much assistance - though it punished the 231st Brigade severely early in the day - for the British heavy guns, well served by their observers during the preliminary bombardment, kept down its fire and destroyed its observation posts.[Note: The attack afforded one interesting testimony to the importance of concealing work while actually in progress. Early aeroplane photographs of the defences showed a large hole dug on the top of Point 1069, with open cable-trenches radiating from it. The next photographs showed the hole covered, and the trenches filled in but still clearly visible. The final ones showed that the observation post had been carefully, but uselessly, camouflaged. Orders were given that particular attention should be paid to this observation post and the trenches, which were still visible, during the bombardment. After the battle it was found to be a dugout with a steel roof and trap door at the top. A headless Austrian artillery officer was lying inside.] The British casualties had been suffered chiefly from shrapnel and machine-gun fire during the preliminary bombardment [52] and while the troops were closing to within assaulting distance of the trenches. They amounted to 136 killed, 1,010 wounded - including wounded-including a high percentage of walking cases - and 5 missing.


Further Reading:

Falls - the fall of Beersheba

"Put Grant straight at it."

The Battle of Beersheba, Palestine, 31 October 1917

Australian and New Zealand Roll of Honour

Battles where Australians fought, 1899-1920


Citation: The Battle of Beersheba, Palestine, 31 October 1917, Falls Account, Pt 1

Posted by Project Leader at 9:50 AM EADT
Updated: Thursday, 8 October 2009 4:57 PM EADT
Sunday, 12 October 2008
The Battle of Beersheba, Palestine, 31 October 1917, 8th LHR, AIF, Unit History Account
Topic: AIF - 3B - 8 LHR

 The Battle of Beersheba

Palestine, 31 October 1917

8th LHR, AIF, Unit History Account


Lieutenant Colonel Leslie Cecil Maygar, VC, Killed in Action at Beersheba


Captain Thomas Sidney Austin produced a unit history called The history of the 8th Light Horse Regiment A.I.F. which included a section specifically related to the battle of Beersheba and is extracted below.


Austin, TS, The history of the 8th Light Horse Regiment A.I.F. :   


BeershebaThe 28th proved a busy Sunday. By 1200 the camp was dismantled and the Regiment all packed and ready to move on the Beersheba offensive. Our first job proved to act as escort to the main convoy to Khalasa and at 1500 that afternoon the foot of Tel el Fara presented a wonderful scene. Parks of supply wagons, ammunition limbers, and guns were formed up in the vicinity, covering acres of ground. Busy staff officers and horsemen were to be seen galloping hither and thither giving orders and sorting the many different units into their respective places in the column. This convoy is probably the record convoy of the war. It carried all the supplies and materials to be used by the Mounted Divisions in their attack on the east and S.E. side of Beersheba - a brilliant stroke which did much to crown with success the first of General Allenby's offensive in Palestine.

The column got safely started by 1700 on the road to Esani, 8 miles distant and which was to be our first halting place. As the wagons strung out the column covered a length of 6 miles, there being 307 4 wheeled vehicles, besides innumerable horses, pack mules and donkeys and the head of the column was almost at Esani before the rear had got clear of the Wadi Ghuzze. Thanks for a very bright moon, everything went off without a hitch. On reaching Esani fresh orders were received and the column was broken up, "B" Squadron going on to Khalasa with a large portion whilst the rest of the Regiment went in to bivouac near Tel Itweil. On the 29th. Brig. General Wilson assumed command of the Brigade and Lieut. Col. Maygar rejoined the Regiment.

Four N.C.O's were granted commissions to complete establishment, namely:- Sgt. C.G.T. Williams, Sgt. H.A. Patterson, Sgt. E.M. Jenner and L/Cpl. F. Moore. The Brigade moved on to Khalasa at 1700 and reached there at 2230. Horses were watered and "B" Squadron rejoined. The Regiment received orders to report to Anzac Mounted Division at Asluj before 0500 on the 30th. and our trek was resumed for that place. Asluj was reached in darkness at 0400 and after reporting to Headquarters there a bivouac site was selected on the North side of
the town near the railway station. A spell was made up to 1700 when the Regiment joined the Divisional column in its march to the east of Beersheba, When just North of Iswaiwan, the Regiment branched off and though not in touch again came under the command of the Australian Mounted Division. By 0700 on the 31st. we had taken up the line running through points 1210, 1180, and 1280 (Sq.Q) which were our place in the dispositions for the attack on the town which could be plainly seen about 3 miles to the N.W. Ras Ghannam redoubt which appeared very strongly held was about 1500 yards directly West. We were linked with the 7th. Mounted Brigade who were some distance to the South of this redoubt, and on our left, whilst on our right were the N.Z.M.R. extending towards Khashim Zanna.

The line advanced slightly but was ordered not to go further forward as the rest of Australian Mounted Division would be up in the afternoon. Patrols were thrown out in endeavours to gain information and a good deal of fire was exchanged between both side. Our casualties were light, 1 man and 1 horse being killed. Meanwhile the attack on our right was developing and concentrating an Tel el Saba, a feature in the Wadi bed about 2 miles due East of the town. This place which was very strongly held fell to the New Zealanders and the 1st. Light Horse Brigade at 1800 after a very determined and bloody fight. Its fall helped very greatly in the capture of other redoubts, The 4th Brigade took over the line held by the Regiment at 1600, and soon after from here made their magnificent charge over the trenches and captured the town and many prisoners. The Regiment was ordered to report to Desert Mounted Corps Headquarters at the rear of Khassim Zanna and arrived there at 1730. Just then 2 enemy aeroplanes swooped down and as there were very many troops and transport vehicles concentrated there a good target presented itself to them and of which they took full toll. At a very low altitude, they bombed and machine gunned assn .mod horses, causing a large number of casualties to our side. Lieut Col. Maygar was seriously wounded by a bomb bursting almost under him, and his horse, also wounded, bolted into the darkness and confusion and we never saw the Colonel again. After much searching his horse was found covered in blood and news was obtained that the Colonel had been got safely to hospital, though he succumbed at Karm two days later. Capt. Sproat and 2 Other Ranks ware also hit, while 2 horses were killed. Neighbouring Units suffered much more heavily.

Major McLaurin took command and the Regiment moved in the darkness to the wadi near Bir Haman, where the houses were watered. The 3rd. Brigade was picked up by the flash at a signal lamp and after an hours spell we moved to a bivouac about a mile east of Tel el Saba. At dawn the next morning enemy aeroplanes again raided, but the horses had been scattered over a wide area and presented poor bombing targets. Luckily the men were standing to arms at the time and rear quickly formed into position where good fire control was obtained on the machines. One machine flying extremely low was caught by a terrific burst of fire and subsequently fell among the hills just to the north, the pilot being found dead.

Orders ware received from BHQ to gain up and this was done by 0800 at new site half a mile west of the Tel. A good days rest was enjoyed here, the horses obtaining a plentiful supply of water and the men fresh rations.


Further Reading:

8th Light Horse Regiment, AIF

8th Australian Light Horse Regiment, Roll of Honour

The Battle of Beersheba, Palestine, 31 October 1917

Battles where Australians fought, 1899-1920


Citation: The Battle of Beersheba, Palestine, 31 October 1917, 8th LHR, AIF, Unit History Account

Posted by Project Leader at 6:47 PM EADT
Updated: Saturday, 3 October 2009 10:22 AM EADT
The Battle of Beersheba, Palestine, 31 October 1917, 6th LHR, AIF, Unit History Account
Topic: AIF - 2B - 6 LHR

The Battle of Beersheba

Palestine, 31 October 1917

6th LHR, AIF, Unit History Account


Watering horses on Beersheba Hebron Road
 
[From: Berrie, Under Furred Hats, plate facing p. 111.]


Lieutenant George Lachlan Berrie produced a unit history published in 1919 called Under Furred Hats (6th ALH Regt) which included a section specifically related to the battle of Beersheba and is extracted below.

Berrie, GL, Under Furred Hats (6th ALH Regt), (Sydney 1919), p. 110:   


Chapter V

The Promised Land

For five days the Regiment remained at Asluj cleaning out wells which had been blown in by the enemy. This work proceeded in shifts day and night and was undoubtedly one of the most arduous undertakings the Regiment ever accomplished. The water supply available was so small that a large number of horses had to be sent back to Khalasa. In addition we found day patrols to various points and night outposts around the camp area.

On the night of the 30th, the Regiment moved out to take its part in the flanking movement around Beersheba. The country travelled over was very difficult, hilly and stony, but by daylight the flanking movement was complete. Reconnaissance was carried out towards Sakaty, and that night outpost positions were taken up astride the Beersheba-Hebron Road. The water supply in this locality was almost non-existent, save for a few Bedouin underground reservoirs and a scanty surface supply in the wadis, the latter due to a providential storm a few days previously.

On the 2nd November the Regiment moved out along the Hebron Road to the Dhaheriyeh Hills,, and were held up by strong forces of the enemy and by snipers in impregnable spots about 12 miles from Beersheba.. Till the 6th inst. a very unequal warfare continued in rough country, the difficulty of water supply for both horses and men, the heat by day, and the continuous night outpost work, was very trying to all ranks.


Further Reading:

6th Light Horse Regiment, AIF

6th Australian Light Horse Regiment, Roll of Honour

The Battle of Beersheba, Palestine, 31 October 1917

Battles where Australians fought, 1899-1920


Citation: The Battle of Beersheba, Palestine, 31 October 1917, 6th LHR, AIF, Unit History Account

Posted by Project Leader at 5:57 PM EADT
Updated: Saturday, 3 October 2009 10:27 AM EADT

Newer | Latest | Older

Full Site Index


powered by FreeFind
Let us hear your story: You can tell your story, make a comment or ask for help on our forum.

Desert Column Forum

A note on copyright

The Australian Light Horse Studies Centre is a not for profit and non profit group whose sole aim is to write the early history of the Australian Light Horse from 1900 - 1920. It is privately funded and the information is provided by the individuals within the group and while permission for the use of the material has been given for this site for these items by various donors, the residual and actual copyright for these items, should there be any, resides exclusively with the donors. The information on this site is freely available for private research use only and if used as such, should be appropriately acknowledged. To assist in this process, each item has a citation attached at the bottom for referencing purposes.

Please Note: No express or implied permission is given for commercial use of the information contained within this site.

A note to copyright holders

The Australian Light Horse Studies Centre has made every endeavour to contact copyright holders of material digitised for this blog and website and where appropriate, permission is still being sought for these items. Where replies were not received, or where the copyright owner has not been able to be traced, or where the permission is still being sought, the Australian Light Horse Studies Centre has decided, in good faith, to proceed with digitisation and publication. Australian Light Horse Studies Centre would be happy to hear from copyright owners at any time to discuss usage of this item.

Contact

Australian Light Horse Studies Centre

eXTReMe Tracker