« October 2008 »
S M T W T F S
1 2 3 4
5 6 7 8 9 10 11
12 13 14 15 16 17 18
19 20 21 22 23 24 25
26 27 28 29 30 31
You are not logged in. Log in


Search the site:


powered by FreeFind
Volunteer with us.

Entries by Topic All topics
A Latest Site News
A - Using the Site
AAA Volunteers
AAB-Education Centre
AAC-Film Clips
AAC-Photo Albums
AIF & MEF & EEF
AIF - Lighthorse
AIF - ALH - A to Z
AIF - DMC
AIF - DMC - Or Bat
AIF - DMC - Anzac MD
AIF - DMC - Aus MD
AIF - DMC - British
AIF - DMC - BWI
AIF - DMC - French
AIF - DMC - Indian
AIF - DMC - Italian
AIF - DMC - Medical
AIF - DMC - Remounts
AIF - DMC - Scouts
AIF - DMC - Sigs
AIF - DMC - Sigs AirlnS
AIF - DMC - 1 Sig Sqn
AIF - DMC - 2 Sig Sqn
AIF - DMC - Eng
AIF - DMC - Eng 1FSE
AIF - DMC - Eng 2FSE
AIF - DMC - GSR
AIF - 1B - 1 LHB
AIF - 1B - 6 MVS
AIF - 1B - 1 LHMGS
AIF - 1B - 1 Sig Trp
AIF - 1B - 1 LHFA
AIF - 1B - 1 LHR
AIF - 1B - 2 LHR
AIF - 1B - 3 LHR
AIF - 2B - 2 LHB
AIF - 2B - 7 MVS
AIF - 2B - 2 LHFA
AIF - 2B - 2 LHMGS
AIF - 2B - 2 Sig Trp
AIF - 2B - 5 LHR
AIF - 2B - 6 LHR
AIF - 2B - 7 LHR
AIF - 3B - 3 LHB
AIF - 3B - 8 MVS
AIF - 3B - 3 LHB Sigs
AIF - 3B - 3 LHFA
AIF - 3B - 3 LHMGS
AIF - 3B - 3 Sig Trp
AIF - 3B - 8 LHR
AIF - 3B - 9 LHR
AIF - 3B - 10 LHR
AIF - 4B - 4 LHB
AIF - 4B - 4 Sig Trp
AIF - 4B - 9 MVS
AIF - 4B - 4 LHFA
AIF - 4B - 4 LHMGS
AIF - 4B - 4 LHR
AIF - 4B - 11 LHR
AIF - 4B - 12 LHR
AIF - 5B - 5 LHB
AIF - 5B - 10 MVS
AIF - 5B - 5 LHFA
AIF - 5B - 5 Sig Trp
AIF - 5B - ICC  
AIF - 5B - 14 LHR
AIF - 5B - 15 LHR
AIF - 5B - 1er Regt
AIF - 5B - 2 NZMGS
AIF - AASC
AIF - Aboriginal LH
AIF - Badges
AIF - Cars
AIF - Chinese LH
AIF - Double Sqns
AIF - Engineers
AIF - Fr - 22 Corps
AIF - Fr - 13 LHR
AIF - Honour Roll
AIF - HQ - 3rd Echelon
AIF - Marching Songs
AIF - Misc Topics
AIF - NZMRB
AIF - NZMRB - AMR
AIF - NZMRB - CMR
AIF - NZMRB - EFT
AIF - NZMRB - NZMFA
AIF - NZMRB - NZMGS
AIF - NZMRB - OMR
AIF - NZMRB - Sig-Trp
AIF - NZMRB - WMR
AIF - Ships
AIF - Ships - Encountr
AIF - Ships - Una
AIF - WFF
AIF - Wireless Sqn
Battles
BatzA - Australia
BatzA - Broken Hill
BatzA - Liverpool
BatzA - Merivale
BatzB - Boer War
BatzB - Bakenlaagte
BatzB - Belmont
BatzB - Bothaville
BatzB - Buffels Hoek
BatzB - Coetzees Drift
BatzB - Diamond Hill
BatzB - Driefontein
BatzB - Elands
BatzB - Graspan
BatzB - Grobelaar
BatzB - Grootvallier
BatzB - Hartebestfontn
BatzB - Houtnek
BatzB - Karee Siding
BatzB - Kimberley
BatzB - Koster River
BatzB - Leeuw Kop
BatzB - Mafeking
BatzB - Magersfontein
BatzB - Modder River
BatzB - Onverwacht
BatzB - Paardeberg
BatzB - Palmietfontein
BatzB - Pink Hill
BatzB - Poplar Grove
BatzB - Rhenoster
BatzB - Sannahs Post
BatzB - Slingersfontn
BatzB - Stinkhoutbm
BatzB - Sunnyside
BatzB - Wilmansrust
BatzB - Wolvekuil
BatzB - Zand River
BatzG - Gallipoli
BatzG - Anzac
BatzG - Aug 1915
BatzG - Baby 700
BatzG - Evacuation
BatzG - Hill 60
BatzG - Hill 971
BatzG - Krithia
BatzG - Lone Pine
BatzG - Nek
BatzJ - Jordan Valley
BatzJ - 1st Amman
BatzJ - 2nd Amman
BatzJ - Abu Tellul
BatzJ - Es Salt
BatzJ - JV Maps
BatzJ - Ziza
BatzM - Mespot
BatzM - Baghdad
BatzM - Ctesiphon
BatzM - Daur
BatzM - Kurna
BatzM - Kut el Amara
BatzM - Ramadi
BatzN - Naval
BatzN - AE1
BatzN - Cocos Is
BatzN - Heligoland
BatzN - Marmara
BatzN - Zeebrugge
BatzN - Zeppelin L43
BatzNG - Bitapaka
BatzO - Other
BatzO - Baku
BatzO - Egypt 1919
BatzO - Emptsa
BatzO - Karawaran
BatzO - Peitang
BatzO - Wassa
BatzP - Palestine
BatzP - 1st Gaza
BatzP - 2nd Gaza
BatzP - 3rd Gaza
BatzP - Aleppo
BatzP - Amwas
BatzP - Ayun Kara
BatzP - Bald Hill
BatzP - Balin
BatzP - Beersheba
BatzP - Berkusieh
BatzP - Damascus
BatzP - El Auja
BatzP - El Buggar
BatzP - El Burj
BatzP - Haifa
BatzP - Huj
BatzP - JB Yakub
BatzP - Kaukab
BatzP - Khan Kusseir
BatzP - Khuweilfe
BatzP - Kuneitra
BatzP - Megiddo
BatzP - Nablus
BatzP - Rafa
BatzP - Sasa
BatzP - Semakh
BatzP - Sheria
BatzP - Surafend
BatzP - Wadi Fara
BatzS - Sinai
BatzS - Bir el Abd
BatzS - El Arish
BatzS - El Mazar
BatzS - El Qatiya
BatzS - Jifjafa
BatzS - Magdhaba
BatzS - Maghara
BatzS - Romani
BatzS - Suez 1915
BatzSe - Senussi
BatzWF - Westn Front
BW - Boer War
BW - NSW
BW - NSW - 1ACH
BW - NSW - 1NSWMR
BW - NSW - 2NSWMR
BW - NSW - 3ACH
BW - NSW - 3NSWIB
BW - NSW - 3NSWMR
BW - NSW - 5ACH
BW - NSW - A Bty RAA
BW - NSW - AAMC
BW - NSW - Aust H
BW - NSW - Lancers
BW - NSW - NSW Inf
BW - NSW - NSWCBC
BW - NSW - NSWIB
BW - NSW - NSWMR_A
BW - NZ
BW - Qld
BW - Qld - 1ACH
BW - Qld - 1QMI
BW - Qld - 2QMI
BW - Qld - 3ACH
BW - Qld - 3QMI
BW - Qld - 4QIB
BW - Qld - 5QIB
BW - Qld - 6QIB
BW - Qld - 7ACH
BW - QLD - AAMC
BW - SA
BW - SA - 1SAMR
BW - SA - 2ACH
BW - SA - 2SAMR
BW - SA - 3SACB
BW - SA - 4ACH
BW - SA - 4SAIB
BW - SA - 5SAIB
BW - SA - 6SAIB
BW - SA - 8ACH
BW - SA - AAMC
BW - Tas
BW - Tas - 1ACH
BW - Tas - 1TIB
BW - Tas - 1TMI
BW - Tas - 2TB
BW - Tas - 2TIB
BW - Tas - 3ACH
BW - Tas - 8ACH
BW - Vic
BW - Vic - 1VMI
BW - Vic - 2ACH
BW - Vic - 2VMR
BW - Vic - 3VB
BW - Vic - 4ACH
BW - Vic - 4VIB
BW - Vic - 5VMR
BW - Vic - 6ACH
BW - Vic - AAMC
BW - Vic - Scot H
BW - WA
BW - WA - 1WAMI
BW - WA - 2ACH
BW - WA - 2WAMI
BW - WA - 3WAB
BW - WA - 4ACH
BW - WA - 4WAMI
BW - WA - 5WAMI
BW - WA - 6WAMI
BW - WA - 8ACH
BW Gen - Campaign
BW Gen - Soldiers
BW General
Cavalry - General
Diary - Schramm
Egypt - Heliopolis
Egypt - Mena
Gen - Ataturk Pk, CNB
Gen - Australia
Gen - Legends
Gen - Query Club
Gen - St - NSW
Gen - St - Qld
Gen - St - SA
Gen - St - Tas
Gen - St - Vic
Gen - St - WA
Gm - German Items
Gm - Bk - 605 MGC
GW - 11 Nov 1918
GW - Atrocities
GW - August 1914
GW - Biographies
GW - Propaganda
GW - Spies
GW - We forgot
Militia 1899-1920
Militia - Area Officers
Militia - Inf - Infantry
Militia - Inf - 1IB
Militia - Inf - 2IB
Militia - Inf - 3IB
Militia - Inf - NSW
Militia - Inf - Qld
Militia - Inf - SA
Militia - Inf - Tas
Militia - Inf - Vic
Militia - Inf - WA
Militia - K.E.Horse
Militia - LH
Militia - LH - Regts
Militia - LH - 1LHB
Militia - LH - 2LHB
Militia - LH - 3LHB
Militia - LH - 4LHB
Militia - LH - 5LHB
Militia - LH - 6LHB
Militia - LHN - NSW
Militia - LHN - 1/7/1
Militia - LHN - 2/9/6
Militia - LHN - 3/11/7
Militia - LHN - 4/6/16
Militia - LHN - 5/4/15
Militia - LHN - 6/5/12
Militia - LHN - 28
Militia - LHQ - Qld
Militia - LHQ - 13/2
Militia - LHQ - 14/3/11
Militia - LHQ - 15/1/5
Militia - LHQ - 27/14
Militia - LHS - SA
Militia - LHS - 16/22/3
Militia - LHS - 17/23/18
Militia - LHS - 24/9
Militia - LHT - Tas
Militia - LHT - 12/26
Militia - LHV - Vic
Militia - LHV - 7/15/20
Militia - LHV - 8/16/8
Militia - LHV - 9/19
Militia - LHV - 10/13
Militia - LHV - 11/20/4
Militia - LHV - 19/17
Militia - LHV - 29
Militia - LHW - WA
Militia - LHW-18/25/10
Militia - Military Orders
Militia - Misc
MilitiaRC - Rifle Clubs
MilitiaRC - NSW
MilitiaRC - NT
MilitiaRC - Qld
MilitiaRC - SA
MilitiaRC - Tas
MilitiaRC - Vic
MilitiaRC - WA
Militiaz - New Zealand
Tk - Turkish Items
Tk - Army
Tk - Bks - Books
Tk - Bks - 1/33IR
Tk - Bks - 27th IR
Tk - Bks - Air Force
Tk - Bks - Yildirim
Tk - POWs
Wp - Weapons
Wp - Hotchkiss Cav
Wp - Hotchkiss PMG
Blog Tools
Edit your Blog
Build a Blog
RSS Feed
View Profile
Open Community
Post to this Blog
Site Index
Education Centre
LH Militia
Boer War
Transport Ships
LH Battles
ALH - Units
ALH - General
Aboriginal Light H
Weapons
Ottoman Sources

"At a mile distant their thousand hooves were stuttering thunder, coming at a rate that frightened a man - they were an awe inspiring sight, galloping through the red haze - knee to knee and horse to horse - the dying sun glinting on bayonet points..." Trooper Ion Idriess

The Australian Light Horse Studies Centre aims to present an accurate history as chroniclers of early Australian military developments from 1899 to 1920.

The Australian Light Horse Studies Centre site holds over 12,000 entries and is growing daily.

Contact: Australian Light Horse Studies Centre

Let us hear your story: You can tell your story, make a comment or ask for help on our Australian Light Horse Studies Centre Forum called:

Desert Column Forum

WARNING: This site contains: names, information and images of deceased people; and, language which may be considered inappropriate today.

Sunday, 19 October 2008
The Battle of Beersheba, Palestine, 31 October 1917, ICC, AIF, Unit History Account
Topic: AIF - 5B - ICC

The Battle of Beersheba

Palestine, 31 October 1917

ICC, AIF, Unit History Account
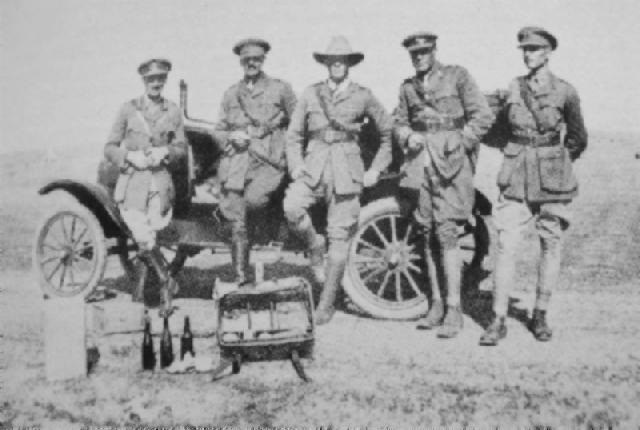
 

ICC GOC Brigadier General CL Smith and Staff looking over the Gaza position after its capture.

[From:  Langley, Sand, Sweat and Camels, plate facing p. 96.]


In 1976 George F and Edmee M Langley produced a unit history about the Imperial Camel Corps called: Sand, Sweat and Camels - The Story of the Australian Camel Corps, in which included a section specifically related to the battle of Beersheba and extracted below.

Langley, GF & EM, Sand, Sweat and Camels - The Story of the Australian Camel Corps, (Melbourne 1976), pp.  99 - 100:


[99] General Allenby realised the cost of a frontal attack on Gaza and the advantages of a flank attack. His aim was to occupy Beersheba on the left of the Turkish line, which would leave their flank exposed. He would then disorganise the Turk's whole plan of defence by hurling in his 20th Corps of infantry, four divisions strong, together with his Desert Mounted Corps and Camel Brigade. The 21st Corps was to move against the Gaza end of the line. The country to be covered was a bare rolling plain, without a single plantation, fence or hedgerow to shelter movements from a watchful apprehensive enemy and his German airmen.

Our railway line from Kantara was only eleven miles from Gaza and growing daily. The pipelines from the 'sweetwater' Canal had reached Rafa, providing a daily supply of hundreds of thousands of gallons of filtered, chlorinated water. Allenby's army (including Egyptian labourers) was close upon two hundred thousand men, in addition to some twenty thousand camels, forty-six thousand horses, fifteen thousand mules and a few thousand donkeys, all dependent on foodstuffs and water from outside sources. These railway and pipelines were being continued towards Beersheba. At Shellal a dam was constructed to hold five hundred thousand gallons-here arrangements were made to fill and load onto camels every hour two thousand fantassies, each containing ten or twelve gallons of water.

The Turks on the other hand presented a contrast highly favourable to the invading force. The Turkish army at this stage was ill-fed, wretchedly clothed, uncertain of its supply of munitions, and very low in spirit. Von Falkenhayn, the German leader of the Baghdad expedition was at dangerous variance with 'the mighty Djemal' as he contemptuously called the Turkish Governor of Syria. The `Young Turk' administration at Constantinople, with the Germans in full support had resolved to recapture Baghdad, which had been so brilliantly won by General Maude. On the other hand Djemal realised that Palestine must be cleared of the British before Baghdad could be taken. He also bitterly resented any interference or advice from the Germans, though, he had to appreciate the arms, and planes and technical services they gave him, which alone made his campaign possible. Neither Djemal nor [100] the German leaders believed it would be possible for Allenby to make his attack on the Beersheba flank, but fully expected the first blow to be made on Gaza, combined with a landing from the sea, north of that town. They were encouraged in this belief by the sham preparations made for a landing on the coast. When the Turks did decide to divert substantial forces from the Mesopotamia Expedition and send them to anticipate and frustrate Allenby’s assault, it was too late.

The Camel Corps dug in after dark on the hillsides, but during the night moved forward a mile and again would dig in . Under cover of darkness the Light Horse, Camel Corps, Artillery and London and Welsh Infantry congregated at the rendezvous within striking distance of Beersheba. The Londoners, at dawn, dashed forward and seized the Turks’ advanced position. Throughout the day, the Camel Corps Brigade took no active part in the battle and soon after dark it seemed probable that they would be wanted to clear the defences between the Gaza and Karm roads. However, the success of the main attack was soon evident and the works were evacuated.


Further Reading:
 
Imperial Camel Corps, AIF
 
Imperial Camel Corps, Roll of Honour 

The Battle of Beersheba, Palestine, 31 October 1917

Australian and New Zealand Roll of Honour

Battles where Australians fought, 1899-1920


Citation: The Battle of Beersheba, Palestine, 31 October 1917, ICC, AIF, Unit History Account

Posted by Project Leader at 8:20 AM EADT
Updated: Thursday, 8 October 2009 8:36 AM EADT
Wednesday, 15 October 2008
The Battle of Maghara, Sinai, 15 October 1916, ICC, AIF, Unit History Account
Topic: AIF - 5B - ICC

The Battle of Maghara

Sinai, 15 October 1916

ICC, AIF, Unit History Account


At the conclusion of the war, an anonymous manuscript was produced and called Imperial Camel Corps History 1916-18. The manuscript was deposited with the Australian War Memorial as AWM224 MSS39. This extract comes from Part 1, p. 14:


October

During the first week of October long reconnaissances to the Maghara Hills were mad by parties under Captain P Goldenstedt.

Water dumps were formed at Zagadan - 14 miles from Bayud - and on 13th October a mobile column of Light Horse, Yeomanry, 4 companies of ICC and 2 sections HK and S MB night marched to Zagadan. From there a night march was made towards Maghara - with one company ICC (No. 12) making a detour to Gebel el Barga where an enemy outpost was supposed to be situated.

The whole column was guided as far as El Rakwa (1410) by Captain P Goldenstedt and in spite of a very thick fog, the whole force was in position at dawn 15th. The position was attacked, a few prisoners were taken by the attack on Maghara itself was not persisted in and the whole column withdrew to Bayud which was reached on the 17th.

Note: The garrison at Maghara was commanded by Nur Effendi who was captured by the 2nd Battn ICC at Bir el Hassana in March 1917.


Further Reading:

Imperial Camel Corps, AIF

Imperial Camel Corps, Roll of Honour

The Battle of Maghara, Sinai, 15 October 1916

Battles where Australians fought, 1899-1920


Citation: The Battle of Maghara, Sinai, 15 October 1916, ICC, AIF, Unit History Account

Posted by Project Leader at 12:01 AM EADT
Updated: Wednesday, 2 December 2009 6:26 AM EAST
Wednesday, 17 September 2008
Bir el Mazar, Sinai, 17 September 1916, ICC Unit History Account
Topic: AIF - 5B - ICC

Bir el Mazar

Sinai, 17 September 1916

ICC, AIF, Unit History Account


In 1976, George F and Edmee M Langley produced a unit history about the Imperial Camel Corps called: Sand, Sweat and Camels - The Story of the Australian Camel Corps, in which included a section specifically related to the battle of Bir el Mazar and extracted below.

Langley, GF & EM, Sand, Sweat and Camels - The Story of the Australian Camel Corps, (Melbourne 1976), p.  68:


The Battalion was to follow the Pilgrim Road, well marked by a telegraph line which was to be cut to clear the enemy posts leading to Mazar. An Arab guide had been promised to lead the column to Malha. There was no time for a distant reconnaissance and troops were confined to the hod area, so as to give enemy planes as little indication as possible of any movements. An hour before the time to move Major-General Chauvel visited the Camel Corps area and explained that it was impossible to provide a guide as the original one was now wanted for the main body of Light Horse. The column would now have to move on a compass bearing and was accompanied by one officer, Lieutenant Lyall, and six Light Horsemen. They were to report to the main body when Kasseiba, an enemy outpost, was cleared. Difficulties were encountered from the very start and Kasseiba was never located and Lieutenant Lyall was despatched with a message to this effect and that we would continue on our way. The Battalion of the Hong Kong and Singapore Mountain Battery who were accompanying us were on their first trek with camels, instead of mules, and were in continuous trouble all night with their equipment; so also were the ambulances. Frequent halts were necessary to prevent straggling. The camels suffered, too; backs were so bad that the veterinary officers looked for a cause in the saddlery and a slightly different pattern was provided from that date onwards.

Two men of No. 7 Company, overcome with exhaustion by the strenuous night's march and having to pull their camels up sand dunes, fell asleep during one of the halts and consequently had not joined up with the column when it moved on. Their bodies were found later in the campaign; they had died of thirst.

At dawn on 17 September, 1916, having reached a point south of Mazar, the action against Mazar was called off and we marched back to Salmana. Nevertheless the Turks did evacuate Mazar two days later. Soon after the return of the Battalion to Bayud and Mageibra, No. 12 Company (Captain G. Smith) joined up, thus making five companies in the Battalion.


Further Reading:

Imperial Camel Corps, AIF

Imperial Camel Corps, Roll of Honour 

Battles where Australians fought, 1899-1920


Citation: Bir el Mazar, Sinai, 17 September 1916, ICC Unit History Account


Posted by Project Leader at 12:01 AM EADT
Updated: Tuesday, 24 November 2009 6:12 AM EAST
Tuesday, 24 June 2008
1st Brigade Imperial Camel Corps Routine Order, 16 June 1917
Topic: AIF - 5B - ICC
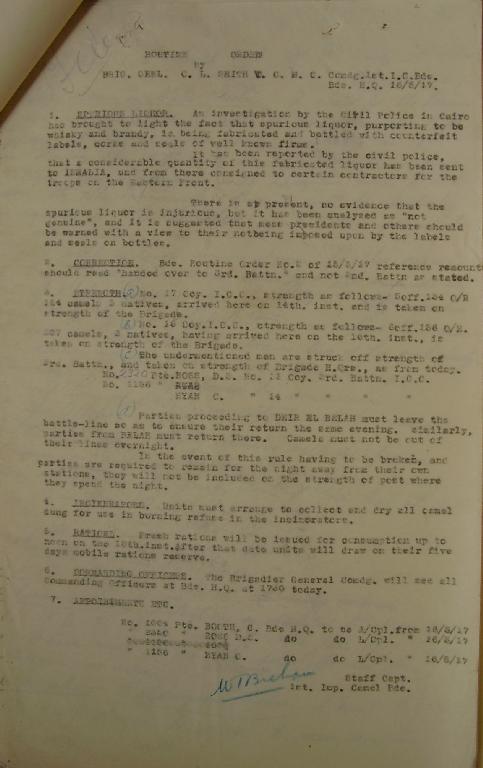
Apart from the War Diary which presents a reflected view of Regimental history, one of the best sources of understanding the immediate challenges facing a regiment is to be found in the Routine Orders. They are a wealth of detail.

 1st Brigade Imperial Camel Corps Routine Order, 16 June 1917


This RO raises the interesting issue of bootleg liquor being passed off as the real thing to the soldiers. Nothing changes when a quick dollar and a captive audience is involved. 
Citation: 1st Brigade Imperial Camel Corps Routine Order, 16 June 1917

Posted by Project Leader at 5:39 PM EADT
Updated: Tuesday, 24 June 2008 5:50 PM EADT
Saturday, 7 June 2008
The Battle of Magdhaba, Sinai, December 23, 1916, ICC, AIF, Commentary
Topic: AIF - 5B - ICC

The Battle of Magdhaba

Sinai, 23 December 1916

ICC, AIF, Commentary


The Battle of Magdhaba by Steve Becker


The Allied Victory at Romani in August had for the moment relieved any direct pressure of a Turkish invasion of Egypt. This and the present advances to Mazar in September had taken the Allied Army towards the major enemy stronghold in the Sinai at El Arish and allowed the strong mounted units of the Army to carry out a number of lighting strikes at isolated Turkish posts in the Sinai.

By the end of November 1916 General Archibald Murray, the Commander and Chief of the Egyptian Expeditionary Force now felt that he was ready to take this opportunity and advance on El Arish and to clear the region of the enemy, which would not only relieve the pressure on Egypt of invasion by the Turkish Army but also keep large numbers of Turkish troops from moving to other fronts. General Murray was also aware that there were at present only two Turkish Divisions in the Palestine-Sinai Area. These Divisions the 3rd and 27th were know as Arab Divisions which were recruited from the local population and thought to be less then trustworthy, both were under strength and combined contained between 6,000 to 10,000 men.

On the 19th December the Camel Brigade was officially formed and began to assemble around El Mazar, General C.L. Smith VC MC slowly organized this scatted companies into the new Battalions with the attached Hong Kong and Singapore Battery of Mountain Artillery for an advance on El Arish. This organization was in such a hurry that no Machine Gun Company or Field Ambulance was attached and only ten companies had arrived in time to take part in the advance. The last unit to arrive was the 14th company under Capt Tolmer and was made up of ex-Light Horsemen many of whom had served on Gallipoli, they had left Abbassia on the 13th of November with the new 2nd Battalion HQ and with the 15th New Zealand company had been on patrol in the area of El Geeila and the Canal till called to the Brigade on the 16th December. The 1st Battalion detached the 4th company less one section under Lt J William’s to Bir El Abd while Lt William’s section came under command of the 1st company.

The Camel Brigade at this time consisted of the following companies;

Camel Bde HQ Gen Smith VC

1st Camel Battalion Maj Langley
4th Co Capt Denson
6th British Co Capt Pettit
7th British Co Capt Gregory
12th Co Capt Smith

2nd Camel Battalion Maj Bassett
3rd Co Capt Naylor
5th British Co Capt Wilson
14th Co Capt Tolmer

3rd Camel Battalion Capt Wright
1st Co Lt Cashman
11th Co Capt Creswell
15th NZ Co Capt McCullum

HK&S Battery Maj Moore


To carry out the Raid on El Arish the Command of the Desert Column was given to General Philip Chetwode and consisted of the Anzac Mounted Division under General Harry Chauvel composed of the 1st and 3rd Australian Light Horse Brigades, the New Zealand Mounted Brigade and attached was the new Imperial Camel Corps Brigade.

The Turkish Garrison at El Arish was believed to be around 1600 strong from the 27th Division and well entrenched while smaller enemy garrisons were situated at El Magdhaba and Abu Aweigila along the Wadi El Arish which protected the Turkish rail head at El Kossaima.

Air reports continued to come in on the enemy during December and the latest report on the 20th stated that the Turks appeared to be withdrawing from El Arish and General Murray ordered the force to advance to El Arish and confirm this report. He allocated the 52nd Lowland Infantry Division for the occupation but it was slow in moving thus allowing the swifter mounted units of the Desert Column to move on El Arish that night.

The Camel companies had a quiet night as they had been assigned to travel on the longer southern route as the horses of the Light Horse Brigades were still not accustomed to the smell of the Camels and in the morning of the 21st after a night march of 23 miles from Mazar units of the Desert Column had surrounded the town and it was found to be clear of the enemy. The sight which greeted the Cameleers in the morning was a long line of exhausted of dehydrated Scotties from the 52nd Division who had been left behind by there Battalions during the night, water was given to these men but the Cameleers were told to leave them as they had to push on to the town.

The settlement of El Arish was like an oasis in the desert with palm trees, grass and the many white roofs of the mosque and the houses, the troops took advantage of this to rest after a long night march.

The unopposed capture of the town promptly allowed the British to use it as an advance base and the rail and water pipe lines were advanced towards the town. El Arish was also used to ship in supplies and move up the remainder of the Infantry which arrived on the 22nd December, it also gave General Murray an important base which would prove invaluable in the months ahead and on the arrival on the 22nd of General Chetwode who quickly ordered General Chauval to pursuit the withdrawing enemy. Patrols were sent out to establish in which direction the enemy had gone as they could move to the east and the border post at Rafa or along the Wadi to El Magdhaba, this was soon evident when word came in by air of the increased garrison at El Magdhaba and Chetwode ordered Chauval to take his Division and the Camel Brigade and advance on El Magdhaba that night.

The Garrison at El Magdhaba now consisted of about 1700 men from the 2nd and 3rd Battalions of the 80th Turkish Infantry Regiment 27th Division under the command of Khadir Bey there was also a number of irregular units and a small Turkish Camel company and one battery of four guns from a mountain artillery unit completed all the available troops.

Magdhaba was a small settlement on the north side of the Wadi El Arish which at this time of year was dry and contained the only wells for many miles. The town itself lay partially in the wadi and was about 20 miles from El Arish and over 30 miles from Rafa. The enemy had heavy fortified the surrounding area with six large redoubts, these were placed to cover all the approaches and to strengthen them a number of trenches were dug to cover the redoubts. The four guns were placed to the north of the wadi near the village to cover the open ground to the north-west which was flat and open of hard sand bare of all cover for over four miles, to the north-east the ground was covered with low scrub bushes while to the south the terrain was broken by a large number of sand dunes.

At El Arish the troops prepared for the march but there was a scarcity of water in the town until more wells could be dug, a supply column of camels from the Camel Transport Corps was dispatched from Mazar in the afternoon and the troops would have to wait until it arrived to draw rations. This column subsequently got mixed up with the 52nd Infantry Division as it struggled up to El Arish with the supply column arriving during the night but few of the animals got a full drink before they had to leave at midnight.

The men and animals of the Camel Brigade had no time to water and since they carried five days supply on them in their fantasise they were not in immediate need of resupply. The Brigade was ordered to be concentrated in the wadi El Arish by 10 pm and all seven companies moved into their order of march, meanwhile there was some delay in moving as the mounted units continued to be resupplied before beginning there march, the 3rd company under Capt Fred Naylor along with the 7th company were detailed to remain behind and to help defend the town while the 4th company less one section was still at Bir el Abd.

It was well after midnight when the force finely set out with the Light horse regiments leading setting a brisk pace as they moved off towards Magdhaba, the night air was clear and cold and the firm ground allowing the horses to move swiftly. Meanwhile the Camel Brigade moved slowly along the wadi as the men fought off the effects of another night in the saddle and the bitterly cold night sent a chill to the bone, there was no smoking on the ride when a few puffs on a weed would have made all the difference. The Camel Brigade was slower then the Light Horse but the troops maintained their distance without a problem as the Division followed the main trail from El Arish to Magdhaba which ran along the telegraph line and the wadi.

At 3.50 am the lights of the camp fires at Magdhaba could be seen in the distance as the troops push on till around 5 am when a halt was called 4 miles from the objective there the troops rested till morning when General Chauvel and staff made a reconnaissance of the enemy and found that the smoke from the camp fires covered the town and the surrounding area, but the number of redoubts was obtained along with the extent of the enemies position.

The Camel Brigade had halted near the Inverness battery and dismounted as the camels and their holders moved to the rear, this like the Light Horse regiments required that every one in four men in the company be used to hold the animals and so were left out of battle while the remainder of the men would carry out the attack, the holders moved the camels into the wadi out of sight as the battalions sorted their companies out and began to move forward to the form up point, some of these companies were at full strength having just arrived in the desert while most had been in the field for some time and unit strength was low.

At 7.50 am reports was received by aircraft that they had been fired on by the Turks and that there was no sign of the enemy reinforcements beyond Ruafa 8 miles south-east of Magdhaba which held a small garrison. General Chauval was now limited to the time he could spend at Magdhaba as the animals had not drunk for some time and with a battle to be fought during a hot day and little water at Magdhaba meant that the town would need to fall quickly or the animals would be in trouble.

Orders for the attack were issued at once with the 3rd Light Horse and NZ Mounted Brigades moving to the east and north-east to attack while the 1st Light Horse Brigade was held in reserve, the Camel Brigade was directed to pin the enemy frontally and allow time for the envelopment by the Light Horse. There were only three batteries of artillery available to Chauvel these were the Somerset and Inverness batteries of the RHA and the Camel Brigades own Hong Kong and Singapore Battery and these were deployed near the Camel Brigade to bring fire on the enemy’s redoubts and to search for her guns. The action would commence once the mounted troops were in position and the battle would start with the artillery commencing fire.

As the Light Horse manoeuvred into position the companies of the Camel Brigade moved forward on foot but the Camel Brigade was at a disadvantage with over four miles to travel before they could reach the enemies defences. They set off at 9 am with the 3rd Battalion leading followed by the 1st Battalion then the 2nd Battalion in reserve, the going was without interference as they approached to within enemy artillery range with the companies strung out over a wide area of desert.

The Camel Brigade deployed 3rd Battalion under Captain Charles Wright to lead the attack with the 1st company under Lieutenant John Cashman and the attached one officer and seventeen men of the 4th company in front, the 15th New Zealand Company under Captain John McCallum in support and the 11th company under Captain Randolph Creswell in battalion reserve. The 1st Battalion under Major George langley was in direct support of the 3rd Battalion with the 6th company under Captain Hubert Pettit and the 12th company under Captain George Smith in Battalion reserve while the 2nd Battalion under Major John Bassett was held in reserve with the 5th company under Captain Charles Wilson detached to guard the Hong Kong and Singapore Battery and Brigade HQ leaving only the 14th company under Captain James Tolmer with the 2nd Battalion as a Brigade reserve.

By 9.25 am the New Zealand Brigade was in position with the 3rd Light Horse Brigade as they moved to secure their area. The artillery opened fire at 9.55 am as they searched for the enemy’s battery when the New Zealand Brigade decided to attack not waiting for the Camel Brigade to get into position but due to the terrain and the heat affect observation for the guns was limited. At this time the attacking companies were still moving into position with the 1st company on the right closest to the wadi while the 15th New Zealand company was on the open left flank both deployed on a one section frontage in three lines with the Lewis guns on the open left flank to enable them to engage the enemy redoubt and cover the advance, to the 3rd Battalion’s rear deployed Maj Langley’s 1st Battalion with its 6th company in support and the 12th company in reserve.

At 10 am a message was dropped by plane reporting the enemy was withdrawing and Chauvel seeing the Camel brigade was still not near the enemies defences quickly ordered the 1st Light Horse Brigade into action. Meanwhile the 1st company was still progressing in extended order as they moved up right across the barren surface in parallel ranks 200 yards apart until the Turks started to target them forcing the men to ground where they lay exposed to the enemy fire for some time before they commenced moving in section rushes of 25 yards covered by each section shooting at the enemies redoubt in the distance. Capt Wright seeing the 1st and 15th NZ Company held up along the wadi ordered the 11th company forward but as they approached they soon found themselves exposed to the enemies fire and joined the 1st company sheltering in the sand.

As the companies had approached the enemy redoubts they came under a violent fusillade from rifle fire, machine guns and artillery and the mistaken reporting of the enemy came home to the leading squadrons of the 1st Light Horse Brigade as a intense fire was directed at them forcing the Brigade into the wadi as they retired out of range while the 3rd Light Horse Regiment was sent into the attack dismounted along the wadi around 10.30 am.

By 11.50 General Chauvel dispatched a report to Chetwode telling him of the progress of the battle which was still going well but time was getting on and the enemy defences were still to be reached. Maj Langley had in the meanwhile seen the lack of progress by the 3rd Battalion and moved the 6th company forward on the 15th NZ companies open left flank to extend the firing line but they to found that the exposed surface could not be overcome when the enemy had all the advantages of position so they to found they could make little progress.

The Camel Brigade was still struggling across the open terrain in front of redoubt No 2 where the firepower of the enemy was at its best on that long flat surface. General Chauval had placed his chief reliance on this attack but the terrain and the skilful placement of the enemy of his defences all were contributing to its lack of progress. By midday this attack had died down as the amount of fire directed on them was too heavy, this fire despite its ferocity was very inaccurate but this mattered little when you’re under it. The 1st company at this time had taken cover in a wash out which lead into the main wadi it was arranged in depth but gave shelter to the men, meanwhile the 11th company was exposed the full fury of the enemies fire as the men pushed there faces into the compacted sand or looked for that all to rare tuft of grass or that small mound of sand to escape the swarm of bullets passing over head. The men quickly became exhausted by the advance with the weight of ammunition, the movement from position to position, the distance travelled and the hot sun along with a lack of water as their water bottles soon were empty, added to the fact that ammunition was limited to their basic load but with the constant firing and time in action this was running out and any resupply would be difficult and dangerous..

At 12.15 pm the word came in to commit the reserve as both Battalions were now in the sand and unable to move. This reserve consisted of only the 14th company under Capt Tolmer who took only 2 sections into the attack leaving the remainder under Lt Young but these were shortly committed in support after 20 minutes.

At 1.05 pm a report had come in of the lack of water at Bir Lahfan were a field troop of engineers had been sent to search for water this was a significant problem as there was no water closer then El Arish and unless Magdhaba should fall and this didn’t look like it would happen soon the horses would be in trouble. With reluctance General Chauvel telegraphed to Chetwode at 1.50 pm to say that the progress of the action was disappointing and that he was going to order the troops to break off the battle.

Meanwhile in front of redoubt No 2 the companies of the Camel Brigade were progressing and had gain touch with the left flank of B and C Squadron of the 3rd Light Horse Regiment about 100 metres from the enemy. A quick discussion ensured as the officers decided on the best approach as they had to cross a wide level stretch of open flat ground and in the end a charge was called. The men of the Light Horse and Camel Brigade leaped into action and with wild cheers the men surged across the open ground under a violent fire from the Turks dropping a number of men but the troops pushed on and as they made the enemy redoubt they quickly surrendered. This charge was under the protective cover of the 3rd Light Horse Regiment Machine gun section’s Lewis guns as well as the Vickers guns of the 1st Light Horse Brigade Machine gun Squadron who did valuable work protecting the charging men until they gained the Turkish works.

The 1st company (with the section of the 4th company) under Lieutenant Bill Cashman were the first into the redoubt along with the 11th company under Captain Randolph Creswell who set about clearing the trench but few of the enemy were prepared to fight it out as they appeared just as exhausted as our men. During the charge Lieutenant John Williams 4th Company was wounded along with a many men from the 11th and 1st companies including the Schuyler brothers from 11th company and Lieutenant Cashman’s batman Bert Hopkinson who had been shot multiple times. As the men sorted the mess out in the redoubt an intense fire was still coming from redoubt No 1 across the wadi. The captured Turks were found to be just as thirsty as our on men and pressure was applied to the remainder of the redoubts to increase there will to give in. In all there were 3 officers and 92 men taken prisoner and clearing the redoubt was completed by 2.30 pm.
One of the lucky soldiers was Pat Doyle 4th Company, who on jumping into the enemy’s trench found his rifle empty and grabbed the firearm of a Turkish soldier preparing to shot him down, but his weapon was also empty and all he received was a burnt hand from the hot gun barrel as he took the weapon from the surprised Turkish soldier.

This first foot in the door was just what General Chauvel was after and he quickly sent a report to Chetwode that the battle was no longer in doubt of victory and asked to dispatch a water column to meet him on the return. In fact around this time there were a number of successful attacks by our troops on redoubts No 3 by the New Zealand Mounted Brigade and No 4 by the 3rd Light Horse Brigade as the enemy was now showing signs of collapse.

These attacks were at 2.30 pm, the Wellington Mounted Regiment, the 8th and 9th Light Horse regiments were still around 500 yards from their objectives, while the Canterbury Mounted Regiment was a little closer, these regiments now took time to reassess the positions and resupply with ammunition before the final push to their objectives. All Troops and Machine Gun sections had expended much of their ammunition during the advance and full magazines were required for the final assault.

While in redoubt No 2 the 3rd Light Horse Regiment and the 1st and 11th companies lined the trenches taking the enemy in redoubt’s No 1 and No 3 under fire as the 6th, 14th and 15th companies were directed towards the centre of the village. The 12th company was committed at this time but it failed to get into action before the battle ended. It was also around this time that Maj Moore moved the Hong Kong and Singapore Battery across the Wadi into a position to the west of No 2 redoubt and so as to provide direct fire onto the remaining redoubts and cover the advance of the Camel companies. The reserve ammunition was also brought up as many of the weapons of the 3rd Battalion had need of resupply.

This last advance by the Camel Brigade into the town was still under a heavy cross fire from the remaining redoubts particularly from redoubt No 1 across the wadi and the 14th Company was severely hit losing Cpl Percy Butcher mortally wounded while Pte Norman Huon was killed but the advance was helped by the use of the company Lewis guns under Sgt Francis Fitzhardinge who was active in using his guns to support the attack until he was wounded and by the direct fire of the guns of the Hong Kong and Singapore Battery..

Around 4 pm both A and C Squadron of the 3rd Light Horse Regiment had moved to help the 2nd Light Horse Regiment in their assault on redoubt No 1 which with the advance by the camel companies and fire from the guns the last flames of resistance were failing.

It was also at this time that the capture of redoubt No 3 and No 6 by the New Zealand Mounted Brigade and the 3rd Light Horse Brigade was successful with a charge by these regiments which took these redoubts with many prisoners but cost the 8th Light Horse Regiment many deaths.

At 4.20 pm redoubt No 1 was finally captured by the 1st Light Horse Brigade with a charge by Major Markwell and Troops of A and B Squadron 2nd Light Horse and A and C Squadrons of the 3rd Light Horse regiments and where Khadir Bey commander of the Turkish garrison was taken prisoner, of whom a surrender was promptly guaranteed, but until that happened and the word was passed to the other redoubts the advance would continue as elements of the New Zealand Mounted Brigade and 3rd Light Horse Brigade moved through the eastern end of the village and across the wadi to attack the southern redoubts and assist the 10th Light Horse Regiment and during which Lt Johnstone of the 8th Squadron Canterbury Mounted Regiment took the four gun battery of Turkish artillery. This also allowing the lead companies of the Camel Brigade to complete their attack into the western end of the village and by 4.30 pm all resistance was ended.

The victory now allowed General Chauvel to dispatch those troops not needed back to El Arish while a number of Regiments cleared the battlefield of prisoners and war material. Those returning met the supply column on the track allowing them to water and rest while the remainder of the troops cleared the battlefield. Together over 1282 prisoners including the commanding officer and two Battalion commanders were taken while 97 bodies were buried of the enemy. The total casualties for the Anzac Mounted Division were 146 of which 5 officers and 17 men were killed most of whom fell to the 8th Light Horse Regiment.

The Camel Brigade officially reported only 1 man killed and 1 officer and 27 men wounded of which one died of wounds.

The records show the Australians in the Camel Battalion’s lost 1 man killed with 2 officers and 20 men wounded of which 1 man died from wounds.

The 15th NZ Company reported 15 men wounded for the battle but records show only four men are confirmed, while the casualties in the British companies were not recorded but only the 6th company came into action but was not seriously engaged.


Acknowledgement: Many thanks to Steve Becker for the manuscript on the Imperial Camel Corps.


Further Reading:

Imperial Camel Corps, AIF

Imperial Camel Corps, Roll of Honour 

The Battle of Magdhaba

The Battle of Magdhaba, Sinai, December 23, 1916, Roll of Honour, Australia and New Zealand

Battles where Australians fought, 1899-1920


Citation: The Battle of Magdhaba, Sinai, December 23, 1916, ICC, AIF, Commentary

Posted by Project Leader at 1:23 PM EADT
Updated: Tuesday, 10 November 2009 10:32 PM EAST

Newer | Latest | Older

Full Site Index


powered by FreeFind
Let us hear your story: You can tell your story, make a comment or ask for help on our forum.

Desert Column Forum

A note on copyright

The Australian Light Horse Studies Centre is a not for profit and non profit group whose sole aim is to write the early history of the Australian Light Horse from 1900 - 1920. It is privately funded and the information is provided by the individuals within the group and while permission for the use of the material has been given for this site for these items by various donors, the residual and actual copyright for these items, should there be any, resides exclusively with the donors. The information on this site is freely available for private research use only and if used as such, should be appropriately acknowledged. To assist in this process, each item has a citation attached at the bottom for referencing purposes.

Please Note: No express or implied permission is given for commercial use of the information contained within this site.

A note to copyright holders

The Australian Light Horse Studies Centre has made every endeavour to contact copyright holders of material digitised for this blog and website and where appropriate, permission is still being sought for these items. Where replies were not received, or where the copyright owner has not been able to be traced, or where the permission is still being sought, the Australian Light Horse Studies Centre has decided, in good faith, to proceed with digitisation and publication. Australian Light Horse Studies Centre would be happy to hear from copyright owners at any time to discuss usage of this item.

Contact

Australian Light Horse Studies Centre

eXTReMe Tracker