« August 2010 »
S M T W T F S
1 2 3 4 5 6 7
8 9 10 11 12 13 14
15 16 17 18 19 20 21
22 23 24 25 26 27 28
29 30 31
You are not logged in. Log in


Search the site:


powered by FreeFind
Volunteer with us.

Entries by Topic All topics  
A Latest Site News
A - Using the Site
AAA Volunteers
AAB-Education Centre
AAC-Film Clips
AAC-Photo Albums
AIF & MEF & EEF
AIF - Lighthorse
AIF - ALH - A to Z
AIF - DMC
AIF - DMC - Or Bat
AIF - DMC - Anzac MD
AIF - DMC - Aus MD
AIF - DMC - British
AIF - DMC - BWI
AIF - DMC - French
AIF - DMC - Indian
AIF - DMC - Italian
AIF - DMC - Medical
AIF - DMC - Remounts
AIF - DMC - Scouts
AIF - DMC - Sigs
AIF - DMC - Sigs AirlnS
AIF - DMC - 1 Sig Sqn
AIF - DMC - 2 Sig Sqn
AIF - DMC - Eng
AIF - DMC - Eng 1FSE
AIF - DMC - Eng 2FSE
AIF - DMC - GSR
AIF - 1B - 1 LHB
AIF - 1B - 6 MVS
AIF - 1B - 1 LHMGS
AIF - 1B - 1 Sig Trp
AIF - 1B - 1 LHFA
AIF - 1B - 1 LHR
AIF - 1B - 2 LHR
AIF - 1B - 3 LHR
AIF - 2B - 2 LHB
AIF - 2B - 7 MVS
AIF - 2B - 2 LHFA
AIF - 2B - 2 LHMGS
AIF - 2B - 2 Sig Trp
AIF - 2B - 5 LHR
AIF - 2B - 6 LHR
AIF - 2B - 7 LHR
AIF - 3B - 3 LHB
AIF - 3B - 8 MVS
AIF - 3B - 3 LHB Sigs
AIF - 3B - 3 LHFA
AIF - 3B - 3 LHMGS
AIF - 3B - 3 Sig Trp
AIF - 3B - 8 LHR
AIF - 3B - 9 LHR
AIF - 3B - 10 LHR
AIF - 4B - 4 LHB
AIF - 4B - 4 Sig Trp
AIF - 4B - 9 MVS
AIF - 4B - 4 LHFA
AIF - 4B - 4 LHMGS
AIF - 4B - 4 LHR
AIF - 4B - 11 LHR
AIF - 4B - 12 LHR
AIF - 5B - 5 LHB
AIF - 5B - 10 MVS
AIF - 5B - 5 LHFA
AIF - 5B - 5 Sig Trp
AIF - 5B - ICC
AIF - 5B - 14 LHR
AIF - 5B - 15 LHR
AIF - 5B - 1er Regt
AIF - 5B - 2 NZMGS
AIF - AASC
AIF - Aboriginal LH
AIF - Badges
AIF - Cars
AIF - Chinese LH
AIF - Double Sqns
AIF - Engineers
AIF - Fr - 22 Corps
AIF - Fr - 13 LHR
AIF - Honour Roll
AIF - HQ - 3rd Echelon
AIF - Marching Songs
AIF - Misc Topics
AIF - NZMRB
AIF - NZMRB - AMR
AIF - NZMRB - CMR
AIF - NZMRB - EFT
AIF - NZMRB - NZMFA
AIF - NZMRB - NZMGS
AIF - NZMRB - OMR
AIF - NZMRB - Sig-Trp
AIF - NZMRB - WMR
AIF - Ships
AIF - Ships - Encountr
AIF - Ships - Una
AIF - WFF
AIF - Wireless Sqn
Battles
BatzA - Australia
BatzA - Broken Hill
BatzA - Liverpool
BatzA - Merivale
BatzB - Boer War
BatzB - Bakenlaagte
BatzB - Belmont
BatzB - Bothaville
BatzB - Buffels Hoek
BatzB - Coetzees Drift
BatzB - Diamond Hill
BatzB - Driefontein
BatzB - Elands
BatzB - Graspan
BatzB - Grobelaar
BatzB - Grootvallier
BatzB - Hartebestfontn
BatzB - Houtnek
BatzB - Karee Siding
BatzB - Kimberley
BatzB - Koster River
BatzB - Leeuw Kop
BatzB - Mafeking
BatzB - Magersfontein
BatzB - Modder River
BatzB - Onverwacht
BatzB - Paardeberg
BatzB - Palmietfontein
BatzB - Pink Hill
BatzB - Poplar Grove
BatzB - Rhenoster
BatzB - Sannahs Post
BatzB - Slingersfontn
BatzB - Stinkhoutbm
BatzB - Sunnyside
BatzB - Wilmansrust
BatzB - Wolvekuil
BatzB - Zand River
BatzG - Gallipoli
BatzG - Anzac
BatzG - Aug 1915
BatzG - Baby 700
BatzG - Evacuation
BatzG - Hill 60
BatzG - Hill 971
BatzG - Krithia
BatzG - Lone Pine
BatzG - Nek
BatzJ - Jordan Valley
BatzJ - 1st Amman
BatzJ - 2nd Amman
BatzJ - Abu Tellul
BatzJ - Es Salt
BatzJ - JV Maps
BatzJ - Ziza
BatzM - Mespot
BatzM - Baghdad
BatzM - Ctesiphon
BatzM - Daur
BatzM - Kurna
BatzM - Kut el Amara
BatzM - Ramadi
BatzN - Naval
BatzN - AE1
BatzN - Cocos Is
BatzN - Heligoland
BatzN - Marmara
BatzN - Zeebrugge
BatzN - Zeppelin L43
BatzNG - Bitapaka
BatzO - Other
BatzO - Baku
BatzO - Egypt 1919
BatzO - Emptsa
BatzO - Karawaran
BatzO - Peitang
BatzO - Wassa
BatzP - Palestine
BatzP - 1st Gaza
BatzP - 2nd Gaza
BatzP - 3rd Gaza
BatzP - Aleppo
BatzP - Amwas
BatzP - Ayun Kara
BatzP - Bald Hill
BatzP - Balin
BatzP - Beersheba
BatzP - Berkusieh
BatzP - Damascus
BatzP - El Auja
BatzP - El Buggar
BatzP - El Burj
BatzP - Haifa
BatzP - Huj
BatzP - JB Yakub
BatzP - Kaukab
BatzP - Khan Kusseir
BatzP - Khuweilfe
BatzP - Kuneitra
BatzP - Megiddo
BatzP - Nablus
BatzP - Rafa
BatzP - Sasa
BatzP - Semakh
BatzP - Sheria
BatzP - Surafend
BatzP - Wadi Fara
BatzS - Sinai
BatzS - Bir el Abd
BatzS - El Arish
BatzS - El Mazar
BatzS - El Qatiya
BatzS - Jifjafa
BatzS - Magdhaba
BatzS - Maghara
BatzS - Romani
BatzS - Suez 1915
BatzSe - Senussi
BatzWF - Westn Front
BW - Boer War
BW - NSW
BW - NSW - 1ACH
BW - NSW - 1NSWMR
BW - NSW - 2NSWMR
BW - NSW - 3ACH
BW - NSW - 3NSWIB
BW - NSW - 3NSWMR
BW - NSW - 5ACH
BW - NSW - A Bty RAA
BW - NSW - AAMC
BW - NSW - Aust H
BW - NSW - Lancers
BW - NSW - NSW Inf
BW - NSW - NSWCBC
BW - NSW - NSWIB
BW - NSW - NSWMR_A
BW - NZ
BW - Qld
BW - Qld - 1ACH
BW - Qld - 1QMI
BW - Qld - 2QMI
BW - Qld - 3ACH
BW - Qld - 3QMI
BW - Qld - 4QIB
BW - Qld - 5QIB
BW - Qld - 6QIB
BW - Qld - 7ACH
BW - QLD - AAMC
BW - SA
BW - SA - 1SAMR
BW - SA - 2ACH
BW - SA - 2SAMR
BW - SA - 3SACB
BW - SA - 4ACH
BW - SA - 4SAIB
BW - SA - 5SAIB
BW - SA - 6SAIB
BW - SA - 8ACH
BW - SA - AAMC
BW - Tas
BW - Tas - 1ACH
BW - Tas - 1TIB
BW - Tas - 1TMI
BW - Tas - 2TB
BW - Tas - 2TIB
BW - Tas - 3ACH
BW - Tas - 8ACH
BW - Vic
BW - Vic - 1VMI
BW - Vic - 2ACH
BW - Vic - 2VMR
BW - Vic - 3VB
BW - Vic - 4ACH
BW - Vic - 4VIB
BW - Vic - 5VMR
BW - Vic - 6ACH
BW - Vic - AAMC
BW - Vic - Scot H
BW - WA
BW - WA - 1WAMI
BW - WA - 2ACH
BW - WA - 2WAMI
BW - WA - 3WAB
BW - WA - 4ACH
BW - WA - 4WAMI
BW - WA - 5WAMI
BW - WA - 6WAMI
BW - WA - 8ACH
BW Gen - Campaign
BW Gen - Soldiers
BW General
Cavalry - General
Diary - Schramm
Egypt - Heliopolis
Egypt - Mena
Gen - Ataturk Pk, CNB
Gen - Australia
Gen - Legends
Gen - Query Club
Gen - St - NSW
Gen - St - Qld
Gen - St - SA
Gen - St - Tas
Gen - St - Vic
Gen - St - WA
Gm - German Items
Gm - Bk - 605 MGC
GW - 11 Nov 1918
GW - Atrocities
GW - August 1914
GW - Biographies
GW - Propaganda
GW - Spies
GW - We forgot
Militia 1899-1920
Militia - Area Officers
Militia - Inf - Infantry
Militia - Inf - 1IB
Militia - Inf - 2IB
Militia - Inf - 3IB
Militia - Inf - NSW
Militia - Inf - Qld
Militia - Inf - SA
Militia - Inf - Tas
Militia - Inf - Vic
Militia - Inf - WA
Militia - K.E.Horse
Militia - LH
Militia - LH - Regts
Militia - LH - 1LHB
Militia - LH - 2LHB
Militia - LH - 3LHB
Militia - LH - 4LHB
Militia - LH - 5LHB
Militia - LH - 6LHB
Militia - LHN - NSW
Militia - LHN - 1/7/1
Militia - LHN - 2/9/6
Militia - LHN - 3/11/7
Militia - LHN - 4/6/16
Militia - LHN - 5/4/15
Militia - LHN - 6/5/12
Militia - LHN - 28
Militia - LHQ - Qld
Militia - LHQ - 13/2
Militia - LHQ - 14/3/11
Militia - LHQ - 15/1/5
Militia - LHQ - 27/14
Militia - LHS - SA
Militia - LHS - 16/22/3
Militia - LHS - 17/23/18
Militia - LHS - 24/9
Militia - LHT - Tas
Militia - LHT - 12/26
Militia - LHV - Vic
Militia - LHV - 7/15/20
Militia - LHV - 8/16/8
Militia - LHV - 9/19
Militia - LHV - 10/13
Militia - LHV - 11/20/4
Militia - LHV - 19/17
Militia - LHV - 29
Militia - LHW - WA
Militia - LHW-18/25/10
Militia - Military Orders
Militia - Misc
MilitiaRC - Rifle Clubs
MilitiaRC - NSW
MilitiaRC - NT
MilitiaRC - Qld
MilitiaRC - SA
MilitiaRC - Tas
MilitiaRC - Vic
MilitiaRC - WA
Militiaz - New Zealand
Tk - Turkish Items
Tk - Army
Tk - Bks - Books
Tk - Bks - 1/33IR
Tk - Bks - 27th IR
Tk - Bks - Air Force
Tk - Bks - Yildirim
Tk - POWs
Wp - Weapons
Wp - Hotchkiss Cav
Wp - Hotchkiss PMG
Blog Tools
Edit your Blog
Build a Blog
RSS Feed
View Profile
Open Community
Post to this Blog
Site Index
Education Centre
LH Militia
Boer War
Transport Ships
LH Battles
ALH - Units
ALH - General
Aboriginal Light H
Weapons
Ottoman Sources

"At a mile distant their thousand hooves were stuttering thunder, coming at a rate that frightened a man - they were an awe inspiring sight, galloping through the red haze - knee to knee and horse to horse - the dying sun glinting on bayonet points..." Trooper Ion Idriess

The Australian Light Horse Studies Centre aims to present an accurate history as chroniclers of early Australian military developments from 1899 to 1920.

The Australian Light Horse Studies Centre site holds over 12,000 entries and is growing daily.

Contact: Australian Light Horse Studies Centre

Let us hear your story: You can tell your story, make a comment or ask for help on our Australian Light Horse Studies Centre Forum called:

Desert Column Forum

WARNING: This site contains: names, information and images of deceased people; and, language which may be considered inappropriate today.

Friday, 6 August 2010
The Battle of Lone Pine, Turkey, 6 - 9 August 1915, Contents
Topic: BatzG - Lone Pine

The Battle of Lone Pine

Turkey, 6 - 9 August 1915

Contents


Items:

The Battle of Lone Pine, Turkey, 6 - 9 August 1915, Outline 

The Battle of Lone Pine, Turkey, 6 - 9 August 1915, Bean Account Part 1


Roll of Honour

The Battle of Lone Pine, Gallipoli, 6 August 1915, Roll of Honour

Lest We Forget


Further Reading:

The Battle for Lone Pine, 6 August 1915

The August Offensive, Gallipoli, August 1915

Gallipoli Campaign

Battles where Australians fought, 1899-1920


Citation: The Battle of Lone Pine, Turkey, 6 - 9 August 1915, Contents

Posted by Project Leader at 12:01 AM EADT
Updated: Friday, 6 August 2010 10:22 AM EADT
The August Offensive, Gallipoli, August 1915, Australian Imperial Force, Roll of Honour
Topic: BatzG - Aug 1915

The August Offensive

Gallipoli, August 1915

Australian Imperial Force

Roll of Honour


Poppies on the Roll of Honour, Australian War Memorial, Canberra


The Roll of Honour contains the names of all the men known to have given their lives in service of Australia during the August Offensive, Gallipoli, August 1915.


Roll of Honour: 

The August Offensive, Gallipoli, August 1915, Australian Imperial Force, Roll of Honour: A - D

The August Offensive, Gallipoli, August 1915, Australian Imperial Force, Roll of Honour: D - K  

The August Offensive, Gallipoli, August 1915, Australian Imperial Force, Roll of Honour: K - R

The August Offensive, Gallipoli, August 1915, Australian Imperial Force, Roll of Honour: R - Z  

Lest We Forget


Further Reading:

The August Offensive, Gallipoli, August 1915

Gallipoli Campaign

Battles where Australians fought, 1899-1920


Citation: The August Offensive, Gallipoli, August 1915, Australian Imperial Force, Roll of Honour

Posted by Project Leader at 12:01 AM EADT
Updated: Saturday, 6 August 2011 1:57 PM EADT
Thursday, 5 August 2010
The Battle of Lone Pine, Turkey, 6 - 9 August 1915, Outline
Topic: BatzG - Lone Pine

The Battle of Lone Pine

Turkey, 6 - 9 August 1915

Outline


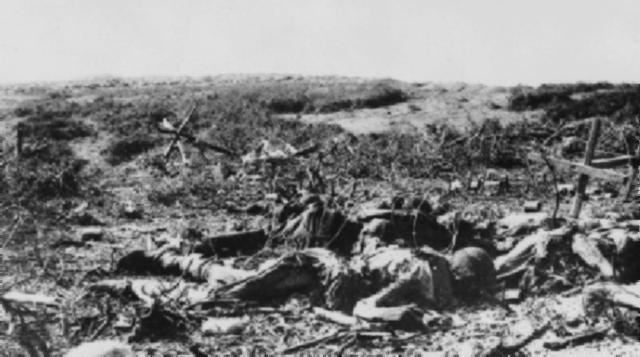
Lone Pine, the result of the attack.


Lone Pine, an action fought on the southern flank of the Anzac (q.v.) position at Gallipoli on 6-9 August 1915, which has become famous as a glorious debacle. The operation was planned purely as a diversion aimed at drawing Turkish reserves away from a major attack to be launched from the northern end of the perimeter (see Hill 971). It involved the Australian 1st Brigade dashing across the lower half of a wide flat hump known as the 400 Plateau and seizing a network of trenches along its eastern edge. In preparation for the assault, the intended objective was pounded by slow artillery shoots at intervals over the preceding three days.


The Australian force locations, 27 July 1915, just before the attack in August.

[From: Hand drawn map from the Australian Division Artillery, 2 August 1915.]


At 4.30 p.m. on 6 August the rate of fire of the guns was increased, and an hour later the troops scrambled out of the trenches in which they had assembled and rushed forward with the setting sun behind them. They were virtually upon the enemy positions before the Turks were able to bring effective fire to bear, but only now discovered that the trenches were roofed over with pine logs which prevented their entry. While some began tearing at the logs to create openings through which to get at their opponents, the majority continued on past the main parapet to the open communication trenches in the rear. Most men jumped down into these and began fighting back towards the covered firing line, using mainly their bayonets to deal with the enemy garrison as they went. A few went on further still, until they stumbled into a depression known as the cup which sheltered the enemy's battalion headquarters and support units. Here they were stopped by Turkish troops who quickly came up to hold this ground.

While the attack had achieved its primary goal within half an hour of its commencement, the Australians now in possession of the main Turkish trench-line found themselves in a desperate struggle to maintain their hold. Parties of the troops quickly threw up sandbag barricades to block any enemy approach along communication trenches or continuations of the trenches they were manning. As darkness fell the Turks made their first attempt to push the Australians out using hand grenades, and this effort continued without relent for the next three days. So fierce was the fighting which followed that the 1st Brigade and the 3rd which reinforced it suffered 2,277 casualties; Turkish losses were claimed as 5,000. Seven Victoria Crosses were awarded for this battle.

Even though the Australians still held the ground they had won when fighting here subsided on 10 August, in every other respect the battle was a disaster. Apart from being immensely costly as a feint, it had actually succeeded in drawing towards this sector of the line major Turkish reinforcements. But as soon as the enemy realised that these were not needed at Lone Pine they were readily at hand to deal with the main British attack as this developed-thereby helping to frustrate the overall plan behind the August offensive.


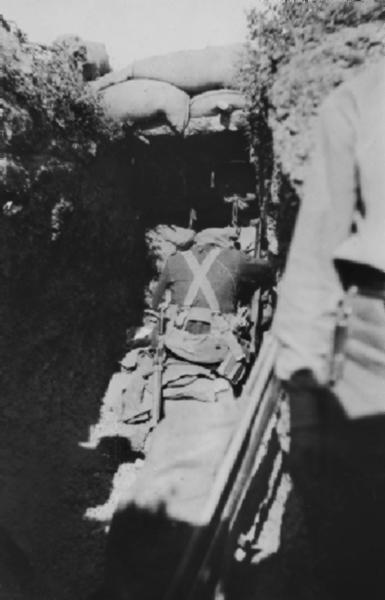
The end of the attack at Lone Pine.

[The sentry guards the most farthest advance at Lone Pine. From: CEW Bean Collection.]


Extracted from the book produced by Chris Coulthard-Clark, Where Australians Fought - The Encyclopaedia of Australia's Battles, Allen and Unwin, Sydney, 1998, pp. 107-108.


Additional References cited by Chris Coulthard-Clark:

C.E.W. Bean, (1924), The Story of Anzac, Vol. 2 , Sydney: Angus & Robertson.


Further Reading:

The Battle for Lone Pine, 6 August 1915

The August Offensive, Gallipoli, August 1915

Gallipoli Campaign

Battles where Australians fought, 1899-1920


Citation: The Battle of Lone Pine, Turkey, 6 - 9 August 1915, Outline

Posted by Project Leader at 12:01 AM EADT
Updated: Friday, 6 August 2010 5:37 PM EADT
Wednesday, 4 August 2010
1st Australian Field Squadron Engineers, Contents
Topic: AIF - DMC - Eng 1FSE

1st FSE, AIF

1st Australian Field Squadron Engineers

Contents


1st Australian Field Squadron Engineers Colour Patch


Formed in August 1914 as part of the 1st Contingent and attached to the Australian Division, the 1st Australian Field Squadron Engineers was made up of engineers from four different states.


Structure

The Australian Light Horse – Structural outline

Australian Light Horse Order of Battle


Corps

Desert Mounted Corps (DMC)


Division

Anzac Mounted Division


Items


Roll of Honour 

1st Australian Field Squadron Engineers, Roll of Honour 

Lest we forget 


Further Reading:

1st Australian Light Horse Field Squadron Engineers, AIF

1st Australian Field Squadron Engineers, Roll of Honour 

Battles where Australians fought, 1899-1920


Citation: 1st Australian Light Horse Field Squadron Engineers, Contents

Posted by Project Leader at 12:01 AM EADT
Updated: Thursday, 7 July 2011 2:09 PM EADT
The Battle of Elands River, South Africa, 4 August 1900, Contents
Topic: BatzB - Elands

The Battle of Elands River

South Africa, 4 August 1900

Contents


Items

Outline

Elands River, South Africa, August 4 to 16, 1900 


Newspaper Accounts

The Battle of Elands River, Letter from Brakfontein, 22 September 1900 

Elands River, Town and Country Journal, 1 September 1900 


War Diary of the New South Wales Imperial Bushmen written by Major David Miller

NSWIB 3 August 1900 

NSWIB 4 August 1900, page 1 

NSWIB 4 August 1900, page 2 

NSWIB 6 August 1900

NSWIB 7 August 1900

NSWIB 8 August 1900

NSWIB 9 August 1900

NSWIB 10 August 1900

NSWIB 14 August 1900

NSWIB 15 August 1900

NSWIB 16 August 1900

NSWIB 17 August 1900

NSWIB 18 August 1900


Elands River, Map of Siege Area, 4 August 1900

Elands River Siege, 4 August 1900, Map


Report of Eland River Battle in the London Times, 13 August 1900, p. 3.

London Times, 13 August 1900, p. 3  


The Report of the Battle written by Major Tunbridge, 2nd Rhodesian Field Force, 15 September 1900

File Note page 1 

File Note page 2

Report page 1 

Report page 2 

Report page 2 

Report page 3 

Report page 4 

Report page 5 

Report page 6 

Report page 7 

Report on Casualties, page 8 


Casualty Biographies

34 Trooper James Daniel Duff

327 Trooper John Waddell

75 Trooper James Edwin Walker

508 Squadron Sergeant Major James Mitchell


Australian Prisoners of War Captured at Elands River, 5 August 1900

Australian POW's at Elands River, 5 August 1900


Tasmanian POWs at Elands River, 5 August 1900

Tasmanians at Elands River, 5 August 1900


Roll of Honour

The Battle of Elands River, South Africa, 4 August 1900, Roll of Honour

Lest We Forget


Further Reading:

The Battle of Elands River, South Africa, 4 August 1900

The Battle of Elands River, South Africa, 4 August 1900, Roll of Honour

The Boer War, 1899 - 1902

Battles where Australians fought, 1899-1920


Citation: The Battle of Elands River, South Africa, 4 August 1900, Contents

Posted by Project Leader at 12:01 AM EADT
Updated: Friday, 6 August 2010 1:51 PM EADT

Newer | Latest | Older

Full Site Index


powered by FreeFind
Let us hear your story: You can tell your story, make a comment or ask for help on our forum.

Desert Column Forum

A note on copyright

The Australian Light Horse Studies Centre is a not for profit and non profit group whose sole aim is to write the early history of the Australian Light Horse from 1900 - 1920. It is privately funded and the information is provided by the individuals within the group and while permission for the use of the material has been given for this site for these items by various donors, the residual and actual copyright for these items, should there be any, resides exclusively with the donors. The information on this site is freely available for private research use only and if used as such, should be appropriately acknowledged. To assist in this process, each item has a citation attached at the bottom for referencing purposes.

Please Note: No express or implied permission is given for commercial use of the information contained within this site.

A note to copyright holders

The Australian Light Horse Studies Centre has made every endeavour to contact copyright holders of material digitised for this blog and website and where appropriate, permission is still being sought for these items. Where replies were not received, or where the copyright owner has not been able to be traced, or where the permission is still being sought, the Australian Light Horse Studies Centre has decided, in good faith, to proceed with digitisation and publication. Australian Light Horse Studies Centre would be happy to hear from copyright owners at any time to discuss usage of this item.

Contact

Australian Light Horse Studies Centre

eXTReMe Tracker