Topic: AIF - 4B - 4 LHB
The Battle of Beersheba
Palestine, 31 October 1917
Grant Account
Brigadier General William Grant, General Officer Commanding the 4th Australian Light Horse Brigade post battle account about the fall of Beersheba
The following is the account from the Commanding Officer of the 4th Light Horse Brigade, the unit that actually conducted the famous Charge of Beersheba.
APPENDIX 188 to 4th ALH Brigade War Diary, 2 November 1917:
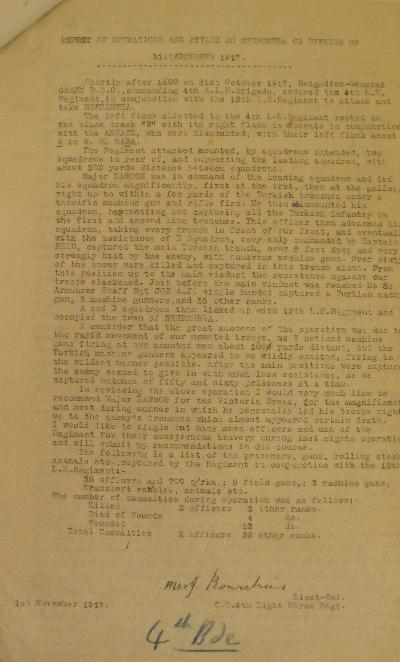
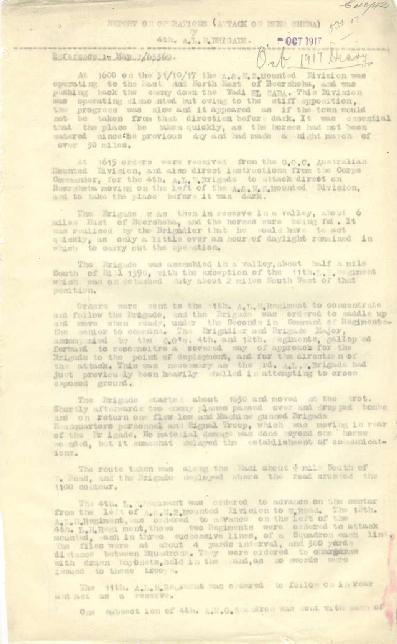
Report on Operations (attack on BEERSHEBA) by 4th ALH Brigade, 31-10-17 by W. Grant, Brigadier-General, Commanding 4th LH Brigade
At 1600 on the 31/10/17 the A&NZ Mounted Division was operating to the East and North East of Beersheba, and was pushing back the enemy down the Wadi el Saba. This Division was operating dismounted but owing to the stiff opposition, the progress was slow and it appeared as if the town would not be taken from that direction before dark. It was essential that the place be taken quickly, as the horse, had not been watered since the previous day and had made a night march of over 30 miles.
At 1615 orders were received from the GOC Australian Mounted Division and also direct instructions from the Corps Commander, for the 4th ALH Brigade to attack direct on Beersheba moving on the left of the A&NZ Mounted Division, and to take the place before it was dark.
The Brigade was then in reserve in a valley, about 6 miles East of Beersheba, and the horses were being fed. It was realised by the Brigadier that he would have to act quickly, as only a little over an hour of daylight remained in which to carry out the operation. The Brigade was assembled in a valley about half a male South of Hill 1390, with the exception of the 11th LH Regiment which was on detached duty about 2 miles South west of that position.
Orders were sent to the 11th ALH Regiments to concentrate and follow the Brigade and the Brigade was ordered to saddle up and move when ready, under the Second in Command of Regiments- the senior to command. The Brigadier and the Brigade Major, accompanied by the COs 4th and 12th Regiments, galloped forward to reconnoitre a covered way of approach for the Brigade to the point of deployment, and for the direction of the attack. This was necessary, as the 3rd ALH Brigade had just previously been heavily shelled in attempting to cross exposed ground.
The Brigade started about 1630 and moved at the trot. Shortly afterwards two enemy planes passed over and dropped bombs and can return one flew low and machine gunned Brigade Headquarters personnel and Signal Troop, which was moving in rear of the Brigade. No material damage was done beyond one horse wounded, but it somewhat delayed the establishment of communications. The route taken was along the Wadi about a quarter mile South of W Road and the Brigade deployed where the road crossed the 1100 contour.
The 4th LH Regiment was ordered to advance on the sector from the left of A&NZ Mounted Division to W Road. The 12th ALH Regiment was ordered to advance on the left of the 4th LH Regiment. The two regiments were ordered to attack mounted, each in three successive lines of a Squadron each line. The files were at about 4 yards intervals and 300 yards distance between Squadrons. They were ordered to charge with drawn bayonets, held in the hand, as no swords were issued to those troops.
The 11th ALH Regiment was ordered to follow on in rear and act as a reserve.
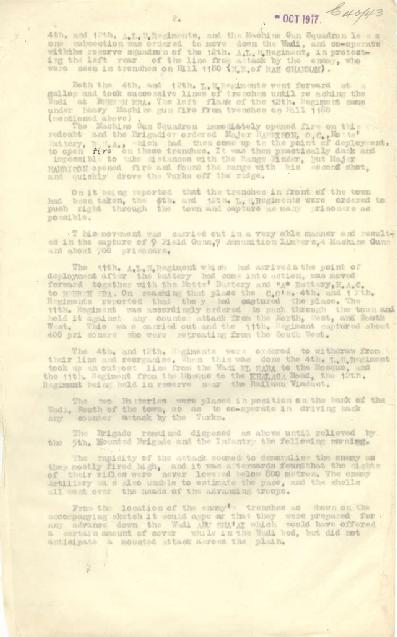
One subsection of 4th Australian Machine Gun Squadron was sent with each of 4th and 12th ALH Regiments and the Machine Gun Squadron less one subsection was ordered to move down the Wadi, and co-operated with the reserve squadron of the 12th ALH Regiment, in protecting the rear of the line from attack by the enemy, who were seen in trenches on Hill 1180 (NE of Ras Ghannam). Both the 4th and 12th LH Regiments went forward at a gallop and took successive lines of trenches until reaching the Wadi at Beersheba. The left flank of the 12th Regiment came under heavy machine gun from trenches on Hill 1180. The Machine Gun Squadron immediately opened fire on this redoubt and the Brigadier ordered Major Harrison, OC, Notts Battery RHA, which had then come up to the point of deployment, to open fire on these trenches. It was then practically dark and impossible to take distances with the range finder, but Major Harrison opened fire and found the range with his second shot, and quickly drove the Turks off the ridge.
On it being reported that the trenches in front of the town had been taken, the 4th and 12th LH Regiments were ordered to push right through the town and capture as many prisoners as possible.
Nine field guns were captured; seven of these have been parked South of the Viaduct, and two which were drawn from their positions by the 11th Regiment, with a view to their being brought in later. Next morning these were found to have been removed by our infantry, it is understood by one of the London Regiments.
Four machine guns and tripods complete and one machine gun, with machine gun equipment, were brought in by the 4th ALH Brigade. Four field gun limbers containing shells have been brought in and three more are being brought in today, 2nd inst. In addition numerous vehicles, animals, stores and equipment have been, and are still being brought in.
The number of prisoners captured is 59 officers and 1090 other ranks.
The 11th ALH regiment which had arrived at the point of deployment after the battery had come into action was moved forward together with the Notts Battery and "A" Battery HAC to Beersheba.
On reaching that place the COs 4th and 12th Regiments reported that they had captured the place. The 11th Regiment was accordingly ordered to push through the town and hold it against any counter-attack from the North, West and South-west. This was carried out and the 11th Regiment captured about 400 prisoners who were retreating from the South-east.
The 4th and 12th Regiments were ordered to withdraw from their line and reorganise. When this was done the 4th LH Regiment took up an outpost line from the Wadi el Saba to the Mosque, and the 11th Regiment from the Mosque to the Khalasa Road, the 12th Regiment being held in reserve near the Railway Viaduct.
The two batteries were placed in position on the bank of the Wadi, South of the town, so as to co-operate in driving back and counter-attack by the Turks.
The Brigade remained disposed as above until relieved by the 5th Mounted Brigade and the Infantry the following morning.
All ranks behaved in a most admirable manner and fearlessly charged several successive trenches at the gallop, in many cases in the face of severe machine gun and rifle fire.
The rapidity of the attack seemed to demoralise the Turks as they mostly fired high, and it was afterwards found that the sights of their rifles were never lowered below 800 metres. The enemy artillery was also unable to estimate the pace, and the shells all went over the heads of the advancing troops.
From the location of the enemy's trenches as shown on the accompanying sketch it would appear that they were prepared for any advance down the Wadi Abu Sha'ai which would have offered a certain amount of cover while in the Wadi bed, but did not anticipate a mounted attack across the plain.
If a dismounted attack had been made from the Wadi Abu Sha'ai it is certain that we would have suffered heavy casualties, as the trenches were very strong, and in the hands machine guns were placed to enfilade the Wadi bed.
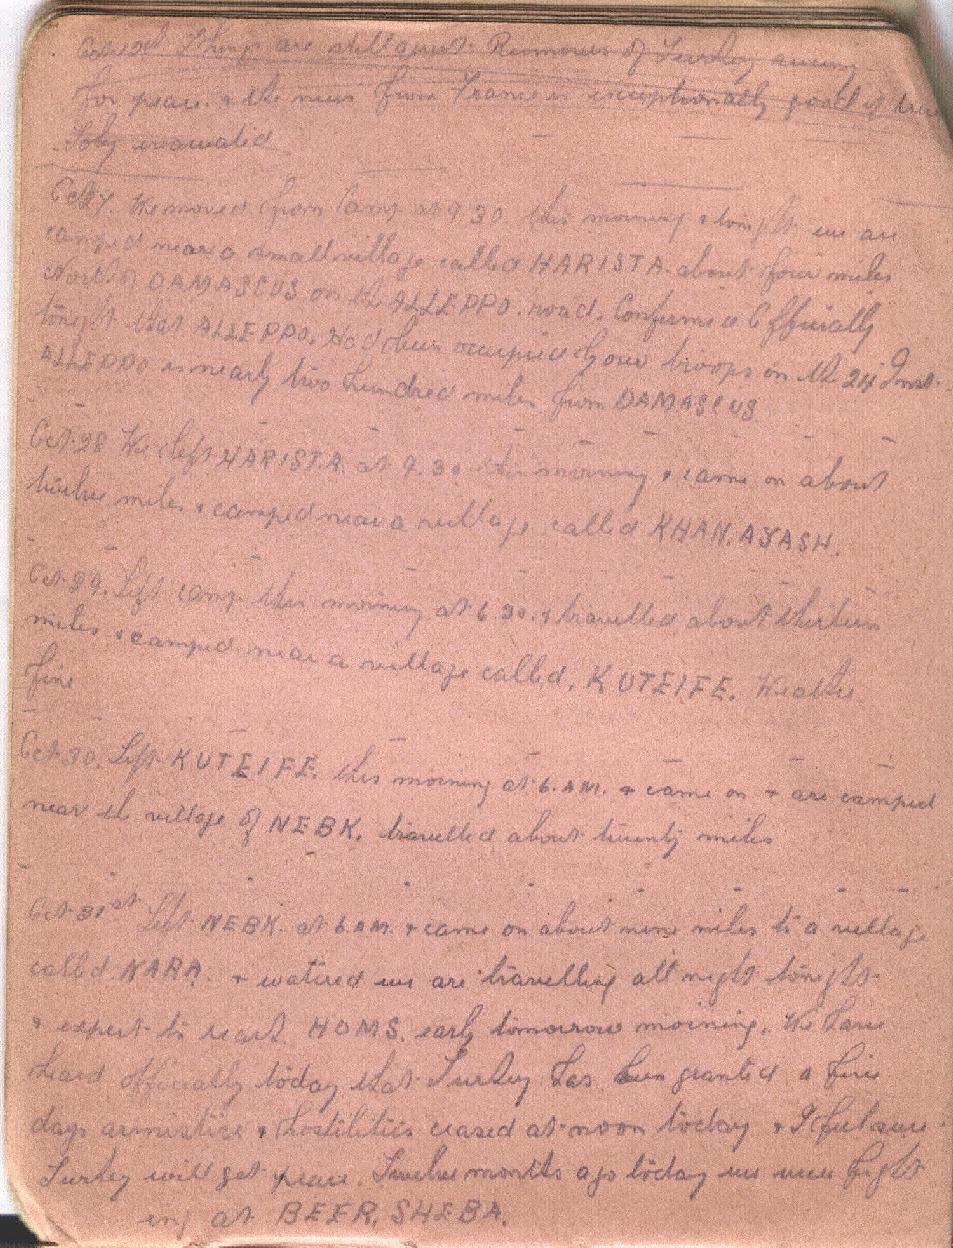
On the 19th of April 1917 at the second battle of Gaza this Brigade made a long advance on foot, with two regiments (11th and 12th) and the Machine Gun Squadron and had 187 casualties without any satisfactory result being obtained. Here the casualties were 32 killed, and another 32 wounded, total 64, which is about one third of the number sustained in the second Gaza battle, and resulted in the capture of 59 Officers and 1090 Other Ranks, besides 10 Field Guns, 5 Machine Guns, and a large number of vehicles, stores and animals. In addition the enemy did not have time to destroy the water supply, which was the mast important factor in the situation.
The high percentage of killed to wounded was due to the hand-to-hand fighting against superior numbers at the trenches. The majority of the wounded fell before the trenches were reached.
The Battle of Beersheba, Palestine, 31 October 1917
Citation: The Battle of Beersheba, Palestine, 31 October 1917, Grant Account