"At a mile distant their thousand hooves were stuttering thunder, coming at a rate that frightened a man - they were an awe inspiring sight, galloping through the red haze - knee to knee and horse to horse - the dying sun glinting on bayonet points..." Trooper Ion Idriess
The Australian Light Horse Studies Centre aims to present an accurate history as chroniclers of early Australian military developments from 1899 to 1920.
The Australian Light Horse Studies Centre site holds over 12,000 entries and is growing daily.
Contact:Australian Light Horse Studies CentreLet us hear your story:
You can tell your story, make a comment or ask for help on our Australian Light Horse Studies Centre Forum called:
WARNING: This site contains: names, information and images of deceased people; and, language which may be considered inappropriate today.
Tuesday, 18 November 2008
Mersa Matruh Topic: AIF - WFF
The Western Frontier of Egypt
To understand the nature of the operations by the Allied forces against the Senussi, three maps are presented below. The purpose is to allow the reader the ability to drill down from the overall picture to gain perspective to the location of the main Allied base.
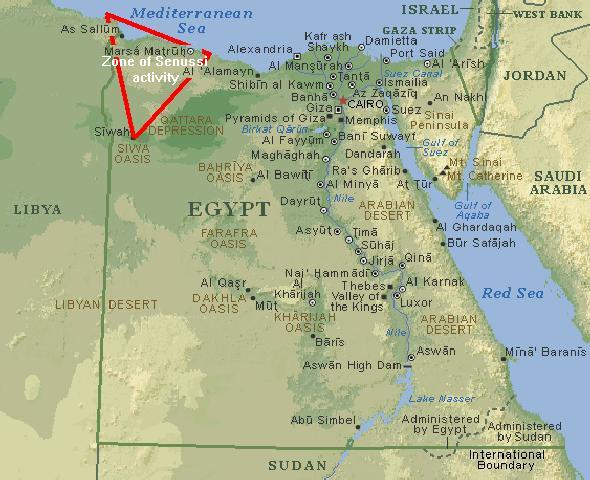
Map 1 - Egypt
Map illustrating the zone of Senussi activity in relation to Egypt.
The triangle of Senussi activity centred around three points in Egypt - Sollum, Matruh and Siwa. This map aims to put the area of the rebellion into the perspective of the region.
Map 2 - The Zone of Activity
The Sollum, Mersa Matruh and Siwa Triangle in which most Senussi activities took place
[Click on map for larger version.]
The map and the one below were drawn up at the time of the operations, for use by the Allied forces in Western Egypt.
Map 3 - Mersa Matruh
Mersa Matruh
[Click on map for larger version.]
Mersa Matruh was the centre of the Allied operations against the Senussi uprising in Western Egypt.
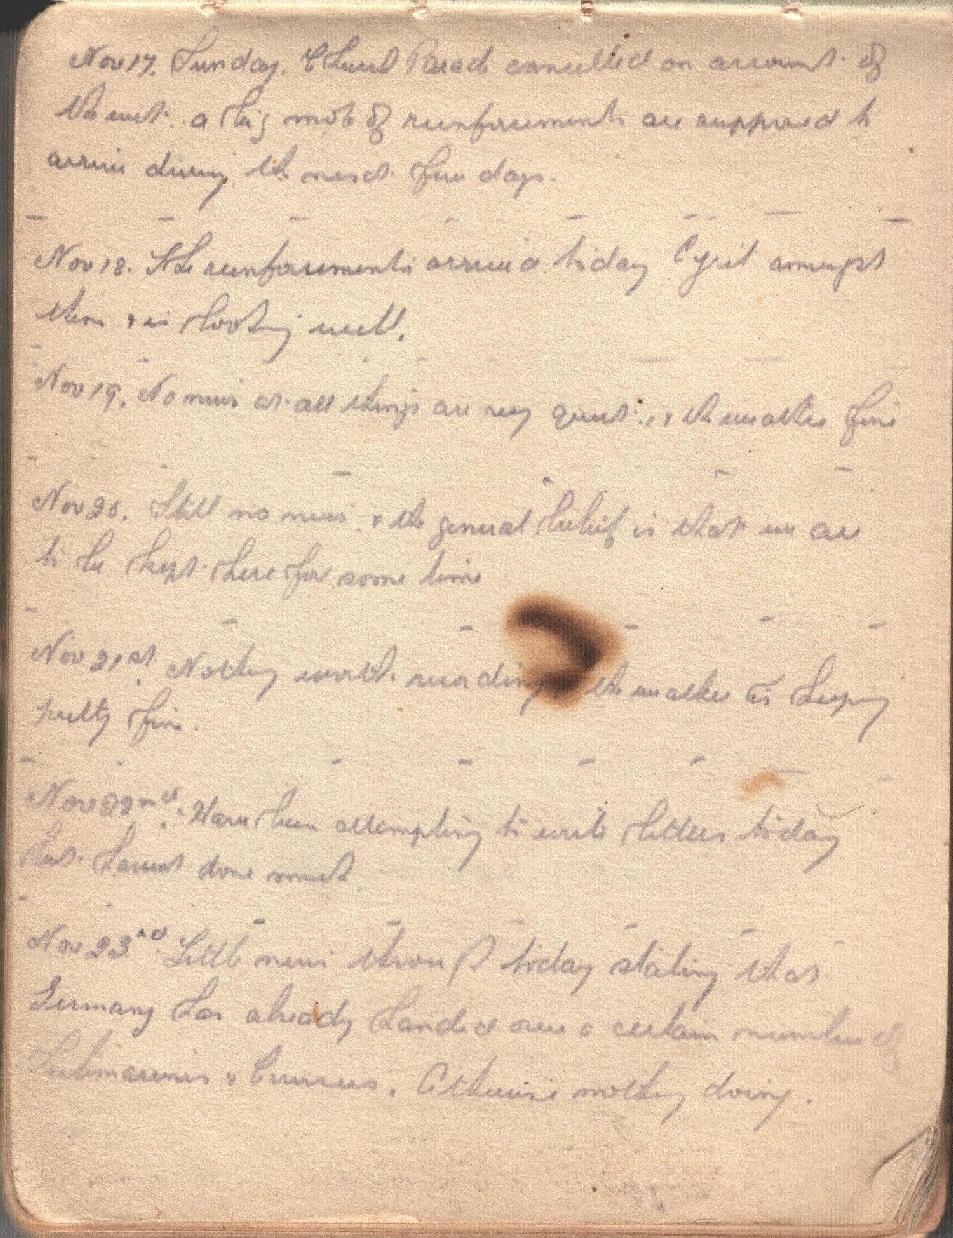
Another entry from the book written by Lieutenant Colonel Hüseyin Hüsnü Emir, called Yildirim. Every day, one page of the book will be posted. This is Page 134.
Colonel Hüsnü, Yildirim, Page 134.
[Click on page for a larger print version.]
This chapter deals with Hüsnü observations of the Turkish response to Beersheba on other parts of the battlefield.
Diaries of AIF Servicemen, Bert Schramm, 18 November 1918 Topic: Diary - Schramm
Diaries of AIF Servicemen
Bert Schramm
18 November 1918
Bert Schramm
2823 Private Herbert Leslie SCHRAMM, a 22 year old Farmer from Whites River, South Australia. He enlisted on 17 February 1916; and at the conclusion of the war Returned to Australia, 10 July 1919.
During part of the course of his military service with the AIF, Bert Schramm kept a diary of his life. Bert was not a man of letters so this diary was produced with great effort on his behalf. Bert made a promise to his sweetheart, Lucy Solley, that he would do so after he received the blank pocket notebook wherein these entries are found. As a Brigade Scout since September 1918, he took a lead part in the September Offensive by the Allied forces in Palestine. Bert's diary entries are placed alongside those of the 9th Light Horse Regiment to which he belonged and to the 3rd Light Horse Brigade to which the 9th LHR was attached. On this basis we can follow Bert in the context of his formation.
The Diaries
The complete diary is now available on the Australian Light Horse Studies Centre Site at:
9th Light Horse Regiment War Diary - Information received that a large draft of reinforcements expected within a few days. These were urgently required as the strength of the Regiment was only 21 Officers and 244 Other Ranks. Ten minutes smartening up drill commenced. Board of Enquiry re Shortages - President Daly, Major TJ, DSO.
Nominal Roll, AWM133, Nominal Roll of Australian Imperial Force who left Australia for service abroad, 1914-1918 War.
War Diaries and Letters
All War Diaries and letters cited on this site should be read in conjunction with the Australian Light Horse Studies Centre, War Diaries and Letters, Site Transcription Policy which may be accessed at:
The following entries are extracted and transcribed from the 9th Light Horse Regiment War Diary, the originals of which are held by the Australian War Memorial. There are 366 entries on this site. Each day has entries as they occurred from 1914 to 1919. In addition to the 9th Light Horse Regiment War Diary, when appropriate, entries from the 3rd Light Horse Brigade War Diary and other regiments with the Brigade will also appear. Entries from the unit history, Darley, TH, With the Ninth Light Horse in the Great War, Adelaide, Hassell Press, 1924 will also appear from time to time. The aim is to give the broadest context to the story and allow the reader to follow the day to day activities of the regiment. If a relative happened to have served in the regiment during the Great War, then this provides a general framework in which the individual story may be told.
9th Light Horse Regiment War Diary - Formation of Regiment occurring at Morphettville Race Course Camp, Adelaide, while "C" Squadron is formed at Broadmeadows Camp, Victoria.
9th Light Horse Regiment War Diary - Extract from Brigade Order dated 18 November 1915, paragraph 613 Authority ZA 2125. Squadrons of 4th Light Horse Brigade both officers and men will be absorbed as reinforcements but the Regiments concerned will have 4 Squadrons instead of three. Officers so absorbed are of course eligible for promotion or transfer outside the Squadrons of the 4th Light Horse Brigade. Similarly, officers of other Squadrons are eligible for promotion or transfer to the Squadrons of the 4th Light Horse Brigade, In other words all four Squadrons will be treated as one Regiment.
1916
Saturday, November 18, 1916
9th Light Horse Regiment Location - Bir Etmaler
9th Light Horse Regiment War Diary - Inspection of new remounts by General Officer in Command 3rd Light Horse Brigade.
1917
Sunday, November 18, 1917
9th Light Horse Regiment Location - Selmieh - el Kubab.
9th Light Horse Regiment War Diary - 0500 Moved via El Mansura crossing Jaffa to Jerusalem railway, Abu Shusheh thence to El Kubab.
0800 O85 K9 Sheet XVII relieving there a regiment of 7th Mounted Brigade Slight enemy shelling and machine gun fire continued all morning from direction of Latron and Amwas. At 1000 report dropped from aeroplane onto Regimental Headquarters stating 4,000 Turkish infantry and 100 horse transport moving through Jerusalem from Bethlehem and to a point on the Nablus Road, 6 miles north of Jerusalem. It made a splendid bombing target. This report was forwarded by galloper to Infantry Brigade Headquarters at Abu Shusheh who dispatched it to destination [General Officer in Command Desert Mounted Corps].
At 1115 orders received to advance and occupy Bir Imman. C Squadron was at once pushed forward followed closely by three troops of B Squadron. 8th Light Horse Regiment had now arrived and was placed under orders of 9th Light Horse Regiment. Orders issued were as follows: C Squadron to occupy Bir Imman to Khirbit el Haditheh, B Squadron Khirbit el Haditheh to Khirbit Baraduk. 8th Light Horse Regiment were ordered to occupy line Khirbit Baraduk to K29 central [All references O85 sheet XVII] C Squadron had orders to maintain touch and watch flank between Yeomanry Division and 9th Light Horse Regiment. Regimental Headquarters with A Squadron two sub sections of 3rd Machine Gun Squadron and A echelon moved into position in Sq O85. Heavily shelled when crossing flat north west of Kubab.
9th Light Horse Regiment sector of the line was occupied by 1330.
At 1215 orders were sent out. 8th Light Horse Regiment will push on to Khirbit el Kusr. 9th Light Horse Regiment less one Squadron on Deir Eyub, owing to extreme toughness of country and having enemy opposition progress was very slow.
At 1600 orders were issued for A Squadron 9th Light Horse Regiment to reconnoitre Yalo, B Squadron supported 8th Light Horse Regiment to move on Deir Eyub. C Squadron to maintain touch between Yeomanry Division and 9th Light Horse Regiment and to continue moving forward on Beit Sira. Masson, 151 Sergeant GG, with patrol from A Squadron reconnoitred Yalo reporting village clear but high ground to the east strongly held by enemy.
At 1630 orders for withdrawal were sent out. The Regiment less C Squadron concentrated on Sq K126 and at 1800 withdrew to Sq E21 sheet XVI arriving there at 2300.
3rd Light Horse Brigade War Diary -
At 0500 the 9th Light Horse Regiment with two sub-sections machine guns moved forward to relieve Regiment of 7th Mounted Brigade at el Kubab. The Yeomanry Mounted Division would operate against the enemy to the north whilst the Australian Mounted Division was directed on Latron and Amwas.
At 0800 the remainder of the Brigade moved forward and reached Kubab at 1100, coming under enemy shelling. Patrols from 9th Light Horse Regiment were sent east and north - east, and gained touch with the left of the Yeomanry Division at Annabeh. Owing to the mountainous nature of the country, great difficulty was being experienced in moving to the required position. The guns and wheeled ambulance had to be left to the north of Amwas. Horses had to be led as the ground was too rocky to ride them. 4th Light Horse Brigade was to cooperate on the right of the 3rd Light Horse Brigade. One squadron 9th Light Horse Regiment was directed on Bir Main - Beit Sira to maintain communication with the 8th Mounted Brigade on their left. The remainder of the 9th Light Horse Regiment moved to occupy Yalo and Deir Eyub with a view to cut the main Latron - Jerusalem road beyond Latron. The 8th Light Horse Regiment in moving to support the 9th Light Horse Regiment also came under artillery fire. Owing to the rough and rocky nature of the locality the movement of the Mounted Troops became very difficult and touch with flanking troops was continually lost. The 9th Light Horse Regiment was unable to reach its objective in the rear of the Turkish position owing to the heavy fire from numerous machine guns which the Turks had emplaced on the right flank of their position. Masson, 151 Sergeant GG, of the 9th Light Horse Regiment with a patrol reconnoitred Yalo village and reported that place clear but high ground to east strongly held by enemy.
At 1025 the Divisional Commander ordered a general withdrawal. The guns of the Notts Battery had been pushed as far forward as the ground would allow. This proved a difficult task and the guns had taken considerable hauling over the rough country. The gunners were well rewarded with good targets and the guns were kept in action throughout the afternoon at a range of 5,000 yards. Enemy guns in Latron were silenced at 1530. Enemy then attempted to manhandle his guns and withdraw them, but rapid fire was opened up and the enemy was dispersed without removing the guns. The Notts Battery had fired 189 rounds during the afternoon. On the advance of the infantry the following day they found four enemy guns were abandoned.
At 1800 the Brigade had withdrawn and commenced to march back to the previous night's bivouac in the vicinity of Junction Station, a distance of 13 miles. Movement through and from the high and rocky hills was very slow. Two water carts and three sand carts, [two carrying wounded], collapsed, and many horses were lamed. At 2230 the Brigade bivouacked.
9th Light Horse Regiment War Diary - Information received that a large draft of reinforcements expected within a few days. These were urgently required as the strength of the Regiment was only 21 Officers and 244 Other Ranks. Ten minutes smartening up drill commenced. Board of Enquiry re Shortages - President Daly, Major TJ, DSO.
1919
Tuesday, November 18, 1919
9th Light Horse Regiment Location - Adelaide
9th Light Horse Regiment War Diary - Regiment disbanded.
The Battle of Amwas, Palestine, 18 November 1917, 9th LHR War Diary Topic: AIF - 3B - 9 LHR
The Battle of Amwas
Palestine, 18 November 1917
9th LHR War Diary
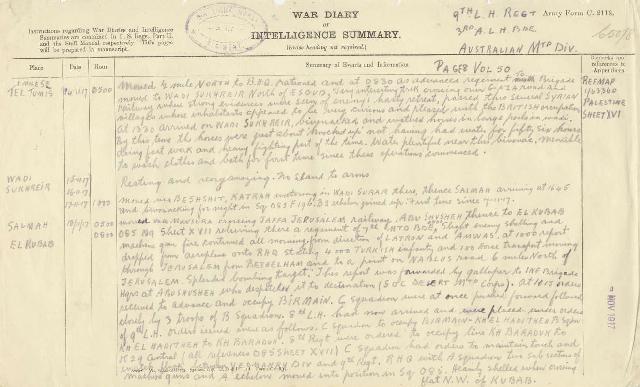
9th Light Horse Regiment War Diary, 18 November 1918.
18 November 1917
0500 Moved via Mansura crossing Jaffa Jerusalem railway Abu Shusheh thence to El Kubab.
0800 O85 K9 Sheet XVII relieving there a regiment of 7th MTD Bde. Slight enemy shelling and machine gun fire continued all morning from direction of Latron and Amwas.
At 1000 report dropped from aeroplane onto RHQ stating 4,000 Turkish infantry and 100 horse transport moving through Jerusalem from Bethlehem and to a point on Nablus Road 6 miles north of Jerusalem. Splendid bombing target. This report was forwarded by galloper to INF Brigade Hqrs at Abu Shusheh who dispatched it to destination (GOC Desert Mounted Corps.
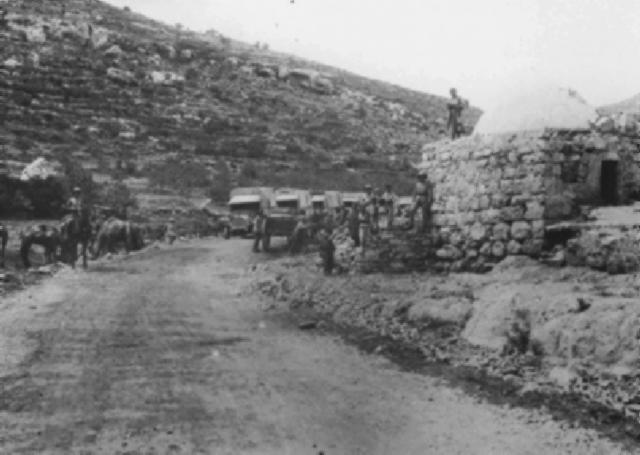
The road at Enab illustrating the mountainous situation facing the 9th LHR.
At 1115 orders received to advance and occupy Birman. C Squadron were at once pushed forward followed closely by 3 troops of B Squadron. 8th LH had now arrived and were placed under orders of 9th LH. Orders issued were as follows: C Squadron to occupy Birman to Kh el Haditheh, B Squadron Kh el Haditheh to Kh Baraduk. 8th Regt were ordered to occupy line Kh Baraduk to K29 central (All references O85 sheet XVII) C Squadron had orders to maintain touch and watch flank between Yeomanry Div and 9th Regt. RHQ with A Squadron two sub sections of machine guns and A echelon moved into position in Sq O85. Heavily shelled when crossing flat NW of Kubab. 9th Regt sector of the line was occupied by 1330.
At 1215 orders were sent out. 8th LH Regt will push on to Kh el Kusr. 9th Regt less one Squadron on Deir Eyub, owing to extreme toughness of country and having enemy opposition progress was very slow.
At 1600 orders were issued for A Squadron 9th LH to reconnoitre Yalo, B Squadron supported 8th LH Regt to move on Deir Eyub. C Squadron to maintain touch between Yeomanry Div and 9th LH and to continue moving forward on Beit Sirra. Sgt Masson with patrol from A Squadron reconnoitred Yalo reporting village clear but high ground to the east strongly held by enemy.
At 1630 orders for withdrawal were sent out. The Regiment less C Squadron concentrated on Sq K126 and at 1800 withdrew to Sq E21 sheet XVI arriving there at 2300.
The Australian Light Horse Studies Centre is a not for profit and non profit group whose sole aim is to write the early history of the Australian Light Horse from 1900
- 1920. It is privately funded and the information is provided by the individuals within the group and while permission for the use of the material has been given for this
site for these items by various donors, the residual and actual copyright for these items, should there be any, resides exclusively with the donors. The information on
this site is freely available for private research use only and if used as such, should be appropriately acknowledged. To assist in this process, each item has a citation
attached at the bottom for referencing purposes.
Please Note: No express or implied permission is given for commercial use of the information contained within this site.
A note to copyright holders
The Australian Light Horse Studies Centre has made every endeavour to contact copyright holders of material digitised for this blog and website and where
appropriate, permission is still being sought for these items. Where replies were not received, or where the copyright owner has not been able to be traced, or where
the permission is still being sought, the Australian Light Horse Studies Centre has decided, in good faith, to proceed with digitisation and publication. Australian Light
Horse Studies Centre would be happy to hear from copyright owners at any time to discuss usage of this item.