


Topic: AIF - WFF
Western Frontier Force
Egypt, 1915 - 1916
9th Light Horse Regiment and the Composite Regiment
Senussi Rebellion and the role played by the 9th Light Horse Regiment with the Composite Regiment
While the bulk of the men from the 9th LHR were freezing on the Gallipoli Peninsular and preparing to leave, another group of their comrades, were just moving into a new theatre of conflict in the Western Desert of Egypt. This was one of the lesser-known campaigns fought by men of the 9th LHR occurred during November and December 1915 and ending for the 9th LHR in January 1916. The conflict became known as the Senussi Rebellion, which rolled on throughout the western borders of Egypt.
The Senussi were followers of an Islamic sect founded in the eighteenth century by a pious sheikh. The chief aim of the sect was nationalistic in that it aimed to use Islam and the rifle to unite all Moslems throughout North Africa into one Islamic nation. It drew upon the nomadic Arabs inhabiting the fringe regions and deserts of Egypt and Libya. As the years progressed so did their militancy and insularity. The Senussi’s used Siwa Oasis as the centre of their movement.
It was from Siwa Oasis that for many years the Senussi, led by Sheikh Sayyid Ahmed, were in armed conflict against the Italians in Libya since 1911 when they seized the Ottoman province of Tripoli. They even helped the Turks fight the Italians at Cyrenaica. All the while they maintained good relations with the British administration. This low level guerrilla war of the Senussi’s against the Italians was still ongoing when the Great War broke out. It was at this point that things changed as far as the British were concerned.
Initially the nationalistic Arabs throughout Egypt were particularly hostile to the British when they declared a protectorate over Egypt in December 1914 in response to the war with the Ottoman Empire. Turkish agents were not quiet. They went throughout Egypt stirring up the nationalists with Ottoman propaganda while the Germans supplied lavish amounts of cash. While this destabilised Egypt, it had little influence upon the Senussi who remained friendly with the British.
Things changed in May 1915 when Italy negated their alliance with German and Austria and subsequently declared war on Turkey as an ally of Britain. For the Senussi, the British were now allies of their sworn enemy and thus now their enemy. The pressure was far too great for the Senussi to remain silent and they stirred into rebellion against the British. For months it was a low level rebellion which the British hoped to control with minimal effort.
Things came to a head in November when the crews from the HMT “Moorina” and HMS “Tara” made their way near Cyrenaica after both their ships were torpedoed by German U Boats. After the British sailors landed on the coast, they sought assistance from the local people. They were taken in and given accommodation while the locals informed the Senussi militia. Later on, the Senussi abducted the sailors and held them as prisoners of war although they might have been willing to ransom them.
The abduction of the sailors was an ideal opportunity to send a message to the British authorities that these captives represented a clear declaration of war against them. The Senussi's were ready. Jaafar Pasha, a competent Ottoman General had whipped a loose force into a highly trained military force of some 5,000 regular forces. In addition there were many irregulars who were only too willing to throw in their lot with the Senussi’s if there was the prospect of loot. In addition to the regular forces, the Ottomans supplied and manned mountain guns and machine guns. The Senussi’s could put quite a formidable force into the field. This danger was not lost on the British.
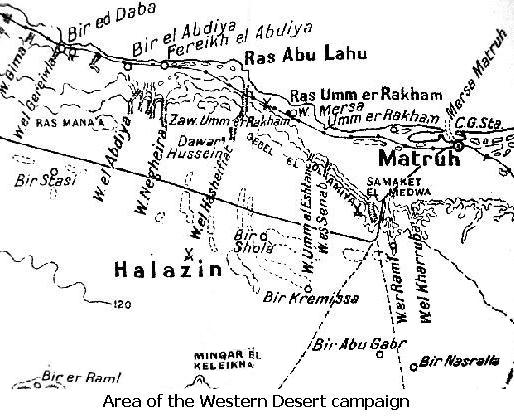
After the abduction, events moved rapidly. Emboldened by their first action, Senussi units rode out from Siwa Oasis and raided Sollum and Sidi Barrani, two British posts, which connected Alexandria to Matruh along the coast. The pressure was too intense on such small posts so the British withdrew to Mersa Matruh. An urgent call was made to Cairo for more forces to contain the rebellion.
For General John Maxwell, British commander for Egypt the situation created a tricky situation. Tactically, there were problems created in exposing supply lines to Gallipoli to attack. Even worse, should this rebellion become more widespread, it would also threaten the Suez Canal, something that Maxwell had to defend with every man available. Since there were very few trained forces in Egypt, Maxwell needed to cobble together an army from the disparate units left in Cairo and Alexandria. He dispatched Major-General Wallace, on 11 December 1915, to lead a composite unit known as the Western Frontier Force to be based at Mersa Matruh for operations against the Senussi.
The Australian formation was to be called the Composite Regiment, made up of men drawn from every training depot in Egypt. Added to them were men from the 9th LHR‘s reinforcements based at the Heliopolis Racecourse. For mobility, all horses to be supplied to this Regiment were to come from the 3rd Light Horse Brigade. This meant that in addition to the fighting men, the farriers were to be drawn from the ranks of the 3rd LH Bde, the men who were left behind from Gallipoli to look after the horses.
The CO of the Composite Regiment was drawn from the Yeomanry with Major Pelham of the 11th Hussars given the post. Second in command was an Australian, Major Tom Daly from the 9th LHR, the erstwhile commander of the 3rd LH Bde Details camp at Heliopolis. Working quickly, Pelham and Daly put together a force of about 535 men. The medical staff was drawn entirely from the 3rd Light Horse Field Ambulance. When the nominal roll was submitted to Wallace, in true bureaucratic style, Cairo staff informed Daly that the Regiment was over-strength by 30 men, who needed to be dropped from the roll. The emergency was not so great as to overlook legal niceties. To keep the indents on rations legal, 30 men were sent back to the various details camps.
When the personnel in the regiment was sorted out, it was moved from Cairo to Alexandria by rail. When they arrived at Mex camp in Alexandria, the men were issued with swords and rifle buckets in addition to all their other light horse issued gear. This altered the nature of the force from light horse to heavy cavalry. It was the first time Australian forces were issued with swords during the Great War. When all the appropriate stores were issued, the men were prepared for action through one week’s intensive training. Part of the syllabus involved the use of swords, a novelty to the Australians.
It was at Mex that the first casualties were suffered. Twenty men from the Composite Regiment went ill through an epidemic of mumps. This left only 485 men in the Regiment, a time when Daly would have reflected that the other 30 men sent back to the camps would have been quite useful at that moment.
Orders were issued that Matruh was to be established as the base for all the Composite Regiment’s operations. Since a large Senussi force periodically cut the road from El Daaba to Matruh and only a regiment of armed men would be able to deal with any attack. In response, all surplus baggage was to be shipped to Matruh. The men horses were entrained to the railhead at El Daaba with instructions to march to Matruh. The first squadron left El Daaba on Wednesday, 8 December 1915 and began their long and slow march.
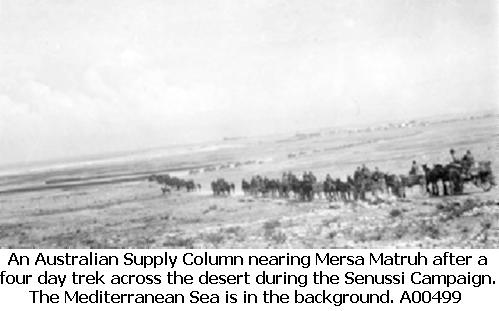
Because of the poor water supply, the trip from El Daaba to Matruh cope with any more than 200 horses in a day. Consequently, the Composite Regiment had to be broken into smaller formations and proceed in the stages at Squadron strength. The journey was some 135 kilometres in distance which could be only completed in 30 – 40 kilometre stages. Along the way Indian troops established and maintained outposts to keep the route open. The squadron protecting the Regimental Headquarters also acted as the escort for the Divisional Train. The march went smoothly and all men arrived at Matruh between 11 and 12 December 1915.
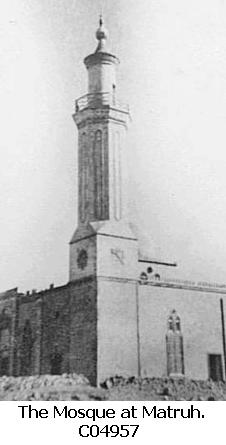
Matruh was a good choice as it was easily defended. On one side was a moat made by the Mediterranean Sea while on the other side was a series of hills. Each of the hills surrounding Matruh held a redoubt. These heavily armed outposts held men and machine guns surrounded by a formidable barrier of barbed wire. Apart from sniping, the Senussi had little ability to breach the defences of the position and capture Matruh.
To overcome the lack of water, each regiment set up their own water supply team comprising an officer and four men, all mounted with pack horses carrying pumping outfits, water testing kits and chlorination boxes. They travelled immediately to rear of the regimental advance guard. Their job was to ensure a good clean water supply. Because of the various bacteria in the water, it had to be chlorinated to kill off any harmful life. In so doing, sometime the chlorination ended up to be so strong that the subsequent product tasted like it came out of a swimming pool. For the men and horses it was bitter and difficult to drink.
At first, wells were used by the troops but they were soon depleted within days. By the beginning of January a desalination plant had been brought into Matruh which ensured a plentiful water supply to the troops. One side product for the men was the ability to enjoy the great luxury, they had water for a hot bath.
However, that was in the future. For the men arriving from their weary trip from El Daaba to Matruh, they went almost immediately into action. On Saturday, 11 December 1915, the men came face to face with the Senussi and came off second best. The day started when the first Composite Regiment squadron to arrive at Matruh, ‘A’ Squadron, was detailed to give support to a Yeomanry patrol working in the area about 10 kilometres south of Matruh near a place known as Samaket el Medwa. As they rode along, the advanced guard of the Yeomanry patrol spotted a small group of Senussi hiding in a depression. Apparently throwing all caution to the wind and seeking a glorious martyr’s death, the little group of Senussi began shooting at the passing Yeomanry. There was nothing more calculated to get the attention of the Yeomanry patrol and it did indeed have the desired result.
While out of the killing zone, the Yeomanry formed up, drew their swords and prepared to charge down the Senussi shooting at them. In seconds the might palfreys of the Yeomanry came charging, swords waving in the air, with the men whooping towards the little group of Senussi. As the Yeomanry came thundering down, the Senussi were seen to retreat into a gully. Into the gully galloped the men from the Yeomanry followed by the Composite Squadron. To their great surprise, suddenly 100 Senussi stood up from their concealed positions and began to shoot at the horsemen. The men knew they had fallen into a trap and fighting their way out with severe casualties seemed the only result. The shoot out began at close quarters. Fierce and bloody fighting began as the Yeomanry and Composite Squadron fought for their very survival.
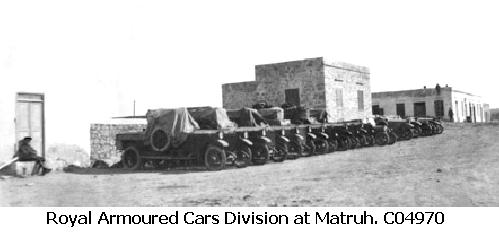
But in true poetic fashion, they were rescued at the last minute. A couple armoured patrol cars from the Royal Navy Armoured Car Division were making a sweep when they fortuitously showed up on the scene. A man sent out on his horse to get help by the Yeomanry commander, alerted the patrol cars as to the situation. After a couple minutes discussion to work out the best tactics, the patrol cars moved to outflank the Senussi. A few bursts of their machine guns gave the Senussi the uncomfortable message that the trap was finished. It was time for the Senussi to move and they did with great rapidity. The wounded were few and able to be transported back to Matruh by the armoured cars.
For the men of the two units, it was a wake up call alerting them to the ability of their foe. If they thought it was going to be simple, this example of Senussi tactics said otherwise. Caution regarding engagement was now the watchword. This group moved along the Khedivial Road until swinging up north through Wadi Sinab to meet up with a main body at bivouacking near Ras umm er Rakham.
On Monday, 13 December 1915, ‘A’ Squadron of the Composite Regiment marched off to Bir Shola, an oasis some 25 kilometres south west of Matruh. When they concentrated with other units, they were part of a greater force, which included two Yeomanry squadrons, a Sikh Battalion, and the 6th Royal Scots Battalion. In opposition to this force was a large force of Senussi spread over a large area. As the units went into action, the allied forces could only respond to the rapid movements of the Senussi. Initially the resulting fight turned out to be an all out melee. Then Sikhs delivered the most powerful blows at Hazalin watched on by everyone else. So excited was everyone about engaging in action that even Padre Devine, posted to the Composite Regiment, found a rifle and took part in the fight. The day was a draw with the Western Frontier Force disengaging and withdrawing to their night bivouacs at Ras umm er Rakham.
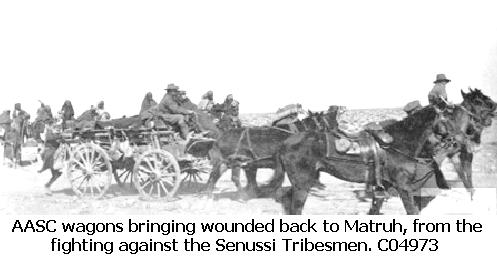
The casualties for the day were 65 men. In picking the men up, instead of stretcher bearers from the field ambulance clearing the battlefield, storemen and drivers from the Australian Supply Corps undertook the arduous task. Some were wounded while collecting the wounded. The injured men were evacuated to a temporary casualty clearing station at Ras umm er Rakham where they were patched up and sent onto a hospital ship called "The Rashid", the former pleasure yacht of the Khedive of Egypt.
That night the men all stood to arms in anticipation of a Senussi attack on their position at Ras umm er Rakham. Nothing happened. For the allied force, the night passed quietly and in peace. The next morning revealed the full story.
As the Allied force went to rest at Ras umm er Rakham, the Senussi thought that the Western Frontier Force would march back to safety of Matruh for the evening. In anticipation of this move, they moved off from Bir Shola and raced as fast as possible to take up a position between Ras umm er Rakham and Matruh and so set an ambush for the unwary force. For them nothing happened either as the Allied force rested at Ras umm er Rakham.
The Western Frontier Force moved off at 6am Tuesday, 14 December 1915, and marched towards Matruh. In the meantime, the Senussi had moved to their ambush position without having eaten or drunk any water. The sun was hot, the men hungry and thirst and feeling very jaded. At 9am, the main force of irregulars was fed up and began to move off leaving a few regulars behind to maintain the ambush.
Half an hour later, at 9.30am the Western Frontier Force arrived at the ambush site. The Senussi regulars could do little else than mount some desultory fire from a mountain gun and precious little else. After a few angry shots, the Senussi retreated and the battle was over after their whimper of an attack. The Allies arrived at Matruh by lunchtime with no casualties. It was clear that one phase of fighting ended in stalemate. It required a new offensive, which was best done by the armoured cars.
After this action, the Light Horse was confined to undertaking routine patrols during the night and day. It was boring work requiring a great deal of concentration while riding over the miles of featureless landscape. At times the close attention lapsed and trouble occurred.
Sometimes things got out of hand and the notion of routine patrol became very much a misnomer. During one occasion, on Saturday 18 December 1915, a troop found itself surrounded by the Senussi who were advancing on the hapless troops. Brisk musket fire from the troop of Light Horsemen was the only thing that held the Senussi at bay although this was only short term. As time went on, things became very uncomfortable for the men who were now fighting to stay alive. In the distant, the advanced guards from the Composite Regiment heard the gunfire and determined the direction. It was obvious that the firing was intense and in the direction where the patrol should be located. The Regiment turned out in force and rode off quickly to rescue their comrades. By sheer determination to survive coupled with excellent training, the troop extricated itself without any assistance. When the Regiment arrived, their only task was to chase off the attacking force which melted away when confronted by such a large force. The troop, despite the intense firefight, suffered only one man wounded. Feeling relieved, the troop rode accompanied by the regiment to Matruh for some well earned rest.
On receiving information that there was a concentration of Senussi south of Matruh around Wadi Medwa and concentrated around a redoubt on Gebel Medwa, a plateau rising above the wadi. On Saturday, 25 December 1915, Christmas Day, the Western Frontier Force left Matruh in 4.00am for a sortie force. The force was broken into two columns, the first being the main force which moved down the Khedivial Road towards Wadi Raml, the most direct route to Gebel Medwa. The other force, a highly mobile cavalry regiment went directly south to follow Wadi el Toweiwia until swinging due west to outflank the retreating Senussi and so capture them.
After reaching Wadi Raml, things then became hard for the force. No tracks leading into the wadis meant that moving wagons up and down slopes required the use of drag ropes and brute force. The horses had to be carefully moved up and down the banks. Once on the plateau they set a course to the west until they encountered the Senussi near Gebel Medwa at about 8am that morning.
The Senussi felt comfortable in letting the force come to them. Their plan was to shoot at the Allied force only when they were close enough to engage at point blank range. At 40 metres, the Senussi opened fire. One man suffered a flesh wound. The fighting heated up with the Senussi being forced to retreat since they were being attacked simultaneously from the north and south. This pincer movement forced the Senussi to move so by 10am the they were retreating westward. The Senussi moved all over the place with feints and ruses being attempted. By 5pm, the Senussi force of about 300 men was trapped in a gully surrounded by the various Allied units. They were fired upon with shrapnel and rifle fire.

An order was given to the force to retire to Matruh. For those on the south side of the gully it meant climbing down some 50 metres to the bottom of the gully and then climbing up again. The men of the Composite Regiment dismounted and walked their way over. Following them came the New Zealand Infantry Battalion. Inside the gully were the remains of a slaughtered force. The Western Frontier Force suffered one dead and four wounded. This was due to good luck by the force and poor shooting from the Senussi.
Apart from the trapped Senussi, the other group with the tough luck story was the Field Ambulance team with their Maltese cart. Unable to ride it down, they asked for assistance from the Composite Regiment and the New Zealanders. No one wanted to lend a hand. They were left to their own devices. With the occasional pot shots fired at them, the men winched their cart into the gully, walked the horses up the other side and then winched the cart up again. The return of a few Senussi gave the men a spur to get a move along. Feeling sorry for themselves they trudged each weary kilometre to Matruh, a 20 kilometre march. Just when they thought things could not get any worse, the heavens opened up with a torrential downpour while they were within sight of Matruh. Dry tents and warm tucker restored their jaded feelings.
After this foray the role of the force went back to routine patrols. Sometimes raids were undertaken to capture supplies of food and fodder which could be used by the Senussi. By the middle of January 1916, the rebellion was substantially reduced. At this time the South African Infantry Battalion joined the force at Matruh relieving the Composite Regiment who set out for Cairo on Thursday, 20 January 1916.
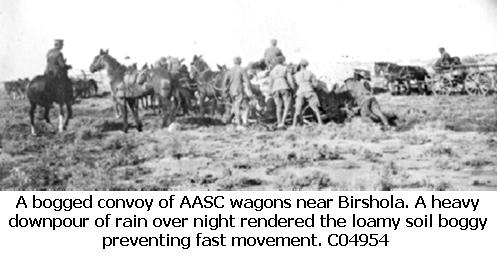
The movement to El Daaba proved to be difficult. More rain fell turning the tracks into a quagmire over which the transport carts had to move. When the Composite Regiment arrived at Agagia, they were asked to remain since a spy had reported the presence of the Senussi leader, Sidi Haroun who was waiting with a couple mountain guns and a force in an attempt to ambush the Regiment. With that in mind, the Regiment marched south for 60 kilometres searching for the elusive force but found nothing. Apparently smoke signals were used to alert the Senussi of the approaching force and they had disappeared.
The rest of the trip to El Daaba where the Composite Regiment took the train to Heliopolis was quiet. By the end of January 1916, all the Light Horsemen had returned to their respective regiments while the horses were returned to the regiments of the 3rd Light Horse Brigade.
Antill was relieved to get the horses back as the 3rd LH Bde was going through a major retraining program. Prior to the arrival of the horses, the men were reduced to practicing their horse skills on wooden horses. It was a good joke for the men but a frustration for the officers. Now the 9th LHR was finally complete again, the real training could begin.
Participants in the Senussi Campaign
This is a list of the 30 men from the 9th LHR who took part in the Senussi Campaign from November 1915 to January 1916.
386 Dvr Jack Brown
107 Far Sgt James Campbell
892A Pte William Carter
24 Dvr James Clark
25 Dvr Michel Cole
396 Sdlr Ernest Couzens
76 S/Smth Melville Farmer
8 Farrier Quartermaster Sgt George Fletcher
640 S/Smth Ray Frauenfelder
416 Dvr Stanley Gundry
420 Pte Thomas Hamilton
418 Pte George Hayhoe
863 Pte Harold Kelly
432 Dvr Philip Kirk
149 S/Smth Sgt Frank Lawrence
168 Dvr Joseph McCarthy
167 S/Smth Harold Mertin
29 L/Cpl William Mingo
162 Dvr John Morrissey
611 Sgt Edward O'Keefe
1116 Pte Edward Parker
1139 Pte Thomas Nathaniel Rickaby
32 Pte Fred Rigby
481 Pte Alfred Rooney
480 Pte Arthur Rowe
613 Pte Thomas Smith
563 Dvr Alfred Stancliffe
199 S/Smth Corporal James Taylor
608 S/Smth Corporal William Turner
Capt Harry Worthington
Further Reading:
Western Frontier Force, Egypt, 1915 - 1916
Battles where Australians fought, 1899-1920
Citation: Western Frontier Force, Egypt, 1915 - 1916, 9th Light Horse Regiment and the Composite Regiment
