« June 2008 »
S M T W T F S
1 2 3 4 5 6 7
8 9 10 11 12 13 14
15 16 17 18 19 20 21
22 23 24 25 26 27 28
29 30
You are not logged in. Log in


Search the site:


powered by FreeFind
Volunteer with us.

Entries by Topic All topics  
A Latest Site News
A - Using the Site
AAA Volunteers
AAB-Education Centre
AAC-Film Clips
AAC-Photo Albums
AIF & MEF & EEF
AIF - Lighthorse
AIF - ALH - A to Z
AIF - DMC
AIF - DMC - Or Bat
AIF - DMC - Anzac MD
AIF - DMC - Aus MD
AIF - DMC - British
AIF - DMC - BWI
AIF - DMC - French
AIF - DMC - Indian
AIF - DMC - Italian
AIF - DMC - Medical
AIF - DMC - Remounts
AIF - DMC - Scouts
AIF - DMC - Sigs
AIF - DMC - Sigs AirlnS
AIF - DMC - 1 Sig Sqn
AIF - DMC - 2 Sig Sqn
AIF - DMC - Eng
AIF - DMC - Eng 1FSE
AIF - DMC - Eng 2FSE
AIF - DMC - GSR
AIF - 1B - 1 LHB
AIF - 1B - 6 MVS
AIF - 1B - 1 LHMGS
AIF - 1B - 1 Sig Trp
AIF - 1B - 1 LHFA
AIF - 1B - 1 LHR
AIF - 1B - 2 LHR
AIF - 1B - 3 LHR
AIF - 2B - 2 LHB
AIF - 2B - 7 MVS
AIF - 2B - 2 LHFA
AIF - 2B - 2 LHMGS
AIF - 2B - 2 Sig Trp
AIF - 2B - 5 LHR
AIF - 2B - 6 LHR
AIF - 2B - 7 LHR
AIF - 3B - 3 LHB
AIF - 3B - 8 MVS
AIF - 3B - 3 LHB Sigs
AIF - 3B - 3 LHFA
AIF - 3B - 3 LHMGS
AIF - 3B - 3 Sig Trp
AIF - 3B - 8 LHR
AIF - 3B - 9 LHR
AIF - 3B - 10 LHR
AIF - 4B - 4 LHB
AIF - 4B - 4 Sig Trp
AIF - 4B - 9 MVS
AIF - 4B - 4 LHFA
AIF - 4B - 4 LHMGS
AIF - 4B - 4 LHR
AIF - 4B - 11 LHR
AIF - 4B - 12 LHR
AIF - 5B - 5 LHB
AIF - 5B - 10 MVS
AIF - 5B - 5 LHFA
AIF - 5B - 5 Sig Trp
AIF - 5B - ICC
AIF - 5B - 14 LHR
AIF - 5B - 15 LHR
AIF - 5B - 1er Regt
AIF - 5B - 2 NZMGS
AIF - AASC
AIF - Aboriginal LH
AIF - Badges
AIF - Cars
AIF - Chinese LH
AIF - Double Sqns
AIF - Engineers
AIF - Fr - 22 Corps
AIF - Fr - 13 LHR
AIF - Honour Roll
AIF - HQ - 3rd Echelon
AIF - Marching Songs
AIF - Misc Topics
AIF - NZMRB
AIF - NZMRB - AMR
AIF - NZMRB - CMR
AIF - NZMRB - EFT
AIF - NZMRB - NZMFA
AIF - NZMRB - NZMGS
AIF - NZMRB - OMR
AIF - NZMRB - Sig-Trp
AIF - NZMRB - WMR
AIF - Ships
AIF - Ships - Encountr
AIF - Ships - Una
AIF - WFF
AIF - Wireless Sqn
Battles
BatzA - Australia
BatzA - Broken Hill
BatzA - Liverpool
BatzA - Merivale
BatzB - Boer War
BatzB - Bakenlaagte
BatzB - Belmont
BatzB - Bothaville
BatzB - Buffels Hoek
BatzB - Coetzees Drift
BatzB - Diamond Hill
BatzB - Driefontein
BatzB - Elands
BatzB - Graspan
BatzB - Grobelaar
BatzB - Grootvallier
BatzB - Hartebestfontn
BatzB - Houtnek
BatzB - Karee Siding
BatzB - Kimberley
BatzB - Koster River
BatzB - Leeuw Kop
BatzB - Mafeking
BatzB - Magersfontein
BatzB - Modder River
BatzB - Onverwacht
BatzB - Paardeberg
BatzB - Palmietfontein
BatzB - Pink Hill
BatzB - Poplar Grove
BatzB - Rhenoster
BatzB - Sannahs Post
BatzB - Slingersfontn
BatzB - Stinkhoutbm
BatzB - Sunnyside
BatzB - Wilmansrust
BatzB - Wolvekuil
BatzB - Zand River
BatzG - Gallipoli
BatzG - Anzac
BatzG - Aug 1915
BatzG - Baby 700
BatzG - Evacuation
BatzG - Hill 60
BatzG - Hill 971
BatzG - Krithia
BatzG - Lone Pine
BatzG - Nek
BatzJ - Jordan Valley
BatzJ - 1st Amman
BatzJ - 2nd Amman
BatzJ - Abu Tellul
BatzJ - Es Salt
BatzJ - JV Maps
BatzJ - Ziza
BatzM - Mespot
BatzM - Baghdad
BatzM - Ctesiphon
BatzM - Daur
BatzM - Kurna
BatzM - Kut el Amara
BatzM - Ramadi
BatzN - Naval
BatzN - AE1
BatzN - Cocos Is
BatzN - Heligoland
BatzN - Marmara
BatzN - Zeebrugge
BatzN - Zeppelin L43
BatzNG - Bitapaka
BatzO - Other
BatzO - Baku
BatzO - Egypt 1919
BatzO - Emptsa
BatzO - Karawaran
BatzO - Peitang
BatzO - Wassa
BatzP - Palestine
BatzP - 1st Gaza
BatzP - 2nd Gaza
BatzP - 3rd Gaza
BatzP - Aleppo
BatzP - Amwas
BatzP - Ayun Kara
BatzP - Bald Hill
BatzP - Balin
BatzP - Beersheba
BatzP - Berkusieh
BatzP - Damascus
BatzP - El Auja
BatzP - El Buggar
BatzP - El Burj
BatzP - Haifa
BatzP - Huj
BatzP - JB Yakub
BatzP - Kaukab
BatzP - Khan Kusseir
BatzP - Khuweilfe
BatzP - Kuneitra
BatzP - Megiddo
BatzP - Nablus
BatzP - Rafa
BatzP - Sasa
BatzP - Semakh
BatzP - Sheria
BatzP - Surafend
BatzP - Wadi Fara
BatzS - Sinai
BatzS - Bir el Abd
BatzS - El Arish
BatzS - El Mazar
BatzS - El Qatiya
BatzS - Jifjafa
BatzS - Magdhaba
BatzS - Maghara
BatzS - Romani
BatzS - Suez 1915
BatzSe - Senussi
BatzWF - Westn Front
BW - Boer War
BW - NSW
BW - NSW - 1ACH
BW - NSW - 1NSWMR
BW - NSW - 2NSWMR
BW - NSW - 3ACH
BW - NSW - 3NSWIB
BW - NSW - 3NSWMR
BW - NSW - 5ACH
BW - NSW - A Bty RAA
BW - NSW - AAMC
BW - NSW - Aust H
BW - NSW - Lancers
BW - NSW - NSW Inf
BW - NSW - NSWCBC
BW - NSW - NSWIB
BW - NSW - NSWMR_A
BW - NZ
BW - Qld
BW - Qld - 1ACH
BW - Qld - 1QMI
BW - Qld - 2QMI
BW - Qld - 3ACH
BW - Qld - 3QMI
BW - Qld - 4QIB
BW - Qld - 5QIB
BW - Qld - 6QIB
BW - Qld - 7ACH
BW - QLD - AAMC
BW - SA
BW - SA - 1SAMR
BW - SA - 2ACH
BW - SA - 2SAMR
BW - SA - 3SACB
BW - SA - 4ACH
BW - SA - 4SAIB
BW - SA - 5SAIB
BW - SA - 6SAIB
BW - SA - 8ACH
BW - SA - AAMC
BW - Tas
BW - Tas - 1ACH
BW - Tas - 1TIB
BW - Tas - 1TMI
BW - Tas - 2TB
BW - Tas - 2TIB
BW - Tas - 3ACH
BW - Tas - 8ACH
BW - Vic
BW - Vic - 1VMI
BW - Vic - 2ACH
BW - Vic - 2VMR
BW - Vic - 3VB
BW - Vic - 4ACH
BW - Vic - 4VIB
BW - Vic - 5VMR
BW - Vic - 6ACH
BW - Vic - AAMC
BW - Vic - Scot H
BW - WA
BW - WA - 1WAMI
BW - WA - 2ACH
BW - WA - 2WAMI
BW - WA - 3WAB
BW - WA - 4ACH
BW - WA - 4WAMI
BW - WA - 5WAMI
BW - WA - 6WAMI
BW - WA - 8ACH
BW Gen - Campaign
BW Gen - Soldiers
BW General
Cavalry - General
Diary - Schramm
Egypt - Heliopolis
Egypt - Mena
Gen - Ataturk Pk, CNB
Gen - Australia
Gen - Legends
Gen - Query Club
Gen - St - NSW
Gen - St - Qld
Gen - St - SA
Gen - St - Tas
Gen - St - Vic
Gen - St - WA
Gm - German Items
Gm - Bk - 605 MGC
GW - 11 Nov 1918
GW - Atrocities
GW - August 1914
GW - Biographies
GW - Propaganda
GW - Spies
GW - We forgot
Militia 1899-1920
Militia - Area Officers
Militia - Inf - Infantry
Militia - Inf - 1IB
Militia - Inf - 2IB
Militia - Inf - 3IB
Militia - Inf - NSW
Militia - Inf - Qld
Militia - Inf - SA
Militia - Inf - Tas
Militia - Inf - Vic
Militia - Inf - WA
Militia - K.E.Horse
Militia - LH
Militia - LH - Regts
Militia - LH - 1LHB
Militia - LH - 2LHB
Militia - LH - 3LHB
Militia - LH - 4LHB
Militia - LH - 5LHB
Militia - LH - 6LHB
Militia - LHN - NSW
Militia - LHN - 1/7/1
Militia - LHN - 2/9/6
Militia - LHN - 3/11/7
Militia - LHN - 4/6/16
Militia - LHN - 5/4/15
Militia - LHN - 6/5/12
Militia - LHN - 28
Militia - LHQ - Qld
Militia - LHQ - 13/2
Militia - LHQ - 14/3/11
Militia - LHQ - 15/1/5
Militia - LHQ - 27/14
Militia - LHS - SA
Militia - LHS - 16/22/3
Militia - LHS - 17/23/18
Militia - LHS - 24/9
Militia - LHT - Tas
Militia - LHT - 12/26
Militia - LHV - Vic
Militia - LHV - 7/15/20
Militia - LHV - 8/16/8
Militia - LHV - 9/19
Militia - LHV - 10/13
Militia - LHV - 11/20/4
Militia - LHV - 19/17
Militia - LHV - 29
Militia - LHW - WA
Militia - LHW-18/25/10
Militia - Military Orders
Militia - Misc
MilitiaRC - Rifle Clubs
MilitiaRC - NSW
MilitiaRC - NT
MilitiaRC - Qld
MilitiaRC - SA
MilitiaRC - Tas
MilitiaRC - Vic
MilitiaRC - WA
Militiaz - New Zealand
Tk - Turkish Items
Tk - Army
Tk - Bks - Books
Tk - Bks - 1/33IR
Tk - Bks - 27th IR
Tk - Bks - Air Force
Tk - Bks - Yildirim
Tk - POWs
Wp - Weapons
Wp - Hotchkiss Cav
Wp - Hotchkiss PMG
Blog Tools
Edit your Blog
Build a Blog
RSS Feed
View Profile
Open Community
Post to this Blog
Site Index
Education Centre
LH Militia
Boer War
Transport Ships
LH Battles
ALH - Units
ALH - General
Aboriginal Light H
Weapons
Ottoman Sources

"At a mile distant their thousand hooves were stuttering thunder, coming at a rate that frightened a man - they were an awe inspiring sight, galloping through the red haze - knee to knee and horse to horse - the dying sun glinting on bayonet points..." Trooper Ion Idriess

The Australian Light Horse Studies Centre aims to present an accurate history as chroniclers of early Australian military developments from 1899 to 1920.

The Australian Light Horse Studies Centre site holds over 12,000 entries and is growing daily.

Contact: Australian Light Horse Studies Centre

Let us hear your story: You can tell your story, make a comment or ask for help on our Australian Light Horse Studies Centre Forum called:

Desert Column Forum

WARNING: This site contains: names, information and images of deceased people; and, language which may be considered inappropriate today.

Monday, 30 June 2008
Diaries of AIF Servicemen, Bert Schramm, 1 July 1918
Topic: Diary - Schramm

Diaries of AIF Servicemen

Bert Schramm

1 July 1918


Bert Schramm


2823 Private Herbert Leslie SCHRAMM, a 22 year old Farmer from Whites River, South Australia. He enlisted on 17 February 1916; and at the conclusion of the war Returned to Australia, 10 July 1919.

During part of the course of his military service with the AIF, Bert Schramm kept a diary of his life. Bert was not a man of letters so this diary was produced with great effort on his behalf. Bert made a promise to his sweetheart, Lucy Solley, that he would do so after he received the blank pocket notebook wherein these entries are found. As a Brigade Scout since September 1918, he took a lead part in the September Offensive by the Allied forces in Palestine. Bert's diary entries are placed alongside those of the 9th Light Horse Regiment to which he belonged and to the 3rd Light Horse Brigade to which the 9th LHR was attached. On this basis we can follow Bert in the context of his formation.


The Diaries

The complete diary is now available on the Australian Light Horse Studies Centre Site at:

Bert Schramm Diary


Finding more about a service person. See:

Navigating the National Archives Service File 


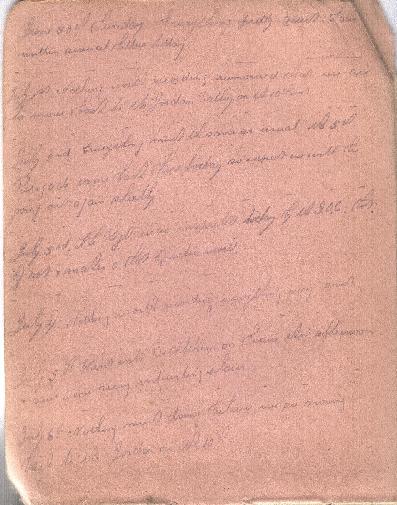
Bert Schramm's Handwritten Diary, 30 June - 6 July 1918

[Click on page for a larger print version.]


Bert Schramm 

Monday, July 1, 1918

Bert Schramm's Location - Solomon's Pools, Bethlehem, Palestine.

Bert Schramm's Diary - Nothing worth recording. Rumoured that we are to move back to the Jordan Valley on the 10th.


9th Light Horse Regiment War Diary

9th Light Horse Regiment Location - Solomon's Pools, Bethlehem, Palestine.

9th Light Horse Regiment War Diary - O'Neil, 686 Trooper T, C Squadron tried by FGCM [Field General Court Martial] - Charge "Absent without leave" Daly, Major TJ, DSO; and, 21 Other Ranks proceeded to Port Said Rest Camp.

0800 - 1030 Training of specialists and Non Commissioned Officer as per Syllabus.

9th LHR AIF War Diary, 1 July


Darley

Darley, TH, With the Ninth Light Horse in the Great War, Adelaide, Hassell Press, 1924.

No Entry


Previous: Bert Schramm's Diary, 30 June 1918

Next: Bert Schramm's Diary, 2 July 1918


Sources Used:

Bert Schramm's Diary

National Archives Service File.

Embarkation Roll, AWM8.

Australian War Memorial Roll of Honour

Nominal Roll, AWM133, Nominal Roll of Australian Imperial Force who left Australia for service abroad, 1914-1918 War.


War Diaries and Letters

All War Diaries and letters cited on this site should be read in conjunction with the Australian Light Horse Studies Centre, War Diaries and Letters, Site Transcription Policy which may be accessed at:

Australian Light Horse Studies Centre, War Diaries and Letters, Site Transcription Policy 


Further Reading:

Bert Schramm Diary

Bert Schramm Diary, Album

Bert Schramm's Photo Album

9th Australian Light Horse Regiment, AIF

9th Australian Light Horse Regiment, War Diary, Day by Day Account

Battles where Australians fought, 1899-1920


Citation: Diaries of AIF Servicemen, Bert Schramm, 1 July 1918


Posted by Project Leader at 11:01 PM EADT
Updated: Wednesday, 1 June 2011 5:20 PM EADT
Where Australians Fought, Sinai, 1916-1917, Sand Sled Plans and Description
Topic: BatzS - Sinai

Where Australians Fought

Sinai, 1916-1917

Sand Sled Plans


Sand Sled Plans


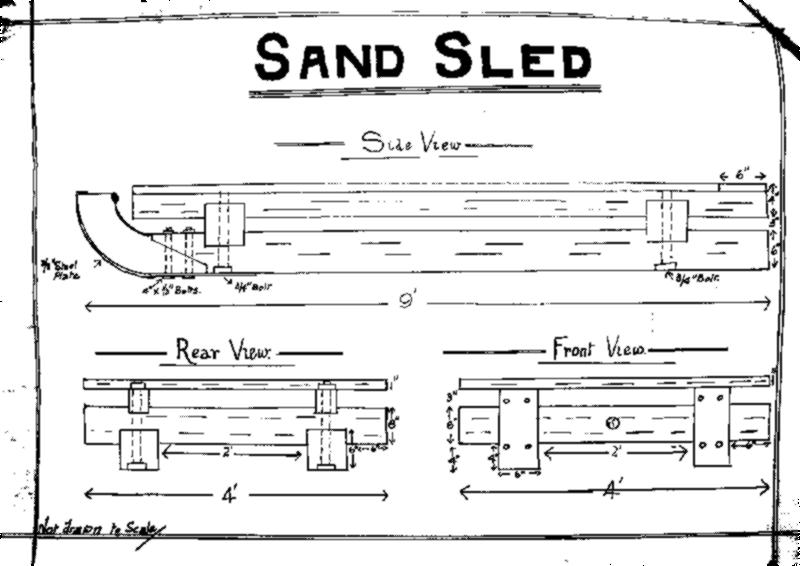
Below is an account describing the construction of the sand car and the blue prints to produce the cart.


When men were in and around camp at Romani and camel transport was fairly scarce horses that had been used for limbered wagons were used, and the Dicvision issued instructions to the AASC to get a standard pattern sled made for the division as Third Section had offered to have these sleds built in Kantara.

A Wheeler Sergeant was sent round to look at the various patterns of teh sleds in use in the division and the attached drawing was the result of the investigations and trials.

The runners were made of 6" 6" Pine, and a bow was scarfed into the forward end of the runner. This was shod with a 3/8" steel plate to strengthen the scarf necessary in the runner, and to stand the wear, as all the friction of forcing a way through the sand came on the forward part of the runner.

Two cross pieces were scarfed into the runner, and through the forward cross place a hole was bored to take a piece of steel wire rope to which was fastened a swingle-bar for traction.

On top of the cross pieces were 2 4" x 4" lengths running directly above the runners, and the full length of the sled on which were nailed the 6" x 1" flooring boards.

The height of the sled was 14 inches and it was discovered by experiment that if the height was at all increased, it had a tendency to top heavyness with a load of any weight.

It was found that two horses could draw this sled carrying from 800 to 1,000 obs all day very easily, and these sleds were even used when the division was out on operations, mostly by the AMC who used them for bringing in the wounded. A lighter pattern was also built for that work, being drawn by one horse, the driver b eing mounted on the horse.

The pattern of the sled as attached was sent down to Kantara and finally became the standard pattern of sled used in the Third Section.


The solution was simplicity in itself - the sand cart. By placing skis under a cart base, the lack of cohesion and thus resistance in the sand became an assistance rather than a hindrance. Clever use of the low resistance of loose sand meant that a team of two horses could draw a fully laden sand cart with a 450kg load over the trackless desert for a day without causing any great discomfort. It was the breakthrough design that supplied the mobile forces in the Sinai for the duration of the campaign.


Further Reading:

The Light Horse

Where Australians Fought, Sinai, 1916-1917

Battles where Australians fought, 1899-1920


Citation: Where Australians Fought, Sinai, 1916-1917, Sand Sled Plans and Description

Posted by Project Leader at 6:56 PM EADT
Updated: Friday, 20 August 2010 5:43 PM EADT
Military Orders, 1903 - 1920, Military Order No. 157, 1909, Hythe School of Musketry, Examination Results
Topic: Militia - Military Orders

Military Order No. 157, 1909

Hythe School of Musketry

Examination Results


 Military Order No. 157, 1909. 


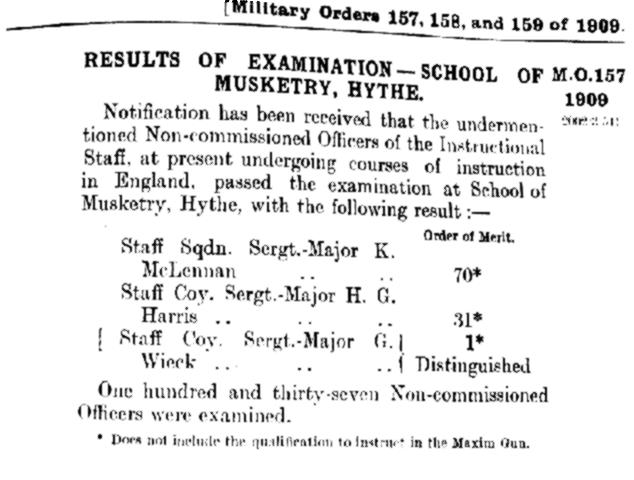
Below is a copy of Military Order No. 157 which detailed the examination results from the School of Musketry at Hythe in Kent, England. The three men who went to the course passed at different levels as listed in the 1909 Military Order.


Results of Examination - School of Musketry, Hythe.

Notification has been received that the undermentioned Non-Commissioned Officers of the Instructional Staff, at present undeergoing courses of instruction in England, passed the examination at School of Musketry, Hythe, with the following result:-

Staff Squadron Sergeant Major Kenneth McLennan - 70*

Staff Company Sergeant Major Henry George Harris - 31*

Staff Company Sergeant Major George Frederick Gardells Wieck - 1*

One hundred and thirty-seven Non-Commissioned Officers were examined.


* Does not include the qualification to instruct in teh Maxim Gun.


The name that stands out is Staff Company Sergeant Major George Frederick Gardells Wieck who graduated as the top of the class for that particular course. Wieck entered the Great War enrolling as a Captain and appointed adjutant of the 9th Light Horse Regiment in November 1914. His service with the 9th LHR was outstanding and received promotions. He ended the war as a Lieutenant Colonel. At the end of the war, he settled in Western Australia. In 1973, he died at the age of 92.


Further Reading:

Military Orders, 1903 - 1920

The Light Horse

Australian Light Horse Militia

Militia 1899 - 1920


Citation: Military Orders, 1903 - 1920, Military Order No. 157, 1909, Hythe School of Musketry, Examination Results

Posted by Project Leader at 5:34 PM EADT
Updated: Friday, 20 August 2010 10:11 PM EADT
Diaries of AIF Servicemen, Bert Schramm, 30 June 1918
Topic: Diary - Schramm

Diaries of AIF Servicemen

Bert Schramm

30 June 1918


Bert Schramm


2823 Private Herbert Leslie SCHRAMM, a 22 year old Farmer from Whites River, South Australia. He enlisted on 17 February 1916; and at the conclusion of the war Returned to Australia, 10 July 1919.

During part of the course of his military service with the AIF, Bert Schramm kept a diary of his life. Bert was not a man of letters so this diary was produced with great effort on his behalf. Bert made a promise to his sweetheart, Lucy Solley, that he would do so after he received the blank pocket notebook wherein these entries are found. As a Brigade Scout since September 1918, he took a lead part in the September Offensive by the Allied forces in Palestine. Bert's diary entries are placed alongside those of the 9th Light Horse Regiment to which he belonged and to the 3rd Light Horse Brigade to which the 9th LHR was attached. On this basis we can follow Bert in the context of his formation.


The Diaries

The complete diary is now available on the Australian Light Horse Studies Centre Site at:

Bert Schramm Diary

Finding more about a service person. See:

Navigating the National Archives Service File 


Bert Schramm's Handwritten Diary, 30 June - 6 July 1918

[Click on page for a larger print version.]


Bert Schramm

Sunday, June 30, 1918

Bert Schramm's Location - Solomon's Pools, Bethlehem, Palestine.

Bert Schramm's Diary - Everything pretty quiet. Have written several letters today.


9th Light Horse Regiment War Diary

9th Light Horse Regiment Location - Solomon's Pools, Bethlehem, Palestine.

9th Light Horse Regiment War Diary - 0600 Roman Catholic Church Parade proceeded to Bethlehem.

1045 Church of England and other denominations parades held in Regimental lines.

9th LHR AIF War Diary, 30 June


Darley

Darley, TH, With the Ninth Light Horse in the Great War, Adelaide, Hassell Press, 1924.

No Entry.


Previous: Bert Schramm's Diary, 29 June 1918

Next: Bert Schramm's Diary, 1 July 1918


Sources Used:

Bert Schramm's Diary

National Archives Service File.

Embarkation Roll, AWM8.

Australian War Memorial Roll of Honour

Nominal Roll, AWM133, Nominal Roll of Australian Imperial Force who left Australia for service abroad, 1914-1918 War.


War Diaries and Letters

All War Diaries and letters cited on this site should be read in conjunction with the Australian Light Horse Studies Centre, War Diaries and Letters, Site Transcription Policy which may be accessed at:

Australian Light Horse Studies Centre, War Diaries and Letters, Site Transcription Policy 


Further Reading:

Bert Schramm Diary

Bert Schramm Diary, Album

Bert Schramm's Photo Album

9th Australian Light Horse Regiment, AIF

9th Australian Light Horse Regiment, War Diary, Day by Day Account

Battles where Australians fought, 1899-1920


Citation: Diaries of AIF Servicemen, Bert Schramm, 30 June 1918


Posted by Project Leader at 12:01 AM EADT
Updated: Wednesday, 1 June 2011 4:39 PM EADT
9th LHR AIF War Diary, 30 June
Topic: AIF - 3B - 9 LHR

9th LHR, AIF

9th Light Horse Regiment

War Diary, 30 June

Pro Gloria et Honore - For Glory and Honour

Regimental March -  Marching Through Georgia


The following entries are extracted and transcribed from the 9th Light Horse Regiment War Diary, the originals of which are held by the Australian War Memorial. There are 366 entries on this site. Each day has entries as they occurred from 1914 to 1919. In addition to the 9th Light Horse Regiment War Diary, when appropriate, entries from the 3rd Light Horse Brigade War Diary and other regiments with the Brigade will also appear. Entries from the unit history, Darley, TH, With the Ninth Light Horse in the Great War, Adelaide, Hassell Press, 1924 will also appear from time to time. The aim is to give the broadest context to the story and allow the reader to follow the day to day activities of the regiment. If a relative happened to have served in the regiment during the Great War, then this provides a general framework in which the individual story may be told.


The Diary


1914

Tuesday, June 30, 1914

See 4th Military District, South Australia for militia activities.


1915

Wednesday, June 30, 1915

9th Light Horse Regiment Location - Walkers Ridge
9th Light Horse Regiment War Diary - 0015 Turk artillery opened on the trenches with field guns and kept up a heavy fire for 20 minutes. Most of the shells were aimed a trifle high.
0030 Very heavy firing was heard in the direction of Quinn's Post and Courtney's but no shots were fired at Walkers ridge.
0040 Observers reported Turks advancing in direction of Sap 1, 2, 3 and Turks Point. All troops promptly occupied the firing parapet and fired on the Turks. A large body attacked Sap 1 and temporarily occupied a portion of it - they were however promptly driven out by a bombing party under Sergeant Sullivan. About 50 Turks assaulted Turk's Point but were driven off.
0130 Turks again advanced but fire from No 1 sap prevented them from getting closer than 50 yards to that sap. From this time onward supporting fire from about 30 rifles was given to the 8th Light Horse Regiment holding Saps 2 to 4 inclusive.
The action ceased at 0330.
The fire discipline of the Regiment was extremely good and few wasted shots were fired. There was a chain of voice and confirmation thus enabling commands and orders to be heard distinctly.
Our casualties were 1 Other Rank killed and 8 Other Ranks wounded. 54 Dead Turks were counted immediately in front of the Regiment's trenches and 7 prisoners were take.
Kirwan flares were used with great effect.
During the assault on Turks Point on machine gun was in danger of capture. Sergeant Ashburner acting as No 1 after having lost his No 2 seized a rifle and shot a Turk who had reached the gun and then turned the gun on the remainder drove them back at once. 50 rifles were captured from the Turks.
Killed in action:
134 Private John Leslie Hopping, 23
Report on action at Anzac, Gallipoli, 30 June 1915 - Captain Weik, Adjutant 9th Light Horse Regiment.
1. General Situation. The period immediately prior to the 30th June 1915 was not marked by any unusual activity on either side. The secret sap had been completed to the edge of the cliff and communication trenches constructed as shown on Sketch A. The sap had not been used as a fire trench and had only a few posts in it. There was nothing to indicate that any hostile attack was imminent.
2. Distribution of Troops. “A” Squadron [Captain Bleechmore] was on the right; “B” Squadron [Major Parsons] on the left; “C” Squadron [Captain Scott] in reserve; and, the Machine Gun Section [Lieutenant Hutchinson] was posted at Turks Point. Lieutenant Colonel Miell was temporarily commanding the whole of Russell's Top and the Regiment was therefore under Major Reynell.
3. The Action. At about 0015 the enemy opened a heavy fire with 77mm guns against our position but very little damage was done and no casualties were caused.
At 0100 a considerable volume of rifle and machine gun fire was noticed and appeared to come from trenches on Baby 700.
At 0130 a report was received from the 8th Light Horse Regiment that the enemy infantry was leaving his front line trench.
At this stage, 15 to 20 men of “A” Squadron moved to the right and occupied several fire bays in the 8th Light Horse Regiment area - from here they were able to bring fire to bear along the front of the secret sap. This sap had been dug through the low scrub and was screened by a low rise about 25-30 feet in front.
Very shortly after 0130 “A” Squadron reported that the Turks had captured the Secret Sap as far up as point "Z" and that one of our men [Hopping] was missing. Major Reynell promptly organised and led a counter attack down Sap "P" and after an exchange of rifle and revolver fire retook the Sap without loss. The Turks had been in possession for about 15 minutes. The garrison of the Secret Sap was at once increased to [45] forty five. As will be seen later, some 40 Turks had already crossed the Secret Sap and were then in our territory.
The infantry action has lasted for 20 minutes and the Turkish attack ceased.
At 0200 a party of 40 Turks appeared in front of the Machine Gun positions at Turk's Point and were promptly engaged with conspicuous success. Heavy casualties were caused and the party dispersed, It is certain that the enemy was not aware of the position of these two guns until they opened fire. As it was not quite clear how many of the enemy were in this vicinity it was thought necessary to reinforce Turk's Point by two troops of “C” Squadron - by 0210 these troops were in position.
At 0210 the Cossack post in Latrine Gully reported that the post had captured a Turk and that others were in the vicinity; almost simultaneously a report was received that several of the enemy were at point Y. The Adjutant, Captain Wiek sent [4] four men to reinforce the Cossack Post, placed two sections at point X; and placed composite parties [consisting of Regimental headquarters personnel] at point V and W to guard the approaches to the 6 inch howitzer. The Turks made no further effort in this locality and it is believed that practically all who crossed the Secret Sap had become casualties.
At about 0230 the enemy attacked again and found our troops alert and eager for the encounter. Our men in the Secret Sap and those who were enfilading the approaches maintained a very accurate rapid fire and the attack was completely crushed. The Machine Gun Section obtained a good skyline target on what the Turks evidently believed to be dead ground and daylight revealed 45 bodies.
At daylight the Turks were detected using dummies for the purpose of drawing our fire.
During the 24 hours after the action finished the enemy was extremely quiet and it is thought this was done to enable us to recover the wounded.
4. Casualties. It is certain that not less than 200 Turkish dead were to the credit of the fire of this Regiment alone and in addition over 100 rifles secured.
Our casualties amounted to 9 Other Ranks including Private Hopping who was killed. All ranks behaved splendidly and the fire discipline of the Regiment was all that could be desired.
Special Army Corps Order, Army Corps Headquarters, 30 June 1915
Last night, the Turks were evidently much upset in their minds after the action of the 2nd Light Horse Brigade and the 3rd Australian Infantry Brigade on the afternoon before.
They evidently anticipated we might be making a big attack from our right, or it may be that they were trying to take us in by making us suppose they themselves were going to attack our right heavily before they brought in an attack against our left.
In any case, about 2100-2200, the commenced a very heavy rifle fire and machine gun attack from their trenches opposite our right front. This continued for about a couple of hours, during which they must have expended an enormous amount of ammunition without drawing any response from us at all.
Then their real attack began on our left and left front against the New Zealand and Australian Division. After a heavy bombardment and rifle attack, the Turks advanced out of their trenches against the 3rd Light Horse Brigade. Nine Turks actually got into our trenches where they were immediately bayoneted. A large force then advanced and tried to work round our left flank, evidently being quite unaware of an excellent secret sap, which had been thrown out by General Russell and which completely guards our left flank. The Turks came up against this with fixed bayonets and were at once met with a heavy fire, losing about 250 men. Finding they could make no headway, they retired to their trenches completely beaten.
About the same time, they advanced to attack Pope's Hill which was held by Colonel Rowell and the 1st Light Horse Brigade. Here too they were at once beaten back leaving some twenty dead in front of our trenches. Another party of Turks tried to break down a gully between the New Zealand right and Pope's Hill, when two troops of Light Horse went out to meet and disperse them.
The Turks, who had prepared their advances by a heavy artillery bombardment, evidently meant and hoped to push their attack home, as it is said that Enver Pasha was with them and told them they must drive us out, while the troops engaged in the attack consisted of three new battalions who have just been brought up against us.
The General Officer Commanding wishes to convey his thanks and congratulations to the troops for their excellent work on this occasion.
3rd Light Horse Brigade War Diary - Turks heavily bombarded our trenches from 2100 to 2300 and at midnight after another heavy bombardment with French 75s and bombs, advanced in force. The 8th and 9th Light Horse Regiments were in the trenches and easily repelled the attack with much slaughter and little loss.
Turks consisted of the 18th Regiment [three Battalions of about 1,000 strong each], many bombs were used but not much firing from enemy who from a short distance about 60 or 70 yards rushed the saps and trenches. Some few, about twenty, succeeded in getting in but most were shot a few yards in front. Some ten were made prisoners and 300 killed, There would probably be another 400 wounded.
Stated by prisoners that Enver Bey was personally present and ordered the position to be taken. Turks had no chance and attacked very half heartedly. They had water and food for two days and trenching tools. A lot of arms and ammunition taken.
Casualties: 8th Light Horse Regiment, six killed, 12 wounded. 9th Light Horse Regiment, 1 killed, 7 wounded.
Men behaved excellently in this there first serious fight and were very cool doing good work. Fire was received until the last. Machine Guns did nothing, positions being unfavourably placed and we got no assistance whatever all night from any of our own artillery. Regiments are depleted and hard worked.
Carew Reynell Diary   - No Entry.


1916

Friday, June 30, 1916
9th Light Horse Regiment Location - Roadhead Serapeum.
9th Light Horse Regiment War Diary - Routine training and patrol work.


1917

Saturday, June 30, 1917
9th Light Horse Regiment Location - El Shellal
9th Light Horse Regiment War Diary - The following promotions approved by Divisional Wire - to be Captains: Dean, Captain AE; Wilkinson, Captain R; Luxmoore, Captain EM; and, Pender, Captain WS.
 

1918

Sunday, June 30, 1918
9th Light Horse Regiment Location - Solomon's Pools
9th Light Horse Regiment War Diary - 0600 Roman Catholic Church Parade proceeded to Bethlehem.
1045 Church of England and other denominations parades held in Regimental lines.


1919

Monday, June 30, 1919
9th Light Horse Regiment Location - Tel el Kebir
9th Light Horse Regiment War Diary - 0900 Advanced party Aikman, Lieutenant GE; and, three Other Ranks proceeded to Moascar.
2255, Headquarters, B and “C” Squadrons entrained at Tel el Kebir for Moascar. Strength of Regiment is 15 Officers and 270 Other Ranks.


Previous: 9th LHR AIF War Diary, 29 June

Next: 9th LHR AIF War Diary, 1 July


Sources:

See: 9th Australian Light Horse Regiment, Contents
Australian Light Horse Studies Centre, AIF War Diaries of the Great War, Site Transcription Policy


Further Reading:

9th Light Horse Regiment AIF

Bert Schramm Diary

9th Australian Light Horse Regiment, Roll of Honour 

Battles where Australians fought, 1899-1920


Citation: 9th LHR AIF War Diary, 30 June

Posted by Project Leader at 12:01 AM EADT
Updated: Tuesday, 14 September 2010 7:51 PM EADT

Newer | Latest | Older

Full Site Index


powered by FreeFind
Let us hear your story: You can tell your story, make a comment or ask for help on our forum.

Desert Column Forum

A note on copyright

The Australian Light Horse Studies Centre is a not for profit and non profit group whose sole aim is to write the early history of the Australian Light Horse from 1900 - 1920. It is privately funded and the information is provided by the individuals within the group and while permission for the use of the material has been given for this site for these items by various donors, the residual and actual copyright for these items, should there be any, resides exclusively with the donors. The information on this site is freely available for private research use only and if used as such, should be appropriately acknowledged. To assist in this process, each item has a citation attached at the bottom for referencing purposes.

Please Note: No express or implied permission is given for commercial use of the information contained within this site.

A note to copyright holders

The Australian Light Horse Studies Centre has made every endeavour to contact copyright holders of material digitised for this blog and website and where appropriate, permission is still being sought for these items. Where replies were not received, or where the copyright owner has not been able to be traced, or where the permission is still being sought, the Australian Light Horse Studies Centre has decided, in good faith, to proceed with digitisation and publication. Australian Light Horse Studies Centre would be happy to hear from copyright owners at any time to discuss usage of this item.

Contact

Australian Light Horse Studies Centre

eXTReMe Tracker