« June 2008 »
S M T W T F S
1 2 3 4 5 6 7
8 9 10 11 12 13 14
15 16 17 18 19 20 21
22 23 24 25 26 27 28
29 30
You are not logged in. Log in


Search the site:


powered by FreeFind
Volunteer with us.

Entries by Topic All topics  
A Latest Site News
A - Using the Site
AAA Volunteers
AAB-Education Centre
AAC-Film Clips
AAC-Photo Albums
AIF & MEF & EEF
AIF - Lighthorse
AIF - ALH - A to Z
AIF - DMC
AIF - DMC - Or Bat
AIF - DMC - Anzac MD
AIF - DMC - Aus MD
AIF - DMC - British
AIF - DMC - BWI
AIF - DMC - French
AIF - DMC - Indian
AIF - DMC - Italian
AIF - DMC - Medical
AIF - DMC - Remounts
AIF - DMC - Scouts
AIF - DMC - Sigs
AIF - DMC - Sigs AirlnS
AIF - DMC - 1 Sig Sqn
AIF - DMC - 2 Sig Sqn
AIF - DMC - Eng
AIF - DMC - Eng 1FSE
AIF - DMC - Eng 2FSE
AIF - DMC - GSR
AIF - 1B - 1 LHB
AIF - 1B - 6 MVS
AIF - 1B - 1 LHMGS
AIF - 1B - 1 Sig Trp
AIF - 1B - 1 LHFA
AIF - 1B - 1 LHR
AIF - 1B - 2 LHR
AIF - 1B - 3 LHR
AIF - 2B - 2 LHB
AIF - 2B - 7 MVS
AIF - 2B - 2 LHFA
AIF - 2B - 2 LHMGS
AIF - 2B - 2 Sig Trp
AIF - 2B - 5 LHR
AIF - 2B - 6 LHR
AIF - 2B - 7 LHR
AIF - 3B - 3 LHB
AIF - 3B - 8 MVS
AIF - 3B - 3 LHB Sigs
AIF - 3B - 3 LHFA
AIF - 3B - 3 LHMGS
AIF - 3B - 3 Sig Trp
AIF - 3B - 8 LHR
AIF - 3B - 9 LHR
AIF - 3B - 10 LHR
AIF - 4B - 4 LHB
AIF - 4B - 4 Sig Trp
AIF - 4B - 9 MVS
AIF - 4B - 4 LHFA
AIF - 4B - 4 LHMGS
AIF - 4B - 4 LHR
AIF - 4B - 11 LHR
AIF - 4B - 12 LHR
AIF - 5B - 5 LHB
AIF - 5B - 10 MVS
AIF - 5B - 5 LHFA
AIF - 5B - 5 Sig Trp
AIF - 5B - ICC
AIF - 5B - 14 LHR
AIF - 5B - 15 LHR
AIF - 5B - 1er Regt
AIF - 5B - 2 NZMGS
AIF - AASC
AIF - Aboriginal LH
AIF - Badges
AIF - Cars
AIF - Chinese LH
AIF - Double Sqns
AIF - Engineers
AIF - Fr - 22 Corps
AIF - Fr - 13 LHR
AIF - Honour Roll
AIF - HQ - 3rd Echelon
AIF - Marching Songs
AIF - Misc Topics
AIF - NZMRB
AIF - NZMRB - AMR
AIF - NZMRB - CMR
AIF - NZMRB - EFT
AIF - NZMRB - NZMFA
AIF - NZMRB - NZMGS
AIF - NZMRB - OMR
AIF - NZMRB - Sig-Trp
AIF - NZMRB - WMR
AIF - Ships
AIF - Ships - Encountr
AIF - Ships - Una
AIF - WFF
AIF - Wireless Sqn
Battles
BatzA - Australia
BatzA - Broken Hill
BatzA - Liverpool
BatzA - Merivale
BatzB - Boer War
BatzB - Bakenlaagte
BatzB - Belmont
BatzB - Bothaville
BatzB - Buffels Hoek
BatzB - Coetzees Drift
BatzB - Diamond Hill
BatzB - Driefontein
BatzB - Elands
BatzB - Graspan
BatzB - Grobelaar
BatzB - Grootvallier
BatzB - Hartebestfontn
BatzB - Houtnek
BatzB - Karee Siding
BatzB - Kimberley
BatzB - Koster River
BatzB - Leeuw Kop
BatzB - Mafeking
BatzB - Magersfontein
BatzB - Modder River
BatzB - Onverwacht
BatzB - Paardeberg
BatzB - Palmietfontein
BatzB - Pink Hill
BatzB - Poplar Grove
BatzB - Rhenoster
BatzB - Sannahs Post
BatzB - Slingersfontn
BatzB - Stinkhoutbm
BatzB - Sunnyside
BatzB - Wilmansrust
BatzB - Wolvekuil
BatzB - Zand River
BatzG - Gallipoli
BatzG - Anzac
BatzG - Aug 1915
BatzG - Baby 700
BatzG - Evacuation
BatzG - Hill 60
BatzG - Hill 971
BatzG - Krithia
BatzG - Lone Pine
BatzG - Nek
BatzJ - Jordan Valley
BatzJ - 1st Amman
BatzJ - 2nd Amman
BatzJ - Abu Tellul
BatzJ - Es Salt
BatzJ - JV Maps
BatzJ - Ziza
BatzM - Mespot
BatzM - Baghdad
BatzM - Ctesiphon
BatzM - Daur
BatzM - Kurna
BatzM - Kut el Amara
BatzM - Ramadi
BatzN - Naval
BatzN - AE1
BatzN - Cocos Is
BatzN - Heligoland
BatzN - Marmara
BatzN - Zeebrugge
BatzN - Zeppelin L43
BatzNG - Bitapaka
BatzO - Other
BatzO - Baku
BatzO - Egypt 1919
BatzO - Emptsa
BatzO - Karawaran
BatzO - Peitang
BatzO - Wassa
BatzP - Palestine
BatzP - 1st Gaza
BatzP - 2nd Gaza
BatzP - 3rd Gaza
BatzP - Aleppo
BatzP - Amwas
BatzP - Ayun Kara
BatzP - Bald Hill
BatzP - Balin
BatzP - Beersheba
BatzP - Berkusieh
BatzP - Damascus
BatzP - El Auja
BatzP - El Buggar
BatzP - El Burj
BatzP - Haifa
BatzP - Huj
BatzP - JB Yakub
BatzP - Kaukab
BatzP - Khan Kusseir
BatzP - Khuweilfe
BatzP - Kuneitra
BatzP - Megiddo
BatzP - Nablus
BatzP - Rafa
BatzP - Sasa
BatzP - Semakh
BatzP - Sheria
BatzP - Surafend
BatzP - Wadi Fara
BatzS - Sinai
BatzS - Bir el Abd
BatzS - El Arish
BatzS - El Mazar
BatzS - El Qatiya
BatzS - Jifjafa
BatzS - Magdhaba
BatzS - Maghara
BatzS - Romani
BatzS - Suez 1915
BatzSe - Senussi
BatzWF - Westn Front
BW - Boer War
BW - NSW
BW - NSW - 1ACH
BW - NSW - 1NSWMR
BW - NSW - 2NSWMR
BW - NSW - 3ACH
BW - NSW - 3NSWIB
BW - NSW - 3NSWMR
BW - NSW - 5ACH
BW - NSW - A Bty RAA
BW - NSW - AAMC
BW - NSW - Aust H
BW - NSW - Lancers
BW - NSW - NSW Inf
BW - NSW - NSWCBC
BW - NSW - NSWIB
BW - NSW - NSWMR_A
BW - NZ
BW - Qld
BW - Qld - 1ACH
BW - Qld - 1QMI
BW - Qld - 2QMI
BW - Qld - 3ACH
BW - Qld - 3QMI
BW - Qld - 4QIB
BW - Qld - 5QIB
BW - Qld - 6QIB
BW - Qld - 7ACH
BW - QLD - AAMC
BW - SA
BW - SA - 1SAMR
BW - SA - 2ACH
BW - SA - 2SAMR
BW - SA - 3SACB
BW - SA - 4ACH
BW - SA - 4SAIB
BW - SA - 5SAIB
BW - SA - 6SAIB
BW - SA - 8ACH
BW - SA - AAMC
BW - Tas
BW - Tas - 1ACH
BW - Tas - 1TIB
BW - Tas - 1TMI
BW - Tas - 2TB
BW - Tas - 2TIB
BW - Tas - 3ACH
BW - Tas - 8ACH
BW - Vic
BW - Vic - 1VMI
BW - Vic - 2ACH
BW - Vic - 2VMR
BW - Vic - 3VB
BW - Vic - 4ACH
BW - Vic - 4VIB
BW - Vic - 5VMR
BW - Vic - 6ACH
BW - Vic - AAMC
BW - Vic - Scot H
BW - WA
BW - WA - 1WAMI
BW - WA - 2ACH
BW - WA - 2WAMI
BW - WA - 3WAB
BW - WA - 4ACH
BW - WA - 4WAMI
BW - WA - 5WAMI
BW - WA - 6WAMI
BW - WA - 8ACH
BW Gen - Campaign
BW Gen - Soldiers
BW General
Cavalry - General
Diary - Schramm
Egypt - Heliopolis
Egypt - Mena
Gen - Ataturk Pk, CNB
Gen - Australia
Gen - Legends
Gen - Query Club
Gen - St - NSW
Gen - St - Qld
Gen - St - SA
Gen - St - Tas
Gen - St - Vic
Gen - St - WA
Gm - German Items
Gm - Bk - 605 MGC
GW - 11 Nov 1918
GW - Atrocities
GW - August 1914
GW - Biographies
GW - Propaganda
GW - Spies
GW - We forgot
Militia 1899-1920
Militia - Area Officers
Militia - Inf - Infantry
Militia - Inf - 1IB
Militia - Inf - 2IB
Militia - Inf - 3IB
Militia - Inf - NSW
Militia - Inf - Qld
Militia - Inf - SA
Militia - Inf - Tas
Militia - Inf - Vic
Militia - Inf - WA
Militia - K.E.Horse
Militia - LH
Militia - LH - Regts
Militia - LH - 1LHB
Militia - LH - 2LHB
Militia - LH - 3LHB
Militia - LH - 4LHB
Militia - LH - 5LHB
Militia - LH - 6LHB
Militia - LHN - NSW
Militia - LHN - 1/7/1
Militia - LHN - 2/9/6
Militia - LHN - 3/11/7
Militia - LHN - 4/6/16
Militia - LHN - 5/4/15
Militia - LHN - 6/5/12
Militia - LHN - 28
Militia - LHQ - Qld
Militia - LHQ - 13/2
Militia - LHQ - 14/3/11
Militia - LHQ - 15/1/5
Militia - LHQ - 27/14
Militia - LHS - SA
Militia - LHS - 16/22/3
Militia - LHS - 17/23/18
Militia - LHS - 24/9
Militia - LHT - Tas
Militia - LHT - 12/26
Militia - LHV - Vic
Militia - LHV - 7/15/20
Militia - LHV - 8/16/8
Militia - LHV - 9/19
Militia - LHV - 10/13
Militia - LHV - 11/20/4
Militia - LHV - 19/17
Militia - LHV - 29
Militia - LHW - WA
Militia - LHW-18/25/10
Militia - Military Orders
Militia - Misc
MilitiaRC - Rifle Clubs
MilitiaRC - NSW
MilitiaRC - NT
MilitiaRC - Qld
MilitiaRC - SA
MilitiaRC - Tas
MilitiaRC - Vic
MilitiaRC - WA
Militiaz - New Zealand
Tk - Turkish Items
Tk - Army
Tk - Bks - Books
Tk - Bks - 1/33IR
Tk - Bks - 27th IR
Tk - Bks - Air Force
Tk - Bks - Yildirim
Tk - POWs
Wp - Weapons
Wp - Hotchkiss Cav
Wp - Hotchkiss PMG
Blog Tools
Edit your Blog
Build a Blog
RSS Feed
View Profile
Open Community
Post to this Blog
Site Index
Education Centre
LH Militia
Boer War
Transport Ships
LH Battles
ALH - Units
ALH - General
Aboriginal Light H
Weapons
Ottoman Sources

"At a mile distant their thousand hooves were stuttering thunder, coming at a rate that frightened a man - they were an awe inspiring sight, galloping through the red haze - knee to knee and horse to horse - the dying sun glinting on bayonet points..." Trooper Ion Idriess

The Australian Light Horse Studies Centre aims to present an accurate history as chroniclers of early Australian military developments from 1899 to 1920.

The Australian Light Horse Studies Centre site holds over 12,000 entries and is growing daily.

Contact: Australian Light Horse Studies Centre

Let us hear your story: You can tell your story, make a comment or ask for help on our Australian Light Horse Studies Centre Forum called:

Desert Column Forum

WARNING: This site contains: names, information and images of deceased people; and, language which may be considered inappropriate today.

Monday, 23 June 2008
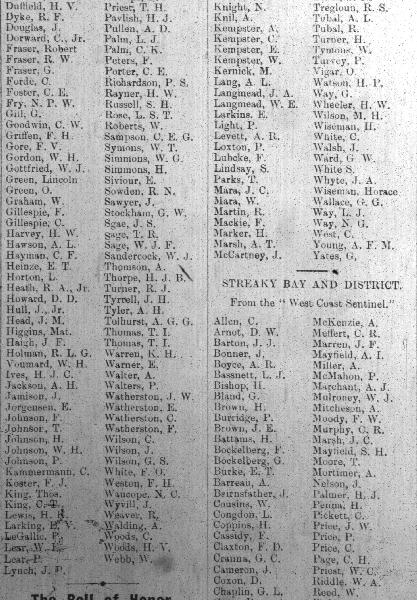
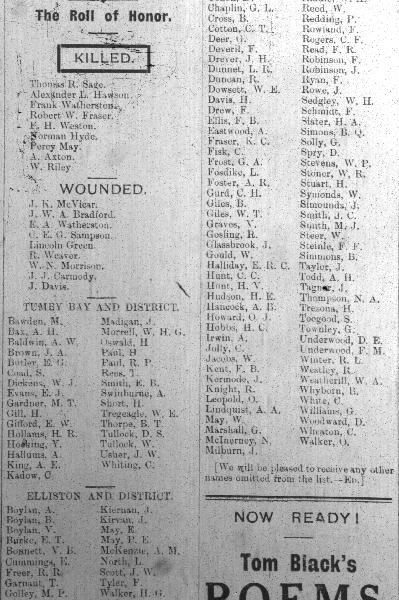
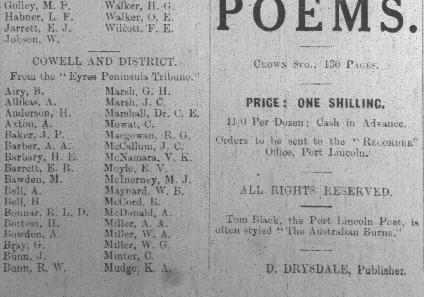
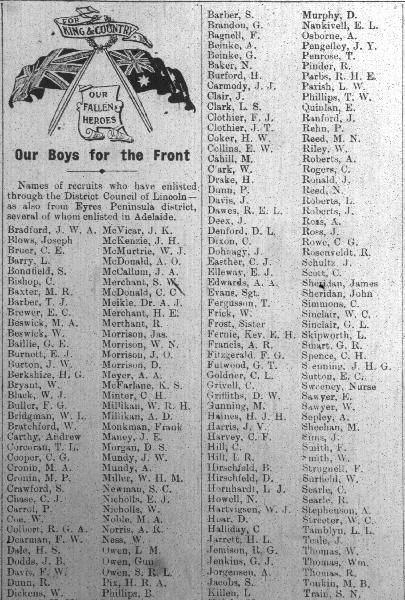
Eyre Peninsular men serving in the AIF, February 1916
Topic: Gen - St - SA
Below is Page 4 from the West Coast Recorder of 23 February 1916. This is the weekly news paper which was printed in Port Lincoln and serviced the whole of the Eyre Peninsular. It was a recruiting ground for 3rd and 9th LHRs along with the 50th Infantry Battalion. In an effort to understand why their menfolk were no longer around, these sort of articles aimed to let everyone know that the experience of loss was shared throughout the region. It didn't make it any easier to cope with the loss but these articles tended to reduce the isolating experience by advertising the names of the families who shared similar feelings of grief.


Citation: Eyre Peninsular men serving in the AIF, February 1916


Posted by Project Leader at 6:20 PM EADT
Updated: Monday, 23 June 2008 6:36 PM EADT
9th LHR AIF War Diary, 23 June
Topic: AIF - 3B - 9 LHR

9th LHR, AIF

9th Light Horse Regiment

War Diary, 23 June

Pro Gloria et Honore - For Glory and Honour

Regimental March -  Marching Through Georgia


The following entries are extracted and transcribed from the 9th Light Horse Regiment War Diary, the originals of which are held by the Australian War Memorial. There are 366 entries on this site. Each day has entries as they occurred from 1914 to 1919. In addition to the 9th Light Horse Regiment War Diary, when appropriate, entries from the 3rd Light Horse Brigade War Diary and other regiments with the Brigade will also appear. Entries from the unit history, Darley, TH, With the Ninth Light Horse in the Great War, Adelaide, Hassell Press, 1924 will also appear from time to time. The aim is to give the broadest context to the story and allow the reader to follow the day to day activities of the regiment. If a relative happened to have served in the regiment during the Great War, then this provides a general framework in which the individual story may be told.


The Diary


1914

Tuesday, June 23, 1914

See 4th Military District, South Australia for militia activities.


1915

Wednesday, June 23, 1915

9th Light Horse Regiment Location - Walkers Ridge
9th Light Horse Regiment War Diary - Lieutenant Colonel Miell relinquished temporary command of 3rd Light Horse Brigade.
3rd Light Horse Brigade War Diary - 8th Light Horse Regiment, one killed, four wounded [two by bombs during night]. 9th Light Horse Regiment, three killed and four wounded [six by shellfire].
Brigadier and Orderly Officer returned to duty from Hospital.
Heavy shelling in trenches in evening.
Kenneth Alan McKenzie Diary - In support Miell Lane.
Carew Reynell Diary  - Have been in trenches since Friday. Still nothing doing at all. McFarlane tells me that I am mentioned in the Army Corps orders this week for good work done. It isn't the same as being mentioned in despatches or anything of that sort and any old hen who keeps busy gets the same. Volunteers wanted yesterday to take out a few scouts to the front and through the Turkish lines. I volunteered and the Colonel recommended me but General Russell says I am "too valuable for the importance of the job". Personally I cannot imagine any more useful sphere than in getting information especially as a general advance appears to be on the cards. However if or when there is an immediate prospect of an advance I am to go out for a day or two and reconnoitre the country in rear of Turkish lines and in their lines. It is work that I feel I can be really useful at.


1916

Friday, June 23, 1916
9th Light Horse Regiment Location - Roadhead Serapeum.
9th Light Horse Regiment War Diary - Routine training and patrol work.
Lieutenant Jacques is attached temporarily to Brigade Headquarters as Orderly Officer and Lieutenant AD Palmer will take over the Machine Gun Section.


1917

Saturday, June 23, 1917
9th Light Horse Regiment Location - El Shellal
9th Light Horse Regiment War Diary - The General Officer in Command inspected the Regiment, the men standing to their horses and he expressed satisfaction at the cleanliness of the camp, the appearance of the men and horses.
The men, who could not attend the disinfecting parade on 21st June 1917, paraded at 0600 and proceeded to Weli Sheikh Nuran under Linacre, Lieutenant FJ.
 

1918

Sunday, June 23, 1918
9th Light Horse Regiment Location - Solomon's Pools
9th Light Horse Regiment War Diary - Syllabus of training issued.
Two officers and 26 Other Ranks visited the Holy Shrines in Jerusalem.
Thirteen Other Ranks marched in from Descorps Reinforcement Camp, Jerusalem.


1919

Monday, June 23, 1919
9th Light Horse Regiment Location - Tel el Kebir
9th Light Horse Regiment War Diary - Regimental cricket team played Belbeis on home ground. Scores: - 9th Light Horse Regiment scored 101 runs, Belbeis 87.


Previous: 9th LHR AIF War Diary, 22 June

Next: 9th LHR AIF War Diary, 24 June


Sources:

See: 9th Australian Light Horse Regiment, Contents
Australian Light Horse Studies Centre, AIF War Diaries of the Great War, Site Transcription Policy


Further Reading:

9th Light Horse Regiment AIF

Bert Schramm Diary

9th Australian Light Horse Regiment, Roll of Honour 

Battles where Australians fought, 1899-1920


Citation: 9th LHR AIF War Diary, 23 June

Posted by Project Leader at 12:01 AM EADT
Updated: Saturday, 7 August 2010 3:45 PM EADT
Diaries of AIF Servicemen, Bert Schramm, 23 June 1918
Topic: Diary - Schramm

Diaries of AIF Servicemen

Bert Schramm

23 June 1918


Bert Schramm


2823 Private Herbert Leslie SCHRAMM, a 22 year old Farmer from Whites River, South Australia. He enlisted on 17 February 1916; and at the conclusion of the war Returned to Australia, 10 July 1919.

During part of the course of his military service with the AIF, Bert Schramm kept a diary of his life. Bert was not a man of letters so this diary was produced with great effort on his behalf. Bert made a promise to his sweetheart, Lucy Solley, that he would do so after he received the blank pocket notebook wherein these entries are found. As a Brigade Scout since September 1918, he took a lead part in the September Offensive by the Allied forces in Palestine. Bert's diary entries are placed alongside those of the 9th Light Horse Regiment to which he belonged and to the 3rd Light Horse Brigade to which the 9th LHR was attached. On this basis we can follow Bert in the context of his formation.


The Diaries

The complete diary is now available on the Australian Light Horse Studies Centre Site at:

Bert Schramm Diary

Finding more about a service person. See:

Navigating the National Archives Service File 


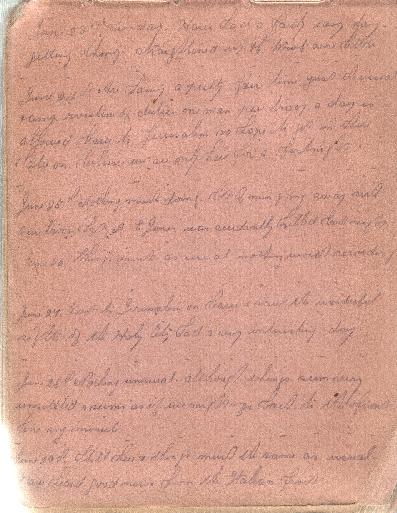
Bert Schramm's Handwritten Diary, 23 - 29 June 1918

[Click on page for a larger print version.]


Bert Schramm

Sunday, June 23, 1918

Bert Schramm's Location - Solomon's Pools, Bethlehem, Palestine.

Bert Schramm's Diary - Have had a fairly easy day. Getting things straightened up. Wrote some letters.


9th Light Horse Regiment War Diary

9th Light Horse Regiment Location - Solomon's Pools, Bethlehem, Palestine.

9th Light Horse Regiment War Diary - Syllabus of training issued.

Two officers and 26 Other Ranks visited the Holy Shrines in Jerusalem.

Thirteen Other Ranks marched in from Descorps Reinforcement Camp, Jerusalem.

9th LHR AIF War Diary, 23 June


Darley

Darley, TH, With the Ninth Light Horse in the Great War, Adelaide, Hassell Press, 1924.

No Entry.


Previous: Bert Schramm's Diary, 22 June 1918

Next: Bert Schramm's Diary, 24 June 1918


Sources Used:

Bert Schramm's Diary

National Archives Service File.

Embarkation Roll, AWM8.

Australian War Memorial Roll of Honour

Nominal Roll, AWM133, Nominal Roll of Australian Imperial Force who left Australia for service abroad, 1914-1918 War.


War Diaries and Letters

All War Diaries and letters cited on this site should be read in conjunction with the Australian Light Horse Studies Centre, War Diaries and Letters, Site Transcription Policy which may be accessed at:

Australian Light Horse Studies Centre, War Diaries and Letters, Site Transcription Policy 


Further Reading:

Bert Schramm Diary

Bert Schramm Diary, Album

Bert Schramm's Photo Album

9th Australian Light Horse Regiment, AIF

9th Australian Light Horse Regiment, War Diary, Day by Day Account

Battles where Australians fought, 1899-1920


Citation: Diaries of AIF Servicemen, Bert Schramm, 23 June 1918


Posted by Project Leader at 12:01 AM EADT
Updated: Tuesday, 31 May 2011 4:01 PM EADT
Sunday, 22 June 2008
Fargher - Hints on Rifle Shooting, Part 4
Topic: MilitiaRC - Rifle Clubs

At the beginning of the new century, the well known and top Australian rifle shooter,  P. Fargher of the Melbourne Rifle Club wrote the book called Hints on Rifle Shooting, published by Sands and Mcdougal in Melbourne. The text deals with all the problems people found with the commonly available service rifles employed in the first decade and beyond within the Australian military forces. As part of the Rifle Club Movement, shooting at rifle clubs was strictly carried out with the designated service weapon. This little book is a gem in detailing all aspects of the rifles from the shooter's point of view. To assist readers to fully understand the weapons used by the Mounted Rifles and Light Horse, the book will be serialised on this blog.

Fargher - Hints on Rifle Shooting, Part 1
Fargher - Hints on Rifle Shooting, Part 2
Fargher - Hints on Rifle Shooting, Part 3
This is Part 4.


If even the 6 lb. could be easily got, it would not be so bad, but it is a. notorious fact that almost every rifle issued from the armoury has a pull of from about 9 to 12 or 14 lbs., and generally a rough dragging pull at that. Accurate shooting appears to be the last thing armourers, and those who pass their work, think of, or they would not habitually supply volunteers with a rifle whose trigger requires a team of bullocks to pull it. It is marvellous how some of the militia shooting men ever hit the target when you come to examine the pull of their triggers.
When you get your new rifle, rub some bees-wax into the join between the barrel and the woodwork to keep out the water, and give the woodwork a liberal application of boiled linseed oil, well rubbed in with the hand, for the same purpose. Get good protectors for both fore and back sights; also a suitable cover, and take the utmost care of your rifle when travelling by rail, etc., to prevent its being knocked about. Never lay the rifle down in damp grass or even on the ground when it is hot, as a warped fore end will ruin the shooting qualities, of the best rifle ever made. Use the jointed rifle rest, which is sold for the purpose.
As the marking on the sights is very rarely correct, being sometimes as much as 100 yards out, the beginner should if possible get some experienced shot to try his rifle over the ranges on a fine day and mark the correct elevation for each range on the ladder with a deep scratch, and this must be looked on as the mean elevation for that rifle and ammunition. The old stager with the aid of his vernier, will, of course, soon find the "mean" of his rifle and carefully record it.

SIGHTS.

Before taking your place at the firing point, it is necessary to give some careful attention to the sights.
The foresight should be attended to at home, and carefully guarded from dust with a protector which covers it all round. There is much diversity of opinion among riflemen as to the best kind of foresight to use, and many devices are used to make it easy to define. Among many others are the "Bisley spot" and the "Miller's line." To put on the "spot" you blacken the whole sight, and then put a very small dot of white paint about half way up, and in the centre, of the barleycorn; the idea is to see the portion of the tip down to and including the "spot," over the bar when aiming. The "Miller's line" consists of a black sight with a white block and a thin white line running up the centre of the barleycorn nearly to the top. Another idea is to put a little blob of white on the tip, which is seen just over the bar in aiming, and a variation of this sight is to have a white spot at the base of the barleycorn and see the whole lot over the bar. This is known among shooting men as the "white tip," and is used by some very prominent shots in this colony.

Citation: Fargher - Hints on Rifle Shooting, Part 4

Posted by Project Leader at 1:31 PM EADT
Updated: Sunday, 22 June 2008 1:37 PM EADT
3rd Light Horse Brigade Signals, 11 August 1915 - Part 1
Topic: BatzG - Aug 1915

The August Offensive

Gallipoli, August 1915

3rd Light Horse Brigade Signals, 11 August 1915 - Part 1


Of all the battles that occurred at Gallipoli, those that occurred in August are the best preserved in terms of records. There is a profusion of signal traffic retained in the records which allows the historian to view history in its most immediate and unvarnished form.

Note: TPD = Torpedo Destroyer


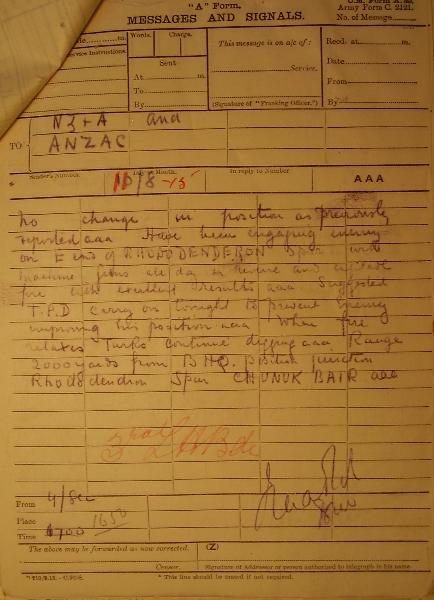
Signal sent by 3rd Light Horse Brigade, 1650, 11 August 1915


The Signal reads:

NZ & A

Anzac

11/8/15


No change in position as previously reported aaa Have been engaging enemy on E end of Rhododendron Spur with machine guns all day in Reverse and enfilade fire with excellent results aaa Suggested TPD carry on tonight to prevent enemy improving his position aaa When fire relaxes Turks continue digging aaa Range 2,000 yards from BHQ. Position junction Rhododendron Spur Chunuk Bair aaa

From 4/Sec

1650

The message aims to give a suggestion on suppressing the entrenching activities of the Turks in the sector through maintaining a strong fire rate with the machine guns from the 3rd Light Horse Brigade position. This proposition relied upon a limitless supply of ammunition.


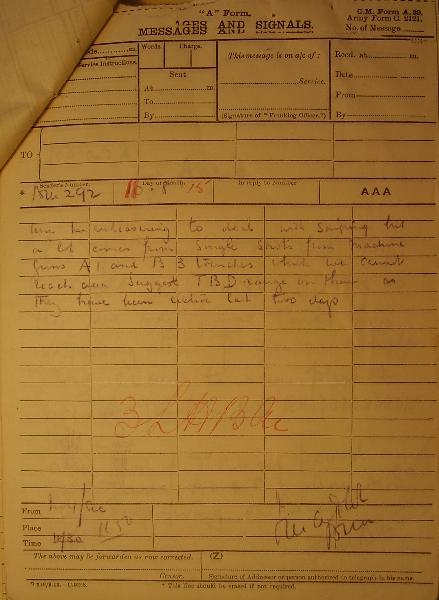
Signal sent by 3rd Light Horse Brigade, 1656, 11 August 1915


The Signal reads:

BN 292

11 . 8 . 15

Am endeavouring to deal with Sniping but a lot comes from single shots from machine guns A1 and B3 trenches which we cannot reach aaa Suggest TBD range on them as they have been active last two days.

No 4/Sec

1656

This signal highlights the problem of sniping and the inability of the 3rd Light Horse Brigade to suppress this Turkish activity.


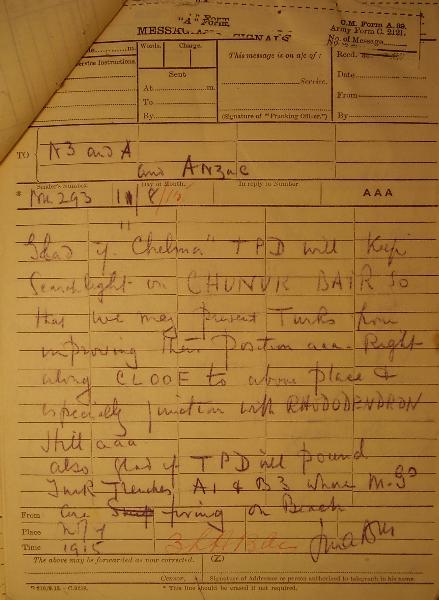
Signal sent by 3rd Light Horse Brigade, 1915, 11 August 1915


The Signal reads:
NZ & A and Anzac

BN 293

11/8/15

Glad if "Chelma" TPD will keep searchlight on Chunuk Bair so that we may prevent Turks from improving their position aaa Right long CLOOF to above place and especially junction with Rhododendron Hill aaa Also glad if TPD will pound Turk Trenches A1 and B3 where MGs are firing on Beach.

No/4

1915


This series of signals is self explanatory in that the aim was to suppress the Turkish ability to develop their trenches at Chunuk Bair and Rhododendron Hill. These signals also indicate the tools at their command to undertake this task.


Further Reading:

The August Offensive, Gallipoli, August 1915

3rd Light Horse Brigade

Gallipoli Campaign

Battles where Australians fought, 1899-1920


Citation: 3rd Light Horse Brigade Signals, 11 August 1915 - Part 1


Posted by Project Leader at 12:06 PM EADT
Updated: Monday, 12 July 2010 10:46 PM EADT

Newer | Latest | Older

Full Site Index


powered by FreeFind
Let us hear your story: You can tell your story, make a comment or ask for help on our forum.

Desert Column Forum

A note on copyright

The Australian Light Horse Studies Centre is a not for profit and non profit group whose sole aim is to write the early history of the Australian Light Horse from 1900 - 1920. It is privately funded and the information is provided by the individuals within the group and while permission for the use of the material has been given for this site for these items by various donors, the residual and actual copyright for these items, should there be any, resides exclusively with the donors. The information on this site is freely available for private research use only and if used as such, should be appropriately acknowledged. To assist in this process, each item has a citation attached at the bottom for referencing purposes.

Please Note: No express or implied permission is given for commercial use of the information contained within this site.

A note to copyright holders

The Australian Light Horse Studies Centre has made every endeavour to contact copyright holders of material digitised for this blog and website and where appropriate, permission is still being sought for these items. Where replies were not received, or where the copyright owner has not been able to be traced, or where the permission is still being sought, the Australian Light Horse Studies Centre has decided, in good faith, to proceed with digitisation and publication. Australian Light Horse Studies Centre would be happy to hear from copyright owners at any time to discuss usage of this item.

Contact

Australian Light Horse Studies Centre

eXTReMe Tracker