


Topic: AIF - 1B - 2 LHR
Battle of Romani
Sinai, August 4 to 5, 1916
2nd LHR AIF Unit History Account
[From: AWM J05572]
Lieutenant Colonel George Herbert Bourne's unit history of the 2nd Light Horse Regiment, AIF, included a section specifically related to the battle of Beersheba which is extracted below.
Bourne, Lieut-Colonel GH, "NULLI SECUNDUS" - The History - of the 2nd Light Horse Regiment Australian Imperial Force - August 1914 - April 1919, (Tamworth 1926), p. 32-6:
CHAPTER VI
SINAI
[32] Late in the afternoon of August 1, it became necessary to send rations and water, from Romani, per camel, to the post holding Hill 110, on order to allow them to remain in touch with the enemy there. The Regiment was at Katia, and in contact with the Turks, but Brigade Headquarters ordered an escort to the convoy to be formed from Quarter-masters' offsiders, farriers, and "light duty" men remaining in camp. Corporal Thorn was placed in charge. The instructions he received were of the vaguest, and he had no compass to steer by. Darkness set in before he had gone two miles, and under it's friendly cover, the Turks swung their right flank forward, and as luck would have it, right across Thorn's path. The result was inevitable; the party walked right into the advancing enemy who withheld their fire till the escort had but little chance of escape and [33] no chance of protecting the convoy. Trooper Kennett and Driver Day were taken prisoners. It is will, regret that we have to record their deaths while in captivity, within two days of each other. Corporal Thorn and Troopers Patterson and King, making a wide detour, reached camp during tile night, and Trooper Jenkins, two days later, after a most exciting experience.
Just before dusk on the afternoon of August 3, the Brigade was ordered out to occupy a line of observation posts from Katib Ganit to Mount Meredith, thence to a point one mile SE of Hod Enna. The 3rd Regiment with their left flank resting on the Romani redoubts, held from Katib Ganit to Mount Meredith inclusive (1 1/2 miles). The 2nd Regiment were given from Mount Meredith, exclusive, to the extreme right (2 1/2 miles). The 1st Regiment were in reserve. It was anticipated that the Turks would attack with in a few days, and as the above line of advance was perfectly open, the Brigade was thrown out thus hurriedly in order to give warning. The positions were not entrenched and indeed were not reached in many case, until after dark; but the picquets lost no time in improvising sand "possies," though without sand-bags and revetting material these not very effective.
The Regiment was disposed as follows:
"B" Squadron (Major Shanahan), left half of line, keeping touch with 3rd Regiment on their left. "A" Squadron (Major Birkbeck) right half of the line. Two machine-guns under Lieut. Hackney were posted in the centre, covering the main approach from Hod Enna. "C" Squadron in support under Captain C. C. Stodart. The difficulty in keeping touch in this extraordinarily deceptive country, can hardly be exaggerated. The line was a succession of sand dunes, each the counterpart of the other; and in most cases the sides were so steep that detours of up to half a mile were necessary to get round them-and if the next post was only half a mile away by direct line, it was a regular pilgrimage to actually reach it in the pitch dark. The Squadrons holding the line were less than 100 strong each, so that we had, say, 200 men to about 4,000 yards.
The N.Z.M.R. Brigade had been in touch with the enemy all day at Katia, and they passed back to their camp at Et Mater, through our line, about 2030 (8.30 p.m.) Their rear-guard passed through about 2115 (9.15 pm,) Apparently the Turks followed close on their heels, for at 2150 the first shots were exchanged between an "A" Squadron picquet and the enemy advance guard, near Hod Enna. This was immediately reported to Brigade Headquarters, and to 3rd Regiment. In a few minutes, our line was being probed from end to end. As it was now obvious that the threatened attack had come, and that the collision was not a mere matter of patrols, it became necessary to thicken and shorten the line, which was in imminent danger of being broken through at any minute. One troop of "C' Squadron, under Lieut. Righetti, to which was attached some details of Regimental Staff, was sent to fill the gap between the right of "B" Squadron and the left of the Machine-gun position. Urgent orders were also sent to Major Birkbeck to withdraw his Squadron, and the machine-guns from the right of the line, and to take up a position in rear [34] of the Regiment’s left. This was a matter of considerable difficulty in the dark, owing to the nature of the ground. About 0100 in the morning of 4th “B” Squadron reported that they were being attacked in strength. A similar report was received from 3rd Regiment. Additional SA ammunition was sent to “B” Squadron and they were told to hold on at all costs; as had the enemy broken through there, the whole of the right of the line would have been cut off. The pressure by the enemy was now increased. This was reported to Brigade Headquarters, and immediately afterwards the telephone line was cut. We had no further communication with Brigade Staff, nor indeed saw any of them till noon next day. Acting on the last message they received from us, however, a Squadron of 1st Regiment was sent in support, but it did not arrive till after 0330. About 0200 the balance of “C” Squadron was put in to line; in spite of which the enemy pressure was such that it was obvious we could not hold him much longer. At 0240, no Officer being available for duty, a NCO was sent back to select a position to retire to. The enemy at this time seemed to be making his main attack on Mount Meredith; and the 3rd Regiment there and our “B” Squadron were having very lively fighting. At the same time the enemy’s main column was marching from Hod Enna past our shortened right flank towards Mount Royston. Anxiously we waited for word from Major Birkbeck as to whether he had succeeded in withdrawing, and just as anxiously we waited for the first streaks of dawn, for there was no question that the darkness was our best ally, and that in daylight we must be overwhelmed. About 0300 the enemy captured Mount Meredith and the 3rd Regiment was forced to withdraw its right, thus exposing our left. No word had been received from Major Birkbeck, and it was yet too soon to assume he had completed his march in rear of us to his new position. Major Markwell had been sent to direct and hasten that operation, but had had difficulty in finding him owing to the darkness. In order to give his party time to reach safety, we therefore held on. At this juncture, Lieut Righetti was killed, and several men were hit. At 0320, being surrounded on three sides and the firing line having been forced back to the led horses, the order was given to withdraw to the position already selected.
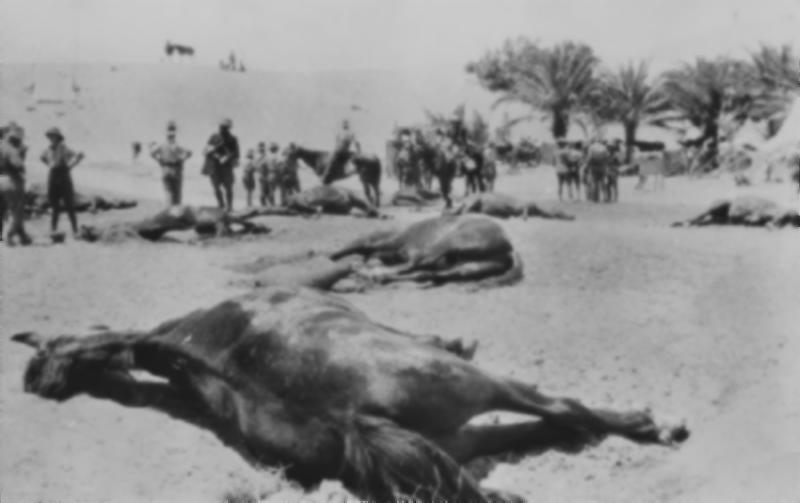
The Turks were now in many cases only 50 years off, and several amusing incidents occurred. One man who had secured his horse offered to take a dismounted man doubleback, and found the other chap was a Turk. Several horses were killed, and the barefooted enemy being quicker over the sand than our boys, who were handicapped with boots and leggings, took several prisoners.
Which of us will forget the scamper away? How so many did get away is a marvel. The bullets were making little spurts of flame all round and among us, on striking the sand. Here we experienced for the first time, the moral effect of turning our back on the enemy, and the question arose in our minds as we rode, “Can we reform?” The order “Sections about – Action front” was given as we reached the position, and was splendidly carried out. This high test of discipline gave us renewed confidence in ourselves. Here too we were joined by the Squadron of 1st Regiment [35] which had been sent out to our support. The ridge was held till daylight, when to our great relief, Major Birbeck's party could be seen laboriously making it's way through the heavy sand, on our right. From here, back to Mt Mala near the main Romani position, each ridge in succession was held, till the enemy, ever working round our right, outflanked and enfiladed us or our horses. Each time we withdrew, we looked for signs of some support. We expected a Brigade of Infantry to be taking up a position in our rear, or at least that our guns would support us from Romani. About 0500, Lieut. Woodyatt was killed, and shortly afterwards Major Shanahan was wounded. A number of other ranks had become casualties, but all things considered, we got off very lightly. And now, at about 0600, we could see the 2nd Brigade coming out to support us. The enemy pressure, too, slackened off a little, as their main force continued to march towards Mount Royston, and across our front, thus threatening the railway, south east of Romani. The line by this time was decidedly mixed, as we had been joined by one Squadron of 1st Regiment, and part of 3rd Regiment, When the 2nd Brigade arrived, that part of 1st Brigade remaining was withdrawn from the line to reform, and for the rest of the morning, was held as Divisional Reserve; C.O., 2nd Regiment having reported to General Chauvel about 0800.
At noon the Regiment was placed under Brig.-General Royston of 2nd Brigade -t he 6th Regiment temporarily coming to 1st Brigade. General Royston was the man of the hour, and seemed to thoroughly enjoy the situation. We took it as a great compliment to be placed under his command. We had ample troops (but to this moment, only part of Anzac Division had been employed, together with a couple of batteries) and now that the intention of the enemy, and his objective had been disclosed, it was a simple matter to check him. The Turks, too, were showing signs of fatigue, having made a rapid night march, and been hung up quite unexpectedly by the 1st Brigade improvised outpost. We had the satisfaction of knowing that our strenuous night's fighting, by forcing the enemy to deploy before he intended, upset his plans and was a big factor in the subsequent victory. Through our temporary transfer to 2nd Brigade we came in for the outpost on the night of the 4th also. We prolonged the right of the 7th Regiment towards Mount Royston, and before dawn on 5th, both Regiments in a long, and very thin, line advanced with the bayonets towards Mount Meredith, sweeping all the Turks off Wellington Ridge, on which they had their main force. The 2nd Brigade on that day consisted of the 2nd and 7th L.H. Regiments and the Wellington Mounted Rifles. The 5th L.H. Regiment was holding Duiedar, about 8 milts south east.
Our Regiment thus had the honour of "Opening the Ball" in the Sinai-Palestine-Syria Campaign; and did so in a most creditable manner.
The bulk of the Turkish force made their escape to Katia, but we got nearly 1,000 prisoners, some machine-guns, etc. Our led horses were now brought up and all mounted troops started to Katia in pursuit. Our horses were too exhausted to permit of a wide flanking movement of the Katia position and the frontal attack was unable to make any impression on the enemy.
[36] "A" Squadron was detailed to keep touch between the NZMR Brigade and the 3rd L.H. Brigade and came under heavy shell fire. The remainder of the Regiment was in reserve on this day (August 5).
On the afternoon of 5th we were transferred to the 1st LH Brigade.
As our horses had now been without water for 52 hours, and the men without rations for a day, we were withdrawn to Romani to rest. The men were quite exhausted after two nights in succession without sleep; and the weather was very hot.
The following casualties had been suffered by the Regiment:Killed: Two officers and seven other ranks;
Died of Wounds: One other rank.
Wounded: Two officers and twenty other ranks.
Taken Prisoners: Eight other ranks
Troopers McColl, Hobson, Littler and Handsley survived their captivity and were repatriated, but is with deep regret that we have to record the deaths of Sergt. Drysdale. Corporals Somerville and Easton and Trooper Ward while in the hands of the Turk.
On 6th, the buried dead and collected enemy material that had been abandoned. The higher command ruled that we were not fit to pursue owing to exhaustion of men and horses.
Further Reading:
2nd Australian Light Horse Regiment, AIF
2nd Australian Light Horse Regiment, Roll of Honour
Battle of Romani, Sinai, August 4 to 5, 1916
Bir el Abd, Sinai, 9 August 1916
Battles where Australians fought, 1899-1920
Citation: Battle of Romani, Sinai, August 4 to 5, 1916, 2nd LHR AIF Unit History Account
