Topic: AIF - NZMRB - AMR
Bir el Abd
Sinai, 9 August 1916
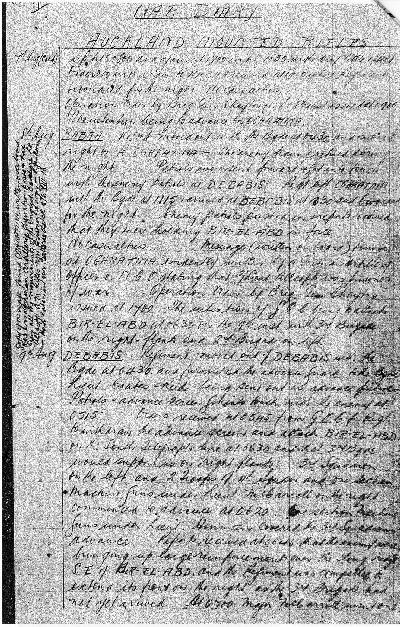
AMR, War Diary Account

The transcription:
8 August
Operation order by Brigadier General Chaytor issued at 1700. The intention of the GOC being to attack Bir el Abd at 0630 on the 9th inst. with 3rd Light Horse Brigade on right flank and 2nd Light Horse Brigade on left.
9 August
Debabis
Regiment moved out of Debabis with the Brigade at 0430 and furnished the advance guard to the Brigade. Lieutenants Coates and Reid being sent out as advance guards.
0515
Orders received at 0545 from GOC for Regiment to withdraw the advance screen and attack Bir el Abd on the south Telegraph line at 0630 and that 3rd Light Horse Brigade would support us on right flank. 3rd Squadron on the left and 2 Troops of 4th Squadron and one Section Machine Guns under Lieutenant McCarroll on the right commenced to advance at 0620. One section Machine Guns under Lieutenant Hinman covered the 3rd Squadron advance. Reports received at 0645 that the enemy were bringing up large reinforcements over the long ridge south east of Bir el Abd and the Regiment was compelled to extend its front on the right as the 3rd Light Horse Brigade had not yet arrived. At 0700 Major McCarroll went out to Command the right of the sector held by the Regiment and also took up 2 Troops (4th Squadron) in support.
The Canterbury Mounted Rifles who were on the far left and the Regiment made steady advance and the enemy were pushed back.
At 0900 our right flank was reinforced with one Squadron of the 5th Light Horse Regiment as the 3rd Light Horse Brigade had not arrived. Steady advances were made both by Canterbury Mounted Rifles and the left flank of the Regiment and at 1100 we held a line running South East and North West across the Telegraph line. At 1120, the Canterbury Mounted Rifles and 2 Troops 3rd Squadron on the left were compelled to retire on account of heavy enfilade fire and we were compelled to withdraw the left flank back to the Telegraph line which left us with two exposed flanks as the 3rd Brigade on the right had not yet been reported. The enemy attacked our position strongly at 1145 but we were able to hold them until reinforcements arrived.
At 1220 (2 Troops Warwick Yeomanry, 1 Troop 5th Light Horse Regiment and one section Wellington Mounted Rifles Machine Guns) Further reinforcements arrived at 1430 and were sent out to reinforce the right flank as the 5th Light Horse Regiment on the extreme right flank reported that the enemy were advancing in force on the ridge held by them. Report received from Major McCarroll at 1350 that 2 Troops of 3rd Brigade had been seen within 1,000 yards of our right flank at 1200 but they had since disappeared. At 1500 we were holding the enemy well.
At 1615 orders received from GOC to withdraw to a position 1,000 yards west on line running north and south over the Telegraph line. Major McCarroll took charge of the withdrawal on the right flank of the sector and on receipt of his report at 1800 that the right flank had started to withdraw the Warwick Yeomanry and 1st Light Horse Regiment Troops were withdrawn on the left flank followed by the Wellington Mounted Rifles Machine Gun Section and then the 3rd and 4th Squadrons.
At 1830 the whole of the Regiment including all troops that had been sent up to reinforce had been successfully withdrawn with very few casualties, considering the way the enemy advanced when they saw the withdrawal taking place and the exceptionally heavy rifle and machine gun fire which was brought to bear on us. Lieutenant Hinmas and his section of Machine Guns did very good work in covering the retirement from the left flank as did Lieutenant McCarroll with his Machine Gun Section on covering the retirement on the right flank. The final withdrawal was delayed on account of shortage of sand carts for evacuating the wounded but the latter were all successfully got out before the withdrawal actually started. the Brigade rendezvoused at Debabis and when all unites were reported present at 1930 - the Brigade moved back to Oghratina and bivouacked for the night.
CasualtiesKilled in Action: Captain OP Johnson
Wounded in Action: Captain M Aldred, Second Lieutenant HM Martin.
Killed in Action (3rd Squadron): 4 Other Ranks
Killed in Action (4th Squadron): 6 Other Ranks
Wounded in Action (3rd Squadron): 10 Other Ranks
Wounded in Action (4th Squadron): 7 Other Ranks
Wounded in Action (11th Squadron): 2 Other Ranks
Roll of Honour
Further Reading:
Auckland Mounted Rifles Regiment
Auckland Mounted Rifles Regiment, Roll of Honour
New Zealand Mounted Rifles Brigade
Battle of Romani, Sinai, August 4 to 5, 1916
Bir el Abd, Sinai, 9 August 1916
Battles where Australians fought, 1899-1920
Citation: Bir el Abd, Sinai, 9 August 1916, Auckland Mounted Rifles Regiment, War Diary Account


