


Topic: BatzS - Magdhaba
The Battle of Magdhaba
Sinai, 23 December 1916
Magdhaba and Kress
The following is an article written by Bill Woerlee1 called Magdhaba and Kress which was first published in Sabretash, the Journal of the Military History Association of Australia, December 2008 edition.
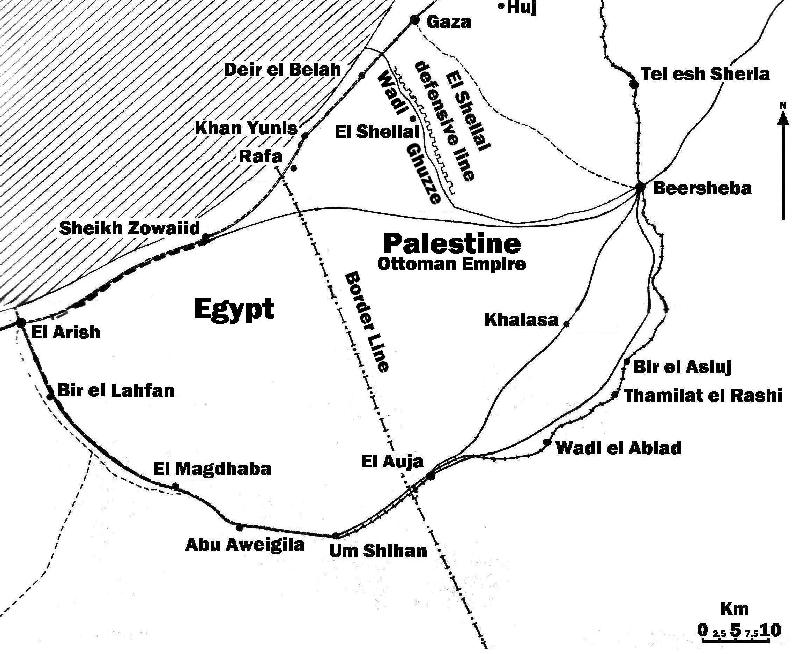
[Map produced by Bill Woerlee, 2008]

[Map extracted from: Gullett, HS, The Australian Imperial Force in Sinai and Palestine: 1914 - 1918, 10th edition, Angus and Robertson, Sydney, 1941, Chapter 14.]
Magdhaba and Kress by Bill Woerlee

Turkish Military Staff at Magdhaba
Unpleasant and serious concerns for Christmas! If the British at Magdhaba decided to go onto el Auja and Beersheba, there was nothing in their way to stop them. The way to Jerusalem was open to the enemy. I raised the alarm and sent units to Beersheba and el Auja by lorry and marching. I was upset over losing our poor comrades around Christmas but it did not change things. On the early morning of 24 I went back to Beersheba. There I received the reassuring message that the British had ridden back to El Arish during the night of 23 to 24. They were obviously satisfied with a local success.2
With this quick summary, General Friedrich Freiherr Kress von Kressenstein,3 passed his judgement over the Allied victory at Magdhaba on 23 December 1916 led by General Chauvel 4 and men from the Anzac Mounted Division.5 At the heart of this comment was the accusation by Kress that Chauvel failed to vigorously exploit the victory at Magdhaba by capturing Beersheba and then possibly Jerusalem, all of which, according to Kress, were available for seizure with little difficulty. In the mind of Kress, such an action was something a competent German General might have undertaken given similar circumstances. Alternatively, the judgement by Kress might be seen as an effort to deflect attention away from his evident failure to provide Magdhaba with adequate means to resist an attack.
This paper aims to examine the validity of this assessment in light of the information and resources available to Chauvel when the Battle of Magdhaba concluded. Included are all logistical and combat resources at El Arish and Magdhaba, coupled with the signals, intelligence reports, threat assessments, post battle reports, and other information that could shape a decision at 4.30 pm, 23 December 1916.
The story of the battle at Magdhaba had its genesis in events that unfolded some two weeks before as the Egyptian Expeditionary Force contemplated a battle against the Turks at El Arish.6
In the Sinai, Djemal7 Pasha’s8 forces were in disarray when the movement of the British railway line reached a point about 20 km west of El Arish. Turkish strategy was to keep a full day’s march from the rail head in order to avoid any contact with the overwhelming numbers of Allied infantry. Since the railway line progressed at an average rate of about 1.5 kilometres per day,9 this gave the Turkish General Staff a good timetable for the Allied rate of advance towards El Arish. The Turkish forces facing the Allied advance numbered some 7,000 combat troops, a force about one third of those available to the Allies. The numerical inferiority meant that they could only play a passive delaying and harassing role rather than an active counter attacking function. While they counted off the Allied railway kilometres, the Turks understood that their occupation of El Arish was only tentative to the extent that the timetable for eviction was dependent upon the work rate performed by the Egyptian Labour Corps which was tied to the slow supply of rail lines. Finally, the day arrived when the railway and all its incumbent potential threats forced a decision upon the El Arish garrison.
By about 15 December 1916, spirited debate erupted between the Ottoman General Staff in Constantinople and the field Generals regarding the best strategy to pursue at El Arish. By necessity it was a slow debate via a telegraph line as no telephone lines existed. All telegrams needed to be encoded, then transmitted by Morse Code, then decoded. If a mistake was made in the coding it created havoc and delayed the conversation even further.
Under these great communications difficulties, the Generals attempted to deal with the crisis facing them. Three options lay before the Generals: to launch a pre-emptive attack on the Allied forces as they had done at Romani in April; to hold on with an energetic defence and retreat as occurred at Bir el Abd and Bir el Mazar; or, to withdraw without offering battle.10 The Turkish compromise decision of 16 December was to retreat without offering battle and thus preserve their forces while simultaneously leaving a strong rear guard to form a garrison at Magdhaba, some 32 km south east of el Arish. The final role of the Magdhaba garrison was to be determined at some later time.
The key function allotted to Magdhaba by the Ottoman forces was to serve as an intermediate freight point between El Auja and El Arish. To furnish protection and a labour force, it was garrisoned by about 300 troops from the 80th IR (Infantry Regiment). Freight movement was facilitated a 600mm gauge light railway or tramway line, commonly known as a decauville line. The rail link extended from the rail terminus at El Auja, Palestine, through to Magdhaba. While not possessing any Decauville locomotives, it was serviced by some 380 horse and camel drawn freight trolleys. 11
After the decision to withdraw from El Arish transpired, Turkish engineering troops began removing the line. Since the track was constructed with ready-made sections of light, narrow gauge track fastened to steel sleepers, the track was portable and easily disassembled for transport. By 23 December, the line had been removed from Magdhaba to Abu Aweigila leaving the garrison in an isolated position although the small supply depot at Um Shihan remained.
On 17 December, the order was given to withdraw the El Arish garrison of about 7,00012 men and reform this force along the massive earthen fortifications completed beside the Wadi Ghuzze and pivoted upon the headquarters at El Shellal. A force of about a thousand Syrians would remain at Magdhaba while the balance of some 6,000 men would make the full round journey. The intent was to bolster the defences of Magdhaba from this Syrian force who were predominantly from the 80th IR. The Turks withdrawing from El Arish began their trek through Magdhaba and then onto El Auja and subsequently to their points of concentration, a journey of about 190 km which for the infantry, meant a about a seven-day march. Supply depots were maintained along the marching route to ensure sufficient rations were available, thus enabling the men to march with the lightest possible loads. The marching timetable was staggered to avoid congestion along the route with the last troops scheduled to depart from El Arish on 20 December.13 The reason for taking the circular route rather than the coastal road lay more with protection of the withdrawing force from any harassment by the British navy which was very effective in delivering devastating cannonades upon targets of opportunity to distances of up to 15 km inland. Kress ordered the revival the old defensive perimeter at Magdhaba which in the past was based upon five redoubts interconnected with trenches.14 The fortifications had fallen into disuse and the repeated kamseens had filled the trenches with sand. The immediate task was to remove the, an undertaking that remained incomplete when Allied forces arrived six days later.
The force defending Magdhaba was commanded by Kadri Bey, the CO (Commanding Officer) of the 80th IR, a Regiment that was administratively allotted to the 27th ID (Infantry Division) although it was attached to the 3rd ID for the most part of 1916. The primary force consisted of two under-strength battalions of about 600 men each.15 There were the 2/80th Battalion commanded by Izzet Bey and the 3/80th Battalion commanded by Rushti Bey. Counted in this force was one curious, and in the end fateful, decision to leave at Magdhaba a token force of a platoon16 from the 80th MGC (Machine Gun Company) who were armed with only one machine gun. The balance of the company consisting of three platoons, each armed with a machine gun, was sent to Shellal.17 The force was supported by a Mountain Battery of four outdated Krupps 7.5cm Gebirgskanone M 1873 guns on loan from the 1st Mountain Regiment as the full 80th IR artillery battery was, at that moment, stationed at Nekhl. Added to Magdhaba garrison was a camel company without camels and a number of other military service units.18 The majority of the men at Magdhaba were Syrian conscripts who did not possess the same commitment to the war as the Anatolian Turks and so were viewed by their Ottoman officers as being of lower quality and dubious loyalty.19 Contrary to this Ottoman belief and to the credit of the men, they bravely withstood the Allied onslaught for over eight hours.
At the time Magdhaba was being garrisoned, the force was given only 40 horses and 51 camels,20 a number barely sufficient to undertake supply work for the 1,400 men stationed at Magdhaba, indicating that raiding the Allied line was, for the moment, a low priority. More than likely, the task assigned to Magdhaba was to primarily withstand an attack as part of a rear guard force. One other role seemed to be assigned to Magdhaba which related to the string of garrisons forming the Turkish left flank Sinai occupation force. The main garrisons included Nekhl and el Kossaima. If the Magdhaba garrison lingered after the completed withdrawal of the Suez Canal Expeditionary force, then its role would become more of a political statement that the Ottoman forces remained in Egypt. Their role would be moot as the isolated garrisons could perform no useful military function. The Generals could not make their minds up on this matter leaving the role of Magdhaba ill defined and confused.
Kress inspected the garrison at Magdhaba on 22 December 1916 and made the following observations:
… I drove from el Auja to Magdhaba, in order to visit the regiment. There were five substantial redoubts constructed with minor communication trenches that surrounded the garrison. Like everywhere, unfortunately it was missing war material necessary to create obstacles. … I was satisfied with the spirit and health of these troops and the arrangements made. 21
Kress recognised the weakness of the force but gambled upon an even weaker response from any attacking Allied cavalry. The assumption relied upon the distance and lack of water resources between El Arish and Magdhaba making it difficult for any cavalry to sustain itself in the field over a longer period than a day. After that, any attack would be called off. To ensure the lack of water, the Turks destroyed the wells at Bir el Lahfan, about 15 km south east of El Arish along the banks of Wadi El Arish, about halfway between Magdhaba and El Arish. Results from the Turkish demolition were discovered by the men of the 3rd Squadron from the Auckland Mounted Rifles22 early in the morning of 22 December.23
Reinforcing Kress’s belief in a weak Allied response was German and Ottoman contempt for the leadership qualities displayed by the officers with the Anzac Mounted Division. The last few months were packed with examples. After the successful 9th LHR (Light Horse Regiment) action at Bir Hamisah on 5 August 1916 leading to its capture, General Antill24 of the 3rd LH Bde (Light Horse Brigade) remained satisfied with a good local victory. Unfortunately, through resting upon the result for whatever reason, Antill failed to develop the result of the victory by cutting off the enemy's line of retreat northwards.25 This tactical failure allowed over two thirds of the Ottoman forces engaged in the battle to escape. Similarly, without proper scouting Chauvel, ordered the Anzac Mounted Division into an attack that almost proved disastrous as the men rode straight into a bog which the Turks had transformed into a well laid out killing zone.26 Good fortune avoided a slaughter. The Allied victory at Romani is still a matter of debate as to whether it was won by the Allies or conceded by Kress when the Ottoman troops retreated. The subsequent victories at Bir el Abd, Bir el Mazar and now El Arish were created by Turkish withdrawals as part of the Kress fighting withdrawal strategy rather than by Allied battlefield ability or victories.
Also the actual reason for General Chetwode27 emphatically ordering the attack on Magdhaba remains part of the historical debate. Chauvel’s plan was to move on and attack Turkish concentrations either at Magdhaba or Rafa with the sole object of expelling the last Ottoman troops from Egyptian soil. Chetwode sent Chauvel a letter on 21 December with orders to prepare for an attack on Magdhaba for 23 December.28 The situation was crystallised with the confirmation of the orders when Chetwode landed by boat at El Arish at 10 a.m. on 22 December.29
The three Brigades Anzac Mounted Division, and Camel Brigade (less one Battalion) were to march that evening as soon as they had drawn supplies and move via Magdhaba on Abu Aweigila and Ruafa with the object of capturing as many enemy remaining there. The force to return as soon its mission was accomplished ... These orders were handed to the Anzac Mounted Division.30
Chetwode’s orders were clear about the objectives. In addition to the specific locations, the orders were in line with the military doctrine exercised by the mounted troops during the Sinai Campaign. They were to engage the Ottoman forces for a day and then to withdraw regardless of outcome. Chauvel was expressly ordered never to deliberately expose the light horsemen in combat engagements that would potentially incur large numbers of casualties. The men were too valuable as mobile troops and more pragmatically, very difficult to replace.
One apparent factor influencing Chetwode was a piece of information which had just come to hand. The British Intelligence section had decoded a Turkish message, dated 21 or 22 December, ordering the Magdhaba garrison to withdraw to El Auja. 31 This made Magdhaba an easy target as the garrison would be preparing to retreat rather than to fight and so their capture would be a good propaganda coup, an essential part of selling the ubiquity of British power to the local inhabitants. General Dawnay32 was emphatic on the propaganda value of quickly capturing places like Magdhaba and Rafa. He wrote a memo about the underlying British Sinai strategy in a letter to the CO Desert Column. He says:
The actual results to be achieved by our operations in Northern Sinai must depend very largely on their moral effect. It will be necessary at all costs to try to give the enemy - and not only the enemy but also the Arab population in Southern Syria near the Egyptian Frontier - an exaggerated impression of our mobility and power to strike. 33
Supporting the intelligence report detail is the action of Kadri Bey who managed to send most of his baggage train and non essential personnel to El Auja before the Allied forces arrived,34 an action indicating an impending withdrawal. In contrast, the message decoded by British Intelligence appears dissimilar to Kress’s commentary since he makes no mention about withdrawing the garrison subsequent to his visit on 22 December.
The attack on Magdhaba was undertaken the next day, 23 December, after an all-night march by the Allied force. Chauvel employed a classic encirclement of Magdhaba to prevent retreat. Since the encirclement perimeter was too far for a mounted division to effectively envelop, the thinly held parts of the line proved to be porous, with small groups of Turks slipping through the cordon almost at will, a fact that Chauvel's air scouts reported upon with regularity.
Another weakness of the encirclement tactic was the inability to concentrate forces at any one critical point for a decisive assault. This happened to Chauvel as the numbers committed to the encirclement meant the troops were unable to concentrate sufficiently to make headway in specific attacks for most of the day. The Ottoman forces vigorously beat off any attack that did form. So energetic was the defenders’ shooting that most contemporary Australian Regimental war diaries and the subsequent post war unit histories mention the formations receiving fire from many Turkish machine guns. In fact, as already mentioned, the Turks had only one machine gun at Magdhaba. At 2.50 p.m., after a futile day which produced some casualties but achieved nothing by way of gain, Chauvel sent out the following order to his generals:
As enemy still hold out and horses must be watered the action will be broken off and the Force withdrawn. Each Brigade will be responsible for its own protection during the withdrawal. Hour of withdrawal to begin at 1500.35
So there it was in black and white. The overall attack failed and was to be called off at 3 p.m.. If the withdrawal had occurred at the time ordered by Chauvel, Kress’s belief in his plan for the defence of Magdhaba, with all its incumbent assumptions, would have been vindicated.

9th Light Horse Regiment’s final charge at Magdhaba
But battle plays cruel tricks on assumptions. Small actions can sometimes have large consequences swinging a battle either way. In this case, the victory hung entirely upon a simple action. General “Fighting” Charlie Cox36 of the 1st LH Bde anticipated the contents in the message he was about to receive from the oncoming messenger. Instead of receiving the message and reading it, Cox is reputed to have said to the messenger: “Take that damned thing away and let me see it for the first time in half an hour!”37 Just prior to this, he had ordered his men to conduct one final assault upon the key Ottoman No. 1 Redoubt. This was his last throw of the dice. Fail and he would be censured for disobeying an order. Cox’s men did not fail him. In company with the Imperial Camel Corps their attack led to a breakthrough and subsequent surrender by the defenders of the redoubt. From there on, the defence perimeter for the Turks began to unravel. In rapid succession, the second redoubt to fall was captured by the 1st LH Bde - 2nd and 3rd LHRs. This brought with it the capture of Kadri Bey and the collapse of any coordinated resistance. The final coup de main was administered by the 3rd LH Bde along with the NZMRB (New Zealand Mounted Rifle Brigade) which brought about the collapse of the entire garrison. Organised resistance ended at about 4.40 p.m.. which resulted in the capture of some 1,280 men.38 The day’s desultory battle was quickly turned into a victory for the Allied forces. Cox’s covert disobedience of Chauvel’s orders brought success through an action that was soon to become part of the Light Horse legend.
It was at this point that Chauvel was on the cusp of the idea outlined by Kress. Even if Chauvel did not appreciate the scale of the victory at Magdhaba, there were still two further objectives as part of the orders, the drive further southwards to Abu Aweigila and Ruafa.39 There is no record of Chauvel seeking to amend his orders to cancel this action and yet he did so with the approval of Chetwode.
Contact with senior levels of command was not a problem had Chauvel sought to capture Abu Aweigila and Ruafa. The signallers had utilised the functional Turkish telegraph line to establish a telephone link between Chetwode in El Arish and Chauvel at Magdhaba which was used to give almost real time status reports of the battle. No contact difficulties existed between Chauvel and Cairo due to the excellent communication lines established indicating that orders could be changed and approved at the highest level. Extraordinarily, nothing of the sort transpired on the day.
Had the orders been amended, the rapid despatch of a Light Horse Brigade with an artillery battery to Abu Aweigila, an hour’s ride away, would have sufficient force to encircle and sever its communications with El Auja. Because of night fall, securing surrender might have taken until the following morning to although judging by the timidity displayed by the officer in command during the day, 40 once the arrival of Allied troops occurred making his position unambiguous, there was every chance of a quick surrender that evening. This would have added to the magnitude of the Turkish defeat and given the mounted troops access to another excellent source of water. For the Turkish Command, the lack of action was a reprieve. The failure to follow up by the Allies meant that once the fall of Magdhaba became known, this combat force at Abu Aweigila remained available to the Turks and so was ordered to withdraw to El Auja to bolster its defences, an action undertaken the following day.41
By 6pm on 23 December 1916 for Chauvel and his force, the situation was positive in every sense. They had an abundance of water with relatively few casualties.42 There was sufficient water and captured tibbin43 to supply the animals. Flushed with a victory, morale was sky high. In every way, the Division was fresh and able to be deployed at a moment’s notice. The men also had a further day’s supply of iron rations in case of supply shortages.
Re-supply for the division after the action at Magdhaba was always going to be a logistical nightmare. The rapidity of the advance had almost over run the capacity of the Supply Corps to cope with the situation. The main supply base prior to the push to El Arish was established at Kilo 149 along the rail line. It was able to supply the men with the basic needs but little more.44 The tenuous nature of the supply situation was illustrated when the Prisoners of War from Magdhaba began to arrive at El Arish. To ensure the provisioning of Turkish rations on 24 December the men from the 52nd Lowland Scottish Division were forced to go on half rations for the day. The Scots were upset but put up with the inconvenience with good cheer.
Supplying El Arish by sea was a difficult affair with stores being put ashore in boats and lighters. Until the rail head arrived in January 1917, this operation was overseen by Admiral Wemyss. By 23 December, a large consignment of stores had been delivered on that day. Following that day, however, the necessity of rapid re-supply trailed off as the rail line neared El Arish and only 1,500 tons arrived by sea during the following fortnight. 45 Had there been an imperative to land supplies to support a drive to Beersheba, then the supplies would have been available in the quantities that arrived on 23 December rather than in the capricious manner they were delivered once high demand through combat activity diminished while the railway was being built. Lack of urgent demand gave Chetwode the luxury of sending men to the rail head for supply purposes until the railway reached El Arish.
On the evening of 23 December, supplies for any further offensive action were available in quantities sufficient to maintain the division in the field without anything lavish added. At 4.30 p.m., Chauvel had already arranged for a convoy to re-supply the troops remaining for the post battle clean up46 indicating that there was excess supply capacity available at El Arish to allocate to an expedition. If despatched from El Arish at about 6 p.m., the camel convoy would have arrived at Magdhaba at about 3 a.m., in time to deliver supplies essential for a 6 a.m. start. Even if such a convoy did not make it in time, there was sufficient ammunition available for one more battle.47 In addition there was the captured war material in the way of four fully supplied mountain guns, 1,000 rifles and 100,000 rounds of small arms ammunition which went some way to replenishing the supplies.
Initial re-supply as a stop gap measure, could have been accomplished by a camel supply convoy. The despatch of GSW wagons from Kilo 149 would have meant that it would take about three days to travel to El Auja. The despatch of motorised transport, which was obviously much faster, would have assisted the situation. The lack of lorries made it difficult as supply officers were loath to make these precious vehicles available. The movement of lorries to any offensive activity would have required the direct intervention from Murray to ensure they were available.
At El Arish, things moved at a rapid pace. The 52nd Lowland Scottish Division was already in occupation with two other infantry divisions to follow when the occupation was certain. If the attack on Beersheba was to go ahead, it would have been the time to despatch a brigade of infantry. The march to Magdhaba was the standard infantry route march distance for one day.
Travelling conditions from El Arish to Beersheba via Magdhaba and El Auja were excellent. The main road was metalled - being some 4.5m wide with a 3m usable driving surface residing on a 30cm camber with spoon drains dug on each side. 48 The roads were suitable for the standard GS (General Service) wagon used by the ASC (Army Supply Corps). In addition, to cope with camel and horse traffic, the Turks had constructed a separate and parallel earthen road which was softer on the hooves, again with a slight camber and spoon drains on each side. Plentiful water was available over the whole length of the road to Beersheba. In assistance with re-supply was the decauville line from Abu Aweigila to El Auja and the rail link to Beersheba, thus cutting down a five day trek by the ASC on a GSW wagon to about two or three days. The journey meant travelling on 42 km of macadamised road with the balance undertaken by rail. The use of motorised transport, if it were made available, would cut the re-supply situation to one day. On 24 December, there were no motorised trucks at El Arish but if necessity required, they were able to be transferred the following day from Kilo 149.
The first leg, from Magdhaba to El Auja was about 42 km over reasonably flat countryside and excellent roads. In terms of timing, this translated into an eight-hour march by horse and for infantry, one and a half days march. A full mounted division employing the standard four man section line of column on the march is almost serpentine, creating a thin trail some 5.5 km in length. At any one point, it took the Division nearly 2.5 hours to pass. The lead regiment was able to take an hour’s break for a meal and water the horses and be on the move before the tail of the division caught up. Although carrying a weight of 115kg including rider, food and equipment,49 horses were treasured and so well looked after by the men. The standard march for the Light Horse was 40 minutes with the horse walking, 10 minutes with the rider walking next to the horse for the cool down and 10 minutes rest. At this rate, a march moved at the rate of about 5.7 km per hour. Watering a horse every six hours kept it fit although at times they could be without water for a couple days before being completely knocked up.
After a short march from Magdhaba to Abu Aweigila to join up with the detached brigade, the division would be able to march onto the next well at Um Shihan where there was only a small Ottoman outpost of about a platoon whose express purpose of keeping the supply lines open. Again, after the surrender of Abu Aweigila, a squadron could have been despatched to take over this outpost for a quick capture. At Um Shihan, the horses could be watered and the troops have a meal. Assisting the forward movement from Um Shihan to El Auja was the remainder of the decauville line. Quite a few trolleys still remained at Um Shihan in anticipation of withdrawing the Magdhaba garrison.
El Auja was a larger settlement full of many substantial masonry buildings, with the dominant structure being the railway station. The railway line north to Palestine and Syria began at El Auja. Since steam trains used huge amounts of water, engineers had constructed a water tower and a well to supply the water requirements of the trains. The intelligence report stated:
Abundant supply for fully 12,000 men from two wells, water which was run into tanks by two motor engines through 4cm pipes. Water was down some 30m in the ground.50
The number of troops at El Auja consisted of at least one company from the 1/80th Battalion and various service units who were in the main, non combat soldiers.51 One major group of non-combat soldiers were attached to the field hospital which at the beginning of December included about 100 tents. There appears to have been no machine guns or field guns at El Auja as these were being despatched by train from about 20 December onwards during the withdrawal. It appears that the last withdrawing combat troops along with eight field guns were entrained on 23 December at the same time when Magdhaba was besieged.52
The number of troops in transit at El Auja was unknown although various intelligence estimations gave numbers between 1,350 to 3,000 men.53 Calculating the exact numbers troops at El Auja on 24 December is made difficult due to the lack of adequate and existing Turkish records. Those who remained were mainly with the non combat formations and usually non essential units such as the baggage trains, field hospitals, engineers and the transport staff, all of whom were awaiting transport to Palestine. The role of the protective troops was to arrange an orderly departure for the remaining units and secure the area from any local population who might seize the opportunity to pilfer. This explains the nub of Kress’s panic regarding El Auja as there were few combat troops available for defensive work.
As with the garrison at Abu Aweigila, it is doubtful if this defensive force was prepared for or even capable of withstanding a sustained battle. The buildings were all situated upon flat and open grounds while the area surrounding El Auja was gently undulating which gave an attacking force the advantage of approaching the settlement without being easily seen or presenting simple targets. The lack of entrenchments meant that any hastily built sandbag redoubt could be speedily put out of action by the accurate fire from Royal Horse Artillery. This deficiency was made up after 24 December with hasty entrenchments being dug. But this is for the future when no attack occurred. The Allied force arriving in the afternoon of 24 December at El Auja would have caught the garrison without any protective redoubts or entrenchments to resist an attack.
Apart from being the obvious jumping off point to capture Beersheba, another benefit arising from capturing El Auja would be the folding up of the small Ottoman garrisons dotted in the Sinai but dependent upon El Auja for supplies. The largest was at El Kossaima, a garrison of 300 Turks, 80 Syrians, 2 field guns, and 1 machine gun. 54 Once isolated, these small outposts would surrender upon their own volition through exhaustion of supplies as there was no escape from the fierce desert which they would have to cross in order to reach the Hejaz Railway some 112 km to the east.
At El Auja, after a meal and a few hours sleep, a night march would be necessary to ensure the element of surprise at Beersheba. It would be prudent at this stage to follow the railway line from El Auja to Beersheba as it would ensure a close supply of water all along the way. Stations with water tanks began with Wadi el Abiad and then Thamilat el Rashi where there was a siding, four large stone buildings and three rail lines to allow shunting. Next was Bir el Asluj at Wadi Rakhama where the key feature included a 1.5m diameter stone-lined well some 15m deep coupled by two similar wells nearby although the wells’ water quality was suspect. For a good place to rest and water the horses, Bir el Asluj was the most ideal place. The horses needed to be refreshed to take on the final part of the journey. Success at Beersheba meant water for the horses while failure meant a walk back to Bir el Asluj. There were another two small stations and then Beersheba.
The total distance from El Auja to Beersheba was 64 km; a twelve-hour march by horse along the road near the permanent way supplied with plentiful water all the way. The march from Magdhaba to Beersheba, 107 km, would have been extremely taxing on both man and beast reaching nearly the limits of physical endurance by the time Beersheba was reached. While difficult, it was well within the Allied Light Horse ability. The men of the division undertook similar rides during the September 1918 actions without any negative consequences to the efficiency of the divisions.
An alternative high risk and more direct route also existed from Auja via Khalasa to Beersheba, a distance of about 50 km or a nine hour-march, which shaved 14 km and three hours off the trek. The major risk was the lack of certain water along the route with Khalasa as the only place holding a well of any significance. The supply was sufficient for about 1,000 camels per day55 but insufficient for a cavalry division at that time,56 although it was very suitable for a fast moving striking force or a flanking guard of two regiments. These could be used to quickly reach Beersheba and feel out the defence while taking decisive action if the circumstances allow.
The highest risk alternative was to entrain a squadron with four machine gun sections on the captured rolling stock and send it to Beersheba station. This would allow the capture of the most strategically important position in one quick thrust. The station capture would split Beersheba’s defences down the middle severing the right flank from the left. It would also lay into their hands more rolling stock which could be quickly employed in bringing up more squadrons. The railway line lent itself to simple defence able to bring enfilading fire should an attack threaten. The advantage of this move would be to sow complete confusion in the Turkish defensive system which would allow the Division to approach almost unmolested, especially from the air. This audacious alternative promised the most return but also the move with the highest risk. If anything went wrong, and there was high potential for many things to go wrong, then the squadron was lost or neutralised requiring rescue.
For the Ottomans, Beersheba itself was not highly prized as a garrison, although it was useful for air reconnaissance due to its air strip and also served as a supply depot. At the opening of the Third Battle of Gaza, 31 October 1917, it was a pawn which they were happy to sacrifice while holding up the Allied advance. By about 3 p.m. on the day of the Allied attack, the Turkish forces were in the process of withdrawing from Beersheba and abandoning the town, some two hours before the famous charge occurred. The defensive systems were in the hills behind Beersheba and not the town itself. This defensive line was buttressed on the towns of Tel esh Sheria and Huj, both provided excellent bases upon which to occupy the natural ramparts of the Southern Palestinian hills. It was no different in December 1916. Most its active combat forces were stripped by the Turks and transferred to Khan Yunis and Gaza.57 The remaining infantry companies at Beersheba were sufficient only to perform local guard functions but with great difficulty could engage in defensive work. After a token resistance at the southern entrance of the town, they would withdraw to the hills overlooking Beersheba. The tough combat would be involved in winkling out the various outposts dotted over the hills which would threaten any occupying force.
The march from Magdhaba to Beersheba would take two days. The men had sufficient rations for this time period while there was more than enough water for man and beast. Beersheba was a busy camel-trading post housing many camel dealers and fodder yards. Horses were also traded in some quantity so tibbin stocks were always at a high level. Surrounding the town were fields of wheat. Supplies presented little problem. Should their rations give out, meals of grilled goat, hommos and tabouli might present a pleasant alternative to biscuit, bully beef and onions, their staple.
Air cover from 34 aircraft was also readily available.58 The Royal Flying Corps 5th Wing stationed at Mustabig was specifically ordered to provide close air support, long range scouting and long range strategic bombing to support the attack on Magdhaba. This Wing was a composite formation with the No. 14 (British) Squadron and the No. 67 (Australian) Squadron. It had an array of different aircraft to perform specialist tasks. The scouting role was to keep a close watch upon Beersheba, El Auja and Abu Aweigila and provide updated estimates of Turkish strength and troop movements in response to the attack at Magdhaba. The rough air strip by Chauvel’s Headquarters was busy with aircraft landing and taking off. At any one time, there were up to four aircraft on the ground.59 One other task was to bomb the airfield at Beersheba to render it unusable for aircraft. During the attack at Magdhaba, the 14th Squadron demonstrated both its scouting skills by giving reliable Ottoman troop information in almost real time while also dropping six 100lb bombs and over a hundred 16lb and 20lb bombs. The effective range of air cover was sufficient to provide a defensive covering air arc over the projected line of advance.
But Christmas Day at Beersheba was one that brought with it all the advantages that a lucky field general could ever wish for when things are going well. In the evening winter came to Palestine. The heavens opened up and it rained heavily with some hail storms. It was so heavy around Beersheba that the roads were impassable for all wheeled transport which meant that there was no likelihood of any reinforcements to support a depleted garrison. If Beersheba fell on Christmas Day then the division was safely under shelter protected by both rain and rifles while at El Auja would have been a brigade of infantry and additional artillery being entrained for Beersheba with the prospect of more artillery support and brigades in transit. While the vehicles could not move across country the train could still run. The rain may have been very uncomfortable for the reinforcing troops, unlike the Turks, there was no impediment to them arriving at Beersheba.
Upon the capture of Beersheba, one military prize would be a functioning air field complete with full aviation fuel tanks, captured Rumplers from the German 300 Flieger Abteilung60 which sat grounded on the soft soil as well as a group of very experience pilots. Once the soil dried out a couple days later, the airfield would be available for Allied aircraft to occupy and fly sorties.61 While the similar weather was experienced at El Arish, this weather did not spread throughout the operational theatre of the Sinai which allowed Allied aircraft to operate at will. The rain also meant that there would be ample surface water supplies for the horses in Wadi el Saba. With the onset of rain, the men who finished the march had every incentive to get the capture of Beersheba finished as quickly as possible so they could get under shelter with a warm fire.
So in terms of the Allies, an advance on Beersheba appears to have been possible. But the above only deals with one side. The Ottoman forces would not be idle. If Chauvel chose to undertake such an action the Turkish ability to respond requires examination.
For Kress, 24 December was a day of crisis. Until he was sure that the attack on Magdhaba was local, he knew the Turkish Beersheba defence perimeter was in trouble. The capture of El Auja would signal a possible movement to Beersheba and air reconnaissance would pick up the movement of the column, unless the Allied forces marched all night after taking El Auja. At that time, all the available Turkish formations were in the process of withdrawing to their allocated positions and so turning the regiments around for re-orientation would produce utter chaos without adding many men for defence. The earliest that any formation withdrawing from El Arish would be ready to undertake combat duties as a unit would have been 27 December leaving the immediately available forces for the defence of Beersheba were at Hebron and Tel esh Sheria whom were almost immediately trucked in when the news of Magdhaba was received by Kress.62 Apart from lack of numbers, the rain would prevent any movement of a force. A valuable day would be lost until the rains subsided and the roads were usable again. The composite force he was able to assemble immediately not amount to more than a couple of poorly trained companies of garrison troops ill prepared for mobile combat. In addition, there was a battery of Austrian howitzers available after 27 December. The effect of this artillery would be more harassing than being a threat since the counter battery ability of the Royal Horse Artillery was of high order. The howitzers would only be able to fire a few rounds and then move location or endure a counter barrage.
While the immediate forces faced may not have been great, nearby were the three regiments from the 3rd ID commanded by Refet Bey, arguably one of the best performing Turkish Generals in the Suez Canal Expeditionary Force during the campaigns of 1916. After being mauled by the Allies at Katia during the Romani offensive in August, the result was the loss of over fifty percent of its effective strength. Consequently, the Division was in the process of being transferred to Palestine for rest, reinforcement and refitting.63 Apart from the 32nd IR, the balance of the division appeared to be suffering from the chaos that accompanied reformation. Weather prevented any concentration of this force until 28 December. The Regiment would not be ready for such a commitment towards attacking the static defences at Beersheba was remote and in the circumstances, too late to be of any use. It was in no condition to seriously contest a fresh force of Allied cavalry and infantry in well defended positions.64
Due to the inclement weather commencing towards the evening of 25 December, the only method of transporting elements of battalion sized formations which required an extensive logistics train would be by rail. The men and baggage would detrain at Tel Esh Sheria, the only Ottoman military base and logical where a concentration troops could occur nearest to Beersheba. While there were excellent shunting facilities at Tel Esh Sheria, the single track leading into the assembly area would, by necessity, restrict the number of troop trains able to arrive at the station at any one time. Of course, this all assumes the ready availability of rolling stock, something that was very uncertain. Re-routing trains and rolling stock already in motion is a difficult task, indeed, almost impossible. Unless there were trains at various depots as a specific reserve, it would take a great deal of time to alter the schedules to requisition sufficient rolling stock to undertake the task.
Any movement towards Beersheba from Tel esh Sheria for infantry entailed a gruelling one day march over hilly terrain in the pouring rain. Until sufficient troops arrived, any frontline force would be relegated to scouting and outpost duty. Turkish attacks would have been futile and exposed the troops to unnecessary casualties. It is an optimistic assessment to estimate that sufficient forces for offensive purposes could be assembled within a week.
Once assembled in sufficient numbers to engage the troops at Beersheba, many valuable days would have elapsed granting the Allied troops time to consolidate their hold. However, it is doubtful if any Infantry Regiment could mount an adequate offensive. For pragmatic reasons and those discussed below, there is a very real possibility that only one Infantry Regiment might be deployed to contain the Allied force at Beersheba rather a whole division. This would be in line with the Turkish defensive doctrine of containing the superior forces of the Allied advance through small blocking engagements and so conceding territory in exchange of avoiding any major combat.
Most of Syrian based Turkish forces were committed to protecting the coastal lines of communication. This was particularly the case covering of the area adjacent to Gaza and Jaffa where divisions were tied to coastal defence. The constant raiding by the British Royal Navy seaplane carriers kept the fear of Allied invasion uppermost in the minds of the Ottoman General Staff, since it had been only a year since the Allied invasion of Gallipoli. This scarring experience of Gallipoli meant that the Turkish Army committed many divisions to the static defence of the coast. The Turkish forces would not be able to take the chance of releasing troops committed to coastal defence with a suspected outflanking seaborne invasion appearing on the coast. So while there were Ottoman forces at hand, they were very light in number for deployment in the defence of Beersheba.
Any move towards Beersheba would have caused consternation in the Ottoman forces. They would have to decide very quickly if the move by the mounted troops through El Auja was a feint or a real invasion. Their uncertainty would be increased by if this move to Beersheba was accompanied by coastal bombardments and air raids from British ships. The Ottomans did not have sufficient forces to cover both contingencies. Additionally, holding Beersheba would not remove the threat of sea invasion but instead reinforce the belief that such a move was part of an encircling strategy.65 Basically, the Ottoman forces would be paralysed until it was clear that there was no further offensive action from the Allied forces, by which time it would be too late to dislodge the Allied occupation of Beersheba.
Should such a daring thrust have been undertaken by Chauvel, Beersheba presented itself as a defensible citadel had it been captured on Christmas Day. With an additional battery of artillery coupled with ample supplies at Beersheba, a force of 7,000 men could have repulsed any attack mounted by the Turkish forces within the following month. As noted above, there was little likelihood of the Ottomans gathering a force of sufficient size to deal conclusively with the Allied force. During the period of initial occupation, it would have taken only 4 days for the first sizable infantry reinforcements to arrive from El Arish along with a protected and regular supply chain. The logistics train would be sheltered for exactly the same reasons it was shielded from the Allies the following year – the desert is a cruel place for anyone without water. The Allied forces did mount a successful raid to El Auja. This was conducted after rigorous scouting and engaging one Australian mounted division as a covering force. It was meticulously planned and carefully executed. In contrast, at the conclusion of 1916, due to the lack of developed water supplies en route, the logistical problem of moving a large formation of troops from El Shellal to El Auja in a flanking movement was beyond the ability of the Turkish forces. Within a week of occupation, the position of the Allied forces at the Beersheba garrison would have been unassailable.
For the Turkish forces, the threat of a flanking move to Rafa, as did happen on 9 January 1917, or a seaborne invasion would be even more probable rendering the fortifications at El Shellal untenable. The net result would have been the withdrawal of the Turkish forces to a fragile defensive line from Tel esh Sheria to Gaza, a position that similarly existed on 1 November 1917, 11 months later. Such a move would also greatly assist logistical operations since any rail construction need only cover an additional 80 kms from El Arish to El Auja, thereby adding to the combat capacity of any force based at Beersheba. Since the section from Um Shihan already possessed a permanent way, upgrading the decauville line to a heavy iron track suitable for trains could proceed as fast as the iron way was supplied taking less time than under normal circumstances. At the same time, preparations for an infantry push through Tel esh Sheria after the capture of Beersheba would threaten Gaza with encirclement and leave the city in an untenable situation. With the clarity of vision that hindsight produces, an assault on Beersheba appears possible with the result of bypassing Gaza which would avoid three costly and frustrating battles in 1917 and might well have shortened the war on this front by about a year.
General Murray66 had already clearly expressed a desire to see the capture of Beersheba some weeks prior to the capture of El Arish and Magdhaba. On 10 December, in an effort to outline his overall strategic goals Murray sent a cable to General Robertson67 where he said:
Occupation of this place would, moreover, have advantage of placing me on a railway. At Beersheba I should be only 70 miles from the Hejaz Line, against which my aircraft could co-operate daily. Further, I cannot but think our appearance at Beersheba would result in a rising of Arab population in southern Syria, who are known to be very disaffected towards Turks.68
This view had the backing of the new British Prime Minister, David Lloyd George, who was desperately casting around for a major propaganda victory to divert public attention away from the brutality and slaughter experience by the Allied troops on the Somme. General Maurice69 wrote General Lynden-Bell70 on 13 December:
The Prime Minister is very anxious, naturally, for some success to enliven the winter gloom which has settled upon England, and he looks to you to get it for him. He talks somewhat vaguely of a campaign in Palestine, and I think has at the back of his mind the hope of a triumphant entry into Jerusalem.71
The coming of Lloyd George seemed to herald a weakening of the original war policy articulated by General Robertson to Murray in a letter dated 4 October 1916 where he said:
Broadly speaking, and in connection with the war as a whole, the French front remains the main theatre of war, and the policy in Egypt therefore necessarily remains a defensive one.72
By December, Murray understood the political change and formulated a strategy in line with the new exigencies. Robertson did not contradict Murray’s goals. Instead, as time proved, Robertson materially added to Murray’s ability to prosecute his war strategy in Egypt.
So undertaking a well calculated gamble in taking Beersheba would have been plainly within the wishes of the Egyptian General Staff and the Prime Minister regardless of the policy expressed by the War Office. Although Lloyd George was keen to see Jerusalem captured and Kress indicated that this was highly possible, that would have entailed a tremendous risk since Jerusalem is highly susceptible to isolation through severing supply lines which unless are well protected, would be easy prey. Unless these lines could be properly secured, Jerusalem would have just turned into another siege similar to that of Kut73 earlier in the year with no prospects or hope of relief. The time frame required capturing Jerusalem during the small window of opportunity contrasted with ability of Allied forces to do so militated against each other making an early capture more a mirage than a practical reality. The lure of Jerusalem could well have been a reality a couple months later with reinforcements and a new offensive.
With Kress’s assessment coupled with the available Allied intelligence at the time of the Magdhaba battle, it clearly suggests that a viable opportunity existed. Was it ever considered by the Allies? Examination of all the available records indicates this idea did not even receive a fleeting consideration. Chauvel’s orders clearly stated that after the capture of Magdhaba, he was to return immediately to El Arish74 although this order was given prior to the successful conclusion of the battle. Perhaps it was feasible for Chauvel to undertake a daring push to Beersheba as the conditions appeared ripe for such an action but this choice was never exercised and so remains one of those great unknowns of the Sinai campaign.
A look at the two key generals involved might suggest an answer as to the idea failing to be canvassed. For Chetwode, he had just taken up his appointment as commander of the Desert Column in December so his familiarity of the terrain and fighting qualities of the Turkish formations in front of his forces would have been limited. Chetwode was an innovative soldier with a flair for the audacious as was demonstrated in the planning for the Third Battle of Gaza. In contrast, Chauvel appears to have been content to receive instructions to undertake forthright actions. This was demonstrated during the September 1918 campaign after the Desert Mounted Corps had achieved all its objectives. It was General Allenby who pressed Chauvel to consider moving his forces to Damascus rather than the other way round.75 This proved to be a self-assured move that destroyed the Ottoman’s will to resist any further. After the capture of Magdhaba, it would have been Chauvel’s role as the most experienced field General to make a suggestion to take Beersheba. The available evidence seems to suggest that this request would have been treated with keen interest.
With an array of powerful senior military and political backing, it is peculiar that not one reference regarding the Beersheba option occurs in any message passed between Chauvel and Chetwode.76 Even the lesser option of capturing Abu Aweigila was never canvassed by the two field generals despite it being part of the original orders. Subsequent to Magdhaba, the only papers in existence deal specifically with the minutiae of Allied consolidation of the positions around El Arish in preparation for further operations. Historically, Abu Aweigila seems to have been a handy pivot for invasions too and from the Sinai so its importance should have been realised. The Turks used Abu Aweigila when attacking the Suez Canal in 1915 and 1916, actions not lost upon various Israeli generals who used the same route for the invasions of 1948, 1956 and 1967. The reason why no discussion occurred between Chetwode and Chauvel about capturing Abu Aweigila and Beersheba will remain another of the Sinai Campaign’s enduring mysteries. Perhaps it just never occurred to them at the time or perhaps they thought it was too difficult or maybe they had other pressing issues occupying their energy, but since nothing was recorded, it will remain unknown.
While an interesting piece of speculation, this idea of Kress avoids some facts about the Allied force confronting him. In making his assessment, it can only be assumed that Kress believed the mounted troops facing him had similar training as given to the Uhlans of Germany. In contrast, the men of Australian and New Zealand were citizen soldiers with little military tradition, let alone training. Rather than being in the colours for years as occurred with European conscripts, these men had to be available for combat after a few months’ basic training. Unless Kress had faulty intelligence reports, he would have known this at the time Magdhaba fell. Kress observed an army in the making while in contrast his assessment was pertinent to a well-trained and confidently led field army. This apparent conflict in Kress’s assumptions and conclusion seem to say more about him as a General who, from pique, appears to be grasping at straws to salve pride from an obvious and emphatic defeat.
Magdhaba was the first occasion in which the mounted Australian and New Zealand forces acted successfully as an independent Division. It was here that they learned the elements of autonomous cavalry warfare. They succeeded in carrying out a plan of limited scope with clearly defined objectives. Magdhaba gave the Anzac Mounted Division a taste of victory coupled with the men gaining a sense of confidence in their abilities.
For the Australian and New Zealand mounted forces, 1916 was a learning period with Magdhaba serving as their graduation day. By the end of the war, the two mounted divisions proved to be devastatingly effective military machines as they systematically dismantled the Ottoman forces in Palestine and drove Turkey to the peace table. As the years have worn on, their exploits became the subject of legends. Magdhaba began the legend.
Acknowledgements
No work is a solitary affair. I would like to express my thanks to the following people for their creative input: Barry Bamford; Steve Becker; Bryn Dolan; Harry Fecitt; Andrew Kilsby; Gareth Morgan, Tosun Saral; and, Mesut Uyar, although I alone take full responsibility for the final essay. In addition, assistance from the long suffering staff at the Australian War Memorial and the National Library of Australia was given promptly and with good cheer. Finally, I would also express my deepest appreciation to Lyn Kelly who was always an unending source of encouragement from the very beginning of this project.
Bibliography
1st Light Horse Brigade War Diary, AWM4-10-1-29, December 1916.
AWM 252-A90
AWM File 45 11/15
Cutlack, FM, The Australian Flying Corps In The Western And Eastern Theatres Of War 1914-1918, 11th Edition, Angus & Robertson, Sydney, 1941.
Deputy Quartermaster General, General Headquarters, Egyptian Expeditionary Force, AWM4, 1/7/5 Part 1 - December 1916 and AWM4, 1/7/5 Part 2 - December 1916.
Falls, Captain Cyril, Military Operations: Egypt and Palestine, Volume I, London, 1928.
Field Service Pocket Book, 1914.
General Staff, Headquarters ANZAC Mounted Division, AWM4, 1/60/10 - December 1916.
General Staff, General Headquarters, Egyptian Expeditionary Force, AWM4, 1/6/9 Parts 3 & 4 - December 1916.
Grainger, John D. The Battle for Palestine, 1917, Boydell & Brewer, Woodbridge, 2006.
Gröschel, Dieter & Ladek, Jürgen, "Wings Over the Sinai and Palestine", Over the Front, Vol 13 No 1, Spring 1998 Edition.
Gullett, HS, The Australian Imperial Force in Sinai and Palestine: 1914 - 1918, 10th edition, Angus and Robertson, Sydney, 1941. Volume VII - First World War Australian Official Histories.
Hodges, Ian, "The battle of Magdhaba", Wartime, Issue 21, Australian War Memorial, 2003.
Intelligence Summaries, General Headquarters, Egyptian Expeditionary Force, December 1916, AWM4-1-9-10.
Kressenstein, Friedrich Freiherr Kress von, Mit den Tèurken zum Suezkanal, 1938.
Letter from Chauvel to Birdwood dated 7 January 1917, AWM 252 A95.
Military Handbook on Palestine, Third Provisional Edition, June 30, 1917, Cairo, 1917
Nicol, C.G., The Story of Two Campaigns, Official war history of the Auckland Mounted Rifles Regiment, 1914 - 1919 in the Battlefields of Gallipoli, Sinai and Palestine during WWI, Wilson and Horton, 1921.
Ordnance Work in Connection with the AIF in Egypt, 1919, AWM 224 MSS 507.
Political Intelligence, General Headquarters, Egyptian Expeditionary Force, AWM4, 1/10/1 - December 1916.
Sanders, Liman von, Five years in Turkey, 1927.
Sheffy, Yigal, British Military Intelligence in the Palestine Campaign 1914-1918, London, 1998.
Turkish General Staff, Birinci Dünya Harbi'nde Turk harbi. Sina - Filistin cephesi, Harbin Ba?langicindan ?kinci Gazze Muharebeleri Sonuna Kadar, IVncu Cilt 1nci Kisim, Ankara 1979. (Sinai-Palestine Front from the beginning of the war to the end of the 2nd Gaza Battle, Volume 4, Part 1.)
Woodward, David R., Hell in the Holy Land: World War I in the Middle East, University of Kentucky Press, 2006.
Footnotes
1 - Bill Woerlee is a consultant who lives in Canberra.
2 - Kressenstein, Friedrich Freiherr Kress von, Mit den Tèurken zum Suezkanal, (1938), pp 207-8.
3 - General Friedrich Freiherr Kress von Kressenstein [24 April 1870 – 16 October 1948] General Officer Commander of the Suez Expeditionary Force which raided the Suez Canal in January 1915 and again in April 1916. He was commonly known as Kress.
4 - General Sir Harry Chauvel [16 April 1865 - 4 March 1945], General Officer Commander of the Anzac Mounted Division until 1917 when he was promoted to command the Desert Mounted Corps consisting of the Anzac Mounted Division and Australian Mounted Division.
5 - During the attack on Magdhaba, the Anzac Mounted Division left El Arish with the 1st & 3rd LH Bdes, New Zealand Mounted Rifle Brigade and it was accompanied by the Imperial Camel Corps, and three Artillery formations: the Inverness and Leicester Batteries, Royal Horse Artillery; and, The Hong Kong & Singapore Battery, a composite force of about 7,000 men.
6 - Implicit in the analysis but no overtly stated are assessments of as the ability for the mounted troops to remain effective as a force after a period of sustained combat for many concurrent days without regular supply. The four occasions taken into consideration includes the breakout of 7 November 1917, the two Es Salt raids of March and April 1918 and the September breakout of 1918. Each example demonstrated that the proposal of Kress examined in the essay was well within the ability of the mounted troops.
7 - Ahmed Djemal Pasha (Turkish: Ahmet Cemal Pa?a) [6 May 1872 – 21 July 1922] led the Ottoman army against Allied forces in Egypt. His First and Second Suez Canal Offensives failed.
8 - Turkish officers’ were granted honorifics to describe the different ranks: Effendi - Lieutenant and Captain; Bey - Major and Colonel; and, Pasha - General.
9 - Letter from Desert Column Headquarters, C/144/52 to OC Military Railways, dated 27 November 1916 and signed by Lieut. Col. VM Fergusson, AWM 45 11/15.
10 - Turkish General Staff, Birinci Dünya Harbinde Türk Harbi, IV ncü Cilt, Ankara, 1978, p. 426.
11 - Intelligence Summaries, General Headquarters, Egyptian Expeditionary Force, AWM4, 1/9/10 - December 1916.
12 - British Intelligence estimates of the numbers around the El Arish area were as at 3 December - El Arish: 1,485 men and 9 guns; Bir el Masaid: 5,430 men, 12 guns & 5 machine guns. Intelligence Summaries, General Headquarters, Egyptian Expeditionary Force, December 1916, AWM4-1-9-10.
13 - General Staff, Headquarters ANZAC Mounted Division, AWM4, 1/60/10 - December 1916.
14 - Turkish General Staff, op. cite, p. 429.
15 - The organisation of Turkish infantry formations from smallest to largest – squad, platoon, company, battalion, regiment, division, corps and army. There were usually 3 Battalions to an Infantry Regiment although at times 4 Battalions were attached. Infantry Regiments were the equivalent to the Allied Infantry Brigades.
16 - A Turkish squad contained between 6-10 men, depending upon the strength of the unit.
17 - Turkish General Staff, op. cite, p. 439.
18 - Ibid, p. 429. This included elements from the 8th Engineers Battalion, 3rd Company; 27th Medical Company; 43rd Mobile Hospital; and, the 46th Cooking Unit.
19 - The nature of the polyglot and multi-ethnic composition of the Ottoman Empire meant that ethnic elements within the Empire had little sense of identification with Ottoman goals. The only group that firmly embraced the Ottoman participation were the Anatolian Turks, the bedrock of the Ottoman Empire. The Syrians were alienated from Ottoman rule, especially after the capricious and despotic behaviour exercised by Djemal Pasha in Damascus during 1915. From that time Syrian loyalty was always suspect.
20 - General Staff, Headquarters ANZAC Mounted Division, AWM4, 1/60/10 - December 1916.
21 - Kress, op. cite, p. 207
22 - Nicol, C.G., The Story of Two Campaigns, Official war history of the Auckland Mounted Rifles Regiment, 1914 - 1919 in the Battlefields of Gallipoli, Sinai and Palestine during WWI, Wilson and Horton, 1921, p. 132.
23 - General Staff, Headquarters ANZAC Mounted Division, AWM4, 1/60/10 - December 1916.
24 - General John Macquarie Antill [26 January 1866 - 1 March 1937] General Officer Commanding the 3rd Australian Light Horse Brigade until 8 August 1916.
25 - This included a 1,000 man force from the 39th IR, the 603 and 606th MGC’s, a mountain battery, and a company of engineers. From this number, about 700 men escaped to Bir el Abd leaving behind 308 prisoners including Germans from the MGC’s.
26 - Gullett, HS, The Australian Imperial Force in Sinai and Palestine: 1914 - 1918, 10th edition, Angus and Robertson, Sydney, 1941, p. 171.
27 - General Philip Walhouse Chetwode, 1st Baron Chetwode, 7th Baronet of Oakley [21 September 1869–6 July 1950]. Chetwode was transferred to Egypt in December 1916 commanding the Desert Column in the Egyptian Expeditionary Force
28 - Letter from Chetwode to Chauvel, dated 21 December 1916, AWM 45 11/15.
29 - General Staff, Headquarters ANZAC Mounted Division, AWM4, 1/60/10 - December 1916.
30 - Ibid.
31 - Sheffy, Y., British Military Intelligence in the Palestine Campaign 1914-1918, London, 1998, p. 207.
32 - Brigadier General Guy Payan Dawnay, [b. 23 March 1878, d. 19 January 1952], Central Staff, Egyptian Expeditionary Force.
33 - Letter from Central Staff, Eastern Force, O.Y.2/16 to CO Desert Column Headquarters, dated 18 December 1916 and signed by Brig Gen GP Dawnay, AWM 45 11/15.
34 - Turkish General Staff, op. cite, p. 429.
35 - 1st Light Horse Brigade War Diary, December 1916, AWM4-10-1-29, p. 20.
36 - General Charles Frederick Cox, [2 May 1863 - 20 November 1944], General Officer Commanding the 1st Australian Light Horse Brigade.
37 - Gullett, HS, The Australian Imperial Force in Sinai and Palestine: 1914 - 1918, 10th edition, Angus and Robertson, Sydney, 1941, p. 221.
38 - 1,280 Ottoman prisoners were taken at Magdhaba which included: Unwounded – 1,210 men; Wounded – 40 men; and, a mixed party of 30 men brought in later. 45 Officers were captured and 97 Ottoman dead were buried by the Allies.
39 - This tactical outcome was articulated in a letter from Central Staff, Eastern Force, Marked O.Y.2/16 to CO Desert Column Headquarters, dated 18 December 1916 and signed by Brig Gen GP Dawnay, AWM 45 11/15; and see also General Staff, General Headquarters, Egyptian Expeditionary Force, AWM4, 1/6/9 Part 3 - December 1916.
40 - General Staff, Headquarters ANZAC Mounted Division, AWM4, 1/60/10 - December 1916.
41 - Cutlack, FM, The Australian Flying Corps In The Western And Eastern Theatres Of War 1914-1918, 11th Edition, Angus & Robertson, Sydney, 1941, p. 49.
42 - Allied casualties were: 5 Officers killed and 7 wounded; 17 Other Ranks killed and 117 wounded; and, 27 horses killed.
43 - Tibbin: For ease of transport, the Arabs and Turks chop straw into a manageable size and then strap it together with twine. The specific product is called "tibbin". It is a common method of presenting fodder for horses and camels throughout the Levant.
44 - Ordnance Work in Connection with the AIF in Egypt, 1919, AWM 224 MSS 507
45 - Falls, Captain Cyril, Military Operations: Egypt and Palestine, Volume I, London, 1928, p. 263.
46 - General Staff, Headquarters ANZAC Mounted Division, AWM4, 1/60/10 - December 1916.
47 - The Allied force carried over a million rounds of small arms ammunition and expended about 400,000 rounds at Magdhaba.
48 - Military Handbook on Palestine, Third Provisional Edition, June 30, 1917, Cairo, 1917, p. 76.
49 - Field Service Pocket Book, 1914, pp. 188-90.
50 - Military Handbook on Palestine, p. 28.
51 - Turkish General Staff, op. cite, p. 429.
52 - General Staff, General Headquarters, Egyptian Expeditionary Force, AWM4, 1/6/9 Part 4 - December 1916.
53 - General Staff, General Headquarters, Egyptian Expeditionary Force, AWM4, 1/6/9 Part 3 - December 1916; and, Intelligence Summaries, General Headquarters, Egyptian Expeditionary Force, AWM4, 1/9/10 - December 1916.
54 - Intelligence Summaries, General Headquarters, Egyptian Expeditionary Force, AWM4, 1/9/10 - December 1916.
55 - Military Handbook on Palestine, p. 41.
56 - The Royal Engineers developed the wells at Khalasa during October 1917 which allowed them to partially service the Desert Mounted Corps on its way to attack Beersheba.
57 - Intelligence Summaries, General Headquarters, Egyptian Expeditionary Force, December 1916, AWM4-1-9-10.
58 - General Staff, General Headquarters, Egyptian Expeditionary Force, AWM4, 1/6/9 Part 3 - December 1916
59 - Letter from Chauvel to Birdwood dated 7 January 1917, AWM 252 A95.
60 - Flieger Abteilung is the German air combat equivalent of the Allied squadron.
61 - Gröschel, Dieter & Ladek, Jürgen, "Wings Over the Sinai and Palestine", Over the Front, Vol 13 No 1, Spring 1998 Edition, p. 29.
62 - Kress, op. cite, p.208.
63 - Intelligence Summaries, General Headquarters, Egyptian Expeditionary Force, December 1916, AWM4-1-9-10.
64 - Turkish General Staff, op. cite, p. 435.
65 - The fear of invasion was taken very seriously. At the beginning of January 1917 the General Officer Commanding the 3rd ID, Refet Bey sent a report to 1nci Kuvvei Seferiye (The 1st Expeditionary Force Command) pointing out the difficulties in mounting an adequate defence of the line from Tel el Fara to Khan Yunis as it left the flank open to British naval bombing from the sea. The report was acted upon by the 1nci Kuvvei Seferiye. The 4th Army Headquarters agreed and work commenced upon fortifying the el Shellal defensive line. Turkish General Staff, op. cite, p. 447.
66 - General Sir Archibald James Murray [23 April 1860 - 21 January 1945], Commander in Chief of the Egyptian Expeditionary Force.
67 - General Sir William Robert Robertson, [29 January 1860 – 12 February 1933], Chief of the Imperial General Staff, War Office 1915-1918.
68 - Woodward, David R., Hell in the Holy Land: World War I in the Middle East, University of Kentucky Press, 2006, p. 53.
69 - General Sir Frederick Barton Maurice [19 January 1871-19 May 1951], Director of Military Operations of the Imperial British General Staff, 1915-1918.
70 - General Sir Arthur Lynden Lynden-Bell [1867- 14 February 1943] Chief of Staff of the Egyptian Expeditionary Force.
71 - Woodward, op. cite, p. 55.
72 - Extract from letter dated 4 October 1916 from Sir William Robertson to G.O.C. Egypt, AWM 252-A90
73 - Kut-al-Amara, a town south of Baghdad, was where the 6th (Poona) Division of the Indian Army was surrounded by a Turkish force on 7 December 1915. After a siege of 147 days, on 29 April 1916, the commander, General Townshend surrendered his force of 13,000 men to the Turks.
74 - General Staff, Headquarters ANZAC Mounted Division, AWM4, 1/60/10 - December 1916.
75 - “When Chauvel told him that scarcely a Turk had crossed the Esdraelon plain or the river near Beisan, he [Allenby] for the first time mentioned the northern ride which was to conquer Syria, seize the Baghdad railway at Aleppo, and so bring to a sudden end the campaign in Mesopotamia. “What about Damascus?” he abruptly asked Chauvel: and the Australian, who never wasted his words, replied: “Rather."” Gullett, op. cite, p. 728.
76 - The author has conducted a search of all Regimental, Brigade, Division and Egyptian Expeditionary War Diaries, Routine Orders, Special Orders, Operational Reports and signals traffic. To date, no document exists of an enquiry about taking Beersheba from Chetwode or Chauvel.
Further Reading:
The Battle of Magdhaba, Sinai, December 23, 1916, Roll of Honour, Australia and New Zealand
Battles where Australians fought, 1899-1920
Citation: The Battle of Magdhaba, Sinai, December 23, 1916, Magdhaba and Kress
