


Topic: AIF - 4B - 11 LHR
The Battle of Maghara
Sinai, 15 October 1916
11th LHR, AIF, Unit History Account
[From Hammond, between p. 56 and p. 57.]
Ernest W. Hammond, in 1984, produced the unit history for the 11th LHR called the History of the 11th Light Horse Regiment, Fourth Light Horse Brigade, Australian Imperial Forces, war 1914-1919, which included a section specifically related to the Battle of Maghara and is extracted below.
Hammond, EW, History of the 11th Light Horse Regiment, Fourth Light Horse Brigade, Australian Imperial Forces, war 1914-1919, (Singapore 1984)
CHAPTER IX. DESERT RAIDS. MAGHARA.
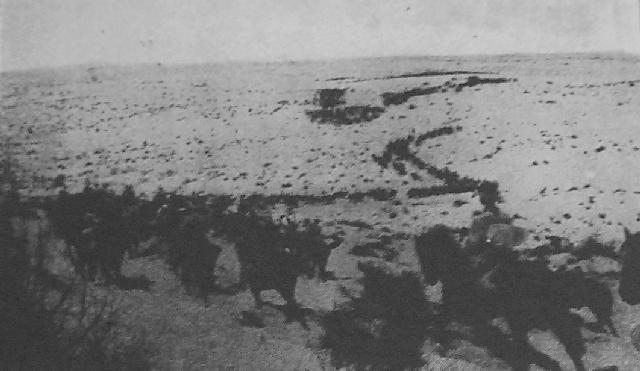
In 1916 the Turkish forces held a line which ran sheer across the Desert of Sinai from Nekhl (the capital), in the south-east, to the Romani area in the north-west, where his right flank flirted with the Mediterranean coast. This frontier was not continuous, in the sense applied to a battle line of trenches, but, was hold by the establishment of strong posts at natural vantage points throughout the area. The country surrounding each stronghold was patrolled by enemy forces. In rapid succession the Turks had experienced a near-victory and a smashing defeat in the Oases of Ogratina, Katia and the Romani district. The Anzac Mounted Division and Imperial troops operating there were driving him back along the coast to El Arish, but his left flank still remained hinged to its original position in the south. He seemed reluctant to leave the strongholds he had established there and which were replete with telegraph station, ration and feed depots and stores of military equipment. Since his main attack had developed in the north, there seemed little likelihood of his attempting to break through on the Central Caravan Route, and eventually he would be compelled to withdraw from his south-eastern position and retire to Beersheba. The military strategist will tell you that it is a grave error of judgment to allow an enemy to retire peaceably from a given position if it can be prevented. An easy withdrawal heightens the morale of the retiring troops and engenders a feeling of impunity in them, and therefore it becomes the aim of an opposing force to change a retirement into a retreat. But in the sector mentioned above it was proposed that the Light Horsemen would accomplish even more than this. A force would be organised to carry out lightning raids on the enemy's two main strongholds Maghara and Nekhl, and thus compel a retreat rather than allow a retirement.
Accordingly, on the 9th October, Major-General Dallas was instructed to gather a force and attack Maghara, which lay in a chain of hills 80 miles from the Canal, Between Bayoud - our furthermost outpost - and Maghara there was a waterless stretch of 40 miles and we would require a considerable camel train to transport the water and rations required for men and horses. It transpired later that actually we did employ the largest camel and ration train used in the desert during the war. The force under General Dallas was made up of the following units. The 11th and 12th Light Horse Regiments, Imperial Camel Corps, City of London Yeomanry, the Hong Kong and Singapore light batteries and the machine gun sections of the 150th and 160th Infantry Brigades. The strength of the 11th Regiment at this time was 24 Officers, 437 Other Rans, 474 horses, 10 mules. Leaving the railhead at El Ferdan on the morning of the ninth, the column covered a distance of 14 miles the first day, camping that night at the wells of Hod el Bada. Major C. A. Lee, an officer of this Regiment, left us here to assume command of the 4th Camel Battalion.
One troop of "C" Squadron under Lieutenant LA Gordon was left at Bada to hold lines of communication, and a troop of "A" Squadron under 2nd Lieut. A. R. Brierty was sent to Jaffier on a similar mission. On the morning of the 10th the column moved to Mageibra, a distance of 15 miles, and on the following day we moved to Hod el Bayoud, where Major-General Dallas and staff joined the column to review his force prior to its advance across that vital stretch of dry waste between Bayoud and Maghara.
Paradoxically, night-marching was to be the order of the day, and so on the 11th, men and horses rested in the shade of the Bayoud palms, while legions of the Arab and Egyptian Labour Corps filled thousands of fantasses with water in preparation for the final dash to Maghara. By 5.30 in the evening, with camels loaded and horses saddled, we moved off in two echelons. The scene, as those long columns of mounted troops and heavily burdened camels moved out from the shadows of Bayoud, beggars description. A red sun dipped below the desert's rim, bathing the valleys in mauve and tipping the lofty sand dunes with crimson and gold. There was a brief period of twilight, but no darkness to follow the day, as a bright full moon rose quickly to disperse the pseudo-darkness, and flood the scene with its soft light.
Over the first few miles we made easy progress, but as the night wore on the column entered country where the sand dunes were high and close together. Frequently we dismounted to lead our horses up the steep sides of the soft sand hills, and our periods of rest came more often. Ordinary marching conditions in the desert call for a rest of ten minutes in every hour, but the road to Maghara was no ordinary one and ere long we rested our horses every half hour.
In the early hours of the morning we camped in the sand hills at Zagadan, and as there was no oasis here, we drew water from our transport supply. The following night we travelled to Rueiset, and on the night of the 14th we camped close to Rakwa and Barga, sentinel outposts of Maghara. The country we traversed on the night of the fourteenth had undergone a gradual change. The soft white sand of the desert had given way to a coarse stony rubble as we neared the foothills of Maghara. Maghara itself was the dominant height in a large cluster of hills, all of which were barren of vegetation and stony. The Wadi Safat Hamied had its source in the Maghara hills, and its course to the plain ran through a narrow pass between the smaller hills of Rakwa and Barga.
The plan of attack was as follows:
The force would be divided into two columns. One under Brig.-General S. F. Mott, comprising the 12th Light Horse, City of London Yeomanry, the 160th Machine Guns and the Hong Kong and Singapore Batteries would swing to the left, and after making a detour, try and reach the heights above Maghara. The second column, under the leadership of Colonel Grant, and comprising the 11th Light Horse, the Imperial Camel Corps and Machine Guns of the 150th Infantry, would send detachments to capture the outposts of Rakwa and Barga, and having done that, the main force would dash through the pass along the Wadi Hamied and attack Maghara. The Imperial Camel Corps was to be held in reserve at Barga. Time was the all-important element in this expedition, for unless we vacated the hills by sundown on the 15th we would have insufficient water to carry us back to the pools at Bayoud.
At 10 o'clock on the night of the 14th, the two columns moved off to carry out the plan of attack already mentioned. "A" Squadron acted as advance guard to this regiment, and at 2.30 a.m. we reached Rakwa. While the troops were riding into position to attack, a dense fog rolled down from the hills and it was impossible to proceed until it lifted. The desert was in a strange mood. A few minutes before the sky had been studded with brilliant stars, which disappeared as though by magic, to leave us floundering in the midst of a white fog that enveloped everything like a gigantic and ghostly blanket. At five paces distant the outline of a horse and rider was blurred and uncertain, at ten paces both were invisible. Previously we had traversed the dry and comparatively flat and sandy wastes of Sinai, where fogs are unknown, but the lofty hills and narrow passes of Maghara were not immune to this very natural phenomenon, and so we dismounted, waiting and fretting at the delay. An hour and a half passed before the fog showed signs of lifting, and when it did we mounted and pressed on, and just as the head of the column reached the Wadi it was fired upon, probably by Bedouins, and their action sufficed to warn the Turks of our approach, for a few minutes later we heard the stutter of a machine-gun higher up the Wadi. At this time the fog again descended upon us with increasing density, and being unable to locate the pass, we were compelled to retire some distance from the hills and await the dawn.
Some time later two troops of "B" Squadron of the Regiment were sent forward to reconnoitre, and they succeeded in capturing a post of seven Turks and four Bedouins. The fog had delayed us to such an extent that the original plan of attack was abandoned in favour of a demonstration against the enemy troops holding the hills overlooking the pass into Maghara. The right column, under the leadership of Colonel Grant, would attack three hills to the right of the pass which, for military convenience, were numbered Hills 1046, 1120 and 1121, whilst the left column, under Brigadier-General Mott, would attack Hill 935 on the left of the pass.
The fog began to lift as the troops moved across the open ground to the foothills, and before long we came under fire from the enemy trenches high up on the slopes above. Lieut. Gee and a troop of men worked their way into the mouth of the pass, but being subjected to machine-gun fire from the cliffs on both sides, they were compelled to retire.
"B" Squadron, led by Major Bailey, swung into the foot of Hill 1121 at the gallop, and dismounting, they worked their way up the slopes, driving the Turks before them. Meanwhile "C" Squadron, led by Major Parsons, with a superb dash across the open ground, reached the shelter of Hill 1046, and dismounting, the men fought their way from cover to cover up its scarred and ragged slopes. The machine-gun sections and the Hong Kong and Singapore Batteries concentrated a heavy fire on enemy sangars on both these hills, enabling the troops to advance rapidly, and ere long the enemy retreated to strongly fortified positions at Maghara.
"A" Squadron, under Major Loynes, had been left at Rakwa to "clean up" enemy snipers and stragglers, and having done so they rejoined the unit at 9.30 a.m. and were held in reserve.
The column under Brigadier-General Mott advanced some distance up the slopes of Hill 935, but realising that it was impossible to gain his objective in the time allowed, he wired the G.O.C. for instructions and was ordered to retire. The movement, involving both columns, was executed at noon and we returned to Rakwa to camp for the night.
The regiment suffered one fatal casualty, and we buried him there in a lonely grave, deep in the solitude of the Maghara Hills. A solitary grave, yet not so lonely, enriched as it is with the splendid memories we hold of our "cobber," Trooper Jack Leswell.
On the morning of the 16th we left Rakwa and proceeded by easy stages to our base at Ferdan Railhead, arriving there on the evening of the 21st.
It is worthy of note that on the previous day, i.e., the 20th October, 1916, while at the oasis of Hod el Bada, we recorded our votes on the Referendum regarding conscription in Australia.
A history of the Light Horse Campaign in the east would be incomplete without special reference to the splendid endurance of our Australian-bred horses. Many of them had no particular claim to breeding, according to the rules, but to us they were thoroughbreds in every sense of the word. Their epic dash across the desert to Maghara and back convinced us of their greatness.
Further Reading:
The Battle of Maghara, Sinai, 15 October 1916
Battles where Australians fought, 1899-1920
Citation: The Battle of Maghara, Sinai, 15 October 1916, 11th LHR, AIF, Unit History Account
Posted by Project Leader
at 12:01 AM EADT
Updated: Tuesday, 1 December 2009 10:20 PM EAST
