


Topic: AIF - Lighthorse
The Australian Light Horse
Notes on Squadron training for Light Horse
Major FA Maxwell
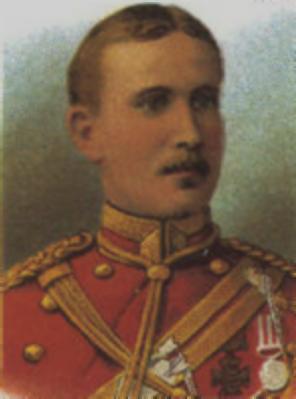
[VC Heroes - Boer War, Card No. 67.]
One of the better leaders of Light Horse in the British Empire, Major Francis Aylmer Maxwell, VC (Sannah's Post), DSO, was seconded for a short period to the Australian Commonwealth Military Forces from the 4 March 1910. As part of his duties, he was asked to give a lecture on the issues that he considered to be the essential points on training a good Light Horseman. The essay which emerged from his lecture notes detail the indispensable knowledge with precision based on hard won experience while gently chiding those who sort to use drill as a goal rather than a means to an end. Maxwell's lecture was published under the title Notes on Squadron training for Light Horse in the Military Journal, June 1911.
Maxwell, FA, Notes on Squadron training for Light Horse, Military Journal, June 1911, pp. 214 - 221.
Notes on Squadron training for Light Horse.
The object of this lecture is to give you a few new lights on how and what to teach squadrons, and, more particularly, troops.
The first and foremost thing I want to rub in is the absolute necessity of training for war, and excluding all that is useless in war or for war. This great principle is neglected by many squadron and troop commanders. The fault lies in the failure to distinguish recruit's training from that of the trained soldier, and we constantly and far too often see the trained soldier coming to parade without his horse, paddling about on his feet at foot-drill, and going through rifle exercises. Once the Light Horseman has passed through the recruit stage, he should leave foot drill and rifle exercises, and similar elementary work, for ever, and go right on to the real business of war.
Now, passing from what not to do, let us look into what we should work at to make ourselves efficient for war, taking the shortest cuts to do so.
First of all, for regimental and squadron work, the troop needs to be handy and mobile in drill, so that, when it is thrown into squadron, it takes its place without confusion. Now, fortunately for us, as so much of our work (in the 3rd Light Horse Brigade) is in troop, the foundation of all drill and manoeuvre is the suppleness and high training of the individual troop, which should be so well trained that it follows its leader unhesitatingly and correctly, no matter what is happening, to right, left, front, or behind.
Therefore, the first business of a troop leader is to make his command as handy and obedient as a polo pony, and there is no quicker method of doing so than by literally teaching it to play " follow my leader " behind him. It is a simple form of instruction: The troop leader gets out in front of hip troop, and without command or signal wheels it all angles of the wheel at the trot and gallop with, of course, considerable advances in between to shady the ranks. He starts at a very slow jog-trot for ten minutes or a quarter of an hour before thinking of increasing the pace to a slow canter or gallop, and so settles the men down and steadies the horses (which latter soon get like slugs thinking there is nothing in it !). The men learn to watch the troop leader's every movement for, unless absolutely alert, those on the outer flank will be all over the place when a wheel is made. They easily tumble to the game, and wheel like a regular troop. After fifteen minutes I have led a light horse troop, which never saw the game before, round and round, as if round a maypole, half-a-dozen men, the pivot man walking, the flank at full gallop, and then moved straight ahead again, the troop following at a perfectly easy pace, and perfectly steady, as if it had been at the job daily for months.
If a troop can play this game moderately well, it has, in my opinion, learnt all its mounted drill, and, in addition, each man in it has learnt that he must look to his troop leader for everything always, and realizes that the troop is the unit to which, and to which only, he belongs.
Combined with the following leader exercise, rapid dismounting and mounting should be practised. Halt the troop, and give the commands, "prepare to dismount" - "dismount," almost simultaneously, and see that the men are off and the even members up in line in two ticks of your watch. Similarly order "prepare to mount" and "mount" close on top of the other, and walk on yourself, by which you will discover the slow ones, who will be seen waltzing around trying to mount, while at the same time you inculcate the principle (if "follow my leader" again, for each man mounted at once moves up behind you. If dismounting and mounting are slow - very slow at first, it uncommonly soon becomes a point of honour not to be left behind, and there is nothing like this method to get the business done. It is a matter of the first importance to mounted rifles to be able to mount and dismount quickly, but it is not realized by squadron and troop commanders in peace; in war it very soon becomes apparent, possibly too much so.
The above is about all the "drill" there is for a troop. It learns to advance by section or file in the recruit stage, and no time should be wasted on increasing or diminishing of front.
When you get troops together in squadron, start them off, individually, for at least a quarter of an hour's "follow my leader." Then bring them together, and move about in column of troops, wheeling them in and cut of line (not for the sake of forming line, but to supple them); wheel troops about, form squadron, and immediately out of it, for a squadron does not need to advance in (unextended) line.
Practise forming squadrons at any pace you like, but never at the halt, so there is no object in practising it in peace. (Later I will explain why it is necessarily for a squadron to be able to form line as a preparation for forming extended line, which is a formation of great value to mounted rifles.)
Do not bother about the formation of column, of half squadrons, unless you an think of any use for it in war. I cannot.
For the rest, practise rapid dismounting and mounting as already described as a most essential part of your "drill."
And now come to what may be termed "fighting'" or "tactical" drill, or exercises as distinct from "drill" in the ordinary sense of the term. But where proceeding with this, it is first necessary to decide what we want, and why we want it; and this short discussion of light horse fighting methods.
First of all, have we tactics of our own or are we - as infantry regiments so persistently urge - to adopt those of infantry, whose characteristics differ so much from ours? Infantry have numbers and great fire power as their assets, while our deficiencies in both are compensated for, and more than made up to us, by our magnificent possession of mobility, if we know how to use it, and use it fully.
Consider the infantry mode of attack. It aims at reaching a position within effective range of the enemy, and there building up such a volume of fire as will crush the enemy and enable the assault to be made. The advance to this fire position, and the gradual piling up of men on it, is slow and costly, but infantry have the numbers to stand the racket.
Shall light horse attack on the same lines, and hope to succeed with their comparatively small numbers? Shall they throw away their mobility, hand over their horses to Nos. 3 (further reducing strength), and transform themselves into a feeble and un-numerous infantry?
If so, why not have a number of one-horse cabs, each of which will carry five or six men to the battle-field? It would be a great deal cheaper than providing each man with a horse to do the same thing, and if infantry complained of our luxury, and if we found it necessary to change our name from light horse to heavy what matter?
Surely it seems ridiculous to suppose for a moment that our methods are the same as those of infantry. Ours should be such as will minimize our deficiencies in numbers and fire power and magnify our possession of mobility. Briefly, our tactics are to rattle at the front door and enter the back; that is, we demonstrate or pin the enemy in front, and, no matter how far we have to go, we turn his flanks and threaten his rear. If we are acting in co-operation with infantry, it may be we only turn or operate on the flanks or rear; but acting alone we shall almost invariably have to play a tune in front as well.
Infantry choose what they believe to be the weakest point in the enemy's position as the objective of their main attack, and the intervening ground may have nothing to say in the matter. They simply go ahead and reach a point beyond which, till the enemy's resistance is overcome, they cannot move, but from which, as already stated, an effective and decisive fire can be poured on him.
Now, our frontal attack is different from the above, and we should choose our ground with the double object of giving us cover behind which we dismount on arrival at it, and at least a fairly effective fire position. We may not find it opposite the weakest point of the enemy's position; but find one we must or consent to walk on our few flat feet in the probably vain hope of arriving at a position within effective range of the enemy.
Say we have found such a position as indicated. It may be, if we are lucky, a. ridge; or it may be a knoll or hill, a creek, a farm, haystacks. How are we to get there? There is only one way in war, whatever peace may teach us, and that is to gallop there in extended order, and, if the range be not too great, covered by the fire of the other portions of our force (in the case of a squadron, say two troops).
Once the frontal attack has safely arrived and has got to work, the covering fire ceases, and the other two troops begin their turning movement, the route of which has previously been thoroughly well reconnoitred.
If the flank attack comes under any part of the enemy's position during its movement, the frontal attack troops devote all their energies to that part, and so divert the attention of the enemy from the flank attack, or at least make them uncomfortable. Immediately the enemy begins to feel the effect of the turning movement, and shows signs of evacuating his position, or some part of it, then will one or both of the first two (frontal attack) troops be ready to mount and gallop to what the enemy has left, and then assist the turning movement.
Thus the whole action is a series of alternate movements, in which one body covers and the other gains ground to flank or front.
Such is my conception of light horse action, and if it is sound and preferable to the purely infantry procedure, then we must try and fit ourselves for it by drill-ground practice, which will enable us to carry out the business on these lines on the field; for it must be remembered that, owing to lack of time, it is comparatively seldom that we can work out actual schemes under which to practise our tactical conceptions.
The following, then, are, I think, some of the exercises one can deduce from the above, and which we should, on non-scheme days practise and perfect ourselves in, so that when we do get into the field we at least have all the essentials of a fight at our finger tips:-
(1) Rapid extensions from troop or squadron
Rapid extensions from troop or squadron; for we may be surprised by fire, and have to extend at a moment's notice (in the preparation for a frontal attack we should probably start from behind cover or out of range, and would extend before getting off).
(2) Long advances in extended order at a steady pace and at the fastest.
Long advances in extended order at a steady pace and at the fastest. The greater our extension and rapidity of our pace the more difficult is the target we offer to the enemy.
(3) Rapid closing on leaders in any direction and at fastest pace
Rapid closing on leaders in any direction and at fastest pace; for, on arrival at our position, whether frontal or flank, we shall have to "close" under the cover we have looked (in the case of our frontal attack) so hard to find, because, whether that cover is small or large, we have to dispose of our horses as well as have men fairly concentrated for purposes of command. (I have frequently been asked why a troop should be closed before dismounting, and the above is the answer.)
(4) Rapid dismounting
Rapid dismounting, already explained under “follow my leader practice."
(5) Disposal of horses
Disposal of horses, of which there are numerous methods:
(a) "Action," when horses are handed to Nos. 3.
(b) " Linking."
(c) Throwing the reins of one troop to one man.
(d) Tying horses to a fence.
(e) Each man holding the reins over his arm while firing in the kneeling position, or hitched round his foot if lying down.
Of the above, neither (a) nor (b) are, in my experience, often employed on service.
As already explained, mounted rifles should always look for cover behind which to dismount, which means that the horses are actually at the fire position, or very close to it. Under such circumstances, it is waste of fire power to leave
one man in four to look after them, and waste of time to link; while the latter method is actually dangerous in wet weather, for when we are in a hurry to mount in order to push on or to retire, we find all the head-ropes have been pulled so tight as to be impossible to unfasten, and life and death delay occurs.
And, therefore, practical experience in war has found other methods than the above more useful, such as (c), (d), and (e). Under (c) method, the horse holder may be the worst shot; he easily holds the dozen horses, which of themselves get in a circle round him, leaving plenty of room between each for their riders to get to them again when "mount" is given. In regard to (d), in this country, as in South Africa, fences abound, and it takes but a moment to hitch the reins to one.
Always remember this dismounting under cover. You cannot dismount in the open under fire, at, say, 800 yards or under. (How often do we see people, surprised perhaps, dismounting on absolutely open ground within even 200 yards of the enemy?)
Suppose, for example, you have chosen a couple of hay rich as the best suitable cover within good shooting distance of the enemy. You gallop towards them in extended order, “class" when near them, and dismount behind them. You cannot fire over the risks, so must get your men out to one side or to both sides, or beyond them; if there is no cover whatever, they must do without, being amply satisfied with the enormous advantage of being brought to within perhaps effective range of the enemy with few, if any, casualties. But in nearly all cases there will be found cover to, which they can crawl, and sufficient to protect them.
When it is time to go on again you double the men back to carer, mount, and gallop on a method ordinarily infinitely preferable to that of pushing on like infantry and leaving your horses further and further behind. Still, there are possible occasions when this may be necessary, and if they can be foreseen, then Nos. 3 must be left with the horses, and the latter made really mobile when led. Personally, l would chance such occasions, put every rifle I could in the firing line, and, getting my men back to the horses close by, ride them on rather than have them led on. When it is a case of retiring, men running back to the horses (to mount under cover) offer a far smaller target than a mob of horses being led out into the open to be mounted. And not the least consideration in all this is the moral effect on the men of having horses in close proximity to them.
The last method (e) also requires explanation, because it is unorthodox as not being in the manual. It is particularly valuable when following up an enemy in retreat, and we have to travel after him at a great pace, and, when near him, dismount, and, without a moment's loss of time (i.e., loss of range), pour fire in on him, then, remounting, repeat the performance. Also, it is of the greatest possible value in fighting a rearguard action pressed by a vigorous enemy over open country offering no features as successive positions. The hottest thing of my small experience was fought under this method over a distance of 3 miles. There was not time to hand over horses to anybody, but each man of a unit dismounted, slung the reins over an arm, dropped on his knee, and opened fire the moment the unit or units nearest the enemy had cleared the front, and continued to do so until the latter had passed through and were dismounted in rear, when up he got and cleared with his unit in rear of them again.
If we can learn anything from the Boers, it is that they never, to the best of our knowledge, had horse-holders, at any rate, in the proportion of 1 to 4.
6. Protective measures when Dismounted.
When dismounted, throw out scouts always and without fail. Do so even on the drill-ground to flank, flanks, or rear. The manual speaks only of the serrefile N.C.O. keeping up communication between led horses and dismounted men, which I cannot help thinking is a waste of material, for Nos. 3 can well do this themselves. Nothing is said about protection of men and horses from surprise, particularly by cavalry, who, if they can stampede your horses, reduce light horse to a very helpless body of men. There are many ways by which they will try to do this, some of which I would like to instance, but space forbids.
Have, therefore, a man in every troop told off as a permanent scout, who, when the troop dismounts for fire action, remains mounted and receives instructions from his commander as to which direction he is to scout, and to what distance. Often two scouts may be necessary.
As already said, never omit this precaution even chi the drill ground. Send your scout to flank or rear even if working in an acre paddock, so that it becomes an instinct. Your serrefile will do all right, for the better the men the better will this most important business be carried out. (The object of the permanent scout remaining mounted is to remind the leader of his existence and the necessity of it.)
7. Fire Discipline.
We must pay the greatest attention to this, the elder brother of all good shooting, and without which shooting loses half its value.
As an arm, we are very weak in this all-important matter. Infantry more fully recognise Fire Discipline, which includes more than the words appear to mean, as the great factor of their work. It embraces among other things:-
(a) The choice of target and its indication.
(b) Estimation of range.
(c) Choice of fire, rapid or slow, continuous or in bursts.
(d) Control over expenditure of ammunition and its replenishment.
(e) Absolute, rigid control over the unit, and instant obedience by all ranks to the commander's orders.
The indication of target clearly, quickly, and in as few words as possible is not easy by any means, and requires much practice. If badly indicated, men will be firing at all sorts of things, and not “following my leader" in the true sense of the word.
Time prevents even a short discussion of the whole of this important subject, but one thing I want to remind you of very particularly, and that is the use of the whistle. We all, of course, know the long drawn-out blast of the "Cease Fire," but what about the short sharp blast we hear so often when mounted, and which calls our attention to a signal about to be made? It is just as useful for the same purpose of attracting our attention when dismounted, and should be in constant use in order to get that perfect control over fire which is so absolutely essential.
As this short whistle blast is a novelty to some, let me explain its use by an example or two.
Your troop (say) is firing at infantry at 700 yards, when another party opens fire on you from another direction. You wish to switch the fire of half your, men on to this lot. Blow a short blast, on which every man of your troop stops firing on the instant, and waits with ears pricked for the new command. You give it - Nos. 1 and 2 sections continue as before; Nos. 3 and 4 at the infantry half left near farm house 800 yards (or you may leave the range to senior section commander). Nothing further, and all will begin firing again without any other command.
In practising this, be sure to see that not a rifle goes off after the "attention" whistle sounds, and drop like a cart-load of lead on any man that lets his off.
Blank ammunition is generally issued, therefore take it out to every Parade - lots of it. It adds reality and interest, and where there is the latter there is a day out for efficiency. In the above business of fire discipline and the use of the short whistle you can check the men disobedient to it, which you would not be able to do without blank, as the click of a released spring is often inaudible. Constantly check, or get a serrefile to check, the sights and see if the men are all firing at the target you have named. Allow no slip-shodness.
If you order rapid fire see that you get it, and not less than ten rounds a minute at that. Do not by any means always give the order to "unload" after “cease fire." (I notice that numbers of men unload after only being given the command "cease fire" - which is quite incorrect.) "Cease fire" simply means "stop firing and raise your safety catch." You may have more business on hand further ahead - possibly further back - and if so you will open fire so much the quicker if you are not unloaded.
Briefly to recapitulate:-
(a) We learn “drill" and rapid dismounting, and mounting in the “follow my leader” practice; and
(b) We learn what may be called “fighting” or “tactical” exercises by practising the following extensions:-
Advances in extended line.
Closing from extended line.
Dismounting, and disposal of horses in various ways.
Scouting while dismounted.
Fire discipline.
Finally, anything we do must, if we are to preserve and encourage the true spirit of light horse, be full of jump and dash.
Further Reading:
Australian Light Horse Militia
Battles where Australians fought, 1899-1920
Citation: The Australian Light Horse, Notes on Squadron training for Light Horse Major FA Maxwell
