Topic: AIF - 3B - 9 LHR
9th LHR, AIF
War Diary, 13 April

Pro Gloria et Honore - For Glory and Honour
Regimental March - Marching Through Georgia
The Diary
1914
Monday, April 13, 1914
See 4th Military District, South Australia for militia activities.
1915
Tuesday, April 13, 1915
9th Light Horse Regiment Location - Mena Camp, Egypt.
9th Light Horse Regiment War Diary - No entry.
Carew Reynell Diary - No entry.
1916
Thursday, April 13, 1916
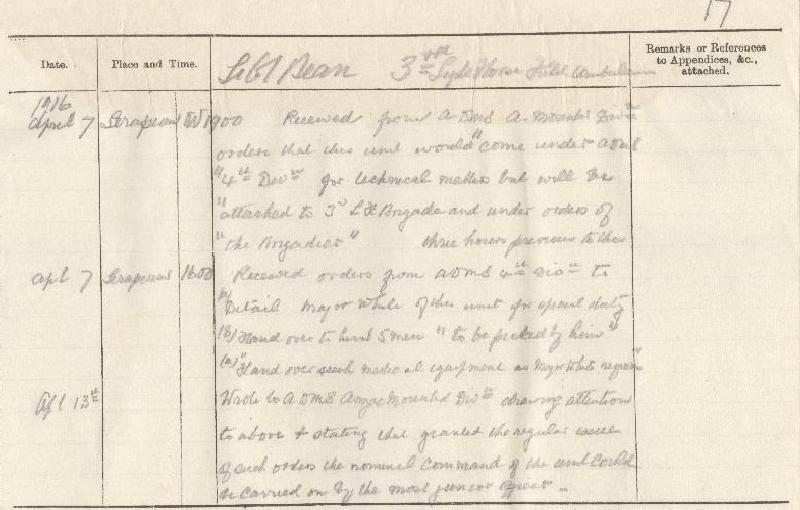
9th Light Horse Regiment Location - Serapeum, Egypt.
9th Light Horse Regiment War Diary - No entry.
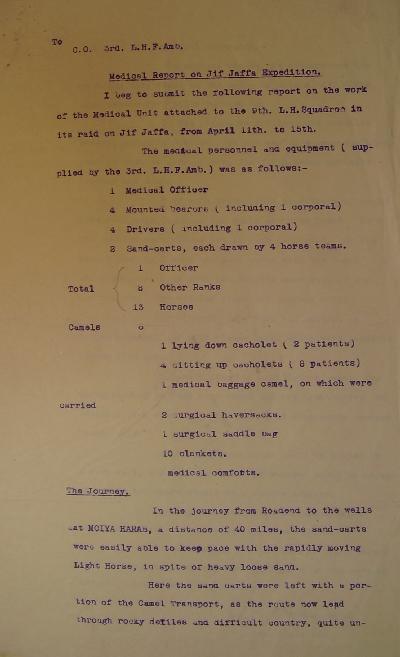
The Jifjafa column reached point 1340, about eight miles from the enemy camp, at 0230 hours and bivouacked until 0530 hours. Here the Bikanir Camel Corps, Wireless Section and Transport were left under the command of Capt Ragless. The column marched on until it reached Hill 1082 and halted there at 0730 hours, and awaited a message from a reconnaissance aeroplane to be dropped. At 0800 hours the message "All was clear" was dropped and it was decided to launch the attack on the enemies position at Jifjafa from this point.
Major Scott with the attacking force to the south of Hill 1082, out of view of the Turkish position at Bir el Jifjafa, observed the enemy camp with field glasses to assess the best means to launch the attack. He had been informed by the pilot of the reconnaissance aircraft that the Turks retired to the hills when the aeroplanes flew over and returned to the camp only after the planes had passed on.
One troop under the command of Lt J. M. McDonald, 9th LHR was despatched to gallop out for about a mile west around the enemy's position and occupy a ridge north-west of the Turkish camp. Another troop under the command of Lt W. S. Pender, 9th LHR was sent out north-east, past the southern part of the enemy's works, then turn and take up a position at the northern rear of the camp.
1917
Friday, April 13, 1917
9th Light Horse Regiment Location - Deir el Belah
9th Light Horse Regiment War Diary - The Regiment undertook routine work for the day.
1918
Saturday, April 13, 1918
9th Light Horse Regiment Location - Selmieh
9th Light Horse Regiment War Diary - Commanding Officer inspection at 1400.
Two Officers and 180 men proceeded to Corps hot baths Jaffa.
1919
Sunday, April 13, 1919
9th Light Horse Regiment Location - Zagazig
9th Light Horse Regiment War Diary - Voluntary church services.
One mounted troop patrolled El Aslugi - Shubra el Nakhla reporting all quiet.
Previous: 9th LHR AIF War Diary, 12 April
Next: 9th LHR AIF War Diary, 14 April
Sources:
See: 9th Australian Light Horse Regiment, Contents
Australian Light Horse Studies Centre, AIF War Diaries of the Great War, Site Transcription Policy
Further Reading:
9th Australian Light Horse Regiment, Roll of Honour
Battles where Australians fought, 1899-1920
Citation: 9th LHR AIF War Diary, 13 April