« August 2008 »
S M T W T F S
1 2
3 4 5 6 7 8 9
10 11 12 13 14 15 16
17 18 19 20 21 22 23
24 25 26 27 28 29 30
31
You are not logged in. Log in


Search the site:


powered by FreeFind
Volunteer with us.

Entries by Topic All topics  
A Latest Site News
A - Using the Site
AAA Volunteers
AAB-Education Centre
AAC-Film Clips
AAC-Photo Albums
AIF & MEF & EEF
AIF - Lighthorse
AIF - ALH - A to Z
AIF - DMC
AIF - DMC - Or Bat
AIF - DMC - Anzac MD
AIF - DMC - Aus MD
AIF - DMC - British
AIF - DMC - BWI
AIF - DMC - French
AIF - DMC - Indian
AIF - DMC - Italian
AIF - DMC - Medical
AIF - DMC - Remounts
AIF - DMC - Scouts
AIF - DMC - Sigs
AIF - DMC - Sigs AirlnS
AIF - DMC - 1 Sig Sqn
AIF - DMC - 2 Sig Sqn
AIF - DMC - Eng
AIF - DMC - Eng 1FSE
AIF - DMC - Eng 2FSE
AIF - DMC - GSR
AIF - 1B - 1 LHB
AIF - 1B - 6 MVS
AIF - 1B - 1 LHMGS
AIF - 1B - 1 Sig Trp
AIF - 1B - 1 LHFA
AIF - 1B - 1 LHR
AIF - 1B - 2 LHR
AIF - 1B - 3 LHR
AIF - 2B - 2 LHB
AIF - 2B - 7 MVS
AIF - 2B - 2 LHFA
AIF - 2B - 2 LHMGS
AIF - 2B - 2 Sig Trp
AIF - 2B - 5 LHR
AIF - 2B - 6 LHR
AIF - 2B - 7 LHR
AIF - 3B - 3 LHB
AIF - 3B - 8 MVS
AIF - 3B - 3 LHB Sigs
AIF - 3B - 3 LHFA
AIF - 3B - 3 LHMGS
AIF - 3B - 3 Sig Trp
AIF - 3B - 8 LHR
AIF - 3B - 9 LHR
AIF - 3B - 10 LHR
AIF - 4B - 4 LHB
AIF - 4B - 4 Sig Trp
AIF - 4B - 9 MVS
AIF - 4B - 4 LHFA
AIF - 4B - 4 LHMGS
AIF - 4B - 4 LHR
AIF - 4B - 11 LHR
AIF - 4B - 12 LHR
AIF - 5B - 5 LHB
AIF - 5B - 10 MVS
AIF - 5B - 5 LHFA
AIF - 5B - 5 Sig Trp
AIF - 5B - ICC
AIF - 5B - 14 LHR
AIF - 5B - 15 LHR
AIF - 5B - 1er Regt
AIF - 5B - 2 NZMGS
AIF - AASC
AIF - Aboriginal LH
AIF - Badges
AIF - Cars
AIF - Chinese LH
AIF - Double Sqns
AIF - Engineers
AIF - Fr - 22 Corps
AIF - Fr - 13 LHR
AIF - Honour Roll
AIF - HQ - 3rd Echelon
AIF - Marching Songs
AIF - Misc Topics
AIF - NZMRB
AIF - NZMRB - AMR
AIF - NZMRB - CMR
AIF - NZMRB - EFT
AIF - NZMRB - NZMFA
AIF - NZMRB - NZMGS
AIF - NZMRB - OMR
AIF - NZMRB - Sig-Trp
AIF - NZMRB - WMR
AIF - Ships
AIF - Ships - Encountr
AIF - Ships - Una
AIF - WFF
AIF - Wireless Sqn
Battles
BatzA - Australia
BatzA - Broken Hill
BatzA - Liverpool
BatzA - Merivale
BatzB - Boer War
BatzB - Bakenlaagte
BatzB - Belmont
BatzB - Bothaville
BatzB - Buffels Hoek
BatzB - Coetzees Drift
BatzB - Diamond Hill
BatzB - Driefontein
BatzB - Elands
BatzB - Graspan
BatzB - Grobelaar
BatzB - Grootvallier
BatzB - Hartebestfontn
BatzB - Houtnek
BatzB - Karee Siding
BatzB - Kimberley
BatzB - Koster River
BatzB - Leeuw Kop
BatzB - Mafeking
BatzB - Magersfontein
BatzB - Modder River
BatzB - Onverwacht
BatzB - Paardeberg
BatzB - Palmietfontein
BatzB - Pink Hill
BatzB - Poplar Grove
BatzB - Rhenoster
BatzB - Sannahs Post
BatzB - Slingersfontn
BatzB - Stinkhoutbm
BatzB - Sunnyside
BatzB - Wilmansrust
BatzB - Wolvekuil
BatzB - Zand River
BatzG - Gallipoli
BatzG - Anzac
BatzG - Aug 1915
BatzG - Baby 700
BatzG - Evacuation
BatzG - Hill 60
BatzG - Hill 971
BatzG - Krithia
BatzG - Lone Pine
BatzG - Nek
BatzJ - Jordan Valley
BatzJ - 1st Amman
BatzJ - 2nd Amman
BatzJ - Abu Tellul
BatzJ - Es Salt
BatzJ - JV Maps
BatzJ - Ziza
BatzM - Mespot
BatzM - Baghdad
BatzM - Ctesiphon
BatzM - Daur
BatzM - Kurna
BatzM - Kut el Amara
BatzM - Ramadi
BatzN - Naval
BatzN - AE1
BatzN - Cocos Is
BatzN - Heligoland
BatzN - Marmara
BatzN - Zeebrugge
BatzN - Zeppelin L43
BatzNG - Bitapaka
BatzO - Other
BatzO - Baku
BatzO - Egypt 1919
BatzO - Emptsa
BatzO - Karawaran
BatzO - Peitang
BatzO - Wassa
BatzP - Palestine
BatzP - 1st Gaza
BatzP - 2nd Gaza
BatzP - 3rd Gaza
BatzP - Aleppo
BatzP - Amwas
BatzP - Ayun Kara
BatzP - Bald Hill
BatzP - Balin
BatzP - Beersheba
BatzP - Berkusieh
BatzP - Damascus
BatzP - El Auja
BatzP - El Buggar
BatzP - El Burj
BatzP - Haifa
BatzP - Huj
BatzP - JB Yakub
BatzP - Kaukab
BatzP - Khan Kusseir
BatzP - Khuweilfe
BatzP - Kuneitra
BatzP - Megiddo
BatzP - Nablus
BatzP - Rafa
BatzP - Sasa
BatzP - Semakh
BatzP - Sheria
BatzP - Surafend
BatzP - Wadi Fara
BatzS - Sinai
BatzS - Bir el Abd
BatzS - El Arish
BatzS - El Mazar
BatzS - El Qatiya
BatzS - Jifjafa
BatzS - Magdhaba
BatzS - Maghara
BatzS - Romani
BatzS - Suez 1915
BatzSe - Senussi
BatzWF - Westn Front
BW - Boer War
BW - NSW
BW - NSW - 1ACH
BW - NSW - 1NSWMR
BW - NSW - 2NSWMR
BW - NSW - 3ACH
BW - NSW - 3NSWIB
BW - NSW - 3NSWMR
BW - NSW - 5ACH
BW - NSW - A Bty RAA
BW - NSW - AAMC
BW - NSW - Aust H
BW - NSW - Lancers
BW - NSW - NSW Inf
BW - NSW - NSWCBC
BW - NSW - NSWIB
BW - NSW - NSWMR_A
BW - NZ
BW - Qld
BW - Qld - 1ACH
BW - Qld - 1QMI
BW - Qld - 2QMI
BW - Qld - 3ACH
BW - Qld - 3QMI
BW - Qld - 4QIB
BW - Qld - 5QIB
BW - Qld - 6QIB
BW - Qld - 7ACH
BW - QLD - AAMC
BW - SA
BW - SA - 1SAMR
BW - SA - 2ACH
BW - SA - 2SAMR
BW - SA - 3SACB
BW - SA - 4ACH
BW - SA - 4SAIB
BW - SA - 5SAIB
BW - SA - 6SAIB
BW - SA - 8ACH
BW - SA - AAMC
BW - Tas
BW - Tas - 1ACH
BW - Tas - 1TIB
BW - Tas - 1TMI
BW - Tas - 2TB
BW - Tas - 2TIB
BW - Tas - 3ACH
BW - Tas - 8ACH
BW - Vic
BW - Vic - 1VMI
BW - Vic - 2ACH
BW - Vic - 2VMR
BW - Vic - 3VB
BW - Vic - 4ACH
BW - Vic - 4VIB
BW - Vic - 5VMR
BW - Vic - 6ACH
BW - Vic - AAMC
BW - Vic - Scot H
BW - WA
BW - WA - 1WAMI
BW - WA - 2ACH
BW - WA - 2WAMI
BW - WA - 3WAB
BW - WA - 4ACH
BW - WA - 4WAMI
BW - WA - 5WAMI
BW - WA - 6WAMI
BW - WA - 8ACH
BW Gen - Campaign
BW Gen - Soldiers
BW General
Cavalry - General
Diary - Schramm
Egypt - Heliopolis
Egypt - Mena
Gen - Ataturk Pk, CNB
Gen - Australia
Gen - Legends
Gen - Query Club
Gen - St - NSW
Gen - St - Qld
Gen - St - SA
Gen - St - Tas
Gen - St - Vic
Gen - St - WA
Gm - German Items
Gm - Bk - 605 MGC
GW - 11 Nov 1918
GW - Atrocities
GW - August 1914
GW - Biographies
GW - Propaganda
GW - Spies
GW - We forgot
Militia 1899-1920
Militia - Area Officers
Militia - Inf - Infantry
Militia - Inf - 1IB
Militia - Inf - 2IB
Militia - Inf - 3IB
Militia - Inf - NSW
Militia - Inf - Qld
Militia - Inf - SA
Militia - Inf - Tas
Militia - Inf - Vic
Militia - Inf - WA
Militia - K.E.Horse
Militia - LH
Militia - LH - Regts
Militia - LH - 1LHB
Militia - LH - 2LHB
Militia - LH - 3LHB
Militia - LH - 4LHB
Militia - LH - 5LHB
Militia - LH - 6LHB
Militia - LHN - NSW
Militia - LHN - 1/7/1
Militia - LHN - 2/9/6
Militia - LHN - 3/11/7
Militia - LHN - 4/6/16
Militia - LHN - 5/4/15
Militia - LHN - 6/5/12
Militia - LHN - 28
Militia - LHQ - Qld
Militia - LHQ - 13/2
Militia - LHQ - 14/3/11
Militia - LHQ - 15/1/5
Militia - LHQ - 27/14
Militia - LHS - SA
Militia - LHS - 16/22/3
Militia - LHS - 17/23/18
Militia - LHS - 24/9
Militia - LHT - Tas
Militia - LHT - 12/26
Militia - LHV - Vic
Militia - LHV - 7/15/20
Militia - LHV - 8/16/8
Militia - LHV - 9/19
Militia - LHV - 10/13
Militia - LHV - 11/20/4
Militia - LHV - 19/17
Militia - LHV - 29
Militia - LHW - WA
Militia - LHW-18/25/10
Militia - Military Orders
Militia - Misc
MilitiaRC - Rifle Clubs
MilitiaRC - NSW
MilitiaRC - NT
MilitiaRC - Qld
MilitiaRC - SA
MilitiaRC - Tas
MilitiaRC - Vic
MilitiaRC - WA
Militiaz - New Zealand
Tk - Turkish Items
Tk - Army
Tk - Bks - Books
Tk - Bks - 1/33IR
Tk - Bks - 27th IR
Tk - Bks - Air Force
Tk - Bks - Yildirim
Tk - POWs
Wp - Weapons
Wp - Hotchkiss Cav
Wp - Hotchkiss PMG
Blog Tools
Edit your Blog
Build a Blog
RSS Feed
View Profile
Open Community
Post to this Blog
Site Index
Education Centre
LH Militia
Boer War
Transport Ships
LH Battles
ALH - Units
ALH - General
Aboriginal Light H
Weapons
Ottoman Sources

"At a mile distant their thousand hooves were stuttering thunder, coming at a rate that frightened a man - they were an awe inspiring sight, galloping through the red haze - knee to knee and horse to horse - the dying sun glinting on bayonet points..." Trooper Ion Idriess

The Australian Light Horse Studies Centre aims to present an accurate history as chroniclers of early Australian military developments from 1899 to 1920.

The Australian Light Horse Studies Centre site holds over 12,000 entries and is growing daily.

Contact: Australian Light Horse Studies Centre

Let us hear your story: You can tell your story, make a comment or ask for help on our Australian Light Horse Studies Centre Forum called:

Desert Column Forum

WARNING: This site contains: names, information and images of deceased people; and, language which may be considered inappropriate today.

Saturday, 9 August 2008
Egyptian Expeditionary Force, Double Squadrons
Topic: AIF - Double Sqns
 
Egyptian Expeditionary Force

Double Squadrons.


Between 28 December 1915 and February 1917, there was an oversupply of men in the Light Horse Regiments. When flushed with such riches, these highly trained men were squandered on various other projects. This solved short term problems but sowed the seeds for an acute shortage of trained light horsemen towards 1918. No regiment was ever up to full war strength again with every precious replacement being fought over like water in the desert.

When there was a plethora of men in the Light Horse Training Regiments, those that did not go to the artillery or service corps but remained as potential Light Horse replacements were formed into active service units known as Double Squadrons charged with the purpose of guarding the Suez Canal. Each Double Squadron was named after the Brigade from whence it was drawn. So the 1st Double Squadron was drawn from the 1st Light Horse Brigade which comprised men from the 1st, 2nd and 3rd Light Horse Regiments. Similarly it was the same for the 2nd and 3rd Double Squadrons. These squadrons were formed in June 1916 although officially they were activated on 6 July 1916.

By November 1916 the threat to the Suez Canal had been removed and the purpose for the Double Squadrons no longer existed. The formations were broken up with most of the men from the Double Squadrons becoming the 4th Battalion of the Imperial Camel Corps on 2 November 1916. Here most remained until the Imperial Camel Corps was disbanded on 1 July 1918 and the men transferred to the newly formed 5th Light Horse Brigade.

Some from the 11th and 12th LHRs remained attached to the Double Squadrons until the formation of the 4th Light Horse Brigade in February 1917. With the new brigade, the last Double Squadron ceased to exist.


Further Reading:

Double Squadrons


Citation: Double Squadrons

Posted by Project Leader at 2:12 PM EADT
Updated: Wednesday, 5 August 2009 4:58 PM EADT
Cotter and the Gezireh Sports Club
Topic: AIF - 4B - 12 LHR

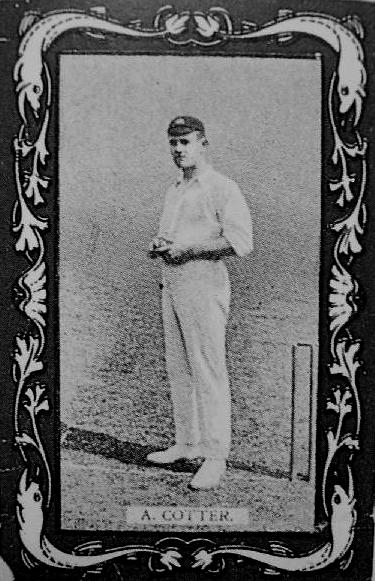
Albert (Tibby) Cotter, the Sydney Express, 1912

Much has been written about Albert (Tibby) Cotter. He was an extra-ordinary bowler with a pace that reached at least 160kmph. Cotter was feared by all who faced him in the international arena of test cricket. During the Great War, Cotter enlisted with the 12th Light Horse Regiment as 924 Tpr Albert Cotter.  He saw service at Gallipoli until his death at Beersheba on 31 October 1917. 

There are a number legends that surround Cotter. The most commonly known legend related to his bowling performance at the Gezireh Sports Club. Harold "Lol" Larwood, the nemisis of the Australian batsmen during the infamous "Bodyline" Series relates this anecdote. 

The Larwood Story by Harold Larwood, Sydney [1982] pp 53-54.

When I first went to Trent Bridge they were still talking about the terrifying speed of Albert (Tibby) Cotter, the human catapult who was reputedly a menace with the ball even when a boy in short pants playing for Forest Lodge public school in Sydney.

When he came into the game in Australia, Trumper, Noble, Duff, Hopkins, Syd and Charles Gregory were all in their prime, with colts like Bardsley, McCartney and Kelleway looming up behind.

Cotter was picked for Australia against England in the Fourth Test in Sydney in 1904 at the age of twenty-one, the youngest fast bowler to win Australian colours since Sammy Woods in 1888. Ernie Jones had finished his career by riding his bicycle into a water-cart and breaking his arm.

Although the returning Englishmen reported that Australia had un-earthed a new pace bowler nobody was prepared for the Cotter who demoralized English players in 1905 (he took 8 for 65 in the last Test). At Worcester he so unnerved the County team that he took 12 wickets for 34 in one day. He bagged 124 wickets on the tour, leaving behind many a set of bruised ribs. The Sydney Express, as they called him, was described on all sides as terrifying, his deliveries frequently playing about the ears.

Cotter won several Tests with his bowling and big hitting. And in a club game in Sydney he once hit 121 for Glebe in 64 minutes and for New South Wales against Victoria scored 68 in 20 minutes.

No cricket enthusiasts were surprised when Tibby was mentioned in despatches for gallantry in the First World War in bringing wounded out under heavy Turkish fire.

In March, 1916, when the war was at its height, a cluster of troops on leave renewed memories of more peaceful days when they gathered at the Gezireh Sports Club, Cairo, to watch a cricket match. The game was between a team of English troops and A.I.F. members. Some of the Australians were from the small headquarters staff left in Egypt after the Gallipoli evacuation, the rest were light-horsemen training for the campaign which eventually was to beat the Turks in Palestine.

The odds were on the Tommies. Several had played for English counties and their captain. Colonel J. W. H. T. Douglas, was the celebrated "Johnny" Douglas who had led England to victory against Australia and South Africa.

Expecting an easy win the Englishmen weren't prepared for the shock they got from a big and powerfully built light-horseman who was brought in from the Suez Canal and dressed for the match simply by discarding hat, shirt and leggings.

Apologizing for being a bit out of practice the Australian skittled the Tommies with short-pitched bumpers, yorkers that knocked bats out of some hands, full tosses which broke a couple of stumps and occasional good-length balls. Most were out before scoring. He then pasted the bowling all over the field before retiring to catch a train back to Suez.

A bullet ended Tibby Cotter's life. About eighteen months later, on October 20, 1917, he was shot through the head at Beersheba by a Turkish soldier, and was the first Australian international cricketer to be killed in war.

Another version of this story will appear in a subsequent post.


Citation: Cotter and the Gezireh Sports Club

Posted by Project Leader at 1:53 PM EADT
Updated: Saturday, 9 August 2008 2:17 PM EADT
Great War Attrocities, Introduction to the framework of atrocities
Topic: GW - Atrocities

Great War Attrocities

Introduction to the framework of atrocities


Hun Kultur

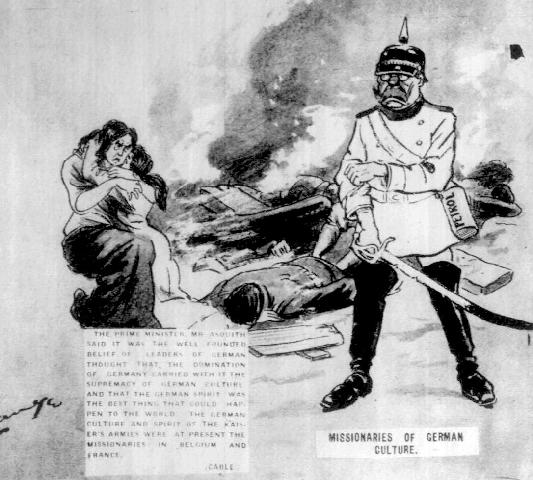
Western Mail, 25 September 1914, p. 24.

[Click on picture for larger version.]


The single thread that appears in all the press, cartoons, photographs, movies and the like of the Great War is the portrayal of the Germans as the bloodthirsty Hun.

The link to the following cartoon was the standard portrayal of the German soldier undertaking his dastardly handy work:

This theme is repeated ad nauseum throughout all the Australian press of the time right from the get go.

The aim is quite simple - to put into sharp relief the behaviour of the Germans when compared to that of the Australians. It is the simple but effective binary:

"Germans = evil;"
"Australians = good".


But how realistic is this picture?

Even when viewed through the vision of the times, cracks were already appearing in the story. It is important that these elements are explored since it is all too easy to gloss over the evil in pursuit of the excellence. But to ignore the evil that was perpetrated is to reduce oneself to the "evil" part of the equation for it makes the Australian story no better than the German Story as portrayed in the press at the time.

By dehumanising the Germans, it made it acceptable to perpetrate outrages against Australian citizens of German origin.

This may be an uncomfortable subject, but it is through discomfort that we understand who we are and where we have come from rather than who we would like to have been and build a fiction around that wish. So this is a reality check for all historians. There will be an exploration of allegations of attrocities committed by Australian soldiers, of which there are many. Some will have substance and others will be nothing more than myth and fantasy. But each known allegation shall be examined over time.


Further Reading:

Great War Attrocities


Citation: Great War Attrocities, Introduction to the framework of atrocities

Posted by Project Leader at 10:51 AM EADT
Updated: Wednesday, 5 August 2009 3:56 PM EADT
Tasmania, 1914, Brighton and Pontville
Topic: Gen - St - Tas

Tasmania, 1914

Brighton and Pontville Camps


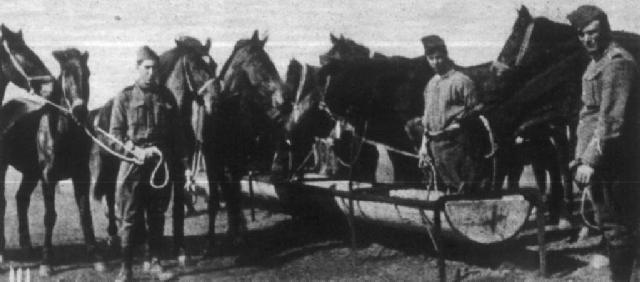
Watering Horses at Brighton Camp

[Photograph taken by William Williamson inThe Tasmanian Mail,  10 September 1914, p. 19.]
 
[Click on picture for larger version.]


Often mention is made in the early records to both Brighton and Ponville camps located just north of Hobart in Tasmania. At the outbreak of the Great War, the men from "C" Squadron, 3rd Light Horse Regiment trained at Brighton while the infantry trained at Pontville. Yet on a map they appear to be at the same location. To clear up any confusion, both camps are described below.


Brighton

Here is the AWM commentary:

Brighton is a small town 28 kilometres from the Tasmanian capital of Hobart. Brighton was one of five sites selected for townships in Tasmania by the Governor of New South Wales, Lachlan Macquarie, in 1821 and for a while was spoken of as a potential capital. A military post was established on the main Hobart-Launceston road at Brighton in 1826 beginning a military presence there that would last for over 170 years. Troops were prepared at Brighton Camp for service in both the First and Second World Wars, and it was also a site familiar to Tasmania's citizen soldiers throughout the Twentieth Century. In the later years of the Second World War Brighton Camp was also used to house prisoners of war and after the war it became a reception camp for refugees from Europe. From the early 1950s onwards, Brighton's primary use was for the training of members of the Citizens Military Forces and Later the Army Reserve. Such usage declined after 1993, and in 1999 it was one of several military camps across Australia used as a save haven for refugees from the conflict in Kosovo. Brighton Camp was closed and sold off soon after.

See:

http://www.awm.gov.au/units/place_1673.asp


Pontville

Extracted from the Aussie Heritage site:

Pontville's involvement in the First World War included volunteers and the establishment of the Australian Imperial Force (AIF) in Tasmania. The Pontville Army Camp was renamed Brighton Army Camp, becoming the focus of military training in Tasmania on 13 August 1914. An ordnance depot was established and volunteers trained as members of the Light Horse, the Field Artillery, Infantry, Engineers and Army Medical Corps. Prior to embarkation South Australian Troops were also in camp at Pontville, and with the Tasmanian Infantry were formed into the 12th Battalion. Historical photographs c.1914 clearly delineate the use of the area by Light Horse Soldiers and it is likely that the name of Rifle Hill, which occupies the centre of the range was named at that time, and that the rifle range was also completed at that time. The rifle range may also incorporate an earlier range used by the Derwent Company of volunteers, since it was usual to retain and develop existing ranges.
See:
Aussie Heritage - Pontville Small Arms Range


That answers the question. Pontville and Brighton camps are two different camps serving different arms of the AIF in 1914.

Just to add to the moment, here is a picture of some horsemen watering their horses at Brighton Camp.

Brighton Camp was also the home for the Medical Corps.

It is part of a series of pictures taken by William Williamson, a respected Hobart photographer. This picture is clearly identified as having been taken at Brighton.


Further Reading:

Tasmania, 1914


Citation: Tasmania, 1914, Brighton and Pontville

Posted by Project Leader at 10:33 AM EADT
Updated: Wednesday, 5 August 2009 4:54 PM EADT
Queensland, 1914, Farewells at Warwick and Kingaroy
Topic: Gen - St - Qld

Queensland, 1914

Farewells at Warwick and Kingaroy


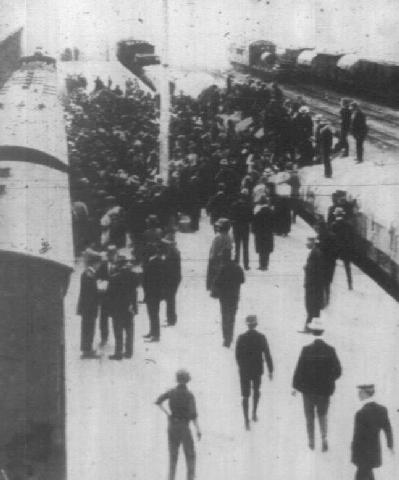
"All aboard!" Last farewells at Warwick Station.
 
[Photograph from The Queenslander, 5 September 1914, p. 28.]

[Click on picture for larger version.]


Warwick, south west from Brisbane and a few clicks south of Toowoomba. No ship to catch but there was the train station.

The following is a picture of the good folks crowding the rail station to give a farewell to the men ready to go to Enoggera.

It is a very busy scene with quite a large rail station. When I saw this picture, I hadn't realised just how big the station was at Warwick. There is a sign commemorating the historic rail station although I suspect that it does not do the scene justice as it understates the significance. Warwick is a town travellers pass through on the inland road journey to Brisbane.

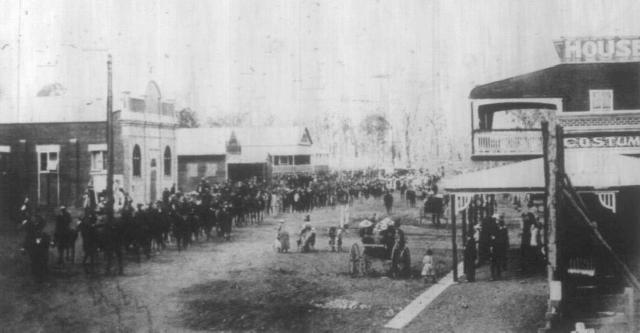
The next picture is from Kingaroy.


Parade moving along Haley St, Kingaroy
 
[Photograph from The Queenslander,  19 September 1914, p. 28.]
 
[Click on picture for larger version.]


The picture was taken as the troops march down the main street.

The pastoral scene of mothers and their children in the middle of the street give this pictue a wonderful bucolic flavour of simpler times. Behind them are buggies full of people viewing the parade. There is a feeling of both excitement but also a matter of fact scene. It portrays the essential laid back nature of the average Australian. The parade  looks as though it is going down Haley Street, Kingaroy.


Further Reading:

Queensland, 1914


Citation: Queensland, 1914, Farewells at Warwick and Kingaroy

Posted by Project Leader at 10:05 AM EADT
Updated: Wednesday, 5 August 2009 4:06 PM EADT

Newer | Latest | Older

Full Site Index


powered by FreeFind
Let us hear your story: You can tell your story, make a comment or ask for help on our forum.

Desert Column Forum

A note on copyright

The Australian Light Horse Studies Centre is a not for profit and non profit group whose sole aim is to write the early history of the Australian Light Horse from 1900 - 1920. It is privately funded and the information is provided by the individuals within the group and while permission for the use of the material has been given for this site for these items by various donors, the residual and actual copyright for these items, should there be any, resides exclusively with the donors. The information on this site is freely available for private research use only and if used as such, should be appropriately acknowledged. To assist in this process, each item has a citation attached at the bottom for referencing purposes.

Please Note: No express or implied permission is given for commercial use of the information contained within this site.

A note to copyright holders

The Australian Light Horse Studies Centre has made every endeavour to contact copyright holders of material digitised for this blog and website and where appropriate, permission is still being sought for these items. Where replies were not received, or where the copyright owner has not been able to be traced, or where the permission is still being sought, the Australian Light Horse Studies Centre has decided, in good faith, to proceed with digitisation and publication. Australian Light Horse Studies Centre would be happy to hear from copyright owners at any time to discuss usage of this item.

Contact

Australian Light Horse Studies Centre

eXTReMe Tracker