« October 2008 »
S M T W T F S
1 2 3 4
5 6 7 8 9 10 11
12 13 14 15 16 17 18
19 20 21 22 23 24 25
26 27 28 29 30 31
You are not logged in. Log in


Search the site:


powered by FreeFind
Volunteer with us.

Entries by Topic All topics  
A Latest Site News
A - Using the Site
AAA Volunteers
AAB-Education Centre
AAC-Film Clips
AAC-Photo Albums
AIF & MEF & EEF
AIF - Lighthorse
AIF - ALH - A to Z
AIF - DMC
AIF - DMC - Or Bat
AIF - DMC - Anzac MD
AIF - DMC - Aus MD
AIF - DMC - British
AIF - DMC - BWI
AIF - DMC - French
AIF - DMC - Indian
AIF - DMC - Italian
AIF - DMC - Medical
AIF - DMC - Remounts
AIF - DMC - Scouts
AIF - DMC - Sigs
AIF - DMC - Sigs AirlnS
AIF - DMC - 1 Sig Sqn
AIF - DMC - 2 Sig Sqn
AIF - DMC - Eng
AIF - DMC - Eng 1FSE
AIF - DMC - Eng 2FSE
AIF - DMC - GSR
AIF - 1B - 1 LHB
AIF - 1B - 6 MVS
AIF - 1B - 1 LHMGS
AIF - 1B - 1 Sig Trp
AIF - 1B - 1 LHFA
AIF - 1B - 1 LHR
AIF - 1B - 2 LHR
AIF - 1B - 3 LHR
AIF - 2B - 2 LHB
AIF - 2B - 7 MVS
AIF - 2B - 2 LHFA
AIF - 2B - 2 LHMGS
AIF - 2B - 2 Sig Trp
AIF - 2B - 5 LHR
AIF - 2B - 6 LHR
AIF - 2B - 7 LHR
AIF - 3B - 3 LHB
AIF - 3B - 8 MVS
AIF - 3B - 3 LHB Sigs
AIF - 3B - 3 LHFA
AIF - 3B - 3 LHMGS
AIF - 3B - 3 Sig Trp
AIF - 3B - 8 LHR
AIF - 3B - 9 LHR
AIF - 3B - 10 LHR
AIF - 4B - 4 LHB
AIF - 4B - 4 Sig Trp
AIF - 4B - 9 MVS
AIF - 4B - 4 LHFA
AIF - 4B - 4 LHMGS
AIF - 4B - 4 LHR
AIF - 4B - 11 LHR
AIF - 4B - 12 LHR
AIF - 5B - 5 LHB
AIF - 5B - 10 MVS
AIF - 5B - 5 LHFA
AIF - 5B - 5 Sig Trp
AIF - 5B - ICC
AIF - 5B - 14 LHR
AIF - 5B - 15 LHR
AIF - 5B - 1er Regt
AIF - 5B - 2 NZMGS
AIF - AASC
AIF - Aboriginal LH
AIF - Badges
AIF - Cars
AIF - Chinese LH
AIF - Double Sqns
AIF - Engineers
AIF - Fr - 22 Corps
AIF - Fr - 13 LHR
AIF - Honour Roll
AIF - HQ - 3rd Echelon
AIF - Marching Songs
AIF - Misc Topics
AIF - NZMRB
AIF - NZMRB - AMR
AIF - NZMRB - CMR
AIF - NZMRB - EFT
AIF - NZMRB - NZMFA
AIF - NZMRB - NZMGS
AIF - NZMRB - OMR
AIF - NZMRB - Sig-Trp
AIF - NZMRB - WMR
AIF - Ships
AIF - Ships - Encountr
AIF - Ships - Una
AIF - WFF
AIF - Wireless Sqn
Battles
BatzA - Australia
BatzA - Broken Hill
BatzA - Liverpool
BatzA - Merivale
BatzB - Boer War
BatzB - Bakenlaagte
BatzB - Belmont
BatzB - Bothaville
BatzB - Buffels Hoek
BatzB - Coetzees Drift
BatzB - Diamond Hill
BatzB - Driefontein
BatzB - Elands
BatzB - Graspan
BatzB - Grobelaar
BatzB - Grootvallier
BatzB - Hartebestfontn
BatzB - Houtnek
BatzB - Karee Siding
BatzB - Kimberley
BatzB - Koster River
BatzB - Leeuw Kop
BatzB - Mafeking
BatzB - Magersfontein
BatzB - Modder River
BatzB - Onverwacht
BatzB - Paardeberg
BatzB - Palmietfontein
BatzB - Pink Hill
BatzB - Poplar Grove
BatzB - Rhenoster
BatzB - Sannahs Post
BatzB - Slingersfontn
BatzB - Stinkhoutbm
BatzB - Sunnyside
BatzB - Wilmansrust
BatzB - Wolvekuil
BatzB - Zand River
BatzG - Gallipoli
BatzG - Anzac
BatzG - Aug 1915
BatzG - Baby 700
BatzG - Evacuation
BatzG - Hill 60
BatzG - Hill 971
BatzG - Krithia
BatzG - Lone Pine
BatzG - Nek
BatzJ - Jordan Valley
BatzJ - 1st Amman
BatzJ - 2nd Amman
BatzJ - Abu Tellul
BatzJ - Es Salt
BatzJ - JV Maps
BatzJ - Ziza
BatzM - Mespot
BatzM - Baghdad
BatzM - Ctesiphon
BatzM - Daur
BatzM - Kurna
BatzM - Kut el Amara
BatzM - Ramadi
BatzN - Naval
BatzN - AE1
BatzN - Cocos Is
BatzN - Heligoland
BatzN - Marmara
BatzN - Zeebrugge
BatzN - Zeppelin L43
BatzNG - Bitapaka
BatzO - Other
BatzO - Baku
BatzO - Egypt 1919
BatzO - Emptsa
BatzO - Karawaran
BatzO - Peitang
BatzO - Wassa
BatzP - Palestine
BatzP - 1st Gaza
BatzP - 2nd Gaza
BatzP - 3rd Gaza
BatzP - Aleppo
BatzP - Amwas
BatzP - Ayun Kara
BatzP - Bald Hill
BatzP - Balin
BatzP - Beersheba
BatzP - Berkusieh
BatzP - Damascus
BatzP - El Auja
BatzP - El Buggar
BatzP - El Burj
BatzP - Haifa
BatzP - Huj
BatzP - JB Yakub
BatzP - Kaukab
BatzP - Khan Kusseir
BatzP - Khuweilfe
BatzP - Kuneitra
BatzP - Megiddo
BatzP - Nablus
BatzP - Rafa
BatzP - Sasa
BatzP - Semakh
BatzP - Sheria
BatzP - Surafend
BatzP - Wadi Fara
BatzS - Sinai
BatzS - Bir el Abd
BatzS - El Arish
BatzS - El Mazar
BatzS - El Qatiya
BatzS - Jifjafa
BatzS - Magdhaba
BatzS - Maghara
BatzS - Romani
BatzS - Suez 1915
BatzSe - Senussi
BatzWF - Westn Front
BW - Boer War
BW - NSW
BW - NSW - 1ACH
BW - NSW - 1NSWMR
BW - NSW - 2NSWMR
BW - NSW - 3ACH
BW - NSW - 3NSWIB
BW - NSW - 3NSWMR
BW - NSW - 5ACH
BW - NSW - A Bty RAA
BW - NSW - AAMC
BW - NSW - Aust H
BW - NSW - Lancers
BW - NSW - NSW Inf
BW - NSW - NSWCBC
BW - NSW - NSWIB
BW - NSW - NSWMR_A
BW - NZ
BW - Qld
BW - Qld - 1ACH
BW - Qld - 1QMI
BW - Qld - 2QMI
BW - Qld - 3ACH
BW - Qld - 3QMI
BW - Qld - 4QIB
BW - Qld - 5QIB
BW - Qld - 6QIB
BW - Qld - 7ACH
BW - QLD - AAMC
BW - SA
BW - SA - 1SAMR
BW - SA - 2ACH
BW - SA - 2SAMR
BW - SA - 3SACB
BW - SA - 4ACH
BW - SA - 4SAIB
BW - SA - 5SAIB
BW - SA - 6SAIB
BW - SA - 8ACH
BW - SA - AAMC
BW - Tas
BW - Tas - 1ACH
BW - Tas - 1TIB
BW - Tas - 1TMI
BW - Tas - 2TB
BW - Tas - 2TIB
BW - Tas - 3ACH
BW - Tas - 8ACH
BW - Vic
BW - Vic - 1VMI
BW - Vic - 2ACH
BW - Vic - 2VMR
BW - Vic - 3VB
BW - Vic - 4ACH
BW - Vic - 4VIB
BW - Vic - 5VMR
BW - Vic - 6ACH
BW - Vic - AAMC
BW - Vic - Scot H
BW - WA
BW - WA - 1WAMI
BW - WA - 2ACH
BW - WA - 2WAMI
BW - WA - 3WAB
BW - WA - 4ACH
BW - WA - 4WAMI
BW - WA - 5WAMI
BW - WA - 6WAMI
BW - WA - 8ACH
BW Gen - Campaign
BW Gen - Soldiers
BW General
Cavalry - General
Diary - Schramm
Egypt - Heliopolis
Egypt - Mena
Gen - Ataturk Pk, CNB
Gen - Australia
Gen - Legends
Gen - Query Club
Gen - St - NSW
Gen - St - Qld
Gen - St - SA
Gen - St - Tas
Gen - St - Vic
Gen - St - WA
Gm - German Items
Gm - Bk - 605 MGC
GW - 11 Nov 1918
GW - Atrocities
GW - August 1914
GW - Biographies
GW - Propaganda
GW - Spies
GW - We forgot
Militia 1899-1920
Militia - Area Officers
Militia - Inf - Infantry
Militia - Inf - 1IB
Militia - Inf - 2IB
Militia - Inf - 3IB
Militia - Inf - NSW
Militia - Inf - Qld
Militia - Inf - SA
Militia - Inf - Tas
Militia - Inf - Vic
Militia - Inf - WA
Militia - K.E.Horse
Militia - LH
Militia - LH - Regts
Militia - LH - 1LHB
Militia - LH - 2LHB
Militia - LH - 3LHB
Militia - LH - 4LHB
Militia - LH - 5LHB
Militia - LH - 6LHB
Militia - LHN - NSW
Militia - LHN - 1/7/1
Militia - LHN - 2/9/6
Militia - LHN - 3/11/7
Militia - LHN - 4/6/16
Militia - LHN - 5/4/15
Militia - LHN - 6/5/12
Militia - LHN - 28
Militia - LHQ - Qld
Militia - LHQ - 13/2
Militia - LHQ - 14/3/11
Militia - LHQ - 15/1/5
Militia - LHQ - 27/14
Militia - LHS - SA
Militia - LHS - 16/22/3
Militia - LHS - 17/23/18
Militia - LHS - 24/9
Militia - LHT - Tas
Militia - LHT - 12/26
Militia - LHV - Vic
Militia - LHV - 7/15/20
Militia - LHV - 8/16/8
Militia - LHV - 9/19
Militia - LHV - 10/13
Militia - LHV - 11/20/4
Militia - LHV - 19/17
Militia - LHV - 29
Militia - LHW - WA
Militia - LHW-18/25/10
Militia - Military Orders
Militia - Misc
MilitiaRC - Rifle Clubs
MilitiaRC - NSW
MilitiaRC - NT
MilitiaRC - Qld
MilitiaRC - SA
MilitiaRC - Tas
MilitiaRC - Vic
MilitiaRC - WA
Militiaz - New Zealand
Tk - Turkish Items
Tk - Army
Tk - Bks - Books
Tk - Bks - 1/33IR
Tk - Bks - 27th IR
Tk - Bks - Air Force
Tk - Bks - Yildirim
Tk - POWs
Wp - Weapons
Wp - Hotchkiss Cav
Wp - Hotchkiss PMG
Blog Tools
Edit your Blog
Build a Blog
RSS Feed
View Profile
Open Community
Post to this Blog
Site Index
Education Centre
LH Militia
Boer War
Transport Ships
LH Battles
ALH - Units
ALH - General
Aboriginal Light H
Weapons
Ottoman Sources

"At a mile distant their thousand hooves were stuttering thunder, coming at a rate that frightened a man - they were an awe inspiring sight, galloping through the red haze - knee to knee and horse to horse - the dying sun glinting on bayonet points..." Trooper Ion Idriess

The Australian Light Horse Studies Centre aims to present an accurate history as chroniclers of early Australian military developments from 1899 to 1920.

The Australian Light Horse Studies Centre site holds over 12,000 entries and is growing daily.

Contact: Australian Light Horse Studies Centre

Let us hear your story: You can tell your story, make a comment or ask for help on our Australian Light Horse Studies Centre Forum called:

Desert Column Forum

WARNING: This site contains: names, information and images of deceased people; and, language which may be considered inappropriate today.

Sunday, 19 October 2008
The Battle of Beersheba, Palestine, 31 October 1917, ICC, AIF, Unit History Account
Topic: AIF - 5B - ICC

The Battle of Beersheba

Palestine, 31 October 1917

ICC, AIF, Unit History Account


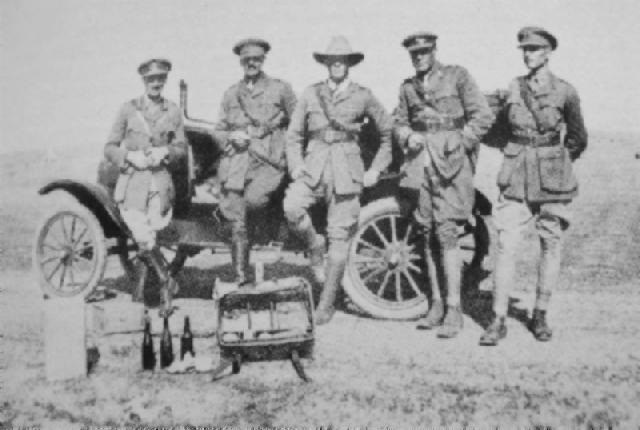
ICC GOC Brigadier General CL Smith and Staff looking over the Gaza position after its capture.

[From:  Langley, Sand, Sweat and Camels, plate facing p. 96.]


In 1976 George F and Edmee M Langley produced a unit history about the Imperial Camel Corps called: Sand, Sweat and Camels - The Story of the Australian Camel Corps, in which included a section specifically related to the battle of Beersheba and extracted below.

Langley, GF & EM, Sand, Sweat and Camels - The Story of the Australian Camel Corps, (Melbourne 1976), pp.  99 - 100:


[99] General Allenby realised the cost of a frontal attack on Gaza and the advantages of a flank attack. His aim was to occupy Beersheba on the left of the Turkish line, which would leave their flank exposed. He would then disorganise the Turk's whole plan of defence by hurling in his 20th Corps of infantry, four divisions strong, together with his Desert Mounted Corps and Camel Brigade. The 21st Corps was to move against the Gaza end of the line. The country to be covered was a bare rolling plain, without a single plantation, fence or hedgerow to shelter movements from a watchful apprehensive enemy and his German airmen.

Our railway line from Kantara was only eleven miles from Gaza and growing daily. The pipelines from the 'sweetwater' Canal had reached Rafa, providing a daily supply of hundreds of thousands of gallons of filtered, chlorinated water. Allenby's army (including Egyptian labourers) was close upon two hundred thousand men, in addition to some twenty thousand camels, forty-six thousand horses, fifteen thousand mules and a few thousand donkeys, all dependent on foodstuffs and water from outside sources. These railway and pipelines were being continued towards Beersheba. At Shellal a dam was constructed to hold five hundred thousand gallons-here arrangements were made to fill and load onto camels every hour two thousand fantassies, each containing ten or twelve gallons of water.

The Turks on the other hand presented a contrast highly favourable to the invading force. The Turkish army at this stage was ill-fed, wretchedly clothed, uncertain of its supply of munitions, and very low in spirit. Von Falkenhayn, the German leader of the Baghdad expedition was at dangerous variance with 'the mighty Djemal' as he contemptuously called the Turkish Governor of Syria. The `Young Turk' administration at Constantinople, with the Germans in full support had resolved to recapture Baghdad, which had been so brilliantly won by General Maude. On the other hand Djemal realised that Palestine must be cleared of the British before Baghdad could be taken. He also bitterly resented any interference or advice from the Germans, though, he had to appreciate the arms, and planes and technical services they gave him, which alone made his campaign possible. Neither Djemal nor [100] the German leaders believed it would be possible for Allenby to make his attack on the Beersheba flank, but fully expected the first blow to be made on Gaza, combined with a landing from the sea, north of that town. They were encouraged in this belief by the sham preparations made for a landing on the coast. When the Turks did decide to divert substantial forces from the Mesopotamia Expedition and send them to anticipate and frustrate Allenby’s assault, it was too late.

The Camel Corps dug in after dark on the hillsides, but during the night moved forward a mile and again would dig in . Under cover of darkness the Light Horse, Camel Corps, Artillery and London and Welsh Infantry congregated at the rendezvous within striking distance of Beersheba. The Londoners, at dawn, dashed forward and seized the Turks’ advanced position. Throughout the day, the Camel Corps Brigade took no active part in the battle and soon after dark it seemed probable that they would be wanted to clear the defences between the Gaza and Karm roads. However, the success of the main attack was soon evident and the works were evacuated.


Further Reading:
 
Imperial Camel Corps, AIF
 
Imperial Camel Corps, Roll of Honour 

The Battle of Beersheba, Palestine, 31 October 1917

Australian and New Zealand Roll of Honour

Battles where Australians fought, 1899-1920


Citation: The Battle of Beersheba, Palestine, 31 October 1917, ICC, AIF, Unit History Account

Posted by Project Leader at 8:20 AM EADT
Updated: Thursday, 8 October 2009 8:36 AM EADT
Colonel Husnu, Yildirim, Page 104
Topic: Tk - Bks - Yildirim

Another entry from the book written by Lieutenant Colonel Hüseyin Hüsnü Emir, called Yildirim. Every day, one page of the book will be posted. This is Page 104.


Colonel Hüsnü, Yildirim, Page 104.

[Click on page for a larger print version.]


These are events that led to the capture of Beersheba, 31 October 1917.


Further Reading:

List of all other Battle of Beersheba accounts  on the blog

Full listing of all material about Beersheba on the blog


Citation: Colonel Hüsnü, Yildirim, Page 104

Posted by Project Leader at 7:50 AM EADT
Updated: Sunday, 19 October 2008 7:51 AM EADT
Diaries of AIF Servicemen, Bert Schramm, 19 October 1918
Topic: Diary - Schramm

Diaries of AIF Servicemen

Bert Schramm

19 October 1918


Bert Schramm


2823 Private Herbert Leslie SCHRAMM, a 22 year old Farmer from Whites River, South Australia. He enlisted on 17 February 1916; and at the conclusion of the war Returned to Australia, 10 July 1919.

During part of the course of his military service with the AIF, Bert Schramm kept a diary of his life. Bert was not a man of letters so this diary was produced with great effort on his behalf. Bert made a promise to his sweetheart, Lucy Solley, that he would do so after he received the blank pocket notebook wherein these entries are found. As a Brigade Scout since September 1918, he took a lead part in the September Offensive by the Allied forces in Palestine. Bert's diary entries are placed alongside those of the 9th Light Horse Regiment to which he belonged and to the 3rd Light Horse Brigade to which the 9th LHR was attached. On this basis we can follow Bert in the context of his formation.


The Diaries

The complete diary is now available on the Australian Light Horse Studies Centre Site at:

Bert Schramm Diary


Finding more about a service person. See:

Navigating the National Archives Service File 


Bert Schramm's Handwritten Diary, 12 - 19 October 1918

[Click on page for a larger print version.]


Bert Schramm

Saturday, October 19, 1918

Bert Schramm's Location - Kaukab

Bert Schramm's Diary -  Five sections of us went on patrol to the village called Dumas north of Beirut Road. Had rather a long ride but nothing doing.

[5 Sections = 20 troopers. See: The Australian Light Horse - Structure and scroll down to Section for further information.]


9th Light Horse Regiment War Diary

9th Light Horse Regiment Location - Kaukab

9th Light Horse Regiment War Diary - Owing to the likelihood of rainy weather the Regiment at 1500 moved to a favourable bivouac site west of main road.

0830 Mueller, Lieutenant GLH; and, Hogan, Lieutenant LR, with troops proceeded on escort duty with 1,000 prisoners to Kuneitra.

9th LHR AIF War Diary, 19 October         


Darley

Darley, TH, With the Ninth Light Horse in the Great War, Adelaide, Hassell Press, 1924.

No Entry


Previous:  Bert Schramm's Diary, 18 October 1918

Next:  Bert Schramm's Diary, 20 October 1918


Sources Used:

Bert Schramm's Diary

National Archives Service File.

Embarkation Roll, AWM8.

Australian War Memorial Roll of Honour

Nominal Roll, AWM133, Nominal Roll of Australian Imperial Force who left Australia for service abroad, 1914-1918 War.


War Diaries and Letters

All War Diaries and letters cited on this site should be read in conjunction with the Australian Light Horse Studies Centre, War Diaries and Letters, Site Transcription Policy which may be accessed at:

Australian Light Horse Studies Centre, War Diaries and Letters, Site Transcription Policy 


Further Reading:

Bert Schramm Diary

Bert Schramm Diary, Album

Bert Schramm's Photo Album

9th Australian Light Horse Regiment, AIF

9th Australian Light Horse Regiment, War Diary, Day by Day Account

Battles where Australians fought, 1899-1920


Citation: Diaries of AIF Servicemen, Bert Schramm, 19 October 1918


Posted by Project Leader at 7:26 AM EADT
Updated: Thursday, 9 June 2011 9:48 AM EADT
9th LHR AIF War Diary, 19 October
Topic: AIF - 3B - 9 LHR

9th LHR, AIF

9th Light Horse Regiment

War Diary, 19 October

Pro Gloria et Honore - For Glory and Honour

Regimental March -  Marching Through Georgia


The following entries are extracted and transcribed from the 9th Light Horse Regiment War Diary, the originals of which are held by the Australian War Memorial. There are 366 entries on this site. Each day has entries as they occurred from 1914 to 1919. In addition to the 9th Light Horse Regiment War Diary, when appropriate, entries from the 3rd Light Horse Brigade War Diary and other regiments with the Brigade will also appear. Entries from the unit history, Darley, TH, With the Ninth Light Horse in the Great War, Adelaide, Hassell Press, 1924 will also appear from time to time. The aim is to give the broadest context to the story and allow the reader to follow the day to day activities of the regiment. If a relative happened to have served in the regiment during the Great War, then this provides a general framework in which the individual story may be told.


The Diary


1914

Monday, October 19, 1914

9th Light Horse Regiment Location -  Morphettville Race Course Camp and Broadmeadows Camp, Victoria. 

9th Light Horse Regiment War Diary - Formation of Regiment occurring at Morphettville Race Course Camp, Adelaide, while "C" Squadron is formed at Broadmeadows Camp, Victoria. 


1915

Tuesday, October 19, 1915

9th Light Horse Regiment Location - Rhododendron Spur

9th Light Horse Regiment War Diary - General Godley inspected the trenches today.


1916

Thursday, October 19, 1916

9th Light Horse Regiment Location - Bir Ganadil

9th Light Horse Regiment War Diary -


1917

Friday, October 19, 1917

9th Light Horse Regiment Location - Um Urgan

9th Light Horse Regiment War Diary - Stood to arms at 0500. C Squadron on night outpost. Quiet night. An agent was blindfolded and led through the outpost line and liberated after dark at 2000. Hogan, Lieutenant LR, returned from Port Said Rest Camp. Wilkinson, Captain R, returned from Cairo.


1918

Saturday, October 19, 1918

9th Light Horse Regiment Location - Kaukab

9th Light Horse Regiment War Diary - Owing to the likelihood of rainy weather the Regiment at 1500 moved to a favourable bivouac site west of main road.

0830 Mueller, Lieutenant GLH; and, Hogan, Lieutenant LR, with troops proceeded on escort duty with 1,000 prisoners to Kuneitra.


1919

Sunday, October 19, 1918

9th Light Horse Regiment Location - Adelaide

9th Light Horse Regiment War Diary - Regiment disbanded.


Previous: 9th LHR AIF War Diary, 18 October

Next: 9th LHR AIF War Diary, 20 October


Sources:

See: 9th Australian Light Horse Regiment, Contents
Australian Light Horse Studies Centre, AIF War Diaries of the Great War, Site Transcription Policy


Further Reading:

9th Light Horse Regiment AIF

Bert Schramm Diary

9th Australian Light Horse Regiment, Roll of Honour 

Battles where Australians fought, 1899-1920

 
Citation: 9th LHR AIF War Diary, 19 October

Posted by Project Leader at 7:05 AM EADT
Updated: Thursday, 16 September 2010 5:33 PM EADT
Saturday, 18 October 2008
The Battle of Beersheba, Palestine, 31 October 1917, 9th LHR, AIF, War Diary Account
Topic: AIF - 3B - 9 LHR

 The Battle of Beersheba

Palestine, 31 October 1917

9th LHR, AIF, War Diary Account


War Diary account of the 9th LHR, AIF.


The transcription:

31 October 1917

From Asluj to Iswaiwin the roads were in a fair order. Nature of country hilly and very stony in places. Arrived in vicinity of Iswaiwin at 1000. Half an hour prior to reaching this point Ayliffe, Lieutenant SH; and, his troops were dispatched north west and Mueller, Lieutenant GLH; and, his troop were dispatched due north. Their orders were to locate the enemy and report enemy's dispositions. Within one and half hours Ayliffe, Lieutenant SH, reported enemy holding Ras Ghannam in strength. Mueller, Lieutenant GLH, pushed further north than was anticipated and was unable to return within time thereby failing to rejoin the Regiment until 1830.

At 1400 Brigade Headquarters and 9th Light Horse Regiment moved from Iswaiwin to support New Zealand Mounted Rifle Brigade in their attack on Tel el Saba. On moving towards Bir Salim Abu Irgeig the Brigade came under enemy shell barrage but reached their first halting place Bir Salim Abu Irgeig without casualties. By this time 1500 the battle of Beersheba was developing. Our right flank consisting of mounted troops kept closing in on Beersheba from the east and south. All along the right flank now presented a wonderful sight. Mounted troops and horse artillery everywhere galloping for positions. Our artillery bombardment of enemy positions was intense. At Bir Salim Abu Irgeig the Regiment saw Tel el Saba surrender to the New Zealanders.

At 1515 the Regiment received orders to move to the right of the New Zealand Mounted Rifle Brigade and take up position at 1060 5 of V in Butein. Daly, Major TJ went forward to get in touch with New Zealand Headquarters. Nature of country between Bir Salim Abu Irgeig and 1060 was open slightly undulating and broken by two small wadis. The Regiment moved across this country in line of troop columns [column of Squadrons each Squadron in line of troop columns] at a steady trot jinking here and there to evade the shrapnel which was being fired at fairly short range. A small gully just south of 1060 was reached without a casualty at 1530. The enemy shelled this gully for 11/2 hours but failed to cause a casualty.

At 1700 orders were received to move and occupy the line 1040 and 960 east of Beersheba. When nearing the Tel el Saba redoubt an enemy aeroplane flying at about 800 feet bombed C Troop of C Squadron killing Leahy, 2815 Trooper CM; Morrison, 2939 Trooper DJ; and, wounding severely Linacre, Lieutenant FJ; and, Williams, Captain H; and, wounding nine Other Ranks. 19 horses were killed and 6 wounded. Many casualties were also inflicted on New Zealanders and No 1 Sub - Section of 3rd Machine Gun Squadron who was close by. At this point we learned that Beersheba had fallen. Heavy explosions were heard which afterwards proved to be the blowing up of the Beersheba wells. The Regiment watered in pools in Wadi Saba and took up and held an outpost line from 1040 to Tel el Saba which A and two troops of B Squadron held all night.

The distance from Khalasa to Iswaiwin is 32 miles and from Iswaiwin via Bir Salim Abu Irgeig - 1060 - Tel el Saba - 1040 is about nine miles. The horses and men stood this severe test splendidly. The last 8 miles owing to enemy artillery fire were particularly strenuous.


Roll of Honour

James Lowry BODKIN

Claude Michael LEAHY

Donald James MORRISON

Lest we forget


Map detailing the movement of the 9th LHR as per the War Diary, 31 October 1917


Further Reading:

9th Light Horse Regiment, AIF

9th Australian Light Horse Regiment, Roll of Honour 

The Battle of Beersheba, Palestine, 31 October 1917

Australian and New Zealand Roll of Honour

Battles where Australians fought, 1899-1920


Posted by Project Leader at 7:49 PM EADT
Updated: Tuesday, 6 October 2009 1:12 PM EADT

Newer | Latest | Older

Full Site Index


powered by FreeFind
Let us hear your story: You can tell your story, make a comment or ask for help on our forum.

Desert Column Forum

A note on copyright

The Australian Light Horse Studies Centre is a not for profit and non profit group whose sole aim is to write the early history of the Australian Light Horse from 1900 - 1920. It is privately funded and the information is provided by the individuals within the group and while permission for the use of the material has been given for this site for these items by various donors, the residual and actual copyright for these items, should there be any, resides exclusively with the donors. The information on this site is freely available for private research use only and if used as such, should be appropriately acknowledged. To assist in this process, each item has a citation attached at the bottom for referencing purposes.

Please Note: No express or implied permission is given for commercial use of the information contained within this site.

A note to copyright holders

The Australian Light Horse Studies Centre has made every endeavour to contact copyright holders of material digitised for this blog and website and where appropriate, permission is still being sought for these items. Where replies were not received, or where the copyright owner has not been able to be traced, or where the permission is still being sought, the Australian Light Horse Studies Centre has decided, in good faith, to proceed with digitisation and publication. Australian Light Horse Studies Centre would be happy to hear from copyright owners at any time to discuss usage of this item.

Contact

Australian Light Horse Studies Centre

eXTReMe Tracker