« October 2008 »
S M T W T F S
1 2 3 4
5 6 7 8 9 10 11
12 13 14 15 16 17 18
19 20 21 22 23 24 25
26 27 28 29 30 31
You are not logged in. Log in


Search the site:


powered by FreeFind
Volunteer with us.

Entries by Topic All topics  
A Latest Site News
A - Using the Site
AAA Volunteers
AAB-Education Centre
AAC-Film Clips
AAC-Photo Albums
AIF & MEF & EEF
AIF - Lighthorse
AIF - ALH - A to Z
AIF - DMC
AIF - DMC - Or Bat
AIF - DMC - Anzac MD
AIF - DMC - Aus MD
AIF - DMC - British
AIF - DMC - BWI
AIF - DMC - French
AIF - DMC - Indian
AIF - DMC - Italian
AIF - DMC - Medical
AIF - DMC - Remounts
AIF - DMC - Scouts
AIF - DMC - Sigs
AIF - DMC - Sigs AirlnS
AIF - DMC - 1 Sig Sqn
AIF - DMC - 2 Sig Sqn
AIF - DMC - Eng
AIF - DMC - Eng 1FSE
AIF - DMC - Eng 2FSE
AIF - DMC - GSR
AIF - 1B - 1 LHB
AIF - 1B - 6 MVS
AIF - 1B - 1 LHMGS
AIF - 1B - 1 Sig Trp
AIF - 1B - 1 LHFA
AIF - 1B - 1 LHR
AIF - 1B - 2 LHR
AIF - 1B - 3 LHR
AIF - 2B - 2 LHB
AIF - 2B - 7 MVS
AIF - 2B - 2 LHFA
AIF - 2B - 2 LHMGS
AIF - 2B - 2 Sig Trp
AIF - 2B - 5 LHR
AIF - 2B - 6 LHR
AIF - 2B - 7 LHR
AIF - 3B - 3 LHB
AIF - 3B - 8 MVS
AIF - 3B - 3 LHB Sigs
AIF - 3B - 3 LHFA
AIF - 3B - 3 LHMGS
AIF - 3B - 3 Sig Trp
AIF - 3B - 8 LHR
AIF - 3B - 9 LHR
AIF - 3B - 10 LHR
AIF - 4B - 4 LHB
AIF - 4B - 4 Sig Trp
AIF - 4B - 9 MVS
AIF - 4B - 4 LHFA
AIF - 4B - 4 LHMGS
AIF - 4B - 4 LHR
AIF - 4B - 11 LHR
AIF - 4B - 12 LHR
AIF - 5B - 5 LHB
AIF - 5B - 10 MVS
AIF - 5B - 5 LHFA
AIF - 5B - 5 Sig Trp
AIF - 5B - ICC
AIF - 5B - 14 LHR
AIF - 5B - 15 LHR
AIF - 5B - 1er Regt
AIF - 5B - 2 NZMGS
AIF - AASC
AIF - Aboriginal LH
AIF - Badges
AIF - Cars
AIF - Chinese LH
AIF - Double Sqns
AIF - Engineers
AIF - Fr - 22 Corps
AIF - Fr - 13 LHR
AIF - Honour Roll
AIF - HQ - 3rd Echelon
AIF - Marching Songs
AIF - Misc Topics
AIF - NZMRB
AIF - NZMRB - AMR
AIF - NZMRB - CMR
AIF - NZMRB - EFT
AIF - NZMRB - NZMFA
AIF - NZMRB - NZMGS
AIF - NZMRB - OMR
AIF - NZMRB - Sig-Trp
AIF - NZMRB - WMR
AIF - Ships
AIF - Ships - Encountr
AIF - Ships - Una
AIF - WFF
AIF - Wireless Sqn
Battles
BatzA - Australia
BatzA - Broken Hill
BatzA - Liverpool
BatzA - Merivale
BatzB - Boer War
BatzB - Bakenlaagte
BatzB - Belmont
BatzB - Bothaville
BatzB - Buffels Hoek
BatzB - Coetzees Drift
BatzB - Diamond Hill
BatzB - Driefontein
BatzB - Elands
BatzB - Graspan
BatzB - Grobelaar
BatzB - Grootvallier
BatzB - Hartebestfontn
BatzB - Houtnek
BatzB - Karee Siding
BatzB - Kimberley
BatzB - Koster River
BatzB - Leeuw Kop
BatzB - Mafeking
BatzB - Magersfontein
BatzB - Modder River
BatzB - Onverwacht
BatzB - Paardeberg
BatzB - Palmietfontein
BatzB - Pink Hill
BatzB - Poplar Grove
BatzB - Rhenoster
BatzB - Sannahs Post
BatzB - Slingersfontn
BatzB - Stinkhoutbm
BatzB - Sunnyside
BatzB - Wilmansrust
BatzB - Wolvekuil
BatzB - Zand River
BatzG - Gallipoli
BatzG - Anzac
BatzG - Aug 1915
BatzG - Baby 700
BatzG - Evacuation
BatzG - Hill 60
BatzG - Hill 971
BatzG - Krithia
BatzG - Lone Pine
BatzG - Nek
BatzJ - Jordan Valley
BatzJ - 1st Amman
BatzJ - 2nd Amman
BatzJ - Abu Tellul
BatzJ - Es Salt
BatzJ - JV Maps
BatzJ - Ziza
BatzM - Mespot
BatzM - Baghdad
BatzM - Ctesiphon
BatzM - Daur
BatzM - Kurna
BatzM - Kut el Amara
BatzM - Ramadi
BatzN - Naval
BatzN - AE1
BatzN - Cocos Is
BatzN - Heligoland
BatzN - Marmara
BatzN - Zeebrugge
BatzN - Zeppelin L43
BatzNG - Bitapaka
BatzO - Other
BatzO - Baku
BatzO - Egypt 1919
BatzO - Emptsa
BatzO - Karawaran
BatzO - Peitang
BatzO - Wassa
BatzP - Palestine
BatzP - 1st Gaza
BatzP - 2nd Gaza
BatzP - 3rd Gaza
BatzP - Aleppo
BatzP - Amwas
BatzP - Ayun Kara
BatzP - Bald Hill
BatzP - Balin
BatzP - Beersheba
BatzP - Berkusieh
BatzP - Damascus
BatzP - El Auja
BatzP - El Buggar
BatzP - El Burj
BatzP - Haifa
BatzP - Huj
BatzP - JB Yakub
BatzP - Kaukab
BatzP - Khan Kusseir
BatzP - Khuweilfe
BatzP - Kuneitra
BatzP - Megiddo
BatzP - Nablus
BatzP - Rafa
BatzP - Sasa
BatzP - Semakh
BatzP - Sheria
BatzP - Surafend
BatzP - Wadi Fara
BatzS - Sinai
BatzS - Bir el Abd
BatzS - El Arish
BatzS - El Mazar
BatzS - El Qatiya
BatzS - Jifjafa
BatzS - Magdhaba
BatzS - Maghara
BatzS - Romani
BatzS - Suez 1915
BatzSe - Senussi
BatzWF - Westn Front
BW - Boer War
BW - NSW
BW - NSW - 1ACH
BW - NSW - 1NSWMR
BW - NSW - 2NSWMR
BW - NSW - 3ACH
BW - NSW - 3NSWIB
BW - NSW - 3NSWMR
BW - NSW - 5ACH
BW - NSW - A Bty RAA
BW - NSW - AAMC
BW - NSW - Aust H
BW - NSW - Lancers
BW - NSW - NSW Inf
BW - NSW - NSWCBC
BW - NSW - NSWIB
BW - NSW - NSWMR_A
BW - NZ
BW - Qld
BW - Qld - 1ACH
BW - Qld - 1QMI
BW - Qld - 2QMI
BW - Qld - 3ACH
BW - Qld - 3QMI
BW - Qld - 4QIB
BW - Qld - 5QIB
BW - Qld - 6QIB
BW - Qld - 7ACH
BW - QLD - AAMC
BW - SA
BW - SA - 1SAMR
BW - SA - 2ACH
BW - SA - 2SAMR
BW - SA - 3SACB
BW - SA - 4ACH
BW - SA - 4SAIB
BW - SA - 5SAIB
BW - SA - 6SAIB
BW - SA - 8ACH
BW - SA - AAMC
BW - Tas
BW - Tas - 1ACH
BW - Tas - 1TIB
BW - Tas - 1TMI
BW - Tas - 2TB
BW - Tas - 2TIB
BW - Tas - 3ACH
BW - Tas - 8ACH
BW - Vic
BW - Vic - 1VMI
BW - Vic - 2ACH
BW - Vic - 2VMR
BW - Vic - 3VB
BW - Vic - 4ACH
BW - Vic - 4VIB
BW - Vic - 5VMR
BW - Vic - 6ACH
BW - Vic - AAMC
BW - Vic - Scot H
BW - WA
BW - WA - 1WAMI
BW - WA - 2ACH
BW - WA - 2WAMI
BW - WA - 3WAB
BW - WA - 4ACH
BW - WA - 4WAMI
BW - WA - 5WAMI
BW - WA - 6WAMI
BW - WA - 8ACH
BW Gen - Campaign
BW Gen - Soldiers
BW General
Cavalry - General
Diary - Schramm
Egypt - Heliopolis
Egypt - Mena
Gen - Ataturk Pk, CNB
Gen - Australia
Gen - Legends
Gen - Query Club
Gen - St - NSW
Gen - St - Qld
Gen - St - SA
Gen - St - Tas
Gen - St - Vic
Gen - St - WA
Gm - German Items
Gm - Bk - 605 MGC
GW - 11 Nov 1918
GW - Atrocities
GW - August 1914
GW - Biographies
GW - Propaganda
GW - Spies
GW - We forgot
Militia 1899-1920
Militia - Area Officers
Militia - Inf - Infantry
Militia - Inf - 1IB
Militia - Inf - 2IB
Militia - Inf - 3IB
Militia - Inf - NSW
Militia - Inf - Qld
Militia - Inf - SA
Militia - Inf - Tas
Militia - Inf - Vic
Militia - Inf - WA
Militia - K.E.Horse
Militia - LH
Militia - LH - Regts
Militia - LH - 1LHB
Militia - LH - 2LHB
Militia - LH - 3LHB
Militia - LH - 4LHB
Militia - LH - 5LHB
Militia - LH - 6LHB
Militia - LHN - NSW
Militia - LHN - 1/7/1
Militia - LHN - 2/9/6
Militia - LHN - 3/11/7
Militia - LHN - 4/6/16
Militia - LHN - 5/4/15
Militia - LHN - 6/5/12
Militia - LHN - 28
Militia - LHQ - Qld
Militia - LHQ - 13/2
Militia - LHQ - 14/3/11
Militia - LHQ - 15/1/5
Militia - LHQ - 27/14
Militia - LHS - SA
Militia - LHS - 16/22/3
Militia - LHS - 17/23/18
Militia - LHS - 24/9
Militia - LHT - Tas
Militia - LHT - 12/26
Militia - LHV - Vic
Militia - LHV - 7/15/20
Militia - LHV - 8/16/8
Militia - LHV - 9/19
Militia - LHV - 10/13
Militia - LHV - 11/20/4
Militia - LHV - 19/17
Militia - LHV - 29
Militia - LHW - WA
Militia - LHW-18/25/10
Militia - Military Orders
Militia - Misc
MilitiaRC - Rifle Clubs
MilitiaRC - NSW
MilitiaRC - NT
MilitiaRC - Qld
MilitiaRC - SA
MilitiaRC - Tas
MilitiaRC - Vic
MilitiaRC - WA
Militiaz - New Zealand
Tk - Turkish Items
Tk - Army
Tk - Bks - Books
Tk - Bks - 1/33IR
Tk - Bks - 27th IR
Tk - Bks - Air Force
Tk - Bks - Yildirim
Tk - POWs
Wp - Weapons
Wp - Hotchkiss Cav
Wp - Hotchkiss PMG
Blog Tools
Edit your Blog
Build a Blog
RSS Feed
View Profile
Open Community
Post to this Blog
Site Index
Education Centre
LH Militia
Boer War
Transport Ships
LH Battles
ALH - Units
ALH - General
Aboriginal Light H
Weapons
Ottoman Sources

"At a mile distant their thousand hooves were stuttering thunder, coming at a rate that frightened a man - they were an awe inspiring sight, galloping through the red haze - knee to knee and horse to horse - the dying sun glinting on bayonet points..." Trooper Ion Idriess

The Australian Light Horse Studies Centre aims to present an accurate history as chroniclers of early Australian military developments from 1899 to 1920.

The Australian Light Horse Studies Centre site holds over 12,000 entries and is growing daily.

Contact: Australian Light Horse Studies Centre

Let us hear your story: You can tell your story, make a comment or ask for help on our Australian Light Horse Studies Centre Forum called:

Desert Column Forum

WARNING: This site contains: names, information and images of deceased people; and, language which may be considered inappropriate today.

Thursday, 23 October 2008
Diaries of AIF Servicemen, Bert Schramm, 23 October 1918
Topic: Diary - Schramm

Diaries of AIF Servicemen

Bert Schramm

23 October 1918


Bert Schramm


2823 Private Herbert Leslie SCHRAMM, a 22 year old Farmer from Whites River, South Australia. He enlisted on 17 February 1916; and at the conclusion of the war Returned to Australia, 10 July 1919.

During part of the course of his military service with the AIF, Bert Schramm kept a diary of his life. Bert was not a man of letters so this diary was produced with great effort on his behalf. Bert made a promise to his sweetheart, Lucy Solley, that he would do so after he received the blank pocket notebook wherein these entries are found. As a Brigade Scout since September 1918, he took a lead part in the September Offensive by the Allied forces in Palestine. Bert's diary entries are placed alongside those of the 9th Light Horse Regiment to which he belonged and to the 3rd Light Horse Brigade to which the 9th LHR was attached. On this basis we can follow Bert in the context of his formation.


The Diaries

The complete diary is now available on the Australian Light Horse Studies Centre Site at:

Bert Schramm Diary


Finding more about a service person. See:

Navigating the National Archives Service File 


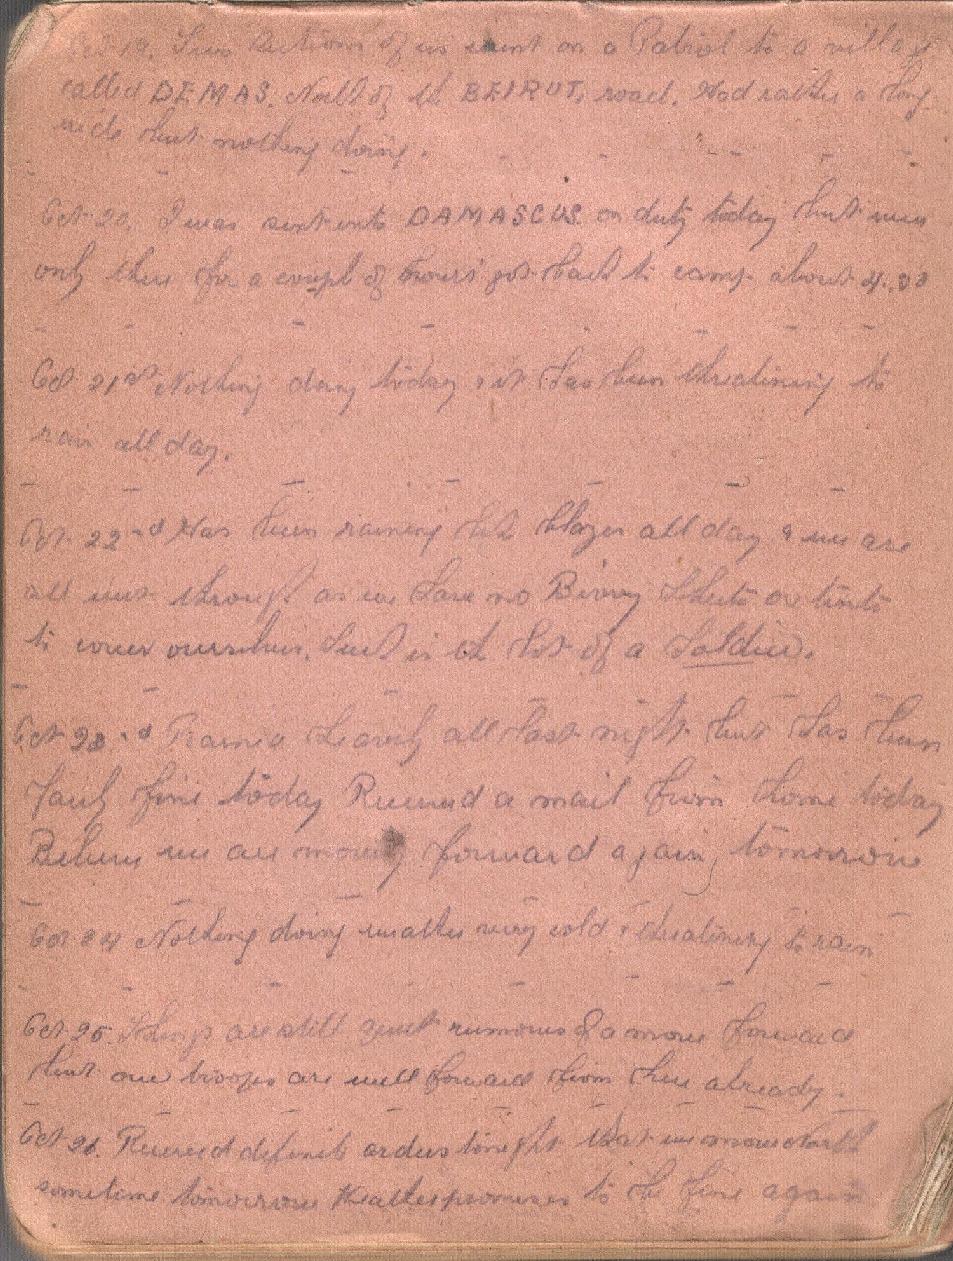
Bert Schramm's Handwritten Diary, 20 - 26 October 1918

[Click on page for a larger print version.]


Bert Schramm

Wednesday, October 23, 1918

Bert Schramm's Location - Kaukab

Bert Schramm's Diary -  Rained all last night but has been fairly fine today. Received a mail from home today. Believe we are moving forward again tomorrow.


9th Light Horse Regiment War Diary

9th Light Horse Regiment Location - Kaukab

9th Light Horse Regiment War Diary - Usual routine.

9th LHR AIF War Diary, 23 October          


Darley

Darley, TH, With the Ninth Light Horse in the Great War, Adelaide, Hassell Press, 1924.

No Entry


Previous:  Bert Schramm's Diary, 22 October 1918

Next:  Bert Schramm's Diary, 24 October 1918


Sources Used:

Bert Schramm's Diary

National Archives Service File.

Embarkation Roll, AWM8.

Australian War Memorial Roll of Honour

Nominal Roll, AWM133, Nominal Roll of Australian Imperial Force who left Australia for service abroad, 1914-1918 War.


War Diaries and Letters

All War Diaries and letters cited on this site should be read in conjunction with the Australian Light Horse Studies Centre, War Diaries and Letters, Site Transcription Policy which may be accessed at:

Australian Light Horse Studies Centre, War Diaries and Letters, Site Transcription Policy 


Further Reading:

Bert Schramm Diary

Bert Schramm Diary, Album

Bert Schramm's Photo Album

9th Australian Light Horse Regiment, AIF

9th Australian Light Horse Regiment, War Diary, Day by Day Account

Battles where Australians fought, 1899-1920


Citation: Diaries of AIF Servicemen, Bert Schramm, 23 October 1918


Posted by Project Leader at 1:01 AM EADT
Updated: Thursday, 9 June 2011 12:01 PM EADT
Colonel Husnu, Yildirim, Page 108
Topic: Tk - Bks - Yildirim

Another entry from the book written by Lieutenant Colonel Hüseyin Hüsnü Emir, called Yildirim. Every day, one page of the book will be posted. This is Page 108.


Colonel Hüsnü, Yildirim, Page 108.

[Click on page for a larger print version.]


These are events that led to the capture of Beersheba, 31 October 1917.


Further Reading:

List of all other Battle of Beersheba accounts  on the blog

Full listing of all material about Beersheba on the blog


Citation: Colonel Hüsnü, Yildirim, Page 108

Posted by Project Leader at 1:01 AM EADT
Updated: Saturday, 25 October 2008 12:57 PM EADT
9th LHR AIF War Diary, 23 October
Topic: AIF - 3B - 9 LHR

9th LHR, AIF

9th Light Horse Regiment

War Diary, 23 October

Pro Gloria et Honore - For Glory and Honour

Regimental March -  Marching Through Georgia


The following entries are extracted and transcribed from the 9th Light Horse Regiment War Diary, the originals of which are held by the Australian War Memorial. There are 366 entries on this site. Each day has entries as they occurred from 1914 to 1919. In addition to the 9th Light Horse Regiment War Diary, when appropriate, entries from the 3rd Light Horse Brigade War Diary and other regiments with the Brigade will also appear. Entries from the unit history, Darley, TH, With the Ninth Light Horse in the Great War, Adelaide, Hassell Press, 1924 will also appear from time to time. The aim is to give the broadest context to the story and allow the reader to follow the day to day activities of the regiment. If a relative happened to have served in the regiment during the Great War, then this provides a general framework in which the individual story may be told.


The Diary


1914

Friday, October 23, 1914

9th Light Horse Regiment Location -  Morphettville Race Course Camp and Broadmeadows Camp, Victoria. 

9th Light Horse Regiment War Diary - Formation of Regiment occurring at Morphettville Race Course Camp, Adelaide, while "C" Squadron is formed at Broadmeadows Camp, Victoria. 

District Orders, No. 54, 23 October, 1914:

His Excellency, the Governor General acting with the advice of the Federal Executive Council, has been pleased to approve of one Light Horse Brigade being formed of persons who voluntarily agree to serve beyond the limits of the Commonwealth in the Australian Imperial Force, in addition to the Units referred to in the Commonwealth of Australia Gazette No. 56 of the 13 August 1914, and Commonwealth of Australia Gazette No. 74 of the 19 September 1914, and for the appointment of the undermentioned Officer thereto :-

3rd Light Horse Brigade -

Colonel F. G. Hughes, V. D., A.D.C. to His Excellency the Governor General, 7th Light Horse Brigade, to be Colonel and to Command.

The 3rd LH Brigade comprised, Headquarters, three Regiments, 8th LHR Vic, 9th LHR Vic & SA and the 10th LHR WA, Signals section, Field Ambulance and Transport section.

The Reverend WA Moore, appointed Chaplain 4th Class, AIF, at Broadmeadows Camp.

See: Broadmeadows 1909


1915

Saturday, October 23, 1915

9th Light Horse Regiment Location - Rhododendron Spur

9th Light Horse Regiment War Diary - No entry


1916

Monday, October 23, 1916

9th Light Horse Regiment Location - Millegha

9th Light Horse Regiment War Diary - Order received from Brigade for the Regiment to move back to Bir Etmaler.


1917

Tuesday, October 23, 1917

9th Light Horse Regiment Location - Um Urgan

9th Light Horse Regiment War Diary - Outpost order issued to Squadrons.


1918

Wednesday, October 23, 1918

9th Light Horse Regiment Location - Kaukab

9th Light Horse Regiment War Diary - Usual routine.


1919

Friday, October 23, 1918

9th Light Horse Regiment Location - Adelaide

9th Light Horse Regiment War Diary - Regiment disbanded.


Previous: 9th LHR AIF War Diary, 22 October

Next: 9th LHR AIF War Diary, 24 October


Sources:

See: 9th Australian Light Horse Regiment, Contents
Australian Light Horse Studies Centre, AIF War Diaries of the Great War, Site Transcription Policy


Further Reading:

9th Light Horse Regiment AIF

Bert Schramm Diary

9th Australian Light Horse Regiment, Roll of Honour 

Battles where Australians fought, 1899-1920


Citation: 9th LHR AIF War Diary, 23 October

Posted by Project Leader at 1:01 AM EADT
Updated: Thursday, 16 September 2010 7:03 PM EADT
Wednesday, 22 October 2008
The Battle of Beersheba, Palestine, 31 October 1917, Wellington Mounted Rifles Regiment, Unit History Account
Topic: AIF - NZMRB - WMR

The Battle of Beersheba

Palestine, 31 October 1917

WMR Unit History Account


Major Alexander Herbert Wilkie, Adjutant of the Wellington Mounted Rifles, a unit which was part of the New Zealand Mounted Rifles Brigade, wrote an account of this unit in 1924 called Official War History of the Wellington Mounted Rifles Regiment - 1914 - 1919, in which included a section specifically related to the Battle of Beersheba and is extracted below. A copy of this book is available on the New Zealand Mounted Rifles Association website.


Wilkie, AH, Official War History of the Wellington Mounted Rifles Regiment - 1914 - 1919, (Auckland 1924).

CHAPTER NINETEEN

The Attack on Beersheba

Towards the end of October the Commander-in-Chief commenced to concentrate his forces at prearranged starting points, prior to launching his offensive against the Gaza-Beersheba line, his plan of attack being: To capture Beersheba, with its essential water supplies, and form a base there from which to attack the enemy in flank and rear and crumple up his line towards Gaza. For the initial operation the 60th and 74h Divisions were to seize the enemy works between the Khalasa Road and the Wadi Saba, whilst the defences north of the Wadi were to be masked by the Imperial Camel Corps Brigade and two battalions of the 53rd Division. The Anzac Mounted Division, Australian Mounted Division, and 7th Mounted Brigade to attack the defences of the town from the north-east, east, and south-east, the XXIst Corps, supported by a Naval bombardment, to pin down the enemy on the Gaza front. The N.Z. Brigade, as part of the Desert Mounted Corps, was to make a wide flanking movement and attack Beersheba from the east and north-east; then to envelop the enemy's left rear, and to capture water supplies in order to form a base, preliminary to further operations northward in conjunction with the Infantry. Before the Mounted troops could move, however, the problem of procuring sufficient water for so many horses in the Esani-Khalasa area had to be overcome, the Turks having destroyed the wells there on 22nd October. Engineers and working parties were sent to restore them, and covering the parties were the 2nd A.L.H. and the Camel Brigades, these Brigades at the same time marking the various routes leading to Beersheba.

Of the enemy situation at this period, General Allenby's records state :-

The German Staff in Sinai had, so far back as August, decided that the British would make another effort to break through on that front, and with such forces that, unless the Turks were heavily reinforced, the result could only be in favour of the British. That the weaknesses of their position were its extent, and the exposed left flank at Beersheba, was fully realised by the Command in the field, and during August and September repeated requests were made to the Higher Command for a shortening of the line by with-drawing from Beersheba, or generous reinforcements so that Beersheba could be held a l'outrance.

The soundness of these demands was fully realised by the German advisers of the Turks, but there existed a policy which was a veritable millstone to those who wished to conduct the operations in accordance with clear strategic principles. This policy was directed towards the recovery of Baghdad. Baghdad, a former capital of the Khalifs, and therefore important to the pan-Islamic party, was ever before the Young Turk, soldier, and politician, and the plan had received the backing of Berlin. A composite German force had been formed, and one of the first of German soldiers, Marshal Erich von Falkenhayn, lent for the carrying through of this undertaking. If Baghdad was to be retaken, every man and gun must be sent to Irak, and every man sent to Sinai decreased the chance of success. But to this was the unanswerable argument of those who asked that reinforcements should be sent to Sinai. "If the Sinai front is broken, Palestine and Syria will fall into the enemy's hands, and not only will Baghdad not be retaken, but the armies in Irak will be caught like a rat in a trap, with the British across their lines of communication at Aleppo." It was not until mid-October that this argument prevailed, and then it was too late. Troops being diverted from Mesopotamia were still on the lines of communication, and the aircraft were still being unpacked and put together on their aerodromes, when the British troops attacked and captured Beersheba on October 31, 1917.

The German Command had, however, estimated the date of the British attack with fair accuracy, which they considered would take place, owing to weather conditions, early in November. But they were totally incorrect in their estimate of its direction.

Various circumstances made them believe that it would consist of a third and final assault on Gaza, combined with a landing to the north, which would turn their right flank and enable the British to occupy the fertile coastal plain. To meet this primarily, all defensive work was concentrated for many weeks on the Gaza sector, and their main reserves - the 7th and 19th Infantry Divisions - were concentrated behind Gaza.

Von Falkenhayn proposed, by a concentration of forces, to deliver an attack on the British right flank, and so drive back General Allenby out of Palestine into the waterless and difficult country east of the Wadi El Arish. In addition to its strategical effect, this would have had the political result of clearing that portion of the Turkish Empire from the invader.

This attack was originally timed for the latter half of October, to precede and forestall the British attack. Owing, however, to indecision, general procrastination, poor transport facilities, and, above all, to the jealousy and opposition of Ahmed Jemel Pasha, G.OC. of the Fourth Army and Governor of Syria, it had to be postponed, and was eventually timed for early December.

By October 28 the organisation of the Turkish forces under the Yildirim Army Group into the seventh and eighth armies was nearing completion. The headquarters of General Kress von Kressenstein (G.OC., Eighth Army) had moved back from Huj to Huleikat, so that the former, now connected to the main railway by a light line, might be used as a reserve area, and Fevzi Pasha (G.O.C., Seventh Army) was about to move forward his headquarters from Hebron to near Beersheba, finally to take over the troops allotted to his command. Marshal von Falkenhayn was at Aleppo, en route to Jerusalem.

The front had been strengthened by three fresh divisions, and the 20th Division was moving towards the front on the line of communication, south of Aleppo.

The Gaza sector was a network of trenches, wire entanglements and strongly-fortified posts, conveniently sited for mutual support and cross-fire, which extended to the south-east until the defences of Beersheba were reached. The German Staff appears to have been very well satisfied as to the security of the line against frontal attack, and any second-line system of defence had been almost totally neglected. A wide turning movement on the east was considered impossible, owing to the broken nature of the country and lack of water.

So much for the enemy's idea of the situation.

The concentration of our troops commenced under most favourable circumstances, for by that time the Turks had become so familiar with the sight of mounted men reconnoitring in front of their position that it was possible to effect it without arousing the suspicions of the enemy.

The advance of the N.Z. Brigade commenced on 24th October, when it proceeded to Esani, 15 miles south-east. At noon on the following day the W.M.R. occupied a line seven miles eastward, whilst the B.G.C. of 179th Infantry Brigade made observations of an important enemy position two and a-half miles southwest of Beersheba, which the Infantry were to attack during the early stages of the general advance.

The Squadron Commanders of the W.M.R. this time were:-

2nd, Major J. 0. Scott; 6th, Major C. L. Sommerville; 9th, Major A. S. Wilder.

On this date General Chaytor arrived at Esani and assumed command of all Desert Mounted Corps troops south of El Ghabi, Goz Mabruk, and El Buggar. Operation orders were then issued relative to the attack of Beersheba, that part of them dealing with the initial attack on the town being of particular interest to the W.M.R. The Anzac Division was to advance from Asluj at 6 p.m. on a date to be fixed, the W.M.R. to march with the advance guard for a distance of ten miles till the column reached a cross road leading to Beersheba; the Regiment was then to press forward and destroy an enemy post near Goz El Shegeib, eight miles south-east from Beersheba; the column to halt at the cross roads whilst the operation was being carried out. The post was to be rushed with the bayonet and no one allowed to escape, firing to be avoided, as it was important not to alarm the posts further north. As soon as the post had been dealt with, information was to be sent back to the head of the column, and in the meantime the Regiment was to await the arrival of the column. The Regiment was further instructed that on the arrival of the column at Goz El Shegeib it would act as advance guard for the march northwards, and that it would then take up a position astride a road about four miles north-west of Go! El Shegeib and be prepared to act either as advance or left flank guard to the Australian Mounted Division; also to endeavour to get signal communication with the 7th Mounted Brigade and locate the enemy's left flank about the vicinity of Ras Ghannam (three miles south-south-east of Beersheba).

On October 28th the N.Z. Brigade left Esani for Khalasa, eight miles further south-east, and on the following day it proceeded to Asluj, sixteen miles due south of Beersheba, where the troops were kept under cover as much as possible, so as not to disclose their presence.

The advance of the Anzac Division against Beersheba commenced at 6 p.m. on October 30th, the W.M.R., as part of the advance guard, marching in rear of the 6th A.L.H. Regiment, the latter leading the column. In order to guard against congestion during the march, special routes had been mapped out for the various arms of the force, metalled roads being reserved for wheeled transport and artillery. On reaching a cross road, previously mentioned, twelve miles north-east of Asluj, at 12.45 next morning, the W.M.R. proceeded to carry out its special mission, as mentioned above, the remainder of the column halting. Marching on a compass bearing in the darkness the Regiment pressed forward with the 9th Squadron as advance guard, two troops of the 2nd Squadron being right and left flank guard respectively, two sections of the 2nd Squadron acting as rear guard. At 3 a.m. the Regiment reported that it had occupied Goz El Shegeib, no enemy being found there, but a flare which had been sent up from the direction of Beersheba probably gave warning of the approach of the force. Having gained its objective, the Regiment awaited further orders. The N.Z. Brigade then moved forward. Some time later the W.M.R. was ordered to continue the advance, and at 6 a.m. the 9th Squadron came under fire from a party of about one hundred enemy cavalry, on an elevated position further north. Supported by three troops of the 2nd Squadron and with the 6th Squadron close at hand, the advance guard drove the enemy from his position towards Beersheba, the town being plainly seen in the distance. The Turks had obviously been surprised, as they had left a hot breakfast behind. From the position taken up, the Regiment moved forward to Khasim Zanna, about five miles east by south of Beersheba, where the N.Z. Brigade linked up on its right. Here the order of march for the further advance was changed as follows :- AM.R., C.M.R., W.M.R. Continuing, the N.Z. Brigade occupied Bir Salem Irgeig by eight o'clock, at which hour it gained touch with the 2nd A.L.H. Brigade on the right.

An hour later enemy troops and transport were observed moving northward from Beersheba, and at the same time enemy camelry were seen close to Tel El Saba. Orders were therefore issued to the two Brigades to press forward on the Tel El Sakaty Tel El Saba line, the Somerset Battery to join the N.Z. Brigade. A few minutes later the A.M.R., with the C.M.R. on its right, advanced towards the Saba Redoubt under covering fire from the battery. The redoubt was strongly held, it being defended by nests of machine guns and some 300 rifles, which covered all approaches, both Regiments coming under the fire of these and from an entrenched battery, one mile to the north of Tel El Saba. Having dismounted, the A.M.R. advanced to the cover of a wadi, 800 yards from their objective, the attack, supported by the

3rd A.L.H. Regiment on the south-east, being launched there later.

At noon the W.M.R., in reserve, advanced to Wadi Saba at Bir Salem Irgeig, where the all-important water was found for the horses, the Regiments moving later with the Brigade along the Wadi Saba to Khirbet El Watan, while our batteries pounded the enemy position. At 2 p.m. the A.MR. were preparing to advance against the first enemy position, the C.M.R. being then some distance to the north. Ten minutes later the A.M.R. had begun the advance by short rushes, covered by artillery and machine-gun fire, their objective - a hill some four hundred yards east of Tel El Saba - being captured at 240. The 2nd W.M.R. Squadron, under Major Scott, then reinforced the right of the A.M.R. and the attack on Tel El Saba commenced. Moving steadily forward at first, the line finally rushed and captured the redoubt at three o'clock, a machine gun and some seventy prisoners being taken. The gun was then used with telling effect against the Turks retiring towards Beersheba under cover of their artillery, which had commenced to bombard the captured positions.

The fall of Tel El Saba, the keystone of the Beersheba system of defences, jeopardised the other positions to such an extent that the enemy was soon overcome in that locality. But the Turkish batteries near Beersheba became more active than ever, the gunners apparently attempting to inflict as much damage as possible before losing their guns. At three o'clock they commenced to shell the horses of the W.M.R. in the Wadi Saba, the fire increasing in intensity, and at four o'clock the Regiment moved with the Brigade to the cover of a high cliff close to Saba Redoubt. There showers of shrapnel fell around the Regiment for some time, three horses being killed find thirty-two wounded before nightfall, the bluff preventing many more casualties.

Meanwhile the attack on the town of Beersheba had begun, the ancient city being occupied by two brigades of the A.L.H. at 5.30 in the afternoon. Thus the left flank of the main enemy line was exposed for the operations which were to be commenced on the following day against it.

For gallant conduct during the day, Trooper N. M. Douglas was awarded the Military Medal. Casualties: One other rank killed, five other ranks wounded, three horses being killed and thirty-two wounded.

The New Zealand Brigade consolidated and held Saba Redoubt during the night, and at seven o'clock next morning (1st November) the W.M.R. and C.M.R. moved, forward in the general advance northward - the W.M.R. on Khirbit El Likeyeh, seven miles north of Beersheba, there to establish communication with the I.C.C. on the left; the C.M.R. to continue the W.M.R. line one mile due east to Khirbit El Ras. About nine o'clock the 6th Squadron, as advanced guard, gained touch with a party of 100 cavalrymen, the latter supported by two machine guns, being on an elevated position, half a mile south of the W.M.R. objective. Closing up on its screen, the Squadron drove the Turks towards the Caves near Khirbit El Likiyeh, where the enemy, with reinforcements, took up a position. Continuing to advance, with the 9th Squadron in close support, the 6th Squadron dislodged the Turks and the W.M.R. occupied its objective. Communication was then established with the I.C. Brigade on the left, the Regiment remaining in the line till relieved at night, whereupon it returned to bivouac at Saba Redoubt. During these operations two 6th Squadron troops, under Captain Cotton, carried out a most successful dismounted reconnaissance, advancing doggedly over broken country and finally capturing a prominent knoll on which machine guns had been particularly active.

The W.M.R. casualties were: One officer and fifteen horses wounded, its captures including four cavalrymen, two hostile Bedouin, two horses, three mules, a range-finder, five boxes of machine-gun ammunition, and a Very pistol.

For gallant conduct during the reconnaissance, Corporal R. H. Graham was awarded the Military Medal.

A shortage of water for horses was keenly felt during the day, and, in consequence, only essential reconnaissances were undertaken in order to conserve the strength of the horses. Fortunately, a heavy downpour of rain had formed pools in wadis; otherwise the trying conditions which ultimately prevailed would have been more acute. A scanty supply of water in the Wadi Saba had served to slake the thirst of some of the horses, but this soon disappeared, and on November 2nd the Brigade proceeded to Bir Imshash, eleven miles eastward, where it occupied an outpost line facing east, covering a number of muddy pools which had been misrepresented as wells. There the puzzle to find water commenced, all ranks not otherwise engaged being sent broadcast for a couple of days to search for it, without any appreciable result.

THE FIGHT AT RAS EL NAGB


Meanwhile the troops in the line to the north had encountered stout opposition, and on the 4th, whilst the W.M.R. and A.M.R. were taking their turn in the search for water, the Brigade was hurried forward to relieve the 5th Mounted Brigade, the latter being heavily engaged in the general line facing Ras El Nagb, thirteen miles north-east of Beersheba. The C.M.R. effected the relief at 5.30 p.m., the two other regiments arriving later, the W.M.R. having meanwhile located a good well, where the water-cart and bottles were filled. The 6th Squadron was placed on tho left of the C.M.R. on a ridge facing Khuweilifeh, against which the Infantry were operating, two A.M.R. Squadrons reinforcing the right of the C.M.R., the strength of the enemy eight hundred yards in front of the New Zealanders being estimated at two thousand rifles and three batteries of artillery. The Turks commenced to attack at three o'clock next morning, their numerical strength, supported by the fire of cleverly concealed batteries, enabling them to maintain aggressiveness throughout the day. From Khuweilifeh, on the left, their guns born. barded our front line. From other directions shells were landed amongst the horses in the Wadi-Sultan, and long-range fire from the north of Khuweilifeh swept the position at intervals. The Somerset and an Indian Mountain Battery were in position south of Ras El Nagb, the fire of these being directed principally at Khuweilifeh. At eight o'clock the 9th Squadron relieved the 6th Squadron, and a couple of hours later the 2nd Squadron took up a position on a knoll west of Ras El Nagh. The enemy were trying to work round the flank there, but well-directed fire from the Squadron dispersed them.

By this time the fall of Beersheba and the forcing back of the Turkish left were taking effect along the Gaza-Beersheba line, from which the enemy had commenced to retire. Mounted troops were required to pursue the fleeting Turks, and the New Zealand Brigade received orders to hold itself in readiness to proceed with the Anzac Division and co-operate with the 20th Corps south of Sharia. The Imperial Camel Brigade was to relieve the New Zealanders at Ras El Nagb, but failed to arrive at the appointed hour, with the result that the departure of the Brigade was delayed for some time.

Meanwhile the left of the New Zealanders' line had been further strengthened by the 6th W.M.R. Squadron, the latter occupying the crest of a ridge on the left of the 2nd Squadron, where it checked an advance of a force of about four hundred Turks who were trying to work round the flank there.

The Turks were very aggressive on the left, and at about 1.30 p.m. the 2nd Squadron was heavily bombarded from the direction of Khuweilifeh, many casualties being inflicted. Major Scott and Captain Hine having been wounded, Captain A. H. Herrick assumed command of the Squadron. Later the Turks advanced with fixed bayonets to within two hundred yards of our line, but heavy cross-fire broke the attack, the Turks retiring to a position five hundred yards from the New Zealanders, where they maintained a vigorous machine-gun and rifle fire till dusk.

Water and rations had been brought forward on packs for the men during the afternoon, but the horses had not had a satisfying drink for at least two days. It therefore became necessary for the men not engaged in holding the line to lead the horses to Beersheba, a distance of fourteen miles, where the nearest water was to be obtained. Next morning the 6th Camel Brigade arrived, giving half a pint of much appreciated water to each of our men before taking over the line. Tired, and sorely in need of sleep as the result of a strenuous week of continuous trekking and fighting, the W.M.R. marched on foot over broken country to Likeyeh, six miles south, where the horses rejoined them later.

The powers of endurance which the horses were found to possess during these trying times in continuing to work under a blazing sun without water for periods ranging from forty-eight to seventy-two hours (the latter time refers to the Hotchkiss gun pack horses) are probably without parallel in the history of warfare. Only acclimatised animals could have survived such an ordeal, and the fact that none of the W.M.R. horses were lost from causes other than casualties speaks volumes for the horsemastership of the men. The Regiment's casualties were:-

Two officers and seven other ranks wounded, six horses killed and thirteen wounded.

For gallant conduct during this engagement the following decorations were awarded :-

Military Cross, Lieutenant C. J. Pierce; Military Medal, Sergeant J. A. Little, Sergeant T. H. Hulton, Lance-Corporal J. J. Austin, Trooper W. G. Fargie, Trooper W. Southern.

The Brigade remained in support of the 53rd Division in the waterless area close to Ras El Nagb till the night of 9th November, when it received welcome orders to move next day.

Gaza had fallen on 7th November, and the Turks had meanwhile been driven northward till the right of their line rested on the sea coast to the north of Hamameh, where the Anzac Division faced them. General Allenby's right, in the vicinity of Ras El Nagb was then firmly established, but strong forces opposed him on the left, so the New Zealanders were to join the Division there.
 

Further Reading:

Wellington Mounted Rifles Regiment

Wellington Mounted Rifles Regiment, Roll of Honour

New Zealand Mounted Rifles Brigade

The Battle of Beersheba, Palestine, 31 October 1917

Australian and New Zealand Roll of Honour

Battles where Australians fought, 1899-1920


Citation: The Battle of Beersheba, Palestine, 31 October 1917, Wellington Mounted Rifles Regiment, Unit History Account

Posted by Project Leader at 9:12 PM EADT
Updated: Wednesday, 7 October 2009 10:40 PM EADT
9th LHR AIF War Diary, 22 October
Topic: AIF - 3B - 9 LHR

9th LHR, AIF

9th Light Horse Regiment

War Diary, 22 October

Pro Gloria et Honore - For Glory and Honour

Regimental March -  Marching Through Georgia


The following entries are extracted and transcribed from the 9th Light Horse Regiment War Diary, the originals of which are held by the Australian War Memorial. There are 366 entries on this site. Each day has entries as they occurred from 1914 to 1919. In addition to the 9th Light Horse Regiment War Diary, when appropriate, entries from the 3rd Light Horse Brigade War Diary and other regiments with the Brigade will also appear. Entries from the unit history, Darley, TH, With the Ninth Light Horse in the Great War, Adelaide, Hassell Press, 1924 will also appear from time to time. The aim is to give the broadest context to the story and allow the reader to follow the day to day activities of the regiment. If a relative happened to have served in the regiment during the Great War, then this provides a general framework in which the individual story may be told.


The Diary


1914

Thursday, October 22, 1914

9th Light Horse Regiment Location -  Morphettville Race Course Camp and Broadmeadows Camp, Victoria. 

9th Light Horse Regiment War Diary - Formation of Regiment occurring at Morphettville Race Course Camp, Adelaide, while "C" Squadron is formed at Broadmeadows Camp, Victoria. 

See: Broadmeadows 1909


1915

Friday, October 22, 1915

9th Light Horse Regiment Location - Rhododendron Spur

9th Light Horse Regiment War Diary - Position was heavily shelled with shrapnel. No casualties. Bomb instruction continued.


1916

Saturday, October 21, 1916

9th Light Horse Regiment Location - Millegha

9th Light Horse Regiment War Diary - Regiment resting. The Regiment undertook routine work for the day.


1917

Monday, October 22, 1917

9th Light Horse Regiment Location - Um Urgan

9th Light Horse Regiment War Diary - Sixteen Other Ranks returned from Port Said Rest Camp.


1918

Tuesday, October 22, 1918

9th Light Horse Regiment Location - Kaukab

9th Light Horse Regiment War Diary - Worked 250 prisoners during day clearing lines of stones, building maize shelters etc.


1919

Wednesday, October 22, 1918

9th Light Horse Regiment Location - Adelaide

9th Light Horse Regiment War Diary - Regiment disbanded.


Previous: 9th LHR AIF War Diary, 21 October

Next: 9th LHR AIF War Diary, 23 October


Sources:

See: 9th Australian Light Horse Regiment, Contents
Australian Light Horse Studies Centre, AIF War Diaries of the Great War, Site Transcription Policy


Further Reading:

9th Light Horse Regiment AIF

Bert Schramm Diary

9th Australian Light Horse Regiment, Roll of Honour 

Battles where Australians fought, 1899-1920


Citation: 9th LHR AIF War Diary, 22 October

Posted by Project Leader at 1:01 AM EADT
Updated: Thursday, 16 September 2010 5:54 PM EADT

Newer | Latest | Older

Full Site Index


powered by FreeFind
Let us hear your story: You can tell your story, make a comment or ask for help on our forum.

Desert Column Forum

A note on copyright

The Australian Light Horse Studies Centre is a not for profit and non profit group whose sole aim is to write the early history of the Australian Light Horse from 1900 - 1920. It is privately funded and the information is provided by the individuals within the group and while permission for the use of the material has been given for this site for these items by various donors, the residual and actual copyright for these items, should there be any, resides exclusively with the donors. The information on this site is freely available for private research use only and if used as such, should be appropriately acknowledged. To assist in this process, each item has a citation attached at the bottom for referencing purposes.

Please Note: No express or implied permission is given for commercial use of the information contained within this site.

A note to copyright holders

The Australian Light Horse Studies Centre has made every endeavour to contact copyright holders of material digitised for this blog and website and where appropriate, permission is still being sought for these items. Where replies were not received, or where the copyright owner has not been able to be traced, or where the permission is still being sought, the Australian Light Horse Studies Centre has decided, in good faith, to proceed with digitisation and publication. Australian Light Horse Studies Centre would be happy to hear from copyright owners at any time to discuss usage of this item.

Contact

Australian Light Horse Studies Centre

eXTReMe Tracker