"At a mile distant their thousand hooves were stuttering thunder, coming at a rate that frightened a man - they were an awe inspiring sight, galloping through the red haze - knee to knee and horse to horse - the dying sun glinting on bayonet points..." Trooper Ion Idriess
The Australian Light Horse Studies Centre aims to present an accurate history as chroniclers of early Australian military developments from 1899 to 1920.
The Australian Light Horse Studies Centre site holds over 12,000 entries and is growing daily.
Contact:Australian Light Horse Studies CentreLet us hear your story:
You can tell your story, make a comment or ask for help on our Australian Light Horse Studies Centre Forum called:
WARNING: This site contains: names, information and images of deceased people; and, language which may be considered inappropriate today.
Tuesday, 4 August 2009
1st Australian Field Squadron Engineers, Roll of Honour Topic: AIF - DMC - Eng 1FSE
1st FSE, AIF
1st Australian Field Squadron Engineers
Roll of Honour
Poppies on the Roll of Honour, Australian War Memorial, Canberra
The Roll of Honour contains the names of all the men known to have served at one time with the 1st Field Squadron Engineers and gave their lives in service of Australia, whether as part of the 1st Field Squadron Engineers or another unit.
Roll of Honour
Leonard Haigh BRIGG, Died of Disease, 20 October 1918.
John CLAYTON, Died of Disease, 23 October 1918.
William George HALLETT, Died of Disease, 18 October 1918.
George Henry SMITH, Died of Disease, 19 November 1918.
Lest We Forget
Acknowledgement: Many thanks to Steve Becker who provided much of the raw material that appears in this item.
Australian Light Horse, Roles within the Regiment, Guards on Horse Lines Topic: AIF - Lighthorse
Australian Light Horse
Roles within the Regiment
Guards on Horse Lines
The following entries dealing with the roles and duties within the hierarchy of a light horse regiment are extracted from a very informative handbook called The Bushman’s Military Guide, 1898. While written in 1898, the information contained in the entries held true for the next twenty years with only minor modifications with the principles remaining as current then as now.
Guards on Horse Lines
(1.) The Night Guard will parade after evening stables fatigue dress, with cloak and service caps, but without arms.
(2.) This Guard will usually consist of 3 men for each 50 Horses in camp, under a corporal. This will allow a sentry to be in charge of 50 horses only.
(3.) In detailing the men for this guard it should be so arranged that the men of the troop, or half squadron, furnish the sentries for the horses of their own unit.
(4.) The corporal in charge of the Horse Lines Guard should frequently visit the horses during the night, accompanied by a trooper of his guard, and should always carry a lantern.
(5.) Sentries on horse lines should challenge after lights out, and when ordered pass the call of "all's well" every half hour until reveille.
Romani and Bir el Abd, Falls Account, Turkish and German Forces Engaged Topic: BatzS - Bir el Abd
Romani and Bir el Abd
Sinai, 4 - 9 August 1916
Falls Account, Turkish and German Forces Engaged
The Battle of Romani, 4-6 August and Bir el Abd, 9 August 1916
[Click on map for larger version]
[From: Military operations: Egypt and Palestine, Sketch 10 facing p. 178.]
As part of the Official British War History of the Great War, Captain Cyril Falls and Lieutenant General George MacMunn were commissioned to produce a commentary on the Sinai, Palestine and Syrian operations that took place. In 1928, their finished work, Military Operations, Egypt and Palestine - From the outbreak of war with Germany to June 1917, was published in London. Their book included a section specifically related to the battle of Romani and is extracted below.
MacMunn, G. & Falls, C., Military operations: Egypt and Palestine, (London 1930), pp. 202 - 203:
Part 7. Turkish and German Forces Engaged.
Germany was now able to assist her Turkish ally with more than the few staff officers who had represented her first contribution in Palestine. For the attack on Egypt she had organized a contingent of all arms and auxiliary services. This force received the code name of "Pasha," and later, when preparations were made to despatch a second and stronger contingent, was known as "Pasha 1." Its constitution was as follows
A machine-gun battalion of 8 companies [Five companies according to Steuber, the official German historian, 8 according to others, Kress speaks of "personnel and materiel for 8 "companies," and it seems certain that 8 of 4 guns each were formed, with the addition of Turkish personnel as drivers, etc.];
5 anti-aircraft groups;
60th Battalion Heavy Artillery [The personnel of the batteries was apparently German as to officers, N.C.O.s and leading numbers, the remainder Turkish.]:-
1 battery 100-mm. guns [2].
1 battery 150-mm. bows. [4].
2 batteries 210-mm. bows. [2 each].
2 trench-mortar companies;
300th Flight Detachment;
Wireless detachment;
3 railway companies;
2 field hospitals;
A number of mechanical transport companies for work in the Taurus.
Austria provided two mountain howitzer batteries of six guns each.
All the above units, with the exception of two 210-mm. howitzers, the trench mortars, (and, of course, the railway and mechanical transport companies) took part in the expedition to Romani. The remainder of the force consisted of the 3rd Division (of twelve battalions), a Turkish regiment of camelry, the 3rd Regiment of Mountain Artillery (three 4-gun batteries), and auxiliary services. The ration strength was about 16,000. In addition to the above there is some evidence that the 81st Regiment of the 27th Division advanced as far as Bir el Abd and took part in the defence of the position there. Nearly 5,000 camels and 1,750 horses accompanied the columns.
The object of the expedition was not to cross the Canal, but to capture the Romani position and then establish strong entrenchments opposite Qantara and bring the Canal under the fire of the heavy artillery. Liman von Sanders as detailed in his book Five years in Turkey (1927) at p. 183, describes the objective as
"not whole and not half; it makes one think of a man trying to wash his hands without wetting his fingers."
But it appears that further troops were to have been brought across Sinai had the first attack succeeded.
The advance was made in three successive columns on account of the scanty water supply, the troops marching by night. The transport of the heavy guns was an extraordinary feat. According to prisoners' reports, boards were laid down over the smaller islands of soft sand and picked up again when the wheels had passed over them. Over large areas of this nature tracks for the wheels of the gun-carriages were dug and packed tight with brushwood. Considerable quantities of ammunition, both artillery and small arm, must have been carried, for it was used without stint at Romani. It is believed, however, that the supply ran short after the 4th August.
The Volunteer Movement in Western Australia, Fremantle Rifle Volunteers Topic: Militia - LHW - WA
Western Australian Militia
Fremantle Rifle Volunteers
The following is an extract from the book written in 1962 by George F. Wieck called The Volunteer Movement in Western Australia 1861-1903, pp. 37 – 39:
Fremantle Rifle Volunteers
Sponsored by Mr. G. B. Humble of Fremantle, a memorial bearing the names of 40 persons desirous of forming an Infantry Volunteer corps at Fremantle was presented to the Military Commandant on 30.8.1872. Approval to form a corps, to be designated the "Fremantle Rifle Volunteers" appeared in the Government Gazette of 5.10.1872. Approval was given also for the new corps to wear uniform of the same type and pattern as that of the defunct Fremantle Volunteer Rifles. Captain R. Sutherland was appointed to Command as from 7.10.1872.
On 7.10.1872 corps strength stood at 71: it increased to 69 plus bandsmen in 1873; and by 1877 had increased to 124 all ranks. The maximum of 137 was reached in 1893 but a drop to 78 occurred in the following year when, presumably, the roll was purged of inefficients and dead-heads.
Approval to form a second Company was given in 1884. For a period of nine years corps strength was never less than 100, overshadowing the Perth Corps in this regard.
The Inspector of Volunteers reviewed the corps on 13.3.1873 (attendance 55) and again on 23.10.1873, both reports being favourable - even to the extent of recommending that new Martini-Henri rifles then on their way from England should be issued to replace the very obsolete weapons the corps then possessed. The new rifles were issued in due course but could not be fired for some months because someone in authority had forgotten to order suitable ammunition.
Corps training was co-ordinated with that of the Perth and Guildford bodies, the three frequently combining to carry out tactical and ceremonial exercises. It formed part of the 1st Battalion W.A. Volunteers and also attended the 1884 camp.
When on 1.7.1899 the Perth, Guildford and Fremantle corps were amalgamated to form the 1st Infantry Regiment, the latter provided "C" and "D" Companies of the new arrangement.
The Nek, Gallipoli, 7 August 1915, The Plan of Attack Orders Topic: BatzG - Nek
The Nek
Gallipoli, 7 August 1915
The Plan of Attack Orders
3rd Light Horse Brigade War Diary, August 1915
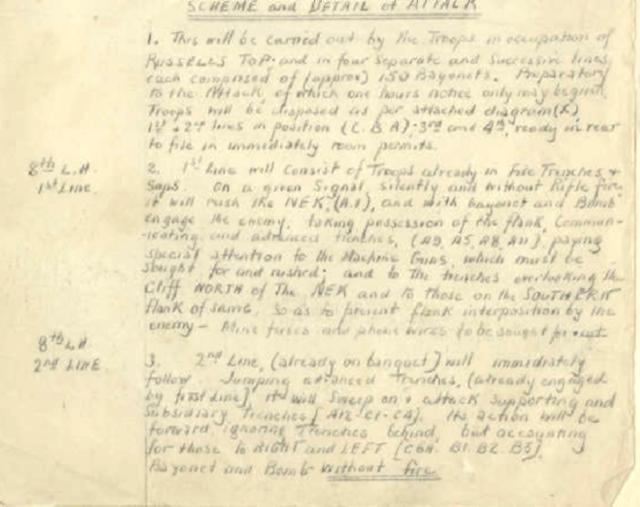
The actual orders were:-
8th L H. 1st Line.
First line will consist of troops already in fire-trenches and saps. On a given signal, silently and without rifle-fire, it will rush The Nek (A1) and with bayonet and bomb engage the enemy, taking possession of the flank, communicating and advanced trenches (A9, A5. A8, A11), paying special attention to the machine-guns which must be sought for and rushed and to the trenches overlooking the cliff north of The Nek and to those on the southern flank of same, so as to prevent flank interposition by the enemy - mine fuses and 'phone wires to be sought for and cut.
8th L.H. 2nd Line
Second line (already on banquette) will immediately follow. Jumping advanced trenches (already engaged by first line) it will sweep on and attack supporting and subsidiary trenches (A12, C1, C4). Its action will be forward, ignoring trenches behind, but accounting for those to right and left (C6A, B1, B2. B3). Bayonet and bomb without fire.
Note.
As soon as first line has moved from our trenches, second line will take the position vacated in order to make room for third line. In passing over intervening space officers will take post in the ranks so as not to make themselves a conspicuous target.
The 10th L.H. 3rd Line.
Having moved up communicating trenches, third line will in like manner be prepared and follow on at once. Its objective will be the next line of trenches (C2, C3, C5, C7, C8) and, if possible. Z. Y, C10, C11, to C12-13. With bomb and bayonet only, the enemy will be driven back and out without turning back, and avenues blocked. Once in the trenches, the enemy will not be able to make effective use of his machine-guns. When the extreme limit of advance has been reached the gain must be made good and safe against machine-gun fire and against counter-attack. Here fourth line plays its part.
10th L.H. 4th Line.
Fourth line will in like manner follow and act in concert with 2 and 3. It must endeavour to join up with the latter. Every second man will carry digging tools in the proportion of one pick to two shovels. It is impossible to define precisely what this line may be called upon to do. This must of necessity depend upon the progress of its predecessors. It may have to down tools and assist but it must make every effort to join up with third line and block the approaches. This is its role."
(The capital letters and figures refer to Turkish trenches which were thus marked on the British maps. "Y" and “Z" were centres or junctions of several trenches )
The Australian Light Horse Studies Centre is a not for profit and non profit group whose sole aim is to write the early history of the Australian Light Horse from 1900
- 1920. It is privately funded and the information is provided by the individuals within the group and while permission for the use of the material has been given for this
site for these items by various donors, the residual and actual copyright for these items, should there be any, resides exclusively with the donors. The information on
this site is freely available for private research use only and if used as such, should be appropriately acknowledged. To assist in this process, each item has a citation
attached at the bottom for referencing purposes.
Please Note: No express or implied permission is given for commercial use of the information contained within this site.
A note to copyright holders
The Australian Light Horse Studies Centre has made every endeavour to contact copyright holders of material digitised for this blog and website and where
appropriate, permission is still being sought for these items. Where replies were not received, or where the copyright owner has not been able to be traced, or where
the permission is still being sought, the Australian Light Horse Studies Centre has decided, in good faith, to proceed with digitisation and publication. Australian Light
Horse Studies Centre would be happy to hear from copyright owners at any time to discuss usage of this item.