"At a mile distant their thousand hooves were stuttering thunder, coming at a rate that frightened a man - they were an awe inspiring sight, galloping through the red haze - knee to knee and horse to horse - the dying sun glinting on bayonet points..." Trooper Ion Idriess
The Australian Light Horse Studies Centre aims to present an accurate history as chroniclers of early Australian military developments from 1899 to 1920.
The Australian Light Horse Studies Centre site holds over 12,000 entries and is growing daily.
Contact:Australian Light Horse Studies CentreLet us hear your story:
You can tell your story, make a comment or ask for help on our Australian Light Horse Studies Centre Forum called:
WARNING: This site contains: names, information and images of deceased people; and, language which may be considered inappropriate today.
Tuesday, 5 October 2010
The Capture of Aleppo, Syria, 26 October 1918, Outline Topic: BatzP - Aleppo
The Capture of Aleppo
Syria, 26 October 1918
Outline
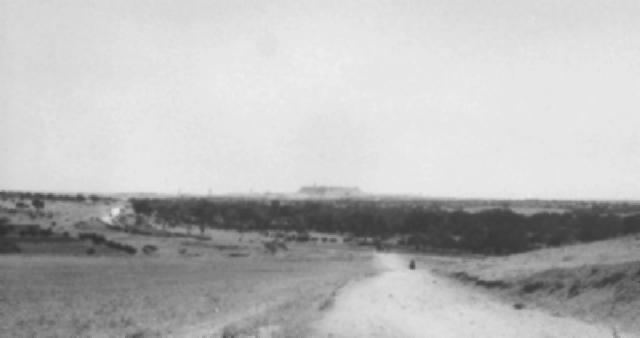
The road leading to Aleppo with the citadel in the distance.
A few weeks after the Liberation of Damascus, 1 October 1918, the British Commander, Sir Edmund Allenby continued a more cautious advance north. At first he wished to use the men of the Australian Mounted Division immediately after Damascus fell but the Division was stricken with illness making the formation virtually inoperative for a few weeks. In its place he sent the 5th Mounted Division supported by auxiliaries from the Northern Arab Army. The Australian contingent included the 1st Australian Armoured Car Section which travelled as the vanguard of the column.
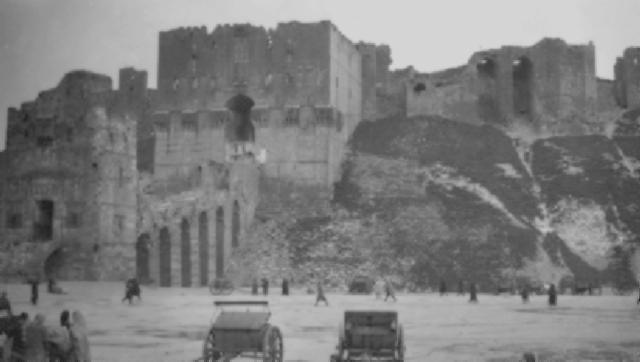
Aleppo, 1912.
After a few inconclusive skirmishes, the Turkish forces withdrew from Aleppo leaving it to the Allied forces to enter without opposition on 26 October 1918. The auxiliaries from the Northern Arab Army took this as an opportunity to loot the city as had been done in Damascus but this time the 1st Australian Armoured Car Section was employed to suppress the outbreak of lawlessness.
The Aleppo Citadel.
Subsequent to the capture, the Allied forces moved north in an advance to Mouslimmiye, where Mustafa Kemal (now in command of the Yıldırım Army Group) had rallied some men under XXII Corps HQ. Kemal held his positions until 31 October, when hostilities ceased following the signing of the Armistice of Mudros.
Destroyed German vehicles abandoned 10 km north of Aleppo.
The Ottoman Empire during the Great War, The Ottoman Army, Outline of Infantry Structure Topic: Tk - Army
The Ottoman Empire during the Great War
The Ottoman Army
Outline of Infantry Structure
When reading about the various parts of a Turkish Infantry unit, the following terms relating to specific formations are employed:
Rifleman
Serviceman’s name
Recruitment
Battalion Service Number
Section
Squad
Platoon
Company
Battalion
Regiment
Division
Corps
Army
Each of these specific units will be examined in terms of ideal composition and role.
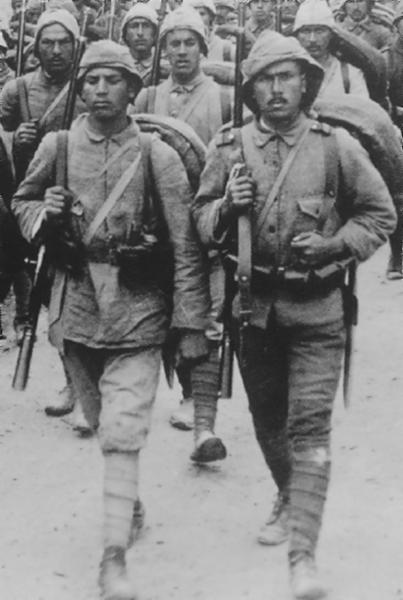
The full service uniform of the ordinary Mehmet in the Ottoman Army.
Rifleman
The individual Rifleman was the most basic part of the Turkish infantry. It is from the Rifleman which all other soldierly functions stem. Though by tradition certain infantry units are based on the rifleman, they employ a variety of other specialized soldiers in conjunction with the rifleman.
All Riflemen were armed with the 7.65 mm Mauser rifle of the 1903 pattern and short bayonet. Officers were armed with a sword and revolver. The sword was rarely carried into action.
Khaki service dress was adopted for infantry use. The service jacket was single breasted with a pleat in the back and four flap pockets. Officers collars were olive green while the rank and file of ordinary line battalions had plain collars. Trousers were plain for the men although officers had red piping. Greatcoats were grey, double breasted with collars or collar patches of the same colour as the service jacket. Boots were brown ankle lace up with khaki coloured puttees. The cap was a khaki kabalak with a distinctive top or dome the same colour as the coat collars. Also popular amongst those troops in the desert was the Kefiye, similar to the Arab headdress.
Serviceman’s name
Until the family name reform of 1927 when everyone was compelled to take a surname, the individual was known by his personal name or sometimes a nickname. Further identification was added by including the name of the soldier’s father to the record.
Top 10 Turkish Personal Names
Name
% Used
Mehmet
13.15%
Mustafa
7.94%
Ali
7.60%
Ahmet
6.98%
Hasan
5.98%
Hüseyin
5.90%
Ibrahim
4.18%
Ismail
4.09%
Halil
3.69%
Osman
3.46%
Total
62.96%
The figures were obtained from the work Sehitlerimiz which was the Turkish equivalent to the Turkish Roll of Honour. The specific campaign was that of Gallipoli, a roll which contained 45,487 names. Because of the random nature for entry selection, Sehitlerimiz provides an excellent sample of the general population within the Turkish Army during the Great War. This explains why the common soldier gained the name "Mehmet" in the same way as calling the ordinary British soldier "Tommy" or the Australian Light Horseman called "Billjim".
With the example of the Australian Light Horse, some 15% of men had the name Bill. Without any other distinguishing feature, if this were the only name employed, the chaos it would create would be immense. Hence the surname was important. But when there is no surname, other conventions were used by the Turks. A nickname became very important. With the Australians, a person might be referred to as "Bluey" rather than his first name or surname. Similarly with the Turks although a far more formal thing as the sobriquet, if known, was part of the man's formal identification.
Here are some examples:
HÜSEYİN, also known as SARIALİ OĞULLARI (SARIALİ SONS), the son of OSMAN
ALİ, also known as KARA KULAK OĞULLARI (BLACK EAR'S SONS), the son of İSMAİL
OSMAN, also known as YÜZBAŞI OĞULLARI (CAPTAIN'S SONS), the son of HACI MEHMET ALİ
AHMET, also known as HASANBEY OĞULLARINDAN (SEIGNIOR HASAN'S SONS), the son of MEHMET
HÜSEYİN, also known as ABİDİN OĞULLARI (ABİDİN SONS), the son of HALİL
Recruitment
Soldiers were enlisted in a particular military recruitment district. At the headquarters of the military district a roll was maintained of all soldiers recruited. It was here that all aspects of the soldier’s service was administered. On this roll was attached all correspondence regarding the soldier and any other notifications such as wounding or death. It is only at these places do we have the records of the individual soldiers. After the fragmentation of the Ottoman Empire, rolls in other districts were destroyed or became inaccessible.
The following is a list of military districts for Anatolia during the Great War:
Turkish serviceman numbers were based solely upon the Battalion in which they were first recruited. Units were locally raised and service numbers were peculiar to that battalion rather than to the military service. So upon joining an Infantry Battalion, the recruit was allocated a number specific to that unit. If the person transferred to another battalion, the service number remained unchanged. The result was that in many situations, men held identical service numbers.
Section
The formation which the individual rifleman most associated was the Section. This was a distinct body composed of four riflemen. Leading this section was usually a senior private or a corporal. This was a tight knit group which worked together as a single unit.
Squad
Two sections were joined together to form a Squad under the leadership of a corporal or sergeant. The consequent nominal strength of a Squad was nine riflemen.
Platoon
Nine squads formed the Platoon which was under the leadership of a lieutenant or second lieutenant. The nominal strength of a Platoon was 73 riflemen.
Company
Under the command of a Captain, a Company was made up of three Platoons plus the supporting personnel. The nominal war strength of a Company was 265 men while the peace strength was 123 men.
Company Establishment Strength
Rank
Peace
War
Captain
1
1
Lieutenant
1
1
Second Lieutenants
2
2
Sergeant Major
1
1
Assistant Sergeant Major
1
1
Sergeants
3
6
Musketry Sergeant
1
1
Musketry Corporal
1
1
Ambulance
1
1
Stretcher Bearers
0
4
Corporals
9
18
Quartermaster Corporal
1
1
Batmen
3
3
Buglers
4
4
Tailor
1
1
Cobbler
1
1
Water Carrier
1
1
Cook
1
1
Other Ranks
90
216
Total
123
265
Water Cart and Horse
1
1
The above, of course was the ideal composition. The reality under war conditions was quite different. Those divisions that faced the Russians in the Caucuses had their battalions reduced to company strength with the divisions being renamed regiments. Similarly the reduction in Battalion strength on the Palestinian Front gave similar results. On paper, a force may have looked imposing but in reality, it had little strength.
Battalion
The standard Turkish infantry battalion was meant to have a war establishment of 1,080 men. This consisted of four Companies totalling some 1,060 men and Battalion Headquarters which added a further 20 men. One addition to the war time establishment of a battalion but not counted in its establishment was a transport section consisting of a sergeant and 25 drivers making 1,106 men per Battalion.
Battalion Staff
Rank
Peace
War
Major
1
1
Lieutenant - Aide de camp
1
1
Medical Officer
1
1
Surgeon
1
1
Chemist
1
1
Imam
1
1
Adjutant
1
1
Armourer
1
1
Staff Sergeant Major
1
1
Staff Sergeant
1
1
Battalion Quartermaster Sergeant
1
1
Battalion Quartermaster Corporal
1
1
Sergeant Bugler
1
1
Corporal Bugler
2
2
Batmen
5
5
Transport Sergeant
0
1
Driver
0
25
Total
20
46
Regiment
The Turkish Infantry Regiment was comparable to the Australian Infantry Brigade. It comprised three Infantry Battalions, one Machine Gun Company and Regimental Headquarters.
Regiment Headquarters
Rank
Peace
War
Colonel
1
1
Lieutenant - Aide de camp
1
1
Adjutant
1
1
Imam
1
1
Colour Sergeant
1
1
Staff Sergeant
1
1
Clerk (Private)
1
1
Orderly Sergeant
1
1
Batmen
4
4
Total
12
12
The armament of the Machine Gun Company, they were either armed with the heavy Maxim guns or the lighter Hotchkiss gun, determined the establishment number of men in a Regiment. If a Maxim Gun Company of 160 men, then the total number on establishment would be 3,490 men while the Hotchkiss Machine Gun Company of 123 men would mean the establishment of the Infantry Regiment was 3,453 men.
Division
A Division contains sufficient material and men to allow the formation to undertake combat actions without reference to any other unit. It is usually called an independent command. All the military services were available within the Division. The core of the Division’s combat ability was provided by three Infantry Regiments. The key function of the division was logistical support of the Infantry Regiments as well as planning support when combat is offered.
The following outlines the wartime establishment of a Turkish Infantry Division.
9 Infantry Battalions of 1,106 men
9,954
3 Machine Gun Companies of average 142 men
426
6 Artillery Batteries of average 173 men
1,038
Sanitary Company, Transport Company and other supports
550
Total
11,968
There were some 63 Infantry Divisions formed by Turkey during the Great War. While this appears to be a great number, the reality was entirely different. After its high point in 1916, the Turkish Army was unable to maintain the troop levels in the Divisions as allowed by their establishment. In Palestine, Infantry Divisions were usually at the strength of an Infantry Regiment.
Corps
A Corps was a major military organisation which consisted of a minimum of two divisions. As the Infantry Corps were degraded through combat in the Sinai and Palestine, they were unable to present a force of more than 5,000 rifles on most occasions.
Army
An Army, in the formation sense, is composed of a minimum of two Corps. By 1918, the Armies in Palestine were at the manning levels of one fully established Infantry Division.
Source: Intelligence Section, Cairo, Handbook of the Turkish Army, 8th Provisional Edition, Government Press, Cairo, February 1916.
The Battle of Montbrehain, France, 5 October 1918, Outline Topic: BatzWF - Westn Front
The Battle of Montbrehain
France, 5 October 1918
Outline
Montbrehain.
Montbrehain, fought on 5 October 1918, was the last action involving Australian infantry on the Western Front during the First World War. Following the successful breaching of the main Hindenburg Line on 29 September - 1 October (see St Quentin Canal), the exhausted and depleted 3rd and 5th Australian divisions which took part in that attack were relieved by the 2nd Australian Division under Major General Charles Rosenthal on the nights of 1 and 2 October. The next day this formation was set to the task of breaching the final network of defences called the Beaurevoir system.
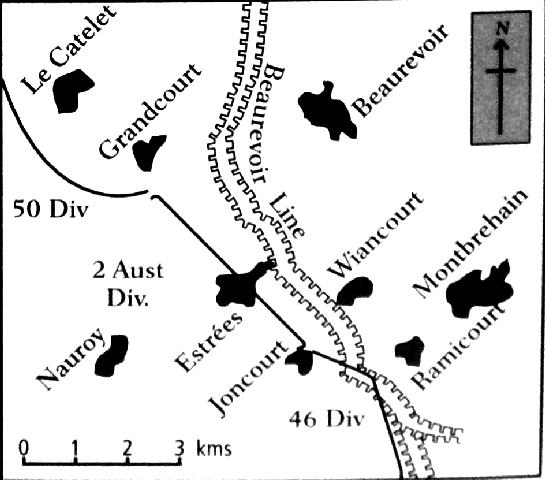
Map detailing the trenches around Montbrehain.
[From: Coulthard-Clark, p. 164.]
The attack begun at 6.05 a.m. by the 5th and 7th Brigades (between them totalling no more than 2,500 men) was launched from around Entrees and directed at Beaurevoir village. Further south, the British 46th Division of the 9th Corps was to attack towards Montbrehain, capitalising on a small breach of the German system won at a salient east of Joncourt a day or so earlier. The Australian attack was a success, though it was stopped just short of its goal; the British, too, broke through and for a time held Montbrehain - village until driven out after midday.
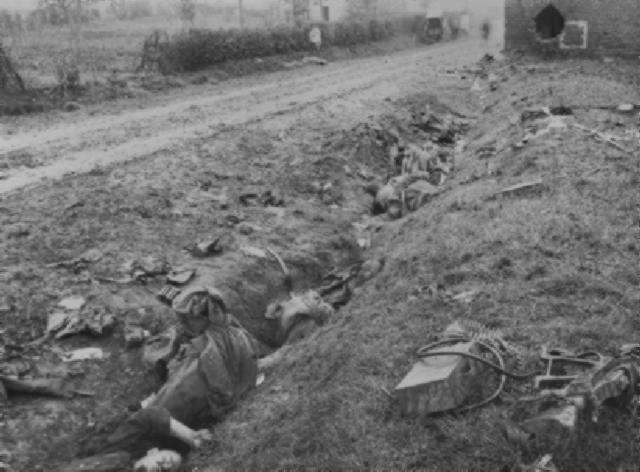
The bodies of German machine gunners in the trench along the roadside at Montbrehain.
After a mishandled attempt to press ahead against Beaurevoir early on 4 October, before noon that day the 2nd Division's 6th Brigade was ordered to make an attack on Montbrehain the following morning. The operation was a brilliant success, the attackers taking 400 Germans captive. The victory was gained, however, at a cost of 430 casualties-a tally which, at that stage of the war, was more commensurate with participation in a general attack rather than a relatively small local attack. That night the 6th Brigade followed the remainder of the AIF out of the front-line and into a rest area west of Abbeville.
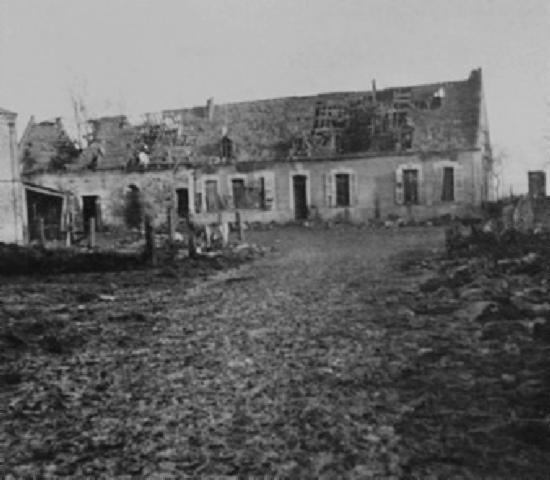
The remains of a bombed farm house in Montbrehain.
Extracted from the book produced by Chris Coulthard-Clark, Where Australians Fought - The Encyclopaedia of Australia's Battles, Allen and Unwin, Sydney, 1998, pp. 164-165.
Additional References cited by Chris Coulthard-Clark:
C.E.W. Bean (1937) The Australian Imperial Force in France during the Main German Offensive, 1918, Sydney: Angus & Robertson.
The Battle of Broodseinde, Belgium, 4 October 1917, Outline Topic: BatzWF - Westn Front
The Battle of Broodseinde
Belgium, 4 October 1917
Outline
Broodseinde with four German shells exploding near the Australian trenches.
Broodseinde, fought on 4 October 1917, was the next operation launched by the British Second Army as part of the Third Battle of Ypres after Polygon Wood (q.v.). In an operation involving twelve divisions advancing on a front of thirteen kilometres, the centre comprised I and II Anzac Corps fighting side by side for the first time. The former had been sideslipped about three kilometres north, so that its front now lay opposite the village of Broodseinde, and If Anzac was brought into the line on its left. Along slightly more than 4.5 kilometres of front there were now four Anzac divisions in line, in order from left to right (north to south): New Zealand, 3rd, 2nd and 1st Australian. While the New Zealanders faced Abraham Heights, the Australians had as their objective the main ridge which adjoined these at Broodseinde.
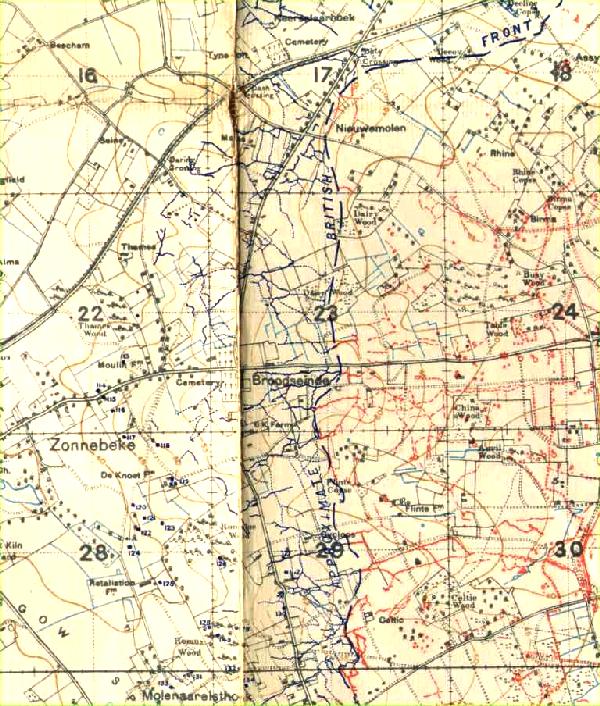
Trench map of the Broodseinde region.
Fearing that the fine weather which had accompanied operations over the preceding fortnight might change, preparations for the attack were hurried forward. On the night before the scheduled start, rain began to fall; it was, however, decided to persist with the planned advance. At dawn on the 4th, 40 minutes before the scheduled start-time at 6 a.m., the 1st and 2nd Divisions were suddenly assailed by a mortar barrage which fell on the shell-holes where they were waiting. Although considerable casualties were suffered in this bombardment, the troops could only wait it out.
Precisely at 6 a.m. the British barrage descended, whereupon the Australians rose to their feet and advanced - only to be met by a line of troops from the German 212th Regiment which also jumped to their feet at that moment 30 metres away. These had been in the process of advancing behind their own barrage in an attempt to recapture some of the ground earlier lost. The Germans hesitated momentarily, evidently disconcerted to find themselves confronted by a bigger attack than their own. The Australians opened fire with their Lewis guns and the enemy promptly broke, pursued by the waves of attackers.
Following the usual stiff fighting around pillboxes, the Australians gained all their objectives on the ridge - though at the cost of 6,500 men: the New Zealanders suffered a further 1,700 casualties. Along the whole line the attack had been successful, thereby giving the British their first glimpse of the Flemish lowlands since May 1915.
Broodseinde Ridge overlooking Ypres.
Extracted from the book produced by Chris Coulthard-Clark, Where Australians Fought - The Encyclopaedia of Australia's Battles, Allen and Unwin, Sydney, 1998, pp. 132-133.
Additional References cited by Chris Coulthard-Clark:
C.E.W. Bean, (1933), The Australian Imperial Force in France 1917, Sydney: Angus & Robertson.
P.A. Pedersen, (1985), Monash as Military Commander, Carlton, Vic.: Melbourne University Press.
The Australian Light Horse Studies Centre is a not for profit and non profit group whose sole aim is to write the early history of the Australian Light Horse from 1900
- 1920. It is privately funded and the information is provided by the individuals within the group and while permission for the use of the material has been given for this
site for these items by various donors, the residual and actual copyright for these items, should there be any, resides exclusively with the donors. The information on
this site is freely available for private research use only and if used as such, should be appropriately acknowledged. To assist in this process, each item has a citation
attached at the bottom for referencing purposes.
Please Note: No express or implied permission is given for commercial use of the information contained within this site.
A note to copyright holders
The Australian Light Horse Studies Centre has made every endeavour to contact copyright holders of material digitised for this blog and website and where
appropriate, permission is still being sought for these items. Where replies were not received, or where the copyright owner has not been able to be traced, or where
the permission is still being sought, the Australian Light Horse Studies Centre has decided, in good faith, to proceed with digitisation and publication. Australian Light
Horse Studies Centre would be happy to hear from copyright owners at any time to discuss usage of this item.