Topic: AIF - DMC - British
Battle of Romani
Sinai, August 4 to 5, 1916
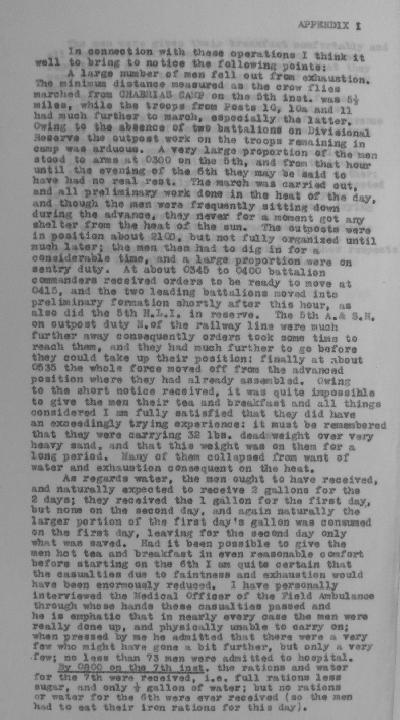
127th Infantry Brigade War Diary Account
War Diary account of the 127th Infantry Brigade.
The transcription:
127th Infantry Brigade, 42nd Infantry Division.
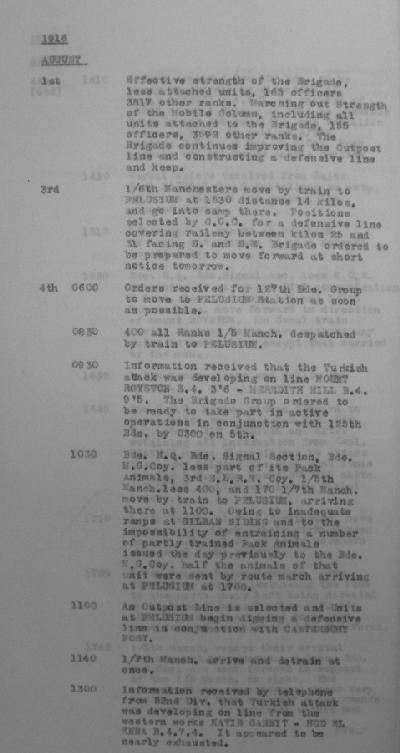
3 August
1/6th Manchesters move by train to Pelusium at 1530 distance 14 kilos, and go into camp there. Positions selected by General Officer Commanding for a defensive line covering railway between kilos 2b and 31 facing south and south east. Brigade ordered to be prepared to move forward at short notice tomorrow.
4 August
0600 Orders received for 127th Brigade. Group to move to Pelusium Station as soon as possible.
0830 - 400 all Ranks 1/5 Manchesters despatched by train to Pelusium.
0930 - Information received that the Turkish attack was developing on line Mount Royston B.4.3.6 to Meredith Hill B.4.9.5. The Brigade Group ordered to be ready to take part in active operations in conjunction with 125th Brigade by 0300 on 5th.
1030 - Brigade Headquarters, Brigade Signal Section, Brigade Machine Gun Company, less part of its Pack Animals, 3rd East Lancashire Royal Engineers Company, 1/5th Manchesters less 400, and 170 1/7th Manchesters move by train to Pelusium, arriving there at 1100. Owing to inadequate ramps at Gilban Siding and to the impossibility of entraining a number of partly trained Pack Animals issued the day previously to the Brigade Machine Gun Company half the animals of that unit were sent by route march arriving at Pelusium at 1700.
1100 - An Outpost Line it selected and units at Pelusium begin digging a defensive line in conjunction with Canterbury Post.
1140 - 1/7th Manchester arrive and detrain at once.
1300 - Information received by telephone from 52nd Division that Turkish attack was developing on line from the western works Katib Gannit to Hod el Enna B.4.7.4. It appeared to be nearly exhausted.
1410 - Orders received for 127th Brigade to be ready to advance to direction of Mount Royston B.4.3.7, in support of Anzac Mounted Troops as soon as possible Brigade not yet complete, one Battalion being en route as well as A/212 Battery Royal Field Artillery, ½ Brigade Machine Gun Company, Pack animals and Ambulance Mobile Section.
1430 - Verbal orders received from Major General Douglas for 2 battalions to move on Mount Royston and support the mounted troops.
1510 - 1/8th Manchesters arrive at Pelusium by train and prepare to move forward immediately.
1530 - Brigade Headquarters, Brigade Signal Section less 8 Other Ranks remaining to carry out Divisional Communication. Two Sections Brigade Machine Gun Company, 1/5th and 1/7th Manchesters move forward in direction of Mount Royston. No Camel train having arrived. Units move without any water or ammunition except that carried by the men.
1616 - 1/8th Manchesters leave and follow the column.
1645 - The General Officer Commanding, having ridden forward to reconnoitre reaches Anzac Mounted Division Headquarters above Bir abu Diyuk and after obtaining all information from General Chaytor makes dispositions to attack the enemy holding the high sand dunes running north west from Mount Royston above Abu Diyuk at 1700 and issue verbal orders.
1710 - 1/5th Manchesters Lieutenant Colonel Darlington, move forward to attack, their right moving on Anzac Mounted Division left on lower northern slopes of Mount Royston.
1725 - 1/7th Manchesters Major Cronshaw, move forward to attack, extending the line to the north their left being directed on high sand dunes ¾ mile north west of Abu Diyuk which appeared to be the most forward position held by the Turks.
1745 - 1/8th Manchesters report their arrival and are put in reserve. 2 Sections Brigade Machine Gun Company are sent forward in support of the 1/5th Manchesters, on right. The attacking lines move forward under very little rifle fire and only a few rounds of shrapnel. On arriving within 500 yards
yards of Turkish positions some white flags are shown. On moving up slope and getting within 250 yards of enemy position more white flags are shown and many Turks leave their trenches and come out to surrender. Others are seen to be retiring in a south easterly direction.
1800 - 1/5th and 1/7th Manchesters are in possession of sand ridge previously held by the enemy. About 250 prisoners are taken casualties 5 men wounded. One Company 1/5th Manchesters are sent to occupy Mount Royston and relieve Anzac Mounted Division troops holding it.
1830 - The advance is continued and connection is made with 5th and 7th Light Horse Regiments on left who were advancing on Mount Wellington from the north.
1900 - The line swings more south on to line Mount Royston to Wellington Ridge B.4.8.8. No opposition is encountered.
1920 - Owing to darkness and having received information from Australian Mounted Division that enemy's formed bodies were at least 3 miles away, any further advance was stopped. The firing line digs in and covering troops are put out. One Company 1/8th Manchesters and one Section Brigade Machine Gun Company are sent to reinforce troops holding Mount Royston. The Brigade occupies the line Mount Royston to a point B.4.5.8. on the Qantara track, where it connected with the 5th Light Horse Regiment, three Companies 1/8th Manchesters, one Company 1/5th Manchesters and one Section Brigade Machine Gun Company for the Brigade Reserve. Brigade Headquarters are established at point B.4.4.8. on the sand ridge south south east of Bir abu Diyuk. A few Turkish dead and over a dozen wounded are found in the immediate vicinity on the position lately occupied by the enemy. Communication to 42nd Infantry Divisional Headquarters at Pelusium very slow owing to press of work on the single signalling station there, messages being received many hours late. During the night a few more prisoners are brought in. There is no firing and all remains quiet.
5 August
0400 - "All Clear" reported at dawn, A few more prisoners are found in Hods. Search parties for collecting Turkish prisoners and wounded are sent out and Companies despatched to gather up all arms and equipment left lying in the enemy's position.
0540 - Owing to extreme congestion of messages at Divisional Signalling Station orders to move forward at 0400 in support of mounted troops are not received til 0540 when a verbal message to that effect is given by a Divisional Staff Officer. The Signalling Message to move is also received at the same time. The 1st line Transport Camels with a portion of the water for the Brigade arrives and Units are closed and proceed to fill their water bottles,
0730 - The Brigade less 1/6th Manchesters and A Battery 212th Brigade moves forward in direction of Hod el Enna B.4.8.4. in two columns preceded by Scouts, 1/6th and 1/7th Manchesters leading, 1/8th Manchesters, Brigade Machine Gun Company and Ambulance Mobile Section following. Distance to Hod el Enna 2¾ miles.
0830 - Marching very slow over heavy sand and being the hottest hours of the day the heat is very trying; and men begin to fall out. No opposition at all to the advance is met with, the Mounted Troops having swept the country thoroughly. Pass a member of Turkish wounded lying in the various Hods and also a good number of prisoners and camels taken by the Mounted Troops.
0935 - Head of the Column arrives at point B.4.7.4. ¾ mile north of Hod el Enna. Headquarters are established there and observation posts put out. 1/5th Manchesters on right with right flank resting an Hod el Enna and 1/7th Manchesters on left with left flank resting on Mount Meredith take up positions for covering the front. Many men very exhausted and all find lying out in the sun without shelter very trying. Remain in this position all day. The want of water towards evening becomes acute, the men having had less than ¾ gallon each since leaving Pelusium.
1800 - Night Outposts are put out, the 1/8th Manchesters on right covering Hod el Enna with their right flank about point B.4.7.3. 1/5th Manchesters on left to connect with 125th Infantry Brigade at Mount Meredith B.4.9.5. 1/6th Manchesters less one Company escorting A Battery, 212th Brigade arrive and are placed in the reserve with 1/7th Manchesters and Brigade Machine Gun Company.
1830 - Ration and water convoy arrives. Orders are received for the Brigade to be ready for a move forward early next morning. Owing to their exhaustion all available Camels are sent back to Pelusium to feed and water. Part of the baggage and 1st line equipment is dumped and a portion of reserve ammunition only put ready for further advance with the remainder of the Camels available.
2230 - 125th Infantry Brigade report they have their outposts in position connecting with the 1/5th Manchesters on their right and 156th Infantry Brigade on their left everything remains quiet during the night and no firing takes place. Communication with Divisional Headquarters still difficult owing to congestion of messages at Divisional Signalling Station.
6 August
0215 - Receive orders to be ready to move towards Qatia 5¼ miles about dawn. The enemy are reported to have retired in the direction of Bir el Abd.
0330 - Orders, received for 42nd Infantry Division to move at 0400 in support of the Mounted Troops and occupy a line from Bir el Mamluk to the ruins of Qatia inclusive. 127th Infantry Brigade to follow 125th Infantry Brigade and the right and left flank guards of ½ Battalion and one Company respectively,
0400 - The Brigade moves off, 1/7th Manchesters on left providing the left flank Guard, 1/5th Manchesters on right followed by Brigade machine Gun Company, one Company 1/6th Manchesters, 3rd East Lancashire Royal Engineers and Ambulance Mobile Section, 2 Companies 1/6th Manchesters right flank guard.
1/8th Manchesters from the right of the Outpost line were ordered to close in an 1/5th Manchesters on the line of march. Owing to difficulty in transmission of orders, the telephone 1ine having broken, this Battalion was delayed in doing so and following an hour or so in rear of the baggage animals. The marching is heavy but good progress in made while the day remains cool.
0800 - On reaching the crest of the rise 2½ miles west of Qatia further advance was stopped by Divisional Orders for the situation to be cleared up.
0840 - Orders to attack Qatia received from Division with directions for a right flanking movement to be made in conjunction with Mounted Troops.
0900 - Attack orders issued and verb instructions given to Commanding Officers.
0920 - The Brigade advances to attack, 1/6th Manchesters less one Company on right with their right flank directed on Mamluk B.4.10.4; 1/7th Manchesters on the left with their left flank directed on gap in palm grove about point B.4.10.5. south west at "Q" in Qatia, to connect with 125th Infantry Brigade. 1/5th Manchesters and Brigade Machine Gun Company form the Reserve following 1/6th Manchesters. The advance is carried out without any opposition. After a short time the heat becomes excessive and many men fall out marching over this heavy sand.
1130 - The firing line reaches the palm groves north of Maraiah B.4.7.4. no enemy are to be seen anywhere. Many men very exhausted and badly in want of water.
1200 - The Brigade closes and rests in the shade till 1400.
1415 - A move forward is made to the eastern groves of Qatia to the north west of Mamluk to get into line with 125th Infantry Brigade. Mutual arrangements are made with that Brigade for the immediate protection of the front.
1800 - An Outpost line for the night is selected and held by 1/6th Manchesters on right and 1/7th Manchesters on the left, connecting with 125th Infantry Brigade and six Maxim Guns. The remainder of the Brigade goes into bivouac in the palm groves immediately south west of Qatia Cemetery. Nothing to report during night.
Roll of Honour
Battle of Romani, Sinai, August 4 to 5, 1916, Roll of Honour, British Forces
Lest We Forget
Further Reading:
Battle of Romani, Sinai, August 4 to 5, 1916, Roll of Honour, British Forces
Battle of Romani, Sinai, August 4 to 5, 1916
Bir el Abd, Sinai, 9 August 1916
Battles where Australians fought, 1899-1920
Citation: Battle of Romani, Sinai, August 4 to 5, 127th Infantry Brigade War Diary Account
Posted by Project Leader
at 12:01 AM EADT
Updated: Monday, 26 October 2009 8:54 AM EADT