Chapter V
The Landing
In the very early hours of the morning of April 25, 1915, the line of battleships, containing the first landing party, lay motionless on the calm seas and the destroyers came slowly up in rear. It was a moonlight night, but cloudy, and everything was favourable for the enterprise. The troops were mustered on deck and the tows got ready. With their full equipment on, the men gradually descended the swaying rope ladders and, as the boats alongside were filled with men, they slowly dropped to the rear until there were strings of tows behind each battleship. It was now about 3 a.m. and the moon was almost below the western horizon and the darkness became more intense. The destroyers with their tows now moved forward and passed the motionless battleships with the long strings of tows drawn out behind. The troops detailed for the landing had been orderly and quiet, but underneath all a fierce excitement was burning and a certain amount of strain was necessarily present : the dim shapes of the ships, the shuffle and clank of equipment, and the silent descending of the rope ladders into the dark boats, and the slow dropping back into position when the boat's complement was reached; all these had their effect on the men and when the order to move slowly forward was given and the whole flotilla crept onward in the eery darkness, the tension was so great that anything at all would have been a welcome break.
J. Lawrence Rintoul draws a vivid picture of the scene:
In the deep of the darkling night,
By the storied Trojan seas,
The boats stole out to fight
On the crag-crowned Chersonese (i.e., Gallipoli).
For the half-moon waned and sank
As the troopships shoreward drave,
And the young troops, rank on rank,
Gazed dumb at the cliff and the wave."
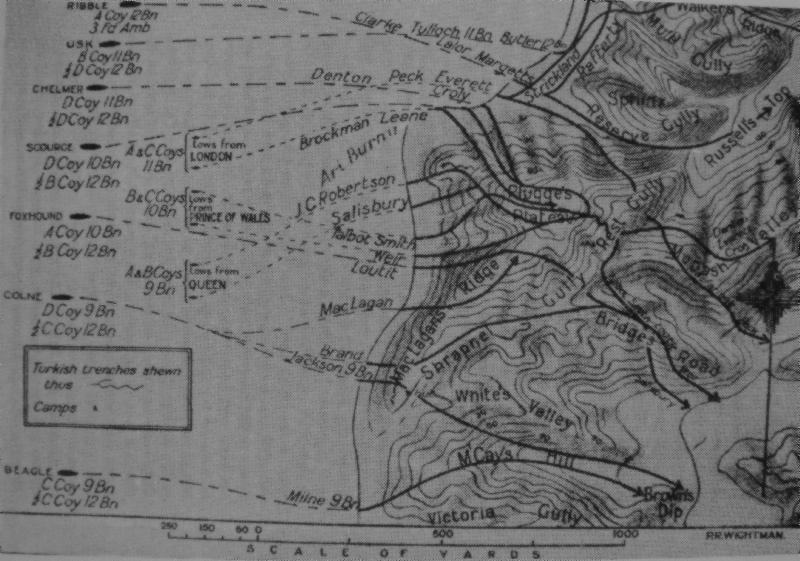
Just before the dawn, the battleships stopped and the tows were cast off and ordered ahead. The steam pinnaces then took them in charge and surged forward with the tows behind them in long strings. The battleships then moved on again very slowly, and the pinnaces raced for the shore, which could be seen only as a dim unreality in the darkness to the east. (See official map of landings from the battleships of various units of the 3rd Australian Brigade on April 25, 1915, at Ari Burnu, later called Anzac, on page 69.)
The destroyers were next ordered to move forward through the battleships and get as close to the shore as possible. Owing to the darkness and the confusion resulting, the pinnaces lost direction and made for the shore under the high ground at Ari Burnu instead of the flatter beach further south at Gaba Tepe.
By the time the pinnaces were ready to cast off the tows the dark mass of the land loomed up higher and higher and the naval men knew that the landing was going to be made about 1,000 yards too far north. However, it was too late to do anything else, so the rowboats were cast off and the troops started to pull them to the shore.
The 11th Battalion boats all made for the extreme left, to the north of Ari Burnu. As the boats strained for the shore the alarm was raised by the Turks. A challenge, and then a shot rang out; then a patter of bullets hit the water, and the battle was on. There are several versions of how the alarm was first given to the Turk, but the most generally accepted one is that one of the pinnaces sent up a shoot of flame from its funnel and so attracted the attention of the enemy. Lieut.-Colonel Newman (then Lieutenant in "C" Company) writes of this incident:
"After this, the boats were taken in tow by one of the naval pinnaces. All was quiet until we got within 100 yards of the shore, when the pinnace on my immediate left shot up a flame from its funnel which lit up the water for some distance around it; then the fun started, and from the black wall in front of us machine guns and rifles opened fire."
One of the first casualties sustained was in "B" Company on the destroyer Chelmer. "Darky," the company cook, was hit as he was standing by the funnel.
As soon as the centre boats, with the 10th Battalion on board, grounded, the troops hopped out and dashed through the water to the beach and took shelter from the storm of fire that was breaking out everywhere from the high ground in front. The 11th Battalion, however, on the left, had to get past the point of Ari Burnu, where the beach receded, and consequently had about 200 yards more to row than the other boat parties. They thus came under heavy fire while still on the water, and many casualties were inflicted before the troops reached the shelter of the land. As the bullets hissed and crackled past, "Combo" Smith said to "Snowy" Howe, and referring to the leaden messengers of death: "Hear the little birds, "Snow'?" and there was a general laugh.
The conduct of the naval officers and ratings in charge of the tows was splendid, and the 11th Battalion will always remember the coolness and hardihood of the "middies" who had charge of the boats. When an Australian officer would have made some alteration in the navigation on one of the boats, the little "middy" immediately checked him by saying tersely, amid a flying hail of bullets: "I'm in charge of this boat, Sir!"
A little before this, when the first shot rang out from the shore, Captain Croly, sitting in one of the leading boats, immediately said: "That's a Mauser"; but the fusilade that followed drowned all argument on the subject, as the one endeavour was to reach the shelter of the shore.
The boys had the greatest difficulty in getting ashore, loaded as they were with their heavy equipment. Even those in the bows of the boats were in fairly deep water after they sprang out, and any men hopping out at the stern and thus getting totally under water had very little chance of getting ashore, and numbers must have been drowned in the dark and confusion. In some of the later boats the rowers were all shot, and they had to be pushed into the water to enable the rest of the men in the boat to get at the oars; for being packed like sardines, there was no chance of taking the place of the rowers unless this had been done, and the boats were drifting about an easy target for the enemy. If this terrible thing had not been done, not one of the men in these boats would have reached the shore alive.
After the 11th Battalion troops had splashed and scrambled ashore and gained the beach, they formed up below the cliffs. Here the men's packs were slipped, bayonets fixed and magazines loaded, but with the cut-offs closed, as no shots were to be fired before it was light enough to see clearly. Some of the men had fixed bayonets while still in the water.
Owing to the loss of direction and consequent bunching of the tows, troops of all the attacking battalions were somewhat mixed up, but there was no time for hesitation. Calling to their men, Captains Leane and Annear and Lieutenants Selby and McDonald rushed to the steep bank and clambered up, helping them, selves by bushes and roots in their endeavour to reach the summit. The Turks were not in great force; but there was a trench about half-way up the first hill, in which a few of the enemy were killed and the remainder fled. After almost superhuman efforts, the men reached the top of the steep hill and the cheers of the 11th Battalion were heard as they reached a Turkish trench there. The Turks were seen fleeing for their lives back inland.
A heavy fire was now directed against the troops, exposed on the brow of the hill, and casualties began to occur. The 11th Battalion party took shelter behind the captured trench and commenced firing.
Lieut. McDonald, of "C" Company, was wounded and then Captain Annear was fatally hit in the head. He was the first Australian officer to be killed in the war. As more troops came to the Australians' assistance the enemy fire was quelled, and so with a great shout of "Come on, the Bloody 11th," the boys rose and dashed off in pursuit of the Turks who could be seen running away.
Some of the men of the first wave had by this time reached a small plateau, later known as "Plugge’s," and were being reorganised by Major Drake-Brockman; but others had gone further north.
The second wave from the destroyers' tows were now landed and in action. They had had a particularly rough time in coming ashore, having been under fire even while with the destroyers. In Lieut. Jackson's boat, six men were hit before landing. When the second wave of the 11th Battalion reached the shore they found Lieut. Peck (the Adjutant) waiting for them under the bank. The party under Peck, Rockliff, Jackson, Everett and McFarlane started off inland about 200 yards north of Ari Burnu, and Peck reached Lieut. Newman with a party of the 11th Battalion, who were holding a small knoll. Peck was wounded here.
The tows from the destroyer Usk gained the shore still further north, and Captain Tulloch, with "B" Company, landed there with some of the 12th Battalion under Lieut. Butler. This party was immediately met by heavy fire, but the troops gallantly pressed on inland and drove the Turks back. They clambered up the steep escarpment and reached what was later known as "Russell's Top." The 12th Battalion had been detailed to act as brigade reserve, and so the party under Butler started to dig in on the plateau; but Tulloch, with the 11th men, remembering the instructions to push forward, maintained their advance and pushed on over the 700 Contour and down the steep slope on the far side and penetrated to the inland slope of Battleship Hill (as it came to be called).
While Tulloch and his men were dashing forward, the Brigadier had arrived at Plugge’s, where Brockman and the bulk of the 11th Battalion were. Colonel Sinclair-MacLagan ordered Brockman to the left towards Baby 700 (one of the main strategical points). While Brockman and Everett were organising in the deep gully below Plugge’s, preparatory to moving, the Turks commenced firing on the party with shrapnel from Gaba Tepe, and henceforward that ravine was known as "Shrapnel Gully." From this place these troops of the 11th Battalion again started forward on the left.
The above account is the bare tale of the Landing and nowise describes the strenuous and gallant nature of the attack; but the 11th Battalion was famous right through its history for "Deeds, not words," and the official diary of the 11th Battalion describes the above events in a few succinct lines. Here is the extract: - “April 25, 1915. 11th Battalion landed under heavy musketry and machine gun fire and stormed the cliffs about 300 feet high. Pushed back the Turks and occupied the position." That is all. There is also a side note, entered probably by Brigade: "Landed 4:30 on beach mile south of Fisherman's Hut, Gallipoli Peninsula." Fisherman's Hut was a rough, stone building on the beach north of Ari Burnu.
Before going on with the development of the attack, a short general description of the 11th Battalion's heavy task may give a better perspective of the action.
When the boys reached the shore, their one desire was to get at grips with the enemy; but everything was against them from the start. They were sodden with sea water and their equipment dragged; they had landed in unknown terrain in a strange country, which rose up stark and steep in front of them. However, they clambered up hand over hand, and helped each other up the worst parts of the steep and precipitous cliffs. Meanwhile, a machine gun was enfilading them and causing many casualties, and the unfortunate wounded and killed rolled down to the beach below.
Gasping and spent, the survivors reached the brow of the ridge, to be confronted with a maze of ridges and valleys-the latter frequently deepening into ravines, with the general tendency of the country to rise higher and higher to the great central ridge. Wherever the enemy were in force they always seemed to have higher ground from which to fire, and the 11th Battalion suffered heavily in the first day's action. The nature of the country quickly disorganised any attempt at recognised formations and the 11th Battalion was quickly split into small groups intermingled with all the other units of the 3rd Brigade.
The general orders had been to press on at all costs (a command that was hardly necessary to Westralian troops), and parties were soon isolated in many of the numerous ravines or on exposed ridges. In spite of all these drawbacks, the attack had been a wonderful success and very gallantly carried out.
Mention was made above of a Turkish machine gun that was enfilading the beach during the actual landing of the troops. This machine gun, which had been firing from the direction of Fisherman's Hut, was causing numerous casualties, so a party under Lieutenants Strickland and C. Gostelow turned north, along the fringe of the coast, and dealt summarily with the machine gun crew. Some of them managed to escape, but there was no more trouble from that direction. This Turkish machine gun had caught the occupants of the northernmost boat, of which four men had jumped into the water and remained on the sheltered side of the vessel; the rest of the troops in trying to gain the shore had been killed in a heap just where they landed.
After the machine gun had been dislodged, the four men managed to reach the shore.
Among the notable events in the attack by the 11th Battalion was the sight of Captain Croly dashing up the hill waving a Turkish sword or bayonet and crying, "Come on, the bloody 11th!"
There was also Padre John Fahey, who, against orders, came ashore with the boys, and who was indefatigable in succouring the wounded and helping in any way that he could.
Captain Brennan (the Medical Officer) showed himself one of the bravest and coolest of men while attending the casualties, and he won the undying admiration and respect of all the troops. During the early stages of the battle he had established an aid-post at what later came to be known as "Steele's Post," and when the stretcher-bearers brought the wounded to the slope above him, the injured men were lowered down a sandslide to the A.M.C. men below. They were then attended to and their wounds properly dressed. Captain Brennan collected all the ration bags from the wounded and stored them nearby. He also sent up food and water by any troops that might be returning to the front line. No. 398 L./Sergeant Wright did invaluable work in this post, and by his example kept his team of stretcher-bearers going at high pitch.
Everything possible was done in these advanced regimental aid-posts to facilitate the speedy removal of the casualties, and much credit must be given to all concerned for the heroic way that this was done. The stretcher-bearers' work was beyond all praise. From the aid-posts the wounded were moved to the beach as fast as circumstances would allow. When it was possible, the wounded were made to walk; but all the serious cases had to be carried by the 'bearers over the rough country between the aid-posts and the beach and, of course, the initial carrying to the top of the hill at Steele's Post had to be mostly done by the stretcher-bearers as well. When it is realised that the vast bulk of this work was done under practically incessant shrapnel fire, some realisation of the magnitude of the task will be obtained.
Every single one of the wounded that could possibly be reached was picked up by the battalion or brigade-bearers and expedited to the beach, and it was no fault of these forward-line troops that the wounded were not evacuated immediately. It is on record that the whole system of evacuation of the casualties from the beach was faulty, and it was due to the woefully bad organisation of the G.H.Q. Medical Staff that a great amount of unnecessary pain and suffering was caused to the sick and wounded troops on account of the delay and the inadequate hospital and transport facilities provided.
It would take too long to go into the details of this maladministration, and it is beyond the scope of this story; but it is necessary to show that the deaths and unnecessary suffering caused by this want of "forethought," to put it mildly, can never be attributed to the officers and men of the Medical Staffs (under Colonel Howse) that were with the front line troops. Colonel Howse himself worked like a Trojan to get the beaches cleared of wounded, but the lack of adequate transport and hospital ships hampered his efforts.
To return to the actual attacking troops. Major Brockman was still in command of the forward troops and was directing them from Shrapnel Gully. He ordered Major Denton and Captain Barnes to move along the Gully and to take up positions on the inland side. While he was preparing to lead his own and some of Captain Leone's men to Baby 700, he was relieved by Major S. Roberts, who kept Leone's company with him as a reserve, and Brockman returned to his own company in Rest Gully, where it had been reorganised, along with other details of the battalion and other units.
Here he found Captain Everett and Lieutenants Selby, Rockliff and MacFarlane, who were instructed to work up the valley and round to the high ground. With these troops on the move Lieutenant Cooke came with a platoon to the reorganising point, and these troops were also sent up Shrapnel Gully towards Baby 700.
Owing to the wild nature of the country, the troops in all these advancing parties found difficulty in keeping touch, especially under the brisk and deadly rifle and machine gun fire, and often heavy shrapnel shelling, which was directed at them. Soon, therefore, these various parties were broken up into numbers of small groups, all endeavouring to maintain direction and to reach the high ground.
In spite of the difficulties encountered, a number of posts were soon established in the recesses at the head of the ravines leading up from the valleys, but the advance towards Baby 700 was not so successful, as most of the troops directed towards that point were absorbed into the fighting on the right of the valley instead of pushing on and going to the left towards the more important objective.
Lieutenants Morgan and Cooke and after them Major Brockman led their men up the valley and managed to maintain the right direction to the flank and Baby 700 While these parties were advancing, Captain Tulloch, with Captain Lalor, of the 12th Battalion, was already on Baby 700 and his two subalterns, Jackson and Buttle, were in advance of him but more towards the right. These advanced troops met with strong opposition and were driven back on Tulloch, who was then holding a position near what was known as the "Nek."
Tulloch's company and the other troops with him had advanced furthest of all the troops of the 3rd Brigade up to this time, and had reached the inland slopes of Battleship Hill and were some of the few Australians that viewed the real objective of their attack. This was the Narrows, whose blue waters were that day seen for the first and last time. They had advanced with the characteristic dash of West Australian troops and had far outstripped all other parties, even although the going was terrible and in exposed places the enemy fire was intense. At one of the frequent halts, Tulloch was joined by Lieut. Mort Reid and some more of the 11th men.
The West Australians advanced in open order until they came to the brow of the ridge. Here the firing became so intense that the troops had to advance by short rushes, and finally they had to crawl forward in the shelter of the scrub until they were held up by strong parties of the enemy with machine guns.
The conduct of these troops was a credit to the men and to their training, for though they had suffered a number of casualties, their discipline and response to orders were as efficient as if they had been on parade. But isolated as they were, they could not hope to retain this advanced position, especially as they were attracting a great deal of fire by shooting at any targets that presented themselves.
The Turks soon outflanked them on the left, and made a determined attack from that quarter. The 11th Battalion troops were surprised, for they thought that their own supporting bodies were on either side. For some time they hung on. Lieut. Mort Reid was badly wounded and retired to the rear. He was offered assistance by Sergeant George Mason, but reckoned he could make the beach unaided. He was never seen again.
In a short time Tulloch was compelled to withdraw owing to fire from nearly all around. The party withdrew by sections to Baby 700, followed by concentrated rifle and shrapnel fire.
By now the fighting had become more general and the troops on Tulloch's right rear, under Captain Lalor, of the 12th Battalion, were engaged and Turkish reinforcements could be seen arriving. The party of the 11th, under Brockman, had arrived at the Nek, where Lalor was, and the battalions were soon mixed up.
This portion of the battlefield soon became one of the crucial points and the Turks made strenuous efforts to drive the invaders back, and succeeded in turning their left flank and were now threatening the rear of the 11th Battalion troops, under Denton, Everett, Croly and Selby.
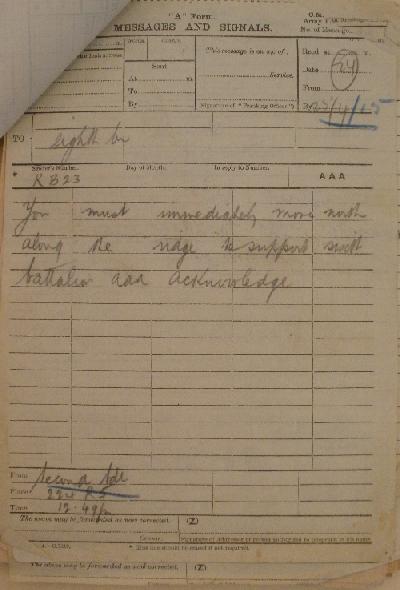
Colonel MacLagan, who was anxiously watching the battle, realised the danger on the left and sent up reinforcements from the 1st Brigade to assist the troops at the Nek. Once again there was a charge forward over the summit of Baby 700 and the troops drove out the Turks and began to dig in.
By the time these reinforcements had mingled with the men of the 3rd Brigade, all units were so mixed up that it was difficult to follow the doings of any one battalion, and the 11th's story for the rest of this first day might well be the story of any of its sister battalions.
All that day the battle swayed back and forward, the Turks trying to outflank the Australians and New Zealanders, who had by this time arrived on Baby 700.
The following personal account by No. 936 Private D. B. Robinson, of the 11th Battalion, is interesting "Captain Tulloch at this time was near the extreme left of the line. Mr. Mort Reid decided we must keep clear of the path, so we inclined to the left where the party again grouped together in the scrub. Owing to the activity of the snipers, it was decided that a man be sent ahead to scout. Mr. Reid ordered me out with Private Gannaway, of the 11th, as a connecting link.
"After advancing some distance in this manner, I came across Captain Lalor of the 12th Battalion (affectionately known as 'Puss-in-Boots,' owing to his small stature and his habit of wearing riding boots) by himself in the scrub, and sent word back to the party to come up. Captain Lalor was under the impression that there was another party just ahead of us that required support. However, we did not see them and rushed fast on ahead with snipers continually potting at us.
"After we had advanced some distance we were held up temporarily by a party of Turks in front, and after dispersing them continued our advance. Eventually we came to open country from which the Narrows could be seen. About a thousand yards ahead of us, on the other side of the valley, we could see a large body of Turks in dark uniforms coming down the opposite ridge with 25-yard rushes. We then lay down and opened fire on them. I was lying next to Mr. Reid with Captain Tulloch towards the left of the line with about half a dozen men on our right. Mr. Reid, with glasses, was coolly directing our fire in the manner in which we had been trained. After firing on the enemy for some time, an order came that we were to entrench. This we commenced to do, alternately filling our magazines and emptying them at the enemy. Casualties were now being sustained, and it was realised that it was futile for such a small body to try and entrench and hold such an open position, as in addition another body of Turks was fighting Oil our right and it was considered that it would not be long before we would he cut off. Three men on our left were instructed to crawl hack to the scrub and retire, then three men on the right. Mr. Reid, at this stage, was badly shot in the thigh, which commenced to swell perceptibly. Word was sent along and it was decided to hang on for a little longer to give him an opportunity to get away, and a man was sent back with him to assist him. This was the last ever seen or heard of Mr. Reid.
"We continued to hang on for a little longer, when the same method of retiring was continued with casualties still occurring, and it became evident to those in the centre that they would be left to play a lone hand; and as if by one impulse, the remainder of us all jumped up and ran back into the scrub. A few of us went back to the extreme left flank, having veered to the right under Turkish shell fire, where we got mixed up with other units, and eventually finished up with the 2nd Battalion and the New Zealanders."
There were fierce attacks from the right, but the gravest danger was always from the left. Time and again the Australians -all battalions mixed up-charged the slopes of Baby 700, but each time were driven back. Lieut. Cooke was never seen again after one of these charges. Lieut. "Jimmy" Morgan was wounded and Captain Lalor of the 12th was killed. A party of the 11th, including "Snowy" Howe, made a rush for a “U”-shaped trench on the left of the high ground, but being enfiladed by a machine gun had to take shelter in the arms of the "U." This party was driven out but later attacked again under a New Zealand officer and his company. The officer was killed and the company badly cut up. From this time on the Turkish attack grew more and more determined, and later in the afternoon the tired and weary Australians were driven back and retired on the main Australian position, which had been selected by Colonel MacLagan on the second ridge.
A few men got out of touch and were left behind. Bugler Ashton, of the 11th, was taken prisoner. Howe and others of the 11th, with some New Zealand machine gunners, were the last to retire and held on till nightfall, when they dug in at the end of the Nek and hung on until they found themselves with, out support, when they again retired on account of being nearly cut off by the Turks. Further back they dug in again and opened fire on the enemy a short distance in front. And so the battle was waged until darkness fell.
Prominence has been given to the action on the left on this eventful day (still April 25), because it chiefly concerned the 11th Battalion; but in the centre, on what was known as the 400 Plateau, the struggle was no less fierce and if anything it was more mixed up than that on the left flank.
The bulk of the 11th Battalion under Brockman, Denton, Everett, Croly, Barnes and Selby had reached MacLaurin's Ridge (as it was later named), when Peck (the Adjutant), who had been searching for the 11th Battalion, joined them. Appeals for support 'were received from the troops in front, a mixed party in charge of Lieut. Loutit, of the 10th. This party contained a number of the 11th Battalion, and was stated by some to have pushed forward further than any other troops on the Australian front, having reached the slopes of the third ridge just under Scrubby Knoll.
Lieutenants Peck and Newman led a party forward to support this advanced line, but this line was already being pushed back by the Turks, and Peck and Newman met the party on a low ridge opposite 400 Plateau. The retiring party was stiffened by the newcomers, but the Turks had a machine gun and subjected the troops to very heavy and accurate fire. Peck was wounded and taken to the rear. For some time the combined party held on, but were driven in again, and withdrew by the gully adjoining their position to the edge of the plateau. Here these troops dug in and formed a screen behind which other troops of the 3rd Brigade dug a line of trenches.
Not long afterwards the Turks advanced in strength, and this screen was driven back on to the defensive line. With this screen were Lieut. Newman and Wally Hallahan, machine gun sergeant of the 11th Battalion. The latter set up his gun in a position near Wire Gully, not far from where Denton, Croly, Everett and the men of the 11th Battalion were dug in on the second ridge, and this became the front line of the sector.
The battle raged all day with varying fortune, and once more the troops were ordered to advance, as the 2nd Brigade was coming in behind. The line advanced across the 400 Plateau and parties of the 2nd Brigade coming up joined in with this line, which soon became split up into little parties consisting of a mixture of all the battalions engaged.
In this last advance the troops bore over to both flanks and consequently a wide gap was left in the centre of the 400 Plateau. This gap was the scene of terrible fighting, but the 11th men were mostly to the north, and the tale of the struggle at Baby 700 and the Nek has already been related. There were still the troops in the posts in the ravines of MacLaurin's Hill, whose doings are yet to be recounted.
The posts which had been formed in the early morning at the heads of the various ravines had each placed a screen of men out in front. These men lay on the forward slope of the long ridge between Baby 700 and the 400 Plateau, and this line of men dug in as best it could on the exposed slope; under heavy fire, it is true, but also in a position from which they could command the valley and some of the country beyond. Major Denton, with Selby and Everett, were in what was known later as "Courtney's Post," and Captain Barnes was close to him with Croly and some of "C" Company. Further south at Wire Gully were Rockliff and McFarlane and half of "A" Company. On the right of the 11th was the 10th Battalion.
Soon after the 11th Battalion had been established in these posts, several companies of the 3rd Battalion reinforced them. Up till then Major Brockman had been in charge of this portion of the line, then Major Bennett, of the 3rd Battalion, and later Colonel Owen took command of the mixed troops. The front posts of this line had lain all day on the forward slope of MacLaurin's Hill and had suffered many casualties. The troops had dug themselves shallow rifle pits, which were fairly effective against machine gun and rifle fire, but were not much protection against the constant and heavy shrapnel fire that was maintained practically all day. Captain C. Gostelow (then Lieutenant), who lay for two days out on that exposed slope, relates the following: "Lying in rifle pits to dodge the shrapnel, I had alongside me a young Scotsman who, in quiet interludes, produced a volume that he called his `Bible.' It was a collection of Robbie Burn's works, and the laddie regaled me with `Robbie' quite often. Whilst here, the machine gun sergeant of one of the battalions of the 3rd Brigade was with us with his Maxim. The muzzle of the machine gun was like a piece of carbon owing to excessive use."
Night was now coming on, bringing with it a certain amount of relief from the intolerable strain of the long day. The troops were now able to move about more freely, for the shellings and rifle fire greatly diminished as the light failed. Things were beginning to be decidedly better when movement was heard on the enemy's side and cries of "Don't shoot! Indian troops!" were heard, and soon large bodies of troops could be seen in front on German Officers' Ridge. The cries were perfectly clear and unmistakable, and the troops withheld their fire. Captain A. E. Croly, who had been in the Indian Army, and who had some acquaintance with Hindustani, went forward with Private Thompson. The latter went forward and interrogated the enemy and on his report was immediately sent back at the double to Major Brockman with the news that the oncomers were Turks; and Captain Croly's voice, famous throughout the 3rd Brigade, was heard shouting: "Shoot the bloody Bastards; they're Turks." Immediately the 11th Battalion opened fire and Sergeant Wally Hallahan got in some deadly work with his machine gun and the attack crumpled.
Word was received later from Colonel MacLagan that there could be no Indian troops on that part of the front.
Darkness had now fallen and with it the danger of Turkish fire was greatly reduced. The men could now move about with, out undue risk, and were able to strengthen their positions by digging and entrenching. This greatly encouraged the men, and when they heard their own guns beginning to retaliate it gave them a greater degree of confidence to feel that at last they were receiving artillery support.
And so the end of the first day found them tired but firmly planted on that rough enemy country; and all night long the rattle of musketry and the staccato bark of machine guns shattered the darkness; and the myriad flashes blazoned to those watching on land and sea that Australia was writing its first page of war history.
The 11th Battalion official report for the day's events is as follows: "Occupied forward ridge about three quarters of a mile from beach and entrenched. Owing to disorganisation consequent on landing on different parts of the beach and being mixed up with other units, it was impossible to get the battalion together as the men were engaged in small parties right along the line of trenches. Captain R. W. Annear was killed on the morning of April 25 while storming the cliffs.
During Sunday and Monday trenches were dug under heavy fire from the enemy, but a line of defence was established. Casualties were very heavy, but it was impossible to ascertain the number as the mixed units were fully employed on the defensive works and could not be withdrawn."
It is always interesting to be able to look at both sides of a campaign, for, besides helping to give a more unbiased view of the whole struggle, there is the added advantage of learning what difficulties both sides were really up against.
The following extracts are from the biography of Mustafa Kemal, the Turkish General who opposed the Australians at Gallipoli, and who by his outstanding personality became President of the new Turkish Republic and later dictator. As a soldier, Mustafa Kemal was one of the greatest military geniuses of our times, and he had the added advantage of being phenomenally lucky. The extracts are from Mr. H. C. Armstrong's "Grey Wolf"
"On Sunday, the 25th April, came the English attack. A soft mist lay over the sea. Out of it slid a great wave of steel ships-battleships, destroyers and transports. One section struck at the north of the peninsula at Bulair. It was a feint, but it deceived von Sanders. Another made to the south. The main attack came at the centre. It consisted of Australians. Its object was to land in the low ground at Gaba Tepe and drive straight across by the valley to Maidos, and then turn and take the range of hills known as the Chunuk Bair, which stood close above Mustafa Kemal's camp and which was one of the keys to the whole position.
"A strong current swept the landing ships too far to the north and the Australians landed in error at Ari Burnu, and finding themselves in the foothills made straight up the steep hills for the crest of the Chunuk Bair.
"Mustafa Kemal knew nothing of this. He had ordered his best regiment, the 57th, to parade at 5:30 a.m. to carry out an ordinary practice manoeuvre up one of the slopes of Chunuk Bair. As he was moving up the hillside he saw a line of Turks, skirmishers, coming over the hilltop.
“`What are you doing?' he shouted.
“`The English have landed. We are the advanced pickets along the shore. We have been forced to retire.'
“`Where have they landed?'
“`At Ari Burnu.'
“`Fix bayonets and turn about,' he ordered.
"A few minutes later came word from the 19th Division on his right, confirming the news and asking for a battalion to cover their left flank.
"Mustafa Kemal calculated quickly. Von Sanders, he knew, believed that the attack would be at the north end near Bulair. But Chunuk Bair was the real key to the whole position. As more news came in it was clear that a large force was landing in front of him and that Chunuk Bair was their objective. In a flash, and by instinct, he realised that he must save Chunuk Bair, and at once. He could not wait for orders; minutes counted. Vitesse, vitesse, toujours vitesse was a maxim of Napoleon's which he often quoted.
“`Have we blank or ball cartridge?' he asked.
“`Ball,' replied a staff-major.
“'Then advance at once and as quickly as possible on to Chunuk Bair.'
"He had only a small-scale map handy. It did not even show Ari Burnu on it. With this in one hand, a compass in the other and a gendarme to guide him, he hurried ahead with 200 men. The ground was steep, covered with boulders and broken into ravines. The men could not keep up with him. When he reached the top there were only a few left. Directly below him, half -way up the last slope not four hundred yards away, he saw the head of the Australian column advancing.
"The regimental commander was some way behind him, urging his men over the rough country. Mustafa Kemal called the most senior near him.
" `Collect all the men you can, get forward and attack the enemy,' he ordered, pointing.
"As the units of the 57th Regiment arrived, out of wind and exhausted by the climb, he reformed them himself and pushed them forward. A battery of guns arrived. He helped to wheel the first gun into position. Continually under fire, he was a raging madman of energy. On his own responsibility and without orders he called up his second regiment and threw it into the fight. He found that was not enough. He called up the third and last, and threw it in also.
"He had ignored all orders to be cautious. On his own responsibility he had thrown into direct action the whole of the army reserves; not one man remained in reserve. He was convinced that he was facing the main attack. If he was wrong and the main attack was elsewhere, his error would be disastrous. But he made no error. His instinct was right. He did not doubt his instinct.
"All that day the battle surged up and down. The Australians were two-thirds of the way up the mountain. They could get no further. The Turks were rapidly getting worn out; the 57th Regiment was decimated; the two Arab regiments were in confusion and ready to break; but the Australians were worn out, too. Five hundred men on either side would have decided the battle.
"When night fell the ridge was still in the hands of the Turks, and the Australians clinging to the hillside a little below them.
"But Mustafa Kemal did not wait. Placing his headquarters behind an outcrop of stone a few yards behind the crest, all that night and next day he worked feverishly, organising attack after attack to push the Australians back down to the sea before they could establish themselves. As each attack failed he prepared another. He was constantly in the line encouraging the men, personally arranging that they should get rest and hot food, and inspiring them with his driving energy. But though he had stopped the Australians he could not push them back down the hills into the sea.
"The crest-line of the Chunuk Bair was the key to the Dardanelles, and the Dardanelles to Constantinople. If the Dardanelles and Constantinople fell, Turkey would be cut off from Germany and forced to make peace. Greece, Roumania and Bulgaria would probably join the English. The moral effect would be world-wide. The road to Russia would be open and she would get arms and food.
"Between the attacking Australians and these tremendous possibilities was Mustafa Kemal, grey-faced, determined, and holding the tired Turks in position on the narrow crest of the Chunuk Bair by his dominating personality alone.
"Unable to force each other back, the Australians and Turks began to dig themselves in: the Australians determined to hold what they had got until they could push forward; the Turks equally determined to stop them and drive them down back into the sea."
It is clear, from the above unbiased account of the Australians' attack on the sector of the Gallipoli Peninsula under the immediate command of Mustafa Kemal, that the Australians and New Zealanders almost won through to the Narrows; and it was no fault of the gallant fellows who made the attack, among whom the men of the 11th Battalion were pre-eminent, that their efforts just fell short of success on that first eventful day of the Gallipoli campaign.
After the strenuous efforts of the first day, April 26 found the troops mostly in a fairly deep trench, where they were moderately secure from shrapnel fire; but many of the 11th Battalion still lay in shallow rifle pits on MacLaurin's Hill and the casualties continued to mount up. On this date Lieutenants MacFarlane and McDonald were wounded.
The sight of the battleships, in the open water behind the troops, was very heartening to the boys, and when the great Queen Elizabeth fired her mighty guns the lads took comfort in the thought that the Turks were getting a bit of their own back. The battleships had continued to fire at recognised targets from the start of the action, and were stated to have dispersed concentrations of enemy troops. The shelling of the Turkish gun positions gave temporary relief, but it could never be said that the naval shells had any real effect in subduing the enemy guns. Nevertheless, the 15-inch guns of the Queen Elizabeth were always a source of wonder and admiration to the troops; the fearful rush of the shells through the air, just like the sound of a very fast train rushing through a railway station, and the tremendous explosion, which hurled dirt and debris in all directions, always seemed to the boys to be the epitome of deadly power.
There were special shrapnel shells made for these guns, with pellets about an inch in diameter, made of iron. The effect of this shrapnel on the Turkish infantry was truly terrible.
The open trenches on MacLaurin's Hill were gradually connected by sapping, by which means the men were under cover while consolidating. For the 11th Battalion April 26 passed quietly, but indications were not wanting that the Turks were preparing for a counter offensive. Owing to the wild and broken nature of the country, this could hardly be undertaken except in daylight, and only a few local attacks, which were easily repulsed, were made by the enemy that night.
At daybreak on April 27, movement could be seen all along the Turkish lines. Captain Everett on the forward slope of MacLaurin's Hill had a great field of view, and he was able to report a great deal of this movement, which tidings he sent back to Colonel MacLagan.
The Turks shelled the Australian position heavily, then cavalry were seen inland, and later an advance was made by these troops opposite the 11th Battalion. This attack was repulsed by rifle and machine gun fire.
In the afternoon a general attack was made by she enemy, and line after line of Turks could he seen advancing. Opposite the 11th Battalion on MacLaurin's Hill a very determined attack was made, but without artillery support, so the troops in the trenches had an open go for some time and soon broke up the attack. When the Turks advanced too closely in some places, the troops rose out of their trenches and charged them; but the enemy never waited for these charges. By evening the whole Turkish attack had failed. All through the night there were rumours and alarms; there were sounds of Turkish trumpets and invocations to Allah; and as the troops expected hourly to he attacked they were on the "qui vive" all night.
When morning broke, however, it was seen that the attack was all over. This, and the fact that the troops were to hr relieved that night, made things much more bearable.
The battalion entry for April 28 is as follows: "The engagement has continued without cessation, the enemy showing considerable activity on the left flank. On this afternoon Captain C. A. Barnes was killed. During the evening portions of the battalion were withdrawn from the firing line and assembled at the beach."
On the night of April 28, the Royal Marine Light Infantry moved in and relieved the troops in the line. They were mostly young, boyish-looking troops and seemed untried and inexperienced beside the big West Australians. The relief was carried out satisfactorily and the troops made back to the beach in small parties and were assembled under the cliffs.
Next day the troops were reorganised and parade states taken. The troops were rested, bathed and re-equipped as far as possible. The boys told each other their experiences and marvelled at the rapid transformation that was taking place on the beach.
The official diary for April 30 runs thus: "About 350 of the battalion assembled on the beach to-day and were marched into bivouacs in reserve."
The parade state of the 11th Battalion on April 30 was as follows:
Officers, 21; Other Ranks, 714. Total, 735.
And the casualty return was
| Rank | Killed | Wounded | Missing | Total |
| Officers | 4 | 9 | 1 | 14 |
| Other Ranks | 63 | 251 | 129 | 443 |
| Total | 67 | 260 | 130 | 457 |
The total casualties for the brigade were 1,864 all ranks.
The missing list seems great and is not a definite indication, as many of the troops were still in the line or had been evacuated without particulars having been taken of their units. There were very few prisoners lost to the Turks.
The following extract is taken from 1st Divisional Orders, dated April 28, and deals with the Landing: "The G.O.C. wishes to convey his most grateful and deep thanks to all ranks for their magnificent work during the last three days.
"It is an almost unprecedented feat for a landing to be effected on a hostile shore in the face of determined opposition, and the manner in which the covering force carried out its landing and at once advanced against a hostile force through a most difficult and jungle-covered, mountainous country is a feat of which any army might be justly proud."
The foregoing account is the bald story of the Landing and in no way describes the stress and strain of the engagement. In all these three days of the fighting, when the troops, panting and breathless, took what shelter they could-when comrade helped comrade or died for his friends; when feats of unrecorded heroism were everywhere; where stretcher-bearers and fatigue parties carrying ammunition kept on till they dropped; what words could ever adequately describe these things?
All this, too, in one of the most impossible of countries, where communications and connections were broken up almost immediately, so that the whole attack was mostly the efforts of small individual groups, led very often by one of the boys; and these small groups fought and stood by each other often till death claimed them. To quote Lieut. J. M. Aitken's (then Private) diary of Thursday, April 29, 1915: "And here I want to say emphatically that, with the exception of a few isolated examples, we were not led by our officers; the men acted on their own initiative, and by taking the whole affair in their own hands saved a very critical situation."
This is where the true discipline of the Australian troops was outstanding; not on the parade ground, nor in the streets of great cities, but where they came up against the stark and fearful realities of the terrible arena of war. Where other troops looked for the guidance of officers or other leaders, Australian troops were mostly capable of meeting emergencies as they occurred, and thus it was that in the awful disorganisation of the Landing the situation was adequately met; and though men saw their dearest cobbers shattered alongside them, and suffered the agony of being unable to help them, an agony fortunately tempered by the frightful conditions that surrounded them, still they carried on. And of the glorious dead what better epitaph could they have had than the verse of Captain James Spent, A.M.C., 3rd F.A.:
"Bury the body-it has served its ends;
Mark not the spot, but 'On Gallipoli'
Let it be said `he died.' Oh! Hearts of Friends
If I am worth it, keep my memory."
So far mention has only been made of the storming parties and those battalions that reinforced or relieved them. There were, however, many 11th Battalion men in the beach parties which had the onerous job of landing stores, munitions and performing all the necessary work for the maintenance of the front line troops.
This work was mostly done under fire and many casualties resulted. Some of the beach parties were used to escort the Indian ammunition mules, and they had a wearisome time trudging up and down the hills from the beach and back again. When the guns were landed, the beach parties were used to cut roads up from the shore so that the guns could be manhandled into position. The following is an extract from the diary of Lieut. Peter Snodgrass (then Private), who was wounded while with a beach party: "The whole country is a succession of steep hills and gullies, and travelling is extremely difficult. We cannot go off the paths for fear of mines. An 18-pounder of the 5th Battery was landed to-day (April 25) and man-handled into position on a low part of the first range of hills. We had to cut a road slantwise up the side, but eventually got the gun into position. The stretcher-bearers are working heroically, and though nearly dropping with fatigue, go back for another load as soon as they deposit one at the dressing-station."
Thus the work behind the lines and at the beach went on, and an increasing number of ships kept coming into view with reinforcements and all the gear necessary for the conduct of the offensive.