"At a mile distant their thousand hooves were stuttering thunder, coming at a rate that frightened a man - they were an awe inspiring sight, galloping through the red haze - knee to knee and horse to horse - the dying sun glinting on bayonet points..." Trooper Ion Idriess
The Australian Light Horse Studies Centre aims to present an accurate history as chroniclers of early Australian military developments from 1899 to 1920.
The Australian Light Horse Studies Centre site holds over 12,000 entries and is growing daily.
Contact:Australian Light Horse Studies CentreLet us hear your story:
You can tell your story, make a comment or ask for help on our Australian Light Horse Studies Centre Forum called:
WARNING: This site contains: names, information and images of deceased people; and, language which may be considered inappropriate today.
Monday, 4 January 2010
Onverwacht, South Africa, South Africa, 4 January 1902, Outline Topic: BatzB - Onverwacht
South African (Second Boer) War
The Battle of Onverwacht, South Africa, 4 January 1902
Outline
Onverwacht an action fought on 4 January 1902 (during the closing stages of the Second South African War), in south-eastern Transvaal about 30 kilometers east of Ermelo. The engagement arose from British efforts to end the activities of a 750 man force led by the Boer commander-in-chief, General Louis Botha. On New Year's Day three mounted columns were sent out from Ermelo in an attempt to pin the enemy against another British column operating along the border with Swaziland. On 3 January the column commanded by Brigadier-General Herbert Plummer suffered an embarrassing minor reverse when New Zealanders forming the advance guard were mauled by the enemy, suffering 28 men captured along with several casualties.
The next day the Boers succeeded in ambushing one of the two corps comprising Plumer's column that led by Major J.M. Vallentin (a British officer) comprising 110 men of the 5th Queensland Imperial Bushmen under Major Frederick Toll along with British Mounted troops. After posting part of his command on the main ridge of a group of kopjes (hills) known as Bankkop, there to wait for the arrival of Plumer and the main body, Vallentin took the rest of his corps forward to the next high ground comprising a line of hills called Onverwacht. Hiding in advance of this new position with a party. Vallentin was suddenly attacked by a force of 300 Boers who had been waiting; concealed in a deep hallow. These pursued Vallentin and his men back to the Onverwacht ridge and immediately forced the entire column to defend its ground.
With their numbers swelling to more than 500, the Boers made a determined push to capture the Maxim quick fire gun (known as a pom-pom) accompanying the corps and prevented its escape by shooting down the horses which pulled it. The gun was pushed into a gully, and the Queenslanders and Hampshire mounted Infantry defending the weapon were forced to retire. Major Toll led his men back from the main ridge on foot, losing one small detachment to enemy capture after all except three men in the group were wounded. Under Vallentin's orders the Queenslanders and Hampshire then attempted to make a last stand on a confined knob of a small ridge which was practically devoid of cover. Assaults on this position by the Boers twice came to within 30 metres and several enemy were shot down just ten metres in front.
After the enemy succeeded in getting in the rear of the knob and effectively isolating it, leaving the defenders subjected to heavy fire on all sides at a range of less than 50 metres, continued resistance became useless. The Boers rushed in to make prisoners of the 70 who remained uninjured, and to take possession of weapons and anything else of use to them. Clothing, including boots, were stripped from the prisoners and even from the dead and wounded. With Plumer's main body fast approaching, the burghers did not linger for long, but promptly turned loose their captives as they made off with their spoils-using 30 captured horses to carry away this material and their dead and wounded. Fortunately, the pom-pom gun was not part of the booty removed by the departing enemy; this was retrieved by men of the 5th Victorian Mounted Rifles who arrived on the scene, and taken to a new defensive position.
Although a pursuit was mounted under the direction of Major l lorry Vialls, a West Australian, the Boers made good their escape and were not again engaged. They had lost at least nine men killed (including their leader, Commandant Oppermann), whereas the British column had suffered 65 casualties (29 dead, 45 wounded). Major Vallentin was among the dead. The Queenslanders alone had thirteen men killed and seventeen wounded. Despite the humiliation of this reverse, which demonstrated the military capabilities of the Boers into the wart very last stages, Plumer was satisfied that no blame attached to the Queenslanders and pointedly commended Toll for his leadership while recommending several of the Australians for gallantry awards.
Extracted from the book produced by Chris Coulthard-Clark, Where Australians Fought - The Encyclopaedia of Australia's Battles, Allen and Unwin, Sydney, 1998, pp. 90-92.
Additional References cited by Chris Coulthard-Clark:
L.S. Amery, (ed.) The Times History of the War in South Africa 1899-1902, Vol. 4 (1906), London: Sampson Low, Marston & Co.
P.L. Murray (1911) Official Records of the Australian Military Contingents to the War in South Africa, Melbourne: Government Printer.
R.L. Wallace (1976) The Australians at the Boer War, Canberra: Australian War Memorial & Australian Government Publishing Service.
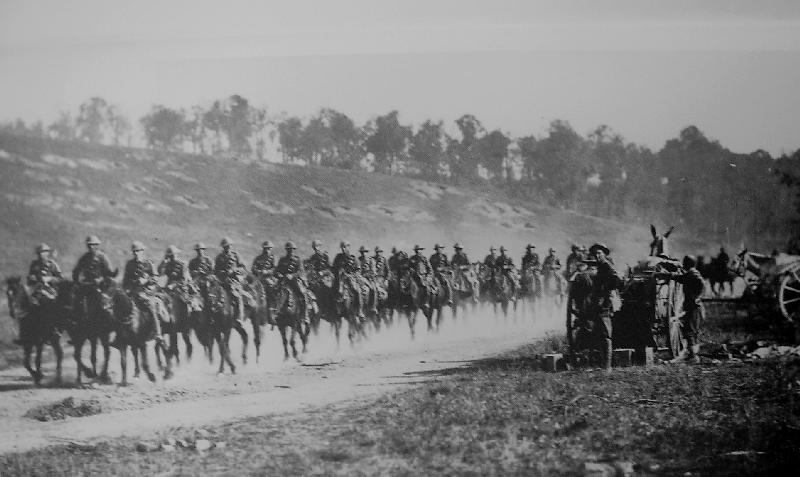
The 13th Light Horse Regiment was formed as part of the 4th Australian Light Horse Brigade, 1915, 4th Contingent and attached to the Australian Division. Recruits went to the Broadmeadows Training Camp to the north of Melbourne, Victoria, from 1 March 1915. The recruits were drawn from throughout Victoria. Many of the men went from the Light Horse Militia formation into the AIF Light Horse.
Training
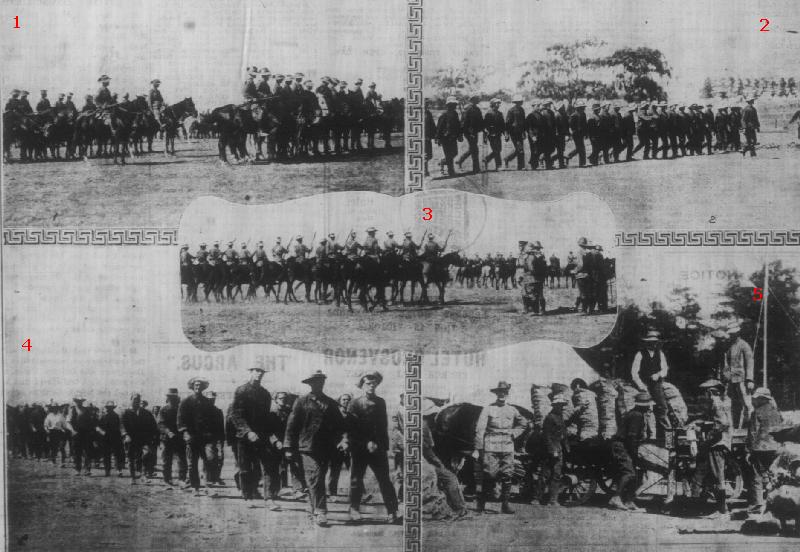
At Broadmeadows Camp
1. Light Horse On Parade; 2. Light Horsemen at Drill; 3. Marching Past the Governor-General; 4. Infantry in the making; and, 5. Army Service Stores.
[From: The Australasian, 17 April 1915, Picture Supplement, p. viii.]
Training for the 13th Light Horse Regiment commenced at Broadmeadows Training Camp to the north of Melbourne, Victoria, from 1 March 1915.
Embarkation
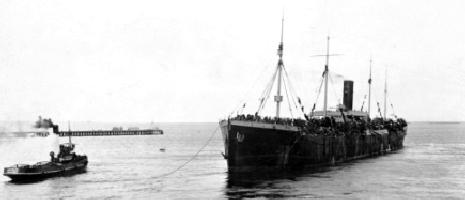
Embarkation of the 13th Light Horse Regiment was accomplished in two groups using both the HMAT A34 Persicand HMAT A44 Vestaliafrom Melbourne, Victoria.
HMAT A34 Persic departing from Port Melbourne on 3 June 1916
An assortment of men from the 13th Light Horse Regiment took part in a second embarkation on the HMAT A44 Vestaliafrom Melbourne, Victoria, 26 June 1915.
The 13th Light Horse Regiment sailed to Egypt and disembarked on 29 June 1915.
Colour Patch
Initially, the only colour separation of the various Australian mounted troops was by use of the pennant. The marker pennants were carried on poles to mark lines troop lines in camps in Egypt. They were not lance pennants as the Australian lancers had red over white pennants on their lances.
Pennant of the 13th Light Horse Regiment
While this pennant was useful in distinguishing horse and troop lines, it failed to identify the individual with a unit. The AIF 1st Australian Division Standing Orders issued in December 1914 ordered the Australian Light Horse Regiments to wear a 4 inch wide [10.2cm] blue armband with the regiment name marked on the band in black lettering.
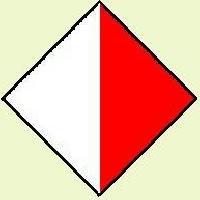
The earlier systems proved to be ineffective so to assist with identification of the men in the various units within the AIF, Divisional Order No 81 (A) Administration was issued at Mena on 8 March 1915 detailing the Colour Patches for the various units in the AIF. The colour patch was made of cloth 1¼ inches wide and 2¾ inches long and worn on the sleeve one inch below the shoulder seam. In contrast, a special amendment to the order created the 13th Light Horse Regiment patch which was a diamond granted under the original order.
13th Light Horse Regiment Colour Patch
When the 13th Light Horse Regiment was appointed as the 1st Corps Cavalry, the Regiment retained the colour patch originally issued. The colour patch carried the red Divisional colour as the left triangle part of the colour patch, while the white unit colour was on the right. This is illustrated with the above presentation.
Gallipoli
As mounted troops, the Light Horse was considered to be unsuitable for work in Gallipoli. The mounted troops volunteered to operate as infantry. On 11 September 1915 the 13th Light Horse Regiment was deployed on primarily defensive activities around the Lone Pine trenches throughout the stay at Gallipoli. The 13th Light Horse Regiment left the peninsula on 20 December 1915.
Defence of Egypt
After the return to Egypt, the 13th Light Horse Regiment moved to the Suez Canal taking part in its defence. The work was hot and monotonous. On 10 March 1916 the 13th Light Horse Regiment was broken up with a squadron allotted per division.
"A" Squadron was allotted to the 2nd Infantry Division.
"B" Squadron was allotted to the 4th Infantry Division.
"C" Squadron was allotted to the 5th Infantry Division.
The 13th Light Horse Regiment Headquarters and Machinegun Section were dispersed. This situation remained in force until May 1916 when the 13th Light Horse Regiment was reformed at Tel El Kebir, Egypt. The Regiment embarked with the 5th Infantry Division to France where the Regiment reassembled on 2 July1916. From then the 13th Light Horse Regiment was allotted to I Anzac Corps as Corps Cavalry.
France
Due to the static nature of the Western Front due to the trenches, traditional cavalry work was not available until the final stages of the war when mobility was a factor. Consequently, while the men from the 13th Light Horse Regiment participated in many of the major battles on the Western Front, it was done mainly as support troops. In that role the 13th Light Horse Regiment undertook traffic control, escort work and generally guarding the llines of communication.
After November 1917, 13th Light Horse Regiment became the Australian Corps cavalry regiment. When the Germans withdrew to the Hindenburg Line in 1917, the 13th Light Horse Regiment was able to take on the traditional reconnaissance role.
During the German St Michael Offensive in March 1918, the 13th Light Horse Regiment played its role in stemming the tide of the German advance. Once the German offensive had run its course, the 13th Light Horse Regiment was able to play an active role in the Allied counter attack and advance which lasted till the end of the war. Through traditional cavalry work, the 13th Light Horse Regiment was able to contribute much. One of its more outstanding operations occurring between 5 and 9 September 1918, was to provide work as advanced guard on a front of some 13.5 kilometres.
Return to Australia
After the cessation of hostilities, progressively the 13th Light Horse Regiment embarked for the long voyage to Australia where the unit was disbanded in Melbourne on 30 April 1919.
Commanding Officers
Lieutenant Colonel George Henry Dean Lieutenant Colonel John McLean Arnott Lieutenant Colonel Ernest Morgan Williams Lieutenant Colonel Dudley Persee White Lieutenant Colonel Alexander Mitchell Lieutenant Colonel Stanley George Hindhaugh
Decorations earned by the 13th Light Horse Regiment
2 DSO - Distinguished Service Orders
5 MC & 1 Bar - Military Crosses
3 DCM - Distinguished Conduct Medals
30 MM - Military Medals
4 MSM - Military Service Medals
10 MID - Mentioned in Despatches
5 foreign awards
Campaigns
Gallipoli
Sari Bair
Gallipoli 1915-1916
Egypt
Defence of Egypt
France
Somme 1916
Somme 1918
Pozieres
Bapaume 1917
Arras 1917
Ypres 1917
Albert 1918
France and Flanders 1916-1918
Casualties suffered by the 13th Light Horse Regiment
57 killed
328 wounded
War Diary
The Australian War Memorial has put these on line and may be accessed here:
The following list details all the embarkations in support of the 13th Light Horse Regiment, AIF, during the Great War. Each entry details to formation and the ships on which the units embarked with the date and place of embarkation. The detail of the formation is linked to a list of men who embarked upon that ship on the specific date.
The Battle of Anzac Cove, Gallipoli, 25 April 1915, 3rd Field Company Engineers, Roll of Honour Topic: BatzG - Anzac
The Battle of Anzac Cove
Gallipoli, 25 April 1915
Roll of Honour
3rd Field Company Engineers, AIF
Poppies on the Roll of Honour, Australian War Memorial, Canberra
The Roll of Honour contains the names of all the men from the 3rd Field Company Engineers known to have served and lost their lives during the Battle of Anzac, 25 April 1915.
Roll of Honour
Ernest James BEAUMONT, 3rd Field Company Engineers.
The Battle of Anzac Cove, Gallipoli, 25 April 1915, 2nd Infantry Brigade Signals - No. 28 Topic: BatzG - Anzac
The Battle of Anzac Cove
Gallipoli, 25 April 1915
2nd Infantry Brigade Signals - No. 28
2nd Infantry Brigade, AIF, Signals - No. 28
The following is a transcription of the Signal No. 28 of the 2nd Infantry Brigade, AIF, which forms part of a series which illustrates the chaos and problems experienced in executing their role in the landings at Anzac on 25 April 1915.
Aust Div
KB33 25/4/15 AAA
Begins:
Sixth Bn reports at 3pm that with aid of eighth a defensive firing line built up but that shrapnel still severe
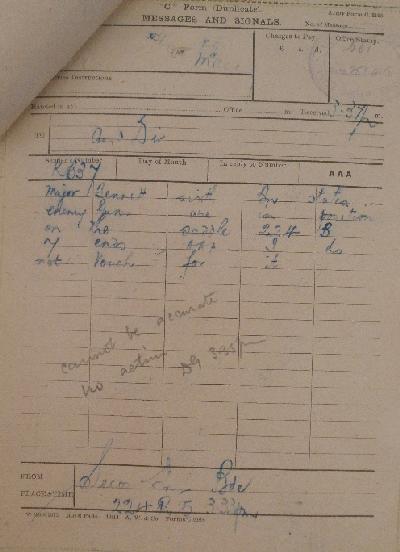
The Battle of Anzac Cove, Gallipoli, 25 April 1915, 2nd Infantry Brigade Signals - No. 29 Topic: BatzG - Anzac
The Battle of Anzac Cove
Gallipoli, 25 April 1915
2nd Infantry Brigade Signals - No. 29
2nd Infantry Brigade, AIF, Signals - No. 29
The following is a transcription of the Signal No. 29 of the 2nd Infantry Brigade, AIF, which forms part of a series which illustrates the chaos and problems experienced in executing their role in the landings at Anzac on 25 April 1915.
Aust Div
KB37 25/4/15 AAA
Begins:
Major Bennett Sixth Bn states enemy guns are in position on the saddle 224 B 7 ends AAA I do not vouch for it
The Australian Light Horse Studies Centre is a not for profit and non profit group whose sole aim is to write the early history of the Australian Light Horse from 1900
- 1920. It is privately funded and the information is provided by the individuals within the group and while permission for the use of the material has been given for this
site for these items by various donors, the residual and actual copyright for these items, should there be any, resides exclusively with the donors. The information on
this site is freely available for private research use only and if used as such, should be appropriately acknowledged. To assist in this process, each item has a citation
attached at the bottom for referencing purposes.
Please Note: No express or implied permission is given for commercial use of the information contained within this site.
A note to copyright holders
The Australian Light Horse Studies Centre has made every endeavour to contact copyright holders of material digitised for this blog and website and where
appropriate, permission is still being sought for these items. Where replies were not received, or where the copyright owner has not been able to be traced, or where
the permission is still being sought, the Australian Light Horse Studies Centre has decided, in good faith, to proceed with digitisation and publication. Australian Light
Horse Studies Centre would be happy to hear from copyright owners at any time to discuss usage of this item.