« February 2010 »
S M T W T F S
1 2 3 4 5 6
7 8 9 10 11 12 13
14 15 16 17 18 19 20
21 22 23 24 25 26 27
28
You are not logged in. Log in


Search the site:


powered by FreeFind
Volunteer with us.

Entries by Topic All topics  
A Latest Site News
A - Using the Site
AAA Volunteers
AAB-Education Centre
AAC-Film Clips
AAC-Photo Albums
AIF & MEF & EEF
AIF - Lighthorse
AIF - ALH - A to Z
AIF - DMC
AIF - DMC - Or Bat
AIF - DMC - Anzac MD
AIF - DMC - Aus MD
AIF - DMC - British
AIF - DMC - BWI
AIF - DMC - French
AIF - DMC - Indian
AIF - DMC - Italian
AIF - DMC - Medical
AIF - DMC - Remounts
AIF - DMC - Scouts
AIF - DMC - Sigs
AIF - DMC - Sigs AirlnS
AIF - DMC - 1 Sig Sqn
AIF - DMC - 2 Sig Sqn
AIF - DMC - Eng
AIF - DMC - Eng 1FSE
AIF - DMC - Eng 2FSE
AIF - DMC - GSR
AIF - 1B - 1 LHB
AIF - 1B - 6 MVS
AIF - 1B - 1 LHMGS
AIF - 1B - 1 Sig Trp
AIF - 1B - 1 LHFA
AIF - 1B - 1 LHR
AIF - 1B - 2 LHR
AIF - 1B - 3 LHR
AIF - 2B - 2 LHB
AIF - 2B - 7 MVS
AIF - 2B - 2 LHFA
AIF - 2B - 2 LHMGS
AIF - 2B - 2 Sig Trp
AIF - 2B - 5 LHR
AIF - 2B - 6 LHR
AIF - 2B - 7 LHR
AIF - 3B - 3 LHB
AIF - 3B - 8 MVS
AIF - 3B - 3 LHB Sigs
AIF - 3B - 3 LHFA
AIF - 3B - 3 LHMGS
AIF - 3B - 3 Sig Trp
AIF - 3B - 8 LHR
AIF - 3B - 9 LHR
AIF - 3B - 10 LHR
AIF - 4B - 4 LHB
AIF - 4B - 4 Sig Trp
AIF - 4B - 9 MVS
AIF - 4B - 4 LHFA
AIF - 4B - 4 LHMGS
AIF - 4B - 4 LHR
AIF - 4B - 11 LHR
AIF - 4B - 12 LHR
AIF - 5B - 5 LHB
AIF - 5B - 10 MVS
AIF - 5B - 5 LHFA
AIF - 5B - 5 Sig Trp
AIF - 5B - ICC
AIF - 5B - 14 LHR
AIF - 5B - 15 LHR
AIF - 5B - 1er Regt
AIF - 5B - 2 NZMGS
AIF - AASC
AIF - Aboriginal LH
AIF - Badges
AIF - Cars
AIF - Chinese LH
AIF - Double Sqns
AIF - Engineers
AIF - Fr - 22 Corps
AIF - Fr - 13 LHR
AIF - Honour Roll
AIF - HQ - 3rd Echelon
AIF - Marching Songs
AIF - Misc Topics
AIF - NZMRB
AIF - NZMRB - AMR
AIF - NZMRB - CMR
AIF - NZMRB - EFT
AIF - NZMRB - NZMFA
AIF - NZMRB - NZMGS
AIF - NZMRB - OMR
AIF - NZMRB - Sig-Trp
AIF - NZMRB - WMR
AIF - Ships
AIF - Ships - Encountr
AIF - Ships - Una
AIF - WFF
AIF - Wireless Sqn
Battles
BatzA - Australia
BatzA - Broken Hill
BatzA - Liverpool
BatzA - Merivale
BatzB - Boer War
BatzB - Bakenlaagte
BatzB - Belmont
BatzB - Bothaville
BatzB - Buffels Hoek
BatzB - Coetzees Drift
BatzB - Diamond Hill
BatzB - Driefontein
BatzB - Elands
BatzB - Graspan
BatzB - Grobelaar
BatzB - Grootvallier
BatzB - Hartebestfontn
BatzB - Houtnek
BatzB - Karee Siding
BatzB - Kimberley
BatzB - Koster River
BatzB - Leeuw Kop
BatzB - Mafeking
BatzB - Magersfontein
BatzB - Modder River
BatzB - Onverwacht
BatzB - Paardeberg
BatzB - Palmietfontein
BatzB - Pink Hill
BatzB - Poplar Grove
BatzB - Rhenoster
BatzB - Sannahs Post
BatzB - Slingersfontn
BatzB - Stinkhoutbm
BatzB - Sunnyside
BatzB - Wilmansrust
BatzB - Wolvekuil
BatzB - Zand River
BatzG - Gallipoli
BatzG - Anzac
BatzG - Aug 1915
BatzG - Baby 700
BatzG - Evacuation
BatzG - Hill 60
BatzG - Hill 971
BatzG - Krithia
BatzG - Lone Pine
BatzG - Nek
BatzJ - Jordan Valley
BatzJ - 1st Amman
BatzJ - 2nd Amman
BatzJ - Abu Tellul
BatzJ - Es Salt
BatzJ - JV Maps
BatzJ - Ziza
BatzM - Mespot
BatzM - Baghdad
BatzM - Ctesiphon
BatzM - Daur
BatzM - Kurna
BatzM - Kut el Amara
BatzM - Ramadi
BatzN - Naval
BatzN - AE1
BatzN - Cocos Is
BatzN - Heligoland
BatzN - Marmara
BatzN - Zeebrugge
BatzN - Zeppelin L43
BatzNG - Bitapaka
BatzO - Other
BatzO - Baku
BatzO - Egypt 1919
BatzO - Emptsa
BatzO - Karawaran
BatzO - Peitang
BatzO - Wassa
BatzP - Palestine
BatzP - 1st Gaza
BatzP - 2nd Gaza
BatzP - 3rd Gaza
BatzP - Aleppo
BatzP - Amwas
BatzP - Ayun Kara
BatzP - Bald Hill
BatzP - Balin
BatzP - Beersheba
BatzP - Berkusieh
BatzP - Damascus
BatzP - El Auja
BatzP - El Buggar
BatzP - El Burj
BatzP - Haifa
BatzP - Huj
BatzP - JB Yakub
BatzP - Kaukab
BatzP - Khan Kusseir
BatzP - Khuweilfe
BatzP - Kuneitra
BatzP - Megiddo
BatzP - Nablus
BatzP - Rafa
BatzP - Sasa
BatzP - Semakh
BatzP - Sheria
BatzP - Surafend
BatzP - Wadi Fara
BatzS - Sinai
BatzS - Bir el Abd
BatzS - El Arish
BatzS - El Mazar
BatzS - El Qatiya
BatzS - Jifjafa
BatzS - Magdhaba
BatzS - Maghara
BatzS - Romani
BatzS - Suez 1915
BatzSe - Senussi
BatzWF - Westn Front
BW - Boer War
BW - NSW
BW - NSW - 1ACH
BW - NSW - 1NSWMR
BW - NSW - 2NSWMR
BW - NSW - 3ACH
BW - NSW - 3NSWIB
BW - NSW - 3NSWMR
BW - NSW - 5ACH
BW - NSW - A Bty RAA
BW - NSW - AAMC
BW - NSW - Aust H
BW - NSW - Lancers
BW - NSW - NSW Inf
BW - NSW - NSWCBC
BW - NSW - NSWIB
BW - NSW - NSWMR_A
BW - NZ
BW - Qld
BW - Qld - 1ACH
BW - Qld - 1QMI
BW - Qld - 2QMI
BW - Qld - 3ACH
BW - Qld - 3QMI
BW - Qld - 4QIB
BW - Qld - 5QIB
BW - Qld - 6QIB
BW - Qld - 7ACH
BW - QLD - AAMC
BW - SA
BW - SA - 1SAMR
BW - SA - 2ACH
BW - SA - 2SAMR
BW - SA - 3SACB
BW - SA - 4ACH
BW - SA - 4SAIB
BW - SA - 5SAIB
BW - SA - 6SAIB
BW - SA - 8ACH
BW - SA - AAMC
BW - Tas
BW - Tas - 1ACH
BW - Tas - 1TIB
BW - Tas - 1TMI
BW - Tas - 2TB
BW - Tas - 2TIB
BW - Tas - 3ACH
BW - Tas - 8ACH
BW - Vic
BW - Vic - 1VMI
BW - Vic - 2ACH
BW - Vic - 2VMR
BW - Vic - 3VB
BW - Vic - 4ACH
BW - Vic - 4VIB
BW - Vic - 5VMR
BW - Vic - 6ACH
BW - Vic - AAMC
BW - Vic - Scot H
BW - WA
BW - WA - 1WAMI
BW - WA - 2ACH
BW - WA - 2WAMI
BW - WA - 3WAB
BW - WA - 4ACH
BW - WA - 4WAMI
BW - WA - 5WAMI
BW - WA - 6WAMI
BW - WA - 8ACH
BW Gen - Campaign
BW Gen - Soldiers
BW General
Cavalry - General
Diary - Schramm
Egypt - Heliopolis
Egypt - Mena
Gen - Ataturk Pk, CNB
Gen - Australia
Gen - Legends
Gen - Query Club
Gen - St - NSW
Gen - St - Qld
Gen - St - SA
Gen - St - Tas
Gen - St - Vic
Gen - St - WA
Gm - German Items
Gm - Bk - 605 MGC
GW - 11 Nov 1918
GW - Atrocities
GW - August 1914
GW - Biographies
GW - Propaganda
GW - Spies
GW - We forgot
Militia 1899-1920
Militia - Area Officers
Militia - Inf - Infantry
Militia - Inf - 1IB
Militia - Inf - 2IB
Militia - Inf - 3IB
Militia - Inf - NSW
Militia - Inf - Qld
Militia - Inf - SA
Militia - Inf - Tas
Militia - Inf - Vic
Militia - Inf - WA
Militia - K.E.Horse
Militia - LH
Militia - LH - Regts
Militia - LH - 1LHB
Militia - LH - 2LHB
Militia - LH - 3LHB
Militia - LH - 4LHB
Militia - LH - 5LHB
Militia - LH - 6LHB
Militia - LHN - NSW
Militia - LHN - 1/7/1
Militia - LHN - 2/9/6
Militia - LHN - 3/11/7
Militia - LHN - 4/6/16
Militia - LHN - 5/4/15
Militia - LHN - 6/5/12
Militia - LHN - 28
Militia - LHQ - Qld
Militia - LHQ - 13/2
Militia - LHQ - 14/3/11
Militia - LHQ - 15/1/5
Militia - LHQ - 27/14
Militia - LHS - SA
Militia - LHS - 16/22/3
Militia - LHS - 17/23/18
Militia - LHS - 24/9
Militia - LHT - Tas
Militia - LHT - 12/26
Militia - LHV - Vic
Militia - LHV - 7/15/20
Militia - LHV - 8/16/8
Militia - LHV - 9/19
Militia - LHV - 10/13
Militia - LHV - 11/20/4
Militia - LHV - 19/17
Militia - LHV - 29
Militia - LHW - WA
Militia - LHW-18/25/10
Militia - Military Orders
Militia - Misc
MilitiaRC - Rifle Clubs
MilitiaRC - NSW
MilitiaRC - NT
MilitiaRC - Qld
MilitiaRC - SA
MilitiaRC - Tas
MilitiaRC - Vic
MilitiaRC - WA
Militiaz - New Zealand
Tk - Turkish Items
Tk - Army
Tk - Bks - Books
Tk - Bks - 1/33IR
Tk - Bks - 27th IR
Tk - Bks - Air Force
Tk - Bks - Yildirim
Tk - POWs
Wp - Weapons
Wp - Hotchkiss Cav
Wp - Hotchkiss PMG
Blog Tools
Edit your Blog
Build a Blog
RSS Feed
View Profile
Open Community
Post to this Blog
Site Index
Education Centre
LH Militia
Boer War
Transport Ships
LH Battles
ALH - Units
ALH - General
Aboriginal Light H
Weapons
Ottoman Sources

"At a mile distant their thousand hooves were stuttering thunder, coming at a rate that frightened a man - they were an awe inspiring sight, galloping through the red haze - knee to knee and horse to horse - the dying sun glinting on bayonet points..." Trooper Ion Idriess

The Australian Light Horse Studies Centre aims to present an accurate history as chroniclers of early Australian military developments from 1899 to 1920.

The Australian Light Horse Studies Centre site holds over 12,000 entries and is growing daily.

Contact: Australian Light Horse Studies Centre

Let us hear your story: You can tell your story, make a comment or ask for help on our Australian Light Horse Studies Centre Forum called:

Desert Column Forum

WARNING: This site contains: names, information and images of deceased people; and, language which may be considered inappropriate today.

Tuesday, 16 February 2010
Zand River, South Africa, May 10, 1900
Topic: BatzB - Zand River

Zand River

South Africa, 10 May 1900

Outline


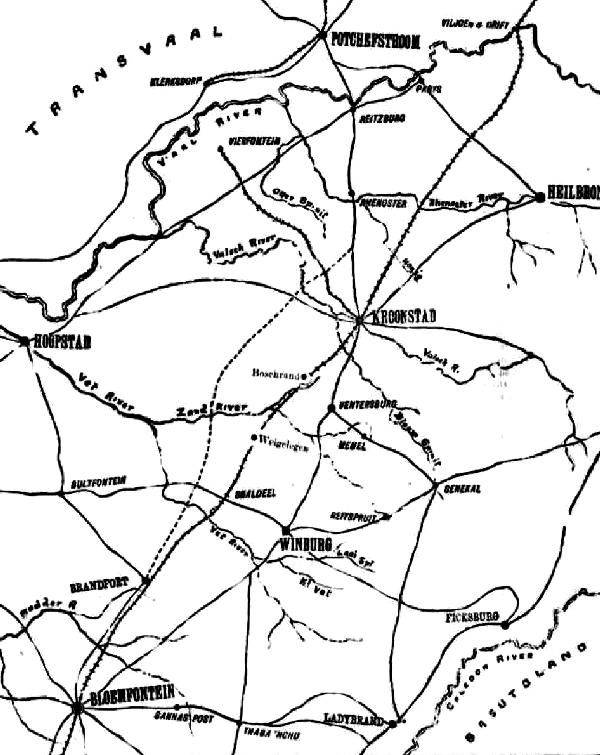
Map of the Zand River Region.
 
[From: Argus 11 May 1900, p. 5]


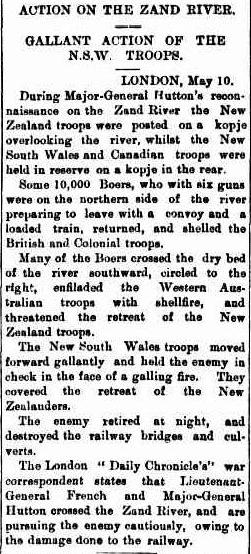
Zand River, an action during the Second South African War, fought on 10 May 1900 in northern Orange Free State as Boer forces attempted to check the advance of the British army led by Field Marshal Lord Roberts. Following the action on 5 May, when the British forced their way over the Vet River (see Coetzee Drift), the Boers had retreated hurriedly to the Zand. It was here that a reconnaissance by the mounted infantry brigade commanded by Major General Edward Hutton (which included several Australian units) found them strongly entrenched around Virginia Siding on 7 May, confirming that this was to be the focus of the burghers' next major show of resistance. A squadron of the New South Wales Mounted Rifles reached within 500 metres of the river, but were driven off by enemy shellfire.

Since the defence on the Vet, the commandant-general of the Boer forces (General Louis Botha) had arrived at Virginia Siding on 7 May to take personal charge of operations, bringing with him some 3,000 reinforcements from the Transvaal. All the Free State burghers still under arms - probably not numbering more than 5,000 - were also now concentrated at the Zand. Their object was to attempt to prevent the capture of Kroonstad, 64 kilometres to the north, which was the Free State capital since the fall of Bloemfontein in March and an important supply centre in its own right. The terrain held a major advantage for this purpose, chiefly in the form of a ridge line running along the river's north bank which formed a useful basis for the defence of the. Boer centre covering the railway line and the left flank in the east. The weak point was the western flank, which was susceptible to a British turning movement, and Botha was obliged to adopt dispositions which took this possibility into account.

Although Roberts recognised the potential for a wide sweep past the Boer flank to carry his cavalry to Kroonstad and beyond, such as he had used to relieve Kimberley (q.v.), he was not prepared to risk the attrition which that tactic had previously caused. The cavalry division, under Lieut.-General John French, had only just been returned to strength in time to rejoin the army for the. Land operation. He nonetheless decided to attempt to envelop Botha's forces by sending two of French's brigades and Hutton's mounted infantry - 4,000 men in all - around the enemy's right flank, meeting up around Ventersburg Siding with another cavalry brigade which was to come in from the east after turning the enemy's left.

Implementation of this plan began on 9 May, when Colonel T.C. Porter's 1st Cavalry Brigade (which included the 1st Australian Horse, the New South Wales Lancers and New South Wales Army Medical Corps) seized control of a ford just west of the furthermost Boer outpost at Diamant Drift, some ten kilometres from the railway. French and his staff, along with Hutton's mounted infantry brigade, joined him here later in the day. The rest of Roberts' army - totalling 38,000 men with 100 field guns and twelve pom-poms - had closed up on the river, but apart from a crossing made at Koolspruit Drift (in the centre) by some mounted infantry the forcing of the Land was left until the following day.

When French set off on 10 May with Porter's brigade, pushing rapidly north-east, Botha was initially unaware that there was any British activity on his flank. Only with the approach of the cavalry towards Vredes Verdrag, a ridge sixteen kilometres directly north and behind him, did he discover the peril confronting the entire Boer defence. After sending off a 200-man reserve to oppose any further progress by French, Botha ordered a general retirement; only a small rearguard was left at Virginia Siding to delay Roberts' main advance.

The measures taken by the Boer commander were just in time. French's efforts to capture Vredes Verdrag and cover the last eight kilometres east to Ventersburg Siding were vigorously opposed, in the first instance by fire from two Boer guns covering the approaches to the ridge. In an attempt to outflank these weapons, the Australian Horse and three other squadrons were sent to seize an apparently unoccupied kopje (low hill) on the left. The troops gained the hill and dismounted, but were then ambushed by a party of Boers who had been lying in wait. Caught in a crossfire and lacking a unified command, the troopers were quickly driven off the hill in confusion. Left behind were fourteen killed and 63 prisoners, 36 of whom were wounded; at least one Australian Horse officer was among those captured.

Attempts by the Boers to capitalise on their success were beaten off, but French -anxious to maintain the momentum of his advance-decided to bypass the enemy position by moving west around Vredes Verdrag and on to the next hill to the north. This movement was constantly harried by the Boers, who were in sufficient strength to keep French's horsemen away from the railway line. Hutton's mounted infantry, following along behind, also encountered some hard fighting. Among the casualties suffered by his brigade were eight men of the New South Wales Mounted Rifles, which regiment had been temporarily assigned to his command.

Meanwhile, Roberts' main column made an easy crossing of the river while his mounted elements in the lead pursued the Boers up the railway to Ventersburg Siding. Although more strongly opposed on the right, the British were again able to drive the Boers back and get across the Land with light casualties. The flanking movement from this side, planned to have been executed by Colonel R.G. Broadwood's cavalry brigade. was late in starting out and played little part in the course of the day's operations, which in effect decided the fate of Kroonstad itself occupied with minimal opposition two days later.

Extracted from the book produced by Chris Coulthard-Clark, Where Australians Fought - The Encyclopaedia of Australia's Battles, Allen and Unwin, Sydney, 1998, pp. 76-78.


Additional References cited by Chris Coulthard-Clark:

L.S. Amery, (ed.) The Times History of the War in South Africa 1899-1902, Vol. 4 (1906), London: Sampson Low, Marston & Co.

History of the War in South Africa 1899- 1902, Vol. 3 (1908), London: Hurst & Blackett.

John Stirling (1907) The Colonials in South Africa, 1899-1902. Edinburgh: W. Blackwood & Sons.


Further Reading:

The Battle of Zand River, South Africa, 10 May 1900

Battles where Australians fought, 1899-1920


Citation: Zand River, South Africa, May 10, 1900, Outline

Posted by Project Leader at 12:01 AM EAST
Updated: Sunday, 11 April 2010 7:34 PM EADT
Monday, 15 February 2010
The Battle of Zand River, South Africa, 10 May 1900, Sydney Morning Herald Account
Topic: BatzB - Zand River

The Battle of Zand River

South Africa, 10 May 1900

Sydney Morning Herald Account 


Sydney Morning Herald, Friday 11 May 1900, p. 5


The transcription:

 
ACTION ON THE ZAND RIVER.

GALLANT ACTION OF THE N.S.W. TROOPS.

LONDON, May 10.


During Major-General Hutton’s reconnaissance on tho Zand River the New Zealand troops were posted on a kopje overlooking the river, whilst the New South Wales and Canadian troops were held in reserve on a kopje in the rear.

Some 10,000 Boers, who with six guns were on the northern side of the river preparing to leave with a convoy and a loaded train, returned, and shelled the British and Colonial troops.

Many of tho Boers crossed tho dry bed of the river southward, circled to the right, enfiladed the Western Australian troops with shellfire, and threatened the retreat of the New Zealand troops.

The New South Wales troops moved forward gallantly and held the enemy in check in the face of a galling fire. They covered the retreat of the New Zealanders.

The enemy retired at night, and destroyed the railway bridges and culverts.

The London "Daily Chronicle's'' war correspondent states that Lieutenant General French and Major-General Hutton crossed the Zand River, and are pursuing the enemy cautiously, owing to the damage done to the railway.


Further Reading:

The Battle of Zand River, South Africa, 10 May 1900

Battles where Australians fought, 1899-1920


Citation: The Battle of Zand River, South Africa, 10 May 1900, Sydney Morning Herald Account

Posted by Project Leader at 12:01 AM EAST
Updated: Sunday, 11 April 2010 10:24 PM EADT
Sunday, 14 February 2010
The Battle of Anzac Cove, Gallipoli, 25 April 1915, 7th Infantry Battalion War Diary
Topic: BatzG - Anzac

The Battle of Anzac Cove

Gallipoli, 25 April 1915

7th Infantry Battalion War Diary 


War Diary account of the 7th Infantry Battalion, AIF.


The following is a transcription of the War Diary of the 7th Infantry Battalion, AIF, of their role in the landings at Anzac on 25 April 1915.


25 April 1915

HMT Galeka


4.45 am - Arrived at anchorage at 4.45 am in accordance with Divisional Orders. As, however, no tows arrived as provided, Lieutenant Commander Hummerville ordered me to disembark the Battalion in the ship's boats. This greatly disarranged my previous orders as men had been told off to tows in accordance with their capacity of the boats provided which differed from the ships boats and room had to be left for men to row. Moreover, the Officers in charge of the boats were unaware of the landing place. All that I or Lieutenant Commander Hummerville could tell them was that they were to land to the left of the 3rd Infantry Brigade.

Major Glassford was in charge of leading boat vide no men attached.

At 5 am, about 120 men of "B" Company 7th Infantry Battalion which was already drawn up on the SS Galeka were embarked in four of the ships boats and proceeded to row ashore. The naval officer on board gave instructions that we were to land on the left of the 3rd Infantry Brigade and we accordingly made for the vicinity of Fisherman's hut (Square 237 L). We could see the 3rd Infantry Brigade Field Ambulance flag flying about Square 237 W7. When about 200 yards from shore the enemy, who were entrenched on knoll behind Fisherman's Hut and knoll about 500 yards south east opened fire on the boats with machine guns and rifles. We landed and took up a position behind sand heaps at edge of beach the fire being to heavy to advance over the flat leading to the huts. We poured in rapid fire and in about a quarter of an hour threatened to assault when the enemy immediately retired. We occupied their trenches in rear of Fisherman's Hut with the remains of the platoons, numbering about 40 men and held the positions to allow the Field Ambulance; who had sent up bearers, to remove the wounded, which was done as far as possible. Assistance was also received from a trawler which towed away two boats loaded with wounded. Messengers were sent to find Battalion Headquarters with messages stating where we were, what had happened, and our intentions which were to hold hill until wounded were removed and then join battalion unless otherwise ordered. At about 2 pm the enemy advanced on our left: we held on as long as possible and then retired along the beach to point in Square 224 G5, arriving there about 7 pm. The party then reported to Major Glassford who directed them to 3rd Infantry Brigade Headquarters.

Gallipoli Peninsular 4pm - Left HMT Galeka by the 5th boat and landed under shrapnel fire. Could not find the landing officer Major Glassford or Major Villiers Stewart who were to meet us according to Divisional Orders. I therefore reported to Colonel McLagen, Brigadier of the 3rd Infantry Brigade and asked for orders. He instructed me to assemble the Battalion behind the right hand point of the Cove in which we had landed and he would arrange for us to go into action on his right. Major Glassford then arrived and confirmed this. With difficulty owing to shrapnel fire, I assembled about half of "C" Company, the whole of "D" Company, one platoon of "B" Company and the whole of "A" company who landed from HMT Clan McGillivray at our place of assembly under instruction from Major Glassford.

About 9.30 pm was wounded below that  ankle joint: remained on field a short time, gave directions for the supplying of ammunition and sent message to Brigadier and to Major Mason of my wound and returned to beach.

The Battalion was then moved over the first ridge and assembled at the foot of a small hillock. From here, under Major Glassford's instructions, two platoons now moved forward to support the 9th Infantry Battalion who were in a ???? ridge in front. At about 2 am Colonel McCay arrived and took over command. He at once ordered the Battalion to advance and on arrival at the spot where the second and third ridge merge into the Plateau 400, he visually ordered me to put the Battalion into the firing line along the front edge of that ridge stating that the 6th Battalion would support me and the 5th Battalion, thus 8 companies. These orders were carried out "D" Company went into action first followed by "A" company as it came up and finally by "C" company and the one platoon of "B" Company available. Major Blizard severely wounded while moving up ridge under front line.


26 April 1915

7th Battalion Headquarters established western slope of Happy Valley. Trying to collect men of the Seventh. Mustered approximately 70. Remainder mixed with other Battalions.

5.15 pm - An advance was ordered in direction of Baby 700. Units became mixed. A line advanced and took up a position which enabled a firing line to be established and then the covering party returned under cover of darkness were subjected to heavy shrapnel and machine gun fire.

The approximate casualties for 25 April 1915 was 400 killed, wounded and missing.


Further Reading:

The Battle of Anzac Cove, Gallipoli, 25 April 1915

The Battle of Anzac Cove, Gallipoli, 25 April 1915, 7th Infantry Battalion, Roll of Honour  

The Battle of Anzac Cove, Gallipoli, 25 April 1915, 2nd Infantry Brigade, Roll of Honour 

The Battle of Anzac Cove, Gallipoli, 25 April 1915, AIF, Roll of Honour 

Battles where Australians fought, 1899-1920


Citation: The Battle of Anzac Cove, Gallipoli, 25 April 1915, 7th Infantry Battalion War Diary

Posted by Project Leader at 12:01 AM EAST
Updated: Tuesday, 6 April 2010 9:19 PM EADT
The Battle of Central Station, New South Wales, 14 February 1916, Outline
Topic: BatzA - Liverpool

Australian Battles 

The Battle of Central Station, New South Wales, 14 February 1916

Outline


YMCA Tent, Liverpool Camp


The Liverpool Riot of 1916 also known as the Battle of Central Station was an event in Sydney, Australia where a large group of Australian soldiers rioted through the streets of Sydney and surrounding areas.

Following Australia's entry into World War I, many Australian men volunteered to fight in Europe and were stationed in camps around Australia to receive military training before being shipped to the front. At 9.00am on 14 February 1916, at Casula Camp in Liverpool in Sydney's southwest, it was announced that the current training session would be extended into the evening, meaning a 27 hour stretch for some of the recruits. 5,000 recruits refused to accept extra duty and went on strike to protest the poor conditions at the camp. The soldiers left the camp and marched towards the centre of Liverpool, where they were joined by other recruits from around Liverpool and the numbers of protesters now reached as many as 15,000. They invaded a number of local hotels, drinking the bars dry, refusing to pay and began vandalising buildings.

The soldiers then gained control of Liverpool train station, overpowered the engineers and commandeered trains heading towards Sydney, where they began rampaging drunkenly through Sydney streets, smashing windows and targeting anyone with a foreign sounding name, including Italian restaurants, even though Italy was an ally. Shops and hotels were looted and people were forced to take refuge in churches to avoid the soldiers. Police reinforcements were called in and began battling the soldiers in the streets of Sydney.

At Sydney's Central Railway Station, armed military guards found a group of over 100 drunken soldiers destroying a toilet block and demanded they surrender. A shot was fired by a rioting soldier over the guards' heads and in response the guards returned fire, killing one soldier and seriously injuring eight others. This incident had a sobering effect on the soldiers and many began surrendering to police and military guards, although small bands of soldiers continued to cause damage throughout the night.

Following the riot, described as the "most disgraceful episode in our military history", about 1000 soldiers were courtmartialled and either gaoled or discharged from the army. However, Australia was desperate for recruits to fight the war and so many soldiers escaped punishment and were sent overseas while the government, anxious to keep the image of the Australian digger as positive as possible, discouraged the media from covering the event.

As a result of the riots, New South Wales, Victoria and Tasmania introduced 6.00pm closing of hotels to guard against a repeat occurrence, matching South Australia's introduction the previous year. It was not until 1955 that New South Wales closing was extended to 10pm.

From Wikipedia: http://en.wikipedia.org/wiki/Liverpool_riot_of_1916


Further Reading:

The Battle of Central Station, New South Wales, 14 February 1916

The Battle of Central Station, New South Wales, 14 February 1916, Roll of Honour

Australian Battles

Battles where Australians fought, 1899-1920


Citation: The Battle of Central Station, New South Wales, 14 February 1916, Outline

Posted by Project Leader at 12:01 AM EAST
Updated: Friday, 6 May 2011 7:29 AM EADT
Saturday, 13 February 2010
The Battle of Anzac Cove, Gallipoli, 25 April 1915, 7th Infantry Battalion, Roll of Honour
Topic: BatzG - Anzac

The Battle of Anzac Cove

Gallipoli, 25 April 1915

Roll of Honour

7th Infantry Battalion, AIF


Poppies on the Roll of Honour, Australian War Memorial, Canberra


The Roll of Honour contains the names of all the men from the 7th Infantry Battalion known to have served and lost their lives during the Battle of Anzac, 25 April 1915.


Roll of Honour


Norman Edward ABERDEEN, 7th Infantry Battalion.

John Knox ADAMS, 7th Infantry Battalion.

William Thomas ADAMS, 7th Infantry Battalion.

James ANDERSON, 7th Infantry Battalion.

John Edward ANDERSON, 7th Infantry Battalion.

Robert ANDERSON, 7th Infantry Battalion.

John Sinclair ANGUS, 7th Infantry Battalion.

Edwin Joseph AULT, 7th Infantry Battalion.


David BAIRD, 7th Infantry Battalion.

Alfred BALDWIN, 7th Infantry Battalion.

Charles BALE, 7th Infantry Battalion.

Hubert Godfrey BEACHLEY, 7th Infantry Battalion.

Walter Herbert BECKENSALL, 7th Infantry Battalion.

John Charles BELL, 7th Infantry Battalion.

Jack BLACKBURN, 7th Infantry Battalion.

Lance Sisca BLANNIN-FERGUSON, 7th Infantry Battalion.

Reginald Rupert BOND, 7th Infantry Battalion.

Roy BONHAM, 7th Infantry Battalion.

William Joseph BOUCHER, 7th Infantry Battalion.

Robert Cleveland BRADLEY, 7th Infantry Battalion.

Vernon Thomas BROOKES, 7th Infantry Battalion.

Richard BUTT, 7th Infantry Battalion.

Reginald John Murray BYRNE, 7th Infantry Battalion.


William Richard CANTWELL, 7th Infantry Battalion.

James Neville CARLESS, 7th Infantry Battalion.

Strutten John CARTER, 7th Infantry Battalion.

Francis Alexander CHARLTON, 7th Infantry Battalion.

Alfred James COLLINS, 7th Infantry Battalion.

Albert Edward COMTE, 7th Infantry Battalion.


Ernest Robert DALY, 7th Infantry Battalion.

Charles DAMEN, 7th Infantry Battalion.

Edmond Butterworth DANAHER, 7th Infantry Battalion.

David Mancel DAVIES, 7th Infantry Battalion.

Harold DENSTON, 7th Infantry Battalion.

William George DIXON, 7th Infantry Battalion.

Stanley Oliver DUNSTAN, 7th Infantry Battalion.


James Adolphus EDGCUMBE, 7th Infantry Battalion.

William Albert EDWARDS, 7th Infantry Battalion.

Thomas Elevious ELLEFSEN, 7th Infantry Battalion.

Sidney Harold Richards ELLIOTT, 7th Infantry Battalion.

Abraham EVANS, 7th Infantry Battalion.


Josephus FULLAGAR, 7th Infantry Battalion.


Joseph Roy GARDNER, 7th Infantry Battalion.

Thomas Andrew GILLISON, 7th Infantry Battalion.

Hugh Barclay GRAHAM, 7th Infantry Battalion.

Ernest Edward Robert GREENWOOD, 7th Infantry Battalion.

Rhys Emlyn GRIFFITHS, 7th Infantry Battalion.

William Gordon GULLIVER, 7th Infantry Battalion.


Vernon Charles HALL, 7th Infantry Battalion.

Albert John HANDCOCK, 7th Infantry Battalion.

John HARMER, 7th Infantry Battalion.

David HAWKINS, 7th Infantry Battalion.

Gordon Gray Carruthers HAWKINS, 7th Infantry Battalion.

Alan Melrose HAYES, 7th Infantry Battalion.

Colin Wilfrid HEAD, 7th Infantry Battalion.

William Walter James HEAD, 7th Infantry Battalion.

John George Douglas HELSHAM, 7th Infantry Battalion.

Arthur HETHERTON, 7th Infantry Battalion.

William Corbett HILL, 7th Infantry Battalion.

Basil John HOOPER, 7th Infantry Battalion.

Archibald James HUTCHISON, 7th Infantry Battalion.


Charles Edward JONES, 7th Infantry Battalion.

Edward Wilfred JUNIER, 7th Infantry Battalion.


Herbert M KEAM, 7th Infantry Battalion.

Thomas KEAN, 7th Infantry Battalion.

Norman Vivian Gladstone KERBY, 7th Infantry Battalion.

Frank KIELY, 7th Infantry Battalion.

Herbert James KINGSTON, 7th Infantry Battalion.

Edward Luke KNIGHT, 7th Infantry Battalion.


George Hill LEVENS, 7th Infantry Battalion.

Frederick Thomas LOCKER, 7th Infantry Battalion.

Cuthbert Jones LONG, 7th Infantry Battalion.

Percival LOXTON, 7th Infantry Battalion.


Alexander Murdo MACAULAY, 7th Infantry Battalion.

Charles Frederick MADDEN, 7th Infantry Battalion.

John Archibald MALCOLM, 7th Infantry Battalion.

Alexander James MCARTHUR, 7th Infantry Battalion.

Alfred MCCOLL, 7th Infantry Battalion.

Fenley John MCDONALD, 7th Infantry Battalion.

Lindsay Gordon MCDONALD, 7th Infantry Battalion.

William MCDONALD, 7th Infantry Battalion.

James Rivet MCGILLIVRAY, 7th Infantry Battalion.

Edward Albert MCKENNA, 7th Infantry Battalion.

Hamish MCNAB, 7th Infantry Battalion.

Alexander George MCPHERSON, 7th Infantry Battalion.

John Rossiter MELVILLE, 7th Infantry Battalion.

George Irvine MIDDLETON, 7th Infantry Battalion.

Frederick John MILGATE, 7th Infantry Battalion.

Robert MORRISON, 7th Infantry Battalion.

James MUNRO, 7th Infantry Battalion.


Alfred Joseph NORTON, 7th Infantry Battalion.


William O'BRIEN, 7th Infantry Battalion.

Michael John O'DWYER, 7th Infantry Battalion.

Daniel James O'LEARY, 7th Infantry Battalion.

Thomas O'LEARY, 7th Infantry Battalion.

Allan Robert OLLEY, 7th Infantry Battalion.


Arthur Mueller PEARCE, 7th Infantry Battalion.

Frederick Francis PEARSON, 7th Infantry Battalion.

Reginald Arthur PENROSE, 7th Infantry Battalion.

Trafford Cyril PETTIGREW, 7th Infantry Battalion.

Alfred James PETTIS, 7th Infantry Battalion.

Thomas Wesley PINDER, 7th Infantry Battalion.

Charles POWLEY, 7th Infantry Battalion.


Richard James Reginald READ, 7th Infantry Battalion.

Clair William REED, 7th Infantry Battalion.

Cyril Lindsay REID, 7th Infantry Battalion.

Roy Everard RICHARDSON, 7th Infantry Battalion.

Bartimas ROBERTSHAW, 7th Infantry Battalion.

Colin Ernest ROBERTSON, 7th Infantry Battalion.

Cecil Harry ROCKE, 7th Infantry Battalion.

Herbert James ROWLAND, 7th Infantry Battalion.

James RYAN, 7th Infantry Battalion.


Frederick SANDERS, 7th Infantry Battalion.

William John SAYERS, 7th Infantry Battalion.

Charles SCHARNESS, 7th Infantry Battalion.

John Alfred SEEGER, 7th Infantry Battalion.

George Henry SHEPPARD, 7th Infantry Battalion.

Walter Henry SLOCOMBE, 7th Infantry Battalion.

Ernest Albert SMITH, 7th Infantry Battalion.

Walter Joseph STEETH, 7th Infantry Battalion.

Richard Harry STEVENS, 7th Infantry Battalion.

Russell William STEWART, 7th Infantry Battalion.

Roy Frank STONE, 7th Infantry Battalion.

Raymond SULLIVAN, 7th Infantry Battalion.

William John SUTHERLAND, 7th Infantry Battalion.


Fremont Leon TABBUT, 7th Infantry Battalion.

Oswald James TANKARD, 7th Infantry Battalion.

James Campbell TELFORD, 7th Infantry Battalion.

Charles TEVENDALE, 7th Infantry Battalion.

Stanley George THOMAS, 7th Infantry Battalion.

John THOMPSON, 7th Infantry Battalion.

William TOMLINSON, 7th Infantry Battalion.

Frederick Arthur Albert TOWNER, 7th Infantry Battalion.

Frank TRICKEY, 7th Infantry Battalion.

James John TWINING, 7th Infantry Battalion.


Athelstan Neville USSHER, 7th Infantry Battalion.


Arthur Wilson VEITCH, 7th Infantry Battalion.

Donald VEITCH, 7th Infantry Battalion.


George William WARREN, 7th Infantry Battalion.

Frederick William WATSON, 7th Infantry Battalion.

William WHITECROSS, 7th Infantry Battalion.

Arthur WILDEN, 7th Infantry Battalion.

Albert Henry WILLIAMS, 7th Infantry Battalion.

Charles Jonathan WILLMOTT, 7th Infantry Battalion.

William Henry WILLS, 7th Infantry Battalion.

Richard Noble WILSON, 7th Infantry Battalion.

Bertram WINSLET, 7th Infantry Battalion.

George William WOOD, 7th Infantry Battalion.

Charles WRIGHT, 7th Infantry Battalion.


George Robert YUILL, 7th Infantry Battalion.


Further Reading:

The Battle of Anzac Cove, Gallipoli, 25 April 1915

The Battle of Anzac Cove, Gallipoli, 25 April 1915, 2nd Infantry Brigade, Roll of Honour 

The Battle of Anzac Cove, Gallipoli, 25 April 1915, AIF, Roll of Honour 

Battles where Australians fought, 1899-1920


Citation: The Battle of Anzac Cove, Gallipoli, 25 April 1915, 7th Infantry Battalion, Roll of Honour

Posted by Project Leader at 12:01 AM EAST
Updated: Tuesday, 6 April 2010 8:59 AM EADT

Newer | Latest | Older

Full Site Index


powered by FreeFind
Let us hear your story: You can tell your story, make a comment or ask for help on our forum.

Desert Column Forum

A note on copyright

The Australian Light Horse Studies Centre is a not for profit and non profit group whose sole aim is to write the early history of the Australian Light Horse from 1900 - 1920. It is privately funded and the information is provided by the individuals within the group and while permission for the use of the material has been given for this site for these items by various donors, the residual and actual copyright for these items, should there be any, resides exclusively with the donors. The information on this site is freely available for private research use only and if used as such, should be appropriately acknowledged. To assist in this process, each item has a citation attached at the bottom for referencing purposes.

Please Note: No express or implied permission is given for commercial use of the information contained within this site.

A note to copyright holders

The Australian Light Horse Studies Centre has made every endeavour to contact copyright holders of material digitised for this blog and website and where appropriate, permission is still being sought for these items. Where replies were not received, or where the copyright owner has not been able to be traced, or where the permission is still being sought, the Australian Light Horse Studies Centre has decided, in good faith, to proceed with digitisation and publication. Australian Light Horse Studies Centre would be happy to hear from copyright owners at any time to discuss usage of this item.

Contact

Australian Light Horse Studies Centre

eXTReMe Tracker