"At a mile distant their thousand hooves were stuttering thunder, coming at a rate that frightened a man - they were an awe inspiring sight, galloping through the red haze - knee to knee and horse to horse - the dying sun glinting on bayonet points..." Trooper Ion Idriess
The Australian Light Horse Studies Centre aims to present an accurate history as chroniclers of early Australian military developments from 1899 to 1920.
The Australian Light Horse Studies Centre site holds over 12,000 entries and is growing daily.
Contact:Australian Light Horse Studies CentreLet us hear your story:
You can tell your story, make a comment or ask for help on our Australian Light Horse Studies Centre Forum called:
The Battle of Paardeberg, South Africa, 17-27 February 1900, Outline Topic: BatzB - Paardeberg
The Battle of Paardeberg
South Africa, 17-27 February 1900
Outline
Paardeberg, a major action of the Second South African War, which was fought in western Orange Free State and ended with the surrender of 4,000 Boers under General Piet Cronje to British forces under Field Marshal Lord Roberts after a siege lasting 17-27 February 1900. The battle arose after Roberts bypassed Magersfontein (q.v.), which Cronje had been occupying to block British attempts to break the siege of Kimberley along the direct northern route of the railway line, by pushing Lieut.-General John French's cavalry division around the Boer's left flank. With Kimberley relieved on 15 February and the British now astride his lines of communication, Cronje had no choice but to hurriedly withdraw east towards Bloemfontein to avoid being cut off entirely.
The Boer retirement initially evaded attempts at capture, despite the fact that Cronje was encumbered with a huge train of ox-wagons and large numbers of families who had joined the men in the field. On the bright moonlit night of 15 February, the commandos succeeded in passing unobserved just five kilometres to the north of Roberts' army. A force of 2,000 mounted infantry (including the New South Wales Mounted Rifles) was sent out the next morning under Colonel Ormelie Hannay, to pursue Cronje and hold him until the slower infantry could arrive and prevent his further escape. This attempt failed when Hannay's men encountered a determined Boer rearguard and were forced to fall back in the face of accurate light artillery fire. Amid the confusion of the retirement, the inexperienced British horsemen (regular infantrymen who had been recently mounted) raced over a steep embankment and into the river. Hannay reformed his troops and resumed the attack, but again they 'fell back in some confusion'.
Cronje was finally brought to bay at Paardeberg on 17 February, when three batteries of British horse artillery operating with French's advanced elements succeeded in getting into a position from which they could shell the head of the Boer column as it attempted to cross to the south bank of the Modder River at Vendutie Drift (ford). Forced into a defensive laager (camp) extending for three kilometres along the north bank, Cronje was quickly encircled and besieged. Over the next two days Major-General Lord Kitchener, Roberts' chief of staff who held local command while the field marshal recovered from a cold, attempted to take the Boer position before it could receive reinforcement. He ordered a series of hasty piecemeal frontal assaults which resulted in over 1,260 British casualties (including 320 dead).
During these preliminary skirmishes on the periphery of the Boer position, Hannay's mounted infantry was again involved on 18 February. In response to vague orders from Kitchener which appeared to direct him to rush the laager at all costs, Hannay prepared his force to carry out an assault - evidently determined to eliminate the stain of the fiasco a few days earlier. This attempt was cut short at 3 p.m. when Hannay was killed while riding bravely at the head of a small token band of his men.
For the next ten days the British vice around the laager was contracted mainly by the digging of trenches rather than direct assault, and the main form of pressure on the Boers came from the heavy bombardment maintained by the 91 guns with Roberts' force. By 26 February the trenches on the eastern side had reached to within 230 metres of the Boer position, and a decision was taken to advance the line with a pre-dawn attack by the Canadian battalion which was present. This succeeded in bringing the British to little more than 80 metres away, in a position which enfiladed all the Boer trenches parallel to the river. At 7 a.m. that morning Cronje finally accepted the inevitable and rode to Roberts' headquarters to offer his capitulation.
By chance, Major Thomas Fiaschi of the New South Wales Army Medical Corps was reputed to have received the enemy's formal surrender. While Fiaschi and members of his corps were collecting Canadian wounded close to the Boer lines, a group of 209 enemy displayed a white flag, filed out of their positions and offered their surrender to him as the senior officer present. In fact, at the same time as this incident was taking place, elsewhere Roberts was personally receiving Cronje's surrender. Nonetheless the story later grew that the honour of receiving the surrender of the whole Boer position at Paardeberg had gone to Fiaschi.
Other Australians played various parts in the action while attached to British units as 'special service officers'. Two members of the New South Wales permanent military forces present were Major (later ;Major-General Sir) William Bridges, attached to the artillery accompanying the cavalry brigade commanded by Colonel R.G. Broadwood, and Lieut. G. Grieve, who was killed on 18 February leading a company of the 2nd Battalion of the Black Watch. Lieut.-Commander W. Colquhoun of the Victorian Naval Forces was also present, in command of one of two 12-pounder naval guns used to shell the laager. When both guns became immobilised through wheel problems on 26 February; Colquhoun took them to Kimberley for repair and succeeded in getting them back in time to take part in Roberts' subsequent operations.
Victory at Paardeberg - coincidentally achieved on the nineteenth anniversary of the defeat suffered by British forces at Majuba Hill in the First South African War - had cost the British 1,540 casualties, compared to probably less than 100 Boers, but it was the last large-scale action of that second conflict. The Capture of Cronje, then the most famous Boer general, had ramifications well beyond the loss of the men and equipment with him at the surrender. Some 14,000 Boers had rushed to his assistance but had been held off by the encircling British; these demoralised forces now rapidly dispersed in disorder towards the east. Faced with growing British strength in conventional military forces, the Boers resorted to guerrilla tactics to prolong the Second South African War for a further fifteen months.
Extracted from the book produced by Chris Coulthard-Clark, Where Australians Fought - The Encyclopaedia of Australia's Battles, Allen and Unwin, Sydney, 1998, pp. 68-70.
Additional References cited by Chris Coulthard-Clark:
L.M. Field (1979) The forgotten War, Carlton, Vic. Melbourne University Press.
F. Maurice (ed.) History of the War in South Africa 1899-1902, Vol. 1 (1906), London: Hurst & Blacken.
R.L. Wallace (1976) The Australians at the Boer War, Canberra: Australian War Memorial & Australian Government Publishing Service.
Zand River, South Africa, May 10, 1900 Topic: BatzB - Zand River
Zand River
South Africa, 10 May 1900
Outline
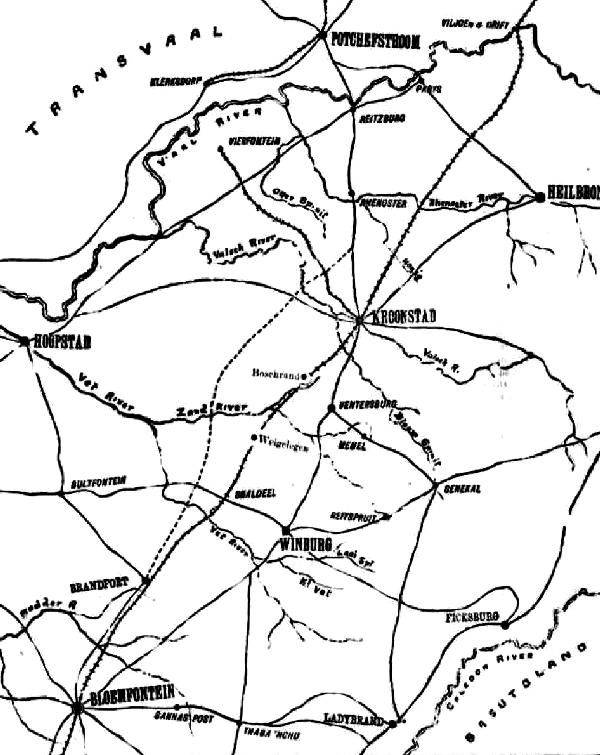
Map of the Zand River Region.
[From: Argus 11 May 1900, p. 5]
Zand River, an action during the Second South African War, fought on 10 May 1900 in northern Orange Free State as Boer forces attempted to check the advance of the British army led by Field Marshal Lord Roberts. Following the action on 5 May, when the British forced their way over the Vet River (see Coetzee Drift), the Boers had retreated hurriedly to the Zand. It was here that a reconnaissance by the mounted infantry brigade commanded by Major General Edward Hutton (which included several Australian units) found them strongly entrenched around Virginia Siding on 7 May, confirming that this was to be the focus of the burghers' next major show of resistance. A squadron of the New South Wales Mounted Rifles reached within 500 metres of the river, but were driven off by enemy shellfire.
Since the defence on the Vet, the commandant-general of the Boer forces (General Louis Botha) had arrived at Virginia Siding on 7 May to take personal charge of operations, bringing with him some 3,000 reinforcements from the Transvaal. All the Free State burghers still under arms - probably not numbering more than 5,000 - were also now concentrated at the Zand. Their object was to attempt to prevent the capture of Kroonstad, 64 kilometres to the north, which was the Free State capital since the fall of Bloemfontein in March and an important supply centre in its own right. The terrain held a major advantage for this purpose, chiefly in the form of a ridge line running along the river's north bank which formed a useful basis for the defence of the. Boer centre covering the railway line and the left flank in the east. The weak point was the western flank, which was susceptible to a British turning movement, and Botha was obliged to adopt dispositions which took this possibility into account.
Although Roberts recognised the potential for a wide sweep past the Boer flank to carry his cavalry to Kroonstad and beyond, such as he had used to relieve Kimberley (q.v.), he was not prepared to risk the attrition which that tactic had previously caused. The cavalry division, under Lieut.-General John French, had only just been returned to strength in time to rejoin the army for the. Land operation. He nonetheless decided to attempt to envelop Botha's forces by sending two of French's brigades and Hutton's mounted infantry - 4,000 men in all - around the enemy's right flank, meeting up around Ventersburg Siding with another cavalry brigade which was to come in from the east after turning the enemy's left.
Implementation of this plan began on 9 May, when Colonel T.C. Porter's 1st Cavalry Brigade (which included the 1st Australian Horse, the New South Wales Lancers and New South Wales Army Medical Corps) seized control of a ford just west of the furthermost Boer outpost at Diamant Drift, some ten kilometres from the railway. French and his staff, along with Hutton's mounted infantry brigade, joined him here later in the day. The rest of Roberts' army - totalling 38,000 men with 100 field guns and twelve pom-poms - had closed up on the river, but apart from a crossing made at Koolspruit Drift (in the centre) by some mounted infantry the forcing of the Land was left until the following day.
When French set off on 10 May with Porter's brigade, pushing rapidly north-east, Botha was initially unaware that there was any British activity on his flank. Only with the approach of the cavalry towards Vredes Verdrag, a ridge sixteen kilometres directly north and behind him, did he discover the peril confronting the entire Boer defence. After sending off a 200-man reserve to oppose any further progress by French, Botha ordered a general retirement; only a small rearguard was left at Virginia Siding to delay Roberts' main advance.
The measures taken by the Boer commander were just in time. French's efforts to capture Vredes Verdrag and cover the last eight kilometres east to Ventersburg Siding were vigorously opposed, in the first instance by fire from two Boer guns covering the approaches to the ridge. In an attempt to outflank these weapons, the Australian Horse and three other squadrons were sent to seize an apparently unoccupied kopje (low hill) on the left. The troops gained the hill and dismounted, but were then ambushed by a party of Boers who had been lying in wait. Caught in a crossfire and lacking a unified command, the troopers were quickly driven off the hill in confusion. Left behind were fourteen killed and 63 prisoners, 36 of whom were wounded; at least one Australian Horse officer was among those captured.
Attempts by the Boers to capitalise on their success were beaten off, but French -anxious to maintain the momentum of his advance-decided to bypass the enemy position by moving west around Vredes Verdrag and on to the next hill to the north. This movement was constantly harried by the Boers, who were in sufficient strength to keep French's horsemen away from the railway line. Hutton's mounted infantry, following along behind, also encountered some hard fighting. Among the casualties suffered by his brigade were eight men of the New South Wales Mounted Rifles, which regiment had been temporarily assigned to his command.
Meanwhile, Roberts' main column made an easy crossing of the river while his mounted elements in the lead pursued the Boers up the railway to Ventersburg Siding. Although more strongly opposed on the right, the British were again able to drive the Boers back and get across the Land with light casualties. The flanking movement from this side, planned to have been executed by Colonel R.G. Broadwood's cavalry brigade. was late in starting out and played little part in the course of the day's operations, which in effect decided the fate of Kroonstad itself occupied with minimal opposition two days later.
Extracted from the book produced by Chris Coulthard-Clark, Where Australians Fought - The Encyclopaedia of Australia's Battles, Allen and Unwin, Sydney, 1998, pp. 76-78.
Additional References cited by Chris Coulthard-Clark:
L.S. Amery, (ed.) The Times History of the War in South Africa 1899-1902, Vol. 4 (1906), London: Sampson Low, Marston & Co.
History of the War in South Africa 1899- 1902, Vol. 3 (1908), London: Hurst & Blackett.
John Stirling (1907) The Colonials in South Africa, 1899-1902. Edinburgh: W. Blackwood & Sons.
The Battle of Zand River, South Africa, 10 May 1900, Sydney Morning Herald Account Topic: BatzB - Zand River
The Battle of Zand River
South Africa, 10 May 1900
Sydney Morning Herald Account
Sydney Morning Herald, Friday 11 May 1900, p. 5
The transcription:
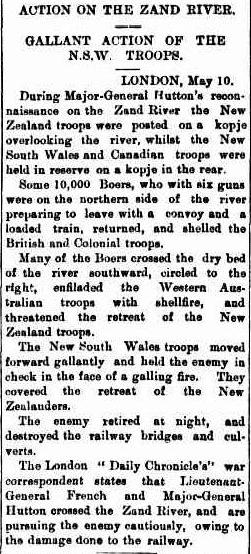
ACTION ON THE ZAND RIVER.
GALLANT ACTION OF THE N.S.W. TROOPS.
LONDON, May 10.
During Major-General Hutton’s reconnaissance on tho Zand River the New Zealand troops were posted on a kopje overlooking the river, whilst the New South Wales and Canadian troops were held in reserve on a kopje in the rear.
Some 10,000 Boers, who with six guns were on the northern side of the river preparing to leave with a convoy and a loaded train, returned, and shelled the British and Colonial troops.
Many of tho Boers crossed tho dry bed of the river southward, circled to the right, enfiladed the Western Australian troops with shellfire, and threatened the retreat of the New Zealand troops.
The New South Wales troops moved forward gallantly and held the enemy in check in the face of a galling fire. They covered the retreat of the New Zealanders.
The enemy retired at night, and destroyed the railway bridges and culverts.
The London "Daily Chronicle's'' war correspondent states that Lieutenant General French and Major-General Hutton crossed the Zand River, and are pursuing the enemy cautiously, owing to the damage done to the railway.
The Battle of Anzac Cove, Gallipoli, 25 April 1915, 7th Infantry Battalion War Diary Topic: BatzG - Anzac
The Battle of Anzac Cove
Gallipoli, 25 April 1915
7th Infantry Battalion War Diary
War Diary account of the 7th Infantry Battalion, AIF.
The following is a transcription of the War Diary of the 7th Infantry Battalion, AIF, of their role in the landings at Anzac on 25 April 1915.
25 April 1915
HMT Galeka
4.45 am - Arrived at anchorage at 4.45 am in accordance with Divisional Orders. As, however, no tows arrived as provided, Lieutenant Commander Hummerville ordered me to disembark the Battalion in the ship's boats. This greatly disarranged my previous orders as men had been told off to tows in accordance with their capacity of the boats provided which differed from the ships boats and room had to be left for men to row. Moreover, the Officers in charge of the boats were unaware of the landing place. All that I or Lieutenant Commander Hummerville could tell them was that they were to land to the left of the 3rd Infantry Brigade.
Major Glassford was in charge of leading boat vide no men attached.
At 5 am, about 120 men of "B" Company 7th Infantry Battalion which was already drawn up on the SS Galeka were embarked in four of the ships boats and proceeded to row ashore. The naval officer on board gave instructions that we were to land on the left of the 3rd Infantry Brigade and we accordingly made for the vicinity of Fisherman's hut (Square 237 L). We could see the 3rd Infantry Brigade Field Ambulance flag flying about Square 237 W7. When about 200 yards from shore the enemy, who were entrenched on knoll behind Fisherman's Hut and knoll about 500 yards south east opened fire on the boats with machine guns and rifles. We landed and took up a position behind sand heaps at edge of beach the fire being to heavy to advance over the flat leading to the huts. We poured in rapid fire and in about a quarter of an hour threatened to assault when the enemy immediately retired. We occupied their trenches in rear of Fisherman's Hut with the remains of the platoons, numbering about 40 men and held the positions to allow the Field Ambulance; who had sent up bearers, to remove the wounded, which was done as far as possible. Assistance was also received from a trawler which towed away two boats loaded with wounded. Messengers were sent to find Battalion Headquarters with messages stating where we were, what had happened, and our intentions which were to hold hill until wounded were removed and then join battalion unless otherwise ordered. At about 2 pm the enemy advanced on our left: we held on as long as possible and then retired along the beach to point in Square 224 G5, arriving there about 7 pm. The party then reported to Major Glassford who directed them to 3rd Infantry Brigade Headquarters.
Gallipoli Peninsular 4pm - Left HMT Galeka by the 5th boat and landed under shrapnel fire. Could not find the landing officer Major Glassford or Major Villiers Stewart who were to meet us according to Divisional Orders. I therefore reported to Colonel McLagen, Brigadier of the 3rd Infantry Brigade and asked for orders. He instructed me to assemble the Battalion behind the right hand point of the Cove in which we had landed and he would arrange for us to go into action on his right. Major Glassford then arrived and confirmed this. With difficulty owing to shrapnel fire, I assembled about half of "C" Company, the whole of "D" Company, one platoon of "B" Company and the whole of "A" company who landed from HMT Clan McGillivray at our place of assembly under instruction from Major Glassford.
About 9.30 pm was wounded below that ankle joint: remained on field a short time, gave directions for the supplying of ammunition and sent message to Brigadier and to Major Mason of my wound and returned to beach.
The Battalion was then moved over the first ridge and assembled at the foot of a small hillock. From here, under Major Glassford's instructions, two platoons now moved forward to support the 9th Infantry Battalion who were in a ???? ridge in front. At about 2 am Colonel McCay arrived and took over command. He at once ordered the Battalion to advance and on arrival at the spot where the second and third ridge merge into the Plateau 400, he visually ordered me to put the Battalion into the firing line along the front edge of that ridge stating that the 6th Battalion would support me and the 5th Battalion, thus 8 companies. These orders were carried out "D" Company went into action first followed by "A" company as it came up and finally by "C" company and the one platoon of "B" Company available. Major Blizard severely wounded while moving up ridge under front line.
26 April 1915
7th Battalion Headquarters established western slope of Happy Valley. Trying to collect men of the Seventh. Mustered approximately 70. Remainder mixed with other Battalions.
5.15 pm - An advance was ordered in direction of Baby 700. Units became mixed. A line advanced and took up a position which enabled a firing line to be established and then the covering party returned under cover of darkness were subjected to heavy shrapnel and machine gun fire.
The approximate casualties for 25 April 1915 was 400 killed, wounded and missing.
The Australian Light Horse Studies Centre is a not for profit and non profit group whose sole aim is to write the early history of the Australian Light Horse from 1900
- 1920. It is privately funded and the information is provided by the individuals within the group and while permission for the use of the material has been given for this
site for these items by various donors, the residual and actual copyright for these items, should there be any, resides exclusively with the donors. The information on
this site is freely available for private research use only and if used as such, should be appropriately acknowledged. To assist in this process, each item has a citation
attached at the bottom for referencing purposes.
Please Note: No express or implied permission is given for commercial use of the information contained within this site.
A note to copyright holders
The Australian Light Horse Studies Centre has made every endeavour to contact copyright holders of material digitised for this blog and website and where
appropriate, permission is still being sought for these items. Where replies were not received, or where the copyright owner has not been able to be traced, or where
the permission is still being sought, the Australian Light Horse Studies Centre has decided, in good faith, to proceed with digitisation and publication. Australian Light
Horse Studies Centre would be happy to hear from copyright owners at any time to discuss usage of this item.