« October 2008 »
S M T W T F S
1 2 3 4
5 6 7 8 9 10 11
12 13 14 15 16 17 18
19 20 21 22 23 24 25
26 27 28 29 30 31
You are not logged in. Log in


Search the site:


powered by FreeFind
Volunteer with us.

Entries by Topic All topics
A Latest Site News
A - Using the Site
AAA Volunteers
AAB-Education Centre
AAC-Film Clips
AAC-Photo Albums
AIF & MEF & EEF
AIF - Lighthorse
AIF - ALH - A to Z
AIF - DMC
AIF - DMC - Or Bat
AIF - DMC - Anzac MD
AIF - DMC - Aus MD
AIF - DMC - British
AIF - DMC - BWI
AIF - DMC - French
AIF - DMC - Indian
AIF - DMC - Italian
AIF - DMC - Medical
AIF - DMC - Remounts
AIF - DMC - Scouts
AIF - DMC - Sigs
AIF - DMC - Sigs AirlnS
AIF - DMC - 1 Sig Sqn
AIF - DMC - 2 Sig Sqn
AIF - DMC - Eng
AIF - DMC - Eng 1FSE
AIF - DMC - Eng 2FSE
AIF - DMC - GSR
AIF - 1B - 1 LHB
AIF - 1B - 6 MVS
AIF - 1B - 1 LHMGS
AIF - 1B - 1 Sig Trp
AIF - 1B - 1 LHFA
AIF - 1B - 1 LHR  
AIF - 1B - 2 LHR
AIF - 1B - 3 LHR
AIF - 2B - 2 LHB
AIF - 2B - 7 MVS
AIF - 2B - 2 LHFA
AIF - 2B - 2 LHMGS
AIF - 2B - 2 Sig Trp
AIF - 2B - 5 LHR
AIF - 2B - 6 LHR
AIF - 2B - 7 LHR
AIF - 3B - 3 LHB
AIF - 3B - 8 MVS
AIF - 3B - 3 LHB Sigs
AIF - 3B - 3 LHFA
AIF - 3B - 3 LHMGS
AIF - 3B - 3 Sig Trp
AIF - 3B - 8 LHR
AIF - 3B - 9 LHR
AIF - 3B - 10 LHR
AIF - 4B - 4 LHB
AIF - 4B - 4 Sig Trp
AIF - 4B - 9 MVS
AIF - 4B - 4 LHFA
AIF - 4B - 4 LHMGS
AIF - 4B - 4 LHR
AIF - 4B - 11 LHR
AIF - 4B - 12 LHR
AIF - 5B - 5 LHB
AIF - 5B - 10 MVS
AIF - 5B - 5 LHFA
AIF - 5B - 5 Sig Trp
AIF - 5B - ICC
AIF - 5B - 14 LHR
AIF - 5B - 15 LHR
AIF - 5B - 1er Regt
AIF - 5B - 2 NZMGS
AIF - AASC
AIF - Aboriginal LH
AIF - Badges
AIF - Cars
AIF - Chinese LH
AIF - Double Sqns
AIF - Engineers
AIF - Fr - 22 Corps
AIF - Fr - 13 LHR
AIF - Honour Roll
AIF - HQ - 3rd Echelon
AIF - Marching Songs
AIF - Misc Topics
AIF - NZMRB
AIF - NZMRB - AMR
AIF - NZMRB - CMR
AIF - NZMRB - EFT
AIF - NZMRB - NZMFA
AIF - NZMRB - NZMGS
AIF - NZMRB - OMR
AIF - NZMRB - Sig-Trp
AIF - NZMRB - WMR
AIF - Ships
AIF - Ships - Encountr
AIF - Ships - Una
AIF - WFF
AIF - Wireless Sqn
Battles
BatzA - Australia
BatzA - Broken Hill
BatzA - Liverpool
BatzA - Merivale
BatzB - Boer War
BatzB - Bakenlaagte
BatzB - Belmont
BatzB - Bothaville
BatzB - Buffels Hoek
BatzB - Coetzees Drift
BatzB - Diamond Hill
BatzB - Driefontein
BatzB - Elands
BatzB - Graspan
BatzB - Grobelaar
BatzB - Grootvallier
BatzB - Hartebestfontn
BatzB - Houtnek
BatzB - Karee Siding
BatzB - Kimberley
BatzB - Koster River
BatzB - Leeuw Kop
BatzB - Mafeking
BatzB - Magersfontein
BatzB - Modder River
BatzB - Onverwacht
BatzB - Paardeberg
BatzB - Palmietfontein
BatzB - Pink Hill
BatzB - Poplar Grove
BatzB - Rhenoster
BatzB - Sannahs Post
BatzB - Slingersfontn
BatzB - Stinkhoutbm
BatzB - Sunnyside
BatzB - Wilmansrust
BatzB - Wolvekuil
BatzB - Zand River
BatzG - Gallipoli
BatzG - Anzac
BatzG - Aug 1915
BatzG - Baby 700
BatzG - Evacuation
BatzG - Hill 60
BatzG - Hill 971
BatzG - Krithia
BatzG - Lone Pine
BatzG - Nek
BatzJ - Jordan Valley
BatzJ - 1st Amman
BatzJ - 2nd Amman
BatzJ - Abu Tellul
BatzJ - Es Salt
BatzJ - JV Maps
BatzJ - Ziza
BatzM - Mespot
BatzM - Baghdad
BatzM - Ctesiphon
BatzM - Daur
BatzM - Kurna
BatzM - Kut el Amara
BatzM - Ramadi
BatzN - Naval
BatzN - AE1
BatzN - Cocos Is
BatzN - Heligoland
BatzN - Marmara
BatzN - Zeebrugge
BatzN - Zeppelin L43
BatzNG - Bitapaka
BatzO - Other
BatzO - Baku
BatzO - Egypt 1919
BatzO - Emptsa
BatzO - Karawaran
BatzO - Peitang
BatzO - Wassa
BatzP - Palestine
BatzP - 1st Gaza
BatzP - 2nd Gaza
BatzP - 3rd Gaza
BatzP - Aleppo
BatzP - Amwas
BatzP - Ayun Kara
BatzP - Bald Hill
BatzP - Balin
BatzP - Beersheba
BatzP - Berkusieh
BatzP - Damascus
BatzP - El Auja
BatzP - El Buggar
BatzP - El Burj
BatzP - Haifa
BatzP - Huj
BatzP - JB Yakub
BatzP - Kaukab
BatzP - Khan Kusseir
BatzP - Khuweilfe
BatzP - Kuneitra
BatzP - Megiddo
BatzP - Nablus
BatzP - Rafa
BatzP - Sasa
BatzP - Semakh
BatzP - Sheria
BatzP - Surafend
BatzP - Wadi Fara
BatzS - Sinai
BatzS - Bir el Abd
BatzS - El Arish
BatzS - El Mazar
BatzS - El Qatiya
BatzS - Jifjafa
BatzS - Magdhaba
BatzS - Maghara
BatzS - Romani
BatzS - Suez 1915
BatzSe - Senussi
BatzWF - Westn Front
BW - Boer War
BW - NSW
BW - NSW - 1ACH
BW - NSW - 1NSWMR
BW - NSW - 2NSWMR
BW - NSW - 3ACH
BW - NSW - 3NSWIB
BW - NSW - 3NSWMR
BW - NSW - 5ACH
BW - NSW - A Bty RAA
BW - NSW - AAMC
BW - NSW - Aust H
BW - NSW - Lancers
BW - NSW - NSW Inf
BW - NSW - NSWCBC
BW - NSW - NSWIB
BW - NSW - NSWMR_A
BW - NZ
BW - Qld
BW - Qld - 1ACH
BW - Qld - 1QMI
BW - Qld - 2QMI
BW - Qld - 3ACH
BW - Qld - 3QMI
BW - Qld - 4QIB
BW - Qld - 5QIB
BW - Qld - 6QIB
BW - Qld - 7ACH
BW - QLD - AAMC
BW - SA
BW - SA - 1SAMR
BW - SA - 2ACH
BW - SA - 2SAMR
BW - SA - 3SACB
BW - SA - 4ACH
BW - SA - 4SAIB
BW - SA - 5SAIB
BW - SA - 6SAIB
BW - SA - 8ACH
BW - SA - AAMC
BW - Tas
BW - Tas - 1ACH
BW - Tas - 1TIB
BW - Tas - 1TMI
BW - Tas - 2TB
BW - Tas - 2TIB
BW - Tas - 3ACH
BW - Tas - 8ACH
BW - Vic
BW - Vic - 1VMI
BW - Vic - 2ACH
BW - Vic - 2VMR
BW - Vic - 3VB
BW - Vic - 4ACH
BW - Vic - 4VIB
BW - Vic - 5VMR
BW - Vic - 6ACH
BW - Vic - AAMC
BW - Vic - Scot H
BW - WA
BW - WA - 1WAMI
BW - WA - 2ACH
BW - WA - 2WAMI
BW - WA - 3WAB
BW - WA - 4ACH
BW - WA - 4WAMI
BW - WA - 5WAMI
BW - WA - 6WAMI
BW - WA - 8ACH
BW Gen - Campaign
BW Gen - Soldiers
BW General
Cavalry - General
Diary - Schramm
Egypt - Heliopolis
Egypt - Mena
Gen - Ataturk Pk, CNB
Gen - Australia
Gen - Legends
Gen - Query Club
Gen - St - NSW
Gen - St - Qld
Gen - St - SA
Gen - St - Tas
Gen - St - Vic
Gen - St - WA
Gm - German Items
Gm - Bk - 605 MGC
GW - 11 Nov 1918
GW - Atrocities
GW - August 1914
GW - Biographies
GW - Propaganda
GW - Spies
GW - We forgot
Militia 1899-1920
Militia - Area Officers
Militia - Inf - Infantry
Militia - Inf - 1IB
Militia - Inf - 2IB
Militia - Inf - 3IB
Militia - Inf - NSW
Militia - Inf - Qld
Militia - Inf - SA
Militia - Inf - Tas
Militia - Inf - Vic
Militia - Inf - WA
Militia - K.E.Horse
Militia - LH
Militia - LH - Regts
Militia - LH - 1LHB
Militia - LH - 2LHB
Militia - LH - 3LHB
Militia - LH - 4LHB
Militia - LH - 5LHB
Militia - LH - 6LHB
Militia - LHN - NSW
Militia - LHN - 1/7/1
Militia - LHN - 2/9/6
Militia - LHN - 3/11/7
Militia - LHN - 4/6/16
Militia - LHN - 5/4/15
Militia - LHN - 6/5/12
Militia - LHN - 28
Militia - LHQ - Qld
Militia - LHQ - 13/2
Militia - LHQ - 14/3/11
Militia - LHQ - 15/1/5
Militia - LHQ - 27/14
Militia - LHS - SA
Militia - LHS - 16/22/3
Militia - LHS - 17/23/18
Militia - LHS - 24/9
Militia - LHT - Tas
Militia - LHT - 12/26
Militia - LHV - Vic
Militia - LHV - 7/15/20
Militia - LHV - 8/16/8
Militia - LHV - 9/19
Militia - LHV - 10/13
Militia - LHV - 11/20/4
Militia - LHV - 19/17
Militia - LHV - 29
Militia - LHW - WA
Militia - LHW-18/25/10
Militia - Military Orders
Militia - Misc
MilitiaRC - Rifle Clubs
MilitiaRC - NSW
MilitiaRC - NT
MilitiaRC - Qld
MilitiaRC - SA
MilitiaRC - Tas
MilitiaRC - Vic
MilitiaRC - WA
Militiaz - New Zealand
Tk - Turkish Items
Tk - Army
Tk - Bks - Books
Tk - Bks - 1/33IR
Tk - Bks - 27th IR
Tk - Bks - Air Force
Tk - Bks - Yildirim
Tk - POWs
Wp - Weapons
Wp - Hotchkiss Cav
Wp - Hotchkiss PMG
Blog Tools
Edit your Blog
Build a Blog
RSS Feed
View Profile
Open Community
Post to this Blog
Site Index
Education Centre
LH Militia
Boer War
Transport Ships
LH Battles
ALH - Units
ALH - General
Aboriginal Light H
Weapons
Ottoman Sources

"At a mile distant their thousand hooves were stuttering thunder, coming at a rate that frightened a man - they were an awe inspiring sight, galloping through the red haze - knee to knee and horse to horse - the dying sun glinting on bayonet points..." Trooper Ion Idriess

The Australian Light Horse Studies Centre aims to present an accurate history as chroniclers of early Australian military developments from 1899 to 1920.

The Australian Light Horse Studies Centre site holds over 12,000 entries and is growing daily.

Contact: Australian Light Horse Studies Centre

Let us hear your story: You can tell your story, make a comment or ask for help on our Australian Light Horse Studies Centre Forum called:

Desert Column Forum

WARNING: This site contains: names, information and images of deceased people; and, language which may be considered inappropriate today.

Saturday, 11 October 2008
The Battle of Beersheba, Palestine, 31 October 1917, 1st LHR, AIF, Unit History Account
Topic: AIF - 1B - 1 LHR

 The Battle of Beersheba

Palestine, 31 October 1917

1st LHR, AIF, Unit History Account
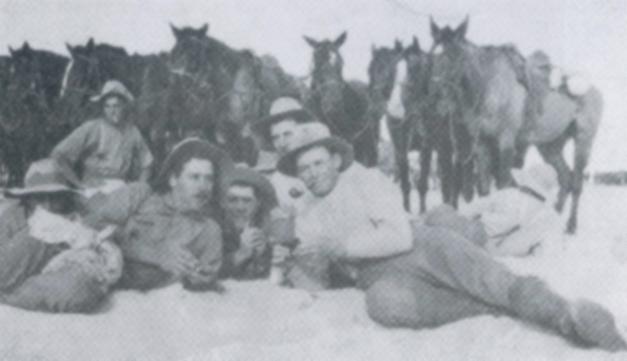
 

2826 Pte Donald McBean, 1st LHR, and friends who took part in the Battle of Beersheba


PV Vernon's 1985 centenary celebration of the Royal New South Wales Lancers included a section on the work performed by the 1st Light Horse Regiment during the Great War. The pages specifically related to the battle of Beersheba are extracted below.

Vernon, PV, editor, The Royal New South Wales Lancers 1885-1985, (Sydney 1986), pp 130-1


[130]

CHAPTER 10

PALISTINE AND THE JORDAN VALLEY: OCTOBER 1917-MARCH 1918


THE regiment left the beach on October 24 and marched with the brigade to Fukhari, where Captain M. E. Wright rejoined from duty at Anzac Mounted Division headquarters. Next day the movement was resumed and after passing Esani and Khalasa, Asluj was reached on the night of October 29-30. At Asluj Regimental Sergeant-Major J. R. Wright and Squadron Sergeant. Major A. I. McDonald were promoted to commissioned rank.

The 2nd Light Horse Brigade was covering Asluj until 6 am, on October 30, when 2nd Lieutenant J. R. Wright and 12 other ranks relieved them on their clay observation post. One troop under Lieutenant Frost was detailed as escort to "B" Echelon transport, and 2nd Lieutenant Parbury and 40 other ranks were detailed as a working party with engineers developing the water supply. The regiment less the two troops left Asluj at 5.30 p.m. and, after watering, joined the brigade near Asluj railway station, which was the rendezvous of the Anzac Mounted Division prior to its advance against Beersheba. After a long night march, the high ground east of and overlooking Beersheba was reached at dawn and orders were issued to the 1st Brigade to attack Tel el Saba, the 2nd and 3rd L.H. being detailed to initiate the attack, while the 1st L.H. was held in reserve. At 10.30 a.m. the regiment was detailed to take up a position on the left flank of the Inverness Battery, which had come into position a mile southeast of Saba, near Khurbet el Watan. The advanced troops were heavily shelled, and all led horses had to be taken back some distance to the broken ground. Lieutenant Wright, with two sections, carried out a very daring reconnaissance of the enemy's position in Wady Saba, bringing back much valuable information. The New Zealand Mounted Rifles materially assisted the attack by a flanking movement from the north, and Tel el Saba was occupied at 3 p.m.

At 4.10 p.m. the regiment received orders to attack the town of Beersheba on the line Hill 970 to the mosque in the town, both inclusive; this line, which was on the northern side of the
 

[131]

town, was made good just after dark. Before the order to attack had been received, however, the position generally had become grave. The enemy, though driven off Saba, was still strong south of the town and stronger north of it. Only a few hours of daylight were left, and the possession of the wells in the town was imperative, for both the infantry and the cavalry. It was neck or nothing, and General Chauvel ordered that Brigadier-General Grant's 4th Australian Light Horse Brigade should make a mounted attack on the trenches on the south-east. At 4.30 p.m. the 4th and 12th Regiments commenced their famous charge. Within an hour Beersheba had been entered, the lightning attack so disorganising and demoralising the Turks that the opposition to the 1st Light Horse Brigade, on the north, failed.

The regiment, strengthening the position, sat tight all night. "A" Squadron under Major White and "B" under Captain Kater held the outpost line, with two troops of "C" Squadron, under Captain Mack, in reserve. A few enemy cavalry approached during the night, but retired on being fired on, at least one of their number being killed. The regiment had taken 90 prisoners, including 11 officers, at the small cost in casualties of two killed (including the R.S.M, P. J. Lenehan) and one wounded. The "A" Echelon transport had had a bad time, two enemy 'planes dropping bombs which killed one other rank and wounded 2nd Lieutenant W. G. Drummond and eight other ranks, while 17 draught horses and five riding horses were killed. Within a few days the infantry had broken the Turkish line at Sheria and, again, between Gaza and the sea. This blow was the opening gambit in the great cavalry drive up the Philistine Plain to Jaffa.

On the morning of November 1, officers' patrols under Lieutenants James, Edwards, Guthrie and Gray were sent forward at 4 a.m. to the front and reported all clear by 6 a.m. Guides went back to escort the camel convoy which arrived at the south side of Beersheba during the afternoon, and at midday the unit was relieved by infantry and moved to a new bivouac site, 1,000 yards east of Beersheba. The weather was wet. The transport with "A" Echelon reached camp at 6 p.m. with horses obtained from other units, as so many had been killed. During the afternoon 20 men under Lieutenant Otton were employed digging graves and 20 more under Lieutenant Parbury were detailed to guard the prisoners.


Further Reading:

1st Australian Light Horse Regiment, AIF

1st Australian Light Horse Regiment, Roll of Honour

The Battle of Beersheba, Palestine, 31 October 1917

Australian and New Zealand Roll of Honour

Battles where Australians fought, 1899-1920


Citation: The Battle of Beersheba, Palestine, 31 October 1917, 1st LHR, AIF, Unit History Account

Posted by Project Leader at 9:58 AM EADT
Updated: Thursday, 8 October 2009 4:39 PM EADT
Wednesday, 17 September 2008
Bir el Mazar, Sinai, 17 September 1916, 1st LHR, AIF, Unit History Account
Topic: AIF - 1B - 1 LHR

Bir el Mazar

Sinai, 17 September 1916

1st LHR, AIF, Unit History Account
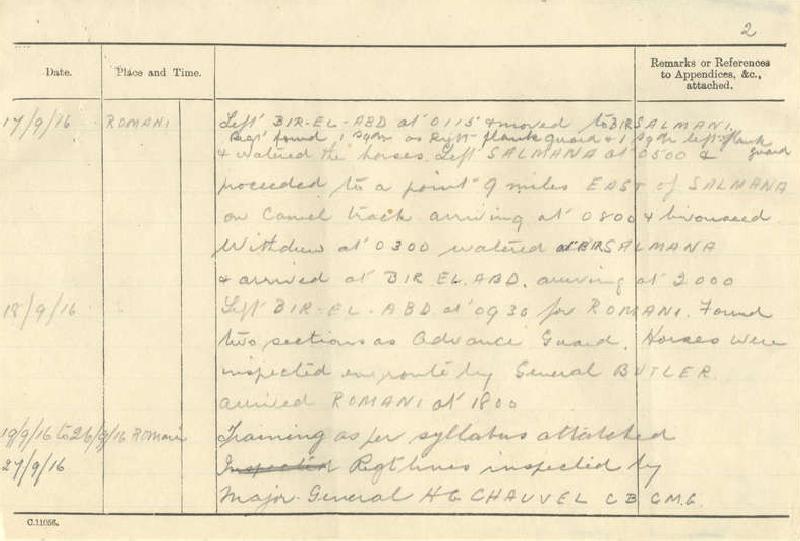
 

PV Vernon's 1985 centenary celebration of the Royal New South Wales Lancers included a section on the work performed by the 1st Light Horse Regiment during the Great War. The pages specifically related to the Battle of Bir el Mazar are extracted below.

Vernon, PV, editor, The Royal New South Wales Lancers 1885-1985, (Sydney 1986), p. 113:


On the 15th the regiment, consisting of 12 officers and 305 other ranks, left camp at night and moved to Bir el Abd via Bir Salmana, reaching their destination on the morning of the 17th. No enemy were seen. On the return journey to Romani, the regiment was halted and inspected by General Butler, the senior remount officer in Egypt, who praised the endurance
of the Australian horses.


Further Reading:

1st Australian Light Horse Regiment, AIF

1st Australian Light Horse Regiment, Roll of Honour

Bir el Mazar, Sinai, 17 September 1916

Battles where Australians fought, 1899-1920


Citation: Bir el Mazar, Sinai, 17 September 1916, 1st LHR, AIF, Unit History Account

Posted by Project Leader at 12:01 AM EADT
Updated: Tuesday, 24 November 2009 6:12 AM EAST
Bir el Mazar, Sinai, 17 September 1916, 1st LHR, AIF, War Diary Account
Topic: AIF - 1B - 1 LHR

Bir el Mazar

Sinai, 17 September 1916

1st LHR, AIF, War Diary Account


War Diary account of the 1st LHR, AIF.


The transcription:

15 September 1916

Regiment 12 Officers and 305 Other Ranks strong.

Left Camp at 1830 and proceeded to a starting point 400 yards east of Infantry Post No. 5. Brigade left starting point at 1900 and moved to Bir el Abd.

16 September 1916

Arrived Bir el Abd at 0500 and biviouacked for the day.

17 September 1916

Left Bir el Abd at 0115 and moved to Bir Salamana. Regiment found 1 Squadron on right flank guard and 1 Squadron left flank and watered the horses. Left Salmani at 0500 and guard proceeded to a point 9 miles east of Salmana on Camel track arriving at 0800 and bivouacked. Withdrew at 1300, watered at Salmana and arrived at Bir el Abd arriving at 2000.


Roll of Honour


Lest We Forget


Additional Reading:

1st Australian Light Horse Regiment, AIF

1st Australian Light Horse Regiment, Roll of Honour

Bir el Mazar, Sinai, 17 September 1916

Battles where Australians fought, 1899-1919


Citation: Bir el Mazar, Sinai, 17 September 1916, 1st LHR, AIF, War Diary Account

Posted by Project Leader at 12:01 AM EADT
Updated: Tuesday, 24 November 2009 6:06 AM EAST
Friday, 29 August 2008
50 Regimental Quartermaster Sergeant Robert Hamilton, MM, 1st Australian Light Horse Regiment, "C" Squadron.
Topic: AIF - 1B - 1 LHR

50  Regimental Quartermaster Sergeant Robert Hamilton, MM, 1st Australian Light Horse Regiment, "C" Squadron.

50 Lance Corporal Robert Hamilton

Robert HAMILTON brief military biographical details from The AIF Project:

Regimental number :  50
Religion:    Presbyterian
Occupation:    Labourer
Address:    Urana, New South Wales
Marital status:    Single
Age at embarkation:    21
Next of kin:    Stonehouse, Lanarkshire, Scotland
Enlistment date:    10 September 1914
Rank on enlistment:    Private
Unit name:    1st Light Horse Regiment, C Squadron
AWM Embarkation Roll number:    10/6/1
Embarkation details:    Unit embarked from Sydney, New South Wales, on board Transport A16 Star Of Victoria on 20 October 1914
Rank from Nominal Roll:    Regimental Quartermaster Sergaent
Unit from Nominal Roll:    1st Light Horse Regiment
Recommendations (Medals and Awards): Military Medal
Recommendation date: 4 November 1917
Fate:    Discharged 15 March 1919
Medals:    Military Medal, 14/15 Star, British War Medal and Victory Medal

Of course, there is a bigger story behind this man than the bare facts reveal. 

Born at Kittymuir Farm, Stonehouse, Lanarkshire, Scotland on the 30 December 1892, Hamilton grew up tough and resilient.

At the tender age of 16, in 1909, he sailed for New Zealand to find work. A few years later, in 1912, he enlisted as a volunteer in the New Zealand Territorial formation, the Otago Mounted Rifles based around the Dunedin region. The Otago Mounted Rifles was composed of the following regional squadrons: the Southland Mounted Rifles, the Otago Hussars, and the North Otago Mounted Rifles. Since Hamilton's bank account was located at Invercargill, it is reasonable to assume that was the region and town close to where he worked and lived. If that is so, then it is highly likely the Territorial squadron Hamilton served with was the 7th (Southland) Squadron, Otago Mounted Rifles

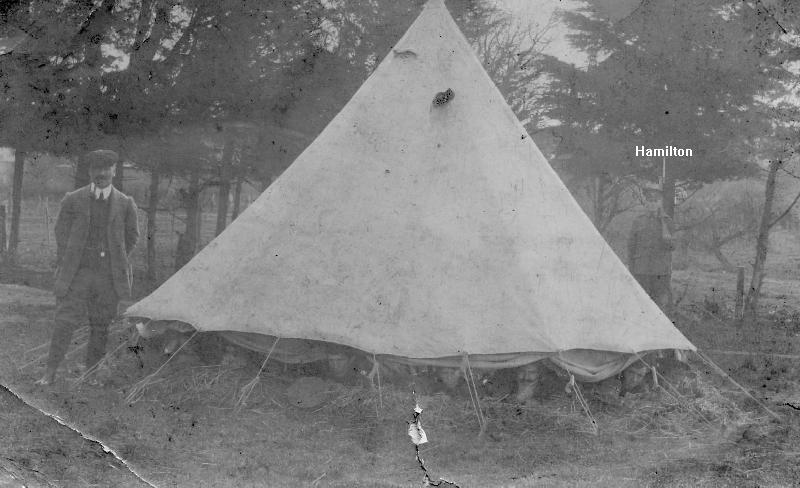
Hamilton's first camp began in July 1912. A photographer was there to take a picture of this event.


Hamilton standing guard outside the Guard Tent on his first bivouac with the Otago Mounted Rifles.


Under the tent, various faces of men can be seen. These men include: Sergeant Paterson, Tpr Kerse, Tpr Turnbull, Tpr Edge, Tpr Watt, Cpl France, Buglar Paterson, and Cpl Kerse.

By 1914 Hamilton was working at Urana, NSW but was still a registered member of the Otago Mounted Rifles. When the Great War began, he was one of the very first men to put his name down to serve with the 1st Light Horse Regiment, then being formed and trained at Rosebery Park, Sydney. Hamilton was allocated the regimental number  "50" on 28 August 1914 and allotted to the Machine Gun Section. However something happened which immpeded his enrolment to the regiment. Hamilton was obviously a man the officers wanted so his position was held open for him in the regiment although his place in the Machine Gun Section was taken by someone else. His problems seem to have been resolved by 11 October and duly allotted to the last squadron to be formed - "C" Squadron.


Routine Order No. 48, 14 October 1914 appointing Hamilton to "C" Squadron


After serving time in Egypt, the Light Horse volunteered to go to Gallipoli and fight as dismounted infantry. The 1st LHR embarked from Alexandria with 25 officers and 447 other ranks,  9 May 1915 on the HMAT Devonha for Gallipoli. The Regiment landed at 6.00am, 12 May 1915, some 200m south of Fisherman’s Hut, ANZAC Cove. Their place at Gallipoli involved work around Pope’s Hill where they remained for most of the campaign.  The Regiment was evacuated from Gallipoli by 21 December1915 and sailed for Egypt.


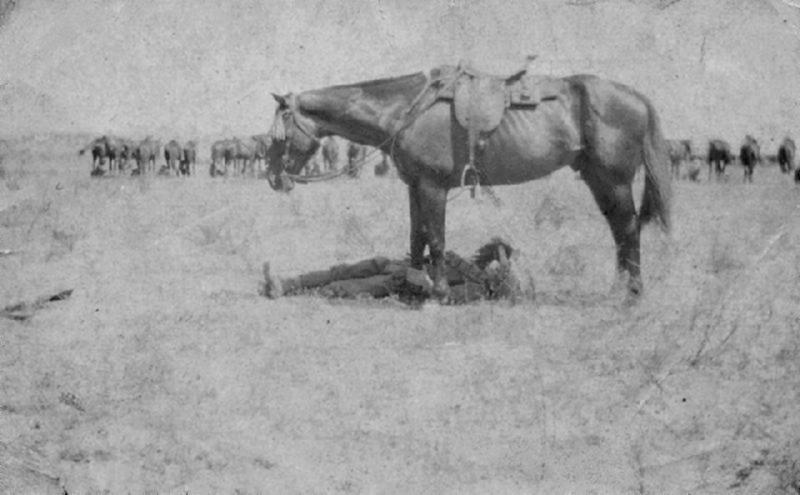
Hamilton taking a snooze under his horse just before going into action.


Hamilton followed his regiment throughout the Sinai and Palestine campaigns. After the opening of the Third Battle of Gaza with the taking of Beersheba, the next objective was Tel el Khuweilfeh where a battle ensued for almost the next week. It was a difficult and tough fight whereby the attacking units were attempting to dislodge Ottoman forces which were well entrenched around hill tops. The hills themselves provided little cover for the attacking force and thus winning this battle was accompanied by outstanding bravery and sacrifice. It was here that Hamilton was awarded a Military Medal for bravery. The citation reads:

On 3rd November 1917 at Tel el Khuweilfeh this NCO took forward a Hotchkiss gun detachment to a forward flank position and considerably helped to keep down the enemy’s fire, and carried in a wounded man under very heavy fire. His coolness and bravery set a fine example to his men all day. Recommended by Lt Col Granville 

On 12 November 1917 Hamilton was wounded in the neck at Jisr Esdud, a place north of Gaza. The wound was not serious enough to require evacuation so Hamilton remained on duty.

At the end of the war, Hamilton took UK leave and travelled to South Hampton on the HT Bermudian where he arrived 19 December 1918. Hamilton returned to Scotland and his parents in time for his 26th birthday, a five year veteran and a war hero. One can only imagine the jubilation in the Hamilton household in Stonehouse, Lanarkshire that Christmas and New Year. The next year, Hamilton applied for his discharge in the UK which was granted on 15 March 1919.


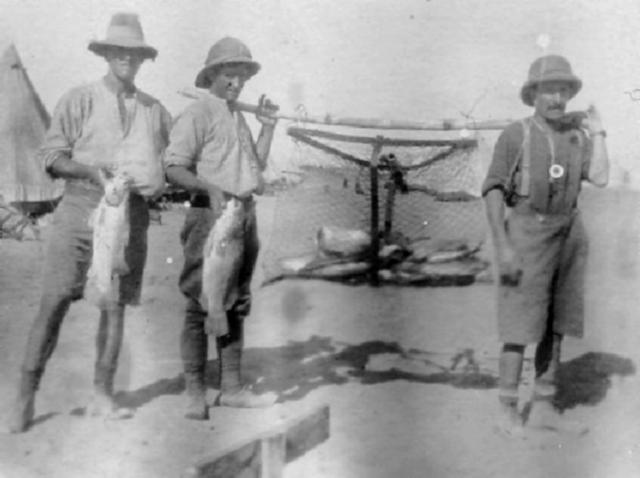
Hamilton displaying his passion for fishing.


He returned home to Stonehouse and married Annie Naismith (grandaughter of Robert Naismith author of Stonehouse Historical and Traditional) of Cross View. The couple established their family home at Hamilton Ferme at the Cross. They brought eight children into the world, they being Minnie, Robert, James, William, Ian, Douglas, Evelyn and Norman.
 
Hamilton, in partnership with his brother in law, James Watson of Thorndale, Manse Road, set up a bus company,  The Admiral. They ran Lancier’s from Strathaven to Cathedral Street in Glasgow. Eventually they gave up the service due to the evil practice by competitors of running buses a few minutes before their scheduled service. This practice still occurs to this very day.

After the bus business, Hamilton took over High lanrig Farm for a year. With the completion of the Council houses built in Newfield Road, Hamilton moved his family into 4 Newfield Road, December 1927.   He bred Greyhounds, and had kennels down at the oilworks under the viaduct. His best dog was Avonhope, a prolific winner and nick named "The rent payer". In pursuit of his passion Hamilton took on work with Sam Park of  Lesmahagow and his business partner George Reid of Larkhall. His role was as the Racing Manager and Handicapper at Larkhall Greyhound Stadium. He held this job from 1936 until 1964 when it closed.

At the outbreak of the Second World War, Hamilton was appointed Section Commander of the Local Defence Force, No 5 Coy,  No 22 Platoon  Section 1.
The platoon members names taken from his diary 26 August 1940 include  David Brown,  Alexander Bambrick,  James Cryan,  William C S Whitelaw,  Henry McFarlane,  David Finnie,  George Harrison,  Archibald Miller,  David Miller,  James Miller, Walter Mitchell,  Henry Speirs,  Andrew McLellan,   Walter Lang,  Thomas Moffat  Hugh Boyle,  John Whitelaw, and George Spence.

Hamilton’s four eldest enlisted in the armed forces

L/Cpl W/ 217659 Minnie Hamilton, 11 September 1942  to  9 March 1946
Auxiliary Territorial Service; Attached   606 (Mixed) Heavy Anti Aircraft Bty   Royal Artillery; Plotter operator on gun sites, South Coast of England and Newhaven.

Cpl Robert Hamilton 1942  to 1947, Royal Artillery served  in  India  and  Burma

WO2 James Hamilton 1942 to 1947; 1 year Royal Artillery, 4 years Royal Electrical and Mechanical Engineers, served in India

Lt Ian Hamilton 1944 to 1948; 1st Bn Seaforth Highlanders, served in India, Java and Malaya.                                                            

Hamilton retired in 1964, kept bee’s, went fishing and carried out maintenance on the vehicles of his sons fruit & veg business and did some handicapping for Shawfield Stadium. Robert Hamilton died in 1970.


Acknowledgement: Many thanks to the kind assistance of William Mackie, the grandson of Robert Hamilton who kindly provided the photographs and biographical details for this entry. Also thanks to Phil for providing the information regarding the Otago Mounted Rifles.


Further Reading:

1st Australian Light Horse Regiment, AIF, History 

1st Australian Light Horse Brigade

Otago Mounted Rifles, NZMRB, History

Australian Light Horse Order of Battle


Citation: 50  Regimental Quartermaster Sergeant Robert Hamilton, MM, 1st Australian Light Horse Regiment, "C" Squadron.


Posted by Project Leader at 10:57 PM EADT
Updated: Monday, 5 January 2009 11:06 AM EAST
Saturday, 9 August 2008
Bir el Abd, Sinai, 9 August 1916, 1st LHR, AIF, War Diary Account
Topic: AIF - 1B - 1 LHR

Bir el Abd

Sinai, 9 August 1916

1st LHR, AIF, War Diary Account


War Diary account of the 1st LHR, AIF.


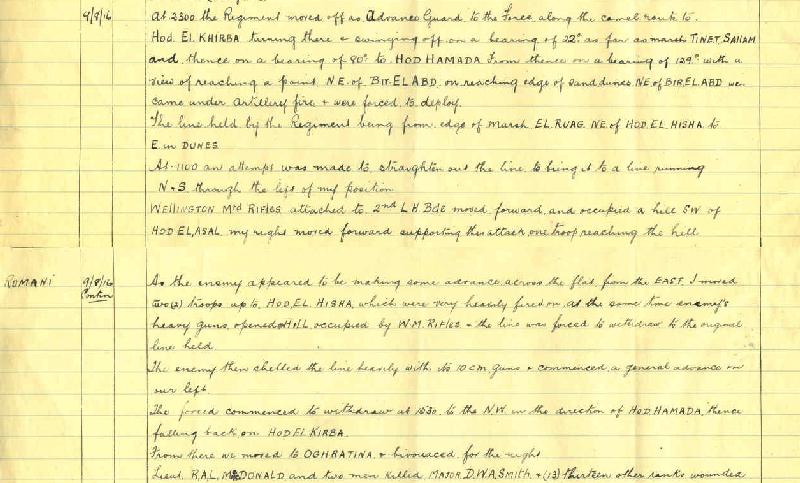
The transcription:

At 2300 the Regiment moved off as Advance Guard to the Force along the camel route to Hod el Kirba, turning there and swinging off on a bearing of 22 degrees as far as marsh Tinet Sallam and thence on a bearing of 80 degrees to Hod Hamada. From thence on a bearing of 129 degrees with a view of reaching a point North East of Bir el Abd. On reaching the edge of sand dunes North East of Bir el Abd we came under artillery fire and was forced to deploy.

The line held by the Regiment being from the edge of marsh El Ruag north east of Hod el Hisha to east in dunes.

At 1100 and attempt was made to straighten out the line to bring it to a line running north and south through the left of my position.

Wellington Mounted Rifles attached to 2nd Light Horse Brigade moved forward and occupied a hill south west of Hod el Asal. My right moved forward supporting this attack. one troop reachint the hill. As the enemy appreared to be making some advance across the flat from the east, I moved two (2) troops up to Hod el Hisha which were very heavily fired on at the same time the enemy's heavy guns opened on hill occupied by Wellington Mounted Rifles and the line was forced to withdraw to the original line held.

The enemy then shelled the line heavily with its 10cm guns and commenced a general advance on our left.

The force commenced to withdraw at 1530 to the north west in the direction of Hod Hamada, thence falling back on Hod el Kirba.

From there we moved to Oghratina and bivouaced for the night.

Lieutenant RAL MacDonald and two men killed. Major DWA Smith and (13) thirteen other ranks wounded.


Roll of Honour

Errol Roland BOUGHTON
Ronald Alexander Leslie MacDONALD
George Rawdon Ffrench NOBBS
Robert Henry James WHITE


Further Reading:

1st Australian Light Horse Regiment, AIF

1st Australian Light Horse Regiment, Roll of Honour

Battle of Romani, Sinai, August 4 to 5, 1916 

Bir el Abd, Sinai, 9 August 1916

Battles where Australians fought, 1899-1920


Citation: Bir el Abd, Sinai, 9 August 1916, 1st LHR, AIF, War Diary Account

Posted by Project Leader at 12:01 AM EADT
Updated: Friday, 18 December 2009 4:56 PM EAST

Newer | Latest | Older

Full Site Index


powered by FreeFind
Let us hear your story: You can tell your story, make a comment or ask for help on our forum.

Desert Column Forum

A note on copyright

The Australian Light Horse Studies Centre is a not for profit and non profit group whose sole aim is to write the early history of the Australian Light Horse from 1900 - 1920. It is privately funded and the information is provided by the individuals within the group and while permission for the use of the material has been given for this site for these items by various donors, the residual and actual copyright for these items, should there be any, resides exclusively with the donors. The information on this site is freely available for private research use only and if used as such, should be appropriately acknowledged. To assist in this process, each item has a citation attached at the bottom for referencing purposes.

Please Note: No express or implied permission is given for commercial use of the information contained within this site.

A note to copyright holders

The Australian Light Horse Studies Centre has made every endeavour to contact copyright holders of material digitised for this blog and website and where appropriate, permission is still being sought for these items. Where replies were not received, or where the copyright owner has not been able to be traced, or where the permission is still being sought, the Australian Light Horse Studies Centre has decided, in good faith, to proceed with digitisation and publication. Australian Light Horse Studies Centre would be happy to hear from copyright owners at any time to discuss usage of this item.

Contact

Australian Light Horse Studies Centre

eXTReMe Tracker