"At a mile distant their thousand hooves were stuttering thunder, coming at a rate that frightened a man - they were an awe inspiring sight, galloping through the red haze - knee to knee and horse to horse - the dying sun glinting on bayonet points..." Trooper Ion Idriess
The Australian Light Horse Studies Centre aims to present an accurate history as chroniclers of early Australian military developments from 1899 to 1920.
The Australian Light Horse Studies Centre site holds over 12,000 entries and is growing daily.
Contact:Australian Light Horse Studies CentreLet us hear your story:
You can tell your story, make a comment or ask for help on our Australian Light Horse Studies Centre Forum called:
WARNING: This site contains: names, information and images of deceased people; and, language which may be considered inappropriate today.
Friday, 3 July 2009
The Volunteer Movement in Western Australia, Albany Volunteer Garrison Artillery Topic: Militia - LHW - WA
Western Australian Militia
18th Light Horse Regiment (W.A.M.I.)
The following is an extract from the book written in 1962 by George F. Wieck called The Volunteer Movement in Western Australia 1861-1903, pp. 66 - 67:
18th Light Horse Regiment (W.A.M.I.)
The 18th Light Horse Regiment was created by changing the designation of the West Australian Mounted Infantry Regiment as stated in Serial 28.
It was the "18th" Regiment in the Federal sequence of numbering of mounted corps. The new designation took effect on 1 January 1903.
The Volunteer Movement in Western Australia, West Australian Highlanders Topic: Militia - LHW - WA
Western Australian Militia
West Australian Highlanders
The following is an extract from the book written in 1962 by George F. Wieck called The Volunteer Movement in Western Australia 1861-1903, p. 67:
West Australian Highlanders
Lieutenant Colonel J. Campbell (Headquarters Staff) an ex-member of the 79th Queen's Own Cameron Highlanders, had long cherished the idea of raising a kilted corps in Western Australia. He found much local support and judicious inquiry revealed that the "Camerons" themselves were more than interested. Approached through the proper channels, the War Office approved and the Cameron Highland Regiment, through their Colonel, gave unqualified approval for the use of the Cameron Erract tartan to be used and for the copying of its uniform by the pro posed corps. It was a most graceful permission. It was soon decided that one Company of 60 all ranks should be raised in Perth and in March 1903 the corps came into being as the "West Australian Highlanders". Approval was given to form a Pipe Band additional to normal Establishment. The corps was administratively independent but was attached to the 4th Battalion W.A. Infantry Brigade for parade pur poses. Enlistment was for three years, the members serving without pay and paying for their own uniforms.
On 1 July 1903 the corps became "D" Company of the 1st Battalion W.A. Infantry Regiment. Several years later it lost its national character and in 1914 Highland Dress was discontinued. It is interesting to note that in 1907 a Scottish company was raised among Railway Department employees stationed at Fremantle; this one did not wear a scarlet tunic.
The Volunteer Movement in Western Australia, Armament Topic: Militia - LHW - WA
Western Australian Militia
Armament
The following is an extract from the book written in 1962 by George F. Wieck called The Volunteer Movement in Western Australia 1861-1903, pp. 68 - 70:
Armament
The Volunteers of Western Australia were destined, in common with most Australian Volunteers, to be armed with weapons which had become obsolete elsewhere. The British Army necessarily kept abreast with foreign armies as regards armament and rapidly accumulated stocks of obsolete and discarded weapons. The necessity to keep abreast did not apply so strongly in the Colonies and in any case it was a question of finance. Replacements were costly and the Colonies were glad to accept at a lower price weapons no longer standard in the British Army. Whatever came was a step-up on what they had and represented progress.
Artillery
Smooth-bore muzzle-loading guns of various types and sizes were carried by most ships arriving at Australian Ports and dumped there. Advertisements appeared offering guns for sale as suitable anchors for buoys, navigation marks, etc.
The first mention of Field Artillery occurs in connection with the W.A. Troop of Volunteer Horse Artillery formed on 1 July 1872. The Troop was armed with two 12Pr. B. L. [12 pounder breach loading] Armstrong-Whitworth guns, complete with limbers and stores. This type of gun was quite new and was then on trial in the British Army : it was not finally adopted, having to make way for the 9Pr. R.M.L. [9 pounder rifled muzzle loading.] These two guns appear to have belonged to the Enrolled Pensioner Force, although no record as to how or when they were received can be traced. The guns were unsuitable being too heavy for the type of corps but as the Commander of the corps was a "Horse Artilleryman" and no other guns were available, the guns had no choice. A photo taken about 1870 shows the guns, manned by Enrolled Pensioners, firing a Salute. They remained on issue until 1894 when they were replaced by two 9Prs; they remained in obscurity until World War II when they were used as dummy anti-aircraft guns on the local sea-front. (It is believed they are now in the loving care of a sentimental old-time gunner).
The next outbreak of artillery ardour occurred at Fremantle when the newly formed Naval Artillery Volunteers, in 1879, proudly paraded with two 6Pr. smooth-bore muzzle-loading guns (minus limbers or other form of draught). So far as can be traced these pieces left their depot on only one occasion, i.e., the 1884 Camp at Albion; they were replaced in 1889 by two 9Pr. R.M.L. [9 pounder rifled muzzle loading.] guns, valued with limbers and wagons at over £850, a gift from the War Office.
In 1902 the 9Pdrs on issue at Perth and Fremantle were replaced by 15Pdr B.L. [15 pounder breach loading] guns of the type in general use by the British Forces through the Anglo-Boer War of 1899-1902.
Coast or Heavy Artillery first appeared in 1893 when a Fort was erected at Albany. Mounted at that time were two 6in. R.B.L. [rifled breach loading.] guns plus some light pieces. It was to assist with the manning of these guns that the Albany Volunteer Garrison Artillery was raised in 1899.
Muskets and Rifles
In the Commissariat Store maintained by the British Government at Perth were 40-50 muskets (including "flintlocks") which that Government magnanimously (?) presented to the Colony. One hundred new Enfield M.L. Rifles received as a gift from England were issued to the Perth corps in June 1862, the Commissariat stock going to the Fremantle corps.
Whenever the Colony could afford to buy new weapons it did so and issued them to the more needy of the Perth and Fremantle corps, the displaced weapons being handed down to those more recently formed. Thus it happened that within some of the corps different types of firearms were in use at one and the same time.
The various types of firearm made their first appearance among the Volunteers on the following dates:
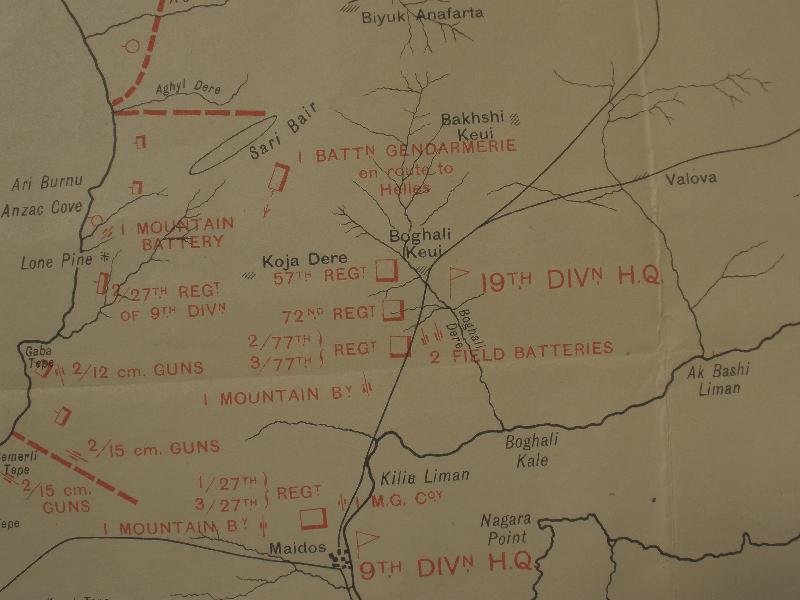
Turkish force dispositions at Anzac, 24 April 1915.
At the urging of Winston Churchill, First Lord of the Admiralty, the Allies decided on a campaign to seize the strategic Dardanelles. A fleet commanded first by Vice Admiral Sackville Carden and then, after his physical breakdown, by Rear Admiral John de Robeck, began a blockade and bombardment of the forts guarding the entrance to and passage of the Dardanelles in February 1915. These Dardanelles defences included 176 medium and heavy guns, 11 mine belts containing 373 mines, and an antisubmarine net. Long-range bombardments on February 19 and 25 succeeded in silencing the Turkish outer works. On March 18 the Allied fleet tackled the main forts along the Narrows of the Dardanelles.
Twelve British and 4 French battle ships made the assault. The most powerful of the battleships was the super dreadnought Queen Elizabeth, carrying eight 15-inch guns. The Turkish batteries included 42 guns of 8-inch bore or more, 6 of which were 14-inch guns. The Allied battlewagons succeeded in largely silencing the Ottoman guns, but then 3 of the capital ships struck mines and sank. The French battleship Bouvet went under with all but 66 of her crew of 630 and the British battleships Ocean and Irresistible met the same fate. Two more battleships were damaged by mines and a third by Turkish coastal batteries and under with all but 66 of her crew of 630 and the British battleships Ocean and Irresistible met the same fate. Two more battleships were damaged by mines and a third by Turkish coastal batteries and 47 more Allied sailors were killed. The Allied naval command decided to with draw, unaware that the Turks had nearly exhausted their ammunition stocks, having fired about 1,600 rounds, and that the enemy's fire direction control, their communications, and many of their batteries had been demolished, aware only that they were suffering appalling and crippling losses from the mines. Turkish personnel losses in repulsing the Allied naval attack were 40 killed and 70 wounded.
On the western end of the Sea of Marmora, the Russian Black Sea Fleet of 5 battleships, 2 cruisers, and 10 destroyers attacked the Bosphorus forts on March. 28. The German battle cruiser Goeben defended Istanbul by sinking 2 Russian destroyers, thus forcing the rest of the Russian fleet to withdraw The battleships having failed, the Allies decided on an amphibious attack on Gallipoli, the small peninsula on the :north side of the Narrows. Turkey at the time of its declaration of war in October 1914 had 36 divisions, deployed thus: 12 around Constantinople, 1 on Gallipoli, 1 on the Asian side of the Dardanelles, 5 along the rest of the Asia Minor coast, 11 in the Caucasus, 2 in Yemen, 2 in the Hejaz, 2 in Mesopotamia. During the course of the conflict another 70 divisions would be raised by the Ottoman Empire. By the time that the Allied amphibious expedition, long delayed by logistical difficulties, approached Gallipoli, the Turkish Fifth Army, commanded by German General Liman von Sanders, deployed 84,000 men in 6 divisions on or near the peninsula.
The Allied expeditionary force, commanded by General Ian Hamilton, consisted of 84 ships, 75,056 troops, including 30,638 ANZACs (Australian and New Zealand Army Corps), commanded by General William Birdwood, and the men of 1 French division, 16,481 animals, and 3,104 vehicles. While the French division made a diversionary landing on the Asian side of the Narrows, the main landings were made on Gallipoli on April 25. The ANZACs landed at Ari Burnu, 15 miles north of the peninsula's tip on the west side. They then attempted to seize the Chunuk Bair height dominating the peninsula, but the Turkish 19th Division, commanded by General Mustafa Kemal (Atatürk), the future father of the Turkish Republics, drove the ANZACs back to the beach. In six days of fighting that cost the men from "down under" 1,252 killed and 4,302 wounded.
At Cape Helles on the tip of the peninsula the 29th Division, commanded by General Alymer Hunter-Weston, came ashore in a poorly managed landing on five beaches. At W Beach 950 men of the Lancaster Fusiliers (who won six Victoria Crosses that day) landed from the steamer Euryalus and ran into murderous Turkish fire that killed 189 British soldiers, wounded 283, and left 61 more missing in action. At V Beach over 1,000 of the 2,000 men disgorged from the collier River Clyde were killed or wounded.
The landings at the other beaches were more successful, but on their way to occupy the commanding height of Achi Baba the men of the 29th Division stopped to brew tea. That teatime cost the British dearly, for the Turks beat them to the height and, as a consequence, kept the landing force pinned to a narrow beach perimeter through all the miserable months ahead. Total British Empire losses for the day were 2,000 at Cape Helles and 2,000 at what was thereafter called ANZAC Cove.
The French landed at Kum Kale on the Asian side of the Dardanelles across from Gallipoli. They killed or wounded 1,700 Turks and captured 500 at a cost of 800 casualties of their own, but were then withdrawn on April 26.
There followed three months of at tack and counterattack, of attrition and stalemate. Allied attempts to break out of their beachheads failed utterly. Their losses in the first four days after the landings were 8,900, including 2,650 killed.
The litany of loss went on. The First Battle of Krithia (also called the Battle of Achi Baba Hill), April 28-30, cost the Allies 3,000 casualties out of 14,000 engaged. The Second Battle of Krithia, May 6-8, added another 6,500 casualties (from 25,000 engaged to the attackers' toll. The Australian 2nd Brigade alone lost 1,056 out of 2,900 engaged. The third battle, June 4, cost the British 4,500 killed or wounded out of 16,000 initiating the attack, including 1,600 lost out of a naval brigade of 2,850 (2 battalions from that brigade lost 60 of its 70 officers). French losses (from 14,000 engaged) in this Third Battle of Krithia added 2,000 more names to this bloody measurement of Allied failure and frustration. (Between April 25-May 12 the French had already lost 12,610 of 22,450 men landed.) Other attacks at Cape Helles on June 21, June 28, and July 12-13 cost 7,700 British and 4,600 French casualties. Turkish counterattacks were no more successful. The Ottoman army lost 10,000 men of 40,000 engaged in attacks on May 1 and May 19, compared to only 600 ANZAC casualties out of 17,000 engaged. Another Ottoman counterattack, June 6, also failed, with total Turkish losses from June 4-6 numbering 9,000.
At sea the situation was no more favourable for the Allies as they lost 3 more battleships to enemy destroyers or subs.
The Goliath was put under on the night of May 12 by torpedoes from a Turkish destroyer, with 570 crewmen dying. The Triumph was sunk on May 25 by U-21, with 73 deaths. And the Majestic fell victim to another U-boat on May 27 and sank with 40 of its crew. The Allies got in a few blows at sea. On May 1 a British sub sank the Turkish troopship Guj Djemal, drowning 2,000 soldiers.
The Allied influx of troops onto the peninsula continued, but some attempts at reinforcement met with disaster. Far from Gallipoli, the 7th Battalion, Royal Scots was shattered before it left En gland. In the worst railroad disaster in British history, the troop train carrying the battalion for eventual service on Gallipoli crashed at Gretna Green on May 22, 1915, killing 214 soldiers and 12 other people, and injuring 246. In the Aegean, on September 17, a U-boat sank the troop transport Ramazan and 311 Indian soldiers drowned.
Reinforced by 3 more divisions, Hamilton determined to break the stale mate by outflanking the Turks with a landing at Suvla Bay farther to the north.
To hold the enemy's attention, Hamilton attacked at Cape Helles on August 6, sending 4 British divisions, totalling 26,000 men, and 13,000 French soldiers against 40,000 Turks. British losses at Cape Helles, Krithia, and Achi Baba on the first day numbered 3,480; the Turks lost 7,510. By August 22 Allied losses surpassed 6,000.
The ANZACs also attacked, one Australian unit of 1,250 losing 650 in an assault on a position called The Nek on August 7. The 600 men of the 8th and 10th Light Horsemen lost 234 killed and 141 wounded. Another 1,700 Aussies fell and seven Victoria Crosses were won on August 6 in fighting around Lone Pine, where 5,000 Turks were also killed or wounded. The general ANZAC assault on Chunuk Bair and Sari Bair Ridge (of which the actions at The Nek and Lone Pine were a part) ended in failure and cumulative casualties of 14,000 by August 22.
The landings at Suvla Bay, August 6-8, commanded by general Frederick Stopford, were at first successful, but the 22,000 attackers in 25 battalions failed to exploit their initial success and were soon bogged down before Chocolate Hill. On August 12, 267 men of the 1st Battalion of the 5th Norfolk Regiment (mostly men from the king's staff at Sandringham Palace) disappeared in the mist during an attack at Suvla. Their fate was unknown for more than 70 years, before evidence was discovered that those who did not die in the attack were executed after capture by the Turks.
A resumption of the Suvla offensive on August 15 went nowhere. On August 21, 14,300 Allied troops assaulted Turkish positions at Hill 60 and Scimitar Hill. One Australian unit of 150 men lost 110 killed or wounded on the slopes of Hill 60. Lord Longford, commanding the attack on Scimitar Hill, fell fatally wounded. Total Allied losses in the Suvla attacks on August 21 were 0 the Turks lost 2,500. Total Allied losses on all the Gallipoli battlegrounds, August 6-29, were 29,000 out of 126,700 engaged. The 37,000 ANZACs taking part in the battles accounted for 7,000 of the Allied toll. The 76,000 Ottoman soldiers engaged suffered 10,000 casualties.
The Gallipoli campaign ground on through the fall of 1915, becoming a smaller version of the Western Front, with all its trenches and torment and a day-to day terror so common that it became al most mundane. A thunderstorm accompanied by hail, for example, drowned 100 men on November 27. General Charles Monro replaced Hamilton on October 15 and, together with General William Birdwood, made plans for an evacuation from the peninsula. That evacuation was carried out in stages from December 10 to the night of January 8-9, 1916, with the Turks successfully deceived and the last 35,268 troops pulled out without loss.
The statistics of the Gallipoli side show are appalling. Of 410,000 soldiers of the British Empire who served on that peninsula in purgatory, 31,389 were killed in battle, 9,708 were reported missing most of whom were believed to have died and 78,749 were wounded. Including the sick, British casualties totalled 198,340. The 29th Infantry Division alone suffered 34,012 casualties - 9,042 KIA and MIA, 10,993 WIA, 13,977 sick. (In all of the Great War the 29th Division suffered cumulative casualties seven times its original strength.) Out of the British Empire and Commonwealth total, Australian casualties totalled 26,094, including 7,594 battle deaths. New Zealand losses were 7,571, including 2,431 battle deaths. The 79,000 French troops who served in Gallipoli suffered 27,000 combat casualties, including 9,000 dead, and 20,000 illnesses. Altogether, including the sick, Allied losses in the Dardanelles endeavour were about 252,000, including 46,000 battle deaths.
Of some 500,000 Turks in 14 divisions who fought in the campaign, 251,309 became casualties - 55,127 KIA, 100,177 WIA, 10,067 MIA, 21,498 dead of disease, 64,440 sick who recovered.
[From: Michael Clodfelter, Warfare and Armed Conflicts, 2nd Edition, pp. 464-5.]
El Burj, Palestine, 1 December 1917, Darley, 9th Light Horse Account Topic: AIF - 3B - 9 LHR
El Burj
Palestine, 1 December 1917
9th LHR, AIF, Unit History Account
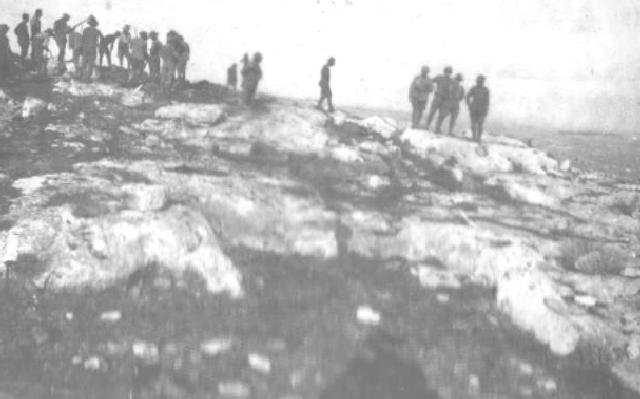
9th LH troopers on El Burj Ridge after the battle.
[Schramm picture.]
Major Thomas Henry Darley produced a unit history of the 9th Light Horse Regiment, AIF, called With the Ninth Light Horse in the Great War, in which included a section specifically related to the Battle of El Burj and is extracted below.
Darley, TH, With the Ninth Light Horse in the Great War, Adelaide, Hassell Press, 1924, pp. 111 - 112.
At 4 p.m. orders were received to the effect that the 4th Light Horse Brigade would take over a portion of the line, and these troops relieved the 8th Regiment which in turn took over the position occupied by the Regiment.
As soon as these moves were effected "A" Squadron relieved the Gloucester Yeomanry and "B" took up a new position 800 yards to the north-west. The new position was splendidly placed, as in the event of attack both these posts could direct their fire right across the front of the central position occupied by the 8th Regiment.
All these posts were quickly joined up by duplicate telephone lines with Regimental Headquarters and from there to the 54th Division. A section of the Machine Gun Squadron was attached to both "A" and "B" Squadrons. During the night enemy shelling was intense, the telephone wires being repeatedly cut, but owing to the foresight of Lieut. A. Burns, Signalling Officer, in duplicating the wires communication was never lost, whilst the 8th Regiment, using single wires, were often compelled to send their messages through our lines. As the night advanced the shell fire of the enemy increased, and by midnight had reached a stage which clearly indicated that an infantry attack was pending.
Our men had made the most of the short time they had occupied these positions by building stone sangars and getting a good knowledge of the nature of the ground in their immediate front, especially with reference to points of concentration for enemy attacks.
On the 1st December, at 1.20 a.m., an enemy force of approximately 1,000 made a most determined attack. The night was very dark and strong gusty winds were blowing, thereby greatly assisting them in concealing their advance. On getting to close quarters, a sudden rush was made against the small hill held by a flank post of the 8th Regiment, who were compelled to fall back to a position about 300 yards in rear. The enemy immediately occupied the position and opened a heavy rifle, bomb, and machine gun fire on the 8th Light Horse Regiment.
"A" Squadron of the 9th were ordered to put down as heavy a barrage as possible across the front of the position held by the 8th Regiment. Fire was immediately opened and inflicted severe casualties on the enemy and also prevented reinforcements moving up in support. It also prevented the enemy advanced troops from withdrawing. Lying behind the stone sangars which had been erected across the tops of the hills held by the Regiment, the squadrons poured a destructive fire on the enemy who had advanced bravely across the open and had actually taken up positions on the small hills held by our troops. Lying as low as possible they contented themselves with throwing stick bombs, of which an enormous number had been carried forward.
Frequent calls were made on the Regiment by the 8th Light Horse for supplies of ammunition as their reserves were not at hand, and RSM Aikman, who had his supplies well organised, was able to meet all demands.
A party of the 4th Royal Scots closed up to the support of the Brigade and did excellent work, their bombers being exceptionally good. Gradually the fire of the enemy died down, and all movement in front seemed to have ceased, but in spite of this all ranks remained at their posts until daybreak. At dawn the 8th Regiment moved forward and took the surrender of 150 unwounded Turks amongst whom was their Commanding Officer. A large number of automatic rifles and bombs were also collected.
The determination of the Turkish attack was established by the fact that large numbers of dead were lying within 30 yards of our sangars, where they had taken cover to throw their bombs. The liberal use they made of their stick bombs, which have a cap on the handle that must be taken off before the cord which sets the mechanism in motion can be pulled, was shown by the fact that one dead Turk, who was seen to be a wearer of the famous Iron Cross, had 60 caps lying in a heap by his side. The enemy dead numbered 200 whilst 300 wounded were stated to have passed back to their dressing station.
Information was gained from an officer prisoner to the effect that their commander was determined to drive the Brigade from its position at all costs, and with this end in view had sent forward a body of picked troops, recent arrivals from the Galician Front. Then were certainly a fine body of men, their physique being the best we had seen amongst the enemy forces. They were well dressed and wore the new pattern German steel helmet. Their equipment appeared to be a recent issue, and all carried the latest pattern Mauser rifle.
The enemy maintained a heavy shell fire throughout the day, whilst the Regiment cleared up the position and buried the dead. Towards evening the fire slackened and died away, the following day was spent in peace and quietness. Our casualties had been slight but the 8th Light Horse suffered severely through being compelled to fall back, but this was unavoidable under the circumstances.
The Australian Light Horse Studies Centre is a not for profit and non profit group whose sole aim is to write the early history of the Australian Light Horse from 1900
- 1920. It is privately funded and the information is provided by the individuals within the group and while permission for the use of the material has been given for this
site for these items by various donors, the residual and actual copyright for these items, should there be any, resides exclusively with the donors. The information on
this site is freely available for private research use only and if used as such, should be appropriately acknowledged. To assist in this process, each item has a citation
attached at the bottom for referencing purposes.
Please Note: No express or implied permission is given for commercial use of the information contained within this site.
A note to copyright holders
The Australian Light Horse Studies Centre has made every endeavour to contact copyright holders of material digitised for this blog and website and where
appropriate, permission is still being sought for these items. Where replies were not received, or where the copyright owner has not been able to be traced, or where
the permission is still being sought, the Australian Light Horse Studies Centre has decided, in good faith, to proceed with digitisation and publication. Australian Light
Horse Studies Centre would be happy to hear from copyright owners at any time to discuss usage of this item.