« November 2010 »
S M T W T F S
1 2 3 4 5 6
7 8 9 10 11 12 13
14 15 16 17 18 19 20
21 22 23 24 25 26 27
28 29 30
You are not logged in. Log in


Search the site:


powered by FreeFind
Volunteer with us.

Entries by Topic All topics
A Latest Site News
A - Using the Site
AAA Volunteers
AAB-Education Centre
AAC-Film Clips
AAC-Photo Albums
AIF & MEF & EEF
AIF - Lighthorse
AIF - ALH - A to Z
AIF - DMC
AIF - DMC - Or Bat
AIF - DMC - Anzac MD
AIF - DMC - Aus MD
AIF - DMC - British
AIF - DMC - BWI
AIF - DMC - French
AIF - DMC - Indian
AIF - DMC - Italian
AIF - DMC - Medical
AIF - DMC - Remounts
AIF - DMC - Scouts
AIF - DMC - Sigs
AIF - DMC - Sigs AirlnS
AIF - DMC - 1 Sig Sqn
AIF - DMC - 2 Sig Sqn
AIF - DMC - Eng
AIF - DMC - Eng 1FSE
AIF - DMC - Eng 2FSE
AIF - DMC - GSR
AIF - 1B - 1 LHB
AIF - 1B - 6 MVS
AIF - 1B - 1 LHMGS
AIF - 1B - 1 Sig Trp
AIF - 1B - 1 LHFA
AIF - 1B - 1 LHR
AIF - 1B - 2 LHR
AIF - 1B - 3 LHR
AIF - 2B - 2 LHB
AIF - 2B - 7 MVS
AIF - 2B - 2 LHFA
AIF - 2B - 2 LHMGS
AIF - 2B - 2 Sig Trp
AIF - 2B - 5 LHR
AIF - 2B - 6 LHR
AIF - 2B - 7 LHR
AIF - 3B - 3 LHB
AIF - 3B - 8 MVS
AIF - 3B - 3 LHB Sigs
AIF - 3B - 3 LHFA
AIF - 3B - 3 LHMGS
AIF - 3B - 3 Sig Trp
AIF - 3B - 8 LHR
AIF - 3B - 9 LHR
AIF - 3B - 10 LHR
AIF - 4B - 4 LHB
AIF - 4B - 4 Sig Trp
AIF - 4B - 9 MVS
AIF - 4B - 4 LHFA
AIF - 4B - 4 LHMGS
AIF - 4B - 4 LHR
AIF - 4B - 11 LHR
AIF - 4B - 12 LHR
AIF - 5B - 5 LHB
AIF - 5B - 10 MVS
AIF - 5B - 5 LHFA
AIF - 5B - 5 Sig Trp
AIF - 5B - ICC  
AIF - 5B - 14 LHR
AIF - 5B - 15 LHR
AIF - 5B - 1er Regt
AIF - 5B - 2 NZMGS
AIF - AASC
AIF - Aboriginal LH
AIF - Badges
AIF - Cars
AIF - Chinese LH
AIF - Double Sqns
AIF - Engineers
AIF - Fr - 22 Corps
AIF - Fr - 13 LHR
AIF - Honour Roll
AIF - HQ - 3rd Echelon
AIF - Marching Songs
AIF - Misc Topics
AIF - NZMRB
AIF - NZMRB - AMR
AIF - NZMRB - CMR
AIF - NZMRB - EFT
AIF - NZMRB - NZMFA
AIF - NZMRB - NZMGS
AIF - NZMRB - OMR
AIF - NZMRB - Sig-Trp
AIF - NZMRB - WMR
AIF - Ships
AIF - Ships - Encountr
AIF - Ships - Una
AIF - WFF
AIF - Wireless Sqn
Battles
BatzA - Australia
BatzA - Broken Hill
BatzA - Liverpool
BatzA - Merivale
BatzB - Boer War
BatzB - Bakenlaagte
BatzB - Belmont
BatzB - Bothaville
BatzB - Buffels Hoek
BatzB - Coetzees Drift
BatzB - Diamond Hill
BatzB - Driefontein
BatzB - Elands
BatzB - Graspan
BatzB - Grobelaar
BatzB - Grootvallier
BatzB - Hartebestfontn
BatzB - Houtnek
BatzB - Karee Siding
BatzB - Kimberley
BatzB - Koster River
BatzB - Leeuw Kop
BatzB - Mafeking
BatzB - Magersfontein
BatzB - Modder River
BatzB - Onverwacht
BatzB - Paardeberg
BatzB - Palmietfontein
BatzB - Pink Hill
BatzB - Poplar Grove
BatzB - Rhenoster
BatzB - Sannahs Post
BatzB - Slingersfontn
BatzB - Stinkhoutbm
BatzB - Sunnyside
BatzB - Wilmansrust
BatzB - Wolvekuil
BatzB - Zand River
BatzG - Gallipoli
BatzG - Anzac
BatzG - Aug 1915
BatzG - Baby 700
BatzG - Evacuation
BatzG - Hill 60
BatzG - Hill 971
BatzG - Krithia
BatzG - Lone Pine
BatzG - Nek
BatzJ - Jordan Valley
BatzJ - 1st Amman
BatzJ - 2nd Amman
BatzJ - Abu Tellul
BatzJ - Es Salt
BatzJ - JV Maps
BatzJ - Ziza
BatzM - Mespot
BatzM - Baghdad
BatzM - Ctesiphon
BatzM - Daur
BatzM - Kurna
BatzM - Kut el Amara
BatzM - Ramadi
BatzN - Naval
BatzN - AE1
BatzN - Cocos Is
BatzN - Heligoland
BatzN - Marmara
BatzN - Zeebrugge
BatzN - Zeppelin L43
BatzNG - Bitapaka
BatzO - Other
BatzO - Baku
BatzO - Egypt 1919
BatzO - Emptsa
BatzO - Karawaran
BatzO - Peitang
BatzO - Wassa
BatzP - Palestine
BatzP - 1st Gaza
BatzP - 2nd Gaza
BatzP - 3rd Gaza
BatzP - Aleppo
BatzP - Amwas
BatzP - Ayun Kara
BatzP - Bald Hill
BatzP - Balin
BatzP - Beersheba
BatzP - Berkusieh
BatzP - Damascus
BatzP - El Auja
BatzP - El Buggar
BatzP - El Burj
BatzP - Haifa
BatzP - Huj
BatzP - JB Yakub
BatzP - Kaukab
BatzP - Khan Kusseir
BatzP - Khuweilfe
BatzP - Kuneitra
BatzP - Megiddo
BatzP - Nablus
BatzP - Rafa
BatzP - Sasa
BatzP - Semakh
BatzP - Sheria
BatzP - Surafend
BatzP - Wadi Fara
BatzS - Sinai
BatzS - Bir el Abd
BatzS - El Arish
BatzS - El Mazar
BatzS - El Qatiya
BatzS - Jifjafa
BatzS - Magdhaba
BatzS - Maghara
BatzS - Romani
BatzS - Suez 1915
BatzSe - Senussi
BatzWF - Westn Front
BW - Boer War
BW - NSW
BW - NSW - 1ACH
BW - NSW - 1NSWMR
BW - NSW - 2NSWMR
BW - NSW - 3ACH
BW - NSW - 3NSWIB
BW - NSW - 3NSWMR
BW - NSW - 5ACH
BW - NSW - A Bty RAA
BW - NSW - AAMC
BW - NSW - Aust H
BW - NSW - Lancers
BW - NSW - NSW Inf
BW - NSW - NSWCBC
BW - NSW - NSWIB
BW - NSW - NSWMR_A
BW - NZ
BW - Qld
BW - Qld - 1ACH
BW - Qld - 1QMI
BW - Qld - 2QMI
BW - Qld - 3ACH
BW - Qld - 3QMI
BW - Qld - 4QIB
BW - Qld - 5QIB
BW - Qld - 6QIB
BW - Qld - 7ACH
BW - QLD - AAMC
BW - SA
BW - SA - 1SAMR
BW - SA - 2ACH
BW - SA - 2SAMR
BW - SA - 3SACB
BW - SA - 4ACH
BW - SA - 4SAIB
BW - SA - 5SAIB
BW - SA - 6SAIB
BW - SA - 8ACH
BW - SA - AAMC
BW - Tas
BW - Tas - 1ACH
BW - Tas - 1TIB
BW - Tas - 1TMI
BW - Tas - 2TB
BW - Tas - 2TIB
BW - Tas - 3ACH
BW - Tas - 8ACH
BW - Vic
BW - Vic - 1VMI
BW - Vic - 2ACH
BW - Vic - 2VMR
BW - Vic - 3VB
BW - Vic - 4ACH
BW - Vic - 4VIB
BW - Vic - 5VMR
BW - Vic - 6ACH
BW - Vic - AAMC
BW - Vic - Scot H
BW - WA
BW - WA - 1WAMI
BW - WA - 2ACH
BW - WA - 2WAMI
BW - WA - 3WAB
BW - WA - 4ACH
BW - WA - 4WAMI
BW - WA - 5WAMI
BW - WA - 6WAMI
BW - WA - 8ACH
BW Gen - Campaign
BW Gen - Soldiers
BW General
Cavalry - General
Diary - Schramm
Egypt - Heliopolis
Egypt - Mena
Gen - Ataturk Pk, CNB
Gen - Australia
Gen - Legends
Gen - Query Club
Gen - St - NSW
Gen - St - Qld
Gen - St - SA
Gen - St - Tas
Gen - St - Vic
Gen - St - WA
Gm - German Items
Gm - Bk - 605 MGC
GW - 11 Nov 1918
GW - Atrocities
GW - August 1914
GW - Biographies
GW - Propaganda
GW - Spies
GW - We forgot
Militia 1899-1920
Militia - Area Officers
Militia - Inf - Infantry
Militia - Inf - 1IB
Militia - Inf - 2IB
Militia - Inf - 3IB
Militia - Inf - NSW
Militia - Inf - Qld
Militia - Inf - SA
Militia - Inf - Tas
Militia - Inf - Vic
Militia - Inf - WA
Militia - K.E.Horse
Militia - LH
Militia - LH - Regts
Militia - LH - 1LHB
Militia - LH - 2LHB
Militia - LH - 3LHB
Militia - LH - 4LHB
Militia - LH - 5LHB
Militia - LH - 6LHB
Militia - LHN - NSW
Militia - LHN - 1/7/1
Militia - LHN - 2/9/6
Militia - LHN - 3/11/7
Militia - LHN - 4/6/16
Militia - LHN - 5/4/15
Militia - LHN - 6/5/12
Militia - LHN - 28
Militia - LHQ - Qld
Militia - LHQ - 13/2
Militia - LHQ - 14/3/11
Militia - LHQ - 15/1/5
Militia - LHQ - 27/14
Militia - LHS - SA
Militia - LHS - 16/22/3
Militia - LHS - 17/23/18
Militia - LHS - 24/9
Militia - LHT - Tas
Militia - LHT - 12/26
Militia - LHV - Vic
Militia - LHV - 7/15/20
Militia - LHV - 8/16/8
Militia - LHV - 9/19
Militia - LHV - 10/13
Militia - LHV - 11/20/4
Militia - LHV - 19/17
Militia - LHV - 29
Militia - LHW - WA
Militia - LHW-18/25/10
Militia - Military Orders
Militia - Misc
MilitiaRC - Rifle Clubs
MilitiaRC - NSW
MilitiaRC - NT
MilitiaRC - Qld
MilitiaRC - SA
MilitiaRC - Tas
MilitiaRC - Vic
MilitiaRC - WA
Militiaz - New Zealand
Tk - Turkish Items
Tk - Army
Tk - Bks - Books
Tk - Bks - 1/33IR
Tk - Bks - 27th IR
Tk - Bks - Air Force
Tk - Bks - Yildirim
Tk - POWs
Wp - Weapons
Wp - Hotchkiss Cav
Wp - Hotchkiss PMG
Blog Tools
Edit your Blog
Build a Blog
RSS Feed
View Profile
Open Community
Post to this Blog
Site Index
Education Centre
LH Militia
Boer War
Transport Ships
LH Battles
ALH - Units
ALH - General
Aboriginal Light H
Weapons
Ottoman Sources

"At a mile distant their thousand hooves were stuttering thunder, coming at a rate that frightened a man - they were an awe inspiring sight, galloping through the red haze - knee to knee and horse to horse - the dying sun glinting on bayonet points..." Trooper Ion Idriess

The Australian Light Horse Studies Centre aims to present an accurate history as chroniclers of early Australian military developments from 1899 to 1920.

The Australian Light Horse Studies Centre site holds over 12,000 entries and is growing daily.

Contact: Australian Light Horse Studies Centre

Let us hear your story: You can tell your story, make a comment or ask for help on our Australian Light Horse Studies Centre Forum called:

Desert Column Forum

WARNING: This site contains: names, information and images of deceased people; and, language which may be considered inappropriate today.

Tuesday, 9 November 2010
Imperial Camel Corps, Contents
Topic: AIF - 5B - ICC

ICC, AIF

The 1st Brigade, Imperial Camel Corps

Contents

1st Brigade, Imperial Camel Corps, Colour Patch


Items

Outline

Imperial Camel Corps - Outline 

History

Imperial Camel Corps - Brief History


Australian Middle East Force Structure

Structure

The Australian Light Horse – Structural outline

Australian Light Horse Order of Battle


Corps

Desert Mounted Corps (DMC)


Division

Anzac Mounted Division

Australian Mounted Division 


Brigade

Imperial Camel Corps - units

5th Australian Light Horse Brigade


Regiments

The First 14th Australian Light Horse Regiment, AIF, History

The Second 14th Australian Light Horse Regiment, AIF, History

15th Australian Light Horse Regiment, AIF, History

1er Regiment Mixte de Cavalerie Du Levant


History

Egyptian Army Camel Corps, A Study of the Tactical Employment of Camel Corps, Percy Account


Battles

Romani - Bir el Aweidia

11th ALHR, AIF, War Diary, account - Bir el Aweidia

11th LHR, AIF account - Bir el Aweidia

Bir el Mazar

Imperial Camel Corps Account  War Diary - No report on Mazar available

Imperial Camel Corps Unit History Account 

Magdhaba

ICC, AIF, War Diary, account  

ICC, AIF, account

The Battle of Magdhaba, Sinai, December 23, 1916, Roll of Honour, Imperial Camel Corps
The Battle of Khuweilfe, Palestine, 1 - 8 November 1917
The Battle of Khuweilfe, Palestine, 1 - 8 November 1917, 3rd Battalion ICC Account


Routine Orders

1st Brigade Imperial Camel Corps Routine Order, 16 June 1917 


Embarkations

Full Roll

Roll: A - C

Roll: D - F

Roll: G - J

Roll: K - L

Roll: M - Q

Roll: R - S

Roll: T - Z


Individual Rolls 

May 1916 Reinforcement

July 1916 Reinforcement

August 1916 Reinforcement

September 1916 Reinforcement

October 1916 Reinforcement

November 1916 Reinforcement Medic Group 1st Military District

November 1916 Reinforcement Medic Group 2nd Military District

November 1916 Reinforcement Vestalia Group  

December 1916 Reinforcement Karmala Group

December 1916 Reinforcement Boorara Group 1st Military District

December 1916 Reinforcement Boorara Group 3rd Military District 

January 1917 Reinforcement Karmala Group 1st Military District

January 1917 Reinforcement Karmala Group 2nd Military District
January 1917 Reinforcement Karmala Group 3rd Military District
January 1917 Reinforcement Boorara Group
February 1917 Reinforcement Boorara Group
February 1917 Reinforcement Morea 17 February Group
February 1917 Reinforcement Morea 20 February Group
March 1917 Reinforcement Port Sydney Group
March 1917 Reinforcement Boorara Group
April 1917 Reinforcements Port Sydney 9 May 1917 Group
April 1917 Reinforcement Port Sydney 22 May 1917 Group
May 1917 Reinforcement Kyarra Group
May 1917 Reinforcement Port Lincoln Group
June 1917 Reinforcement Canberra Group
June 1917 Reinforcement Kyarra Group
July 1917 Reinforcement Commonwealth Group
July 1917 Reinforcement Port Darwin Group
August 1917 Reinforcement


Roll of Honour

Imperial Camel Corps, Roll of Honour 

Lest We Forget


Further Reading:

Imperial Camel Corps, AIF

Imperial Camel Corps, Roll of Honour 

Battles where Australians fought, 1899-1920

Double Squadrons  


Citation: Imperial Camel Corps, Contents

Posted by Project Leader at 12:01 AM EAST
Updated: Tuesday, 9 November 2010 8:45 AM EAST
Monday, 9 November 2009
The Battle of Khuweilfe, Palestine, 1 - 8 November 1917, 3rd Battalion ICC Account
Topic: AIF - 5B - ICC

The Battle of Khuweilfe

Palestine, 1 - 8 November 1917

3rd Battalion ICC Account


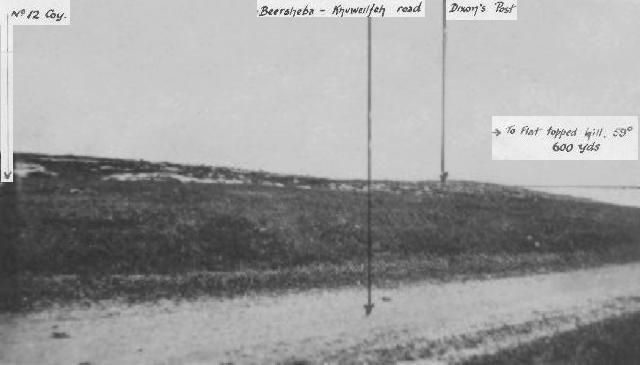
Photograph 1, 3rd Battalion ICC Account, detailing dispositions.

[Click on picture for larger version.]


The following was the plan of attack of General Officer Commanding, 158th Brigade, and detailed first by him in Operation Order No. 45, 5 November 1917 at 1815, to Officer Commanding 3rd Battalion, and afterwards modified and altered by him verbally as far as the 3rd Battalion was concerned before the attack took place.


Hand drawn map detailing the plan of attack for 6 November 1917.

[Click on map for larger version.]


The 158th Brigade - 3 Battalions in the firing line and one in reserve.

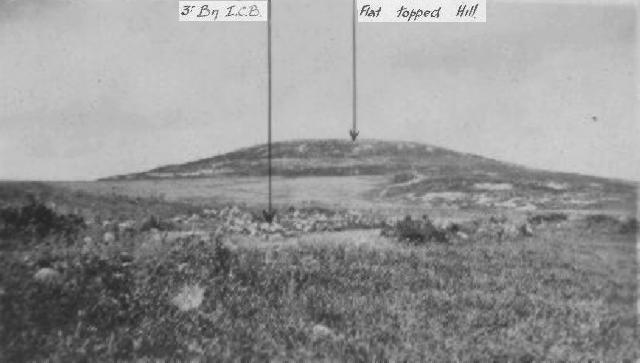
The three battalions in the firing line - 1/1st Herefords on the right, 1/6th Royal Welch Fusiliers in the centre and 1/7th Royal Welch Fusiliers on the left, were to form up at 0310 on 6 November 1917, covering a frontage of 500 yards each; making a total frontage of 1,500 yards, and at the time arrange (0421) the Brigade was to advance under the cover of an artillery barrage and take by storm the Turkish position, moving forward as the barrage lifted. The 3rd Battalion Imperial Camel Battalion was to follow up in rear of the right of the 1/1st Herefords, and as that Brigade made good its first objective (viz Flat Topped Hill) this hill was to be occupied by the 3rd Battalion with the view of protecting the right flank against a probable counter attack, whilst the 1/1st Herefords were to continue the advance.


Hand drawn map detailing the situation at 8.30 am, 6 November 1917.

[Click on map for larger version.]


The advance commenced at the appointed time (0421) but for unforseen reasons one of the three Battalions of the 158th Brigade was late in assembling at the point arranged, and the right hand battalion got orders, when on the move, to extend to its left and take up a total frontage of 1,000 yards. In the dark they lost direction and while doing this did a complete left wheel, leaving the 3rd Battalion in the air, and in front of the original line.

The Commanding Officer of the 1/1st Herefords had pointed out his first objective (viz "Flat Topped Hill") to the Officer Commanding 3rd Battalion, and asked the latter to occupy it after it had been taken by the Herefords under the artillery barrage.


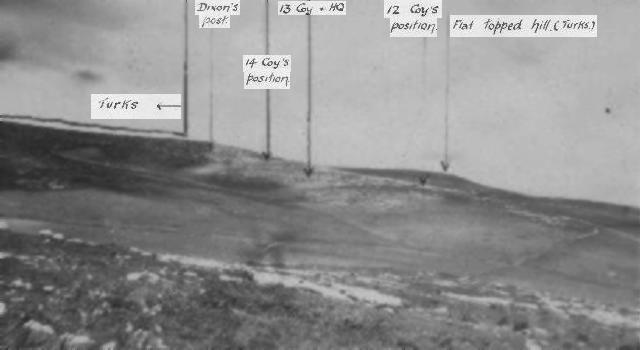
Photograph 2, 3rd Battalion ICC Account, detailing dispositions.

[Click on picture for larger version.]


The night was very dark, and when the 1/1st Herefords lost direction it was not at first reported by the Intelligence Section of the 3rd Battalion.

Just before dawn broke, Lieutenant Moore, the Battalion Intelligence Officer however succeeded by a personal reconnaissance in discovering that the 1/1st Herefords had deviated very far from the original plan of attack and line of advance, although their actual direction and the reasons for it was still most obscure. The Battalion was then lying down in the open, in front of what proved a very strongly held hill, impregnable from a frontal attack.

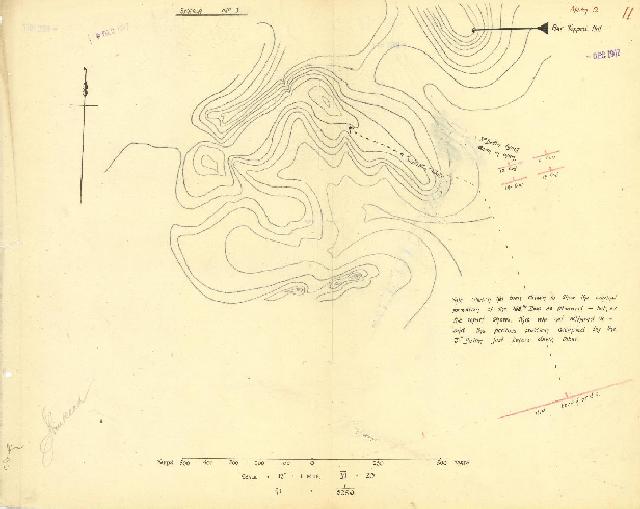
As the artillery barrage had lifted and no fighting had taken place on this hill, realizing the opportunity to attack - while the defenders were still demoralized from the barrage- had gone, and something was amiss, the 3rd Battalion was moved round behind a low spur, which faced the "Flat Topped Hill", and ran parallel to it (See Sketch 1) to wait until it became light enough to see how the situation stood.


Hand drawn map detailing the situation during 6 November 1917.

[Click on map for larger version.]


The Battalion had only just cleared the point of the spur, when a terrible outburst of machine gun fire took place from "Flat Topped Hill" and the ground the Battalion had just cleared was swept with a devastating fire so severe that nothing could have lived in it. The Battalion was only saved from being exterminated by the orderly way in which Officers Commanding Companies changed direction in the growing light and moved their companies to the flank ordered without loss of time.

Two companies (11 and 12) were placed behind the spur named, and at once came under a very heavy machine gun fire from the Turks on "Flat Top Hill", who were about 300 yards distant.

Just as the right flank was secured, about 200 infantry, of the 1/1st Herefords, who had lost all their officers and had got out of touch with the attacking force and had been slightly demoralised, came rushing back on our left, giving up to the Turks the point of the ridge which dominated all that held by the 3rd Battalion, and which was the key of the position. The position was almost lost, but Lieutenant (Now Captain) Dixon, taking in the crisis at a glance, rushed to the front with about 20 of his men, and taking off his hat cheered the demoralised infantry back in a most gallant manner, retaking the point and holding on to it throughout the fight. About 0830 the Turks again made a most determined attack round our left flank and left rear driving back the infantry in places and endeavoured to seize a hill to the rear of the Battalion, which dominated that held by us and which would - if occupied by the enemy - have completely encircled our position not only by fire - as they now did at this time - but by men also.


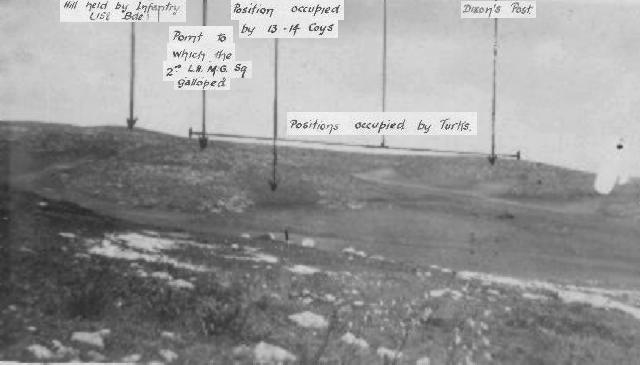
Photograph 3, 3rd Battalion ICC Account, detailing dispositions.

[Click on picture for larger version.]


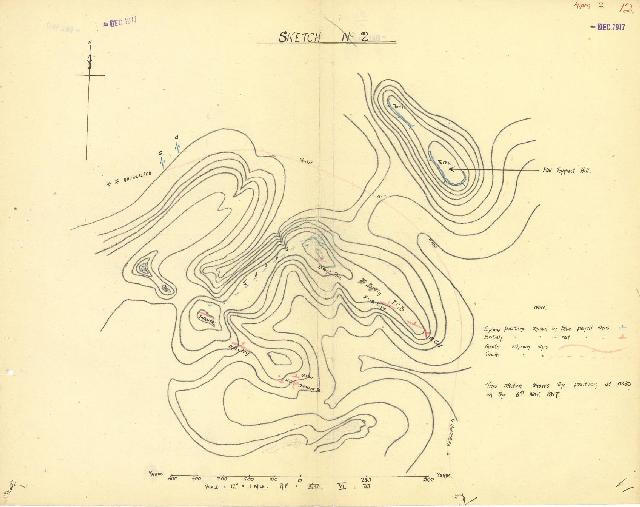
The position looked again very critical, but the infantry rallied in our rear and the Turkish encircling movement was checked (vide sketch for the position at 0830).

Although the Turks were prevented from surrounding the 3rd Battalion altogether by men, they now swept every approach to its position by machine gun, rifle and shrapnel fire.

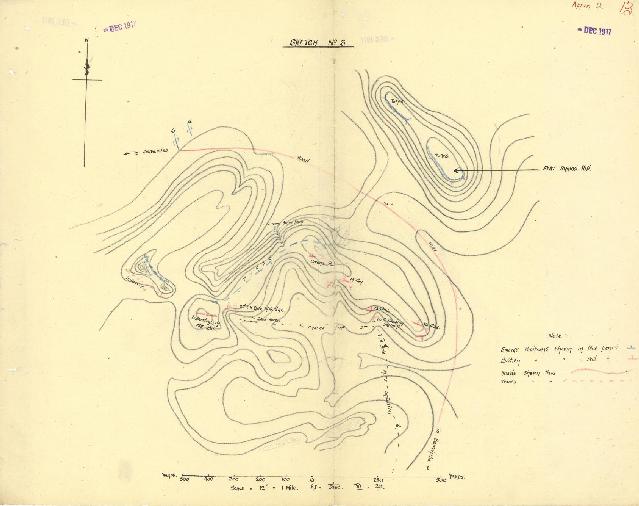
At about 1000, representations were made by the 3rd Battalion to the General Officer Commanding of the 150th Brigade for the infantry to come up and drive the Turks off the ridge which they held to the left rear (vide Sketch 2)  and over which the infantry held the commanding ground. This for reasons unknown they were not ordered to do, but the 2nd Brigade Light Horse Machine Gun Squadron were ordered to gallop up a little valley commanded by the Turks and secure the left of the ridge they held. They charged in a very gallant manner, and at once came under a murderous machine gun and shrapnel fire, but very gallantly led by Captain Caine the reached their objective, at which pint the hill rose so abruptly as to give cover from the Turkish firing line above and slightly to their right. They rushed their guns up the hill within forty yards of the Turks, and although the teams were shot down almost to a man, their very gallant action caused the Turks to pause and gave the 3rd Battalion breathing time to size up their position.

The Battalion held on in a critical position all day, the enemy giving no quarter to wounded or stretcher bearers alike.

Throughout the night the position was grave but morning broke to see the Battalion still holding to its ground.

Lieutenant Bickford succeeded in obtaining water and rations under cover of darkness, although a previous attempt by another party had failed under a heavy fire.


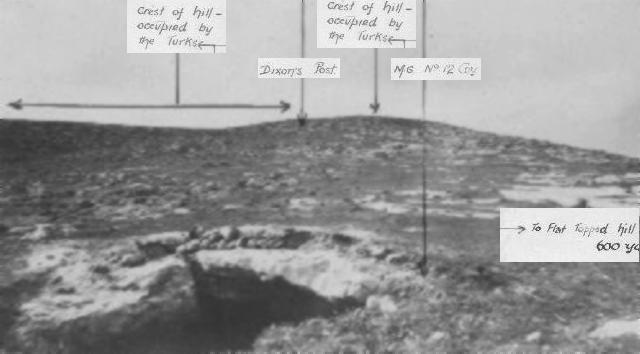
Photograph 4, 3rd Battalion ICC Account, detailing dispositions.

[Click on picture for larger version.]


Before dawn on the 7th the 2nd Battalion Light Horse Machine Gun Squadron were withdrawn under cover of darkness, and two infantry platoons which had joined the battalion during the night were put into the position they evacuated by an officer of the 3rd Battalion. These platoons lost very heavily as it became light.

The Battalion held on during the 7th and an enemy counter attack upon Dixon's Post was successfully driven off. Sniping fire became more deadly as the day went on.

About 1500 the Artillery were directed on the ridge to our left rear (vide sketch 3) with marked affect. About 1630 Lieutenant Dixon assisted by rifle grenades, and also by artillery fire, moved against the Turkish positions to his left and left rear and with fixed bayonets cleared the ridge.

The Battalion held to the ground during the night of the 7/8th and next morning it was discovered that the Turks had withdrawn leaving us masters of the position.


Photograph 5, 3rd Battalion ICC Account, detailing dispositions.

[Click on picture for larger version.]


Sources:

See: 3rd ANZAC Battalion, Imperial Camel Corps War Diary, November 1917, AWM4, Sub-class 11/8
Australian Light Horse Studies Centre, AIF War Diaries of the Great War, Site Transcription Policy


Further Reading:

The Imperial Camel Corps Brigade

The Battle of Khuweilfe, Palestine, 1 - 8 November 1917

The Battle of Khuweilfe, Palestine, 1 - 8 November 1917, Roll of Honour

The Third Battle of Gaza, Palestine, 26 October 1917 - 2 January 1918

Battles where Australians fought, 1899-1920


Citation: The Battle of Khuweilfe, Palestine, 1 - 8 November 1917, 3rd Battalion ICC Account

Posted by Project Leader at 12:01 AM EAST
Updated: Tuesday, 9 November 2010 9:08 AM EAST
Saturday, 31 October 2009
Imperial Camel Corps - Outline
Topic: AIF - 5B - ICC

ICC, AIF

Imperial Camel Corps 

Outline


The evolution of the Imperial Camel Corps

Camel Companies

After the outbreak of the Senussi Rebellion in the western desert of Egypt, the first response was create composite regiments from the Light Horse reinforcements.  As the Light Horse Regiments returned from Gallipoli, so too were the men from those regiments serving with the Western Frontier Force. In response to this, a specific force was formed that was capable of traversing large distances over waterless territory. Camels were seen as the obvious form of transport.

In January 1916 the Imperial Camel Corps was formed to answer the needs for such a desert oriented force. Initially the men came from a variety of formations but usually infantry men who had experience with camels. This proved to be a skill concentrated in the Western Australian units and those also from South Australia where the camel was a key locomotive animal.

Four companies were initiallly formed. These were:


1st Camel Company

The 1st Camel Company was formed in Egypt on 24 January 1916 from volunteers drawn out of the 4th and 8th Infantry Brigades. On 16 December 1916 the 1st Camel Company was absorbed into the 1st Camel Battalion. The Battalion was disbanded on 25 July 1918 with all the available personnel forming 14th Light Horse Regiment.


2nd Camel Company

The 2nd Camel Company was formed in Egypt on 30 January 1916 from volunteers drawn out of the 1st and 2nd Infantry Brigades. On 10 March 1917 the 2nd Camel Company was absorbed into the 1st Camel Battalion. The Battalion was disbanded on 25 July 1918 with all the available personnel forming 14th Light Horse Regiment.


3rd Camel Company

The 3rd Camel Company was formed in Egypt on 31 January 1916 from volunteers drawn out of the 3rd and 7th Infantry Brigades. On 16 December 1916 the 3rd Camel Company was absorbed into the 1st Camel Battalion. The Battalion was disbanded on 25 July 1918 with all the available personnel forming 14th Light Horse Regiment.


4th Camel Company

The 4th Camel Company was formed in Egypt on 31 January 1916 from volunteers drawn out of the 4th and 8th Infantry Brigades. On 16 December 1916 the 4th Camel Company was absorbed into the 1st Camel Battalion. The Battalion was disbanded on 25 July 1918 with all the available personnel forming 14th Light Horse Regiment.


Following the success of the Camel Companies in the Western Desert, over time, ten more companies were formed from the various British units excess Light Horse reinforcements in the various training depots.


5th Camel Company

The 5th Camel Company was a British manned Company drawn from the 53rd Territorial Infantry Division. On 16 December 1916 the 5th Camel Company was absorbed into the 2nd Camel Battalion.  After the breakup of the Imperial Camel Corps on 25 July 1918, the 5th Camel Company remained as a camel formation giving assistance in the Hejaz campaign.


6th Camel Company

The 6th Camel Company was a British manned Company drawn from the Yeomanry 4th Dismounted Brigade. After the breakup of the Imperial Camel Corps on 25 July 1918, the 6th Camel Company remained as a camel formation giving assistance in the Hejaz campaign.


7th Camel Company

The 7th Camel Company was a British manned Company drawn from the 54th Territorial Infantry Division. After the breakup of the Imperial Camel Corps on 25 July 1918, the 7th Camel Company remained as a camel formation giving assistance in the Hejaz campaign.


8th Camel Company

The 8th Camel Company was a British manned Company drawn from the Yeomanry 6th Mounted Brigade. After the breakup of the Imperial Camel Corps on 25 July 1918, the 8th Camel Company remained as a camel formation giving assistance in the Hejaz campaign.


9th Camel Company

The 9th Camel Company was a British manned Company drawn from the Yeomanry 8th Mounted Brigade. After the breakup of the Imperial Camel Corps on 25 July 1918, the 9th Camel Company remained as a camel formation giving assistance in the Hejaz campaign.


10th Camel Company

The 10th Camel Company was a British manned Company drawn from the Yeomanry 22nd Mounted Brigade. After the breakup of the Imperial Camel Corps on 25 July 1918, the 10th Camel Company remained as a camel formation giving assistance in the Hejaz campaign.


11th Camel Company

The 11th Camel Company was formed in Egypt on 6 July 1916 from volunteers drawn out of the Anzac Mounted Division. On 16 December 1916 the 11th Camel Company was absorbed into the 3rd Camel Battalion. The Battalion was disbanded on 25 July 1918 with all the available personnel forming the 15th Light Horse Regiment.


12th Camel Company

The 12th Camel Company was formed in Egypt on 15 July 1916 from volunteers drawn out of the light horse reinforcements. On 16 December 1916 the 12th Camel Company was absorbed into the 3rd Camel Battalion. The Battalion was disbanded on 25 July 1918 with all the available personnel forming the 15th Light Horse Regiment.


13th Camel Company

The 13th Camel Company was formed in Egypt on 25 July 1916 from volunteers drawn out of the light horse reinforcements. On 16 December 1916 the 13th Camel Company was absorbed into the 3rd Camel Battalion. The Battalion was disbanded on 25 July 1918 with all the available personnel forming the 15th Light Horse Regiment.


14th Camel Company

The 13th Camel Company was formed in Egypt on 4 August 1916 from volunteers drawn out of the light horse reinforcements. On 16 December 1916 the 14th Camel Company was absorbed into the 3rd Camel Battalion. The Battalion was disbanded on 25 July 1918 with all the available Australian personnel forming the 15th Light Horse Regiment.


15th Camel Company

The 15th Camel Company was raised on 24 July 1916 from New Zealand Mounted Rifles reinforcements in the Egyptian training depot. The 15th Camel Company was joined as part of the 4th Camel Battalion, a composite Australian and New Zealand formation. The Battalion was disbanded on 25 July 1918 with all the available New Zealand personnel forming the 2nd New Zealand Machine Gun Squadron.


16th Camel Company

The 16th Camel Company was raised on 17 October 1916 from New Zealand Mounted Rifles reinforcements in the Egyptian training depot. The 16th Camel Company was joined as part of the 4th Camel Battalion, a composite Australian and New Zealand formation. The Battalion was disbanded on 25 July 1918 with all the available New Zealand personnel forming the 2nd New Zealand Machine Gun Squadron.


17th Camel Company

The 17th Camel Company was formed in Egypt on 3 February 1917 from men transferred out of the disbanded 4th Camel Regiment. The 17th Camel Company was joined as part of the 4th Camel Battalion, a composite Australian and New Zealand formation. The Battalion was disbanded on 25 July 1918 with all the available Australian personnel joining either the 14th Light Horse Regiment or 15th Light Horse Regiment.


18th Camel Company

The 18th Camel Company was formed in Egypt on 3 February 1917 from men transferred out of the disbanded 4th Camel Regiment. The 17th Camel Company was joined as part of the 4th Camel Battalion, a composite Australian and New Zealand formation. The Battalion was disbanded on 25 July 1918 with all the available Australian personnel joining either the 14th Light Horse Regiment or 15th Light Horse Regiment.


Camel Regiments


1st Camel Regiment

The 1st Camel Regiment was formed in Egypt during September 1916 by redesignating the 11th Light Horse Regiment. During the reorganisation of the Light Horse Divisions, the Regiment resumed its old identity as the 11th Light Horse Regiment in February 1917. The 11th Light Horse Regiment became part of the 4th Light Horse Brigade in the Imperial Mounted Division and then Australian Mounted Division.


2nd Camel Regiment

The 2nd Camel Regiment was formed in Egypt during September 1916 by redesignating the 12th Light Horse Regiment. During the reorganisation of the Light Horse Divisions, the Regiment resumed its old identity as the 12th Light Horse Regiment in February 1917. The 12th Light Horse Regiment became part of the 4th Light Horse Brigade in the Imperial Mounted Division and then Australian Mounted Division.


3rd Camel Regiment

The 3rd Camel Regiment was formed in Egypt on 24 December 1916 by redesignating the 4th Light Horse Regiment. During the reorganisation of the Light Horse Divisions, the Regiment resumed its old identity as the 4th Light Horse Regiment in February 1917. The 4th Light Horse Regiment became part of the 4th Light Horse Brigade in the Imperial Mounted Division and then Australian Mounted Division.


4th Camel Regiment

The 4th Camel Regiment was formed in Egypt on 10 November 1916 from men transferred out of the disbanded 1st, 2nd and 3rd Light Horse Double Squadrons. [See: Double Squadron - Units] The 17th and 18th Camel Companies [See above] were formed in Egypt on 3 February 1917 from men transferred out of the 4th Camel Regiment which was subsquently disbanded.


Camel Battalions and the Imperial Camel Corps Brigade

The camel companies were small formation adapted for the small scale encounters that occurred in the Western Desert. With the massed armies of the Turks met in set piece battles, the size of the units proved unsuitable for effective combat against the Turks in Palestine. In response, the Allied authorities amalgamated the independant companies into camel battalions in December 1916. The three companies were original formed with a fourth company added in February 1917. These four Battalions were brigaded into the 1st Imperial Camel Corps Brigade, a composite Brigade which included 10 Australian, 6 British and 2 New Zealand Companies. Although formed from all states, all camel reinforcements came from New South Wales.


1st Camel Battalion

Originally the 1st Camel Battalion was formed in the Sinai on 2 August 1916 as a composite British and Australian Camel formation. Into the Battalion came the 5th (British), 6th (British), 7th (British) and 4th Camel Companies. At prior to the Battle of Magdahba, the 5th (British) Camel Company was replaced by the 12th Camel Company. Hence the 4th, 6th (British), 7th (British) and 12th Camel Companies comprised the 1st Camel Battalion during the Battle of Maghdhaba. In early January 1917, the 6th (British), 7th (British) and 12th Camel Companies were replaced by the 1st, 3rd, and 15th (New Zealand) Camel Companies, with the 4th Camel Company remaining. It was this composition of the Batalion that took part in the Battle of Rafa. On 10 March 1917, the 15th (New Zealand) Camel Company was replaced by the 2nd Camel Company assigned making the Battalion now an entirely Australian formation. The Battalion was disbanded on 25 July 1918 with all the available personnel forming 14th Light Horse Regiment.


2nd Camel Battalion

In early January 1917, all the British Camel Companies were brought together into the 2nd Camel Battalion. After the breakup of the Imperial Camel Corps on 25 July 1918, the 2nd Camel Battalion remained as a camel formation giving assistance in the Hejaz campaign.


3rd Camel Battalion

Originally the 3rd Camel Battalion was formed in the Sinai on 4 December 1916 as a composite New Zealand and Australian Camel formation. Into the Battalion came the from 1st, 11th and 15th (New Zealand) Camel Companies. In early January 1917, the 1st and 15th (New Zealand) Camel Companies were replaced  by the 12th and 14th Camel Companies thus making it now an exclusive Australian Battalion. When engaged at the Battle of Rafa, the 3rd Camel Battalion comprised the 11th, 12th, 13th and 14th Camel Companies. The Battalion was disbanded on 25 July 1918 with all the available personnel forming the 15th Light Horse Regiment.


4th (Anzac) Camel Battalion

The 4th (Anzac) Camel Battalion was created during the process of reforming the Light Horse structure in Egypt. Formed in the Sinai on 16 February 1917, it was a composite New Zealand and Australian Battalion with the component units being the 16th (New Zealand), 13th, 17th and 18th Camel Companies. After the Second Battle of Gaza, 19 April 1917, the 13th Camel Company was transferred to the 3rd Camel Battalion and replaced by the 15th (New Zealand) Camel Company. The 4th (Anzac) Camel Battalion consisted of the  14th (New Zealand), 15th (New Zealand), 17th and 18th Camel Companies. In January 1918, the transfers of the 13th Camel Company and the 15th (New Zealand) Camel Company were reversed returning back to the original configuration of the 16th (New Zealand), 13th, 17th and 18th Camel Companies. The Battalion was disbanded on 25 July 1918 with all the available Australian personnel joining either the 14th Light Horse Regiment or 15th Light Horse Regiment while all the available New Zealand personnel formed the 2nd New Zealand Machine Gun Squadron.


Artillery

The artillery unit at the disposal of the Imperial Camel Corps was the No. 1 Hong Kong & Singapore Battery, RGA which was on the strength of the an Indian Mountain Battery, was been temporarily transformed into a Camel Battery with great success. The battery consisted of three sections, each with two 13 pounder mountain guns. The nickname of this unit was the "Bing Boys".


Australian Camel Field Ambulance

Raised in Victoria and trained at Seymour Camp in early 1917, the unit embarked on 10 May 1917. After the issue of camels and further training, the Australian Camel Field Ambulance joined the Imperial Camel Corps at Sheik Weli Nuran on 23 August 1917 thus replacing the 1/1 Welsh Field Ambulance. The unit had the distinction of being the only mounted field ambulance unit with a dedicated Quartermaster. The Australian Camel Field Ambulance was renamed the 5th Light Horse Field Ambulance.


Colour Patch

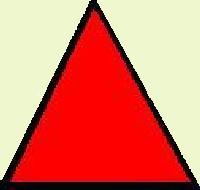
To assist with identification of the various units within the AIF, Divisional Order No 81 (A) Administration was issued at Mena on 8 March 1915 detailing the Colour Patch for the various units. The 1st Imperial Camel Corps Brigade received the colour in 1916 which was plain red in the shape of a triangle.


1st Imperial Camel Corps Brigade Colour Patch

The individual Battalions attached to the 1st Imperial Camel Corps Brigade carried the their own specific colour as a triangle illustrated with the above description about each individual unit.


Commanders:

Brigadier General Clement Leslie Smith, VC, MC.


Attachments

Desert Column 1916.

Desert Mounted Corps 1917 until July 1918.


Campaigns

The Imperial Camel Corps was formed from the various companies whose battle honours were transferred to the Brigade.

Egypt:

  • Western Desert
  • Defence of Egypt

Sinai:

  • Magdhaba; and,
  • Rafa.

 Palestine:

  • First Battle of Gaza;
  • Second Battle of Gaza;
  • Third Battle of Gaza;
  • Beersheba;
  • Khuweilfe/Ras es Nagh;
  • Bald Hill;
  • Amman; and,
  • Musallabeh.


Embarkations:

The following list details all the embarkations in support of the Imperial Camel Corps, AIF, during the Great War. Each entry details the individual soldier's: rank on embarkation; full name; Declared age; last occupation held; last address as a civilian; enlistment Date; and, ultimate fate. Each man is linked to a brief military biography where ever possible. One interesting point is that many of the men listed in the embarkation roll for the Imperial Camel Corps ended up in a different unit altogether. This list details the men's starting point in the AIF.

May 1916 Reinforcement

Sydney, New South Wales on board RMS Morea 27 May 1916

July 1916 Reinforcement

Sydney, New South Wales on board RMS Mongolia 8 July 1916

August 1916 Reinforcement

Sydney, New South Wales on board RMS Malwa 22 July 1916

September 1916 Reinforcement

Sydney, New South Wales on board RMS Mooltan 19 August 1916

October 1916 Reinforcement

Sydney, New South Wales on board HMAT A43 Barunga 20 October 1916

November 1916 Reinforcement Medic Group 1st MD

November 1916 Reinforcement Medic Group 2nd MD

November 1916 Reinforcement Vestalia Group

Sydney, New South Wales on board HMAT A7 Medic 12 December 1916

Sydney, New South Wales on board HMAT A7 Medic 12 December 1916

Melbourne, Victoria on board HMAT A44 Vestalia 15 December 1916

December 1916 Reinforcement Karmala Group

December 1916 Reinforcement Boorara Group 1st MD

December 1916 Reinforcement Boorara Group 3rd MD

Sydney, New South Wales on board RMS Karmala 3 February 1917

Melbourne, Victoria on board HMAT A42 Boorara 10 May 1917

Melbourne, Victoria on board HMAT A42 Boorara 10 May 1917

January 1917 Reinforcement Karmala Group 1st MD

January 1917 Reinforcement Karmala Group 2nd MD

January 1917 Reinforcement Karmala Group 3rd MD

January 1917 Reinforcement Boorara Group

Sydney, New South Wales on board RMS Karmala 3 February 1917

Sydney, New South Wales on board RMS Karmala 3 February 1917

Melbourne, Victoria on board RMS Karmala 6 February 1917

Melbourne, Victoria on board HMAT A42 Boorara 10 May 1917

February 1917 Reinforcement Boorara Group

February 1917 Reinforcement Morea 17 February Group

February 1917 Reinforcement Morea 20 February Group

Melbourne, Victoria on board HMAT A42 Boorara 10 May 1917

Sydney, New South Wales on board RMS Morea 17 February 1917

Melbourne, Victoria on board RMS Morea 20 February 1917

March 1917 Reinforcement Port Sydney Group

March 1917 Reinforcement Boorara Group

Sydney, New South Wales on board HMAT A15 Port Sydney 9 May 1917

Fremantle, Western Australia on board HMAT A42 Boorara 22 May 1917

April 1917 Reinforcements Port Sydney 9 May 1917 Group

April 1917 Reinforcement Port Sydney 22 May 1917 Group

Sydney, New South Wales on board HMAT A15 Port Sydney 9 May 1917

Fremantle, Western Australia on board HMAT A15 Port Sydney 22 May 1917

May 1917 Reinforcement Kyarra Group

May 1917 Reinforcement Port Lincoln Group

Sydney, New South Wales on board HMAT A55 Kyarra 3 September 1917

Fremantle, Western Australia on board HMAT A17 Port Lincoln 30 June 1917

June 1917 Reinforcement Canberra Group

June 1917 Reinforcement Kyarra Group

Sydney, New South Wales on board SS Canberra 16 November 1917

Fremantle, Western Australia on board HMAT A55 Kyarra 17 September 1917

July 1917 Reinforcement Commonwealth Group

July 1917 Reinforcement Port Darwin Group

Fremantle, Western Australia on board HMAT A73 Commonwealth 9 November 1917

Sydney, New South Wales on board SS Port Darwin 30 April 1918

August 1917 Reinforcement

Fremantle, Western Australia on board HMAT A73 Commonwealth 9 November 1917

See: Troop transport ships for information and photographs about the various ships employed in transporting the troops to Egypt.


Acknowledgement: Many thanks to Steve Becker who has provided much useful assistance in the construction of this page.


Further Reading:

Imperial Camel Corps, AIF

Imperial Camel Corps, Roll of Honour 

Double Squadrons

Battles where Australians fought, 1899-1920


Citation: Imperial Camel Corps - Outline

Posted by Project Leader at 12:01 AM EADT
Updated: Tuesday, 2 March 2010 10:02 AM EAST
Friday, 30 October 2009
Imperial Camel Corps, Roll of Honour
Topic: AIF - 5B - ICC

ICC, AIF

Imperial Camel Corps

Roll of Honour


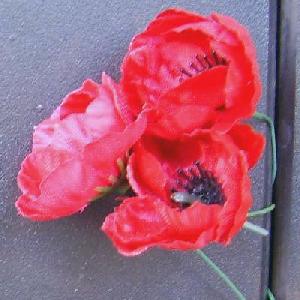
Poppies on the Roll of Honour, Australian War Memorial, Canberra


The Roll of Honour contains the names of all the men known to have served at one time with the Imperial Camel Corps and gave their lives in service of Australia, whether as part of the Imperial Camel Corps or another unit.


Roll of Honour


Roy Bunbury ARMSTRONG, Died of Disease, 30 October 1918.


Charles BASKETT, Died of Disease, 13 October 1918.

Ernest BIRD, Died of Wounds, 8 April 1918.

Arthur Edward BROWN, Killed in Action, 11 April 1918.

William John BROWN, Killed in Action, 30 March 1918. 

Cecil Robson BROWNING, Killed in Action, 11 April 1918.

Percy BUTCHER, Killed in Action, 23 December 1916.

Richard Leslie Oliver BUTTERS, Died of Disease, 22 November 1918.


John CAMPBELL, Died of Wounds, 5 June 1918.

Walter Walterous CLEMENTS, Died of Disease, 20 October 1918.

Rees CLIFFORD, Killed in Action, 30 March 1918.

Sidney Albert COLE, Died of Disease, 12 November 1918.

William Joseph COLEMAN, Killed in Action, 7 November 1917.

Gerald Arthur COLLETT, Killed in Action, 5 June 1917 .

David COLQUHOUN, Killed in Action, 8 November 1917.

Guy Sydney CONNOR, Killed in Action, 19 April 1917.

Herbert Stephen CONNOR, Died of Disease, 10 July 1918.

Sidney Martin CONNOR, Died of Disease, 9 October 1918.

James COOPER, Died of Disease, 7 November 1918.

John Allan COOPER, Died of Disease, 22 October 1918.

Ernest James CRAGGS, Killed in Action, 31 October 1917.


William George DALZIEL, Died of Disease, 14 December 1918.

Cecil Montague DASKEY, Killed in Action, 19 April 1917.

Bertie Leon DORNAN, Died of Disease, 29 October 1918.


David Henry EDDY, Died of Disease, 12 October 1918.

Thomas Stanley Pryse EXELL, Died of Wounds, 30 November 1917.


Harold Hamilton FARLOW, Killed in Action, 1 June 1918.

Walter Leslie FEEBREY, Killed in Action, 11 April 1918.

Henry Peter FLEGLER, Died of Wounds, 12 April 1918.

Malvern Plymton FOLLAND, Killed in Action, 11 April 1918.

Edward Charles FRASER, Killed in Action, 25 September 1918.


Richard Clarence GREEN, Died of Disease, 25 October 1918.

Walter Bede GREENHALGH, Killed in Action, 31 October 1917.

Ellis Charles Thomas GROVE, Died of Disease, 23 June 1918.


Charles Wolseley HAIG, Died of Disease, 6 November 1918.

Digby Hamilton HAY, Died of Disease, 4 February 1919.

Arthur Ernest HOPE, Killed in Action, 7 November 1917.

Norman Farquhar Bruce HUON, Killed in Action, 23 December 1916. 


Henry JOHNSON, Died of Wounds, 4 December 1917.

John William JONES, Killed in Action, 6 August 1916.


William KEENAN, Died of Accident, 14 February 1917.

George Stanley Arthur KING, Killed in Action, 6 November 1917.

Robert KIRKPATRICK, Died of Disease, 20 October 1918.

Wilhelm KONSTEN, Killed in Action, 19 April 1917.

Frederick Thomas LINDBECK, Died of Disease, 23 October 1918.

Robert Clement Ramsay LINDSAY, Died of Disease, 14 October 1918.

John LYONS, Died of Disease, 17 October 1918.


Jack Lawrence MAYSTEERS, Died of Disease, 25 June 1917.

Patrick McNAMARA, Died of Wounds, 10 June 1918.

Harry Endrich MORLEY, Killed in Action, 6 November 1917.

Arthur Burton MUGGLETON, Died of Wounds, 1 December 1917.

David MUIR, Killed in Action, 28 March 1918.

Neil MUNRO, Killed in Action, 19 April 1917.

George Alexander MURDOCH, Died of Disease, 8 April 1919.


Nicholas James OATES, 23 Infantry Battalion attached to Imperial Camel Corps, Killed in Action, 6 August 1916.  


William Thomas PAPWORTH, Died of Disease, 5 December 1918.

Joseph Anthony PAUL, Killed in Action, 9 January 1917.

Arthur Robert Thomas PEACE, Died of Wounds, 6 December 1917.

Roy Noel PEISLEY, Killed in Action, 6 November 1917.

Harry PUNSHON, Died of Wounds, 25 February 1918.


Robert Culley QUIN, Killed in Action, 11 April 1918.


William John RAYNOR, Killed in Action, 11 April 1918.

James Reginald REID, Killed in Action, 6 November 1917.

George Henry RICHARDS, Killed in Action, 31 October 1917.

Frederick Hastings RICHARDSON, Died of Disease, 9 November 1918.

Harry Arthur ROBINSON, Killed in Action, 29 March 1918.


John Joseph Bede SAMUELS, Died of Disease, 23 November 1917.

Norman Edward Johnston SCHMIDT, Killed in Action, 1 November 1917.

Noel Hunter SHERRIE, Died of Wounds, 8 June 1917.

Victor SPINKS, Died of Wounds, 5 June 1917.

Archibald Allan STOKES, Died of Disease, 20 August 1918.

William Thomas STOREY, Died of Disease, 31 June 1918.


Herbert James TEATHER, Died of Disease, 24 October 1918.

Francis George THOMPSON, Killed in Action, 7 November 1917.


Herbert John VIGORS, Killed in Action, 30 September 1918.


Douglas Kendell WATT, Died of Wounds, 8 October 1918.

George Frederick WEEDON, Died of Disease, 1 November 1918.

Albert Edward WHITTAKER, Killed in Action, 19 April 1917.

Robert John WILKINSON, Died of Disease, 10 June 1916.

Andrew James WOOD, Killed in Action, 6 November 1917.

Harold WRIGHT, Died of Disease, 27 October 1918.


Lest We Forget


Acknowledgement: Many thanks to Steve Becker who provided much of the raw material that appears in this item.
 

Further Reading:

Imperial Camel Corps, AIF

Imperial Camel Corps, Roll of Honour

Battles where Australians fought, 1899-1920


Citation: Imperial Camel Corps, Roll of Honour

Posted by Project Leader at 12:01 AM EADT
Updated: Tuesday, 5 July 2011 11:30 PM EADT
Thursday, 29 October 2009
Imperial Camel Corps - Brief History
Topic: AIF - 5B - ICC

ICC, AIF

The 1st Brigade, Imperial Camel Corps

Brief History


Members of the Camel Corps, Abbassia, Egypt, 1915


The following is an article written by Jim Underwood called The organisation of the Imperial Camel Brigade, 1916-1918, which first appeared in the official journal of the Military History Society of Australia, Sabretache, in their edition of 1 December 2003.

Jim Underwood, The organisation of the Imperial Camel Brigade, 1916-1918, Sabretache, 1 December 2003.


The 1st Brigade, Imperial Camel Corps - more commonly known as the Imperial Camel Brigade - was raised on 13 December 1916 under the command of Brigadier General Clement Leslie Smith VC MC (17 January 1878-14 December 1927) was an English recipient of the Victoria Cross, the highest and most prestigious award for gallantry in the face of the enemy that can be awarded to British and Commonwealth forces. (1). The Brigade concentrated at Mazar on the north coast of the Sinai Peninsula, north-eastern Egypt. Located between the Gulfs of Suez and Aqaba at the northern end of the Red Sea, it covers some 23,500 sq mi (61,000 sq km). 19

December; and on the following day advanced to El Arish where it was attached to the Anzac Mounted Division. The Anzac Mounted Division was a mounted infantry (light horse) division formed in March 1916 in Egypt during World War I following the Battle of Gallipoli when the Australian and New Zealand mounted regiments returned from fighting as infantry. The Imperial Camel Brigade had its baptism of fire as a brigade formation at the Battle of Magdhaba. The Battle of Magdhaba took place near the tiny Egyptian outpost of Magdhaba in the Sinai desert, some 22 miles from El Arish on the Mediterranean coast. In late 1916 the Turkish forces in the Sinai that had been menacing the British-controlled Suez Canal had retreated to the 23 December 1916--only four days after being concentrated and 10 days after being raised. (2)

While the actions of the Imperial Camel Brigade are referred to in official and private accounts of the Sinai and Palestine campaigns, little has been published on its structure. The aim of this paper is to examine the Brigade organisation as it evolved over the period from its raising in December 1916 until its disbandment in June 1918. Part 1 of the paper records the organisational changes that took place in the Brigade during its existence. Part 2 which will appear in the March 2004 Sabretache will take a closer look at the establishments of the units that formed the Brigade.


PART 1

Brigade Organisation--December 1916 The initial organisation of the Brigade was: (3)

Brigade Headquarters

1st (Anzac) Camel Battalion

2nd (Imperial) Camel Battalion

3rd (Anzac) Camel Battalion

No. 1 Mountain Battery, Hong Kong & Singapore, Royal Garrison Artillery

26th (Camel) Machine Gun Squadron,

Machine Gun Corps (MGC) Section,

2/1st (Cheshire) Field Company,

Royal Engineers (TF) Signal Section,

Royal Engineers Wireless Section,

Royal Engineers Section,

1/1st Welsh Field Ambulance (TF) Detachment,

Army Service Corps Detachment,

Camel Transport Corps (4) Detachment,

Egyptian Labour Corps


The two Territorial Force (TF) units were on loan from the 53rd (Welsh) Infantry Division (TF) which was then garrisoning the Suez Canal Defences. The detachments from the Army Service Corps, the Camel Transport Corps and the Egyptian Labour Corps were ad hoc units for which there were no proper establishments.

The strength of the Brigade was approximately 2,800. It was capable of putting into the firing line, after providing "camel holders": 1,800 rifles, 36 Lewis light machine guns, eight Maxim medium machine guns and six 10 pounder pack mountain guns. (5)

Raising of Independent Camel Companies--1916

The main combat elements of the Brigade--the Camel Battalions—were formed from the independent Camel Companies that had been raised from January 1916 onwards to combat the pro-Turkish Senussi tribesmen who were threatening the Nile Valley from the Libyan Desert. During its existence, the Imperial Camel Corps raised 18 Camel Companies—10 Australian, six British and two New Zealand.

The first four Camel Companies, filled by Australian infantrymen from the First and Second Divisions, Australian Imperial Force (AIF), marched into the British Army's Camel Corps School at Abbassia near Cairo in the last week of January 1916. All four Companies were in the field on operations against the Senussi before the end of March 1916. (6) Also in January 1916, the permanent staff of the former Camel Corps School were absorbed into a new Headquarters, Imperial Camel Corps under command of Major C L Smith VC MC. (7)

In March 1916, it was decided to increase the Camel Corps by six Companies with personnel drawn from various British Territorial Infantry and Yeomanry units then in Egypt. In June, approval was given for five additional Companies. The personnel for the four additional Australian Companies were provided from the Anzac Mounted Division and Light Horse reinforcements in Egypt. The fifth Company was raised from the New Zealand Mounted Rifles. Subsequently, in the first half of 1917 two more Australian Companies and a further New Zealand Company were raised from the same sources.

Provisional Camel Battalion

In late July 1916, as part of the British preparations for the forthcoming Battle of Romani, four Camel Companies that had been operating in the Western Desert of Egypt against the Senussi threat, were formed into a provisional Camel Battalion for operations east of the Suez Canal. This provisional Battalion formed part of now Lieutenant Colonel C L Smith's "Mobile Column" which operated on the extreme right flank of the British advance eastwards after the Battle of Romani (4-5 August 1916). The Column was engaged in several clashes with the Turkish Left flank guard as it tried to envelop the open desert flank of the withdrawing Turkish force. The main combat elements of the "Mobile Column" were the 11th Australian Light Horse Regiment, the City of London Yeomanry Rough Riders and the provisional Camel Battalion. (8) During these operations the Camel Battalion consisted of three British Companies and one Australian Company.

An ever-changing provisional Camel Battalion saw action during the early months of the British advance from Romani to El Arish. Imperial Camel Corps operations included participation in the raid on Mazar (15-17 September 1916), the attack on Maghara (13-15 October 1916) and wide-ranging patrols in the Sinai Desert on the southern flank of the British advance towards Palestine.

Raising of Regular Camel Battalions

In September 1916, approval was given to form regular Camel Battalions and most of the independent Companies were redeployed from the Western Desert to the Sinai to man these units. The 1st Battalion was raised on 9 September; the 2nd Battalion on 4 November and the 3rd Battalion in early December. Although the Imperial Camel Brigade was formally established on 13 December 1916, the allocation of Companies to Battalions remained flexible for some months. This may be illustrated by reference to the changing composition of the 1st Camel Battalion in Table 1 below.

Table 1. CHANGING COMPOSITION OF THE 1st CAMEL BATTALION

Aug 1916--Provisional Camel Battalion--Smith's Mobile Column

No.4 Camel Company (Australian)
No.5 Camel Company (British)
No.9 Camel Company (British)
No.10 Camel Company (British)

09 Sep 1916--1st Camel Battalion formed

No.4 Camel Company (Australian)
No.5 Camel Company (British)
No.6 Camel Company (British)
No.7 Camel Company (British)

13 Dec 1916--Formation of the Imperial Camel Brigade

No.3 Camel Company (Australian)
No.4 Camel Company (Australian)
No.7 Camel Company (British)
No.12 Camel Company (Australian)

26 Dec 1916--After Battle of Magdhaba

No.1 Camel Company (Australian)
No.3 Camel Company (Australian)
No.4 Camel Company (Australian)
No.15 Camel Company (New Zealand)

Late Mar 1917--Final Organisation--After First Battle of Gaza

No.1 Camel Company (Australian)
No.2 Camel Company (Australian)
No.3 Camel Company (Australian)
No.4 Camel Company (Australian)


Brigade Augmentation

In the first half of 1917, the Imperial Camel Brigade took on a more formal structure and the ad hoc and "on loan" units initially included in the formation were replaced by units with authorised establishments.

In January 1917, the 1/1st Scottish Horse Mounted Field Ambulance replaced the section of the 1/1st Welsh Field Ambulance that was on loan from the 53rd (Welsh) Infantry Division. This was an improvement in medical support to the Imperial Camel Brigade. The Welsh Field Ambulance was an Infantry Division Field Ambulance and its stretcher bearers were not mounted. Furthermore, only one section of the Welsh Field Ambulance had been allotted to the Brigade. This had proved inadequate during the attack on Magdhaba when the Brigade had suffered 27 wounded. The Scottish Horse Field Ambulance was at least a mounted unit; but its organisation was designed to support a Cavalry Brigade of about 2,000 personnel not a Camel Infantry Brigade of some 3,000 personnel capable of operating away from established lines of communication. 

In February 1917, the Imperial Camel Corps Mobile Veterinary Section joined the Brigade. This was a purpose designed veterinary section catering for sick, injured and wounded camels. Prior to its arrival, veterinary support in the Brigade was very basic consisting of a single Veterinary Sergeant in each Camel Company.

In March 1917, the 10th Field Troop, Royal Engineers replaced the section of the 2/1st (Cheshire) Field Company on loan from the 53rd (Welsh) Division. This, too, was a significant enhancement. The section of Cheshire engineers had been drawn from an Infantry Division and it lacked the mobility to support the Camel Brigade. The 10st Field Troop was specifically raised and equipped to support the Imperial Camel Brigade. Importantly, the new Troop had a significant capacity to develop water supplies; a capability lacking in the Cheshire's section.

In May 1917, the newly raised 4th (Anzac) Camel Battalion joined the Brigade. From this time onwards, it was usual for three Camel Battalions to operate forward with the Brigade while the fourth Battalion was rested in the Suez Canal Defences. At the same time, four of the six British Camel Companies formed the 2nd (Imperial) Camel Battalion while two Companies were rested or patrolled in the Western Desert where the restless Senussi remained a dormant threat.

Also in the first half of 1917, the ad hoc administrative detachments were replaced by properly established units raised specifically to support the Imperial Camel Brigade. The Imperial Camel Corps Brigade Train replaced the Army Service Corps detachment. The Imperial Camel Corps Brigade Ammunition Column replaced the temporary Ammunition Column provided by the Camel Transport Corps. The Imperial Camel Brigade Signal Section replaced the wireless and cable sections at Brigade Headquarters. The Imperial Camel Brigade Ordnance Section was also formed. At the same time there were significant changes to No. 1 Mountain Battery and the 26th Machine Gun Squadron.

No. 1 Mountain Battery, Hong Kong & Singapore, Royal Garrison Artillery. This Battery was manned by British and Indian officers and Sikh and Indian Muslim other ranks. The other ranks were recruited in Hong Kong and Singapore mainly from ex-Indian Army regulars residing in these two colonies. Despite its title, there were no Chinese in the unit. The Battery was equipped with horses and mules when it fought in the Western Desert against the Senussi in the first half of 1916; but in June 1916 it was converted to camel transport. It was initially equipped with six 10-pounder BL pack mountain guns. This gun had been introduced into the British inventory in 1901 but it was obsolete by European standards. It used an old-fashioned three-piece breech mechanism. There was no recoil system. The gun leaped and bucked when it fired. It was even known to topple over when fired on uneven ground. The gun's calibre was 2.75 inches and the standard projectile weighed 10 pounds. Its maximum range was 6,000 yards with percussion or 3,700 yards with time fuse. In early 1917, the Battery was re-equipped with an improved gun--the Ordnance BL Mark I calibre 2.75 inches. This new gun bad a maximum range of 5,600 yards for shrapnel and 5,800 yards for high explosive. Two of the older 10-pounder mountain guns were retained as rudimentary anti-aircraft guns although the gun detachments relied on the expediency of throwing their greatcoats over the guns to camouflage them from prying German aircraft. (9) No camouflage nets were provided.

With the limited range of its guns, the Battery bad to fight from a position well forward in both attack and defence. Its personnel were highly regarded for their bravery in action and professionalism. Within the Brigade, the Battery was affectionately known as the "Bing Boys" on account of the high pitched plaintive noise made by the discharge of the mountain gun.

26th (Camel) Machine Gun Squadron. The history of the Machine Gun Squadron is somewhat obscure. No unit War Diaries have been located in Australia or the United Kingdom. There are also discrepancies between various published works and official records regarding the title of the Brigade's machine gun unit and its parent unit. During its existence this unit apparently underwent a number of name changes. The Brigade machine gun unit appears to have been established initially in Egypt as the 26th (Scottish Horse) Squadron, Machine Gun Corps in October 1916. The parent unit was the 1/3rd Scottish Horse--a Yeomanry regiment that had fought dismounted at Gallipoli as part of the 2nd Mounted Division. After the evacuation of Gallipoli, the Regiment was sent to Egypt where it became part of the 1st Dismounted Brigade. (10)

Whether the Scottish Horse machine gun unit was originally a horsed unit or camel mounted has not been determined. No record has been located of the unit undertaking camel training at Abbassia in October 1916 or at any other time. However, the 26th (Camel) Machine Gun Squadron was on the Imperial Camel Brigade's order of battle when it was raised in December 1916. To add another wrinkle to the problem, the history of the New Zealand Camel Companies--With the Cameliers in Palestine by John Robertsun--states that the 26th (Camel) Machine Gun Squadron was formed from the machine gun sections of three Scottish Yeomanry regiments that had fought at Gallipoli--the Scottish Horse plus the Lanarkshire Yeomanry and the Ayrshire Yeomanry. (11)

Initially, the 26th Machine Gun Squadron was armed with eight Maxim machine guns that had apparently seen hard service at Gallipoli. (The normal allotment of guns to a machine gun squadron was 12 guns.) In the first quarter of 1917, the Machine Gun Squadron was reequipped with eight Vickers medium machine guns and about the same time the unit was retitled the 265th Machine Gun Company. In some contemporary documents the unit is also referred to simply as the Imperial Camel Brigade Machine Gun Company. (12)

Australian Camel Field Ambulance. When the Imperial Camel Brigade was raised in December 1916, Headquarters Egyptian Expeditionary Force approached the Australian Government, through AIF headquarters in Egypt, to provide the personnel for a camel-mounted Field Ambulance to support the Brigade. (13) The Australian Government approved the request but advised that it would be several months before the unit became operational. It was agreed that the officers and senior NCOs would be drawn from Australian medical units then serving in Egypt; while the bulk of the other ranks personnel would be sent to Egypt after completing their initial military and medical training in Australia. The officers and NCOs would join the Australian contingent when it arrived in Egypt. Until the Australian Camel Field Ambulance became operational, medical support was provided by the two British Army Territorial Force units indicated above--the 1/1st Welsh Field Ambulance and later the 1/1st Scottish Horse Mounted Field Ambulance.

Meanwhile in Australia, in late January 1917, 93 other ranks commenced their military and medical training at Seymour, Victoria. This contingent departed Australia on l0 May 1917 on HMAT Boorara and arrived in Egypt on 19 June. Here they were joined by six officers, one warrant officer and 13 senior NCOs. The Ambulance commenced camel training on 29 July 1917 and this was completed within three weeks. On 18 August, the unit entrained at Cairo and moved to the Palestine front that was then facing the Turkish Gaza-Beersheba defensive line. On 20 August 1917, the Australian Camel Field Ambulance replaced the 1/1st Scottish Horse Mounted Field Ambulance in the Imperial Camel Brigade. However, for a period, 30 members of the Scottish Horse Field Ambulance remained attached to the Camel Field Ambulance as the Australian establishment did not initially include the necessary drivers and artificers--saddler, farrier, wheelwright--to man the wheeled vehicles issued to the Ambulance. The original Australian concept was that the whole Ambulance would rely solely on camels for transport and medical evacuation. With the advance of the British force into southern Palestine, the terrain proved more suitable for the use of wheeled vehicles and those held by the Scottish Horse Field Ambulance were taken over and retained by the Australian Camel Field Ambulance.

97th Australian Dental Unit. This unit, consisting of one officer, two sergeants and one private, was attached to the Australian Camel Field Ambulance from 1 September 1917. Prior to the attachment of this dental unit, there had been no dental support in the Imperial Camel Brigade since its raising in December 1916. The only dental equipment carried in the Brigade was a set of forceps carried by the Battalion and Field Ambulance medical officers. Extractions were done without any local or general anaesthetic. Considerable dental work was required prior to the third Battle of Gaza to make the Brigade dentally fit. (14) (It is interesting to note that dentures were only provided if the soldier had insufficient teeth to masticate the Army ration.)

Brigade Organisation--December 1917

By the end of 1917 the order of battle of the Imperial Camel Brigade had settled down into the organisation that it was to retain until its disbandment in June 1918:

Brigade Headquarters

1st (Anzac) Camel Battalion

2nd (Imperial) Camel Battalion

3rd (Anzac) Camel Battalion

4th (Anzac) Camel Battalion

No. 1 Mountain Battery, Hong Kong & Singapore, Royal Artillery

265th Machine Gun Company, Machine Gun Corps

10th (Camel) Field Troop, Royal Engineers

Brigade Signal Section, Royal Engineers

Imperial Camel Corps Brigade Train

Imperial Camel Corps Brigade Ammunition Column

Imperial Camel Corps Brigade Ordnance Section

Australian Camel Field Ambulance

97th Australian Dental Unit

Imperial Camel Corps Mobile Veterinary Section


Disbandment of the Imperial Camel Brigade

By mid-1918 the British advance into Palestine had moved into country which was increasingly unsuitable for camel operations. The rugged nature of the Judean Hills and the cold, wet winter of 1917-1918 caused an excessive number of camel casualties. In early June, the decision was made to convert the Australian and New Zealand Camel Companies to horsed units. (15) Personnel from the 1st Camel Battalion were used to form the 14th Australian Light Horse Regiment; while the 3rd Camel Battalion formed the 15th Australian Light Horse Regiment. These two Regiments, together with a French Colonial cavalry regiment--Regiment Mixte de Marche de Cavalarie--formed the main combat units of the newly raised 5th Australian Light Horse Brigade. (The French cavalry regiment consisted of North African troops--two squadrons of Spahis and two squadrons of Chasseurs d'Afrique.)

The two New Zealand Camel Companies were used to raise the 2nd New Zealand Machine Gun Squadron that supported the 5th Light Horse Brigade. (16) At the same time, the Australian Camel Field Ambulance was converted to a mounted brigade field ambulance and re-titled 5th Australian Light Horse Field Ambulance, also supporting the 5th Light Horse Brigade. Personnel from the 4th Camel Battalion were used to bolster the number of troops in the 14th and 15th Light Horse Regiments as a number of personnel in the 1st and 3rd Camel Battalions returned to their original units.

The six British Camel Companies were retained until 1919; mainly for patrolling the lines of communication and the Sinai Desert. The last two British Companies were not disbanded until June 1919 but personnel strengths were progressively run down. There was one last hurrah for the Imperial Camel Corps. No.7 and No.10 (British) Camel Companies were detached to the Hejaz from July to September 1918 to assist Colonel T E Lawrence and his Arab army in its attacks against the Damascus-Mediua railway east of Aqaba. The majority of the camels of the Imperial Camel Corps also found their way to the Hejaz. Some 2,000 riding camels and 1,000 baggage camels were transferred to Lawrence for use by his Arab army in its advance to Damascus.

Notes:

(1) Australian War Memorial - AWM4 Item 11/12/1 - War Diary Headquarters Imperial Camel Brigade 13 December 1916. The dates of specific events in some published accounts of the Imperial Camel Corps are at variance with the dates used in this papst. (and with one another). Where possible, dates used in the paper are taken from contemporary Official Records.

(2) Australian War Memorial - AWM224 Item MSS42 - Imperial Camel Brigade--Short History compiled by Captain R Hall in 1919, p. 1. Captain Hail was the Staff Captain on Headquarters, Imperial Camel Brigade when the Brigade was disbanded in July 1918. He also wrote a book on his experience in the Imperial Camel Corps: The Desert Hath Pearls, Melbourne: The Hawthorn Press, 1975.

(3) Australian War Memorial - AWM4 Items 11/12/1 and 11/12/2 - War Diary Headquarters Imperial Camel Brigade December 1916 and January 1917.

(4) Attached to the Brigade as a temporary smallarms Ammunition Column. It consisted of 59 camels and 23 Egyptian drivers. Australian War Memorial - AWM4 Item 11/12/2 - War Diary Headquarters Imperial Camel Brigade January 1917.

(5) Hall, op.cit, p. 1.

(6) Australian War Memorial - AWM45 Item 12/36 PART 1 - Report on Organisation and Formation of the Imperial Camel Corps, 1916 dated 31 December 1916.

(7) Ibid.


(8) Sir Archibald Murray's Despatches (June 1916-June 1917) - Second Despatch. London: J. M. Dent & Sons Ltd, 1920; pp. 60-61.

(9) Order of Battle of the Egyptian Expeditionary Force, 26 July
1917, p. 7.

(10) Correspondence with the Machine Gun Corps Old Comrades Association, United Kingdom, 22 February 2002.

(11) John Robertson, With the Cameliers in Palestine, Dunedin, NZ: A H & A W Reed, 1938; p. 26. On page 25 there is a photograph of the Scottish machine gunners on parade with their camels.

(12) For example, see Australian Imperial Force Order No 874 dated 27 September 1917.

(13) Colonel R M Downes, The Australian Army Medical Services in the World War of 1914-1918, Volume 1 Part II The Campaign in Sinai and Palestine, Melbourne: Australian War Memorial, 1930; p. 269 and National Archives of Australia A11803/1 Item 1817/89/151.

(14) Australian War Memorial - AWM224 MSS279: Australian Camel Field Ambulance. Narrative by Major G S Shipway dated 26 May 1919.

(15) Australian War Memorial - AWM25 Item 157/1 - Headquarters Imperial Camel Brigade Preliminary Instruction dated 10 June 1918 and Headquarters Imperial Camel Brigade Re-organisation Order No 1 dated 16 June 1918.

(16) Major J H Luxford, With the Machine Gunners in France and Palestine. The Official History of the New Zealand Machine Gun Corps in the Great World War 1914-1918, Auckland: Whitcombe & Tombs Ltd, 1923, p. 225.


Further Reading:

Imperial Camel Corps, AIF

Imperial Camel Corps, Roll of Honour 

Battles where Australians fought, 1899-1920

Double Squadrons  


Citation: Imperial Camel Corps - Brief History

Posted by Project Leader at 12:01 AM EADT
Updated: Monday, 5 April 2010 9:49 AM EADT

Newer | Latest | Older

Full Site Index


powered by FreeFind
Let us hear your story: You can tell your story, make a comment or ask for help on our forum.

Desert Column Forum

A note on copyright

The Australian Light Horse Studies Centre is a not for profit and non profit group whose sole aim is to write the early history of the Australian Light Horse from 1900 - 1920. It is privately funded and the information is provided by the individuals within the group and while permission for the use of the material has been given for this site for these items by various donors, the residual and actual copyright for these items, should there be any, resides exclusively with the donors. The information on this site is freely available for private research use only and if used as such, should be appropriately acknowledged. To assist in this process, each item has a citation attached at the bottom for referencing purposes.

Please Note: No express or implied permission is given for commercial use of the information contained within this site.

A note to copyright holders

The Australian Light Horse Studies Centre has made every endeavour to contact copyright holders of material digitised for this blog and website and where appropriate, permission is still being sought for these items. Where replies were not received, or where the copyright owner has not been able to be traced, or where the permission is still being sought, the Australian Light Horse Studies Centre has decided, in good faith, to proceed with digitisation and publication. Australian Light Horse Studies Centre would be happy to hear from copyright owners at any time to discuss usage of this item.

Contact

Australian Light Horse Studies Centre

eXTReMe Tracker