"At a mile distant their thousand hooves were stuttering thunder, coming at a rate that frightened a man - they were an awe inspiring sight, galloping through the red haze - knee to knee and horse to horse - the dying sun glinting on bayonet points..." Trooper Ion Idriess
The Australian Light Horse Studies Centre aims to present an accurate history as chroniclers of early Australian military developments from 1899 to 1920.
The Australian Light Horse Studies Centre site holds over 12,000 entries and is growing daily.
Contact:Australian Light Horse Studies CentreLet us hear your story:
You can tell your story, make a comment or ask for help on our Australian Light Horse Studies Centre Forum called:
4th Light Horse Brigade formed Australia 4 March 1915. Shipped to Egypt without horses where broken up 26 August 1915. Reformed in February 1917 as part of the Imperial Mounted Division. The reconstituted Brigade lost the 13th Light Horse Regiment which went to France but gained the 4th Light Horse Regiment.
The first 4th Australian Light Horse Brigade, 1915
4th Light Horse Brigade formed Australia 4 March 1915. Shipped to Egypt without horses where broken up 26 August 1915.
11th Australian Light Horse Regiment
This was a composite Regiment recruited primarily from Queensland with a South Australian Squadron.
"A" Squadron recruited from Queensland.
"B" Squadron recruited from Queensland.
"C" Squadron recruited from South Australia.
The Regiment was broken up on 26 August 1915 as reinforcements to Regiments at Gallipoli.
"A" Squadron became "D" Squadron, 2nd Light Horse Regiment.
"B" Squadron became "D" Squadron, 5th Light Horse Regiment.
"C" Squadron became "D" Squadron, 9th Light Horse Regiment.
12th Australian Light Horse Regiment
This Regiment was recruited exclusively from New South Wales.
The Regiment was broken up on 26 August 1915 as reinforcements to Regiments at Gallipoli.
"A" Squadron became "D" Squadron, 1st Light Horse Regiment.
"B" Squadron became "D" Squadron, 7th Light Horse Regiment.
"C" Squadron became "D" Squadron, 6th Light Horse Regiment.
13th Australian Light Horse Regiment
This Regiment was recruited exclusively Victoria in March 1915. This Regiment served as a complete formation at Gallipoli. After Gallipoli was sent to France as Divisional Cavalry along with "B" and "D" Squadrons from the 4th Light Horse Regiment.
4th Signal Troop
The 4th Signal Troop was formed in March 1915.
Commanders:
Colonel Reginald Spencer-Browne 4 March 1915 to July 1915
Embarkation
The original Brigade embarked to Egypt during months of May and June 1915. In Egypt additional training occurred at Heliopolis Camp.
See:Troop transport ships for information and photographs about the various ships employed in transporting the troops to Egypt.
Attachments
Formed Australia March 1915.
Disbanded and broken up when sent to Gallipoli and attached to the New Zealand and Australian Division at Gallipoli from May 1915 to February 1916.
Outline of the 4th Australian Light Horse Brigade, AIF
Formed in February 1917 as part of the Imperial Mounted Division. The previous 4th Light Horse Brigade was formed in March 1915 and disbanded on 26 August 1915 when the 11th, 12th and 13th Light Horse Regiments were broken up to provide reinforcements for the units that were at Gallipoli. The reconstituted Brigade lost the 13th Light Horse Regiment which went to France but gained the 4th Light Horse Regiment. Regiments included:
4th Australian Light Horse Regiment
This Regiment was recruited exclusively Victoria in August 1914 as divisional cavalry for the Australian Division. During the Gallipoli campaign, the Regiment was attached to the 2nd Infantry Brigade. "B" and "D" Squadrons embarked for France in May 1916. A new "B" Squadron was raised as a consequence. The Regiment was renamed 3rd Camel Regiment in September 1916 and served with the Imperial Camel Corps until it brigaded with the 11th and 12th Light Horse Regiments into the 4th Light Horse Brigade in February 1917.
This was a composite Regiment recruited primarily from Queensland with a South Australian Squadron.
"A" Squadron recruited from Queensland.
"B" Squadron recruited from Queensland.
"C" Squadron recruited from South Australia.
The Regiment was broken up on 26 August 1915 as reinforcements to Regiments at Gallipoli.
"A" Squadron became "D" Squadron, 2nd Light Horse Regiment.
"B" Squadron became "D" Squadron, 5th Light Horse Regiment.
"C" Squadron became "D" Squadron, 9th Light Horse Regiment.
The Regiment was reconstituted on 20 February 1916 at Heliopolis, Egypt.
The Regiment was renamed 1st Camel Regiment in September 1916 and served with the Imperial Camel Corps until it brigaded with the 4th Light Horse Brigade in February 1917.
This Regiment was recruited exclusively from New South Wales.
The Regiment was broken up on 26 August 1915 as reinforcements to Regiments at Gallipoli.
"A" Squadron became "D" Squadron, 1st Light Horse Regiment.
"B" Squadron became "D" Squadron, 7th Light Horse Regiment.
"C" Squadron became "D" Squadron, 6th Light Horse Regiment.
The Regiment was reconstituted on 20 February 1916 in Egypt.
The Regiment was renamed 2nd Camel Regiment in September 1916 and served with the Imperial Camel Corps until it brigaded with the 4th Light Horse Brigade in February 1917.
The 4th Light Horse Brigade Train was primarily recruited around Melbourne and trained at Broadmeadows. After Gallipoli, this unit underwent some name changes from 4th Supply Section in February 1917 to 36th Australian Army Service Corps Company in August 1917.
9th Mobile Veterinary Section
The 9th Mobile Veterinary Section was formed in February 1917.
4th Light Horse Machine Gun Squadron
The 4th Light Horse Machine Gun Squadron was formed when the Parent Brigade was formed in February 1917.
Artillery
Artillery support was provided for the 4th Light Horse Brigade from the British 19th Horse Artillery Brigade, "A" Battery, Honourable Artillery Company.
4th Light Horse Training Regiment
Formed in Egypt during February 1917, this unit trained incoming reinforcements while allowing the wounded and sick a place to recover before returning to active service. The Training Regiment contained three squadrons, each duplicating the Regiments within the Brigade to whom it supplied the reinforcements. The Training Regiment was disbanded in July 1918 to be replaced by the Australian Light Horse Training Regiment when recruits were no longer tied to a Regiment but placed in a general pool of reinforcements called the General Service Reinforcements.
Embarkation
The original Brigade embarked to Egypt during months of May and June 1915. In Egypt additional training occurred at Heliopolis Camp.
See:Troop transport ships for information and photographs about the various ships employed in transporting the troops to Egypt.
Colour Patch
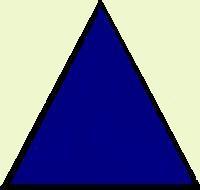
To assist with identification of the various units within the AIF, Divisional Order No 81 (A) Administration was issued at Mena on 8 March 1915 detailing the Colour Patch for the various units. The 4th Light Horse Brigade received the colour in 1917. The colour patch for the Regiments was made of cloth 1¼ inches wide and 2¾ inches long and worn on the sleeve one inch below the shoulder seam. In contrast, the colour patch for the 4th Light Horse Brigade was plain electric blue although for Headquarters was in the shape of a triangle while the individual Regiments used the rectangle shape in the prescribed manner.
4th Light Horse Brigade Colour Patch
The individual units attached to the 4th Light Horse Brigade carried the royal blue colour as a lower triangular part of the colour patch, the unit itself having their colour on the top. This is illustrated with the above description about each individual unit.
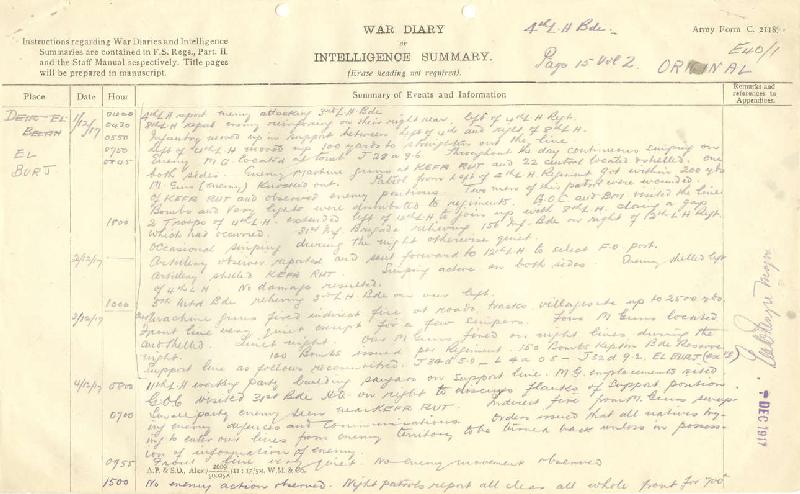
El Burj, Palestine, 1 December 1917, 4th Light Horse Brigade War Diary Account Topic: AIF - 4B - 4 LHB
El Burj, Palestine, 1 December 1917
4th Light Horse Brigade War Diary Account
4th Light Horse Brigade War Diary, Saturday, 1 December 1917.
War Diary of the 4th Light Horse Brigade, AIF
The War Diary provides an excellent reference to the day to day activities of note that occurred within a particular unit. They were never designed to be histories in themselves but aids to future historians who wish to write about their deeds. The War Diary was often written up at the end of the day when most men were weary and seen as just another useless activity demanded by "the Heads" in far off places. It was only years later when unit histories were produced that the value of the War Diaries became to be realised by the men. The result is that the War Diary is usually light on detail. These details can be supplemented by Routine Orders and signals where these may exist.
The entry for Saturday, 1 December 1917 is transcribed below.
0430 - 8th Light Horse Regiment report enemy reinforcing on their right rear, left of 4th Light Horse Regiment.
0550 - Infantry moved up in support between left of 4th Light Horse Regiment and right of 8th Light Horse Regiment.
0750 - Left of 4th Light Horse Regiment moved up 100 yards to straighten out the line.
0845 - Enemy machine gun located at point J28.a.9.6. Throughout the day continuous sniping on both sides. Enemy machine guns at Kefr Rut and 22 Central located and shelled. One machine gun (enemy) knocked out. Patrol from left of 4th Light Horse Regiment got within 200 yards of Kefr Rut and observed enemy positions. Two men of this patrol were wounded. Bombs and Very Lights were distributed to regiments. General Officer Commanding and Brigade Major visited the line.
1800 - 2 Troops of 4th Light Horse Regiment extended left of 4th Light Horse Regiment to join up with 8th Light Horse Regiment closing a gap which had occurred. 31st Infantry Brigade relieving 156th Infantry Brigade on right of 12th Light Horse Regiment. Occasional sniping during the night otherwise quiet.
The Battle of Beersheba, Palestine, 31 October 1917, Grant Account Topic: AIF - 4B - 4 LHB
The Battle of Beersheba
Palestine, 31 October 1917
Grant Account
Brigadier General William Grant, General Officer Commanding the 4th Australian Light Horse Brigade post battle account about the fall of Beersheba
The following is the account from the Commanding Officer of the 4th Light Horse Brigade, the unit that actually conducted the famous Charge of Beersheba.
Grant's account about the fall of Beersheba, p. 1.
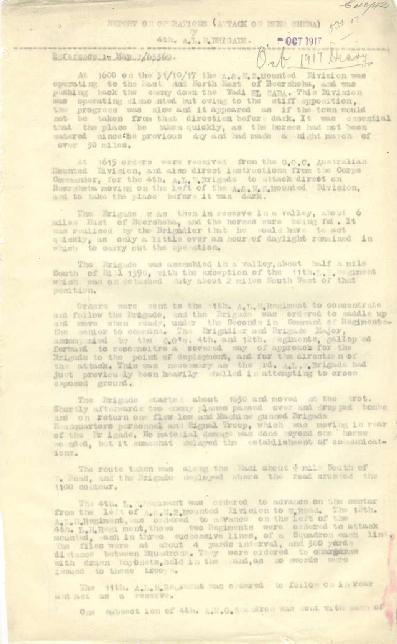
APPENDIX 188 to 4th ALH Brigade War Diary, 2 November 1917:
Report on Operations (attack on BEERSHEBA) by 4th ALH Brigade, 31-10-17 by W. Grant, Brigadier-General, Commanding 4th LH Brigade
At 1600 on the 31/10/17 the A&NZ Mounted Division was operating to the East and North East of Beersheba, and was pushing back the enemy down the Wadi el Saba. This Division was operating dismounted but owing to the stiff opposition, the progress was slow and it appeared as if the town would not be taken from that direction before dark. It was essential that the place be taken quickly, as the horse, had not been watered since the previous day and had made a night march of over 30 miles.
At 1615 orders were received from the GOC Australian Mounted Division and also direct instructions from the Corps Commander, for the 4th ALH Brigade to attack direct on Beersheba moving on the left of the A&NZ Mounted Division, and to take the place before it was dark.
The Brigade was then in reserve in a valley, about 6 miles East of Beersheba, and the horses were being fed. It was realised by the Brigadier that he would have to act quickly, as only a little over an hour of daylight remained in which to carry out the operation. The Brigade was assembled in a valley about half a male South of Hill 1390, with the exception of the 11th LH Regiment which was on detached duty about 2 miles South west of that position.
Orders were sent to the 11th ALH Regiments to concentrate and follow the Brigade and the Brigade was ordered to saddle up and move when ready, under the Second in Command of Regiments- the senior to command. The Brigadier and the Brigade Major, accompanied by the COs 4th and 12th Regiments, galloped forward to reconnoitre a covered way of approach for the Brigade to the point of deployment, and for the direction of the attack. This was necessary, as the 3rd ALH Brigade had just previously been heavily shelled in attempting to cross exposed ground.
The Brigade started about 1630 and moved at the trot. Shortly afterwards two enemy planes passed over and dropped bombs and can return one flew low and machine gunned Brigade Headquarters personnel and Signal Troop, which was moving in rear of the Brigade. No material damage was done beyond one horse wounded, but it somewhat delayed the establishment of communications. The route taken was along the Wadi about a quarter mile South of W Road and the Brigade deployed where the road crossed the 1100 contour.
The 4th LH Regiment was ordered to advance on the sector from the left of A&NZ Mounted Division to W Road. The 12th ALH Regiment was ordered to advance on the left of the 4th LH Regiment. The two regiments were ordered to attack mounted, each in three successive lines of a Squadron each line. The files were at about 4 yards intervals and 300 yards distance between Squadrons. They were ordered to charge with drawn bayonets, held in the hand, as no swords were issued to those troops.
The 11th ALH Regiment was ordered to follow on in rear and act as a reserve.
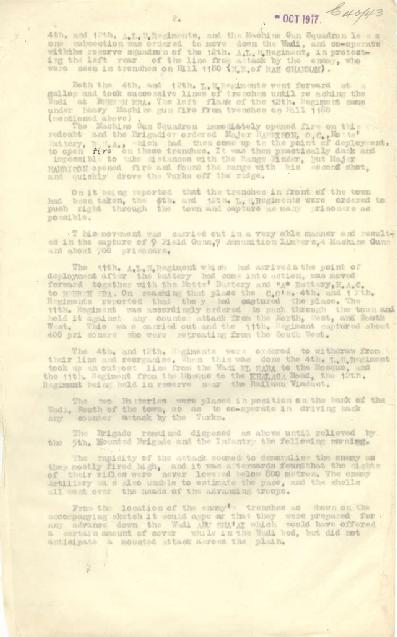
Grant's account about the fall of Beersheba, p. 2.
One subsection of 4th Australian Machine Gun Squadron was sent with each of 4th and 12th ALH Regiments and the Machine Gun Squadron less one subsection was ordered to move down the Wadi, and co-operated with the reserve squadron of the 12th ALH Regiment, in protecting the rear of the line from attack by the enemy, who were seen in trenches on Hill 1180 (NE of Ras Ghannam). Both the 4th and 12th LH Regiments went forward at a gallop and took successive lines of trenches until reaching the Wadi at Beersheba. The left flank of the 12th Regiment came under heavy machine gun from trenches on Hill 1180. The Machine Gun Squadron immediately opened fire on this redoubt and the Brigadier ordered Major Harrison, OC, Notts Battery RHA, which had then come up to the point of deployment, to open fire on these trenches. It was then practically dark and impossible to take distances with the range finder, but Major Harrison opened fire and found the range with his second shot, and quickly drove the Turks off the ridge.
On it being reported that the trenches in front of the town had been taken, the 4th and 12th LH Regiments were ordered to push right through the town and capture as many prisoners as possible.
Nine field guns were captured; seven of these have been parked South of the Viaduct, and two which were drawn from their positions by the 11th Regiment, with a view to their being brought in later. Next morning these were found to have been removed by our infantry, it is understood by one of the London Regiments.
Four machine guns and tripods complete and one machine gun, with machine gun equipment, were brought in by the 4th ALH Brigade. Four field gun limbers containing shells have been brought in and three more are being brought in today, 2nd inst. In addition numerous vehicles, animals, stores and equipment have been, and are still being brought in.
The number of prisoners captured is 59 officers and 1090 other ranks.
The 11th ALH regiment which had arrived at the point of deployment after the battery had come into action was moved forward together with the Notts Battery and "A" Battery HAC to Beersheba.
On reaching that place the COs 4th and 12th Regiments reported that they had captured the place. The 11th Regiment was accordingly ordered to push through the town and hold it against any counter-attack from the North, West and South-west. This was carried out and the 11th Regiment captured about 400 prisoners who were retreating from the South-east.
The 4th and 12th Regiments were ordered to withdraw from their line and reorganise. When this was done the 4th LH Regiment took up an outpost line from the Wadi el Saba to the Mosque, and the 11th Regiment from the Mosque to the Khalasa Road, the 12th Regiment being held in reserve near the Railway Viaduct.
The two batteries were placed in position on the bank of the Wadi, South of the town, so as to co-operate in driving back and counter-attack by the Turks. The Brigade remained disposed as above until relieved by the 5th Mounted Brigade and the Infantry the following morning.
All ranks behaved in a most admirable manner and fearlessly charged several successive trenches at the gallop, in many cases in the face of severe machine gun and rifle fire.
The rapidity of the attack seemed to demoralise the Turks as they mostly fired high, and it was afterwards found that the sights of their rifles were never lowered below 800 metres. The enemy artillery was also unable to estimate the pace, and the shells all went over the heads of the advancing troops.
From the location of the enemy's trenches as shown on the accompanying sketch it would appear that they were prepared for any advance down the Wadi Abu Sha'ai which would have offered a certain amount of cover while in the Wadi bed, but did not anticipate a mounted attack across the plain.
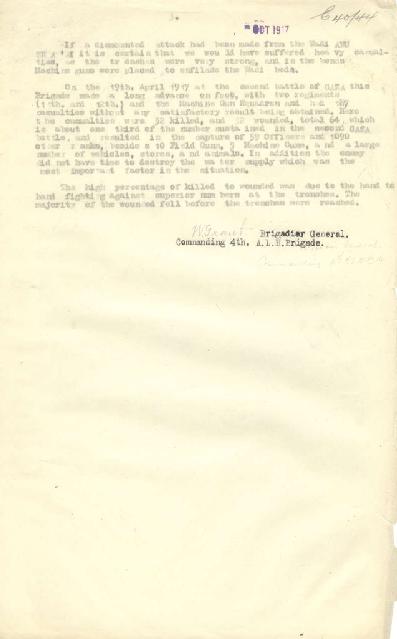
Grant's account about the fall of Beersheba, p. 3.
If a dismounted attack had been made from the Wadi Abu Sha'ai it is certain that we would have suffered heavy casualties, as the trenches were very strong, and in the hands machine guns were placed to enfilade the Wadi bed.
On the 19th of April 1917 at the second battle of Gaza this Brigade made a long advance on foot, with two regiments (11th and 12th) and the Machine Gun Squadron and had 187 casualties without any satisfactory result being obtained. Here the casualties were 32 killed, and another 32 wounded, total 64, which is about one third of the number sustained in the second Gaza battle, and resulted in the capture of 59 Officers and 1090 Other Ranks, besides 10 Field Guns, 5 Machine Guns, and a large number of vehicles, stores and animals. In addition the enemy did not have time to destroy the water supply, which was the mast important factor in the situation.
The high percentage of killed to wounded was due to the hand-to-hand fighting against superior numbers at the trenches. The majority of the wounded fell before the trenches were reached.
The Australian Light Horse Studies Centre is a not for profit and non profit group whose sole aim is to write the early history of the Australian Light Horse from 1900
- 1920. It is privately funded and the information is provided by the individuals within the group and while permission for the use of the material has been given for this
site for these items by various donors, the residual and actual copyright for these items, should there be any, resides exclusively with the donors. The information on
this site is freely available for private research use only and if used as such, should be appropriately acknowledged. To assist in this process, each item has a citation
attached at the bottom for referencing purposes.
Please Note: No express or implied permission is given for commercial use of the information contained within this site.
A note to copyright holders
The Australian Light Horse Studies Centre has made every endeavour to contact copyright holders of material digitised for this blog and website and where
appropriate, permission is still being sought for these items. Where replies were not received, or where the copyright owner has not been able to be traced, or where
the permission is still being sought, the Australian Light Horse Studies Centre has decided, in good faith, to proceed with digitisation and publication. Australian Light
Horse Studies Centre would be happy to hear from copyright owners at any time to discuss usage of this item.